Learning how to wall mount a TV gives you the power to make one of the biggest upgrades for your home theater (outside of buying a new TV or a fancy sound system). And we've already found the best TV mounts. Wall-mounting a TV comes with a number of benefits, from a cleaner aesthetic design, to better ergonomics for more enjoyable watching.
It's also super affordable, with plenty of excellent mounting options selling for $100 or less. Whether you have a simple tilting wall mount or a fully articulated, dual-arm mount that provides a full range of motion and positions, the basics for installing that hardware are pretty much the same.
From the prep work to the actual installation, here's how to wall mount a TV, step by step.
Aside from having a TV and a wall, you'll need to have a few things on hand to properly mount your TV.
You'll also want at least one other person to help. You'll need an extra pair of hands to help lift and position the TV, and perhaps a second person to assist in getting the position just right.
Take it from a guy who has personally unboxed and set up dozens and dozens of TVs – you need someone else to help you out. While smaller TVs can be handled by a single person, anything over 50 inches should be moved and lifted by two people. Even if the weight is manageable for a single person to lift, the size and shape of the TV make it unwieldy, and care has to be taken to prevent damaging the display. Mounting a broken TV will take all the fun out of it.
When handling a TV, you'll want to take extra care to protect the display panel. A large sheet of glass or plastic will naturally have some flex to it, but the underlying display technology usually doesn't. Even a little bit of unwanted flexing or pressure on a panel can damage a TV beyond repair. (Again, take it from a guy who has broken a few TVs over the years.)
To properly lift and carry a TV, you want to let the TV chassis do the work of supporting the display. Lift from the bottom of the set, supporting it at the side or top corners to keep the TV upright, in the same position it would be in normal use. This is the ideal position for the TV, because the chassis bears all of the weight and pressure. Try not to lean one way or the other, because the thinnest TVs can actually bend under their own weight enough to damage the display.
When laying a TV down flat, lay it screen-side down on a large flat surface that's covered with a clean, soft blanket or carpet. Any stray objects or debris can scratch the screen or bezel, so make sure it's really clean!
You want a surface that will evenly support the entire flat front of the TV, with no uneven portions that would place additional pressure on any one spot, or that would leave one side of the TV unsupported.
Very carefully set the TV down on its bottom edge and gently lean it forward, lowering it down onto the soft surface, holding both the top corner and the middle of the side so as to evenly support the TV, being careful not to introduce unnecessary twisting or pressure on the panel.
The first thing you'll need to do is select the right wall mount for your TV. This comes down to two major factors: what size bracket your TV will accept, and what style of TV mount will work best for your set and the room it's in. Any of the selections from our best TV mounts list should work for most TVs, but be sure to confirm the details of your own TV and needs via its manufacturer or the manual it shipped with.
Bear in mind that wall mounting a TV may also put it at a different distance from the seating you already have. Make sure that you plan accordingly to put the TV at the appropriate distance for optimal viewing. (Check out our article What size TV should you buy? for more details about viewing distance. )
)
You'll also want to unbox the mount and familiarize yourself with the product before you start any sort of installation and mounting project. Make sure that you have the necessary screws (both for the wall and for attaching to the TV) and that you understand how the wall bracket and TV mounting plate attach to each other.
Once you've settled on the right mounting bracket for your TV, you'll need to choose the right location, and position it at the right height. Proper wall positioning is essential when wall-mounting a TV, because your ability to adjust the TV position afterwards will be quite limited, even with an articulated wall mount.
Start by finding the right wall. This will be located in a pretty central location, where the seating in your living room or home theater lets you sit comfortably while watching movies and shows. Be sure that the wall also has access to the necessary power outlets and any cable or satellite connections.
Center the TV at the right height, with the center of the screen more or less at eye level. (This is where it helps to have a second helper that can check the comfort and angle as you and another helper hold the actual TV.) You can note the desired position by marking the lower right or left corner with pencil or masking tape.
Finally, consider the position of the mount in relation to the TV. Some TVs attach mounting brackets in the center of the chassis, while others are offset toward the bottom, so plan accordingly to position your wall mount correctly.
For more helpful positioning tips, check out our helpful guide on mounting your TV: best viewing angle and height.
Once you've got everything you need and have planned out the basics, like where you want to put the TV and understanding how the TV mount is put together, you're ready to mount the TV. It's a pretty simple process, but doing it right will be the difference between an attractively mounted TV and one that may not sit right, or even damages the TV.
1. Find the studs
Once you've settled on the perfect spot on the wall, you'll need to find the studs to mount the bracket properly. Mounting your TV wall bracket to the studs provides the structural strength necessary to support a TV that could weigh anywhere between 30 and 100 pounds. Drywall alone will not support this sort of weight, so it's essential that you anchor the TV mount into the studs.
Finding the stud location is as simple as using a cheap stud finder, or using other means to find stud location. Measure the mounting points on the TV while bracket to determine how many studs you need to find. For most, it will be a span of two studs, one for the left and one for the right. Depending on the specifics of your walls and your chosen TV mount, it may need to be a span of three studs. You can mark the location of studs lightly on the wall with a pencil.
(Image credit: Shutterstock/DGLimages)2. Mark the hole position
Next you'll need to mark specifically where you plan to screw into the wall. Ideally, you will use a level to ensure that these marks are not only even between the two studs, but also to make sure that the amount will not be slanted. You can mark specific locations for the pilot holes on the wall itself in pencil, or, you can tape paper over the intended mounting location, using either a pre-printed template or marking one up on your own.
3. Double check the bracket position
With your marks in place, it's time to position the mounting bracket on the wall. First, place the bracket flat against the wall, lining up one screw location with the first marked hole. Keeping that point firm, pivot the other side of the bracket as needed to line up with the second hole. Use a level to double check that the mount is level when it's aligned with your planned pilot holes.
(Image credit: Shutterstock/Mix Tape)4. Drill pilot holes
Using a drill, you'll need to drill pilot holes through the drywall and into the studs in the proper positions.
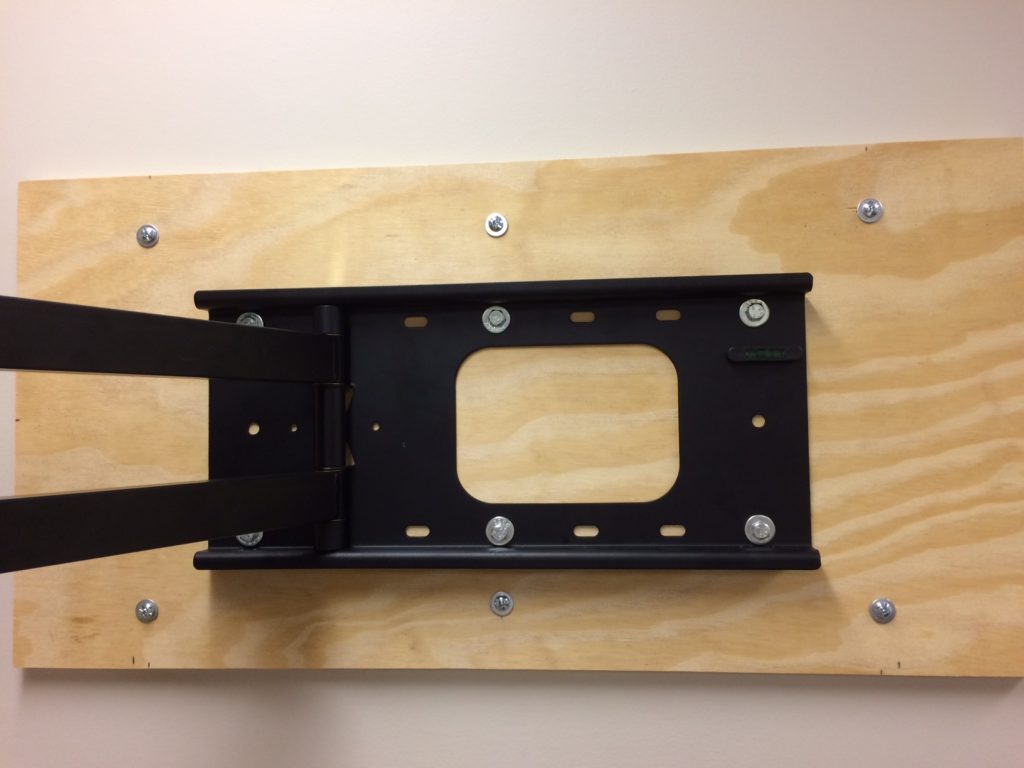
5. Mount the wall bracket
Once the pilot holes are drilled, you will use the included mounting screws to secure the wall bracket. Using a power drill, screwdriver or ratchet, put in the wall screws to firmly attach the bracket to the wall, with the screws going into the studs.
Generally speaking, you'll want the screws tight enough to hold the bracket snug against the drywall, with no wiggling or rattling of the mounting plate. If the screws are sinking into the drywall or the bracket is warping in any way, you have overtightened.
With the wall bracket properly placed, you are more than halfway done mounting your TV.
(Image credit: Shutterstock/Ole.CNX)6. Attach the TV mounting plate
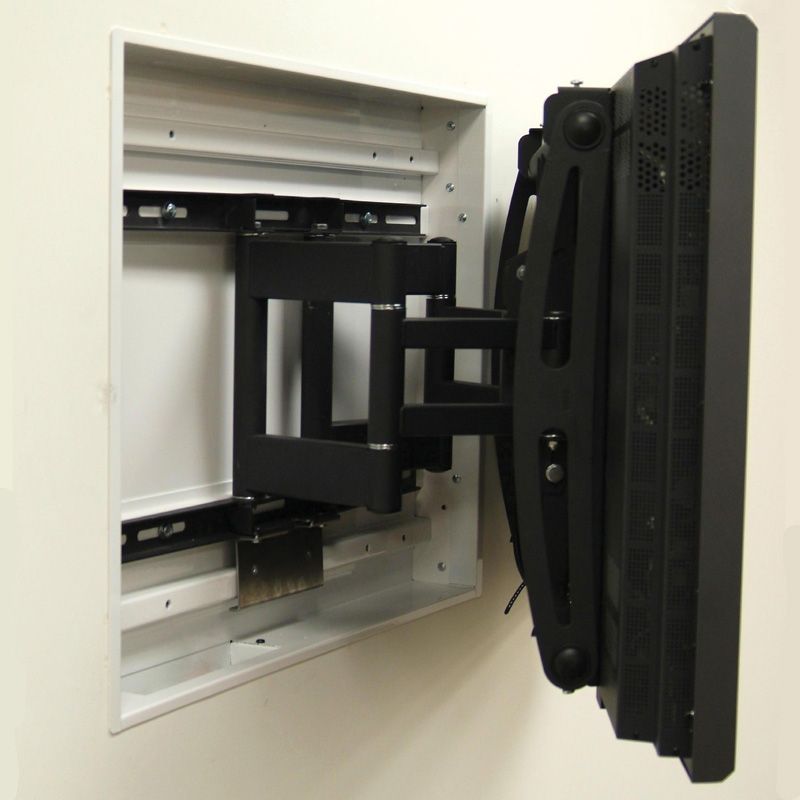
Next you'll attach the mounting plate to the TV. This is the second half of the TV mount, which will attach to the back of the TV, and then connect with the wall bracket to securely hang the TV on the wall. Depending upon the type of mount you are using, the two halves may be attached through a simple clip, a rail system, or even an extendable arm.
Line up the TV mounting plate with the VESA mounting holes on the back of the TV chassis. Using the included screws that should have come with your TV mount, attach the mounting plate to the TV using a screwdriver.
Be especially careful not to over tighten the screws, which can result in damage to the TV chassis or stripped screw heads, both of which can cause real issues mounting (or later unmounting) the TV. A good rule of thumb is to tighten the screw until it holds the bracket snug against the chassis, and then tighten a quarter turn.
(Image credit: Shutterstock/Naypong Studio)7. Attach the TV mounting plate to the wall bracket
With both the wall bracket and TV mounting plate securely in place, all that's left is to attach the two.
Start by lifting the TV to the proper height, or slightly higher than the intended position, so that the TV can be lowered to attach the bracket and plate.
In some instances, this will be a drop-in connector with safety screws that can be tightened after attaching, but others will use attachments that may clip or screw into place. Be sure to consult the instructions that came with the TV mount and use the included hardware to attach the plate to the bracket.
Take care when lifting the TV, with particular attention paid to holding the TV by the outside bezels, and not the glass. Be especially careful not to grab or press on the screen, which can damage the display very easily.
Once the amount is properly attached, you can allow the bracket to support the weight of the TV.
8. Reconnect the TV
All that's left at this point is to reconnect power to the TV and any other devices that might need to be plugged in. Once that's done, you can kick back and enjoy the newly-mounted TV.
Our favorite TV mounts
Echogear Full Motion TV Wall Mount EGLF2
$119. 99
99
View Deal
See all prices
Sanus Advanced Full-Motion Premium TV
$299.99
View Deal
See all prices
Reduced Price
Mounting Dream Tilt TV Wall Mount
$49.99
$25.48
View Deal
See all prices
Reduced Price
Rocketfish Tilting TV Wall Mount
$99.99
$59.99
View Deal
See all prices
Echogear Full Motion TV Wall Mount EGMF2
$49. 99
99
View Deal
See all prices
Peerless-AV Full-Motion TV Wall Mount
$44.52
View Deal
See all prices
Get instant access to breaking news, the hottest reviews, great deals and helpful tips.
Contact me with news and offers from other Future brandsReceive email from us on behalf of our trusted partners or sponsorsBrian Westover is currently Lead Analyst, PCs and Hardware at PCMag. Until recently, however, he was Senior Editor at Tom's Guide, where he led the site's TV coverage for several years, reviewing scores of sets and writing about everything from 8K to HDR to HDMI 2.1. He also put his computing knowledge to good use by reviewing many PCs and Mac devices, and also led our router and home networking coverage.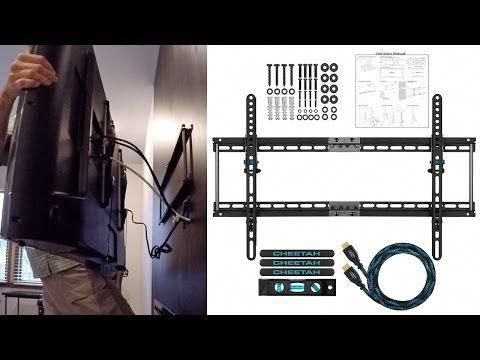 Prior to joining Tom's Guide, he wrote for TopTenReviews and PCMag.
Topics
TV
For maximum cool factor and a super clean look for your entertainment center, mounting your flat-panel TV is the way to go. Here’s how to hang that flat-screen TV up on the wall.
Jump to:
Before you get started on your TV mount installation, here are a few things you’ll want to have on hand:
 Otherwise you could end up with an expensive mess on your hands.
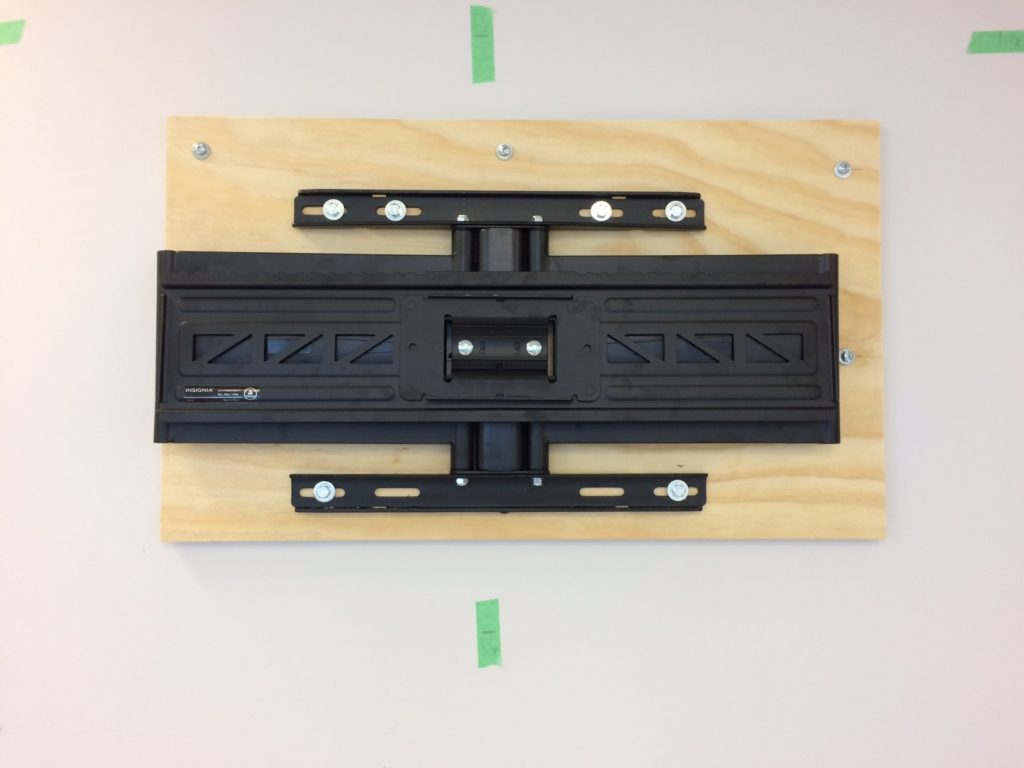
You don’t want a bunch of cables and TV antennas hanging down from your TV. That’s a good way to ruin the whole sleek aesthetic you were going for in the first place. Fortunately, there are a few options for cable management.
 There are covers you can purchase that match the color of your wall, offering a simple way to hide cables.
Check out our Editor’s Choice awards for Best TV Providers and Best Live TV Streaming Services to get the right TV for you and your household.
If you have everything you need already, great! Let’s get started on the best way to mount your TV on the wall.
 When it does, mark it with some painters tape so you remember the position.
 If so, remove them.
And that’s it! Kick back, relax, and enjoy living the high life with a wall-mounted TV.
About the Author
Mike Strayer
Mike Strayer, PhD, has written and edited TV, internet, and tech content across the interwebs for over seven years.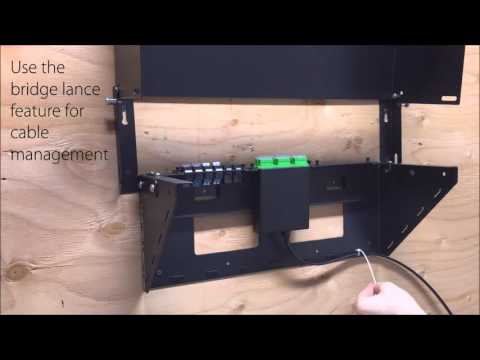 As Managing Editor of CableTV.com, he nerds out dissecting labyrinthian channel lineups and sifting through massive on-demand libraries. Off the clock, catch him on his couch deep in The Twilight Zone or wandering Westworld.
The shovel is an indispensable tool for every self-respecting gardener, fisherman, hunter, owner of an SUV or a private house. The shovel mount is installed on the car, in the barn, on the terrace - in any convenient place.
Contents
A shovel can become an ax or a cleaver if necessary, but there are often difficulties with its operation. After use, the tool almost always remains dirty and it is not always possible to wash it, especially after digging the car out of the mud. For such cases, as well as for more convenient storage and transportation, a shovel mount is used.
A distinctive feature of purchased holders is that they can be used to fasten shovels with handles of different diameters. But the price of universal fasteners is often overpriced, and it is not always possible to find such a device in local hardware stores. If you wish and have some skills, you can make fasteners yourself. It consists of two holders with clips on nuts or snap hooks and mounting on bolts, screws or nails.
There are several types of fasteners. And they differ in the time it takes to retrieve the tool and reliability. But if the shovel is not mounted on the outside, the choice between them is of no fundamental importance.
Single-arm holder types consist of a base and a hook that is attached to the base. It closes with a bolt and nut. The nut can be made in the form of a lamb. The opening of the single-arm holder is faster than the double-arm holder. Sometimes the shovel is fixed with a slotted prong.
This type of fastener is suitable if the tool is used infrequently and is used only for spades.
It holds in most cases better than a single-horn, consists of a base and a clamp, which is attached to the frame at both ends with bolts or "wings". Making it yourself is easier.
Before installation, you need to consider where and how the holder will be installed, so that later you do not have to redo the fasteners. Slightly less important is it vertically or horizontally fixed. In a car, they are usually installed horizontally. It is worth checking how convenient it will be to use it.
First you need to choose a location. Indoors, it is best to place the fastener horizontally at a height of about 190 cm above the floor in order to take up a minimum of free space on the wall. Outside, it is desirable to install fasteners so that the metal structural elements are not flooded with rain, otherwise corrosion is possible and the fastener bolts will have to be changed.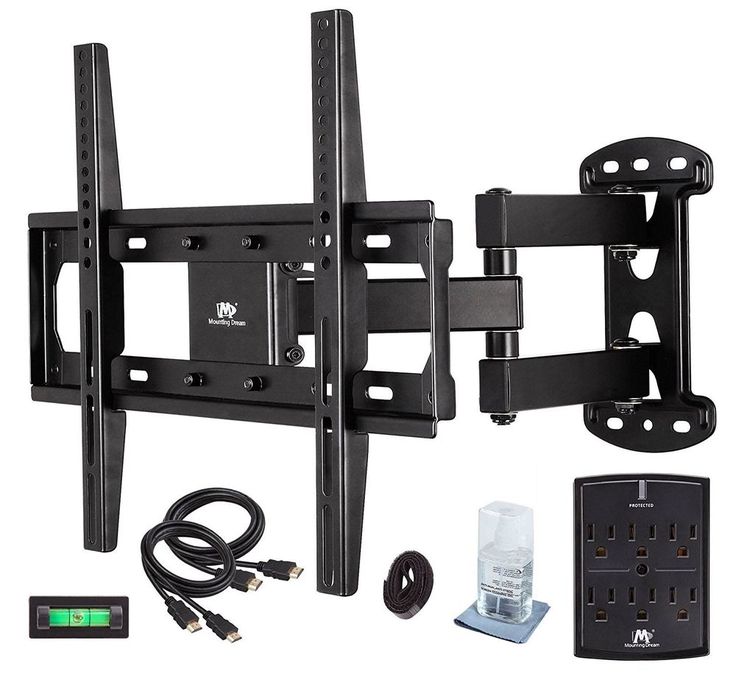
You can mount the shovel on any suitable, preferably wooden, plane, such as a shed post, garage wall, door, but first of all, you need to evaluate the convenience.
The shovel can be mounted outside or inside the vehicle. In the absence of rails or other means of fastening on the roof of the car, it remains to mount the shovel in the luggage compartment. And it is not at all necessary to keep a full-size shovel in transport. A sapper shovel will always help, although not as effectively as a full-size one, to remove dirt from under the wheels. It can be mounted on an ATV, going on a long hike.
The holders can be attached to the roof rails with bolts and washers. If the fasteners are located in the trunk, you should be prepared for possible damage to the plastic in the luggage compartment.
Shovel holders can be created in several ways.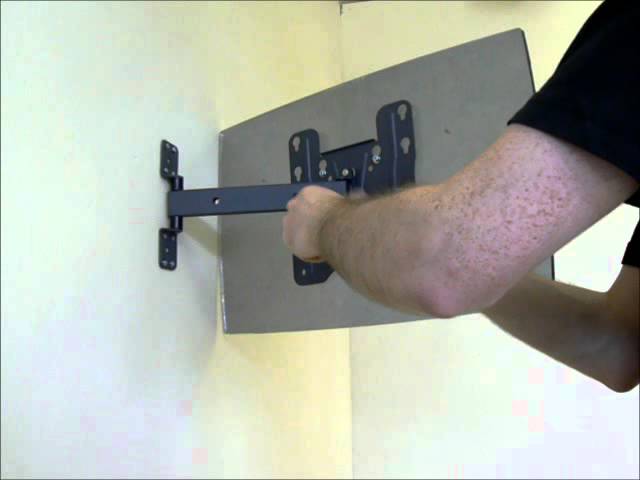
The simplest manufacturing option is from rubber elements: old insulating tubes, bundles. But such fasteners have earned a lot of negative feedback, because some fishermen and hunters have lost an expensive shovel, securing it in this way.
A stronger fix can be made with scaffolding collars or swivel collars. It is necessary to separate them using a hacksaw or grinder, make a hole with a diameter slightly larger than the diameter of the bolt for fastening, replace the nut with a lamb. Scaffolding clamps hold the tool firmly, but it is difficult to make holders out of them. In addition, this requires some equipment.
The lamb tends to unwind during the ride due to vibration.
Quality grip is made from standard plumbing clamps. You just need to replace the nuts with lambs. The hole for mounting looks quite decent. Rubber, which is used as a sealant, is another plus in favor of such clamps. They make one of the most reliable, simple and cheap holders.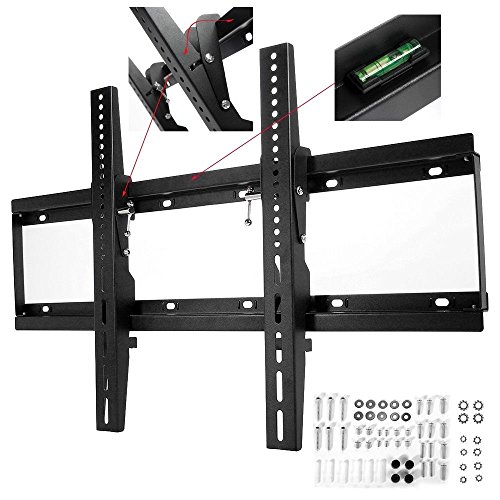
Thus, fasteners can be made from:
If the DIY options are not suitable, to choose the right prefabricated fastener, you should watch the video:
Yes!
45.47%
None. Additional answers required. Now I'll ask in the comments.
39.76%
Partial. There are still questions. I'll post it in the comments now.
14.78%
Voted: 1313
How to install a curtain rod with a wall or ceiling mount.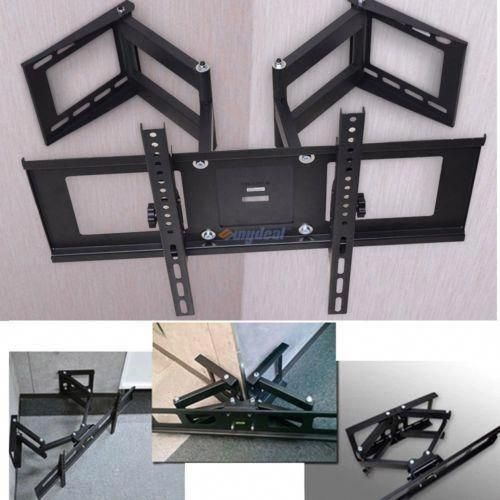
One of the final stages in the repair of the premises is the installation of a curtain rod. This work is not difficult, and everyone can handle it, in this article we will look at the installation of wall and ceiling cornices step by step.
Eaves according to the method of fastening are ceiling and wall, for one curtain or even tulle and lambrequin:
Single row - under the curtain, usually installed in the kitchen.
Double row - for blinds and curtains.
Three-row - for tulle, curtains and pelmet.
There are several types of cornices for curtains:
String - consists of a cable stretched over fasteners, only light curtains are suitable for such a cornice.
Profile baguette - consists of a plastic or metal profile and a decorative baguette, depending on the type of fastening, it can be attached to the ceiling or to the wall.
Flexible - can take any shape - semicircle, zigzag, made of plastic or flexible metal.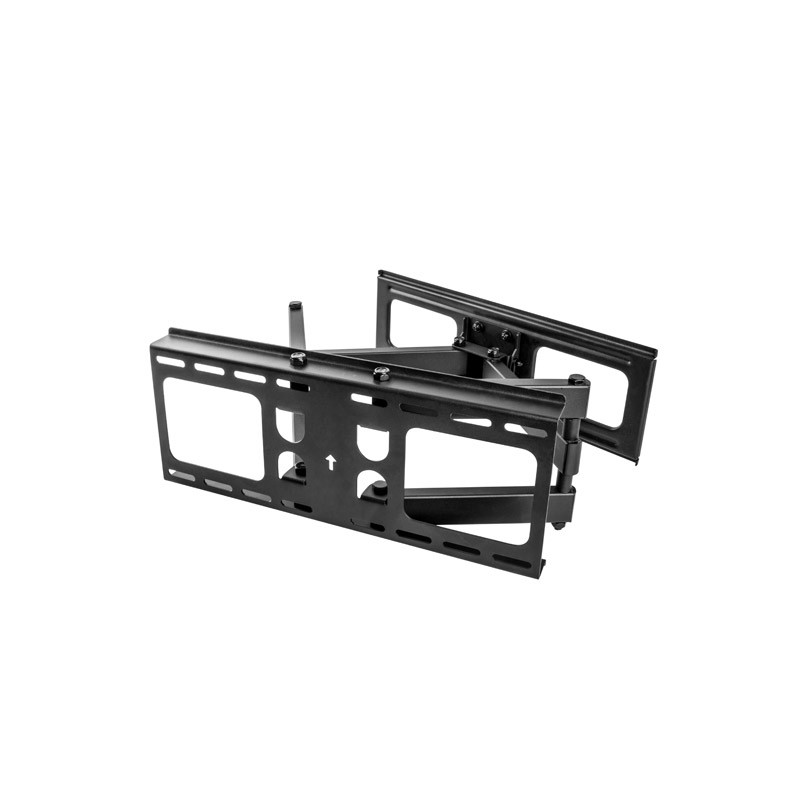
Round - consists of a plastic, wooden or metal tube, on which rings with curtain fasteners are put on.
Most often, profile ceiling and round wall cornices are used in the interior design of residential premises, and we will consider their installation.
Eaves installation tool:
It is more convenient to install the cornice with an assistant, but if this is not possible, then you can do it alone.
How to install a wall mounted curtain rod.
We measure the window opening with a tape measure, mark the location of the fasteners with a pencil, which should be at the same level and no closer than 15 cm from each edge of the window opening.
Attach the fastener to the wall and mark the holes on the wall with a pencil.
Using a hammer drill or an impact drill with a drill for concrete, make holes in the wall with a thickness equal to the dowel and a depth of the length of the dowels.
We hammer into the holes of the dowel with a hammer, apply the fastening element and fasten it with self-tapping screws using a Phillips screwdriver or a screwdriver.
Self-tapping screws and dowels are included with the purchase of the cornice.
Insert the decorative cup and support bracket, fix the bracket with the side screw.
Before attaching the second fixing element, the cornice tube must be inserted and aligned horizontally using a spirit level.
Next, we mark the holes for the holes in the wall in this way and fasten the second mount to the wall. If the window is wide or it is a balcony block with a window and a door, then 3 fixing elements are installed so that the cornice pipe does not sag.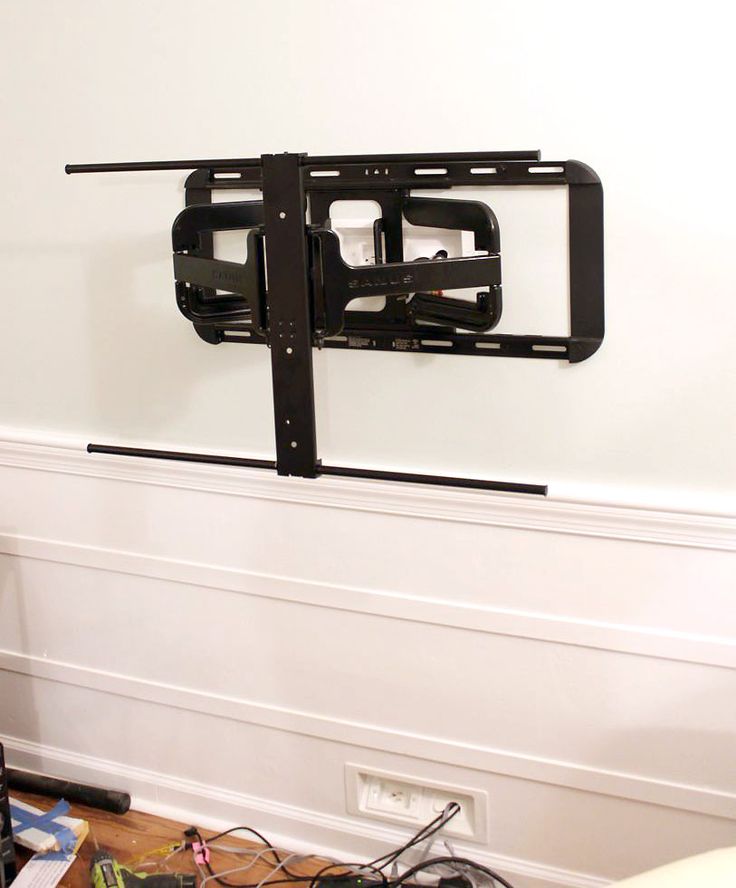
We put curtain rings on the pipe and insert it into the brackets, leaving 1 - 2 rings behind the brackets along the edges of the pipe. We fix the pipe in the bracket with a screw.
Attach decorative end caps to the ends of the pipe.
If there are pencil marks left on the wallpaper, you can wipe them off with an eraser.
The cornice is installed, it remains to hang the curtains.
How to install the ceiling cornice.
Ceiling cornice is a plastic or metal strip with 2 - 3 hook guides and a decorative trim panel.
Also available with swivel corners.
The structure is usually attached to the ceiling with dowels and self-tapping screws.
Ceiling cornice with plastic strip.
Ceiling cornice with metal strip.
We collect all the elements of the cornice and try on the ceiling, if necessary, we saw off the plank and decorative panel to the required length with a metal file.