If your ATVs front end alignment is off, you may notice the ATV pulling to the side while riding, or a shaking and wobbling feeling in the handle bars while on the trail.
That’s not the only effect you’ll notice either, your tires will wear unevenly and need to be replaced sooner if you’re out of alignment. Not to worry, a front end alignment is a pretty easy task you can do yourself at home with some basic hand tools.
When you buy a brand new quad, the manufacturer recommends you do a front end alignment after the first 30 days. Then, every 3 months after that. To me, that seems a bit extreme. I do mine once a year with my yearly maintenance before I take it out for the season.
You will also want to do an alignment any time you swap out your tie rods, or do any work on the machine involving those parts. Here are the steps you take to do an alignment, I go into more detail on each of these steps below.
First you want to make sure your quad is on a level surface. You don’t need to spend a ton of time on this getting it perfect. But try to get the machine as level as possible, it makes the whole job easier.
If you have a flat spot in a garage or drive way, that would work best. But you could always jack up one side of the machine if you’re on a really uneven area. The quad won’t need to move for you to do the alignment.
As part of this step, make sure your tire pressure is set to spec or to what you normally ride with it set to. The most important factor is that the tire pressure is the same from side to side. Front and back doesn’t need to match, and usually shouldn’t. But make sure the left front tire matches the right front tire at least.
This step isn’t absolutely necessary, but it sure makes everything a lot easier knowing the handle bars aren’t able to move and mess with any of your measurements. If you have someone that won’t mind sitting there holding the handle bars straight that would work.
In fact, having someone sitting on the machine is better because the measurements will more closely match the conditions you have when someone is riding the machine. But if it’s just you doing this job, you’ll have to find another way to secure the handle bars.
I usually just get a ratchet strap and wrap the two hooks on each side of the handle bars and through the grab bar on the back to keep the handle bars from moving at all. It’s really a simple step that will save you some headache later on. Don’t strap it down to tight or you could cause other damage, just enough to hold her steady.
The camber of your front tires is often overlooked. But since we’re doing an alignment, this is the best time check the camber is on point. You’ll want to take a level and place it against the side of the tire vertically. Try to be as close to center near the axle as you can.
Rest the level against the bottom of the tire on the outside of the tire and get the bubble into the center of the level. Now measure the gap between the top of the level and the top part of the tire. You should get somewhere between 0.2 and 0.8 inches distance.
Not all ATVs and UTVs are rated to have the same camber. Check your service manual for the exact measurements, but about 1/8 inch to 3/4 inch is a pretty common standard to go by. If you’re not within those measurements, you should adjust your camber.
To adjust your camber, take the cotter pin out of the castle nut of your ball joint where it connects to the upper A-Arm and loosen the castle nut. Now with the correct size wrench, adjust the ball joint by screwing it in or out to get your camber within the recommended range.
Some A-Arm assemblies require that remove the ball joint from the spindle it sits in order to adjust. Once you’re done with the adjustment tighten back up the castle nut and put back the cotter pin.
If you want to think of the camber as the vertical alignment, then think of the toe as your horizontal alignment. First determine weather your machine calls for a toe-in or toe-out alignment by checking your service manual.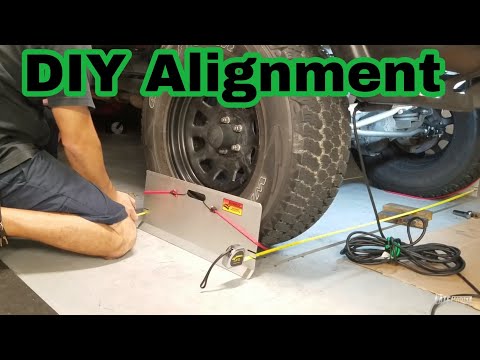 Most quads require a 1/4 inch toe-in alignment.
There are two popular methods for actually getting the toe-in toe-out measurements. I prefer method two because it’s easier to see if only one tire is out of alignment or if both are.
Method 1 is quicker and a pretty straight forward way to get your measurements. You’ll simply measure the distance between the middle point on both your front tires, front and back at axle height.
The distance measurement between the center of the front of the tires will be measurement A and the distance between the center of the back of the tires will be measurement B. You will take your measurements and subtract measurement A from measurement B to find your toe-in. If the measurement is negative, you have a toe-out situation.
I found it easiest to measure the front of the tires, then put a piece of tape or something to mark where you measured. Then rotate the tires 180 degrees by rolling the quad to get the back side measurements.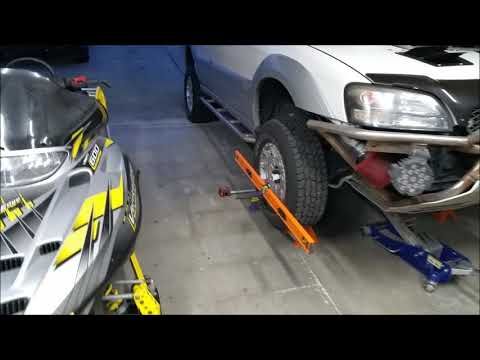
To find out which wheel is out of alignment, maybe both are, maybe just one is. Take a long 2×4 or something long and straight that won’t bend. And hold it flush with rear tires and along-side the front tires.
Measure the distance the from the 2×4 to the front tires. The distance should be the same from right tire to left tire. If it’s off then you will want to get the adjustments done to the tie rods to get these to match.
For a toe-in alignment you will want the front of the tires measurement away from the 2×4 to be higher than the back of the front tire by about 1/8 inch. Remember that the standard toe-in measurement is about 1/4 inch? Well, that’s both front tires combined.
If you find that you need to make adjustments to your toe, that is all done with the tie rods. Start by loosening the lock nut on the tie rod ends. You will want to use two wrenches to do this part.
One wrench to hold the tie rod in place and the other to loosen the tie rod end lock nut.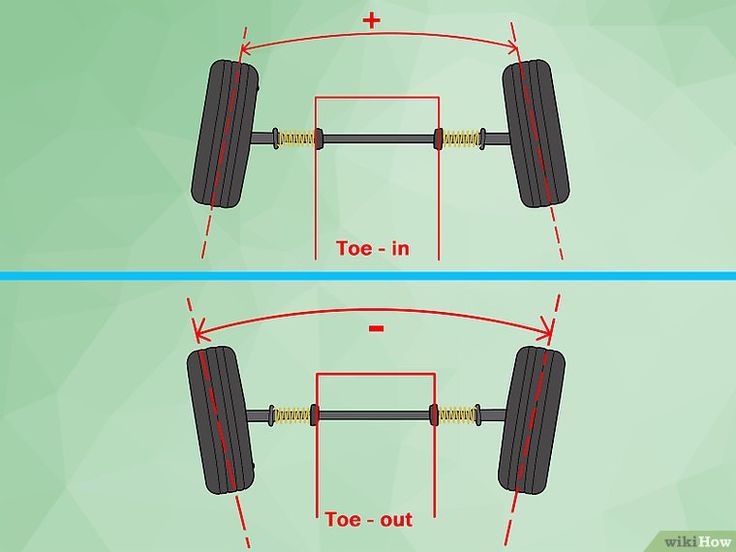 If you don’t use two wrenches you could cause damage to your machine.
Once the tie rod ends lock nut is loosened up, you will be able to adjust the tie rods. Make the adjustments to the tie rod by spinning clockwise or counter clockwise to get your correct toe measurement.
You will most likely need to adjust the tie rod, and take another measurement, repeating until the toe is where you need it to be.
After you’ve got your toe-in or toe-out where you want it, you can tighten the tie rod end nuts back up and you’re good to go. It’s a good idea to take another measurement after you’ve tightened them up just in case it shifted a little bit when tightening.
There you have it, an ATV front end alignment. If you’re alignment is still off after doing this, you may have a bent tie rod or A-Arm. If you notice, the handle bars still wobble or shake, you may just need to Balance The Tires or maybe even Replace The Wheel Hub Bearings.
Sharing is caring!
Making your quad faster is easy. Just bring money. There are endless tips on how to make your motor stronger, your suspension better and your chassis crisper. But by the same token, we have ridden some very expensive machines that feel like junkers because the builder ignored basic setup fundamentals.
Wayne Hinson at Hinson Racing was one of the pioneers in ATV racing and was crew chief for riders like Gary Denton and Doug Gust. He never lets an ATV leave his shop without going over some very basic setup items. Here are a few of the secrets he shared with us.
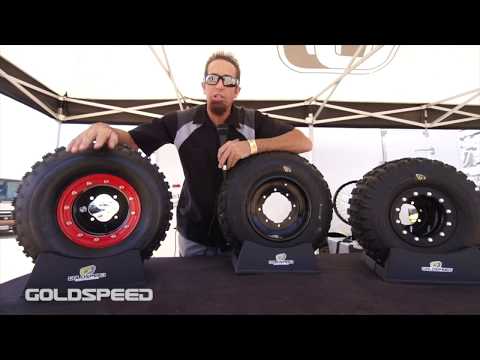
MATCHED TIRES
You won’t believe how much variation there is in tire size. You can have four tires of the proper spec and of the same make with four very different circumferences. When you have different-size wheels in back, you are robbing horsepower as one wheel tries to cover more ground than the other. In front, you can create handling and steering problems. If you go to any auto race, you see that the tires are pre-measured and stacked in sets. You can easily measure your own tires by inflating them to a consistent pressure and wrapping a tape measure around the outer circumference. You can also dab a little grease on one knob, then roll it across the garage floor. The space between grease dabs is the circumference. Do this before you run a new set so that you can return one of the tires and ask for a closer match.
TOE-IN
Most manufacturers deliberately deliver the quad with the steering adjusted poorly. The front wheels typically are toed inward slightly. This creates more drag and makes a quad slow down more quickly when the throttle is chopped. Most tuners agree that a free-rolling quad is best.
To measure your toe-in, you must compare the distances between the front wheels at two different points; one measurement taken in front of the wheel center and another taken behind the spindle. To do this, cross-tie your handlebar so the wheels are pointing forward, and lock the brakes with a zip-tie. The idea is to make sure both wheels are pointing in the same direction, so carefully mark a point on the leading edge of both tires and measure the distance between them. Then make marks on the training edge of both front tires, and measure again. If the front marks are farther apart than the rear marks, you are toed-out and will have instability. If they are toed-in, you will have drag. To correct this you will need to turn the tie-rods’ adjuster nut in or out.
STRAIGHT-LINE TEST
When you take your quad for a test ride, there are a number of things you should check. Among them are the handlebar position and the hands-off stability. For the record, don’t really take your hands off; just feel for a pull in one direction or the other. The handlebar should be dead even when the quad is going straight; otherwise, it could cause handling problems or rider fatigue. This can be adjusted at the tie-rods in quarter-turn increments, making equal adjustments on both sides. If the quad pulls one way or the other on flat ground, there are several things you should check. In order of likelihood, check tire pressure, brake drag and suspension adjustment. You should also look for any damage to the A-arms or tie-rods.
TIRE PRESSURE
Never underestimate the importance of tire pressure. It should be checked every single ride. The proper level varies wildly according to tire construction and soil, so test rides are important. Look for certain symptoms. If the quad has poor traction, decrease the tire pressure. If the quad won’t turn, increase the tire pressure, particularly in the rear. If there’s too much feedback in the bars, decrease the pressure in the front. If you’re concerned about flats, increase the pressure.
PRELOAD OR AIR PRESSURE
Most modern quads offer a wealth of suspension adjustments. Again, test riding is critical. What worked for a 150-pound test rider at the factory probably won’t work for a 200-pounder in the dunes. In general, sand requires stiffer settings. Softer spring-preload and compression-damping settings are best for hardpacked soil. Mud can go either way, but stiffer settings generally work better because it offers increased ground clearance for dealing with ruts, and also because of the additional weight of mud buildup. When adjusting the air pressure in Fox air shocks, always make sure that the wheels are off the ground.
BALANCE
Once you have your suspension set up, it’s a good idea to check your ground clearance in the front and in the rear. Most quads are fairly level across the bottom when unweighted. Then, when the rider is in place, the rear end will be slightly lower than the front. Never set up a quad with less clearance in front than in the rear, and by the same token, try not to have more than a half-inch of difference between the two when the quad is unloaded.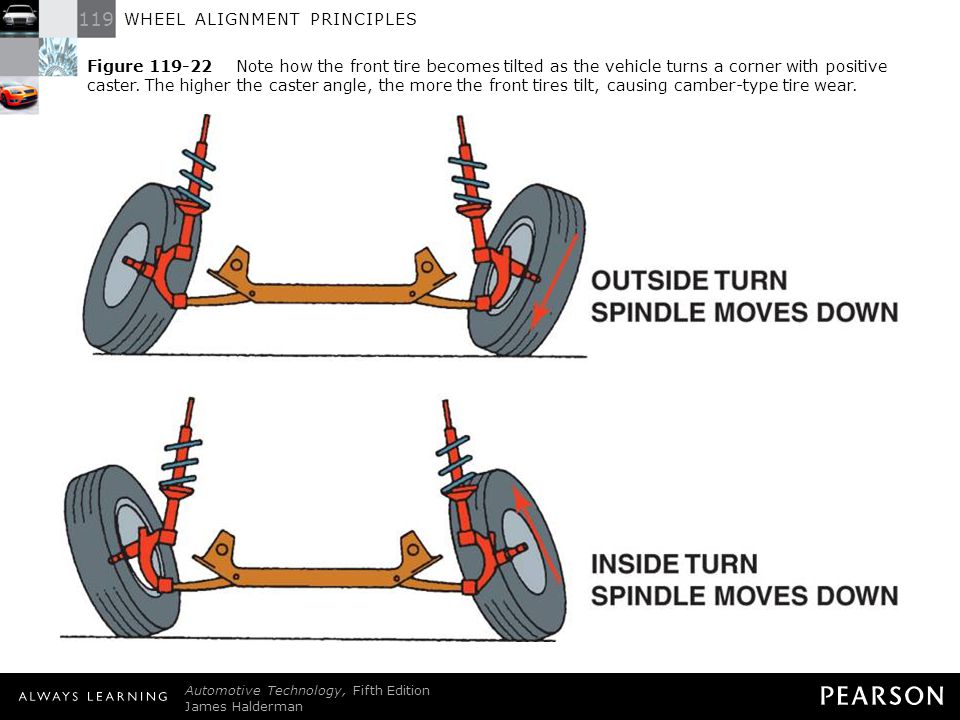
To make your quad roll as freely as possible, both front wheels should go in the same direction. To check your toe-in, start by fixing the bars to point straight forward with tie-down straps.
Before attempting a front-end measurement, be sure to lock the front brake with a zip-tie. Just locking the park brake won’t do this, as it usually doesn’t affect the front wheels.
Find the centerline of the wheel by measuring from the ground to the axle, then make your marks on the insides of the front wheels at this height. Make one mark in front of the axle and another behind it.
Now, measure the distance between wheels at the front marks and compare that to the distance between wheels at the rear marks.
In order to adjust toe-in and to adjust the handlebar hands-free position, make small changes at the tie-rods.
Set your shock preload so that your ground clearance is slightly higher in the front than in the rear with the quad unweighted. This will become more pronounced with the rider on board.
So, in a rut, the steering wheel rips out of your hands, when driving straight the ATV goes to the right or left, you notice uneven tire wear or you see that one or both wheels sharply go to the side with the steering wheel set straight - all these are clear signs that that it's time for toe and camber adjustment .
It should be noted that on some ATVs only the convergence is regulated, and the camber is set by the manufacturer.
Getting rid of the problem.
There are many ways, we will try to talk about the most obvious and intuitive.
Which nuts to turn?
#1 Loosen nuts; No. 2 Toe adjustment (turn the tie rod itself with a wrench; No. 3 camber adjustment;
Attention! You do not need to hang the ATV, adjust it on a flat surface without holes and hills, set the steering wheel straight.
Visually we try to evaluate the wheels in front, look at the eye, it will immediately become clear which wheel goes to the side more and which one less. Sometimes adjusting by eye is enough, if we want everything according to science, then we move on.
Method 1
On the rim, on the very edge from the inside, on both sides of each wheel, near the shoulder, we make marks with a marker so that the marks are parallel to the ground.
With the help of a simple ruler, we set the convergence, we rest the ruler against the marks and measure the front and back along the marks.
A ruler is a pipe inserted into a pipe of a larger diameter, at its ends there are L-shaped stops (curved so that the bottom of the ATV does not interfere), with which we will rest against the marks.
For convenience, we fasten the tape measure onto the ruler and look at the numbers, the shiny bolt is the lock, rested on the marks in front and fixed it, looked at the numbers and repeated the procedure on the back of the wheels.
We loosen the locking nuts on the steering rods, turn the rods in one direction or another, twisted and measured a bit, realized that it was a little or a lot, we turn further. Wheel alignment is measured between the edges of the rim. The wheels should be as in the figure below, the difference between A and B should be 0-3mm (less in front and more in the back). Universal convergence is made 0 mm.
After we lock the nuts and try to drive, perhaps the steering wheel will be a little crooked, and the quad will drive smoothly. We loosen the lock nuts again and turn the rods for the same number of revolutions, thereby aligning the steering wheel, but without touching the convergence.
Nothing needs to be adjusted on the rear suspension.
Method 2
1. Set the steering wheel to straight ahead.
2. Place the stands in front of the ATV perpendicular to the rear wheels as shown.
3. Stretch the elastic band around the ATV legs so that it just touches the rear wheels lightly.
4. Measure the distance between the tensioned tape and the front and rear points on the front wheel rim. The distance to the far point on the rim should be 2 - 3 mm greater than the distance to the near point on the same rim.
You yourself could see for yourself that there is nothing complicated in adjusting the toe and camber on an ATV, and you yourself are quite capable of doing it without resorting to the services of a car service. So we put the saved money in our pocket and happy and satisfied we go for a ride.
"Carburet setting...
Wheel chains... "
Camber adjustment problems on an ATV are a very common problem on this type of motorcycle. And even cool ATVs "get sick" with a similar problem. This malfunction is diagnosed by the following features:
● when turning, the steering wheel of the motorbike breaks out of the hands;
● When driving in a straight line, the ATV will turn to the right or left;
● rubber on wheels wears unevenly;
● The wheels lean noticeably to the side when the steering wheel is level.
You can adjust the camber with your own hands, or by contacting the services of professionals from a motorcycle service. In some models of ATVs, you can only change the toe with your own hands, and the camber is set during the manufacture of the vehicle, and does not change in the future.
If you want to forget about wheel alignment problems, then you have three options:
● unscrew the nuts a little to loosen them;
● adjust toe;
● Adjust the camber.
It is not necessary to hang the ATV for this work, it is best to place it on a flat surface with the handlebars straight. Usually, the need for camber adjustment can be identified purely visually by determining which of the front wheels of the motorcycle deviates to the side.
If it was not possible to correct the situation by eye, then you can try to loosen the nuts. This is done as follows:
● Use a marker to mark the wheel rims with two marks parallel to the ground;
● using a ruler, determine the amount of toe-in front and rear from the marks;
● loosen the nuts on the tie rods with a wrench;
● tighten the rods to the optimum toe-in values;
● Toe-in is measured between the edges of the ATV's rims and should be between zero and three millimeters.
Now you need to check if the adjustment has been made correctly. For this purpose, you need to fasten the nuts, and try to drive a quad bike a little. Sometimes it happens that the motorbike moves smoothly, but the steering wheel looks to the side. To fix this, you need to loosen the nuts again, and scroll the corresponding number of turns of the thrust, trying to give the steering wheel a level position.
If the above method does not suit you, there is an alternative. To adjust the camber on an ATV, follow these steps:
● set the vehicle's steering wheel straight;
● place the racks in front of the motorbike in a perpendicular position relative to the rear wheels;
● Wrap the ATV with elastic so that it barely touches the rear wheels;
● measure the distance from the tape to the rear and front marks on the rims. The difference between the measured distances should not exceed three millimeters.
Adjusting the camber of an ATV is not the most difficult task, and therefore every motorist can cope with it if desired.
If you do not have enough free time or skills to adjust the camber of an ATV with your own hands, then you can always contact the Dvako Moto motorcycle dealership. Highly qualified craftsmen will perform all the necessary repairs and maintenance of any type of motorcycle not only extremely quickly, but also at a very pleasant price.