Great handling and stability are key in ATV racing and riding, but we can’t all afford top-notch equipment for our machines. Over the years, the Dirt Wheels crew teaches tips and tricks on how to pick the right performance parts that won’t kill your budget and how to properly set up an ATV to enhance its handling. In this how-to, we widen a stock machine with aftermarket A-arms up front and widen the rear axle to give the quad a more stable footprint. Our goal is to be able to ride faster and in more control on a budget.
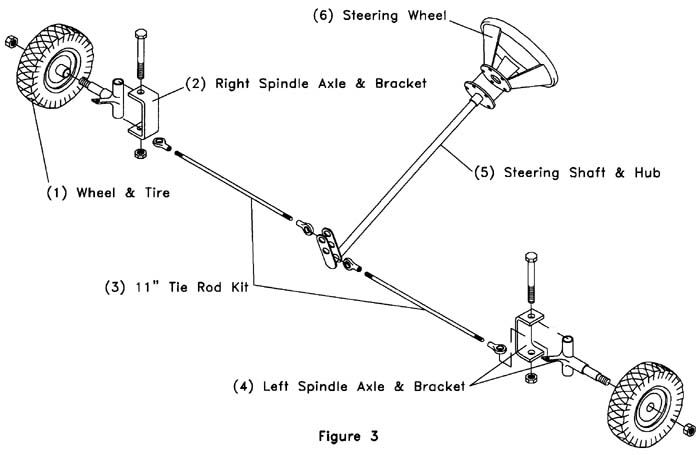
We took one of the industry’s best ATVs, the Honda TRX400X (EX), which started out as a well-known trail quad until 450 sport quads took over the market, and began wrenching on it. Alba Racing sells a set of high-quality A-arms for the 400’s front end at an easy price of $450. You can purchase the set by calling (619) 561-0188 or go to www.teamalbaracing.com.
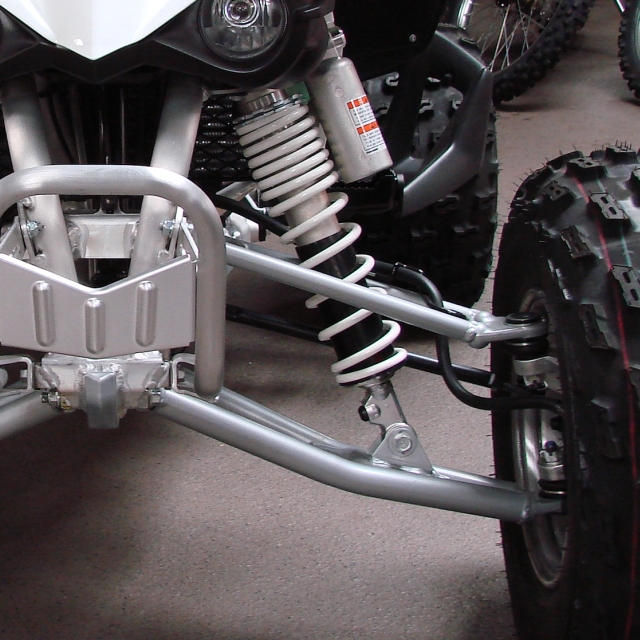
The kit adds 2 inches of width on each front corner, has camber and caster adjustments, and will work with stock or long-travel suspension by installing or removing the shock adapters that come in the set. Alba’s bottom A-arms fit long-travel suspension normally, but they designed an adapter that bolts onto the long-travel mount and where the ball joint connects to the arm. This provides the stock-sized suspension-mounting bracket and lets the quad sit at the correct height in the front end. Re-valving your front suspension is a good idea if you stick with the stock shocks. We switched out our TRX400X’s front shocks with a stock set of TRX450R’s, which helped the quad ride better with the new Alba kit. A set of similar A-arms that fit stock shocks from Lonestar Racing start at $599. Long-travel versions can cost over $700 from other companies and not provide the option of running stock or long-travel shocks.
There are two main options to widen the rear axle of a sport quad. You can buy a new axle that will add 2 inches to each side, or the less expensive option would be to purchase wheel spacers that add the same width. We went with a $100 set of 2-inch wheel spacers from Slasher, which you can pick up from your local MTA dealer. There are upsides and downsides for each route, though. Wheel spacers bolt up to the stock wheel studs and then the wheel mounts to the spacer’s lug bolts. This creates a weak point on the stock wheel studs that could break from too much stress by landing hard off jumps or slamming the rear wheels into turns and rough terrain. Buying a new rear axle is more expensive, generally costing between $300–$500, but it could be the better way to go depending on the type of riding or racing you do.
STEP 1: You can work on both sides at once, but focusing on one side at a time might be easier. Take off the front wheels and set them out of the way.
STEP 2: There is no need to remove the tie-rod ends from the spindle or steering stem. Loosen the lock nuts on the tie-rod and spin the tie-rod until it is disconnected from both tie-rod ends. You might need the stock tie-rod nuts for the new rods.
STEP 3: Taking off the brake calipers from the spindle can be helpful to do the job. If you removed them, rest them on something so the brake lines aren’t stressed from hanging freely, or zip-tie them to your frame. Remove the cotter pins from the stock ball joints that run through the castle nuts and ball-joint shafts. A flat-blade screwdriver and needle-nose pliers are useful to remove them.
STEP 4: Then remove the castle nuts from the ball joints. The spindle rotates freely on the A-arms since the tie-rod is removed. You can take a piece of wood or a wooden hammer handle and rest it between the stock A-arm and spindle to keep it from moving depending on the direction you have to turn your wrench to remove the castle nuts.
STEP 5: A pickle fork is the easiest tool to use to remove the ball joints. This tool can cause damage to the stock ball joints and make them unable to use if you ever want to put the stock A-arms back on. Slide the forks between the ball joint and spindle, and use a hammer to pound on the back end of the pickle fork. The ball joints should pop loose pretty easily.
STEP 6: Remove the shock from the upper shock mount and the lower A-arm. The arms will then hang down freely. Remove the upper and lower A-arms off of their mounts. Now you can clean up the spindle where the new ball joints will be installed.
STEP 7: Read the instructions that come with the kit to see which spacers to use when you install the top arm. Depending on what type of riding you do, the spacers are used to offset the top A-arm to your preference. Once you bolt on the top arm, the bottom one can be attached, which doesn’t require spacers.
STEP 8: Next step is to bolt on the new ball joints to the new A-arms. The bottom ball joint has no adjustments and can be tightened down in place. The top ball joint is adjustable to set the camber later on, so do not tighten them all the way down once you install them to the new arms.
STEP 9: Reattach the shock onto your machine the same way it was removed from the stock A-arms.
STEP 10: Once the new ball joints are installed on the A-arms, you can attach the wheel spindle to your machine. Make sure the tie-rod end on the spindle is in the right place so the spindle is installed correctly. Slide the bottom ball joint into the spindle, and screw the nut down a few threads. Do the same with the top ball joint into the spindle.
STEP 11: Take a piece of wood and place it between the spindle and the bottom A-arm in the front or rear of it, depending on which ball joint you are tightening. The bottom joint might require extra pressure to seat into the spindle. You can utilize a jack stand or wooden block to rest the bottom ball joint on, so you can tighten the nut down. Tighten the ball-joint nuts down as hard as possible so they seat properly into the spindle. Reattach the brake caliper to the spindle if you had to remove it.
STEP 12: If the stock rod nuts are required, install them on the new tie-rods first. Then, making sure the new tierods are installed evenly into the tie-rod ends, screw them on until the spindle looks straight from the front of your machine. Lightly tighten the tie-rod nuts against the tierod ends. You will have to make adjustments to this later for a proper alignment.
STEP 13: At this point everything should be installed, aside from the wheels. Make sure every nut and bolt removed or installed on the new A-arm kit is tight. Some parts require torque specs. The only loose part should be the top ball joint for adjusting the camber.
STEP 14: Install the wheels onto your machine. Now you can set your quad back on its wheels and follow the alignment instructions that the kit comes with to set up your machine the way you prefer it to handle.
STEP 15: With the rear tires removed, slide the spacers onto the lug bolts and tighten them down with the new lug nuts. Make sure they are tightened properly.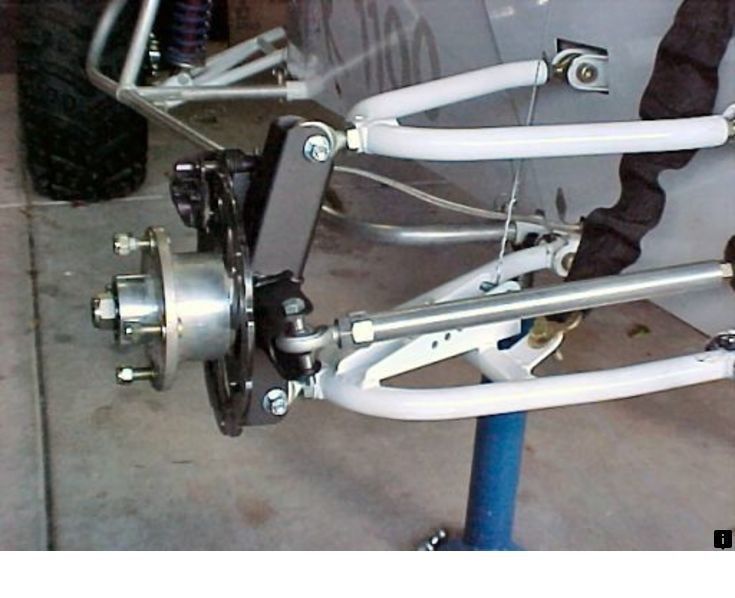 If any of them are too loose, that can cause the lug bolts to snap and your wheel to part from your machine.
STEP 16: Now you can install the wheels onto the wheel spacers with the stock lug nuts. Make sure those are properly tightened as well. It is that simple.
Making your ATV wider can have some benefits like improved handling and a more stable ride through corners. It’s no wonder this is a popular enhancement for professional and recreational riders. But there are a couple different routes you can take to widening your quad.
To make your ATV wider, you can either get some wheel spacers, flip the wheels around, or you can upgrade your axles and A-Arms with wider aftermarket parts. All options will give you a wider stance, but each come with their own pros and cons.
A very common approach is to put wheel spacers on just the front, or all the way around front and rear. Some people prefer longer A-Arms in the front and wheel spacers in the back, or leave the back as-is. And lastly, the most solid way to widen your quad, is to put longer A-Arms in the front and a longer axle in the rear.
There are easy ways to widen your ATVs stance, and spend less than 100 bucks doing so, which I’ll talk more about later. But first, you should know the pros and cons of widening your ATV, then you’ll have a better idea of which route you want to take.
There are some great advantages to widening your quad from handling improvements to safer riding. But the main reason many riders widen their ATV is for the stability improvements when cornering.
A wider quad will be able to take corners at higher speeds without the risk of tipping or lifting up one side on you. This is also a safety improvement, less chance of tipping means for a safer ride.
But what about the downside? Well for one, some of the widening methods put extra strain on your parts and require maintenance or repairs more often. For example, the wheel spacers method.
Adding a set of wheel spacers to your ATV is a quick and easy way to widen the quad. But it puts extra pressure on wheel on the outside edge of the spindle. This causes what some people refer to as bump steer. Hitting any little bump will pull your steering in ways you weren’t expecting.
Another problem is the added strain to your suspension system when using wheel spacers. You are basically extending the wheels out but keeping the suspension system in place, causing it to take on more of a load than it was originally designed for.
I don’t think any of these are reasons to stop you from getting wheel spacers if you’re just looking for a cheap and quick way to widen your quad. But if you ride pretty rough and want a more reliable option, go with aftermarket parts like widening A-Arms and axles.
Another thing to consider, is where you ride. Some trails have width restrictions on ATVs. Mostly trails with bridges or gates will have these restrictions, but you can get a fine if you’re riding a quad wider than the width restriction on a trail.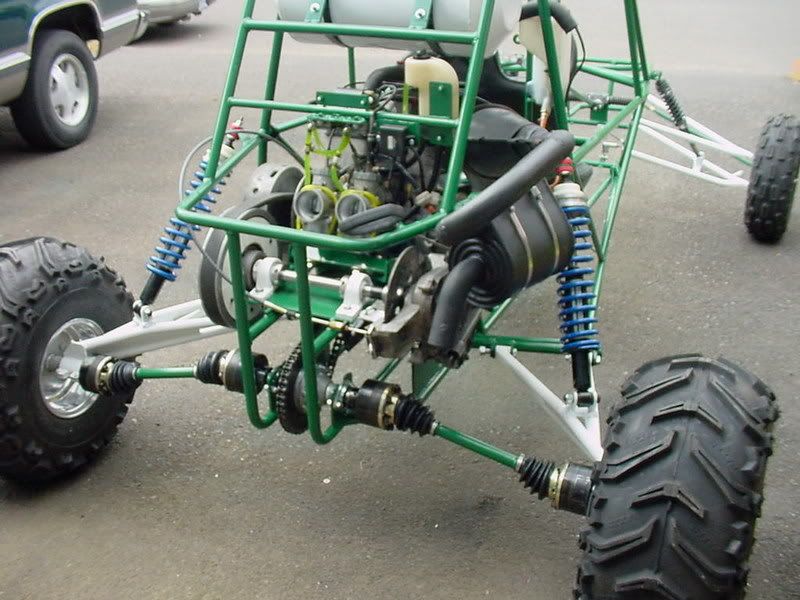
The front of the ATV should always be a little wider than the rear. This of course is personal preference and not all ATVs come stock with a wider front. The front and rear should be pretty close in width either way. But if I had to choose, I would suggest a slightly wider front end.
In fact, a lot of people only widen the front of the quad and they leave the rear as it is, stock. If you only widen the rear, or make the rear wider than the front, the ATV will tip more easily and the handling won’t be ideal.
The reason is that when you’re riding, you’re not paying all that much attention to the rear of the quad. Your eyes are facing forward, in the direction you’re heading. If your rear end is wider than the front. You’ll have to worry about the back end hitting things you wouldn’t expect.
Lets say you make a close pass to a tree, another rider, or any obstacle. You think you’re in the clear because your front tires squeeze by.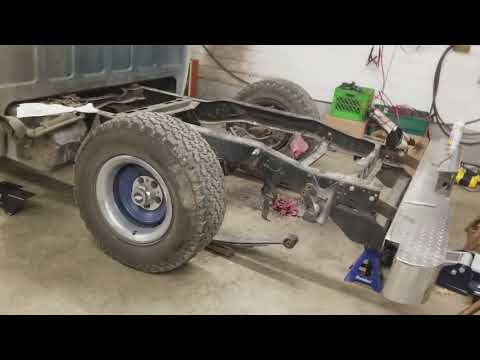 But if the rear of the quad is wider, your back tires might hit the obstacle and cause you injury, or worse, broken parts.
This may seem hacky, but is actually a pretty common mod. What you do is flip the wheel around on the hub to give you a few extra inches of width. It’s completely do-able, people do it all the time and it works.
Most wheels will have a deeper inside of the rim than the outside. The wheel will bolt back on to the hub the same way with the same lug nuts. It will just be flipped so the shallow side of the rim is facing in towards the ATV.
I don’t really like this method because of where the tires stem is after you flip them. You could always drill a new hole in the rim and put a new tire stem in. But even then, on the front, you could wind up having valve stem clearance problems with the front brakes. I just avoid this method myself, but it can be a quick and cheap way to widen your quad a little bit without having to spend any money.
If you do go this route, keep in mind your tire tread. Some tires have the tread shaped to move in a certain direction. If that’s the case for you, you can try swapping the sides of the quad your tires are on when you flip them. That way the tread is still facing the right direction.
This is another popular option to take because of how easy and cheap it is to do. For the most part people will add these onto the rear when they widen the front with longer A-Arms, but some people even put these on all four wheels of their machine.
It’s a pretty quick and easy install too. You simply take your wheel off, mount the wheel spacers on the hub where the wheel was, and then mount the wheel onto the wheel spacers. Simple as that, and you’re good to go. Most wheel spacer kits will come with instructions to do the install, and most of the time it’s a pretty straight forward process.
If you ride your quad pretty hard or take turns and jumps at higher speeds, I do not recommend using wheel spacers. You’re better off with longer A-Arms in the front and a longer axle in the back. A lot of people have had good luck with wheel spacers, but I’ve heard the horror stories of a wheel spacer cracking, breaking off, and causing a crash.
If you do mostly light trail riding or don’t like beating on your machine, you’ll probably be fine though. Wheel spacers can be found for around 50 bucks online now a days for a really decent quality set. Check out this set of Freedom Country ATV Wheel Spacers on Amazon to start your search.
This is my preferred method for widening your ATV in the front end. Nothing beats solid parts that you can rely on that you’ve installed on your machine yourself. I usually go for a +2 inch extension on the A-Arms, but it’s really up to you how wide you want your quad.
You can find extended A-Arms for almost any ATV online for between 300 and 450 bucks. Try this ATV Extended A-Arms Search in Amazon.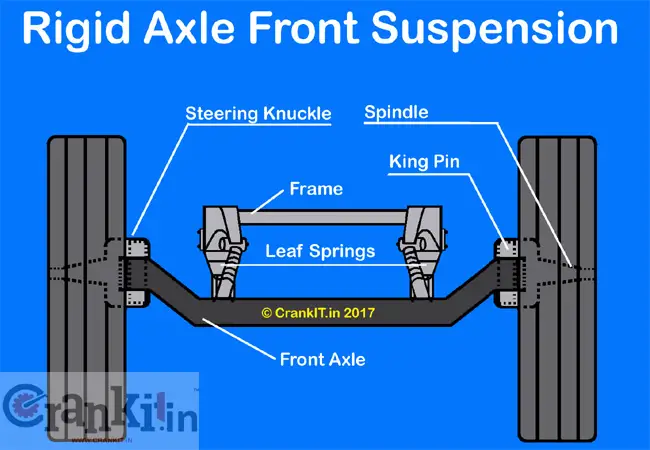 I have had good luck with the Team Alba Racing A-Arms before. Just make sure you get the right ones for your year, make, and model.
To swap the A-Arms out check out my Step By Step Guide To Removing And Installing A-Arms On An ATV article for a guide on how to do the swap. Most good sets of extended A-Arms will come with instruction, and may have special steps for any special spacers or washers included in the kit.
This is my preferred method for widening the back end of an ATV. It’s a lot harder to do, and will cost a little more than just throwing on some wheel spacers. But when you’re done, you’ll have a solid machine that you don’t have to be careful riding.
You can find extended axles for most ATVs online for a couple hundred bucks a pop. Putting the total for both sides above 400 dollars in most cases. Check out this ATV Extended Axle Search in Amazon to give you an idea of what you’re looking at.
Some of the axles you buy will come with instructions, but a lot of them don’t. So I wrote this How To Change Out An ATV Axle article to give you the step by step procedure if you need it. It will probably take a few hours to change out the axles on both sides of the quad.
Sharing is caring!
A quad bike, unlike a snowmobile, is an all-season use technique. But in order for the all-terrain vehicle to faithfully plow the virgin snow all winter, it must be prepared for operation in the cold season. Otherwise, by the end of winter, or even earlier, the quadric can easily “die”. The AvtoVzglyad portal tells about the nuances of the winter use of "quadrics".
Maxim Stroker
Most often, ATV owners face the problem of difficult starting in cold weather. Perhaps the problem may be in poor contact between the power wires and the battery terminals. If there is oxidation in the connection, then the battery itself does not charge well and at the time of starting in the cold it simply does not have enough voltage to confidently turn the crankshaft with the starter.
The problem is solved simply: disconnect the wires from the battery, remove oxides with sandpaper, and so that they do not form in the future, we process the battery terminals with a special Liqui Moly Kontaktreinig contact cleaner. This combined action aerosol formulation removes metal oxides and grease in a single process. The special chemical formula almost instantly loosens and eliminates oxide salts, restores electrical conductivity, and also blocks leakage currents.
But much more often the cause of difficult start-up in cold weather is engine oil. Most ATVs run on 10W-40 or 10W-50 lube during the summer. In general, such oil is considered to be quite all-weather, but if your “quad” is not in a heated garage, but on the street, then in severe frosts, difficulties arise with starting the engine, since the thickened oil provides excessive resistance.
But even if the engine starts, then the first seconds after starting it can work, which is called dry, since it will be very difficult for the oil pump to create the necessary pressure due to the thickened lubricant and supply it to the rubbing surfaces. This is especially dangerous for motors assembled on so-called plain bearings, because due to oil starvation, main or connecting rod bearings can turn.
In order not to encounter such a problem, before the onset of severe cold, you should fill the ATV engine with oil with a viscosity of 5W-50. The Liqui Moly product line has a quality lubricant with the right characteristics, one hundred percent suitable for ATV operation in winter. Liqui Moly ATV 4T Motoroil 5W-50 HC-synthetic motor oil provides maximum performance and engine protection under all operating conditions.
Anti-wear additive package and base stock provide maximum ATV engine protection and trouble-free operation over a wide range of temperatures and loads.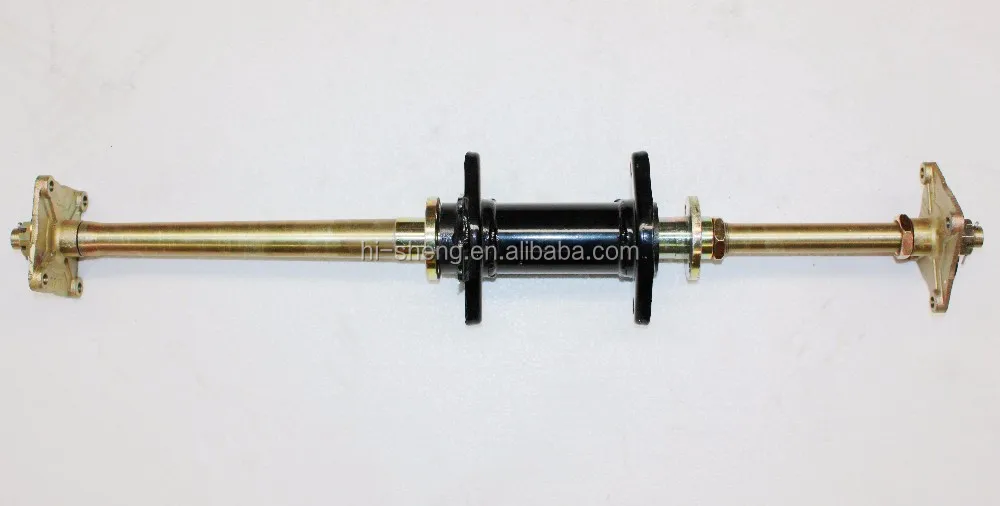 The oil guarantees easy start-up at low temperatures and high viscosity-temperature stability.
It is by no means a superfluous procedure before winter to change the oil in the all-terrain vehicle gearboxes. Despite the fact that there is no winter transmission for ATVs as such, it is still necessary to change the oil before frosts, because water from autumn puddles could well get into these nodes, through a breather or seals, which, mixed with oil, turns into an emulsion . And if you take into account that the gearboxes of modern ATVs have an electrician (someone has an electromagnetic clutch, someone has a servo drive), then there will be continuous problems from such a “slurry” in winter.
If there is any chance that the gearboxes of your "rogue" have taken a sip of water, then in addition to filling in new oil, they also need to be washed. Drain the waste from the gearboxes, tighten the bottom plug, and pour the quick cleaner Liqui Moly Schnell-Reiniger through the filler.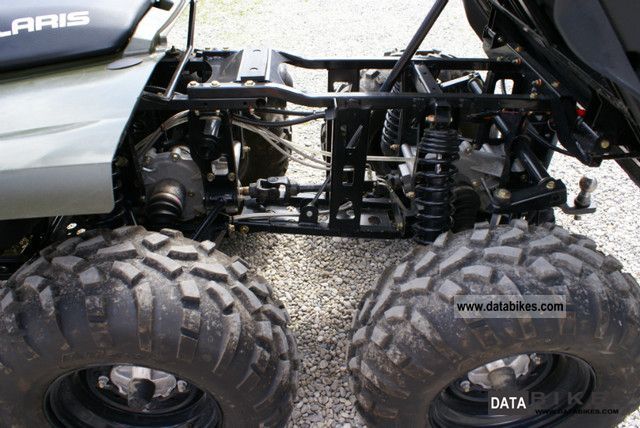
This agent is absolutely safe for electrics and rubber seals of the gearbox, but at the same time it will effectively clean the inside of the assembly from the remnants of the emulsion. For best results, jack up the quad axle you are flushing and turn the wheels forward/back by hand to flush the remaining emulsion from the sidewalls as well. After that, unscrew the drain plug, get rid of the dirty contents and, screwing the plug back, pour in fresh gear oil.
ATVs most often use a transmission with a viscosity of 75W90. It is suitable for most ATVs and is poured into both front and rear gearboxes. The German brand Liqui Moly has in its assortment a synthetic gear oil for motorbike Gear Oil 75W-90. It is in a sense universal, all-weather, and equally suitable for transmissions and motorcycles, and scooters, and ATVs, and snowmobiles.
This oil contains polyalphaolefins and special additives, due to which the lubricant does not change its properties either at sub-zero or positive temperatures. Its thermo-oxidative stability and resistance to aging allow for extended drain intervals that are significantly higher than other similar oils of similar viscosity.
In any case, check the manufacturer's recommendations before filling gears with oil, as some ATV models require gear oil for clutch operation. By the way, Liqui Moly also has such oils in its product line.
For the running gear to work well, it also needs to be prepared for the winter. Namely, lubricate the bushings of the fists and suspension arms with grease with a low freezing point, which at the same time is capable of operating in combined metal-plastic pairs. Perfectly fits this description of Liqui Moly Thermoflex Spezialfett.
This light beige grease has a long service life and is resistant to water and low temperatures (up to -50C).
… As we can see, in order to meet the Russian winter fully armed, an ATV does not need so much: the desire of the owner, skillful hands and high-quality technical fluids, such as German Liqui Moly fluids.
We solve "unsolvable" problems with the repair of equipment in one "puff"
21936
We solve “Unresolved” problems of repairing equipment in one “PSHIK”
21936
Subscribe to the Autovzglyan channel:
, ATVs, car service, repair, maintenance, motor vehicles, auto chemicals, life hack
What we have: a KL-789 children's ATV with minor malfunctions, some free time and a desire to stick an arduino lying around there.
What we want: something that lasts longer than one month, preferably with improved performance.
The ATV has two 12V RS550 commutator motors, with a shaft speed of 19300 rpm at idle, connected to the rear wheels with a diameter of ~30 cm through gearboxes with a gear ratio of ~131. Simple math says that the maximum speed of this vehicle should be 19300/131/60 * 3.14 * 0.3 = 2.31 m/s or 8.3 km/h. In practice, he travels at about 7 km/h. During the selection of new components, I struggled with the desire to make the maximum speed, and the fear that this would be too dangerous a transport for children. Therefore, it was decided that he should go 1.5-2 times faster. In addition to engines, I was not satisfied with it:
 Section 0.75-1 sq. mm, which with rated currents of 20A are heated to a significant temperature
 Those. I was not satisfied with absolutely all the electrics. After some thought, it was decided to use:
 0, as the controller of all this
 In addition, to reduce the rumble of plastic wheels and improve the smoothness of the ride, 4 tires 12.5 "for baby strollers were bought, after which they were slightly modified with a clerical knife, and then they were pulled onto the wheels of an ATV and fixed with self-tapping screws:
When everything arrived, a prototype was assembled on its knees, it turned out that the engines even without load heat up to 70 degrees in 3-5 minutes of operation, I had to buy two coolers for them, and the regulators, on the contrary, even with the fans turned off, do not heat up ( looking ahead, on an ATV under load, they also do not heat up). Because we have two motors on two different sides, it was necessary to solve one more problem - sensory motors spin only in one direction.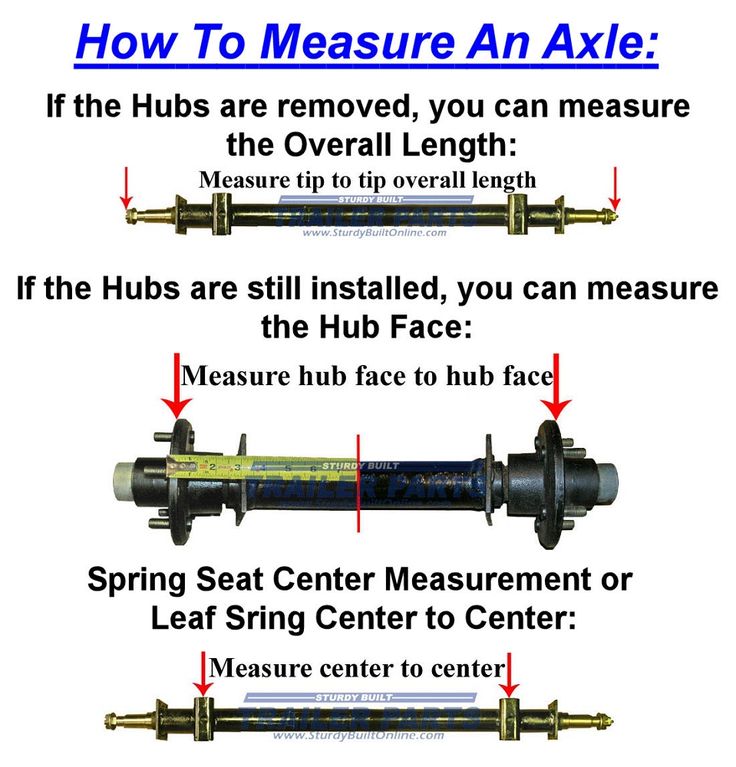 Initially, it was planned to disassemble one motor and turn the sensor 180 degrees in it ... but reality has shown that this cannot be done with little bloodshed. Moreover, during experiments with the sensor and timings, one of the regulators partially burned out, as a result, I abandoned the sensor and connected them as ordinary BCs. The sensor itself consists of three Hall sensors that monitor the position of the rotor, and a temperature sensor. It was decided not to leave all this economy, but to connect it to the MK and use it as an engine temperature sensor, an engine speed sensor, and later, knowing the gear ratio, as a speed sensor.
The pwmservo library was somewhat puzzling, it is designed to control servos (regulators in my case) through hardware PWM, with an accuracy of 1 degree, only 180 states, and the “forward” direction is only half the range, i.e. 90 states. It seemed to me that this was not enough, I had to edit the library to the detriment of the cross-platform arduin (it turned out only for controllers with 16 MHz), the result is 1000 states in each direction (the unit is equal to 0. 5 μs of the PWM duration, PWM from 1 to 2 ms).
After the work "on the knee" was more or less debugged, all this equipment was installed on the ATV:
Photo
Engine + gearbox:
Inside a small creative mess of wires (just threw all the wires inside, I wanted to test faster, later brought to human form):
Because the power turned out to be more than 500 W, it was necessary to limit the rate of increase of the gas, if you sharply turn the gas to the maximum from a place, the power will increase smoothly, and will reach its maximum in about 3 seconds. I am sure that without this there would be an effect of instant overturning.
In general, here is a telemetry video recording from the phone screen, everything is visible there, only due to a slightly glitched speed sensor in the left engine (left green column), the speed data is slightly underestimated, the maximum speed achieved on fresh batteries is 18 km/h
Values of the columns: blue - engine temperature in degrees, green - engine speed in rpm, orange - power supplied to the engines in conditional numbers from 0 to 1000, gray - throttle position.
And this is how it goes:
I wasn’t dragged away… it’s slipping, but I rode the quad bike itself, and judging by the telemetry, it doesn’t care who is on top
On the first video, a crunch is heard at the start. On the first evening, the gearboxes completely failed. The problem turned out to be that the gearboxes consist of nylon gears rotating on a 9 mm steel axle without bearings, so the friction force of the gears turned out to be so large that in one gearbox the middle just melted out in the gears and the alignment was lost. In another gearbox, the gear was welded to the axle, and the axle began to rotate in the housing and melt it, as a result of which the gear also lost alignment.
To solve this problem, you need:
The new axles are 5mm, so I had to print bushings on a 3D printer with an outer diameter of 9 mm (like the old axles), and an inner diameter of 5 mm, in order to be able to install the new axles in the old gearbox housing, 11 mm holes were drilled in the gears with a depth of 5 mm with both sides (bearing seats).