Home > Company > Tire Safety > Choosing Tires > Determining Tire Size
Once you have determined it’s time to buy tires, you’ll need to know what size tires are correct for your vehicle. Depending on what you drive, you may be interested in how to find the right tire for your…
This information is usually inside your car’s doorjamb, in your owner’s manual. To ensure your current tire or a replacement tire you may be looking at matches your vehicle’s requirements, it will be good for you to understand how tire sizing works. You may have never paid attention to the string of numbers and letters on every tire, but it’s a gold mine of information.
If you’re unsure of how to read tire measurements from your tire walls, the information and graphics below will tell you how to read tire size, understand and interpret it. If you decide you want to substitute a new size or tire type, consult an authorized tire retailer who can expertly advise you, because many optional tire sizes may have different load capacities and could require wheels of a different rim width or diameter and different inflation pressure.
Not sure you need new tires? Our Tire Replacement Guidance article will help you determine whether it’s time to retire your tires.
Most passenger cars, SUVs and light pickups (1/2 ton and smaller) will come with tires that are either P-Metric or Euro-Metric. For P-Metric tires, you’ll see the letter “P” before the number sequence begins: P225/70R16 97H. P-metric is a designation standardized by the Tire and Rim Association for a “passenger car” tire type. For Euro-Metric there will be no preceding letter before the number sequence begins: 225/70R16 98H. Euro-Metric is a designation standardized by the European Tyre and Rim Technical Organization for a “passenger car” tire type.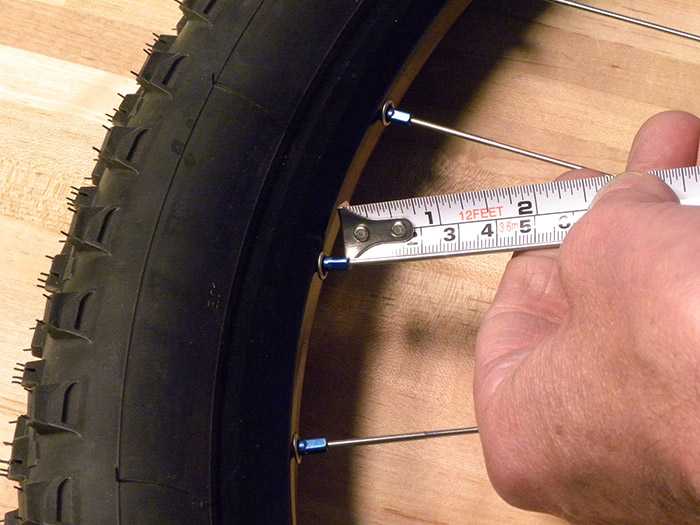 Both P-Metric and Euro-Metric size tires are designed to primarily be used on passenger vehicles, which can include cars, minivans, SUVs, and other light duty pickup trucks.
If your vehicle is an SUV, Pickup truck or van, you might see a different type of size designation on your placard that is specific for heavy duty light trucks and vans, especially common on ¾ ton and larger pickup trucks and vans. There are two common size types in this category, LT-Metric and Euro-Metric Commercial (aka C-type). Both size types are metric and so use the same structure as P-Metric and Euro-Metric but have some different characters in the size that differentiate them from their passenger car cousins. LT-Metric tires will have the letters “LT” before the size number sequence: LT245/75R17 119/116R Load Range E. Notice that there are two load index numbers and a Load Range, see the section on Load Index for more info. LT-Metric is a designation standardized by the Tire and Rim Association for a “light truck” type tire.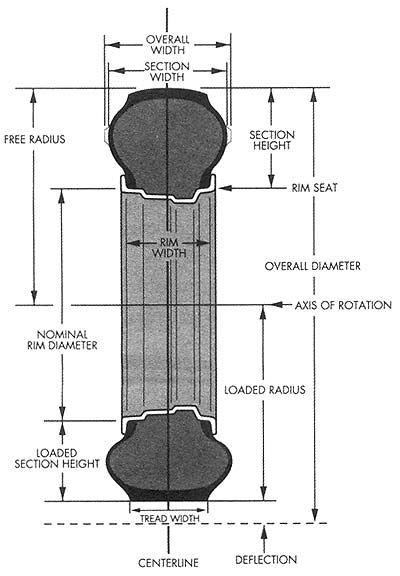 Euro-Metric Commercial or C-Type tires will look very similar to a passenger Euro-Metric size except that there will be a “C” right after the rim size: 23/65R16C 121/119R. Notice that the C-type tires also have two load index numbers. Euro-Metric Commercial, or C-Type is a designation standardized by the European Tyre and Rim Technical Organization for a light truck type tire. Light truck tires are designed to be used on vehicles capable of carrying heavy cargo and are usually only specified by a vehicle manufacturer on vehicles exceeding a certain load capacity.
Other types of tires that fall into the Metric sizing type are Temporary Spares, they start with “T”. If you see a size that starts with “ST,” that means “special trailer” and is only for use on a trailer.
Regardless of whether you are looking at a P-Metric, Euro-Metric, LT-Metric, Euro-Metric Commercial, T or ST tire the numbers in the size mean the same thing.
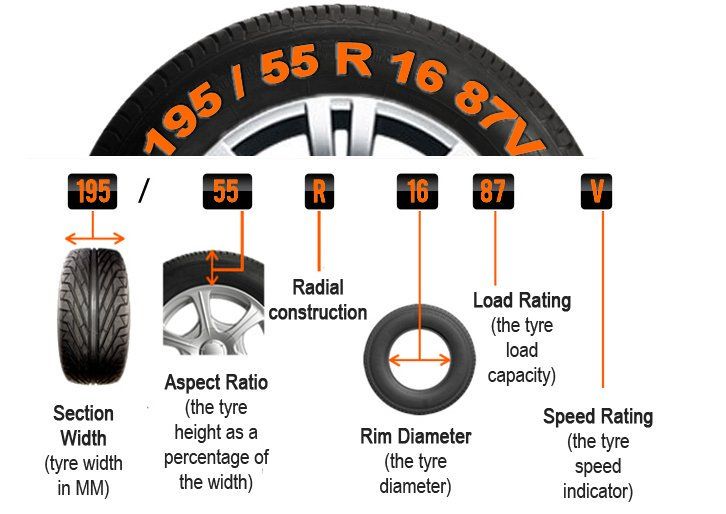
The first number to appear in your tire size information is the width, in millimeters, of the correct tires for your vehicle: P225/70R16 91S.
Tire width always refers to the measurement from one sidewall to another. Thus, a tire with the measurement “P225” is for a passenger vehicle and has a nominal width of 225 millimeters.
After the slash mark, the next number you see is for the tire’s aspect ratio, which essentially tells you how tall your tire’s profile is: P225/70R16 91S. Aspect ratios are delivered in percentages. Tire makers calculate the aspect ratio by dividing a tire’s height off the rim by its width. If a tire has an aspect ratio of 70, it means the tire’s height is 70% of its width.
Lower aspect ratio tires, such as a 60 series, generally offer vehicle handling performance advantages over higher aspect ratio tires, such as a 75 series, but a typical trade off can be ride harshness.
After the aspect ratio comes a letter that indicates the type of internal construction maintaining your tire’s stability: P225/70R16 91S.
There are two types of construction that you may see on the sidewall of a tire:
Radial tires are the most common tires on the road in the United States today; thus “R” will usually be shown in the tire size designation. Radial construction means the tire’s internal ply cords are oriented in a radial direction, from one bead over to the other, essentially perpendicular to the direction of rotation. You may also occasionally see RF indicating a run flat tire or ZR indicating a tire that is a speed rating higher than V.
The next number is the diameter code, in inches, of the rim onto which the tire can be mounted. For example, a tire with the P225/70R16 91S would fit a rim with a 16-inch diameter.
Load index can be a confusing subject because there are so many different caveats, but we will try to explain everything here.
The next figure after the rim size in the sequence is your tire’s load index, which tells us how much weight, in pounds, the tire can support when fully inflated: P225/70R16 91S
We call it the load “index” because the number doesn’t tell us the precise number of pounds the tire can carry, at least not by itself. However, the number does correspond to a specific load capacity listed in an index. Beginning with 1 and ending with 150, numbers in the load index represent carrying capacities of 99 to 7385 lbs.
There are two types of load types for passenger tires though, Standard Load and Extra Load. If a tire is Standard Load there will be no markings indicating it but if it is Extra Load the letters XL will appear after the size and load index.
Standard Load Euro-Metric: 215/55R17 94V
Extra Load Euro-Metric: 215/55R17 98V XL
Passenger car tires like P-Metric and Euro-Metric will only have one load index number where LT-Metric and Euro-Metric Commercial (C-Type) will have two numbers separated by a slash. The first number is the load index if the tire is used in a single application, the second number is the load index if the tire is used in a dual application. Passenger type tires cannot be used in a dual application. Light truck tires will also have a Load Range that is indicated by a letter, such as Load Range E. Load Range is an older term that is still commonly used in the industry so you may hear your tire dealer reference it but the load index numbers are the best way to ensure you have the proper tire.
One important but often misunderstood facet about load index is that the load index numbers between standards organizations (P-Metric vs Euro-Metric) are not necessarily on the same scale. Meaning that two tires in the two different systems that have the same load index number could have different maximum load capacities. This is why it’s important to not only look at the load index number but also verify the actual load capacity.
The final figure in a tire size sequence is the speed rating, which is indicated by a letter: P225/70R16 91S.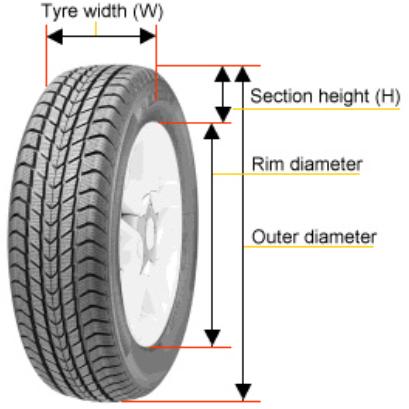 Just as your load index number corresponds to a specific load, your speed rating letter corresponds to a particular speed capability based on a standardized laboratory test.
For example, a tire with speed rating “S” is rated for up to 112 mph, while a tire rated “R” is up to 106 mph. Remember that this isn’t a recommended cruising speed. Of course, you should always follow legal speed limits on roadways.
Replacement tires must have the same or higher speed rating as the vehicle’s Original Equipment to maintain vehicle speed capability. If a vehicle has tires with different speed ratings, it is the speed rating of the “slowest” tire that dictates the vehicle top speed.
There is one last sizing type that you should know about, especially if you are in the market for off road tires for a light truck or SUV. It’s called a Flotation size and the numbers in this sizing format are very different from the Metric formats.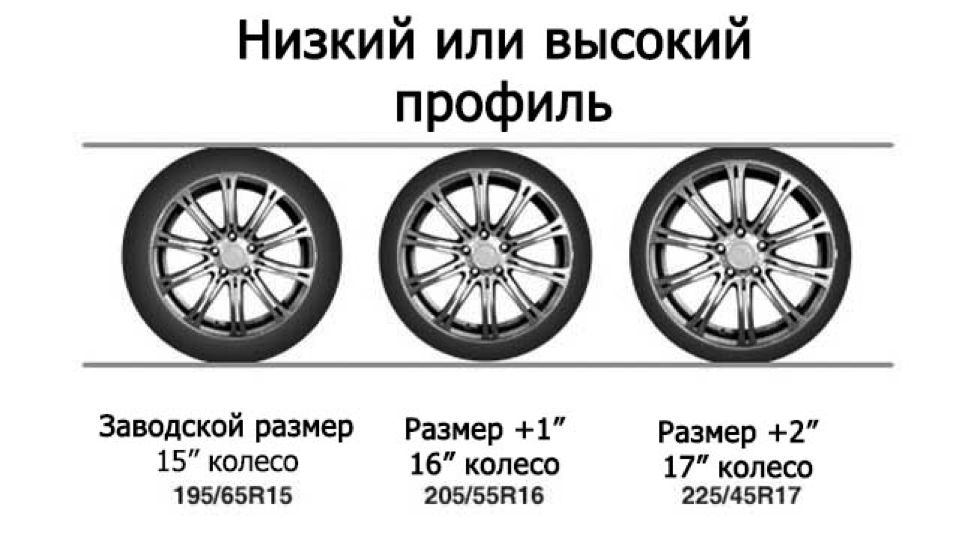 Flotation sized tires are similar to LT-Metric tires in application except for a few important points. Number one, they cannot be used in dual applications and number two, an equivalent size tire may have different load capacity than its LT-Metric counterpart.
The first number in the Flotation tire size is the overall diameter in inches. Pretty straight forward.
The second number is the section width (sidewall to sidewall) measurement in inches. Again, fairly simple.
After the section width comes a letter that indicates the type of internal construction: 33X12.50R17LT 120Q.
This is the same as is found in the metric sizing systems.
There are two types of construction that you may see on the sidewall of a tire:
Radial tires are the most common tires on the road in the United States today; thus “R” will usually be shown in the tire size designation. Radial construction means the tire’s internal ply cords are oriented in a radial direction, from one bead over to the other, essentially perpendicular to the direction of rotation.
The next number is the diameter code, in inches, of the rim onto which the tire can be mounted. For example, a tire with the 33X12.50R17LT 120Q would fit a rim with a 17-inch diameter.
The letters LT will be after the Rim Diameter indicating that this tire type is intended for Light Truck vehicles similar to the LT-Metric and Euro-Metric Commercial (C-Type) tires.
Load Index and Speed Rating have the same meaning and format as the tires using the metric sizing system. Note that since flotation tires cannot be used in a dual application there will be only one load index number instead of two.
Another group of stamping on certain types of tires is the Uniform Tire Quality Grading or UTQG. This grading and stamping is required for passenger car tires (i.e. P-metric and Euro-metric) in the all season and summer categories. Dedicated winter tires, Light Truck (LT-Metric, Euro-Metric Commercial, Flotation) and Motorcycle tires are excluded from this requirement.
Quality grading is designed to make the tire purchase decision easier for you. Ideally, the system is intended to provide simple, comparative data so you can make an intelligent buying decision. However, the ratings are based upon test results achieved under special conditions. This means it’s possible to misinterpret the comparative data as it relates to your individual driving habits, conditions, etc. You should still rely on your service or tire professional for assistance.
Quality grading designates the comparative performance levels of a tire based on government-specified tests but commissioned by the individual tire manufacturers. All tire manufacturers are required to grade regular and all-season passenger tires in three categories:
UTQG
Treadwear
The treadwear grade is a comparative rating based on the wear rate of the tire when tested under controlled conditions on a specified government test course for 6,000 miles (9,600 km). For example, a tire graded 150 would wear one and a half times as well on the government course as a tire graded 100. However actual tire performance depends on driving habits, road characteristics, service practices, and other factors that can influence the outcome.
Traction Grades AA, A, B and C
The traction grades from highest to lowest are AA (the highest), A, B and C. They represent how well tires stop on wet pavement as measured under controlled conditions on specified government test surfaces of asphalt and concrete. C-rated tires will have the lowest traction performance.
WARNING: THE TRACTION GRADE ASSIGNED IS BASED ON A WET BRAKING (STRAIGHT AHEAD) TRACTION TEST AND DOES NOT INCLUDE CORNERING (TURNING) TRACTION.
Temperature Grades A, B and C
The temperature grades A, B, and C represent the tire's resistance to the generation of heat and its ability to dissipate heat when tested under controlled conditions on a specified indoor laboratory test wheel. Sustained high temperature can cause the tire’s material to degenerate and reduce tire life, and excessive temperature can lead to sudden tire failure. The grade C corresponds to a performance level all passenger car tires must meet under the Federal Motor Vehicle Safety Standard No. 109. Grades A and B represent higher levels of performance on the laboratory test wheel than the minimum required by law.
WARNING: THE TEMPERATURE GRADE IS ESTABLISHED FOR A TIRE THAT IS PROPERLY INFLATED AND NOT OVERLOADED. EXCESSIVE SPEED, UNDER INFLATION, OR EXCESSIVE LOADING, EITHER SEPARATELY OR IN COMBINATION, CAN CAUSE HEAT BUILDUP AND POSSIBLE TIRE FAILURE.
DOT Quality Grades
All passenger car tires must conform to other federal requirements in addition to these grades.
Learn about our mission, our achievements, and our ongoing commitments
Read Our Origin Story
Tire size can be confusing. Some numbers on the sidewall are listed in millimeters while others are inches. Plus, the right size for your car, truck, or trailer can differ depending on where and how you drive.
You can see your original equipment tire size in your owner’s manual or on the placard generally located on the driver’s side door jam. This is the sizing recommended by the vehicle manufacturer.
If you’re interested in switching out your tires for a different look or performance, a good place to start is the numbers and other indicators on your existing tires’ sidewall. Next, have a tire professional help you determine a tire size range that will fit your vehicle and driving needs.
Here’s what those numbers and indicators on the sidewall indicate and how to understand them:
A: TIRE TYPE The first letter in the code tells you what class of tire it is.
P stands for passenger vehicle tire. P-class tires include cars, SUVs, crossovers, minivans and smaller pickup trucks.
LT means light truck tire, designed for vehicles that are capable of carrying heavy loads, towing trailers, or for those looking for an extra heavy duty option. These are often equipped on three-quarter or 1 ton trucks and SUVs.
ST stands for Special Trailer. These tire sizes are meant for trailers, including fifth wheels and other travel trailers, as well as boat and utility trailers.
If there’s no letter before the first number, you have a metric tire most commonly referred to as European size. It’s also measured in millimeters but may have a different load capacity than a P or LT tire.
B: TIRE WIDTH The three-digit number following the letter is the tire’s width (from side to side, looking at the tire head on) in millimeters. This may also be referred to as the section width.
C: ASPECT RATIO The forward slash separates the tire width number from the two-digit aspect ratio. The bigger the aspect ratio, the higher/taller the tire’s sidewall, or “profile” as it’s sometimes called.
The aspect ratio is indicated on the tire sidewall as a percentage. It’s the height of the sidewall measured from wheel rim to top of the tread, expressed as a percentage of tire width.
In this example, the aspect ratio is 65, meaning the sidewall is 65 percent as high as the tire is wide. To get the sidewall height, take the tire width of 215 mm and convert it to inches (8.46). Then multiply this by 65% (.65). This gives you an answer of 5.5, the sidewall height in inches.
D: CONSTRUCTION TYPE This single letter tells you about the internal construction of the tire.
R is for radial tires, the industry standard for most tires today. They have better road grip, lower rolling resistance for better gas mileage, ride comfort and durability than previous generations of tires. In a radial tire, the plies — layers of strong cords made of a blend of polyester, steel and fabric and coated with rubber — are laid perpendicular to the direction of travel.
D is for tires built with diagonal (crisscrossed) plies, called bias-constructed tires. They are also called conventional, x-ply, or cross-ply tires. Some motorcycle and trailer tires still use this internal construction.
Some run-flat tires are identified with an F followed by the type of internal construction.
E: WHEEL DIAMETER This two-digit number specifies wheel diameter in inches. It’s the distance between the two bead seat areas (where a tire gets tightly sealed onto the wheel).
F: LOAD INDEX The two-digit or three-digit number that follows the gap specifies tire load index. The load index symbol indicates how much weight a tire can support, based on the following standard chart. In our example, the load index is 89, which indicates the tire has a load capacity of 1,279 pounds, when inflated to the tire’s maximum air pressure rating.
G: SPEED RATING The last letter is the tire speed rating. This indicates the top speed it’s safe to travel at for a sustained amount of time. A tire with a higher speed rating can handle heat better and provide more control at faster speeds. The maximum operating speed of a vehicle is no more than the lowest speed rating of all tires mounted on the vehicle. (Of course, you should always abide by speed limits for safer driving.) Speed rating is usually, but not always, a single letter (see the chart).
Below you will find several charts that will help you understand tire sizing numbers, including a load index chart and speed rating chart.
A tire size calculator is a quick way to see whether the tire size you’re considering will likely fit your car, SUV, sports car, light truck or crossover.
But remember that is only an estimate. It’s important to stay within the sizing tolerances of your vehicle. Tires that are the wrong size could cause some pull in the steering wheel, rub against the suspension or body of your vehicle, reduce clearance on hills, or result in a stiffer or noisier ride.
If you’re considering mounting a different tire size on your vehicle, check with a tire expert. Find out whether the tires and wheels you have your eye on are the right fit for your vehicle’s suspension, gearing, and bodywork. And ask how any differences in revolutions per mile, tire speed, load index, and speed rating will affect your ride quality and vehicle performance.
See how new tires and rims will look on your car or truck using our Virtual Wheels simulator, available at any Les Schwab.
Find Your Store
To select a tire for a chainsaw, you need to know the type of tail, bar length, groove width and nose sprocket pitch.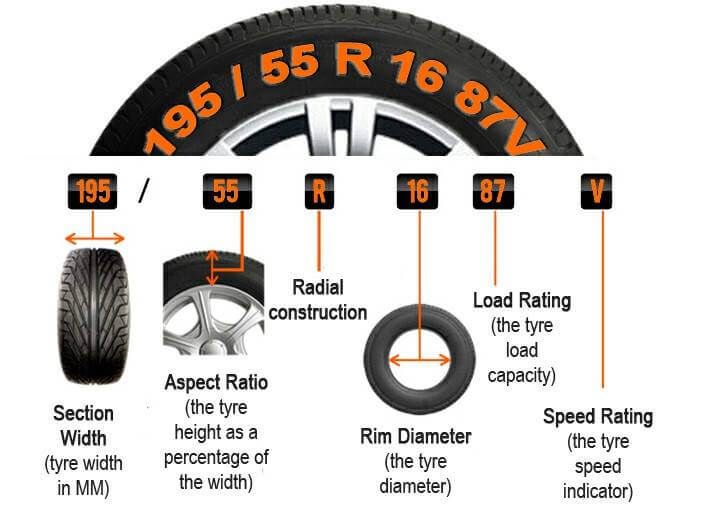
The length of the cutting part of the tire differs from its total length. The length of the tire is considered to be the length of the cut (working part) - this is the distance from the front of the saw to the rounded tip of the nose of the tire. This size is rounded to the nearest inch or centimeter. An inch is denoted as "equal to 2.54 cm.
For example, the length of the cutting part of the tire for the Stihl MS180 chainsaw is 40 cm.
40 cm ÷ 2.54 = 15.7 inches. Rounding results in 16" (in.).
For chainsaw Stihl MS180 fits 16 inch (40 centimeter) tire Oregon article 160SDEA074
Print PDF catalog of shanks in 1:1 scale, you will need 7 A4 sheets for printing.
If the file does not open, you will need Adobe Acrobat Reader to view PDF files.
Download Oregon tire shank catalog.
Be sure to turn off scaling before printing.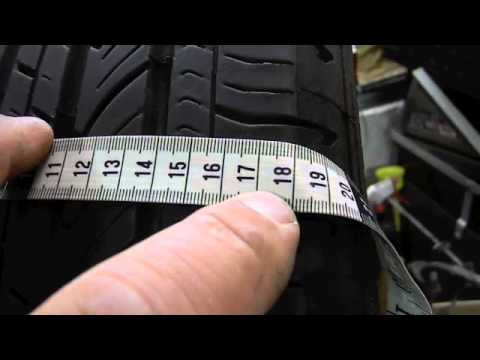
To determine your tire shank part number, please attach your shank to the printout.
| Code: А041 Groove width: 8.2 mm Shank designed for electric and chainsaws: | |
| Code: A061 Groove width: 6.4 mm Shank designed for electric and chainsaws: | |
| Code: A064 Groove width: 6.4 mm Shank designed for electric and chainsaws: | |
| Code: A074 Groove width: 8. Shank designed for electric and chainsaws: | |
| Code: A218 Groove width: 6.4 mm Shank designed for electric and chainsaws: | |
| Code: A318 Groove width: 6.4 mm The shank is designed for electric and chainsaws: | |
| Code: K041 Groove width: 8.2 mm Shank designed for electric and chainsaws: | |
| Code: K095 Groove width: 8. Shank designed for electric and chainsaws: | |
| Code: K153 Groove width: 8.1 mm Shank designed for electric and chainsaws: Dolmar | |
| Code: D009 Groove width: 9.0 mm The shank is designed for electric and chainsaws: | |
| Code: D024 Groove width: 10.0 mm Shank designed for electric and chainsaws: | |
| Code: D025 Groove width: 12.1 mm Shank designed for electric and chainsaws: | |
| Code: D033 Groove width: 14. The shank is designed for electric and chainsaws: | |
| Code: D176 Groove width: 8.0 mm Shank designed for electric and chainsaws: | |
| Code: D196 Groove width: 8.2 mm Shank designed for electric and chainsaws: | |
| Code: E031 Groove width: 14.0 mm The shank is designed for electric and chainsaws: | |
| Code: E099 Groove width: 14.0 mm Shank designed for electric and chainsaws: | |
| Code: B083 Groove width: 8. Shank designed for electric and chainsaws: |
← How to find out the size of chains for a chainsaw: marking table | How to sharpen a chainsaw chain with a file →
Control of the chain movement with fixing its tension and regular lubrication is provided by one simple and absolutely irreplaceable element. The saw bar belongs to the category of consumables, since it takes on peak loads that deform and seriously wear it out as it works. This article will briefly and clearly show what criteria to select a new part, how to install on a tool and make easy repairs.
The general idea of the structure of any element consists of knowing its constituent parts and understanding their interaction. To operate the tire as long and efficiently as possible, it is useful to have a clear picture of the principle of its operation. The functional role of the part in the chainsaw system is extremely clear to anyone who has observed this tool in operation. First of all, the tire serves as a guide for the chain, as well as a means of tensioning and lubricating it.
At a cursory examination of the element, one gets the impression that it is cut from a single sheet of metal. In fact, the tire consists of 3 plates (2 side and one central), securely fastened with rivets. The central element is an order of magnitude shorter and thinner than the side ones, which is due to the formation of guide grooves into which the chain shanks are immersed. The free space in the front part (on the nose) of the tire is occupied by a driven sprocket, which provides free play of the chain when tensioned.
For ease of movement and wear protection, the sprocket is mounted on a bearing whose central part is riveted to the side plates. For maintenance of the mechanism, expressed in cleaning and lubricating the rollers, special holes are provided on both sides of the tire.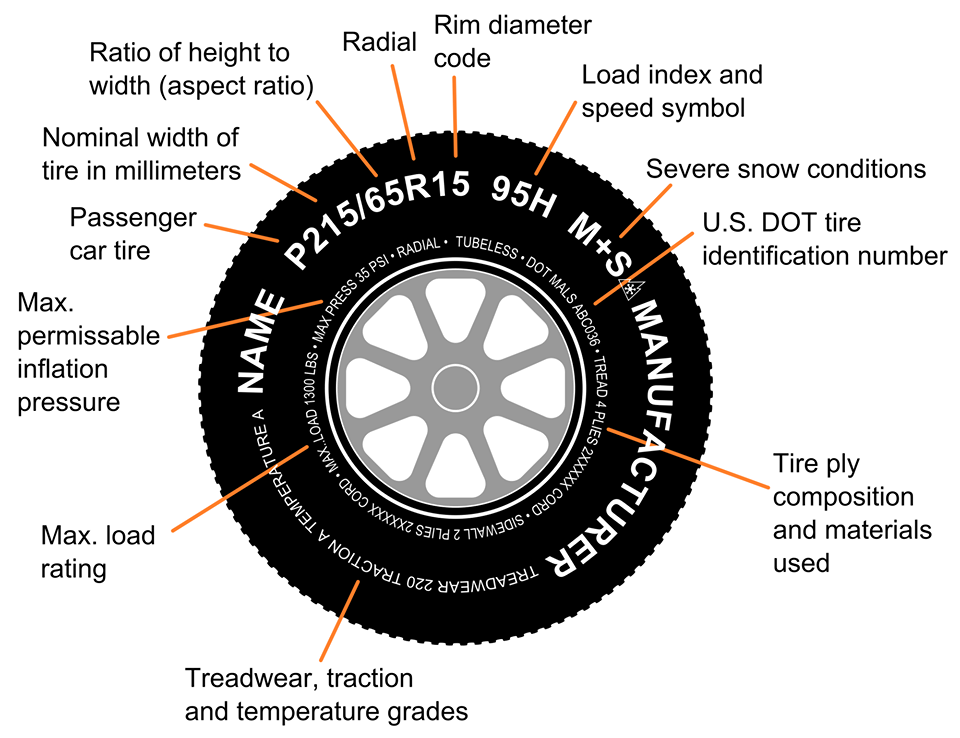
There are a number of technological holes in the tail section of the guide. The largest, elongated opening ensures even installation of the blade, along two studs fixed on the engine crankcase. In one of the 2 symmetrically located holes, the chain tensioner pin is inserted, and the oil pump fitting enters the smallest one, supplying lubricant to the chain shank during operation.
The variety of chain guides is quite extensive, but it cannot be called overly impressive. Modern saw bars are classified by slot width, blade length, driven sprocket pitch and shank. Based on the values of these indicators, there is a choice of replaceable peripherals. We will analyze each parameter in order, starting with the most important.
The length of the saw blade determines the maximum insertion depth in the material and the allowable chain size that can be attached to it. According to the standard, the values are expressed in inches and are indicated on the part itself (in the area of \u200b\u200bthe shank), along with the recommended number of links. Standards vary depending on the pitch of the driven sprocket. Data on the most common varieties are shown in the following table.
In order to avoid a decrease in the motor resource of a household saw, it is highly recommended not to install a long guide (more than 45 cm) on it. The larger the area of contact with wood, the harder it is for the engine to work, thus, the faster the wear of the CPG. Many Chinese devices are equipped with 45 cm tires in order to draw attention to the product. Of course, the tool copes with the load, but if you install 38 cm on it, it will become much more cheerful.
Bar shank can be generic or branded which will not fit most saw models. Each manufacturer recommends its equipment, and sometimes frankly imposes products, making it impossible to use other options due to the unique arrangement of technological holes. For example, when installing a Stihl bar on a saw of any other brand, there are serious problems with putting on the chain, accompanied by inconsistencies in the tension and lubrication holes.
Recommendation. When choosing a tire for a simple, household chainsaw (not Stihl, Makita, Husqvarna), take a closed-type universal shank. For reliability, be guided by the old guide or by the model of the tool.
The driven sprocket of the bar allows the blade to move freely in the bend. By standard, the teeth can be sharpened to 0.325 and 3/8 inch chain pitch (0.404 and 1/4 are rare). Even with the possible combination of elements of different sizes, it is strictly forbidden to work with such a combination, since wear and tear and the likelihood of breakage increase sharply.
You can find out the required sprocket pitch from the marking on the side plate of the tire. If the data is erased, it is possible to measure the chain in use by knowing the distance between the centers of the first and third rivets, anywhere. Converting inches to metric gives the following values: 0.325” = 8.25mm, 3/8” = 9.3mm, 0.404” = 10.2mm, and 1/4” = 6.35mm.
The slot width determines the dimensions of the shank that can be inserted into it.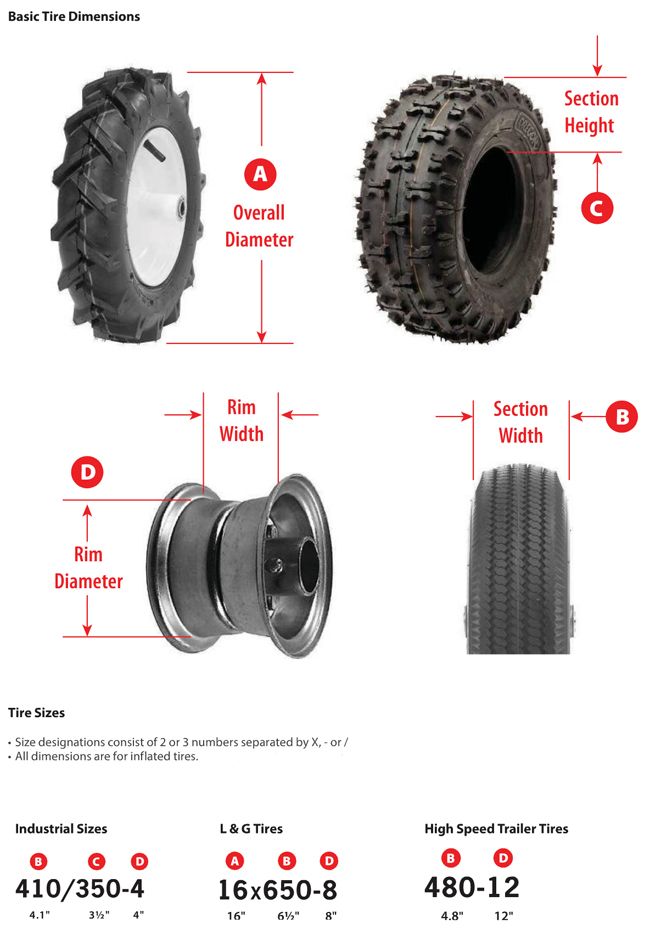 This indicator indirectly indicates the class of the device. Simple, household guides are equipped with chains with the thinnest shank - 1.1 - 1.3 mm. Hobbyist rigs have a wider slot, 1.4 to 1.5 mm, while professional saw bars can accommodate 1.6 to 2.0 mm shanks.
To increase stability and work efficiency, even minimal play must be eliminated. The location of the chain in the guide should be tight, but without obstructing movement. You can find out the required groove width by measuring the chain shank with a vernier caliper, or by experimenting by attaching it to a new tooling.
By finding out the values of all the above parameters, you will form a clear picture of the required part, and the selection error will be eliminated. As a final touch, it's helpful to know how chainsaw bar length is measured and how important the number of chain links is. A brief discussion of the topic is below.
The correct choice of guide depends on the knowledge of specific indicators that reflect the design features of the part. The most important and controversial parameters include the length of the chainsaw tire, which is measured in two ways.
The fastest, but not very accurate option is to use a regular ruler or tape measure. The main thing is that not the entire canvas is measured from beginning to end, but only its working part, which begins after the end of the main fastening recess (approximately). Divide the resulting value by 2.54 (centimeters to inches) and round the number to one of the generally accepted standards: 10”, 12”, 14”, 16”, 18”, 20”. For a complete list of current sizes, see the table above.
The second method involves the calculation using the existing circuit. First you need to find out the pitch by measuring the distance between the centers of any 3 rivets and dividing the value by 2 (8.25 mm is 0.325 inches, and 9.3 mm is 3/8”). Next, we count the number of links along the shank. For 3/8” the value can range from 40 to 68, and for 0.325 pitch it can range from 64 to 76 chain shanks. Knowing the exact number of links and pitch, we go to the above size table and determine the length of the tire by comparing 2 values.
The process of equipping a tool with a saw set does not require technical skills and is described in detail in the technical documentation of a specific model. In the absence of such a guide, you can always refer to the following instruction, which briefly and demonstratively demonstrates each action. The explanation is based on a classical design that is relevant for most devices.
1. The saw bar is located on the right side of the housing, under a plastic cover secured with 2 nuts. We unscrew both and remove the protection.
2. On the 2 studs that held the cover, we install the tire, passing them through the longitudinal recess in the shank.
3. Put on the chain, placing the shanks on the drive sprocket and in the grooves of the bar. The cutting teeth, in the upper half, should face forward.
4. Replace the protective cap, but do not screw it in yet. For an accurate fit, slide the chain along the groove of the guide by hand.
5. After making sure that the blade moves freely, you can install the fixing nuts on the studs and tighten them slightly by hand (so that the cover does not hang out). We do not tighten, because we need freedom of movement of the tire.
6. It remains to tension the chain by turning the special screw located on the end or front side of the protective cover. Optimal tension, allows you to effortlessly remove the 3 chain shanks by grasping the link in the central part of the bar.
Please note. A new chain stretches fairly quickly and requires constant checking of tension. Monitoring the state of the headset is necessary not only for safety, but also to improve work efficiency. A well-tensioned chain moves without difficulty, and at the same time does not vibrate at the points of contact with the guide.
Among the few problems that arise during the operation of the guide, the most urgent is associated with wear or deformation of the driven sprocket. This is a relatively simple nuisance that can be repaired at home. It is expressed in the jamming of the sprocket or the large backlash of the chain shanks with teeth. For repairs, you will need a welding machine, a grinder and a suitable repair kit.
If buying a replacement sprocket is like buying a new tire, you can try rebuilding the old one. Actual when jamming, when the rollers are scattered, erased, but the part itself can still work. An ordinary drill with a diameter of about 2.5 mm can act as a source of replaceable elements (to match the standard rollers).
Just clamp the drill in a vise and cut into jewelry washers (you can use abrasive, but be careful with diamond). To prevent small parts from flying apart, it is better to install a magnet nearby, which will attract the elements when cutting. To get a complete set of rollers and fill the circle, you will need about 2x standard length drills. After sawing the required number of rounds, we put them in an asterisk and proceed to paragraphs 3, 4 of the previous instructions.
The described restoration method will extend the life of the guide, but soon there will be a problem with the wear of the sprocket, and it will have to be changed (or the entire headset). A more complete demonstration of the restoration process is presented in the next video, which clearly shows the entire do-it-yourself chainsaw tire repair. The video, with useful comments by the author, conveys all the main aspects of the work.

 2 mm
2 mm 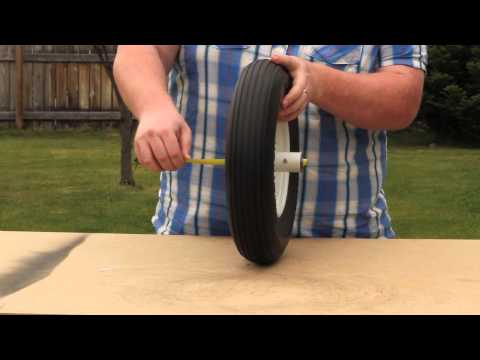 2 mm
2 mm  0 mm
0 mm  0 mm
0 mm