Home » Tire Patches vs. Tire Plugs: Which Is Better?
What are tire patches and tire plugs? Well, they are useful when you get a flat tire. In such cases, there’s a good chance that a minor repair can get you back up and running again quickly.
Three of the most common of these “minor repairs” are:
The first option, a tire plug, is cheap and fast to administer. Plugs work best when you’ve run over a nail or similar blunt object that punctures the tire and causes it to leak air. After the nail or sharp object is removed, the plug can be inserted into the hole to fix the leak. While plugs of the old days were problematic and served more as a band-aid type of repair than anything else, many plugs available today actually vulcanize to the tire to provide better stability.
Tire patchA patch, on the other hand, is considered to be a better quality tire repair. However, it’s a bit more laborious of a repair than a plug. Patching a tire actually consists of removing the tire from the rim and then using a die grinder to clean up a 2-inch diameter around the puncture to give the patch enough of an area to bond with. The patch is then pushed from inside the tire through the outside of the tire, sealed, and let dry.
The best modern tire repair solution is a plug/patch combo product. This is one piece and it combines the best benefits of both options.
Keep in mind that not all tire damage can be repaired. For example, tire bubbles are a dangerous problem that will result in needing new tires.
The question is: Can or should you repair a tire on your own?
If you purchased your tires from a mechanic or tire-specific business, then chances are they will either plug or patch your tire for free if it develops a leak and a patch or plug can resolve the issue.
Tire plugMany tire-specific businesses will also fix your tire via these means as a way of developing goodwill with you, the customer, so that when it comes to buying new tires you’ll consider purchasing that next set from them.
However, outside of these two scenarios, tire patching and plugging aren’t necessarily expensive (usually only $10-$20 a repair), but more of an inconvenience.
Considering this, patching your tires on your own might not be worth it.
DIY patching or plugging is still an option, yet we’d advise you to be absolutely sure of what you’re doing before going the patching route.
The plugging route is fairly simple (and cheap, as plug kits can be purchased for just a few dollars), as all you really need to do is locate the hole and insert the plug. Going the patching route is also fairly inexpensive, but there’s a lot more involved.
For instance, patching a tire consists of:

Plugs won’t usually work when a puncture is near the sidewall, as it likely won’t be able to completely seal the area. Plugs are also ineffective when the puncture is on an angle. Patches are usually the better-recommended option, but they do have their limitations. For instance, if a puncture is greater than a quarter-inch in diameter, a patch will likely be ineffective and the tire may be too damaged to repair.
What’s better – tire plugs or tire patches?Plugs, when installed correctly and in the right situations, can help a tire last for up to 25,000 additional miles.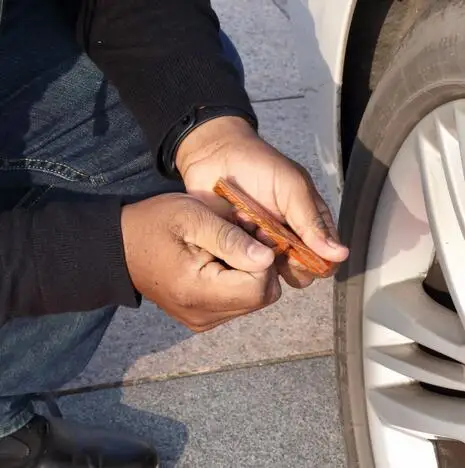 But while plugs can be effective, usually patches are considered to be the better, more secure option of the two. The patch/plug combo is the safest and most reliable option.
Yes and no. Years ago they were and if they aren’t installed correctly or in the right situations today, they still are. However, today’s plugs vulcanize to the tire and can help it last for tens of thousands of miles more.
[lasso ref=”run-flat-tires-link” id=”1904″ link_id=”1211″]
Posted by Jefferson Bryant Know How
Flat tires tend to happen at the worst time in the worst places. If you are on the road or outside of normal business hours when your vehicle has a flat and the spare is missing or no good, you might feel stranded, but there is an option—a tire plug kit. This is something that anybody can do, you just need the right parts.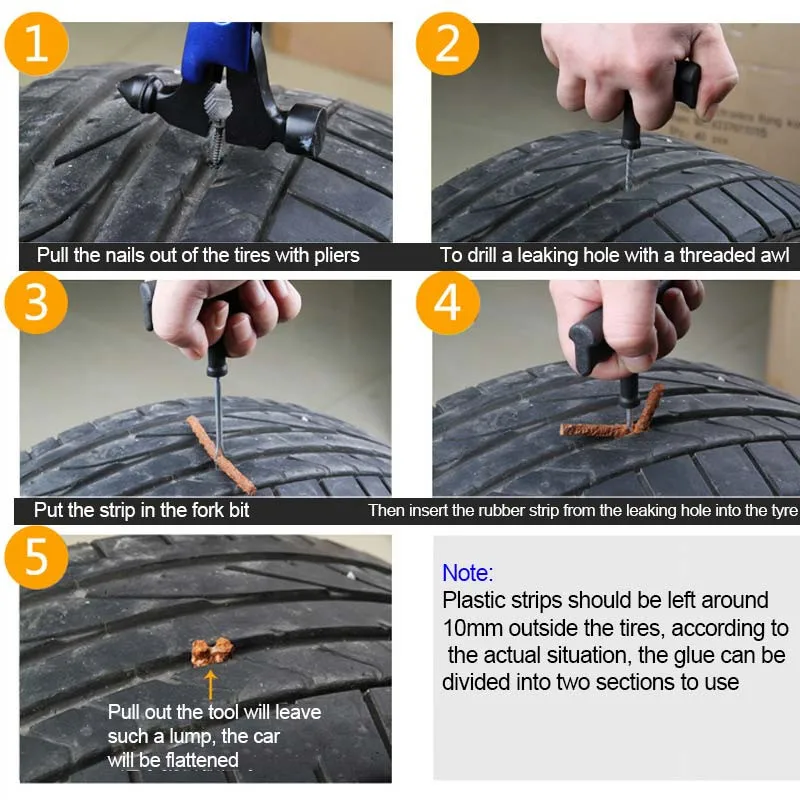
Liquid tire repair might get you down the road, but it could make your tire repair difficult and possibly damage the TPMS (Tire Pressure Monitor System) unit inside the rim itself depending on the formula. The best solution for an emergency tire repair is a tire plug. Made from cork and a gooey adhesive that keeps it place and seals the tire, a tire plug repair is an excellent way to get your car back on the road until you can get to a tire shop for a proper internal patch.
Installing a plug in your tire works for pierced tread area only. You cannot fix sidewall damage, compression breaks (from potholes, gravel roads or curbing) or any other type of catastrophic tire damage. The most common road hazards you will find are punctures from nails and screws. Fixing these issues are perfect for the good old fashioned tire plug. If you are wondering how long does it take to plug a tire, then the answer is just a few minutes. Most of the time is spent preparing to perform the plug itself. Here’s how to plug a tire with a plug kit.
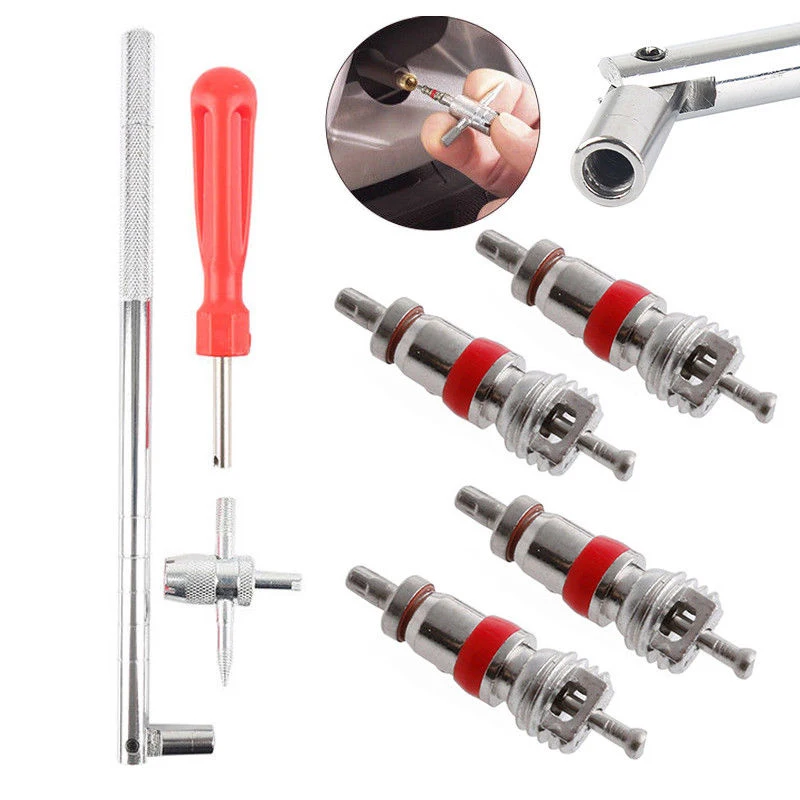
You will need the following to make a tire plug repair:
There are all kinds of tire plugging kits, but you want the most complete tire repair kit which comes with the plugs, the installation tool, and the reamer tool. Some flat tire repair kits just come with the plugs and installer, but the reamer tool is a necessary component to a good repair. Some tire plugging kits also come with liquid cement. You can use it or not, but the cement helps make a more permanent repair.
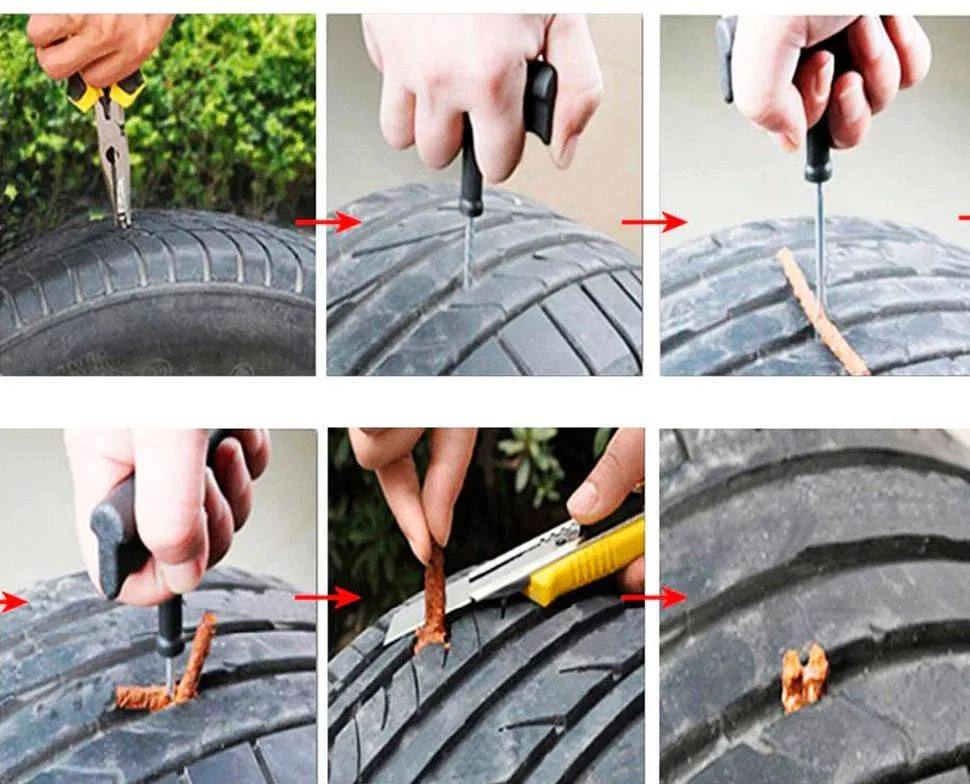
Locate the puncture. If you don’t see or hear the puncture, spray some soapy water on the tire and look for bubbles.
Remove the offending item. This is usually easy, but sometimes the nail or screw is worn down, making it hard to get a bite on it. This is where the side-cutters come in really handy. You will want to position the tire where you get the most leverage.
Side cutters work best for removing these items, as they can grip small round objects better than regular pliers.Insert the reamer. This will take some effort, as you have to push it through the steel belts. Use a twisting motion and push it into the tire. Once the reamer is through, saw it in and out of the tire a few times to really make a nice hole for the plug. Yes, it is counter-intuitive, but it is necessary.
The reamer requires some effort. You will hear the belts scrubbing the reamer as your break through.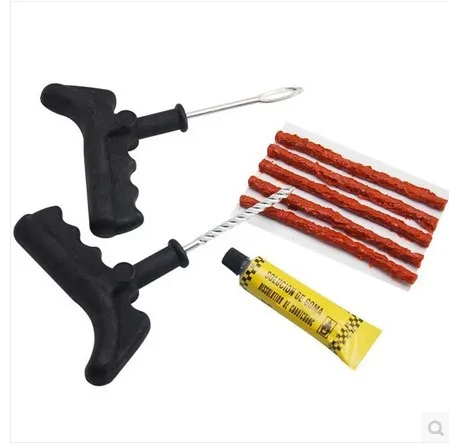
Push the reamer all the way and then saw it in and out a few times to make a clean hole.
Prep the plug and installer. Pull a plug off the strip and push it through the eyelet of the installer tool. The pliers will make this easier. Push a little through, grab it with the pliers and pull the plug halfway through the eyelet.
Pull a cork strip from the tire plugging kit and grab the installer tool, which looks like a large needle with a slit in the eye.Threading the sticky cork tire repair plug is not easy, but if you can get it squished into the hole, you should be able to pull it on through. The side cutters might help.
Insert the plug into the tire. If the kit has liquid cement, apply some to the plug before inserting it into the tire. Simply push the installer into the hole in the tire until the plug is about 3/4 of the way in. Twist the installer tool 90-degrees and pull it out. The plug will stay in the tire and the tool will come out nice and easy. You may trim away the excess plug or leave it to wear away as you drive.
This is what you should see when the tire plug is installed.
Once the tire repair plug is in you can now twist the handle 90-degrees and pull the tool out.
Fill the tire to the proper PSI. If you have a portable air compressor, this will make things easy. However, if you do not, you need to get air very soon.
All done. You can trim the tire plug or leave. You will need air, so don’t go driving until you have the tire aired up.Every automobile you own should have an emergency tire plug repair kit in the tool box, along with a portable air compressor. These emergency repairs are quite good, but for a long term repair, you should take the vehicle to a tire shop for a proper repair as soon as possible. They will know the best way to patch a tire for your type of damage.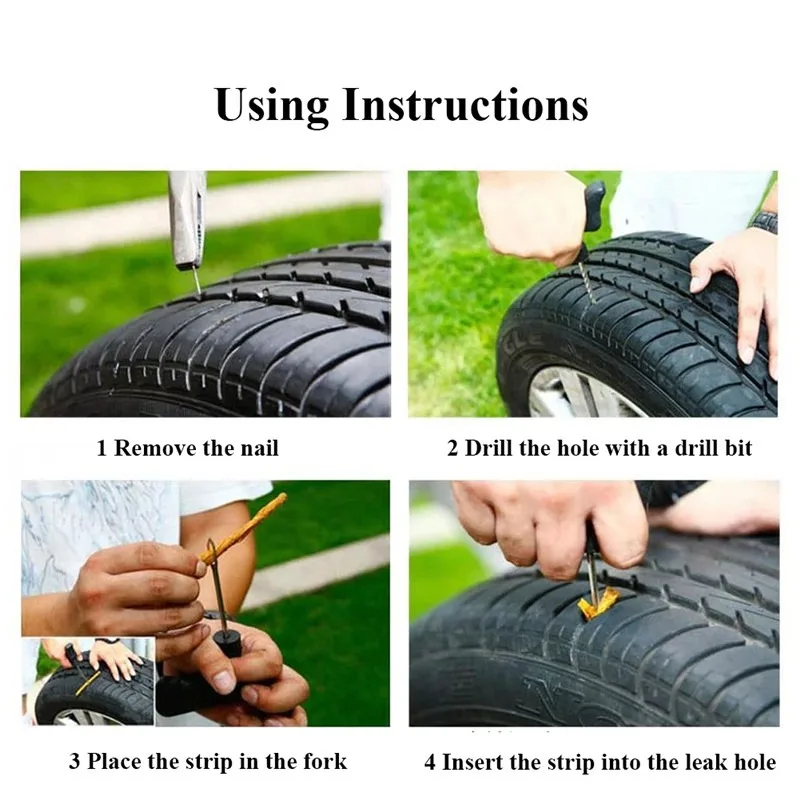
Check out all the steering & suspension parts
Categories
Know How
Tags
emergency repair, flat tire, flat tire repair, patch flat tires, sealant, tire maintenance, tire plug kit, tire pressure, tire safety, tire wear, tires, wheels
A life-long gearhead, Jefferson Bryant spends more time in the shop than anywhere else. His career began in the car audio industry as a shop manager, eventually working his way into a position at Rockford Fosgate as a product designer. In 2003, he began writing tech articles for magazines, and has been working as an automotive journalist ever since. His work has been featured in Car Craft, Hot Rod, Rod & Custom, Truckin’, Mopar Muscle, and many more. Jefferson has also written 4 books and produced countless videos.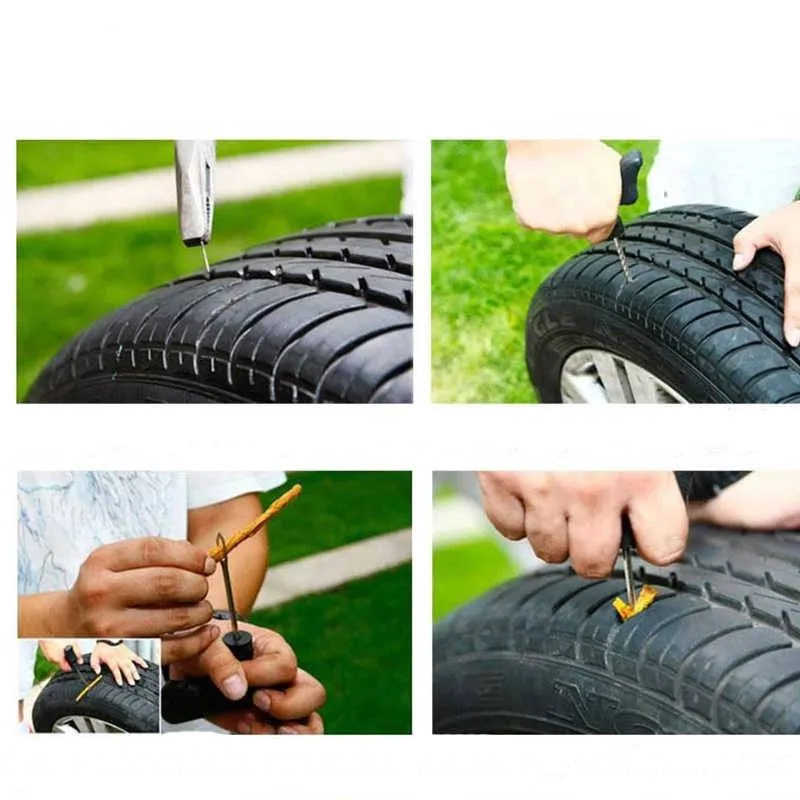 Jefferson operates Red Dirt Rodz, his personal garage studio, where all of his magazine articles and tech videos are produced.
For independent replacement of tires in a baby stroller we will need:
So let's get started. To facilitate the process of changing a tire or tube, remove the wheel from the stroller. Usually this is not a problem. On modern wheelchairs, it is necessary to press just one button in the middle of the wheel and the pins on the hub will move apart, freeing the rear wheel from the grooves:
If it is a front steered wheel, it must be removed along with the fork. To do this, clamp the metal tab and pull the wheel from the baby stroller down:
Then you need to unscrew the right and left screws from the front wheel fork using two Phillips screwdrivers and remove the axle by pushing it out.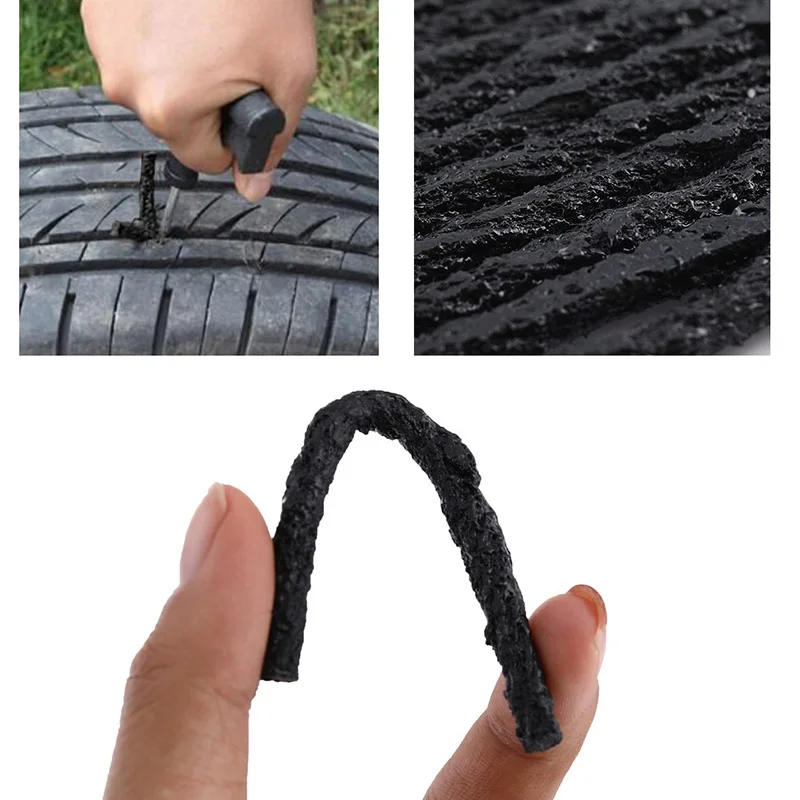 Now the wheel can be removed and nothing will interfere with us when replacing a tire or camera. Some front 10 inch wheels have split rims. It is necessary to unscrew the screws and the wheel rim will be divided into two parts.
After removing the wheel from the baby stroller, remove the cap and deflate the chamber inside the tire by pressing the spool (thin pin) inside the nipple.
Removing the tire
Now we need the mounts. Pry off the tire with one pry bar, tucking it between the rim and the tire. At a distance of about 10 centimeters, insert the second and remove the first, but so that the cord does not jump back. Insert it further in a circle and pry the tire of the baby stroller again. Do this until the entire side of the tire is out of the wheel rim.
Use your finger to push the nipple into the wheel rim so that it does not interfere with the tube removal.
Remove the camera.
The entire tire can then be removed from the wheel rim without much difficulty.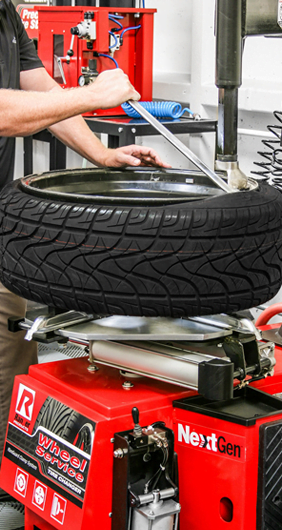
Perform a visual inspection of the tube and tire. If the wheel has deflated before, immerse this chamber in a basin of water and identify the place from which it releases air. This place can be sealed with a patch, but it is easier and more reliable to change the old one for a new one by ordering it in our store.
Putting back together
Make sure that the pressure is 1.8-2 atmospheres, otherwise the tire will quickly wear out and tear.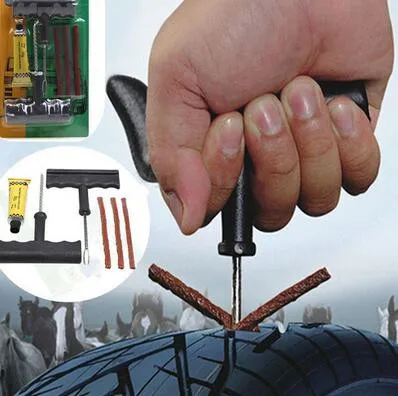
You can visually see how the process of replacing the tire and the camera of the front (steered) wheel, using the example of the Zippy baby stroller:
The following video shows the replacement of the tire and the camera of the rear wheel using the example of the Zippy baby stroller:
Both videos are from YouTube, user Malysh Servis
That's it. We hope that our article will make it easier for you to repair the wheel of a baby stroller. Walk to your health!
A safe environment is created to protect yourself from accidental domestic injuries. We will tell you what ways there are to secure every corner if there is a child at home.
A safe home is one that minimizes the risk of injury. This is a place where you can leave your child to play for a while without supervision. And do not be afraid at the same time that he may accidentally hit his forehead on the corner of the table, get to important documents or open the window on his own. An environment that is familiar and invisible to adults can be dangerous for a child who is fully aware of the world.
Special accessories will help you increase the level of safety in your home. These are inexpensive and easy-to-install useful household items that will save you from trouble. The most popular are:

In this article we will tell you what each of them is useful for and what features of accessories and their application you should pay attention to before buying.
Flexible soft corners and tape, which are attached to the corners of furniture, will protect not only small ones, but also adults from bruises. It is especially useful to have additional corner protection when the children in the family take their first steps. At this time, they often lose their balance and fall.
They are made using health-friendly foam rubber with increased strength and elasticity or soft silicone.
Tape is available in lengths of 1 and 2 meters, corners of various shapes. The color of the tape and corners is easy to match the color of the furniture. These accessories are attached to a special Velcro adhesive that leaves no residue.
Reliable obstacle on the way to window openings - window locks.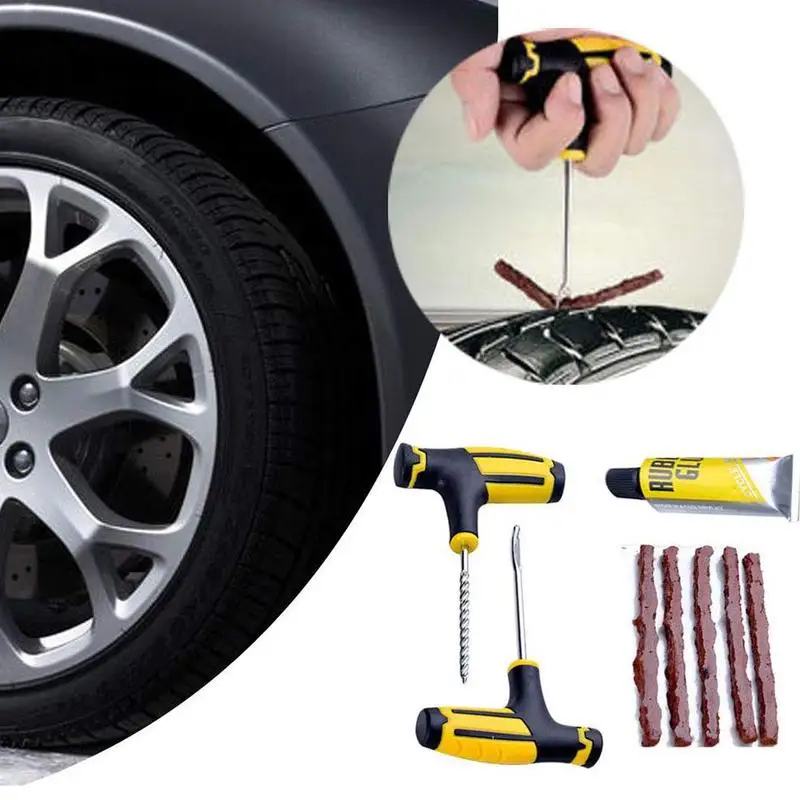
A wide variety of window locking devices can be found on sale, which will prevent children from opening the window out of curiosity or pampering without parental permission.
The locks restrict the movement of the sashes - it will no longer be possible to open the window wide and ventilate the room in a quick way. But safety comes first.
The classic method can be used to lock the window: the handle-key. In the place where the handle should be, a “closed” pad and a rotary mechanism are mounted. The window can only be opened using the key handle.
See also: How to choose a playpen
An alternative option would be a handle fixed in the window with a button (“pressed-turned”). But a child can quickly learn to bypass such protection.
There is also a special "child" lock for the window. It is installed at the bottom of the frame, consists of two parts that are securely fastened together - a key is used. This option allows you to use the window depending on the weather - open for ventilation or completely close. In this case, you only need the key to open the window wide open.
Among the obvious disadvantages of this protection option: the lock may not fit the installed window. In this case, it is worth considering the method of installing the lock in the frame - mortise mounting.
Cabinet doors are like a magnet for little ones. To prevent injury and make cabinet shelves inaccessible, use special locking devices.
The interior door stopper is useful to keep the door from slamming shut and pinching your child's fingers. The latch will also help out in the case when the elements of the door, when fully opened, can damage walls or furniture.
There are two types of door locks:

Another type of potentially hazardous item is household appliances, plumbing fixtures with lids, and small boxes. Universal blockers will help to fix the microwave oven, refrigerator, dishwasher and even the toilet bowl.
To prevent children from getting to detergents, sharp and breakable objects, a furniture silicone blocker is useful - a strap that is fixed with fasteners on the sides and connects a cabinet or chest of drawers door to the body, or two hinged doors to each other.
Attach bollards to surfaces with a strong adhesive backing. After removing the elements, the adhesive is easy to remove, it does not leave marks on the surface.
Outlets are a constant attraction for children, so it's important to protect your child from possible electric shock. Plugs for sockets will help to avoid trouble.
Most often, the plug for the socket is a plug, the size of the socket socket.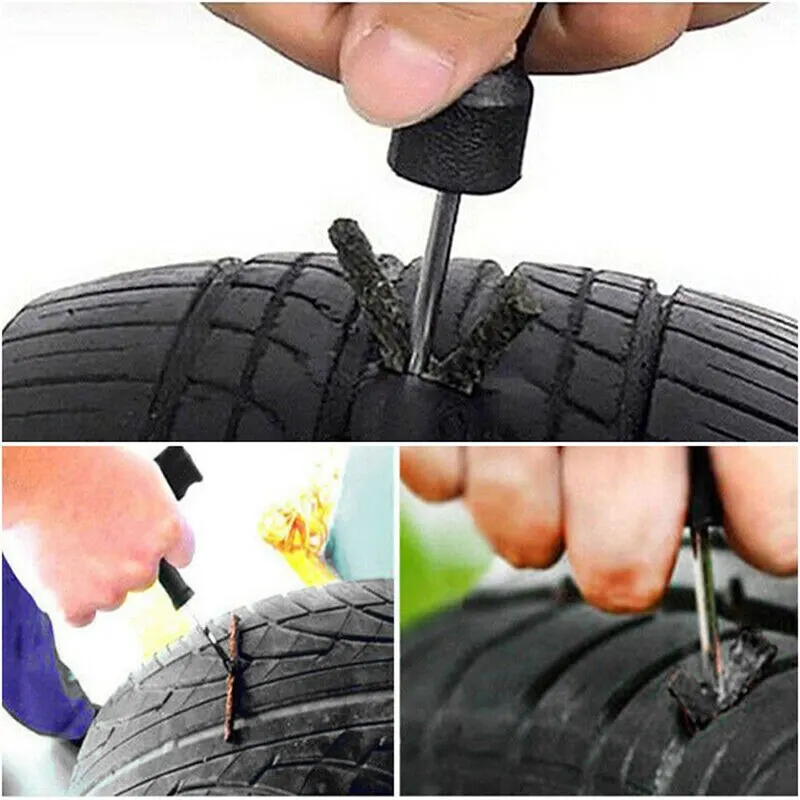 The pins inserted into the outlet holes additionally hold the plug, so it is almost impossible for a child to pull it out. Plugs are usually made of plastic with an additional sealed gasket made of rubber or silicone.
More advanced socket covers use a locking key.
You can also find a simplified version of such protection on sale - the task of decorative plugs is to “hide” the socket in the interior.
Among the home security accessories you may find useful: Will guarantee that the little explorer will not tip the TV over by pulling on it;