We are known for our quality cheap tires in Rochester NY but did you know we offer a variety of other services as well? At Hooper’s Tire Outlet, we are all about tires and everything to do with tires, which is why we offer valve stem replacements. We know not everyone is as well versed in tires as we are, but we value our customers and want to make you are aware of this very important part of tire care.
A valve stem is a self-contained valve that opens to let air in the chamber of the tire. It opens once an air pump is pushed in and automatically closes immediately following the removal of the pump. It seals whatever air has gotten inside, preserving the pressure of the tire. They are most commonly used in automobile, motorcycle, and bicycle tires. A Schrader valve, which is a type of valve stem, is the most common valve used on automobile tires.
They are valve stems that are attached to poppet valves with a spring threaded through them so that they close automatically to preserve optimal tire pressure.
It can be tricky to identify a leak in your valve stem. It will have all the symptoms of a flat tire, which could lead you to googling quality cheap tires in Rochester NY, but get your tires checked for holes first! It is possible you could have a hole in your tire. But if they have no leaks, you could be dealing with a valve stem leak. A valve stem leak would act just as a hole would, slowly letting air loose through the base or valve body. Leaks in the valve stem could happen for a vast amount of reasons, but the main reason up here is from road chemicals and corrosion.
It’s funny you asked. Replacing valve stems is one of the other various services we provide, besides our incredible deals and services with quality cheap tires in Rochester NY, of course. If you are looking to be preventative for the future, we also offer valve stems with TPMS. TPMS is a tire pressure monitor system, which works with your valve to monitor the pressure of your tire, so you know when it is a leak in your tire or valve stem. We can match you up with the right valve stem replacement for your tire in either of our locations.
The valve stem itself is fairly inexpensive, but trying to do it yourself can be personally costing. At Hooper’s Tire Outlet, you can purchase the valve stem and have it replaced at our shop for only $15. And, with the purchase of any of our quality cheap tires in Rochester NY, we will replace the valve for you for only $5. Valve stems with TPMS installations are merely $30 or $25 with any tire purchase. You can also get a free sensor scan with our installation services. We pride ourselves on providing quality service to all our customers and hope we can do the same for you!
No! Valve stems can be a fairly easy repair to your tires, especially if that is the only problem with them. But feel free to check out our quality cheap tires in Rochester NY at Hooper’s Tire Outlet anytime! We are more than happy to help you find the best deal for your tires today!
“A tire only loses air if it’s punctured.” This is a common misconception that we have all had or heard and yet the reality is quite different. Indeed, a tire can lose air even without a puncture, as for example in the case of a crack in the valve that is used to inflate your tires. A punctured valve is difficult to detect, and not taking care of it in time can have real consequences for your tire, but also (and above all!) for your safety. Blackcircles Canada, your online tire specialist, offers below a complete guide to the causes and consequences of a punctured valve, and how to repair a leaking valve stem.
A valve is a pin located on the outside of the tire, through which the tire can be inflated/deflated. It has a mechanism consisting of a spring-mounted valve that closes tightly with the air pressure inside the tire. Over time, the stem valve may become brittle and cracked, which may increase the risk of air leaking through it.
When the stem valve leaks, the affected tire is no longer able to retain air. Depending on the extent of the damage, the air will leak out slowly or more quickly. In both cases, the valve must be replaced.
If the air leakage is slow, you will be subject to the problems encountered by drivers driving with underinflated tires. Internal damage that can shorten the service life of the tire by up to a quarter, increased fuel consumption due to higher rolling resistance: the tire will damage faster, and your energy-efficiency will be significantly lower. The tire will also have poorer traction and the stability of your car will be reduced when cornering, not to mention the more pronounced deformation of the tire that increases its internal temperature, which can cause it to burst. Finally, an under-inflated tire increases the risk of hydroplaning. Tire pressure is thus very important!
First of all, make sure it is the tire valve stem that is leaking. To do so, there’s a very simple trick! Apply a mixture of water and dishwashing soap to the valve with the cap removed. If bubbles start to appear, your valve is leaking. If this is not the case, and there is a definite air leak, it will be located elsewhere on the tire.
Step 2: Gather the right tools before you start!Before you begin, make sure you have all the necessary equipment to complete the replacement of the faulty valve stem.
For this, you will need the following:

You are now ready to start the process!
Step 3: Loosen the nuts on the wheel you are going to work on.To do so, use the wrench mentioned in the previous step to loosen each of the lug nuts holding your wheel in place. Do this while the car is still on the ground.
However, for certain models of vehicles, it is possible that the wheel nuts have an anti-theft ring. If this is the case, you’ll have to use the appropriate special key to remove the locking nut(s).
Step 4: Raise your vehicle with the jack and then remove the wheel.First and foremost, make sure the handbrake is applied so that your vehicle is completely immobilized. Then, use your jack to lift your car. Be sure to position it on the right part of the chassis so that the car is properly supported. This will prevent any damage to the car and any bodily injury. Once your car is lifted, secure it on jack stands. Unscrew the wheel bolts completely, then remove the wheel. Finally, place the wheel on the ground flat, with the outside of the wheel facing up.
If you have not already done so, remove the valve cap. Then remove the valve stem core using the valve stem removal tool to release the air from the wheel, which should normally deflate completely on its own.
Step 6: Separate the tire’s bead from the wheel.For this step, use the sledgehammer in the following way: hit the tire sidewall with the sledgehammer in the same spot until you hear a crack or popping sound, and see the inside lip of the tire visibly break loose from the rim. This means that the tire has been successfully detached from the lip of the wheel.
Once the tire bead has been broken, continue hitting with the sledgehammer around the tire to detach the sidewall around the entire circumference of the wheel.
Step 7: Remove the tire from the rim.Once the sidewall of the tire is separated from the outer edge of the rim around the entire circumference of the wheel, insert your tire iron between the edge of the rim and the inside lip of the tire, and then pry upward to pull the lip of the tire over the edge of the wheel. Once you have pulled the lip of the tire over the edge of the wheel, work the tire iron around the rim until the entire lip of the tire is off the rim.
Once the sidewall of the tire is completely above the wheel, grab it by its removed lip and pull it upward so that the opposite lip that was at the bottom of the wheel is now touching the top edge of the rim. Use your tire iron again by inserting it between the tire’s lip and the edge of the wheel and pry upwards to pull the lip over the edge of the rim. As before, work the tire iron around the edge of the wheel until the tire is removed from the wheel.
Step 8: Remove the defective valve stem and replace it with the new one.Once the tire is separated from the rim, it is time to remove the valve stem. To do this, first pull out the valve stem free from the wheel using the needle-nose pliers. Once this has been done, install the replacement valve stem from the inside of the wheel. Once it is in position, use the needle-nose pliers again to pull it through into its right place on the wheel.
Once the stem is in place, it is time to put the tire back on its rim. To do this, start by pressing the tire down over the rim until the bottom bead clears the edge of the rim. The aim here is to return the lower sidewall of the tire to its original position on the wheel.
Then press the upper sidewall of the tire down underneath the edge of the wheel. Then tuck your tire iron between the tire sidewall and the rim edge and use it to make the opposite movement to the one you used to pull the tire sidewall out of the rim. Once the bead clears the lip of the wheel, use the tire iron to work your way round the entire wheel until the tire is completely installed on the wheel. Then inflate it to the correct pressure using the air compressor.
Step 10: Make sure there are no other leaks, and mount your wheel back on!Once the tire is inflated to the correct pressure, check for other leaks. If all is well, mount the wheel on your vehicle and bring it down by lowering the level of the jack stands until the repaired wheel touches the ground and you can safely remove them.
Ultimately, it is very important to make sure your tires are free of air leaks to maintain proper air pressure at all times. In the case of a slow air leak, the consequences can be dramatic. If the air leak is due to a faulty tire valve, you will definitely need to replace it. You can either follow the above procedure on how to repair a leaking tire valve or take it directly to a specialist. If, on the other hand, you need to change the entire tire, consult our selection of tires adapted for your car directly online on our website!
Tire Installation 101: When and how to change your tires?
Author Teplov Pavel Reading 3 min. Views 11 Posted by
Your tire is leaking and you can't figure out why? If you've checked the nail but haven't found it, it may be time to complete your valve stem replacement.
There's no reason to remove a tire when changing a valve stem - and the shop doesn't have to either. Let's take a look at a complete guide to installing and replacing a tire valve stem.
Content
Replacing the valve stem is a simple task, even if you are not a mechanic. Repairing new valve stems costs about $10 if you do it yourself. If you bring it to the store, it will cost about $30.
Before you start replacing anything, make sure you have the right tools. When you get the new valve stem, you will also need a new valve stem and valve stem tool.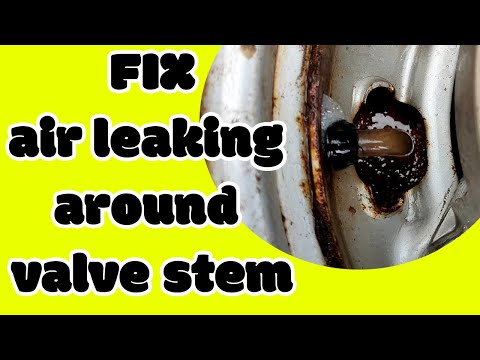
Valve stem tool looks like a plus sign.
Before replacing the valve stem, check that it is actually leaking. If you take some water and a drop of dish soap and rub it against a valve stem without a cap, you can check for leaks.
The valve stem is leaking if small bubbles form on it. stem base.
If bubbles do not form, the valve stem is most likely not the culprit.
After confirming that the valve stem is leaking, you need to bleed the tire after you have removed it. You will need to unscrew the valve from the tire using the valve stem tool you purchased earlier.
If air remains in the tire, the valve stem will be under pressure, so be sure to remove all air before removing the core. Once you have removed the core, discard it and you are ready for the next step.
The valve core tool you purchased is required to clean the inside of the valve stem. Clean the hole in the tire where the valve stem came out and make sure it is free of dirt and debris.
Now that you have your tire ready with the new valve stem and it is clean, grab your valve stem. Using the same end of the valve stem tool, install the new valve core. Tighten the new valve, making sure there are no leaks.
When the new valve is tight, re-inflate the tire and reinstall the valve cap. That's it, and you replaced the valve stem yourself!
As you can see, it requires a few simple steps to replace the valve stem yourself. This way you save money and time. It will take less than 10 minutes from end to start.
Want more valve advice? Contact us today!
Settings
Back to search
Cause:
Adjusted clearance in the valve actuator is too small or the maintenance interval has not been observed.
Consequence:
The valve no longer closes properly. Exhaust gases flowing past the valve seat heat up the valve head. This causes overheating and burning of the valve head in the seat area
.
Reason:
During installation, the spring was not installed correctly. The misalignment resulted in a lateral bending moment (M) on the valve stem.
Consequence:
The resulting variable bending load resulted in damage to the valve guide and ultimately to failure of the valve stem end.
Cause:
After installing the tappet, the prescribed waiting time before starting the engine (at least 30 minutes) was not observed. Because of this, there was not enough time to remove excess oil from the working area of the pusher.
Consequence:
When the engine starts prematurely, the valves hit the pistons, bend or break.
Cause:
The valve seat or valve guide was incorrectly centered during rework.
Consequence:
The valve does not close properly, overheats and burns out in the seat area. Due to the one-sided load on the valve head, fatigue fractures in the area of the fillet are also possible.
Cause:
The clearance in the valve guides is too large, because they are badly worn or have been drilled too wide during repair.
Consequence:
Due to the breakthrough of hot gases, strong carbon formation is possible in the area of the rods and guides. The valve stroke becomes heavy, the valve no longer closes, and this leads to overheating (burning, melting) of the seat surface.
Cause :
When rebuilding the valve guides, the diameter of the guides was measured incorrectly and was found to be too small.
Consequence:
Lack of lubrication, hard running and sticking of the valve stem in the guide. As a result, this can also lead to overheating in the area of the valve head or seat.
Cause:
Old, worn valve cotters were used to rebuild the valves.
Consequence:
If worn nuts are reused, the clamp may loosen during operation. Friction corrosion appears on the stem, and the valve in this place loses its strength. Because of this, fatigue fractures from vibrations are possible.
Reason:
The distribution of force from the rocker to the surface of the end of the valve stem is non-centric.
Consequence:
This leads to one-sided wear of the rod and its end. Shear load on the valve stem, caused by non-centric force distribution, results in fatigue fractures in the clamping area.
Cause:
Bending of the valve stem results in one-sided loading of the valve seat on the seat ring.
Consequence:
One-sided loading causes a variable bending load and fatigue fractures in the area of the fillet, at the transition to the bar.
Cause:
Combustion disturbances cause significant thermal and pressure loads in the combustion chamber.
Consequence:
The valve head cannot withstand strong thermomechanical stress and bends inwards. It takes the so-called tulip shape and breaks.
 com
com Practical tips for replacement and repair
For professional use only. We reserve the right to make changes and inconsistencies in the drawings. Refer to the relevant catalogs or TecAlliance based systems for identification and replacement information.
The Motorservice Group uses cookies on your device to optimize the design and continuous improvement of its web pages, as well as for statistical purposes. Here you will find more information on the use of cookies, our Imprint and the Privacy Policy.
By clicking the "OK" button, you confirm that you have taken note of the cookie information, data protection declaration and imprint. You can change your cookie settings for this website at any time [link]
We attach great importance to transparency in the protection of personal data.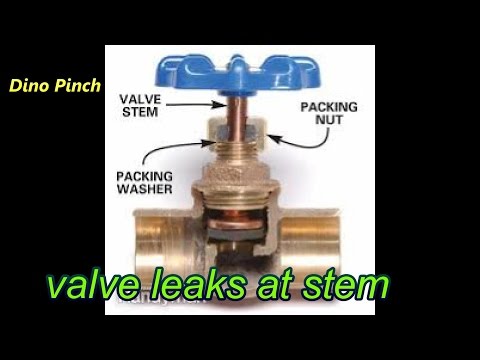 On our pages you will receive precise information about which settings you can select and what functions they perform. You can change the setting you have chosen at any time. Regardless of the setting you choose, we will not identify you personally (unless you have explicitly entered your data, for example in contact forms). You can find information about deleting cookies in your browser help. Further information can be found in the Data Protection Statement.
Cookies are necessary for the operation of the website to ensure its proper functioning. In the absence of cookies, errors and error messages may occur.

Cookies make your visit to the website more convenient and comfortable, for example, by storing certain settings so that you do not have to set them again each time you visit the site.