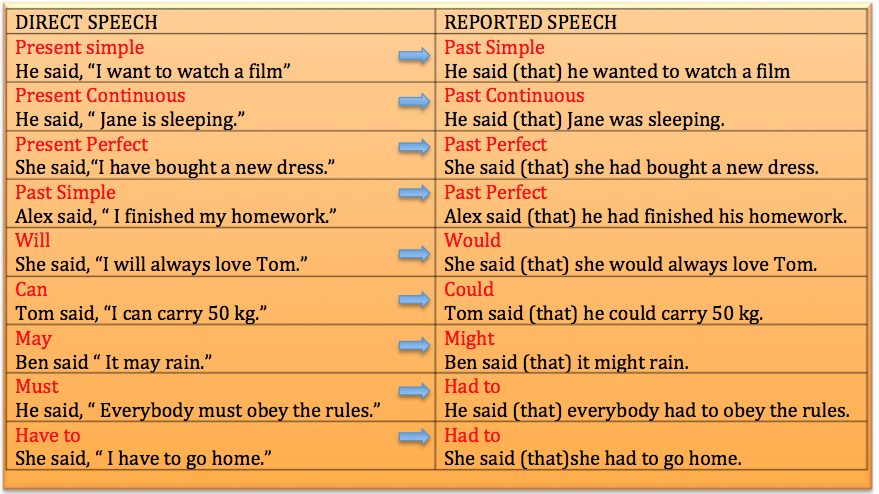
Posted on by Justin Brunner
An inner tube can cover up a lot of problems. It can prolong the useful life of your tire in some situations, but it can’t be used in all tires. This guide from Blain’s Farm & Fleet will help you match the right inner tube with your tire.
An inner tube is a doughnut-shaped tube made of thin rubber that lines the inside of a tire and prevents leaks.Generally speaking, inner tubes are best suited to use on non-highway farm implement and lawn and garden tires. If you have a flat tire, have it inspected by one of the skilled service technicians in our Service Centers.
It’s possible that you won’t need to replace the tire. If the tire went flat from leaking around the rim, then a tube will fix the problem. Also, if the tire has a puncture in it that’s not too big, a tube will hold the air in and let you keep using the tire. Finally, your tire may already have a tube in it, and the tire might be flat because the tube or its valve stem failed.
In any of these cases, installing or replacing an inner tube can solve your problem.
However, it can be dangerous to put an inner tube in a car or truck tire that will be driven at speed on the highway. Most auto mechanics advise against installing inner tubes in radial car and truck tires, because the tube can rub against the inside of the tire and cause heat buildup at highway speeds. Heat buildup can lead to tire blowouts.
Especially in lower profile tires (tires with an aspect ratio lower than 65% of the width of the tread face), a tube cannot function properly. An inner tube inflates to a circular cross section, but the cross section of the inside of a low profile tire is a narrow rectangle. This results in the inner tube getting squeezed, and possibly developing creases that can cause it to fail.
Getting the right inner tube is fairly easy, since manufacturers usually make inner tubes that are specially sized to fit each different tire size. So just write down the size of your tire (found on the side of the tire) and take it to your local Blain’s Farm & Fleet’s Auto Parts Department, and one of our friendly and knowledgeable associates will help you find the right tube for your tire.
You must, however, take note as to whether you have a radial-ply tire or a bias-ply tire. If you have a radial tire, there will be a letter “R” before the last number in your tire size (i.e. 225/75R15). If you have a bias ply tire, there will usually be a letter “B” or “D” before the last number in your tire size (i.e. 225/75D15 or 225/75B15).
If you install a radial tube in a bias tire, or a bias tube in a radial tire, you risk heat buildup and tire blowout.
For more vehicle guides and how-to’s, check out Blain’s Farm & Fleet’s Automotive blog.
Posted in: AutomotiveTagged: Auto Maintenance, Auto Parts, Auto Repair, Automotive Tires, Selecting the Right Tires, Tire Maintenance
Your tractor is a complicated machine with multiple moving parts working together to accomplish a set goal. If one part of the machine isn’t working to its fullest capacity, then the whole thing falls apart. Keeping things like the tires in good condition might seem like a “handle it when it needs addressing” issue, but not knowing the ins and outs of the tire can prove problematic.
When it comes time to shop for new tractor tires, you have many factors you need to consider. Every tire has different features, including construction methods, construction materials, tire specifications, purposes, styles, and various other structural traits that impact your decision. Each facet of the tire must be carefully considered so you can make the most informed decision possible.
One of the fundamental parts of any tire is the inner tube. Most people have heard of inner tubes used with motorcycles or bicycles, or as a means of having fun on a snowy day. However, few people are familiar with using inner tubes in tires for commercial or passenger vehicle tires. Inner tubes are not limited to a specific vehicle type, but it is generally uncommon for modern cars to use tires with inner tubes. Almost all tires used on modern vehicles are tubeless, using a Schrader valve attached through the rim or wheel for regulating air pressure. Inner tubes are typically used for tractors, some construction equipment, and lawnmowers, to name a few.
If you own any of these machines, chances are you will need to know a thing or two about your tires' inner tubes, so read on and learn a bit about an essential part of your tire.
An inner tube is a circular tube that inflates like a balloon within a larger encapsulating tire. They are manufactured using many different materials, most often with rubber compounds or plastics and synthetic rubbers. When most people hear the words "inner tubes," they immediately think of winter days going down snow-covered hills at speeds their moms would not be happy seeing. However, inner tubes are for more than having fun during a snow day.
Tires4That.com carries tire inner tubes for sale online for a variety of vehicles and applications. For smaller two-tire vehicles, such as motorcycles and bicycles, the tubes are built to specific strengths and sizes based on the intended ride type. For larger, heavier vehicles, inner tubes need to be sturdy and more durable. No matter the size, we provide a place to buy inner tubes online for our customers' convenience. In fact, we're currently running a special on inner tubes: you can get 25% off with the purchase of any two or more!
While most cars on the road use tubeless tires, many vehicles still rely on an inner tube to allow the proper inflation for their intended applications. Inner tube tires are typically used on tractors and most industrial equipment — all of which need added inflation and stability provided by the inner tubes to maintain proper balance. Knowing the appropriate sizing requirements that each inner tube needs for a particular type of tire makes all the difference in the world when it comes time to fit the tires on your machines.
Inner tubes have a wide array of sizes available. Each inner tube is designed to fit with the circumference of specific wheels and the width of the tire itself. Knowing your tires' ins and outs and the tasks you need the vehicles to perform will help you determine your inner tubes' necessary sizes. To properly size an inner tube, you will need to inflate it slightly before measuring it against the wheel's size well. Inflating it even a little bit allows you to measure the inner tube without appearing too long correctly. Under-inflated inner tubes do not sit correctly within the wheel and will interfere with the proper sizing.
Finding the right inner tubes for your tires can be an anxiety-inducing experience. Luckily for you, Tires4That.com has an inner tube selection to suit your every tire need, no matter the size or application. Look through our extensive inventory to find the perfect inner tubes for your vehicles, and don’t forget to save 25% on your order when you purchase two or more!
While you're browsing your inventory, you can also check out our array of front tractor tires for sale! To purchase your tires, simply add them to your cart, or call 877-795-3728 for assistance with your order. For any additional questions or inquiries, contact us online today!
on
The chart's horizontal axis, also called the category axis and x-axis, displays text labels instead of numeric intervals; it also supports fewer scaling options than the chart's vertical axis (value axis, or y-axis).
However, you can set the following axis parameters:
Interval between tick marks and labels. nine0003
Location of signatures.
Display order of categories.
Axis type (dates or text).
Location of divisions.
Intersection point of the horizontal and vertical axes. nine0003
To change the scales of other axes, see Change the scale of the vertical axis (values) in a chart or Change the scale of the depth axis (data series) in a chart.
Note: The following procedure applies to Office 2013 and later. Looking for the steps for Office 2010?
In the chart, click the category axis you want to change or select it from the list of chart elements do the following:
Click anywhere in the chart.
The Chart Tools tab opens with additional tabs Design and Format .
On the Format tab in the Current Selection group, click the arrow in the box at the top and select Horizontal axis (categories).
On the Format tab, in the Current Fragment group, click the Format Selection button.
In area "Axis format" , do the following:
Important: These scaling options are only available if the category axis is selected.
To change the order of the categories, check the axis parameters once and then select them in reverse order .
To change the axis type to text axis or date axis, expand the axis options, and then in the Axis Type area, select text axis or date axis Text and data points are evenly distributed on the text axis. The date axis displays dates in chronological order at specified intervals (units), such as the number of days, months, or years, even if the dates on the worksheet are not in sequential order or using different units.
Note: Default value Automatically select based on data defines the axis type that best suits the selected data type.
To change the point at which the vertical (value) axis intersects the horizontal (category) axis, expand the axis options, and then in the Vertical Axis area, select the category number and enter the desired number in the text box, or select By Maximum Category, to indicate that the vertical (value) axis intersects the horizontal (category) axis after the last category on the x-axis. nine0003
To change the interval between divisions, separate divisions, and then enter the desired number in the "Interval between divisions" field.
Note: This number determines the number of categories that appear between tick marks.
To change the spacing between axis labels, expand the labels, and then in the "Spacing between labels" field, select "Spacing unit" and enter the desired number in the text box.
Tip: Enter 1 to display a label for every category, 2 to display a label for every second category, 3 to display a label for every third category, etc.
To change the location of the axis labels, expand the labels, and then enter the desired number in the Distance from Axis box.
Tip: To position the labels closer to the axis, enter a smaller number. To increase the distance between the label and the axis, enter a larger number.
In a chart, click the category axis you want to change, or select it from the list of chart elements using the following steps.
nine0042Click anywhere in the chart.
The panel Chart Tools with additional tabs Design , Layout and Format will open.
On the Format tab, in the Current Fragment group, click the arrow next to the 9 box0035 Chart elements , then click Horizontal axis (category axis) .
On the Format tab, in the Current Fragment group, click the Format Selection button.
nine0010In the Format Axis dialog box, under Axis Options , do one or more of the following:
Important: These scaling options are only available when the category axis is selected.
To change the interval between divisions, in field Interval between divisions enter the desired number.
Note: This number determines the number of categories that appear between tick marks.
To change the interval between axis labels, under Label spacing , select Interval unit , and then enter the desired number in the text box. nine0003
Tip: Enter 1 to display a label for every category, 2 to display a label for every second category, 3 to display a label for every third category, etc.
To change the location of the axis labels, in the field Label distance from axis enter the desired number.
Tip: To position the labels closer to the axis, enter a smaller number. To increase the distance between the label and the axis, enter a larger number.
To change the order of the categories, select the Reverse order of categories check box.
To change the axis type to text axis or date axis, in the Axis type field, select either Text axis or Date axis . The text and data points are evenly spaced along the text axis. The date axis displays dates in chronological order at specified intervals (units), such as the number of days, months, or years, even if the dates on the worksheet are not in sequential order or using different units. nine0003
Note: The default value of Automatically select based on data determines the axis type that best suits the selected data type.
To change the position of tick marks and axis labels, select the required parameters in the fields Basic , Intermediate and Axle labels .
To change the intersection point of the vertical axis (values) and the horizontal axis (categories), under Vertical axis intersects , select option In category number , and then enter the desired number in the text box, or select option In largest category . to indicate that the vertical (value) axis should intersect the horizontal (category) axis beyond the last category of the x-axis.0003
Tips:
After changing the scale of an axis, it may be necessary to adjust its formatting. For more information, see Change the display of chart axes.
Scaling does not affect the overlap of rows or the width of the gap between rows. To change the row overlap or gap width settings, right-click the data row and select Data series format . In section Row Parameters , enter the desired values.
By default, the minimum and maximum scale values for each axis in the chart are calculated automatically. However, the scale can be adjusted to suit your needs. For example, if all data points in a data table are between 60 and 90, you can set the value axis (y) to be 50 to 100 instead of 0 to 100. If the value axis spans a very wide range, you can also change it on a logarithmic scale. nine0003
This step only applies to Word for Mac: from the View menu, select Print Layout.
Click the chart.
On the "Format" tab in the list, select the horizontal axis (categories) and click the "Format 9" button0035 area".
In area "Axis format" , do the following:
Important: These scaling options are only available when the category axis is selected.
To change the order of the categories, check the axis parameters once and then select them in reverse order .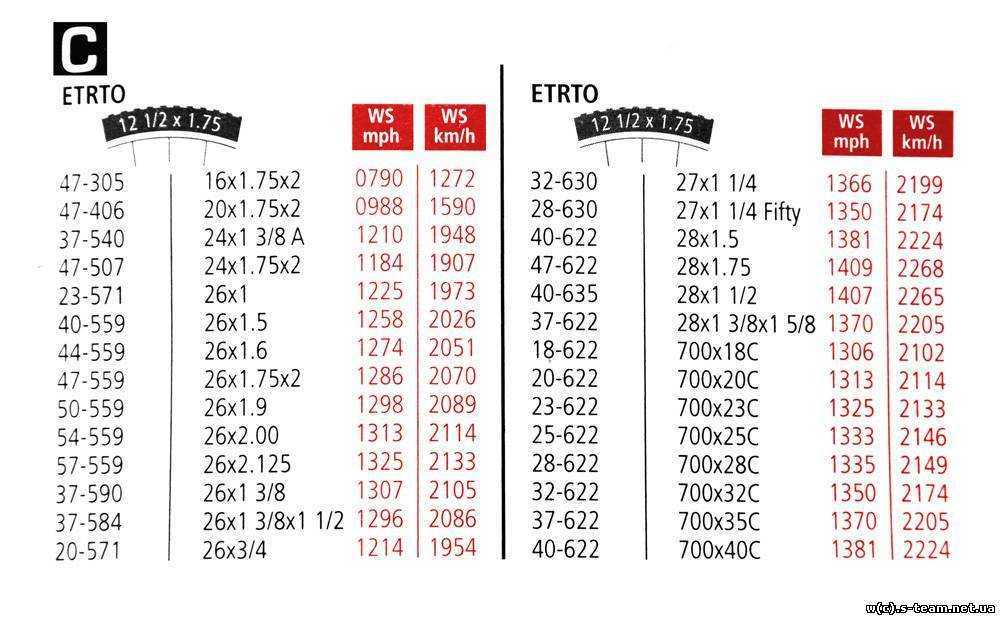 nine0036
To change the axis type to text axis or date axis, expand the axis options, and then in the Axis Type area, select text axis or date axis . Text and data points are evenly distributed on the text axis. The date axis displays dates in chronological order at specified intervals (units), such as the number of days, months, or years, even if the dates on the worksheet are not in sequential order or using different units. nine0003
Note: The default value of Automatically select based on data determines the axis type that best suits the selected data type.
To change the point at which the vertical (value) axis intersects the horizontal (category) axis, expand the axis options, and then in the Vertical Axis area, select the category number and enter the desired number in the text box, or select By Maximum Category, to indicate that the vertical (value) axis intersects the horizontal (category) axis after the last category on the x-axis.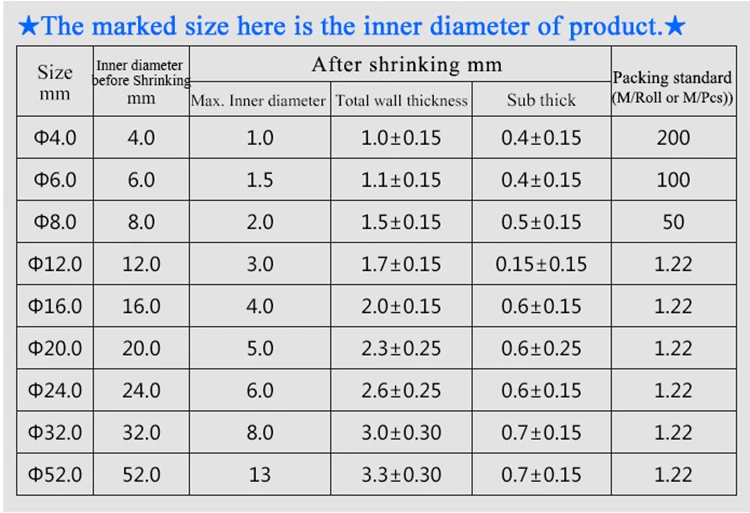 nine0003
To change the interval between divisions, separate divisions, and then enter the desired number in the "Interval between divisions" field.
Note: This number determines the number of categories that appear between tick marks.
To change the spacing between axis labels, expand the labels, and then in the "Spacing between labels" field, select "Spacing unit" and enter the desired number in the text box.
Tip: Enter 1 to display a label for every category, 2 to display a label for every second category, 3 to display a label for every third category, etc.
To change the location of the axis labels, expand the labels, and then enter the desired number in the Distance from Axis box.
Tip: To position the labels closer to the axis, enter a smaller number. To increase the distance between the label and the axis, enter a larger number.
To place the label in the desired location, mark up the "Signatures" list and select an option from the list.
The target audience of your presentation or report - investors, management and just people - do not expect to receive a bunch of numbers, but already formulated conclusions or clearly placed accents. There is a need to draw the attention of the audience to factors and circumstances, to show plans and strategies.
But there is one problem - the perception of positive and negative results. At the same time, different audiences have different attitudes even to positive ones. For example, journalists may be skeptical about achievements. Shareholders tend to react painfully to losses. And here a subtle thoughtful approach is needed. nine0003
You can talk about failures and negativity in a very boring and tedious way, but an interesting and peppy story about successes can be backed up with a visual demonstration, including a presentation with impressive graphs. At the same time, a correctly chosen diagram can radically change the perception of information: if you simply show how the company's income grew during the year, it will not be as impressive as if your competitor's subsidence dynamics is shown nearby.
One of the difficulties that significantly slows down reporting and analysis work is choosing the right type of chart. Choosing it incorrectly can cause confusion in the minds of the viewers or lead to an erroneous interpretation of the data. nine0003
Let's look at an infographic on the world's butter production.
Top Lead infographic for Baker Tilly. View in full size.
Everything is here - production volumes, exports, forecasts, demand, consumers and tons of information. This infographic contains what is essentially a huge amount of data on an entire industry. Nevertheless, it is easy to understand, and certain trends are clearly visible on the chart.
To create a chart that explains and demonstrates accurate analytics, you first need to understand the reasons why you might need them at all. In this article, we'll look at five questions that come up when choosing a chart type. Then we will give an overview of 13 different types of diagrams, from which you can choose the most suitable one.
1. Do you need to compare values?
Graphs are ideal for comparing one or more sets of values and can easily display the lowest and highest readings. nine0003
To create a comparison chart, use the following types: bar chart, pie chart, scatter chart, scale with values.
2. Do you want to show the structure of something?
For example, you might want to talk about the types of mobile devices your site visitors use or your total sales broken down into segments.
Use the following charts to show structure: Pie, Stacked Column, Vertical Stack, Area, Waterfall. nine0003
3. Do you want to understand how data is distributed?
Distribution tables help you understand key trends and point out what is out of line.
Use these charts: scatter plot, line chart, histogram.
4. Are you interested in analyzing trends in a particular set of data?
If you want to learn more about how numbers behave over a particular time period, there are chart types that are very good at showing this. nine0003
You will need: line chart, dual axis (bar and line), histogram.
5. Want to better understand the relationship between setpoints?
Relationship graphs are suitable for showing how one variable relates to another or to several different variables. This can be used to show positive, negative, or zero impact on another digit.
Use the following charts for this: scatter chart, bubble chart, line chart. nine0003
To better understand each chart and its uses, let's take a look at each chart type.
The histogram is used to show comparison between different items, also it can compare items over a certain period of time. This format can be used to track the dynamics of transitions to a landing page or the number of customers over a certain period. nine0003
Top Lead Infographic for AEQUO Law Firm
Bar Chart Design Guidelines
.
2. Use horizontal marks to improve readability.
3. Start the y-axis at 0 to correctly plot the values. nine0003
A bar chart—mostly a horizontal bar chart—should be used to avoid confusion when one data bar is too long or when comparing more than 10 items. This option can also be used to visualize negative values.
Top Lead infographic for Aggeek online publication. View in full size.
Bar chart design guidelines
1. Choose a unified color scheme and highlight areas that you want to highlight as significant inflection points or changes over time.
2. Use horizontal marks to improve readability.
3. Start the y-axis at 0 to correctly plot the values.
The line chart shows trends or progress and can be used to visualize a wide variety of categories of data. It should be used when you are creating a graph based on long-term data collection. nine0003
Top Lead infographic. The line chart is at the bottom.
Line Chart Design Guidelines
1. Use solid lines.
2. Do not draw more than four lines to avoid visual distractions.
3. Use the correct height so that the lines take up approximately 2/3 of the height of the Y axis.
which, for example, is data for a period, and the other is better suited for grouping by category. Thus, it is possible to demonstrate the correlation or its absence between different indicators. nine0003
Top Lead infographic for Growth Up. The chart with the dual axis is at the top.
Dual Axis Chart Design Guidelines
1. Use the left y-axis for the primary variable because it is natural for people to look to the left first.
2. Use different plot styles to illustrate the two datasets.
3. Select contrasting colors for the compared datasets.
The area chart generally looks like a line chart, but the space between the x-axis and the line of the graph is filled with color or a graphic. This option is suitable for demonstrating the relationship between parts of a whole, for example, the contribution of individual sales representatives to the total sales for the year. This will help analyze both the whole picture as a whole and information about trends in individual areas.
Top Lead infographic for Baker Tilly. From top to bottom: pie chart, two area charts, pie charts. nine0434
Area Chart Design Guidelines
1. Use translucent colors.
2. Use no more than four categories to avoid confusion.
3. Organize data with a high frequency of variability at the top of the chart to make it easier to perceive dynamic changes.
It can be used to compare a large number of different components. For example, the frequency of visiting several sites and each page individually. nine0003
Infographics and layout — Top Lead. For Naftogaz of Ukraine. Stacked chart - bottom left. View in full size.
Stacked Chart Design Guidelines
1. It is best used to illustrate part-whole relationships. For greater clarity, choose contrasting colors.
2. Zoom in on the chart large enough to see the size of the groups in relation to each other. nine0003
A pie chart shows a static number and how the parts add up to a whole - the composition of something. The pie chart shows the numbers as a percentage and the sum of all segments should add up to 100%.
Infographics and layout — Top Lead. For Naftogaz of Ukraine. View in full size.
Design Guidelines for Pie Charts
1. Do not add too many categories so that the difference between the slices is clearly visible. nine0003
2. Check that the total sum of all parts is 100%.
3. Arrange the pieces according to their size.
Top Lead infographic for Baker Tilly. View in full size.
A waterfall is used to show how intermediate values—positive and negative—affect the initial value and lead to the final result. An example would be to visualize how a company's total revenue depends on different departments and translates into a specific amount of profit. nine0003
Infographics and layout — Top Lead. Annual report "Naftogaz of Ukraine". Waterfall chart in the top half of the layout. View in full size.
Waterfall Chart Design Guidelines
1. Use contrasting colors to highlight differences in datasets.
2. Choose warm colors to show growth and cool colors to show falling.
The funnel chart shows the sequence of stages and the speed at which each stage is completed. It can be used to track the sales process or user interaction with the site.
Top Lead infographic.
Funnel Chart Design Guidelines
1. Scale the size of each section to accurately represent the size of the data set.
2. Use contrasting colors or shades of the same color from darkest to lightest as the funnel narrows. nine0003
There are several other types of charts - they are not used so often, but can also be useful for visualizing large amounts of data. Among them:
Scatter plot shows the relationship between two different variables or shows distributional trends. It is suitable if you have a lot of different point data and want to find common ground in the dataset. This visualization works well in finding exceptions or patterns in the distribution of data. nine0003
Scatter Plot Design Guidelines
1. Include more variables such as different sizes to combine more data.
2. Start the y-axis at 0 for accurate data distribution.
3. If you are using trend lines, you must limit yourself to two to make the graph clear.
A bubble chart is similar to a scatter chart. But only in the sense that it can show distribution and interconnection. There is a third set of data, which is denoted by the size of the circle. nine0003
Design Guidelines for Bubble Charts
1. Grade bubbles by area, not diameter.
2. Make sure the marks are clear and visible.
3. Use only circles.
This graph shows the progress towards the goal, compares it according to different criteria and displays the result as a rating or performance.
Design Guidelines for Scale with 9 Values0417
1. Use contrasting colors to show momentum.
2. Use one color in different shades to measure progress.
A heatmap shows the relationship between two elements and provides rating information.