Anyone who has been riding bikes for a while can tell you that sooner or later, you’re going to get a flat. Even with tube sealant that prevents flat tires for up to two years, it’s just an unavoidable occurrence. When flats occur, the best thing you can do is be educated and prepared to patch the tube so that you can quickly get back on the road. Let's get started:
Materials NeededConsider these different flat tire scenarios: The at-home repair scenario where you're walking your bike into the garage and notice that the back wheel is sagging a little bit—you have a flat. Or, the on-the-trail repair scenario where 20 miles into a 50 mile ride, you go down hard on a rock and get a nasty pinch flat.
We’re going to walk you through some of the materials you’ll need for either situation, and then how to use them for both. Here’s a list of some things you will need to repair your tube.
Follow these 4 easy steps to patch your bicycle tube and repair your flat.
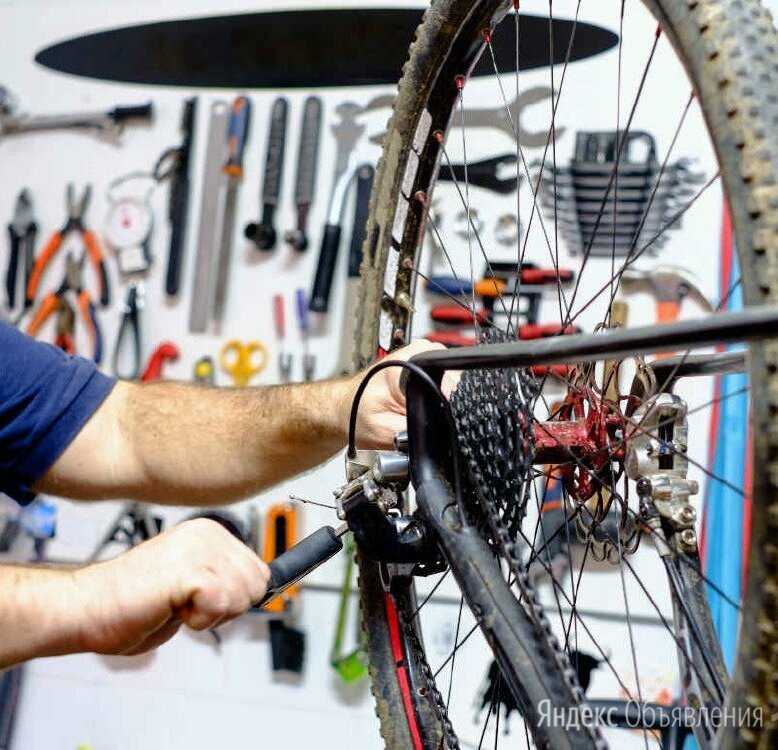
Step 1. Remove Your Tire
Take your tire lever and hook it around the outer edge of the tire (the bead) to get it off of the rim. Once you have the tire lever under the tire rubber, hook the other end of your tire lever around one of your spokes to keep the tire elevated. With a second tire lever, work your way around the rim, taking the tire out of the bead until one side has been completely removed from the rim.
Step 2. Find the Leak
If the puncture or gash in your tube is not easily apparent, you’re going to need to fill the tube back up to locate where the air is escaping from. There are a couple of different ways to find the leak. The layman’s way would just be to run your hand along the tube and try to feel it out.
The bucket of water method that we mentioned earlier, however, is a more accurate way. If you’re at home, fill your sink or a large bucket full of water and submerge each end of the tube. Watch for air bubbles escaping from your tire to locate your problem area.
Make sure you submerge each side, as there may be more than one puncture. Be sure to check the inside of the tire to make sure that the puncture-causing object has been removed. Once located, mark that spot with your tire marking chalk.
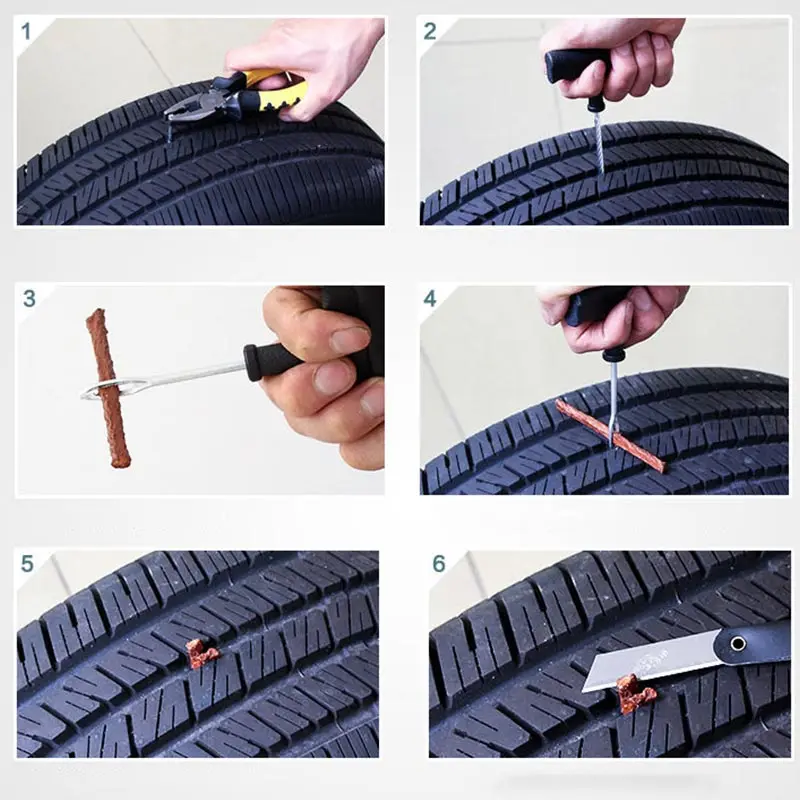
Step 3. Patch the Hole
When patching the hole in your bicycle tube, make sure that the area around the puncture is clean so that the patch will stick. Using the scuffer from your patch kit (sand paper or emery paper will also do the trick), rough up the area around the puncture so that your adhesives have something to grip.
If your patches don’t require glue, simply press them firmly over the hole. For patches that do need glue, add a layer of glue and spread it evenly around the area. Wait for the glue to get a little tacky, and then press on your patch. If you have the materials available to you at home, some cyclists will sprinkle talcum powder on top of the patch so that that patch/adhesive doesn’t stick to the inside of the tire.
Step 4. Put It All Back Together
Put a little air into your tube and then put it back in the tire, making sure, again, that there are no foreign objects remaining in the tire. Be sure to insert the tube and tire back into the rim using only your hands, as the tire levers may pinch the tube and cause another flat (we certainly don’t want that after all your hard work).
Once you’ve pushed the tire back in and the valve stem is securely inside the tire, inflate your tube back to maximum pressure, being sure to check the tire one more time to make sure that the bead is installed snugly. Ready to ride!
Repairing a bike inner tube is not only simple and cheap, but it's also mandatory in respect for the environment. Indeed a punctured tube can be repaired many times before being thrown out. A different matter is when the tube is cut or the valve leaks, since it's more difficult repair the tube. Anyway most of the times the leak is caused by a nail or a thorn, and the hole is very tiny.
Although many of you already know this process, I'll explain how to easy add a patch to a pierced bike inner tube.
All you need is a pump and a repairing kit. I take for granted you already know how to remove the wheel from the bike and the tube from the wheel, so I don't deal this topic here, ask in comments if you fall in some obstacle.
The repairing kit is composed by some patches (probably of different sizes), some scratch tools (sandpaper or a little metal grater), a little tube of mastic (a type of glue) and maybe some little rubber tubes to spread mastic.
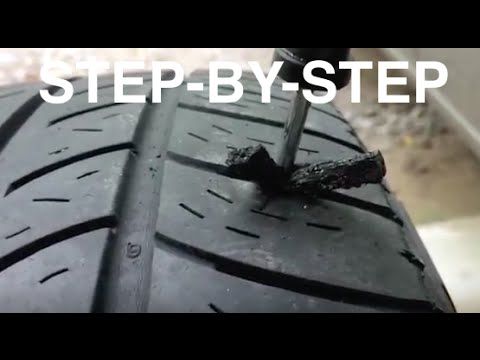
First thing to do: find the hole. This could be simple or pretty long. If you're lucky the hole is big enough to listening the air flowing out when you inflate the tube.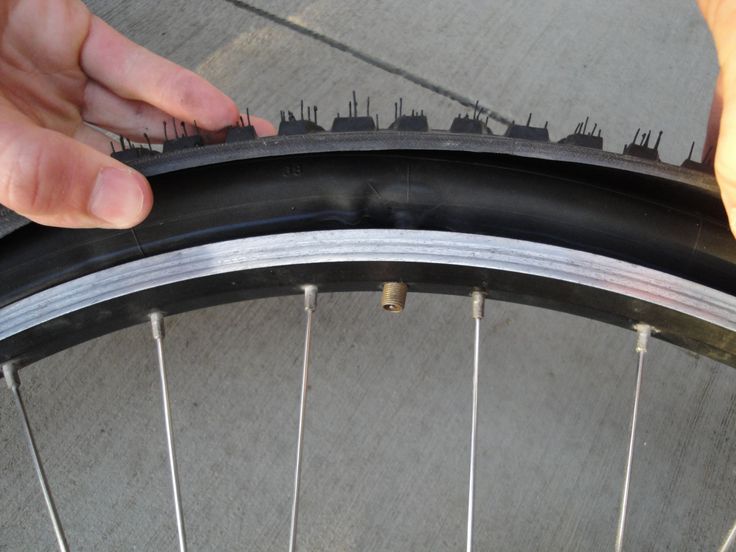 But many times the hole is so tiny that air comes out very slow and it's difficult to find, in this case go to next step.
To find the tiny holes inflate the tube. Don't be scared to inflate the tube very much, it could also become double in dimensions without exploding, and this will help you find the hole, since some hole remain closed with low pressure. At this time dip the tube into water, a sector at a time, until you see the bubbles coming out.
Mark the hole with a permanent marker, so you will not have to make the entire process a second time if you look away for an instant ;-)
Make the mark twice as big as the patch with an "X" through the center of the hole, it allows for spreading out glue if too much is applied.
With the help of sandpaper or grater scratch the rubber all around the hole, this will help the mastic to adhere to the tube. No reason to wash away the rubber powder when finished, just blow it away or clean with your hand.
Time to spread the right amount of mastic on a surface a little wider than the patch. Move the head of the mastic container from center to the border, as pizza maker does with the tomato sauce.
Use a thin layer of glue. More isn't better and if it is cold will take much longer to cure. If too much comes out use the small rubber tubes in the repairing kit to spread it out.
The mastic will now dry in a few minutes. About 10 minutes will be probably a good time to wait before attaching the patch.
Don't touch the area that has been roughed up. Oil from your hand will contaminate the surface and impact glue adhesion.
The patches have a metal cover on the glue side, and a plastic foil on the other one. When you remove the metal cover, the plastic transparent sheet should remain in place, you'll remove it after the gluing process.
Push the patch very hard over the dry mastic, you should use now an hard tool to make pressure, as the back of the pump. The more pressure you apply the more efficient the fixing will be.
To remove the thin plastic sheet you have to keep down the patch red border with your nail. It's not a big problem if the border detaches, anyway try to leave it glued. If the plastic layer won't release from the top of the patch, leave it be, when 60+ psi push it against the inside of the tire, it isn't going to make any difference.
Now you could in theory assemble the tube on the wheel, inflate it and ride. So don't be afraid to do that, BUT...
Remember to check both the inside of the tire and the tube protector strip on the rim for what caused the hole! If you miss that step you'll probably incur in the same identical accident for the same reasons.
Otherwise this is probably your reserve tube, you are at home fixing it meanwhile you relax your limbs after an hard riding morning, and you can wait some more time before inflating the tube to check the good air detaining. Let's say ten minutes...
Inflate a lot the tube and hang it somewhere in your haven, if it's still inflated the next day your reparation is perfect, if not restart from step two ;-) Obviously you can test the tube into water right away.
Now deflate (this is the tedious part), roll up the tube and hold it with an elastic. If you predict to not use it in a few time, you probably should scatter it with talcum powder, so the rubber will last much more time.
Also pay attention keeping your reserve tubes in the little bag under the saddle, because continual rubbing can wear out the borders. A solution is to put the tube in an old sock, which makes a great rag and you can put it on your hand if you need to swing a derailleur out of the way to remove the rear wheel.
And remember, always bring at least a reserve inner tube with you, among with the necessary to change it, and to be safe bring also a repairing kit, it happens to get three or more blowouts in the same trip! I'm not speaking about city cycling ;-)
 Where is it better to mount it: in front or behind?
 Edited: 01/22/2018
In the article “How to choose a child bike seat”, we looked at what age you can take a child on bike trips, what to look for when choosing a child bike seat and the types of protection for bike seats.
In this article, we will look at the important question of where and how to attach the bike seats to the parent's bike.
As mentioned in the last article, there are several options for attaching the seat to the bike - both in front of the cyclist and behind him.
The experience of parents of cyclists who take their children out at a very early age suggests that the location of the child seat depends on the age of the child. It is better to carry the very small ones in front of you, and the grown-up ones - in the back.
Each option has its pros and cons, which we will now focus on.
Chairs of this type are designed for the smallest children weighing up to 10, maximum 12 kg, i. e. it is somewhere up to 1.5-2 years.
In general, this chair is suitable for parents with children up to 1.5-2 years old for short distance riding on good and even asphalt. It is very good if a suspension fork is installed on the parent bike, because. it will smooth out bumps from bumps in the road.
As in the first case, the child sits in front of the cyclist.
There are the following mounting options:
| Front frame mount | Mounting with a flexible steel fork on the down tube | |
| Mounting with a flexible steel fork on the steering tube | Fastening with a flexible steel fork on the frame seat tube |
Given the above disadvantages, we can say that a large seat, fixed in front of the saddle, creates problems for the cyclist himself. It is inconvenient to hold the steering wheel, turn the pedals and you have to “peek out” all the time because of the child on the road.
In this situation, in my opinion, it is much better to use simple and small models. This is especially true for trips over short distances: when parents need to take their child to kindergarten, go to the store, or you take a short walk with the whole family. All the same, it is difficult to carry a small child for a long time - he simply will not sit out, he needs to move.
For such cases, a simple and cheap chair, which is fastened to the pipe with 4 bolts within 5 minutes, with a soft seat and back, is the best option. For example, the model in the photo.
So:
The seat fixed in front of the cyclist, no matter what frame tube it is attached to, is suitable for leisurely and calm trips on asphalt or rolled dirt roads for children under 4 years old and weighing up to 17 kg.
| Fastening with a flexible steel fork on the frame seat tube | Carrier mount with rubber dampers | Rigid rack mount |
 Some models of chairs come with a trunk directly. For example, bicycle seats of the German company Topeak are equipped with a branded aluminum trunk.
Often the models of seats with shock absorbers, which are attached to the seat tube, can be installed both in the version in front of the cyclist, and in the version behind the trunk.
To be honest, the option of mounting the bike seat on the rear seat tube on steel shock absorbers is the best option we have ever considered.
It does not interfere with the cyclist to pedal and steer the bike, the centering of the bike and, therefore, its handling and maneuverability do not change too much. The child rides softly and comfortably, as the steel mounts also play the role of shock absorbers.
The seat is quickly attached to and removed from the bike. If it is removed, then the remaining lock on the pipe does not interfere with the cyclist. Having bought an additional lock, you can take the child in turn on a bike trip simply by rearranging the chair from dad's to mom's bike.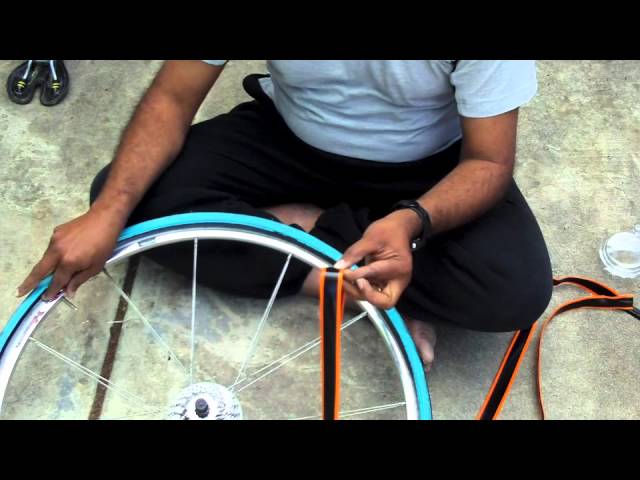
Such mounts are quite universal, since bicycle frames are different (short, lowered, without a top tube), but all bicycles have a seat tube. The only thing you need to check, of course, is that the shift and brake cables do not pass through the seat tube or fasten the lock where they are not.
When purchasing a chair with a seat tube mount, make sure that the seat tube mount is compatible in diameter with your bike's seat tube. Typically, fasteners are compatible with pipes with a diameter of 28 to 40 mm.
If the bike does not have a rack, then some parents buy a rack for the seatpost, and attach a seat to it. We do not consider this option too good for the following reasons:
 It is pressed not only by the cyclist himself, sitting in the saddle, but also by the weight of the child on the chair. Moreover, keep in mind that the child presses like a lever - he does not sit on the pin itself, but at the end of the trunk. So the load it puts on the pin is higher than its weight. As a result, when driving on our very “flat roads”, this place in the seat tube, and the seat post itself, will have too much shock loads and it may not withstand. This is especially true for aluminum and carbon frames and seatposts.
 A very good solution for transporting babies is a child seat that is attached to the seatpost, but the child is in front of the parent.
For example, this option:
purchase for a child under 3 years old of a small child bike seat with front mounting on a steel shock-absorbing fork. And when he grows up - buy a chair for mounting at the back, again on a steel shock-absorbing mount. The child will feel comfortable, and parents calmly.
And good luck with your children!
We welcome cyclists of all ages!
In this most interesting section of our site you will find articles about bicycles carefully collected and written by us. They reflect all the most necessary technical knowledge about bicycle technology, advice from professionals from the world of cycling, interesting facts and many other entertaining things.
If you are a beginner and do not yet understand complex terms or can not catch technical subtleties, then our experts will always assist you in choosing a bike or explain this or that article - just leave a comment.
Our collection of articles about bicycles and everything related to them is constantly updated and is added, and we strive to ensure that you have no questions left. But if they do arise - do not hesitate to ask, you will always be answered!
All Top ten most read articles Brands, manufacturers Cycling clothes and shoes Bicycle trips Bicycle and safety Bicycle and city Bicycle and health Bicycle and sex Bicycle and creativity Bicycle equipment Bicycle accessories Bicycle parts (bike parts) Bicycle personalities Cycling Bicycle tuning Bicycle selection Mountain bikes Skiing Children's bicycles Clothes, shoes and accessories for winter skiing Preparation of winter equipment pokatushki Buying a bike Different Bicycle repair and maintenance scooters Sledges and snow scooters Bicycle assembly slopes Snowboard Snowboard and ski for kids Test reviews cycling technique Alpine skiing technique snowboarding technique Electric bikes electric scooters English-Russian Dictionary
cycling terms Dictionary of a cyclist
Bicycle ride. What it is?
Today we will discuss how rolling affects the movement and why it takes so much attention.
Planetary hubs: pros and cons
Internal shifting, or shifting without shifters
Aluminum alloys: 7005 and 6061 - which is better?
What is the best aluminum alloy for your bike?
Bicycle records
Unusual records, unusual bikes, unusual people
Cycling records
Incredible distances, super speeds and unusual ways of riding
Seasonal storage in VeloDrive
The 2020-2021 storage season is just around the corner! We take your bikes to the warehouse!
Cycle paths
Cycle paths instructions for use
Dictionary of a cyclist
Interpretation of basic cycling terms.