main content of page
OWNER CENTER |
Welcome, Kawasaki owners. Access the information and tools you need to get the most out of your vehicle.
Welcome, Kawasaki owners. Access the information and tools you need to get the most out of your vehicle.
OWNER CENTER
OWNER'S & SERVICE MANUALS PARTS DIAGRAMS KAWASAKI SUPPORT WARRANTY KAWASAKI PROTECTION PLUS™ SAFETY RESOURCES
Kawasaki Genuine Parts are the only parts on the market specifically engineered and tested to fit your Kawasaki vehicle. They undergo comprehensive evaluation to ensure the hightest quality and durability standards to help maximize the life of your vehicle, and give you peace of mind that your Kawasaki is always operiating at peak performance.
The proper maintenance of your Kawasaki vehicle is the best way to ensure that it operates at its full potential. Whether you work on your vehicle or bring it to an authorized dealer for service, we recommend that you use Kawasaki Genuine Parts.
Select a category and model to find the parts diagram you are looking for.
Select a Vehicle Category
MOTORCYCLEATVSIDE X SIDEWATERCRAFTELECTRIC BALANCE BIKE
Select a Year
Select Vehicle
The vehicle identification number (VIN) on motorcycles, ATVs, MULE utility vehicles, Teryx recreational utility vehicles, electric balance bikes or hull identification number (HIN) on personal watercraft is unique to each unit. No two are alike.
VINs have 17 digits*. They look like this: JKAVFKA16VB508039. *VINS MADE BEFORE 1981 MAY VARY.
HINs have 12 digits. They look like this: KAW46436J697.
Each Kawasaki product line has a distinct VIN location. The exact location for these numbers in your particular model is illustrated in your owner's manual near the front of the book. They also appear on your registration documents.
MOTORCYCLESALL-TERRAIN VEHICLESTERYX RECREATIONAL UTILITY VEHICLESMULE UTILITY VEHICLESWATERCRAFTELECTRIC BALANCE BIKE
You will find the VIN stamped on the steering head, below the handlebars.
You will find the VIN on the front of the frame, centered below the radiator.
You will find the VIN in the rear corner of the upper deck rail.
You will find the VIN on the front side of the main frame near the right front A-arm.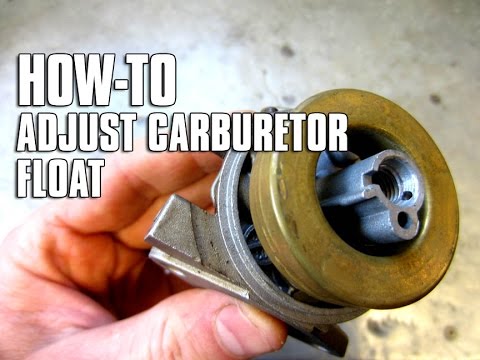
You will find the VIN on the top edge of the front bench seat base, just below the seat cushion.
You will find the VIN stamped on the rider’s side of the head tube below the handlebars.
Subscription Preferences
DISCLAIMER: Not legal for sale or use in California - Shop Approved Parts
Take your performance to new heights with a Jet Kit for your ATV. Increase power and improve performance throughout the entire RPM range, while improving throttle response and smoothness. These Jet Kits take the guesswork out of tuning your ATV.
Whether you’re rolling with a stock ATV or you’ve made some modifications, our Jet Kit will optimize your air/fuel ratio to eliminate rough spots and help you take control of your ATV’s power. You can go with a Stage 1 Jet Kit to give your stock engine a 5% boost of horsepower or send it all the way up to Stage 3 if you’ve already made major modifications to your ATV.
Perfect for ATVs with a stock engine using the stock airbox, air filter, and pipes. Stage 1 Jet Kits are engineered to improve throttle response and deliver approximately 5% more horsepower than stock. These kits are fully adjustable to allow the use of well-designed aftermarket pipes and stock replacement air filters, like K&N.
If you’ve made slight modifications to your ATV, but still crave more performance, a Stage 2 Jet Kit is the solution.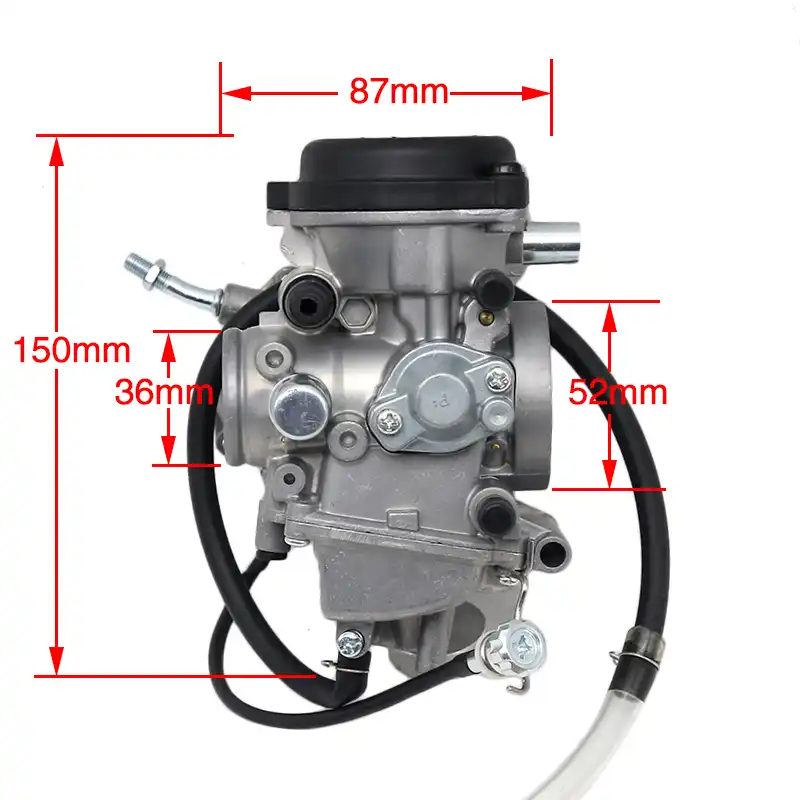 With a Stage 2 Jet Kit, you could see power gains of approximately 8%. This kit is intended for ATVs with stock or mildly tuned engines using a well - designed aftermarket pipe with a modified airbox and a stock replacement air filter.
Dynojet’s jet kits are designed to upgrade every part of your carburetors air/fuel ratio with included step-by-step instructions for whatever you need upgraded.
From your fuel needle to the main air jet, Dynojet has extensively tested every component, which means that you’ll see results as soon as you rev the engine.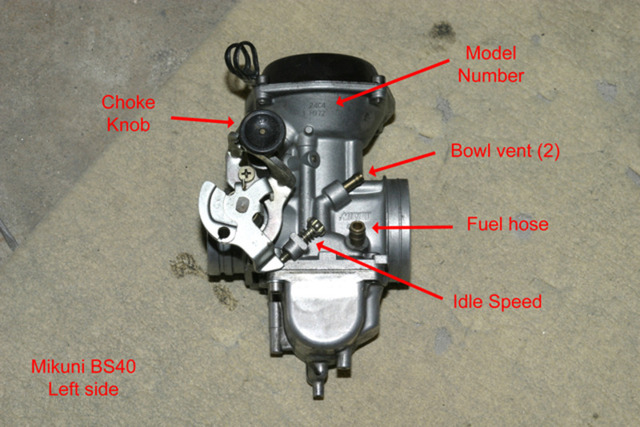
These jet kits give some extreme upgrades in a small package. They increase power and smoothness throughout the entire rev range while maintaining fuel economy. There are multiple kit options from stock commuter motorcycles to race-ready bikes and everything in between.
| Description | Size | Updated | Download |
|---|---|---|---|
Installation Guide - Jet Kit for Kawasaki KFX400 (219. 29 kB) (Apr 20, 2020) 29 kB) (Apr 20, 2020) | 219.29 kB | Apr 20, 2020 |
Sign Up for Our Newsletter:
In order for the ATV to work like a clock, the rider needs to regularly carry out a complete maintenance of the equipment. And a key element of maintenance is ATV carburetor adjustment. Over time, the system starts to work incorrectly, which increases fuel consumption, worsens dynamics and other problems appear. So how do you adjust an ATV carburetor?
The operation and life of the engine directly depends on the quality of the fuel mixture. The carburetor is responsible for the preparation of the composition, but after prolonged use of the equipment, the settings “go astray”. This results in:

Many riders who decide to buy an inexpensive ATV simply do not spare the technique and ignore this procedure. But even if you plan to change your device in 1.5-2 years, adjustment is needed. The reason for this is increased fuel consumption. A quad with an untuned carburetor "eats" 30-40% more gasoline, and these are tangible costs.
So how do you adjust the carburetor on a Chinese ATV? For this you need:
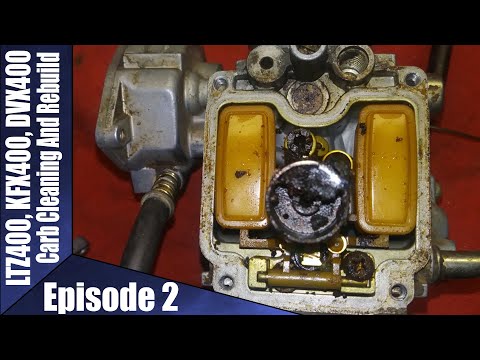
However, it is important to remember that all adjustments are made only with a "clean" carburettor. This means that the rider needs to remove all the dirt from the node and flush the system to remove condensation and sediment from it.
Note: Just before adjusting, the engine must be warmed up to operating temperature.
To set the carburetor idle speed, the float chamber must first be cleared of fuel. To do this, start the ATV, close the fuel cock and wait until the machine stalls (5-10 minutes). To speed up the process, you can take a little ride on the quadric. Of course, gasoline can be drained, but in any case you will have to warm up the device, so the first method of "removing" gasoline is more effective.
Then:
Read the manual before adjusting the carburetor on a 125cc ATV to be sure. Remember that the location of the bolts is different in different devices, so read the documentation in advance.
To evaluate the quality of the fuel composition, make a test run.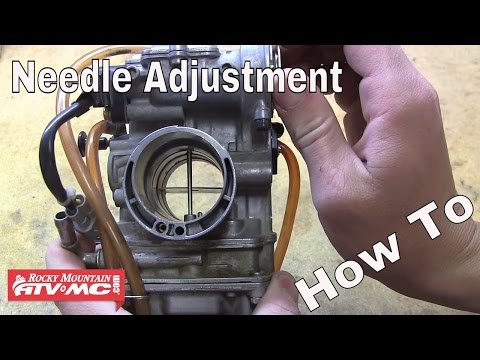 After that, unscrew the candle, and evaluate its condition. If it is:
Also look out for these “symptoms”: damaged tip (electrode failure), oil deposits (damage to rings and caps), chips and inclusions (sign of motor failure).
To adjust the mixture you need to twist the needle cover and pull it out. To get the needle, pull out the cable. After that, move the ring in the required direction (lower - more air, but less fuel and vice versa). Then start the engine and make sure it doesn't stall.
The last step in adjusting the 125cc ATV carburetor is adjusting the petrol level. To do this, you need:
Note: Adjust as carefully as possible as system components are very fragile. Ideally, carburetor tuning should be done by a specialist.
06/16/2020 21754
It often seems like an insurmountable task for beginners to tune and adjust the carburetor of an ATV, but in fact, it is far from being the case. Using our instructions, you can easily set up a carburetor with your own hands.
Due to improper carburetor settings, problems such as: failures during acceleration, jerks while driving, uncertain start of the engine, poor acceleration dynamics, overheating, loss of power, increased fuel consumption, formation of deposits in the combustion chamber.
So what exactly are we going to tune?
Attention! The adjustment is carried out under the condition of a warm engine and a clean carburetor.
First, make sure there is no condensation in the carburetor. First, you need to drain the gasoline from the float chamber, for this you need to close the fuel cock and partially unscrew the screw No. 1, after the gasoline has drained from the float chamber, tighten the screw No. 1.
Let's look at photos of candles with various deposits and defects.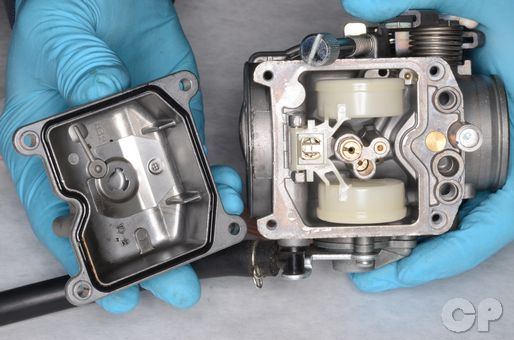
A 100% indicator of a correctly adjusted combustible mixture is carbon deposits on a candle.
Consider the location of the screws for adjusting the quality of the mixture and idle speed of carburetors of different models.
#1 Float chamber plug; No. 2 Mixture quality screw;
#3 Idle adjustment screw.
1 - quality adjustment screw at idle; 2 - fuel inlet fitting; 3 - fitting through which you can sleep fuel from the float chamber; 4 - screw-plug of the float chamber.
1 - ventilation tube; 2 - idle speed adjustment screw; 3 - screw for adjusting the composition of the air-fuel mixture.
ATV carburetor speed and mixture adjustment.
1. Start and warm up the engine until it reaches operating temperature.
2. Adjust the idle screw to set the idle speed to normal. Completely, until it stops, tighten the fuel mixture screw, the engine should stall. If this does not happen, check the tightness of the air supply system from the air filter.
3. Loosen the fuel mixture screw 1 turn. (Turning the screw clockwise, we enrich the mixture, unscrewing it counterclockwise, we lean).
4. Start the engine and, by adjusting the idle screw, set the speed slightly higher than usual
5. Slowly unscrew the fuel mixture screw until the engine reaches maximum speed (we unscrew the screw no more than 2 turns, but depending range may fluctuate due to engine wear and other faults).
6. Re-adjust the idle screw to set the idle speed to normal.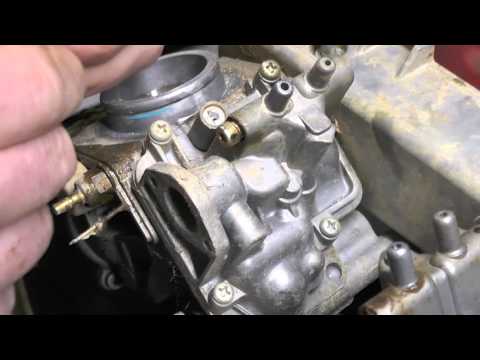
7. Press the throttle trigger several times, check if the idle speed is stable.
Mixture quality adjustment with a needle.
Probably you have heard more than once about adjusting the quality of the mixture on the carburetor by manipulating the needle. I note that these are extreme measures, for the initial adjustment, use the mixture quality screw, and only if you do not get the desired result, unscrew the mount and remove the needle. What does she represent? This is the main element that regulates the amount of gasoline supplied to the combustion chamber. Connected directly to the throttle handle through a cable. When you turn the knob, the needle rises higher, opening up a channel for fuel, thereby delivering more mixture, which increases power, which translates into speed.
You will see 5 grooves on the needle at the attachment point. Initially, the retaining ring fixes it in the central position, this is the best option. But sometimes it is not possible to achieve the required quality of the mixture.