Tubeless tyre technology for bikes is exactly what you’d imagine from the name – it does away with inner tubes, working in much the same way as the tyre and rim of a modern car.
Tubeless is now the default option for mid-range to high-end mountain bikes and gravel bikes, and it’s becoming increasingly popular for road bikes too.
This guide covers the basic principles of tubeless and we’ve got separate advice on tubeless setup for road bikes and tubeless setup for mountain bikes.
Don’t miss our guides to the best tubeless road tyres, the best mountain bike tyres, and the best gravel tyres.
Also, if you want to optimise your tyre setup for speed, comfort, grip and puncture protection, we’ve got in-depth guides to road bike tyre pressure and mountain bike tyre pressure.
If there are any technical terms or jargon that aren’t familiar, scroll to the end of the article for a full glossary.
Tubeless does away with inner tubes. Enve
A tubeless tyre looks like a standard tube-type clincher tyre but requires no inner tube and, once ‘seated’ (seating is the process of snapping the beads into position), it forms an airtight seal with the rim.
A valve just like the one you’d find on an inner tube is fitted directly to the rim.
For the system to work, neither the rim nor tyre can leak air, so the tyre needs to fit tightly to the rim.
Sealant, which sloshes around inside the tyres, is an essential part of any tubeless setup.Russell Burton / Immediate Media
Sealant poured into the tyre or injected through the valve helps plug any tiny leaks. This sealant stays liquid inside the tyre and will heal small punctures suffered while riding.
Tubeless tyres are not to be confused with tubular tyres. Tubulars (also known as ‘tubs’ or ‘sew-ups’) are a traditional type of tyre that’s glued or taped to a tubular-specific rim. They are still widely used in road racing and cyclocross but have otherwise largely been replaced by high-performance clinchers.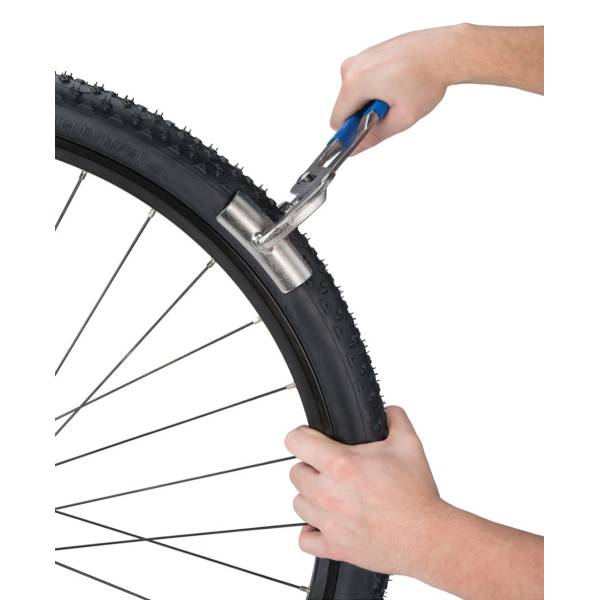
Tubeless setups suffer fewer punctures, but it’s the potential performance benefits of lower pressures that are the main advantage of the tech.BikeRadar
The number one advantage of tubeless tyres compared to standard clinchers with inner tubes is they can be run at lower pressures without the risk of pinch flats.
A pinch flat occurs when your tyre hits an obstacle (such as a rock or the edge of a pothole) and deforms to such an extent that it squashes the inner tube against the rim. This leads to a characteristic ‘snake bite’ style double puncture.
With no inner tube to trap, and sealant in the tyre to heal small punctures, a tubeless setup is much less prone to flatting overall, and so allows you to reap the benefits of lower tyre pressures.
These include greater comfort, and potentially more grip and speed too, although the relationship between tyre pressure and performance is complex so it’s hard to generalise.
Tubeless tyres may also have lower rolling resistance and therefore be faster than an equivalent tubed setup, but again it’s hard to generalise because there are many variables and it depends exactly what you consider to be an apples-to-apples comparison.
There is a general consensus that tubeless tyres roll faster than tubulars, though, and this is driving a gradual adoption of tubeless by pro road racers.
The advantages of tubeless are pretty clear cut for mountain bikes and gravel, but the picture is more nuanced for road use – many riders feel the added complexity is not worth the benefits.
When things don’t go to plan, tubeless can be messy and inconvenient.Jonny Ashelford / Immediate Media
Tubeless setup and maintenance is inherently more onerous than using inner tubes, tubeless tyres cost more than non-tubeless tyres, and you’ll need to keep buying sealant.
Some tubeless tyres mount easily and will seat on the rim using a normal pump.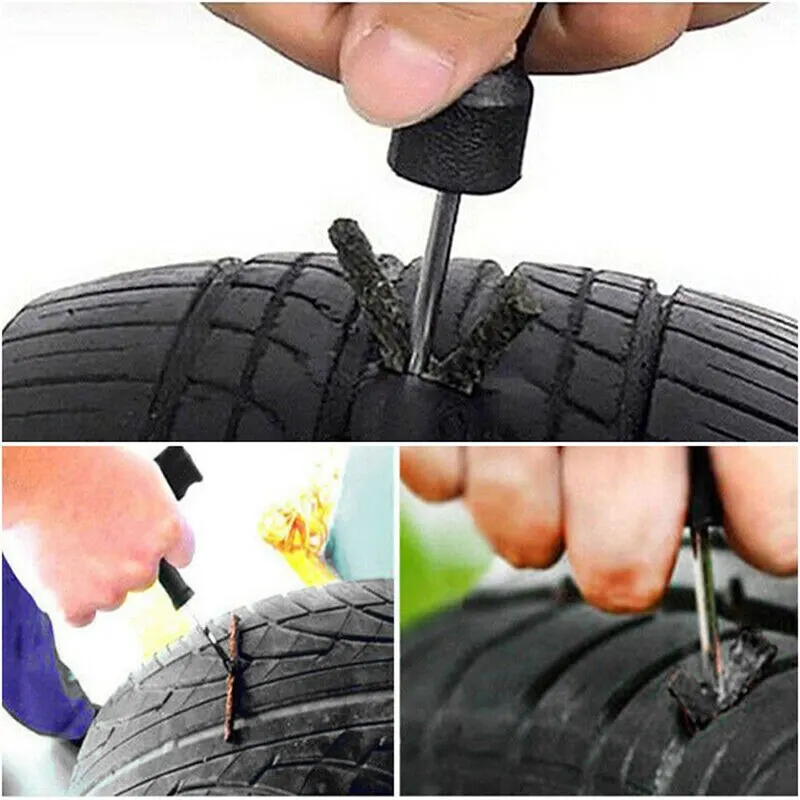 However, this often isn’t the case and some tyres are tricky to mount and/or need a dedicated tubeless inflator or air compressor to seat.
Sealant can be messy and needs to be renewed periodically – typically every few months – because it gradually dries out.
Tubeless tyres also need to be pumped up more frequently than tubed tyres – it’s advisable to check your pressures before every ride.
It’s important to make sure you’re matching compatible parts when you go tubeless.Matthew Loveridge / Immediate Media
For the best and safest results, tubeless requires both tyres and rims designed specifically for the job. Tubeless tyres have stretch-resistant beads to prevent blow-off under pressure and casings that are sealed to prevent air loss.
Rims vary in design but usually have a central channel to make tyre fitting easier, and humps that keep the tyre beads locked in position. The majority also have bead hooks to aid tyre retention, but hookless rim designs are also common and some brands claim these offer an advantage.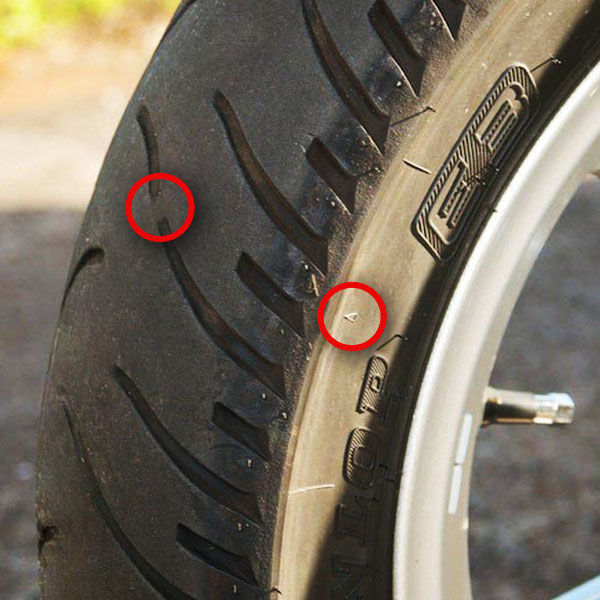
It used to be common in the mountain bike world – and cyclocross/gravel to some extent too – to run standard tube-type clincher tyres and/or standard clincher rims tubeless.
However, with the choice of proper tubeless tyres and rims now on the market, there’s not much incentive to do this. Results with homebrew setups vary greatly, and it’s definitely not the easiest or safest option.
With a road bike, you should never run a non-tubeless tyre tubeless or attempt to convert a standard tube-type rim. The higher pressures used on the road make this dangerous and the consequences of failure can be serious.
Brands use various terms to designate their tubeless tyres. Maxxis, for example, uses “TR” for Tubeless Ready.
These terms are sometimes used interchangeably and don’t have standardised definitions.
For some brands, a tubeless-ready rim is exactly that, and all you need to do is insert a valve (which may or may not be included with the wheels), fit an appropriate tyre and add sealant.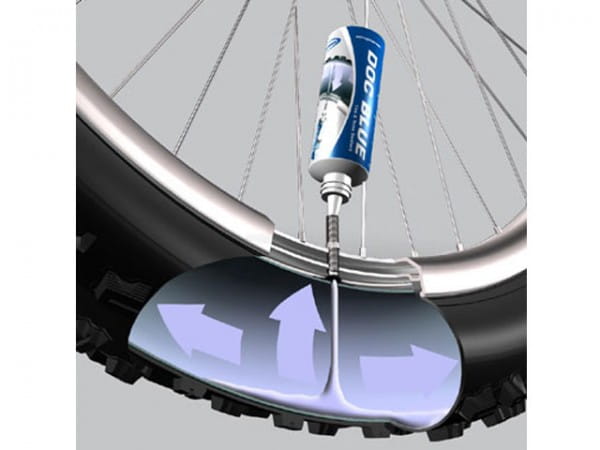
If a wheel is described as tubeless-compatible, it’s likely you’ll also need to fit tubeless tape to seal the rim.
In the road world, it’s not uncommon for bikes to ship with tubeless-compatible wheels, but non-tubeless tyres.
That means you’ll need to fork out for a set of new tyres in addition to the other bits if you want to ditch your inner tubes – a significant extra outlay.
Hookless rims are only suitable for tubeless-specific tyres. You can usually fit an inner tube if you need to (for example, as a get-you-home measure – you’ll need to remove the tubeless valve first, of course), but you can’t fit a standard tube-type tyre because there’s a risk it will blow off the rim.
For mountain bikes, tubeless compatibility is mostly straightforward but tyre designs vary and some will be more porous (and hence require more sealant to hold air) than others.
In the late nineties, Mavic created the UST standard (Universal System Tubeless), and this is only designed to work with UST-conforming tyres and rims.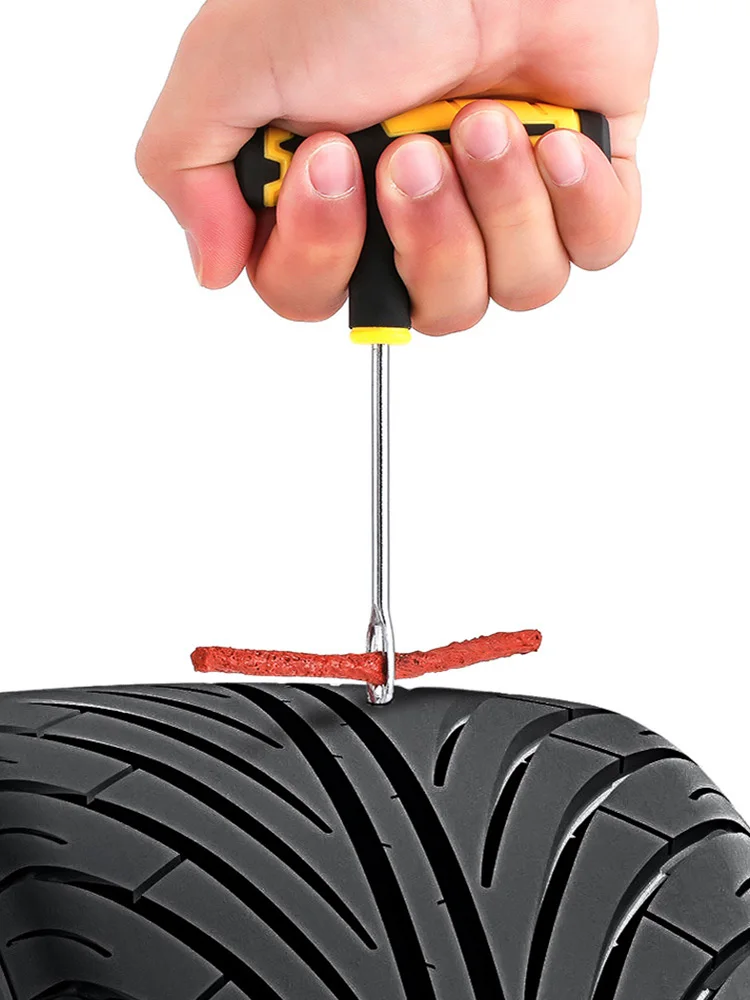
These tyres are made to an exacting specification and are heavier and more airtight than many ‘tubeless-ready’-designated tyres.
Otherwise, you should expect any tubeless-ready mountain bike tyre to work with any tubeless-ready mountain bike rim, unless the respective manufacturer explicitly forbids it.
When it comes to tyres, it’s critical you follow manufacturer guidelines to stay safe.Simon Bromley / Immediate Media
For road and gravel bikes, things are a bit messier. Tubeless standards haven’t yet fully settled down and you should pay close attention to rim and tyre manufacturer guidelines when considering a particular combination.
We’ve got separate guides on tubeless setup for road bikes and mountain bikes, but here are the basics for setting up your wheels tubeless:
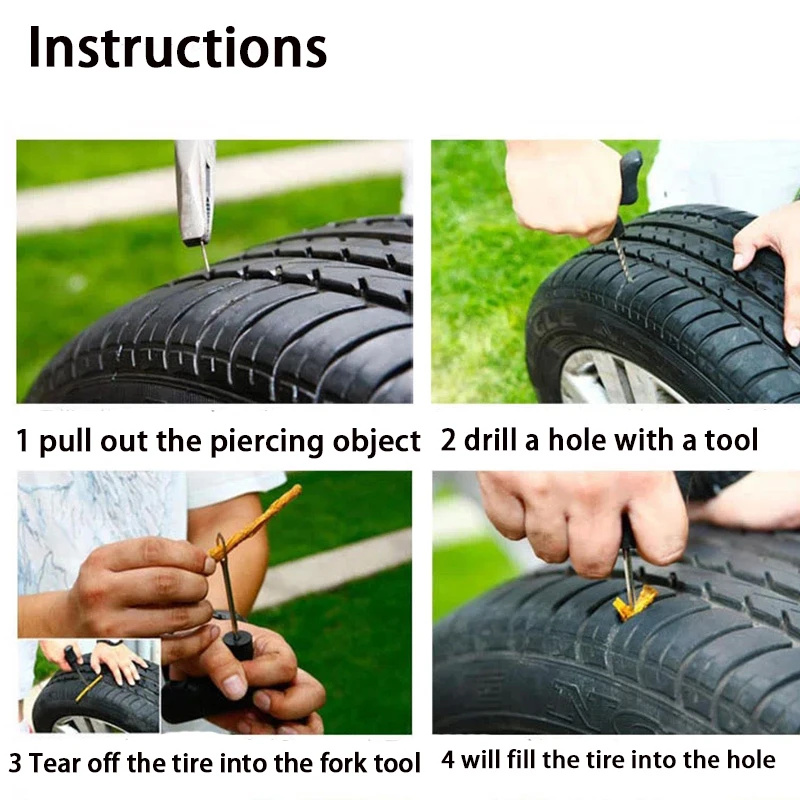
There are all manner of tubeless tyre repair solutions on the market.Steve Behr
Overall, you should experience fewer punctures with tubeless. The beauty of the technology is that small punctures are healed by sealant as you ride, sometimes without you even noticing.
Larger punctures or slashes require more intervention. Your options are:
We’ve got a separate guide on how to repair a tubeless tyre.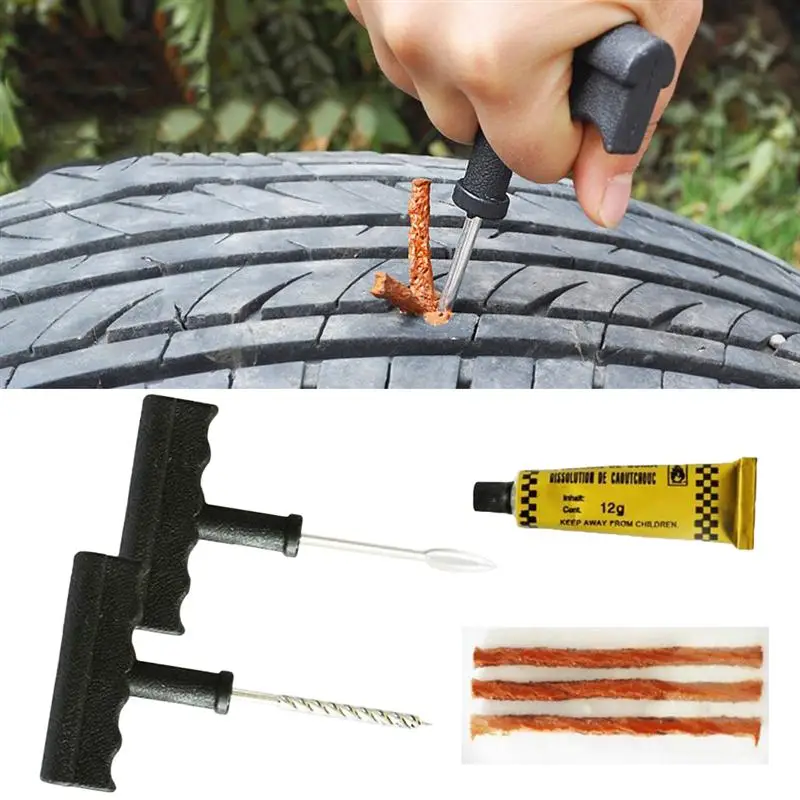
Tubeless isn’t a panacea, but it offers meaningful advantages for many riders.Felix Smith / Immediate Media
It depends. For mountain bikes it’s an unequivocal yes. For gravel bikes it’s a yes, assuming you want to get the best out of your bike and you do actually take it off tarmac.
For road bikes, it’s a yes if you want the performance benefits or you suffer a lot of punctures, but the differences are less stark.
At BikeRadar we’re broadly pro-tubeless, but we recognise it’s not for everyone and we certainly wouldn’t recommend it for a bike that’s used infrequently because the sealant will simply dry up.
 Tube-type and tubeless tyres are both types of clincher
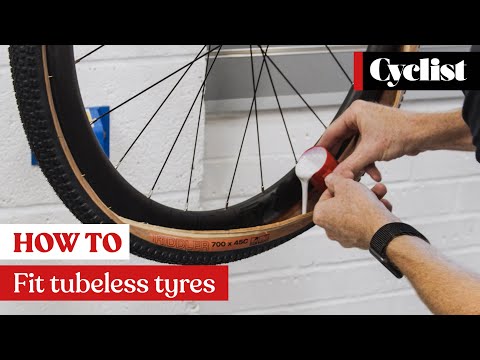 A number of tyre makers produce UST tyres, but only Mavic and Mavic’s licensees produce UST rims
Matthew Loveridge (formerly Allen) is BikeRadar's former senior writer, an experienced mechanic, and an expert on bike tech who appreciates practical, beautifully-engineered things. Originally a roadie, he likes bikes and kit of every type, including gravel bikes and mountain bikes, and he's tested a huge variety of all three over the years for BikeRadar, Cycling Plus, Cyclist.co.uk and others. At 174cm tall and 53kg, he looks like he should be better at cycling than he actually is, and he's ok with that.
Road tubeless setup can seem like a bit of a dark art to the uninitiated, but the technology has improved massively in recent years. Here, we demystify the process and explain exactly how to set up your road tubeless tyres.
To understand how to set up your road tubeless tyres, it’s first useful to explain what makes up a tubeless setup and what each component does.
If you’re researching what tyres to buy, we’ve got a buyer’s guide to the best tubeless tyres. We’ve also got a guide on how to repair a tubeless tyre.
Tubeless tape seals up the bed of a non-UST rimStans No Tubes
Tubeless tape is an airtight rim tape that is applied to the bed of a rim to seal up spoke holes and rim joins.
There are a few variations of tape available, with some rated for both road and mountain bike use.
A tubeless valve is much like a regular Presta valveJoe Norledge / Immediate Media
A tubeless valve is a Presta-style valve that is identical in function to a regular inner tube valve. It’s usually (though not always) fitted to a conical bung that sits in the valve hole.
When the lockring is tightened down, it deforms the bung around the valve hole and tape, creating an airtight seal.
Any good tubeless valve should have a removable core. This helps with initial inflation and seating and, should the valve core become clogged up with sealant, allows you to either clean or replace this easily without having to unseat the tyre.
Tubeless sealant is usually a latex-based liquid that can seal small holesRussel Burton
Sealant is a milky, most commonly latex-based liquid that will seal small holes in your tyre, usually before you’ve even noticed there’s a puncture at all.
An excellent explainer on how tubeless sealant works can be found in our guide to the best tubeless sealants.
Stan’s No Tubes Race Sealant and Effetto Caffélatex are two of our favourites.
Mavic’s UST rims have a totally sealed bedBikeRadar
Like the tyre, tubeless ready road rims are visually identical to a regular clincher rim.
However, closer inspection reveals that, like tubeless tyres, the profile of the hook of the rim (where the bead of the tyre interlocks with the rim) is subtly different. The well of the rim is often slightly deeper as well.
A select few rims — mostly from Mavic — are built to UST (Universal System Tubeless) standards. Among other things, this standard dictates that the rim must be sealable without tape, with the rim bed free of holes.
These are relatively few and far between and you’re much more likely to come across a rim with a regular drilled bed.
The bead of a tubeless tyre is subtly, and critically, differentJoe Norledge / Immediate Media
Tubeless road tyres may look the same as a regular clincher, but they are subtly and critically different.
The two key differences are the dimensions and profile of the bead; the bead is usually very slightly smaller (or, more accurately, made to tighter tolerances) than a clincher and the profile of the bead is designed specifically to interlock with the unique hook of a tubeless rim.
A little bit of jiggery-pokery can get most mountain bike tyres to go tubeless — though not always safely — but on the road, we absolutely recommend you only ever use proper tubeless tyres and rims as the pressures, speed and consequences of failure involved are very, very high.
The Pro One is our favourite road tubeless tyreBen Delaney / Immediate Media
The following video includes paid product placement for Schwalbe
We demystify how to set up road tyres tubeless on our YouTube channel
Thoroughly clean your rim before applying tapeJoe Norledge / Immediate Media
Before applying tape, ensure your rim bed is absolutely clean and free of residue from any old tape or old sealant.
It’s best to avoid mechanical removal for all but the most stubborn of residue. Instead, turn to methylated spirits and a clean rag to soften up any old glue.
Avoid using any solvents, particularly on carbon rims, as this can damage them. If you’re in anyway unsure whether a particular chemical is safe to use, contact your rim manufacturer.
Give the rim one last final wipe down with a clean rag.
Thoroughly clean your rim before applying tapeJoe Norledge / Immediate Media
Starting from the side of the rim opposite the valve hole, begin by holding the tape down into the well of the rim with a few fingers and apply around 6 to 8 inches onto the rim, ensuring it is central and kept very taught.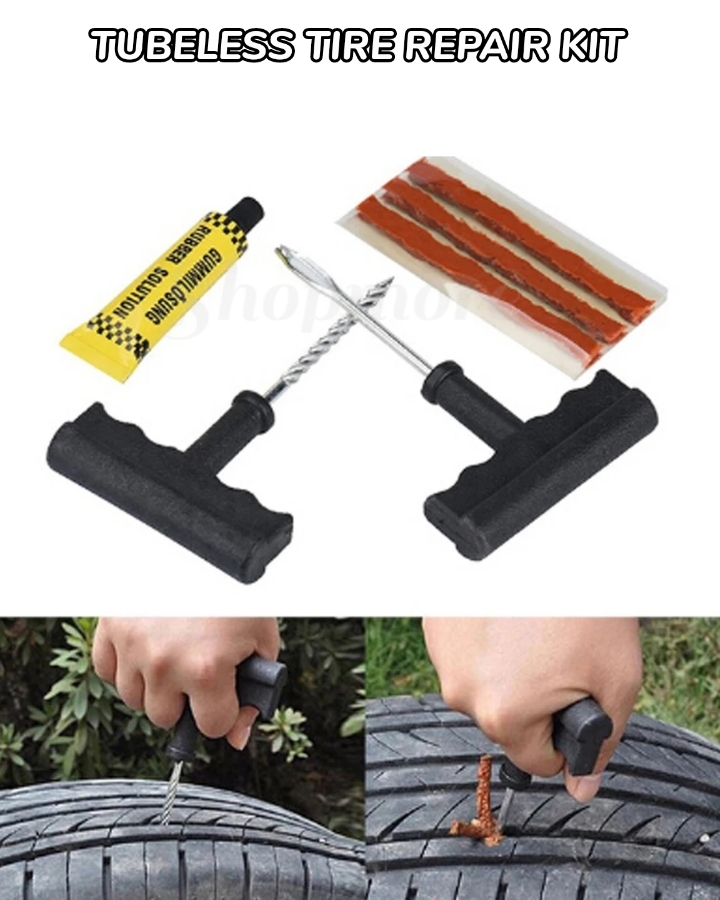
https://media.immediate.co.uk/volatile/sites/21/2018/11/TubelessTape720_2Mb-fc5be98.mp4
Once you have applied this small section, the tape should hold itself in place. At this point, I like to hold the wheel around the hub and rotate the wheel away from me as I apply further tape, keeping the tension high and ensuring it stays nice and central.
Overlap the tape by about four inchesJoe Norledge / Immediate Media
Wrap all the way around the rim, again keeping the tension high and avoiding straying to the edges. Once you have reached the start of the tape, overlap by around 4 inches, cut the tape and firmly press the tape down with your thumbs, working out any bubbles.
Check there is no damage to the tapeJoe Norledge / Immediate Media
Once the tape is applied, thoroughly check around the wheel for any bubbles, tears or areas you have strayed too far from the edge.
If you have damaged the tape, it is possible to patch it, but bitter experience has shown that this often doesn’t work and it’s best to just retape the rim. Faff now will avoid roadside heartache later!
Run a plastic tyre lever around the edge of the tapeJoe Norledge / Immediate Media
Once you’re happy the tape is in good order, run the lip of a plastic tyre lever around the bead of the rim to seat it fully.
Use a small prick or soldering iron to make a hole for the valveBikeRadar
Start by finding the valve hole on the rim and pushing, from the inside outward, a small prick or spoke through this to mark exactly where the valve hole is.
Then, from the outside, make a small hole in this. If you really want to show off, you can use a soldering iron or heat the prick up to make a clean hole.
Push the valve through the hole and let it ‘cut’ the hole to size. Some recommend cutting the tape with a Stanley knife, but I’ve found this to sometimes tear the tape.
Push down on the valve with your thumb such that it deforms the bung, screw on the lockring.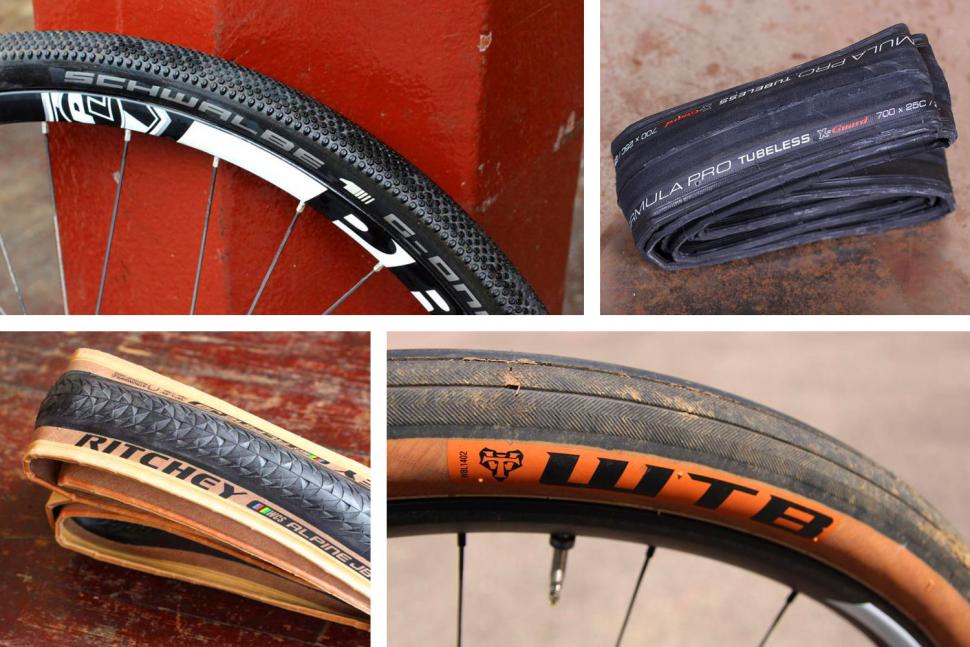 It’s good practice to put the tiniest dab of grease on the lockring to make roadside removal easier.
As there’s no tube to pinch, you can be a bit more liberal with your use of tyre levers, though you’ll gain big kudos if you can fit tyres without themJoe Norledge / Immediate Media
Fitting a road tubeless tyre is exactly the same as a regular clincher, but can be a bit more difficult due to the tighter bead.
The good news is that you can be a bit more liberal with your use of tyre levers, as there’s no tube to worry about. Don’t go totally gung-ho though because it’s still very easy to nick or otherwise damage tubeless tape, forcing you to start all over.
With a bit of good technique and a heavy, grippy pair of gloves, it’s normally good to go sans levers.
Once you’ve got both sides of the tyre on, massage the tyre and ensure it is sitting in the well all the way around the rim and the tyre sits on either side of the valve.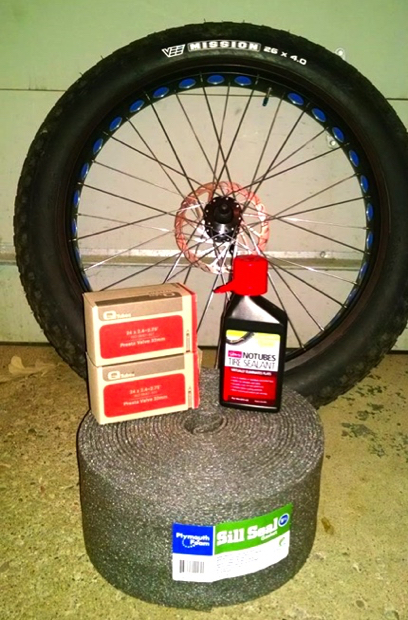
Fill your tyres with the recommended amount of sealantJoe Norledge / Immediate Media
If you’re confident in your ability to get the tyre on with minimal fuss, you can add your sealant before fully fitting the tyre.
However, if it’s a new combination, you may find it much easier to add the sealant via the valve. This can be done via a syringe or a small applicator bottle.
Gently rotate the wheel to coat the inside of the tyre.
A few swift blasts from a decent track pump should seat the tyreJoe Norledge / Immediate Media
With the valve core still removed, double check that the tyre is seated correctly around the whole wheel.
Fit your track pump and, hopefully, a few swift blasts of air will pop the tyre into place.
If only one side or a section of the tyre seats, keep pumping until you hear a number of satisfying pings and the tyre is seated around the full circumference of the wheel.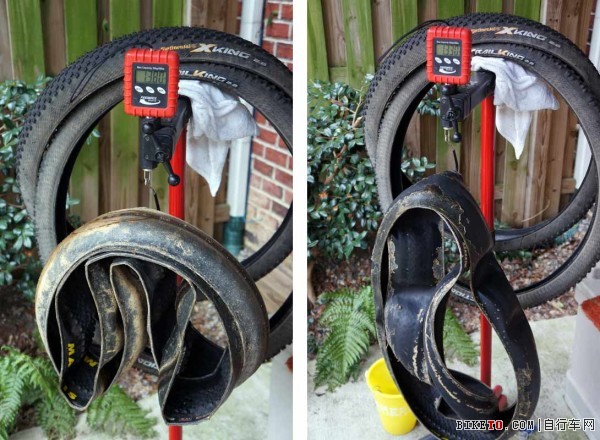
As soon as it is seated, remove the head of the pump and replace the valve core.
Spin the wheel to coat the inside of the tyreJoe Norledge / Immediate Media
Add a bit more air then give the tyre a vigorous shake and spin to fully coat the inside of the tyre. Once done, pump your tyres up to the recommended pressure.
It is often possible to seat a high-quality road tubeless setup without removing the valve core, but this is so dependent on the quality of your track pump, so I recommend avoiding any faff and taking the extra 30 seconds that removing your valve core takes.
And that’s it! Do you have any recommendations for road tubeless setup? Any experiences, good or bad, that you want to share? Let us know your thoughts in the comments below.
Deputy editor
Jack Luke is the deputy editor at BikeRadar and has been fettling with bikes for his whole life.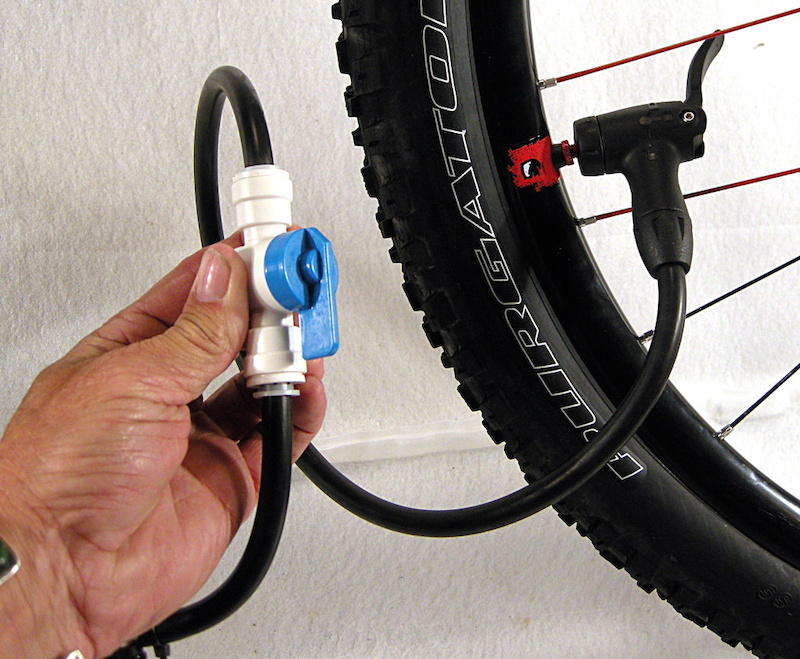 Always in search of the hippest new niche in cycling, Jack is a self-confessed gravel dork, fixie-botherer, tandem-evangelist and hill climb try hard. Jack thinks nothing of bikepacking after work to sleep in a ditch or taking on a daft challenge for the BikeRadar YouTube channel. He is also a regular contributor to the BikeRadar podcast. With a near encyclopaedic knowledge of cycling tech, ranging from the most esoteric retro niche to the most cutting-edge modern kit, Jack takes pride in his ability to seek out stories that would otherwise go unreported. He is also particularly fond of tan-wall tyres, dynamo lights, cup and cone bearings, and skids. Jack has been writing about and testing bikes for more than five years now, has a background working in bike shops for years before that, and is regularly found riding a mix of weird and wonderful machines. Jack can also often be seen zooming about with his partner aboard their beloved tandem, Cecil.
A tube tire for a passenger car consists of a tire and a tube with a valve fitted with a cap or key cap.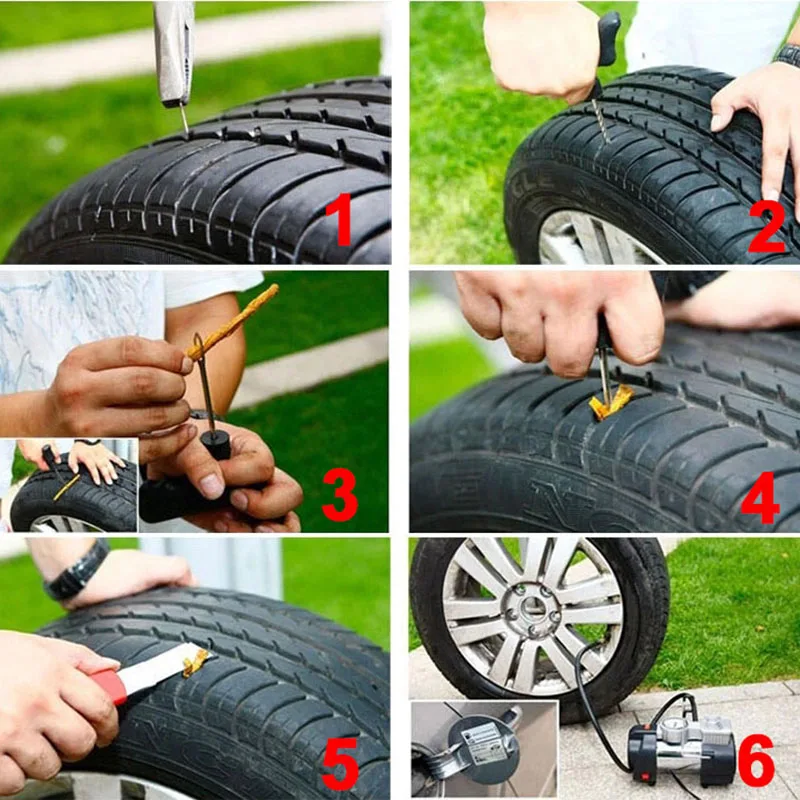
The chamber is an annular closed rubber tube with a rubber-metal valve. It is made of elastic rubber and serves only to hold compressed air.
Chambers operate under severe conditions, experiencing alternating deformations at high temperatures. Therefore, rubber for cameras should be airtight, elastic, resistant to thermal aging, not change their physical and mechanical properties at different ambient temperatures. The size of the chamber must strictly correspond to the size of the tire with which it is completed.
If we are talking about tires for passenger cars, tube tires are now a thing of the past. Foreign manufacturers have abandoned tubes, and now only tubeless tires are on the market. Cameras can be seen on domestic tire models, but not on all. Everything goes to the fact that cameras will soon become history.
A tubeless tire differs from a conventional one - it has a sealing layer 1.5...2.0 mm thick, which is vulcanized to its inner surface. It is made from a mixture of natural and synthetic rubbers with reduced gas permeability.
The tire beads are provided with a sealing rubber layer, which provides the necessary tightness in the area of the beads landing on the wheel rim flanges. This is facilitated by the special design of the tire beads, designed to increase the angle of inclination of the toe of the bead and the increased tightness of the beads on the landing shelves of the rim.
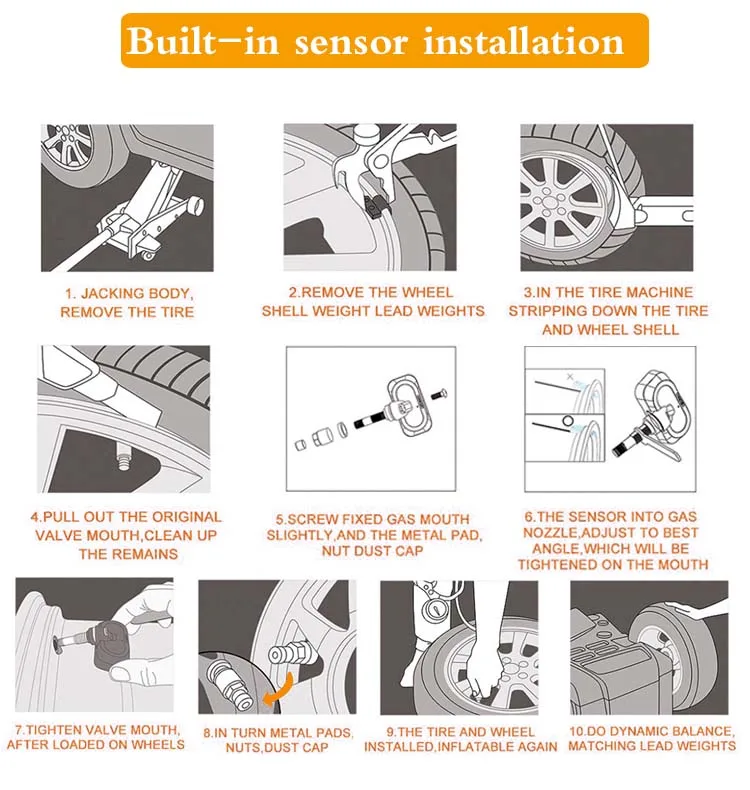
For tubeless tires, plug-in rubber-to-metal valves (rice) are used, which are installed in the valve holes of the rim with a tight fit.
Advantages of tubeless tires:
The main advantages of tubeless tires compared to tube tires are:
Attention:
At the same time, the use of tubeless tires requires careful mounting and dismantling. Damage to the bead flanges, especially steel ones, can lead to depressurization of a tubeless tire. If a tire is damaged, it must be repaired by specialists using equipment designed for this purpose.
In case of loss of pressure, do not drive with a flat tire. this will destroy the hermetic layer.
The tube is not inserted into the tubeless tyre. At first glance, you increase the strength of the tire, in fact, an air cushion is formed between the chamber and the pressure layer, contributing to the destruction of the latter. If the load on the wheel is increased (for example: a sharp turn), the wheel may break.
There are complaints about tubeless tires due to weak sidewalls. I would like to say that this is not so. There are no perfect tires. The manufacturer seeks from the tire not only durability, but also comfort when driving. It is the softness of the sidewall that gives a feeling of smoothness in movement. Having made a rigid sidewall, we will be able to jump on curbs and sewer wells on our car; when driving on a flat and good road, we will feel uncomfortable.
| Tire labels - how to read? From November 1, 2012, tires sold in countries within the European Union must have special stickers. They contain information, in particular, about the fuel.. July 11, 2022, 11:34 | |
| Causes of tire wear Tire wear is often the result of too much speed at which we move. However, there are many more factors influencing this process. Tire condition during .. 04 July 2022, 11:58 | |
| What is the minimum tread depth allowed? The tread of a tire is sometimes analyzed in terms of appearance and shape, modern technologies implemented by the manufacturer, or performance in winter conditions. However, the key parameter of tires in.. June 23, 2022, 10:06 | |
Tire deformation and side ties. What to do with them? What to do with them? One of the remarkable and main features of the structure of the inner part of any tire is the threads that make up the cord. For quite a long time they have a radial location at.. June 08, 2022, 10:21 | |
| Wheel alignment - do I need to change tires? If your vehicle behaves on the road, it may mean that you need to replace suspension components, steering system, wheels or tires. For this may.. 07 April 2022, 15:47 | |
Tubeless tires: device, advantages over tube tires
Today, car manufacturers are equipping their models with tubeless tires. Chamber rubber is a thing of the past, now it can only be found on old foreign cars or domestic cars. If you are the owner of just such a car, then this article will help you make a choice in the direction of tubeless tires.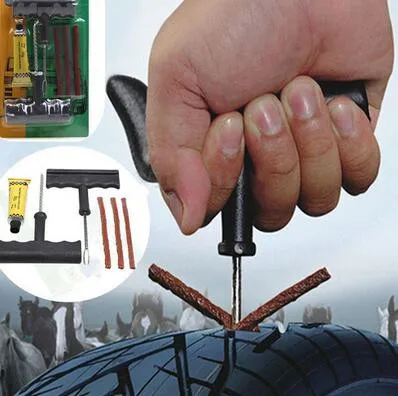
We will look at how chamber and tubeless tires differ, the device and features of modern tires.
Let's start with tube tires. They consist of two elements: a chamber made of a rubber compound in the shape of a torus, and a tire. The composition of the rubber should provide not only strength, but also the elasticity of the tire. When air is supplied inside the chamber, it should increase slightly in size according to the principle of a balloon. The dimensions of the tube and the tire itself must match perfectly, as the tube must fit inside without creases.
Their appearance will quickly cause the tire to become unusable. Tube tires do not last long, as their main element constantly experiences deformations under the influence of high temperatures. It is unprofitable for manufacturers to spend money on creating a “hardy” camera, so even domestic manufacturers have refused such tires.
Tubeless car tires consist of one tire.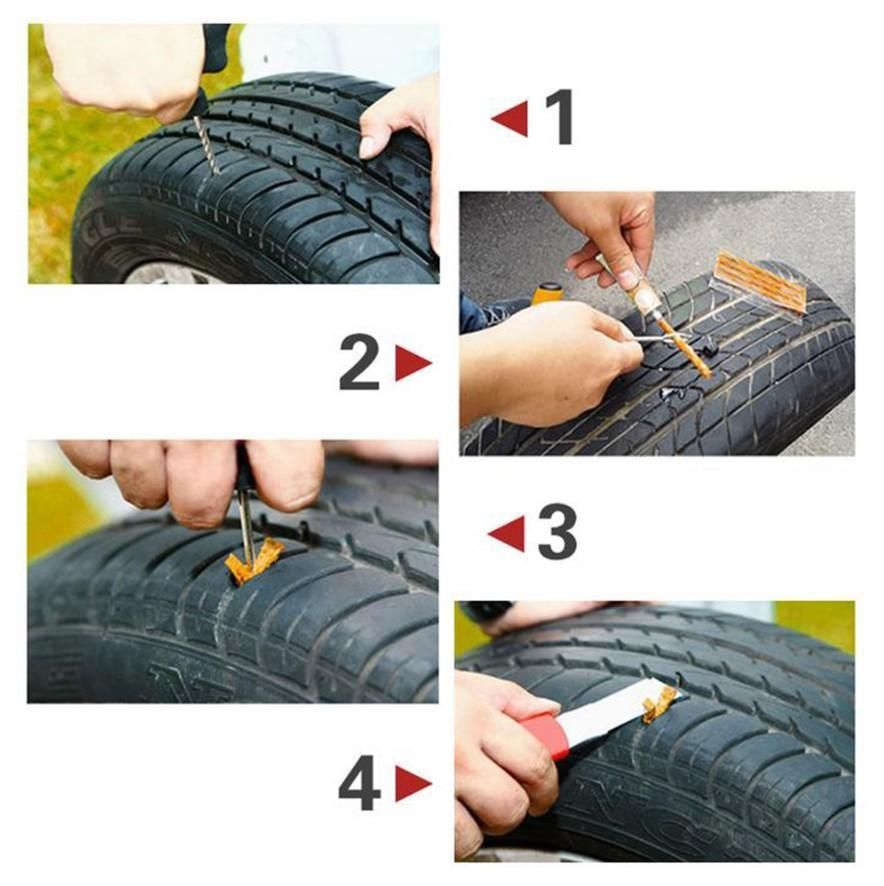 A 2 mm rubber layer is applied to its inside, due to which the tire does not allow air to pass through. Manufacturers also thought about the joint between the rim of the disc and the sides of the tire, where air leakage is also possible. To prevent this, the board is covered with a layer of soft rubber. The principle of operation of a tubeless tire is quite simple.
The tire bead sits on the rim shelf, in tubeless tires this element has a rounded protrusion, due to which the tire wraps around the bead from two sides. This solution ensures reliable tightness of the connection. Motorists know that a certain amount of air must enter the tire; in a tubeless tire, this issue is resolved with a valve that is installed on the rim of the rim. Now you know how tubeless tires differ from tubeless ones.
To understand why chamber models are a thing of the past, it is worth considering their disadvantages:
 Light weight is the main advantage of tubeless tires, as a large mass increases the inertial movement of the wheel when driving on uneven road surfaces, as a result, the undercarriage wears out much faster.
 We already know how a tubeless tire works, so it's easy to see the advantages over tubeless tires. Tubeless tires have improved tightness due to soft rubber at the joints, and malfunctions associated with chafing of elements have been eliminated. After a puncture, the tire does not fail, and if necessary, you can drive with a damaged tire to the nearest tire changer. The service life of chambered rubber is much longer, since it is not subject to overheating.
This is important - the disadvantages of tubeless tires and mounting features
Tubeless and tubeless tires differ not only in design, but also in the method of installation and repair. The main disadvantage of such rubber is installation, which will be problematic to do with your own hands. During mounting and dismantling, it is very easy to damage the bead flanges, which will lead to depressurization of the tire. Repair of a punctured tire should be carried out by professionals using special equipment. That is, on the way you will not be able to “patch up the rubber”.
Answer to the question “Which is better for tube or tubeless tires?” we gave. The main criterion for choosing any component is safety; if a tubeless tire is punctured at high speed, you will not lose control.