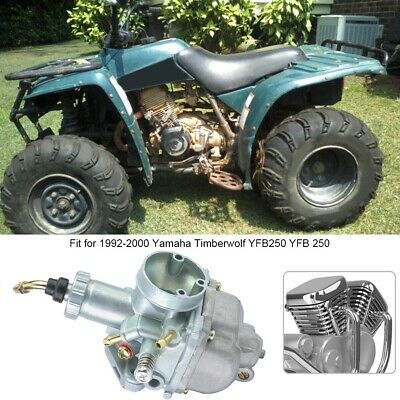
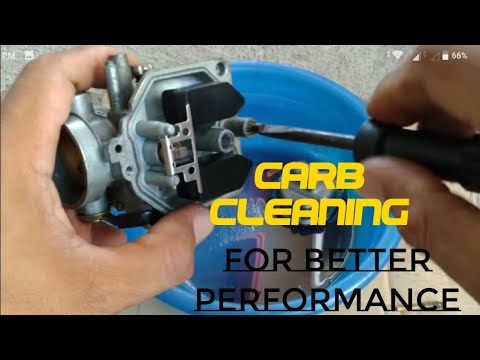
An ATV carburetor performs the vital role of mixing air and gasoline (in the right amounts) before getting the mixture into the ATV’S cylinders. Although not commonly used in modern ATV releases, carburetors are still popular for owners who don’t mind tuning their cars or ATVs frequently. But how does an ATV carburetor work?
An ATV carburetor works by mixing air and fuel to allow for internal combustion. Carburetors usually have a narrow kink called a venturi that speeds up the air, thus lowering its pressure. Decreased air pressure allows the fuel pipe to release fuel, allowing air and fuel to mix in the cylinders.
Curious to learn how an ATV carburetor works? Then you couldn’t be in a better place. Read on as we break down the basic functions of a carburetor.
A carburetor is a mechanical device that mixes fuel and air to allow for internal combustion. Its function is inspired by Bernoulli’s principle, which states that as air moves faster, its static pressure reduces, consequently increasing its dynamic pressure.
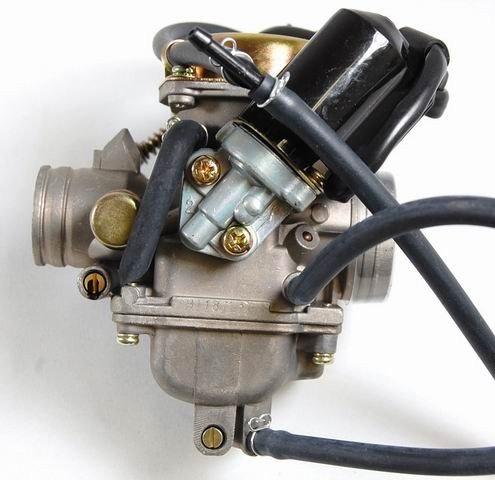
An ATV carburetor has an open pipe in the form of a venturi, which allows for the passage of air into the engine’s inlet manifold. The inlet manifold, also called the intake manifold, is part of the engine that supplies the air/fuel mixture to the cylinders.
The venturi widens and narrows strategically to regulate airspeed. You’ll find a butterfly valve known as the throttle valve, which can be turned to either block or allow airflow into the system. By controlling the amount of air that flows through the carburetor’s throat, the valve determines the air/fuel mixture ratio, thus regulating engine speed and power.
The narrowest part of the venturi usually has small holes that allow for the introduction of fuel. The presence of jets ensures that fuel flow is regulated precisely in the fuel path, thus allowing for proper combustion.
Carburetors usually vary in terms of design and complexity. However, most of these mechanical devices function on the same basic principle- mixing air and fuel to promote combustion and consequently power the engine.
You’ll find that most ATV carburetors use a simple design. They have a vertical air pipe that’s strategically located above the engine cylinders. The vertical air pipe is then joined to a horizontal fuel pipe (at the narrowest part of the venturi).
The failing pressure of the speeded-up air creates a much-needed sucking effect for the release of fuel. The air-fuel mixture can then be regulated through two swiveling valves located above and below the carburetor’s venturi.
The top valve is called a choke and regulates the amount of air that can flow in the venturi. When the choke is closed, airflow is restricted, allowing the venturi to suck in more fuel, thus giving the engine a fuel-rich mixture.
This comes in extra handy when the engine is cold, running quite slow, or when it’s just starting up.
The second valve is called the throttle and also helps to regulate the air-fuel mixture. The more the carburetor’s throttle is open, the more the airflow inside the carburetor, which translates to more fuel being sucked.
This results in more energy release, increased power, and eventually a faster ATV, hence explaining why opening the throttle valve allows an engine to accelerate.
Here’s a quick animation showing how a carb works:
Here’s a quick summary of how the ATV carburetor works:
Carburetors have been gradually phased out over the years, with more preference given to fuel injection systems. While both systems perform similar functions, carburetors are a lot hard to program, which decreases fuel economy and overall efficiency.
On the other hand, fuel injection systems are preferred due to their ability to deliver fuel straight to the cylinder. Carburetors tend to struggle when it comes to idling, which is pretty straightforward for the more modern fuel injectors.
Idling is possible with fuel injection since the system can gradually add small amounts of fuel to keep an engine going. Contrastingly, carburetors tend to have the throttle closed when idle. As a result, a carbureted engine will need an idle jet to prevent stalling after the throttle is closed.
Fuel injection systems also produce reduced levels of gas vapor, which reduces the chances of fire outbreaks.
Fuel injection systems have played a major role in the gradual phasing out of carburetors. A fuel injection system comprises a complex set of sensors and electronics, which allows for clean and highly efficient combustion.
ATV can either use carburetors or fuel injection systems to power the engine. Despite being phased out slowly, Carburetors have a simple working mechanism that makes them ideal for some ATV enthusiasts.
When the ATV engine is started, the choke (top valve) regulates the airflow into the pipe. The venturi plays a pivotal role in regulating air pressure inside the pipe, which determines the amount of fuel released from the tank.
The throttle also helps regulate the air-fuel mixture, allowing the engine to produce the power needed to accelerate the ATV.
Sharing is caring!
A carburetor is a highly sensitive, precision instrument designed to blend fuel and air in the correct ratio across the rather dynamic operating range of an internal combustion engine.
They’re also, believe it or not, very easy to understand. While I won’t say that carburetors and their tuning (tailoring carburetion to a particular engine and even specific use scenario) are easy, their principle of operation is quite simple, and service is usually easy to perform if the carburetor design is a workable one and there is sufficient access to it. Carburetors are kind of neat because we still live in an era where they are used (and arguably the most complicated and best carburetor designs are all that are left in play), but due to emissions restrictions, they are no longer developed. They’re sort of a living fossil in that respect.
In order to best explain carburetor design and improvement, I’m going to do what I usually do: take you back to earlier times to understand the simplest form of the topic we’re covering, and then we’ll skip ahead to all the big major milestones. I’ll also pepper in some factoids so this doesn’t get dry.
Here's the basic idea behind a venturi. If you understand this, you've pretty much got the hang of a carb. RevZilla illustration.
Like quite a few parts of a motorcycle, the air-and-fuel mixin’ device is born from research completed in another century. In the 1730s, Daniel Bernoulli, a Swiss mathematician and physicist, discovered that air pressure decreases as velocity increases. It so happens that a nice, consistent way to force that scenario to occur is to move the air through a restricted section of tube; the air speeds up, and the pressure falls. That was discovered around 1797 by an Italian physicist named Giovanni Venturi. He designed a tube that had a much smaller inlet at that restriction, in that low-pressure area. That inlet allows the tube to pull liquid into the flowing air.
That’s the whole thing in a nutshell. That’s what a carb is and does. It is a tube that flows air with very specifically placed voids that admit a very specific amount of fuel into an engine.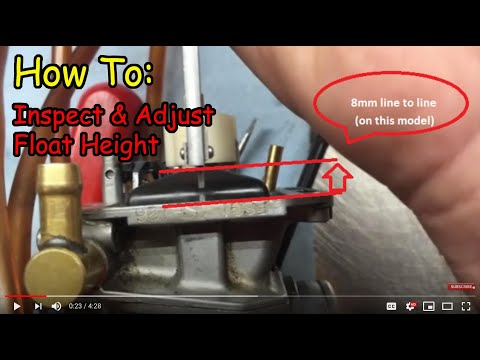 And ideally, it also emulsifies the fuel with air — atomization. (It’s important to know that liquid fuel is far less easy to ignite than fuel vapor suspended in air.)
This is a removable venturi from a Langsenkamp-Linkert carburetor found on many antique Harley-Davidson products. See the area where the diameter necks down? Photo by Lemmy.
So when you “give it gas,” you’re really not doing anything with the fuel at all. There is no direct link between your right hand and the gasoline. What you’re doing is actually pouring on the air. You’re admitting more air into your engine — it just so happens that due to Venturi’s effect, the air’s greater pressure differential allows it to carry along more fuel with it.
If you don’t make it any farther in this article, you pretty much understand what a carb does, and how it does it. But, like all mechanical bits in moto, there were evolutions and improvements that are very interesting. The history and evolution also help explain why you won’t find an antique Schebler from an early Harley hanging off a drag bike.
Before we start, you should know all carburetors can be classified by how air enters and exits the carburetor when it is oriented in its mounted position. So a downdraft carb, like you might find on a V8 muscle car, has air that enters from the top and moves down, picking up the fuel, where they travel together into the manifold and then on to the combustion chamber.
In the motorcycle world, nearly every carburetor is a sidedraft. I’m sure some eagle-eyed reader will produce an obscure model with an up- or downdraft carb I can’t think of, but odds are excellent if you see a motorcycle carburetor, it’s a sidedraft unit. This is due primarily to packaging constraints, and also is interrelated with attempting to keep intake runner length as close to equal as possible on multi-cylinder motorcycles.
The choke, a relic of a bygone era. This flap is closed manually to restrict airflow at the end of the carb away from the engine. It lets the engine "suck" against it, so fuel can come in easily, but the restriction on air makes the engine very rich, easing starting. Photo by Lemmy.
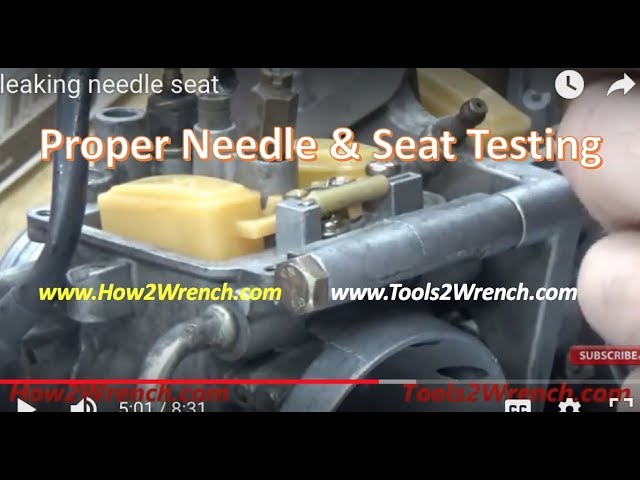
Most carbs have a bowl, an area where the fuel kind of hangs out. Some are set off to the side remotely, but most have a literal bowl that detaches from the body of the carburetor. In there is a float, which works just like the float in your potty. It controls the needle, which seats on an item called, rather logically, the seat.
A carburetor bowl. Photo by Lemmy.
Most motorcycle carbs are gravity-fed (the tank always mounts above the carb, unless there is a fuel pump to help), so the float, needle, and seat work together to admit fuel into the carb as needed without overfilling the bowl.
The black item here is the float, and connected to it is the needle, which seals against its seat. The out-of-focus brass bits are the jets. The topmost brass item is the pilot jet, and the lower is the main. Photo by Lemmy.
In the bowl, you may also see jets leading into the main body of the carb. These are usually replaceable brass pieces with very precisely sized drilled orifices. They often come in a range of sizes for tuning purposes. The size of the hole affects the amount of fuel in the air/fuel mixture.
Here's a carb slide. Note that the cutaway (the notched section at the bottom left) is visible. The cutaway shape and height can be altered to change off-idle response. This slide is analogous to the butterfly valve in earlier carburetors. Photo by Lemmy.
You may also see needles in the carb, as well. Depending on the carb, they may be fuel needles or air needles or “needle jets.” These look like an actual needle (though thicker) and are not the same as the needle that attaches to the float. Isn’t that silly?
In the body of the carburetor, you may see a slide, which holds the jet needle, or you may see a throttle disc, which may move when you turn the throttle (it might not, too, depending on what type of carb you have) and you might see another disc, the choke flap. Not all carburetors have all of these pieces. Why? Well, that is a nice segue into how carbs evolved and differ from one another.
I’m going to describe the following in terms of increasing complexity, and generally speaking, things moved in this order in terms of complexity. Improvements were made on very different schedules, but this is roughly the progression — it was just implemented at different times by different carb and bike manufacturers, and some steps got skipped along the way.
During the sunrise of motorcycling, carbs were similar to that basic unit we just described up above. Engines were crude, so the carburetors could be as well. Compression ratios were low, metallurgy was poor, which limited engine speeds, sealing technology was somewhere between prehistoric and nonexistent.
Some early motorcycles used an atmospheric inlet valve. Effectively, the intake valve was held closed with a spring like a normal valve of today, but the spring was much weaker. The valve was not opened mechanically, though, as in today’s motors. Instead, the piston’s downward motion created enough negative pressure to overcome the weak spring and admit the incoming air fuel charge into the combustion chamber. As the suction decreased, the valve then closed under spring pressure. This isn’t directly related to carburetors, but it comes into play a little later in this article, so hold that thought, OK? After a few years, intake valves became the standard ones we know now, being opened by a cam and lifter with a nice strong spring to close 'em back up.
As engines became more capable, it was realized that smoother operation and better running could be achieved through more precise control of fuel delivery. An engine at idle, a quickly turned throttle from a rider demanding acceleration, and an engine at full wail all have very different fuel delivery needs.
Early bike carbs had two circuits, the idle circuit and the high speed circuit. A “circuit” can be thought of as the portion of the throttle that that particular fuel path controls. So an idle circuit on an early carb might control idle to perhaps 25 percent throttle, and the high-speed circuit might handle the rest. In almost every carburetor, there is a some overlap and bleed as to what circuit serves what part of the throttle. Changing something in one circuit may change something in the other, and often, parts like adjustable air bleeds can move the transitioning point to avoid rough or erratic circuit changes.
A good example of this is the venturi size. Early Harley Linkert-Langsenkamp carburetors, for instance, are very similar carburetors, even for engines of reasonably different power capabilities. Air flow was controlled with a “butterfly” or throttle disc, so named because in operation, it resembles the flapping of a butterfly’s wing. To account for having one body to use with many displacements, different venturis were available for Linkerts, and those were more or less the differentiating factor between carb models.
The problem, however, is that a given size of venturi is really only optimal for a given flow rate, which translates into a single engine speed.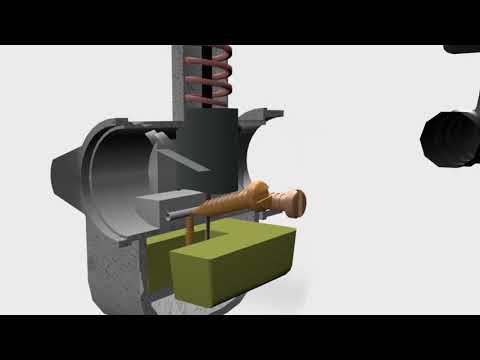 That’s just fine for a rototiller or the like, which uses an engine that operates at a fixed speed. They’re flexible enough, but the ideal situation would be venturis of different sizes for various throttle situations. Enter the slide carb.
A slide carburetor. Photo by Lemmy.
Slide carburetors differed from butterfly carbs in that they did not use a butterfly valve, but instead a round or flat “slide” that operates similarly to a guillotine is used. This slide is lifted by the throttle cable when a rider “twists the wick.”
Slide carbs offer a few advantages over a butterfly-style carb. First, and most importantly, the venturi size enlarges as the throttle is opened. It’s small at small throttle openings, and gets bigger at big openings. These carbs are still referred to as “variable-venturi” by some people.
This is a butterfly setup. Many early carburetors use this valve design. The shaft the disk is mounted on rotates 90 degrees or so. This position would be wide-open throttle. Yee-haw! Photo by Lemmy.
Slide carbs also have the advantage of not having throttle shaft bushings to wear out. Worn bushings can really make maintaining a reasonable idle speed and mixture a challenge. Additionally, because that throttle shaft and butterfly are not taking up space in the carb mouth, a slide carb at wide-open throttle has no inherent obstruction in the intake path.
Remember when we were talking about circuits earlier? One of the ways carburetors were improved was through addition of circuits. On the one hand, additional circuits provided increasingly granular and finer tuning ability. The downside to that, as it is on anything with increased adjustability, is increased complexity, which brings the ability to adjust more incorrectly than ever before.
Here is the orifice drilled into a pilot jet. It should be pretty easy to understand why gummy fuel or a dirty carburetor can prevent your motorcycle from starting and running. Photo by Lemmy.
One circuit that popped up and is found on most slide carbs is the jet needle we talked about earlier. Rather than simply have an idle circuit and an “everything else” circuit, the throttle was split into three parts. On most slide carbs, the jet needle controls from about one-eighth throttle right up to wide open, with the pilot handling idle and off-idle duty, and the main circuit handling most of the bigger throttle openings, usually with some assistance from the jet needle.
The jet needle. Note the various clip positions, as well as the very careful taper of the jet needle. Photo by Lemmy.
Jet needles often have multiple positions for their retaining clips. The higher that jet needle rides in the slide (clip moving towards the pointed end of the needle jet), the richer the mixture can be made in the middle part of the throttle. That handles the lower end of the midrange. The higher end is handled by the needle taper itself. A long, gentle taper will be leaner as the throttle is opened than a short, aggressive one as the needle moves up with the slide.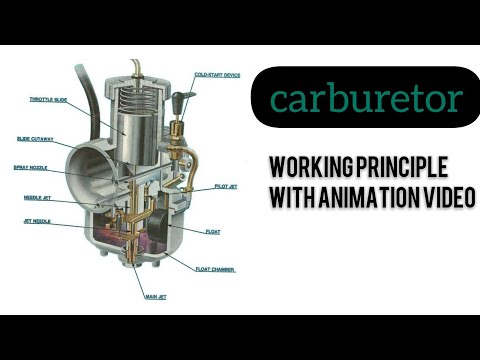
Interestingly, things like needle jets with multiple positions began to disappear in later carburetors, not because they didn’t work well, but emissions restrictions forced manufacturers into making their carburetors “tamper proof.” This is often why idle mix screws are set from the factory and blocked off with brass plugs. You can still access the adjustment screw, you just have to remove the pressed-in plug, which usually qualifies as tampering with an emissions control device. Kind of a Catch-22 there, huh?
Another development that came along was the addition of an accelerator pump, which isn’t a separate circuit, but addresses a very specific need: remove the stumble that tends to come from a quickly opened throttle valve. That stumble generally occurs because airflow is increased suddenly, yet fuel lags behind. Accelerator pumps are basically a tiny, mechanically actuated fuel pump that is controlled by the throttle, and they usually open only under certain circumstances.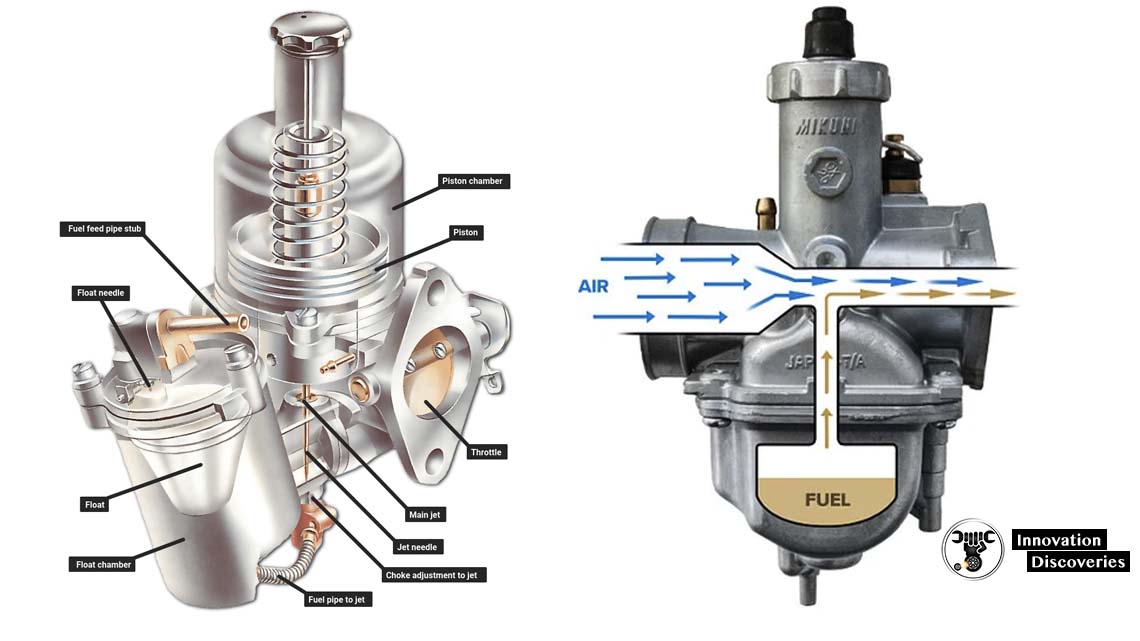 If you ever hear someone talking about a “pumper” carb, this is what they’re referencing.
They are set up so that a soft throttle opening isn’t strong enough to actuate them, but when the throttle is whacked open hard, a nice shot of fuel is fed to the carb. (They can be tuned, in most cases, so the size of the “shot” can be tailored to juuuust remove the bog, yet not run too rich.)
Another adjustment began to show up on carburetors, too, as time wore on: air bleeds. Adjustable air bleeds basically help hurry or delay the transition from one circuit onto another, again extending the adjustability of a carburetor, for better or for worse.
This is a CV carburetor. See that great big cover on top? That's your tipoff. Photo by Lemmy.
Well, that sub-heading is a bit of a misnomer. While there are still some carburetor-equipped motorcycles rolling out of factories, they’re becoming scarce and are usually found on holdover designs.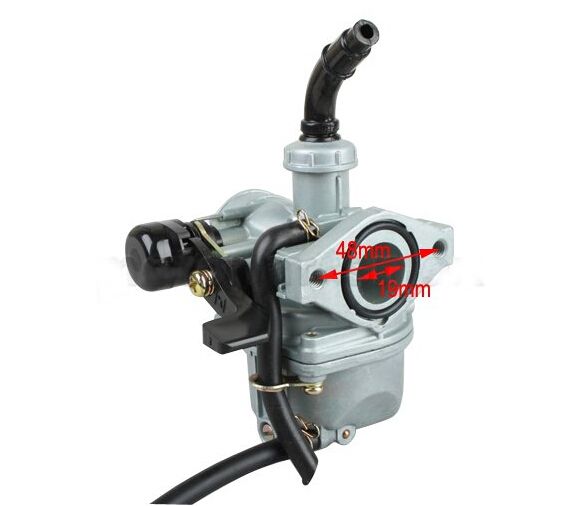 So we can define “modern” here as around the 1990s.
Enter the constant velocity, or CV, carb. CV carbs have been around for a long time, but they became very popular in the 1990s due to their ability to carburate cleanly while minimizing the excess unburned hydrocarbons that less precise fuel atomizing devices provided.
And this is a CV slide. (Kind of sounds like a neat dance, doesn't it?) This is a later diaphragm-style unit. See why the tops on the carbs are so big? Photo by Lemmy.
Effectively, the CV carburetor lifts the slide not mechanically, but pneumatically. The carb separates the slide lifting function by using the throttle cable to open and close a butterfly in the carb throat, rather than by lifting the slide directly. The slide, now sealed with a diaphragm and kept closed with a weak spring, opens relative to engine vacuum. In this way, the carburetor slide is controlled by the engine. The rider is really controlling the airflow somewhat indirectly.
“But Lem!” I hear you say. “Wouldn’t that just make throttle response worse?” Yes. Yes it would. But it wasn’t bad, especially when an accelerator pump was put into play. It was nicer for the environment, because there weren’t all these rich spikes (numerically low air/fuel ratio) occurring every time a rider got throttle happy. Instead, a nice even rise in engine revs occurred in a fashion that was less damaging to the environment. However, you generally will not see CV carbs (usually identified by very large square or round tops where the diaphragms are contained) on race or competition machines. (Go check out a modern two-stroke dirt bike!) Instead, their use was relegated primarily to more workaday standards and commuter motorcycles. CV carbs, as you may have guessed, are very thrifty on fuel. What they give up in throttle response and performance, they return in efficiency and economy.
And at this point, I’ll bring you back to that thought I asked you to hold earlier. Remember the atmospheric valves? Those basically relied on engine vacuum overcoming a weak spring to admit air and fuel into the engine. Sound familiar? Designers basically took the same principle, coupled it with ol’ Venturi’s idea, and produced the most technologically advanced and environmentally efficient mass-produced carbs ever fitted to production motorcycles.
With the exception of holdover motorcycles that still meet emissions laws, like the Suzuki S40 Boulevard or Honda XR650L (which both use CVs, by the way) and competition machines, carburetors are pretty much gone, supplanted by fuel injection.
Why, you may ask? Well, they’re easier on the environment. Fuel injection shuts off the fuel supply in high-vacuum, low-load situations. (Think about when you’re going downhill in a numerically low gear with the throttle closed.) A carburetor, by design, continues to chuck a lot of fuel into the intake tract. So fuel injection is a bit more efficient in that regard.
The bigger reason, though, is that a carburetor pollutes a lot more than FI — but probably not in the way you think. Because carbs are not pressurized systems like fuel injection, fuel must fall from the tank into the carb’s fuel bowl by way of gravity, which means both the tank and the bowl must be vented to atmosphere, releasing very harmful unburnt hydrocarbons into the air. And fuel, like many solvents, evaporates very readily. When you multiply all that evaporation by all the motorcycles in the world, you can easily imagine how much gasoline (in gaseous form) was being released into the atmosphere. (Fuel injected bikes are sealed systems and usually contain an evaporative canister to trap the fumes until the next time the bike is started, when they’re drawn into the intake and burned.)
Carburetors work well, and they’re amazingly simple, yet precise devices. They’ve gone by the wayside for a reason, but that certainly doesn’t take away from the ingenuity required to develop, create, and tune them.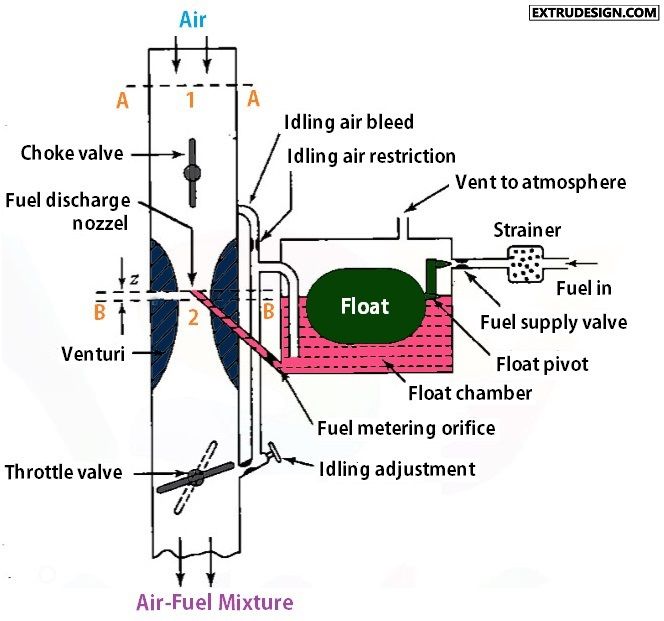
Modern ATVs are equipped with two-stroke and four-stroke engines. As a rule, two-stroke engines are installed on light, children's and teenage models, and four-stroke engines are installed on utility and powerful sports ATVs. The engines of all CFMOTO ATVs are four-stroke. Consider the principle of operation of 4-stroke engines and their advantages over 2-stroke ones.
 Secondly, the design features of a 4-stroke engine significantly reduce the amount of carbon deposits on the working surface of the piston and cylinder.
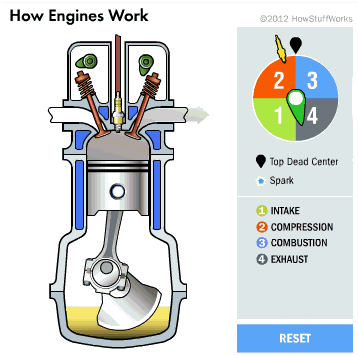
The name speaks for itself - the engine sequence is divided into four strokes:
 Gases that are formed as a result of fuel combustion exit through the exhaust pipe. When the piston reaches its top point, the exhaust valve closes and the whole process is repeated from the beginning.
Consider the step-by-step sequence of actions to start the engine on an ATV and note some features of operation.
 To conserve battery charge, each start-up cycle should take a minimum of 10 seconds. If the battery is discharged, it must be removed and charged.
 As you can see, there is nothing complicated in the operation of a four-stroke engine, everything is consistent and simple. However, CFMOTO experts do not recommend interfering with the operation of the engine yourself. If you need ATV maintenance or repair, please contact the nearest CFMOTO dealership in your city.
Addresses of dealer centers
CF MOTO ATVs are exciting, interesting and very convenient to use on the farm, these small ATVs combine increased cross-country ability and reliability, decent speed and power. Driving a quad bike is really easy and those who got into classes with an instructor are convinced of this rather quickly. However, if you couldn't find someone who would give you a couple of first lessons, we hope this article will help you start your acquaintance with ATVs with pleasant moments.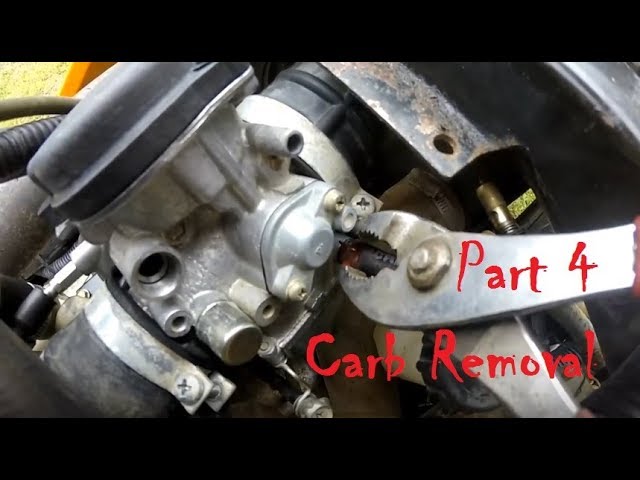
If you have no driving skills at all, when looking at any device, you can get confused by the abundance of all kinds of screens, buttons, buttons, however, do not worry fast enough, you will not only understand why they are needed, but also use them confidently, but until this happens , carefully study the instructions for your ATV to find out where and what is located on it. You need to understand the location of the main controls on the ATV and understand how its main systems work, which can help if you suddenly get stuck with a broken ATV far from home, however, if you do not have technical talents, and even more so if you have them, the best way out is nevertheless will call for help, although it would not hurt to check in what position the engine start button is also choosing the ATV correctly. This is not the device that should be inherited from the grandfather. The ATV is chosen to be suitable for you. You should be comfortable in the saddle and all the levers are well accessible when riding. A powerful large ATV can be very difficult to manage, especially if you are new to this business, but you should not buy too small a model. Knees resting on the steering wheel do not add confidence to the driver.
By the way, the book that comes with the quad bike can be very useful if, according to the old Russian habit, you still refer to the instructions when the fantasy is over, you risk losing the quad bike sooner than you think, but this is quite an expensive toy.
Do not ride an ATV without the necessary equipment, a helmet is required when riding. Even if he spoils your hair, this is still not enough reason to be left without a head. Without a head, the hairstyle is almost useless. Clothing should be tight and with long sleeves and trousers, this allows you to save a lot on greens. Now about how to get on the road.
Putting the gear in neutral, and the ATV on the parking brake, we sit in the saddle. We turn on the ignition and, realizing that nothing is happening, we remember the parking brake. Squeeze the brakes until the quad comes off it and shift into first gear if you can't find it, then your quad has an automatic transmission and will do everything for you. Now you can add gas to finally start moving. Upshifting occurs when the engine has enough revs, but don't rush into it. The first few rides should be introductory so that you get an idea of how the quad behaves in response to your actions. And it is better to move at this time on flat surfaces. Until you learn how to drive an ATV.
To stop, you need to release the gas and wait until the ATV stops moving, apply the parking brake.
Now a little about the ignition process itself.
Most modern ATVs are equipped with an electric starter, in this case there are no problems with ignition, just turn the key in the lock and add gas. But some models are still equipped only with a kick start, however, learning how to use it is not bad, and for those who drive a modern model, anything can happen.
First, check that there is enough fuel in the tank, because no one wants to waste their efforts in vain. Turn the key to the “on” position, turn on the ignition toggle switch on the panel.
The speed should be in neutral, if it is not, depress the clutch and move the lever to neutral. In this position, the light on the panel lights up and the ATV moves easily. This is a test in case you do not know where the neutral gear is located.
air will help it ignite faster. ATV already warmed up can be started immediately.
If your ATV is equipped with an electric starter, which is available on many models of ATVs, for example Suzuki, you just need to press the starter button and wait until the engine starts. If there is no electric start or it does not work, sit on the ATV and press the starter until the engine starts. In any case, you need to squeeze the gas so that gasoline begins to flow into the engine. Once the ATV has started, close the choke and you're good to go. For a physically unprepared driver, any trip on an ATV is quite a heavy load. That is why before getting into the saddle it would not be bad to warm up a little.