You may have heard of a choke before and noticed your machine has one. But how does a choke work? Well, I’ll explain that here, as well as when to use a choke and common problems with ATV chokes.
A choke is only seen on a carburetor of a carbureted engine. If you have a fuel injected engine, but still notice what looks like a choke lever, that is actually a fast idle or idle advance. It serves the same purpose but works in a different way than a choke.
Another thing many people confuse for a choke, is called the enricher. They work the same way as a ‘fast idle’ in theory but are found mostly on carbureted engines. I’ll give a brief explanation of each of these. Because a choke, an idle advance, and an enricher are all used for mostly the same purpose.
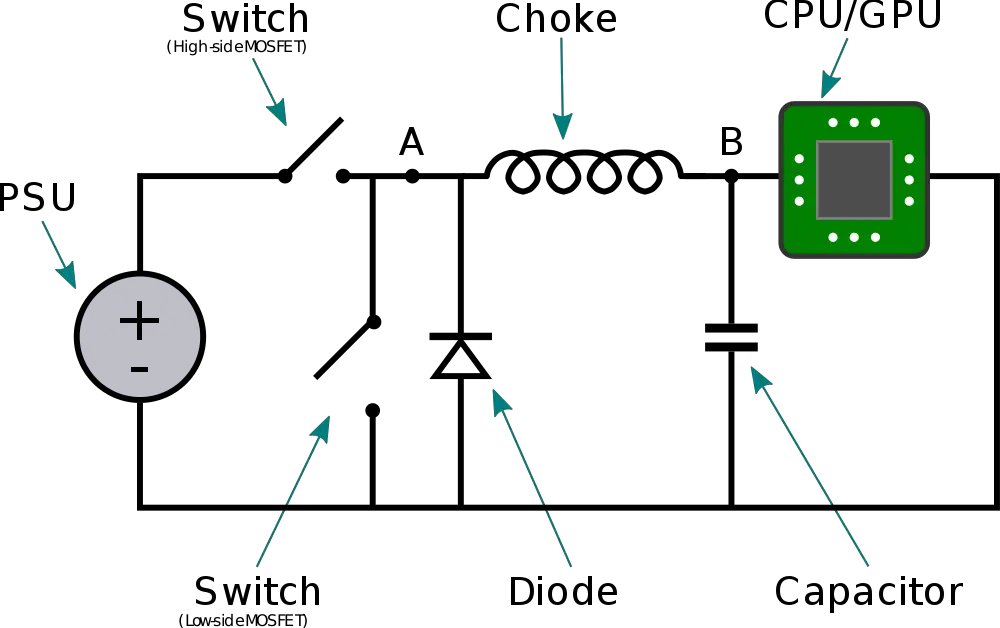
An ATV choke works by blocking some of the air from entering the carburetor and mixing with the fuel. When the choke is on, the air/fuel mixture entering the engine is a lot richer (more fuel than normal) which helps start and keep an engine running if it’s cold. Once the engine warms up, you can turn the choke back off.
Notice in the diagram below, the choke valve is allowing maximum air to pass through the carburetor to mix with the fuel. The choke is in the off position in this picture. This is how a warmed up engine will look.
If you are starting the engine on a cold day, you may want to use the choke to help you start and idle the engine. When you set the choke to the on position, the choke valve will close, blocking a lot of air from entering and mixing with the fuel.
The fuel/air mixture will be very rich (contain a lot of fuel) which helps get a cold engine started and idling. You won’t want to leave the choke on while you ride, the choke could actually stall the engine once it warms up.
An idle advance is mostly seen on fuel injected engines, but has the same purpose as a choke. You would use it to start a cold engine. The idle advance however, is essentially just adding extra fuel to the engine rather than limiting air the way a choke does.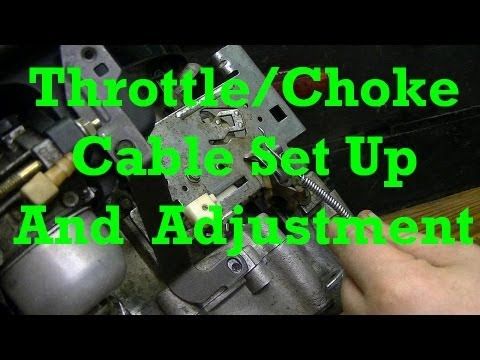
This still creates a richer air/fuel ratio and helps start cold engine all the same.
The enricher works the same way an idle advance, but is found inside a carburetor. They basically add fuel to the air/fuel mixture helping start cold engines. Many people confuse the enricher with a choke because it is on a carburetor and operates from a lever or plunger like a choke does.
An ATV choke is most useful to start a cold engine. By creating a richer fuel to air ratio, the engine has more gas to stay running. Once the engine is warmed up though, it won’t need the extra fuel. You shouldn’t ride or rev the ATV while the choke is on. Wait for the engine to warm up, turn the choke off, and then you can ride.
There are four main types of ATV choke. The plunger style, lever style, handle style, and switch style. I’ll go over each of these and how you’re supposed to use them. Here is a picture to show you the differences.
The lever type choke should be in the down position during normal operation. To use the choke to start a cold engine, lift up on the lever to turn the choke on. Once the engine has warmed up, return the lever to the down position.
The handle type choke is usually found on the left side of the handle bars if you have this type of choke. During normal operation the handle type choke will be pushed all the way to the left.
To turn the choke on, push the handle lever to the right. Once the engine is warm, return the handle lever back all the way to the left.
The plunger type choke is usually found on the side of the machine or near the fuel shut off valve. During normal operation the plunger type choke will be all the way suppressed (all the way in).
To open the choke to start a cold engine, pull up on the plunger type choke. Once the engine is warm, push the plunger back to be all the way suppressed.
A switch type choke is usually found on the side of the machine or near the gas tanks fuel shut off valve. During normal operation, the switch type choke will lay flat (like in the picture above).
To open the choke to start a cold engine, pull up on the switch so it is sticking straight out, 90 degrees from its starting position. Once the engine is warmed up, return the switch to its original position.
Here I will answer some of the most common choke related questions I get. Not all of these are a simple easy fix, but maybe I can help point you in the right direction.
This problem happens quite a bit actually. It’s when you pull the choke to the open position, and it immediately slides back a little bit. This causes the choke to only be half on or turn all the way back off completely.
Of course you could just stand there holding it on, but who wants to do that. The most common reason this happens is because the cap to the choke comes loose. When this happens the little grips that apply pressure to the choke tube don’t grab and hold as strongly anymore.
Simply pull back the rubber gasket protecting the choke tube, right under the choke plunger you pull up on. And you should find a little cap that screws in and out to adjust the tightness of the choke. Tighten er down a bit and you should see an improvement.
This screams carburetor problems all over it. Sure you could adjust your idle screw first and maybe that will fix it. If the idle screw is set to idle too low, the engine will die everytime you turn the choke off.
But you’re probably going to need to clean your carburetor out good. I mean take apart and clean everything especially the needle jet/pilot jet. This happens a lot if old gas has been sitting in the float bowl for too long.
The carburetor is prone to getting plugged up from debris in gas or from old gas gumming things up.
If none of these answers helped you, you may need to replace the choke and choke cable on the machine. This usually isn’t the case. If you’ve ruled out choke problems and don’t know where to start, check out my ATV Won’t Start: Common Problems And How To Fix article for a step by step guide.
Sharing is caring!
• Tim Technical Support Specialist
I’m all choked up!
Welcome to this week’s tech talk at Venom Motorsports!
The “choke” function on our bikes can sometimes be a little tricky to get the hang of.
This week we are going to chat in very practical terms how to use your choke...and the problems you may have experience with it. We will also demonstrate choke operation in our youtube video link.
Keep in mind that this information applies to all of our fine gas powered Super Pocket Bikes, Dirt Bikes and ATVs!
Ok onto this week’s topic.
So Tim...How does the choke work? LOL a little theory first!
The purpose of the “choke” is to enrich the air fuel mixture to help start a cold engine. Cold is the key word here because a “cold engine” will not easily vaporize the fuel in the air fuel mixture entering the engine. So we need to enrich the mixture in a cold engine to increase the amount of combustible vapour present.
When you close the “choke” you reduce the volume of combustion air entering the cylinder, this changes the air/fuel ratio to a very rich mixture. More fuel in the air fuel mixture than normal helps the bike to achieve ignition of the air fuel mixture and start.
Let’s review the combustion KABOOM equation.
Spark + Fuel + Air = KABOOM!
When KABOOM occurs the piston is pushed downward in the engine cylinder, which turns the crankshaft, which turns the gears in the transmission, which drives the chain, which turns the rear wheel gear, which makes you go zoom! So KABOOM is most important.
When discussing the air/fuel mixture in the engine, the key concept is the ratio of fuel to air. For all fuels there is an upper and lower air fuel ratio that will support combustion.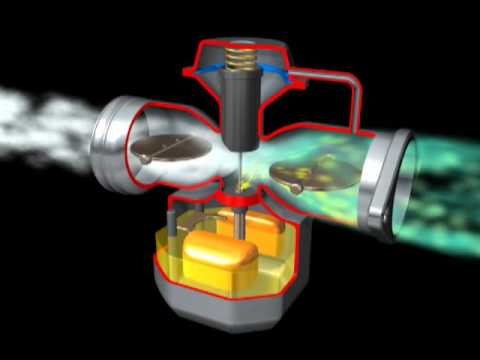 If your too rich...no kaboom, if your too lean...no kaboom. It needs to be just right to get the best performance out of your engine.
Tim,...When is the “choke” on? And what the heck does that mean?
Inside the carburetor is a choke plate. This is a movable plate that opens and closes allowing more airflow through the carb or less. When the choke is engaged, the choke plate covers some of the carb throat opening. We would say that the “choke” is on or closed. This restriction of air flow reduces the amount of air available for combustion which means that the air fuel mixture is very rich. A rich mixture is needed to start your bike when it is cold...colder than a cup of coffee.
Typically the “choke” is on when the choke lever is in the up position or when the choke lever is inline with the handle bars on your bike. Choke on means that the choke plate is covering the carb throat.
The “choke” is off when the choke lever is down or when the choke lever is facing you if your choke is a handle bar mount. Choke off means that the choke plate is not covering the carb throat.
Tim...Ok so its a warm day and this is the first time starting my brand new bike. I gave the bike full choke and I tried and tried but it will not start. What’s wrong?
We only need to “choke” a bike when the engine is cold...that is to say not as warm as a cup of coffee.
If the bike is warmer than a cup of coffee no choke is needed.
The above condition occurs when you choke a bike when it does not need it. The bike will become flooded and not start. To get it going, simply open the choke...or think of it as NO choke. Give the bike some throttle, say ½ open throttle and try to start the bike. The ½ open throttle will help bring more air into the cylinder allowing the air fuel mixture to ignite. Once the bike starts release the throttle and allow the bike to warm up before driving away. Say 30 seconds to a minute at idle to allow lubricating oil in the engine to reach every part of the engine. Always a good rule of thumb.
Tim...Ok so its a cold morning and this is the first time starting my brand new bike. What do I do?
This is a great question again the key word is “cold”.
If the bike is cold than yes! Close the choke fully before trying to start it, and do not touch the throttle. Once the bike starts and warms for a minute you can open the choke and drive away. This is a good practise as all bikes need to sit for that first minute of operation to allow for lubricating oil to work its way through the engine. Just giving your bike a minute to warm up will extend the life of the engine. I know its tuff to do because we all want to just take right off...but it’s a good habit to form.
Ok so if the bike has been sitting in the sun all day...do I still need to “choke” it to get it started? No choke is needed. If the engine is warm, the engine will start right up.
What if I was riding the bike, than stopped for awhile? Do I need to “choke” it again to get it started? Again No.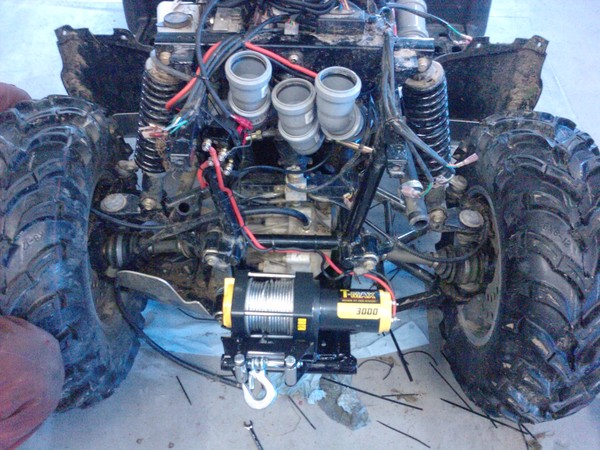 .. If the engine is warm, the engine will start right up.
Ok Tim so how warm is warm enough? Think about a cup of coffee in your hands, yeah about that warm is warm enough to not require any “choke”, LOL but warm enough to require a warning label on a cup of coffee.
hTim...I have a very hard time starting my cold bike. It seems that I have to roll my bike over many many times to get it to start, once it starts it seems to run perfectly, what’s the problem?
This was a customers question that I have delt with a few times. Can you guess what the problem is? This person never read any of my blogs or even the starting instructions for his bike. He did not know what a choke was...and simply rolled the bike over enough times to warm up the cylinder to the point where the air fuel mixture would ignite.
I was on the phone with him...as he was trying to start his cold bike. I explained to him what the choke did and how to turn it on. Before rolling the bike engine over, I got him to choke the bike and it started right away! He was amazed!!!
This has happened to me more than once. The choke really is so very important for cold starts.
Tim...What can I do if I am really not sure if the choke is open or closed?
If you are not sure if the “choke” lever is in the open or closed position you can figure this out easily.
Simply remove the air filter fitted to the carburetor and look into the throat of the carb.
Move the “choke” lever back and forth.
When the “choke” is closed you will see a metal plate restrict the opening of the carb throat. This is the CHOKE ON! position.
When the “choke” is open you will not see the metal plate and you can see right into the throat of the carb. This is the CHOKE OFF position.
Tim...what happens if I drive the bike with the “choke” closed?
Well this is something we have all done at some point.
As the engine is running very rich it will tend to “bog” down when you hit the throttle.
So when you give the engine throttle to speed up...it will do so very slowly, seem to have no power or simply stall out as the air/fuel mixture is too rich.
No need to worry, once you open the “choke” up your bike once again runs just fine.
Tim...I have heard of “flooding” the engine, what does that mean?
Flooding the engine happens when you “choke” an engine that does not need to be “choked”. With the “choke” closed we roll the engine over again and again and again without achieving ignition of the too rich air fuel mixture. This floods the cylinder with a super rich air fuel which will not ignite or support combustion as there is too little air in the air/fuel mixture. No need to worry, just open the “choke” give the engine ½ throttle and try to start the engine again. If you are feeling handy pull the spark plug, clean it than open the engine throttle full wide open. Role the engine over a few times to purge the cylinder. Once purge reinstall the spark plug and your engine should now start up, no problem.
My only concern here is with a “super choked” engine. Where the engine was rolled over multiple times, should have started but did not. This condition can cause some gasoline to make its way into your Lubricating oil and ruin it. When does this happen? Well typically its the spark plug, not the choke that is the problem. Before going into intense trouble shooting simply replace the spark plug. Spark plugs are a $3.00 part that can save a lot of frustration. If in doubt chuck the plug out! If you know that you “super flooded” the engine it is a wise move to change the oil before starting it again.
I hope you enjoyed this week’s tech talk, please take a moment and check out our “I’m all choked up” video on youtube!
If you have any tech questions about our bikes, please feel free to email them to...
Have a great day!
Tim
Technical Support Specialist
Venom Motorsports Canada
 Operation, repair, tuning.
 Yesterday finally coped with the previously described problems in the engine. Actually, I didn’t want to get into the engine on my own - that’s why I took it to official dealers, then to a good (according to previous experience) car service.
As a result, the ATV moved from one place to another for several weeks, and the problem was not solved. As a result, I decided it - I state further.
The officials, after a couple of weeks of studying the ATV, only shrugged their shoulders: they only listed the error codes for me, so I myself knew perfectly well - fortunately I learned to diagnose it myself through the self-diagnosis system. And when I was just about to take an ATV to them, I specifically called in advance and clarified whether they have a device that allows you to adjust the throttle position sensor.
I sinned on this sensor from the very beginning: well, what can lead to "sneezing" into the air filter, turning off the engine and heating the exhaust at the same time? It is logical that the throttle position is incorrect: the mixture is either too rich and burns out in the muffler, or poor and the engine stalls. If the position sensor gives incorrect signals to the ECU, then the engine control systems will not work correctly.
Throttle position sensor adjustment is a full page in the service manual. First, it is proposed to test it (the voltage on the contacts is checked), after which, if there are deviations, the adjustment procedure is described. In principle, this is not a complicated procedure, but the accuracy of voltage measurements should be hundredths of a volt. Plus, measurements are made through a special device that clings to the sensor terminal. Here on the left in the picture this prefix is \u200b\u200bdepicted, into which they offer to climb with a multimeter.
At one time I wanted to adjust the position of the sensor myself, but it confused me that the wires shown in the repair manual were of a different color. Moreover, this prefix is incomprehensible ... In general, I called official dealers and asked if they had such a thing, if they knew how to use it and if they could do it. Yes, they say, what a problem! Bring!
Brought. First of all, they asked if any of the acquaintances had the same ATV, only without malfunctions. Well, I replied that none of my friends had a Sportsman 800, and asked - why, they say? And we, - they say, - from a serviceable one, all the sensors would be thrown in turn until the problem was gone. Once again, I confirmed my distrust of such "masters", but since I brought the quadric, I left them to be torn to pieces. As a result, they were written off with Moscow and Yaroslavl dealers, but they never came up with anything. They found some kind of microcrack on the nozzle sealing ring, but they said that they say it is not in the working area and should not affect the work. And the funny thing is that in the end (after my urgent requests to set up the throttle position sensor) it turned out: they don’t have this prefix for measuring the voltage on the sensor at all. Competent experts confused it with some kind of prefix for synchronizing carburetors. The fact that they do not have a computer for diagnosing Polaris ATVs - I knew for a long time. Here are the official dealers....
In general, I didn’t see any sense from them - I took the quadra and took it to another car service, where more sane craftsmen checked the electrics. They said that the sensors are all working, they changed the high-voltage wires, put in new candles - but the problem did not go away. The fact is that they checked the fundamental performance of the sensors, not knowing the exact values of the signal voltage. As a result, I began to think about problems in the gas distribution system. However, the motorists, whom I would have dared to give the ATV to be torn to pieces, were inundated with snowmobile maintenance and would only begin to deal with my problems after the New Year holidays.
It did not suit me, I brought the quad to the garage, removed the stator cover, examined the flywheel... I will probably write about this in more detail later, for now I will only report that I didn’t see anything suspicious there right away.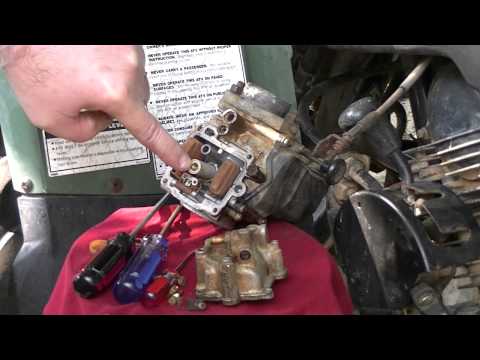 But when I came to the disassembled quadra the next day, I saw a puddle of antifreeze mixed with oil under it. Apparently, an oil seal or a gasket has been pierced - it will have to be replaced, so you still have to actually climb into the engine ....
Well, back to the problems with the engine itself. The ATV was in the garage, and I looked at it and thought about how to fix the problem. At one fine moment, I thought - what prevents me from measuring the voltage at the contacts of the damper position sensor with a simple enumeration? there are only three wires, it’s not a problem to calculate the right pair, a digital multimeter has appeared in the garage since the time of LED circuits - it seems like no one bothers to try.
As a result, I recommend doing it right with the ATV turned on (you don’t need to start the engine, just turn on the electrical part), and not with a battery, as suggested in the manual. The throttle valve will need to be disconnected from the air ducts and the position sensor wire of interest to us and the throttle cable placed in a PVC braid will go from it. You don't need to disconnect them. Taking this opportunity, I again washed the throttle valve: during my experiments, a decent amount of soot accumulated in it.
We will be interested in this three-pin terminal next to the throttle valve (to the position sensor installed in the damper body from the terminal 20 centimeters of wire): with tips stripped of insulation:
We fix the wires at one end in the connector (we make sure that they do not close, of course):
We connect the connector, thereby clamping our "contacts for testing" between the standard contacts:
Next, you need to unscrew the clamping bolt , which sets the damper position at idle. The bolt must be unscrewed so that it does not touch the damper itself, and the damper is completely closed. The manual recommends at this stage to open and close the damper a couple of times with the accelerator trigger (with the bolt already unscrewed). This stage in the repair manual is designated as very important, since it is from this value (fully closed damper) that the remaining modes of its operation will be determined.
Now you need to find two of our three wires with a multimeter, between which the voltage will be in the region of 0.5 volts. I draw your attention - the voltages are extremely small, and the tuning accuracy in the manual is +/-0.01 V - so the measurements are only with a digital multimeter and with a correctly selected measurement limit on it.
Here, by sequential enumeration of combinations of wires, I determined the desired pair (on other pairs of wires, the voltage, it seems, is 5 V, or is completely absent - in general, you can’t go wrong):
Voltage 0.538 V, we don’t pay attention to the color of the wires, we fix the wires to the probes by simply winding them - for convenience, because we don’t have to rearrange the probes anymore. The manual says that the voltage should be 0.528 +/-0.01 V. We see that we have it almost at the upper limit of the permissible. I decided to bring it closer to the middle of the range. To do this, as described in the manual, we loosen the fastening of the sensor itself - a small asterisk bolt:
We look at the multimeter readings, slightly rotate the sensor clockwise or counterclockwise, depending on whether we need to lower or increase the voltage. Pull the mount back. When the bolt is screwed into place, the readings of the multimeter change. Those. it is necessary to experimentally select the required voltage margin so that when the bolt is tightened, the readings are taken to the desired 0.528 volts. Well, after a little rigmarole I got 0.523 V:
We set the initial position of the sensor. Now you need to adjust the position of the throttle at idle. To do this, we begin to screw in place the previously unscrewed clamping bolt (not the sensor mount). In this case, we look at the multimeter. It should show (according to the setup guide) 0.710 V. Since I already took photos when reconfiguring the sensor, I decided to make it a little smaller - I had a high idle speed and I set the damper at the lower limit of the allowable range - 0.700 V:
As a result, after installing the damper in place, the engine speed at idle:
I did not lower it below. Initially (at the first setting), at a voltage of 0.710V, it got idle speeds in the region of 1400, which is too much, although the gears were switched on even at such speeds without the slightest jerk or shock.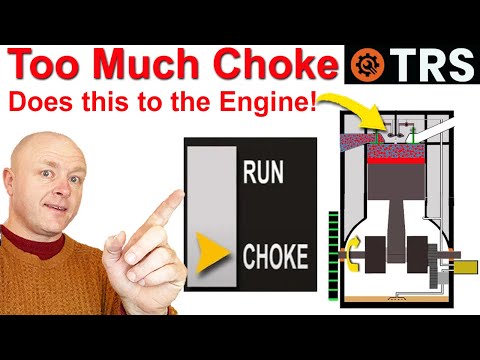 The second time I set the voltage to 0.7 V and the rpm became 1280+/-10. In general, before all these adjustments, the voltage at the sensor was approximately 0.5 V and 0.4 V (instead of 0.710 V and 0.528 V, respectively).
I can safely say: the problem with turning off the engine with a slight pressure on the throttle, instability of revolutions, sneezing into the air filter and shooting in the muffler - disappeared completely! An extensive list of problems has been completely eliminated. The muffler does get hot. I plan to watch it again in the near future - in more detail. In the meantime, I am extremely pleased with myself;)
P.S. Having figured out the idle speed control system on the ATV, I can say with confidence that idle speed adjustment is possible with DMM only. You should not turn the adjusting bolt without a multimeter, and even "adjusting" idle ones by pulling the throttle cable on the steering wheel is complete nonsense.
Photo from open sources
He checks many different components, even changes various parts, but all in vain.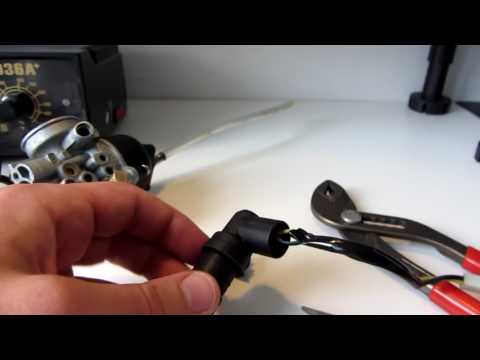 The AvtoVzglyad portal tells where to look for the weak link.
Viktor Vasiliev
The cause of many problems can be a dirty or faulty throttle valve, because this unit is used to control the air supply to the engine. It could also be a broken sensor. Below are five reasons why it can be judged that the throttle assembly requires attention, along with other machine systems, by the way.
The control lamp lights up when the engine control unit receives incorrect values from the sensor. The problem can be checked by connecting a scanner to the machine. If in fact the throttle is open, and the scanner shows the opposite, this indicates a sensor failure. It is interesting that such a malfunction is wandering. That is, the emergency lamp may periodically go out, which will confuse the driver.
Problems with the throttle manifest themselves when the driver tries to start the engine after a long stop.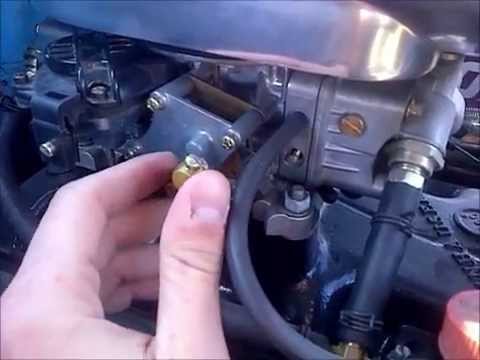 The car starts with difficulty, and then the engine shakes until it reaches operating temperatures.
At idle and medium speed, the tachometer needle begins to live its own life. This could be either a dirty idle speed sensor or a problem with the throttle. So we advise you to inspect both of these nodes.
Photo from open sources
If the car began to accelerate sluggishly, the engine responds lazily to pressing the gas pedal, then this is another sign of a broken throttle sensor.
Of course, the drop in power does not unambiguously say that the culprit of the trouble is the throttle. There can be a whole "bouquet" of various "sores". But during repairs, this is an occasion to inspect this unit too.
Another indirect sign of problems with the damper position sensor. However, if the engine has an appetite for fuel, we advise you to check the health of the sensor. The culprit of the problems may be the loss of contact on the "slider". The reason is the simple wear of the resistive layer, due to which the electrical contact disappears.
435221
Manufacturer's photo.
Finally, we note that the cause of the problems noted above can also be such a common defect as throttle valve jamming. It is provoked by high-temperature deposits that impair the mobility of the “curtain”. There is only one way out in such a situation - the use of special autochemistry. True, there are not many such drugs on the market.
Of the imported products, perhaps, only Pro-Line Drosselklappen-Reiniger aerosol, developed by Liqui Moly (Germany), can be distinguished. This product is intended for cleaning elements of the intake tract of gasoline engines. Its use allows you to get rid of a lot of problems. This is especially important for engines with a high compression ratio.
They often develop heavy carbon deposits on the intake valves, which can only be removed with the highly penetrating Pro-Line Drosselklappen-Reiniger.