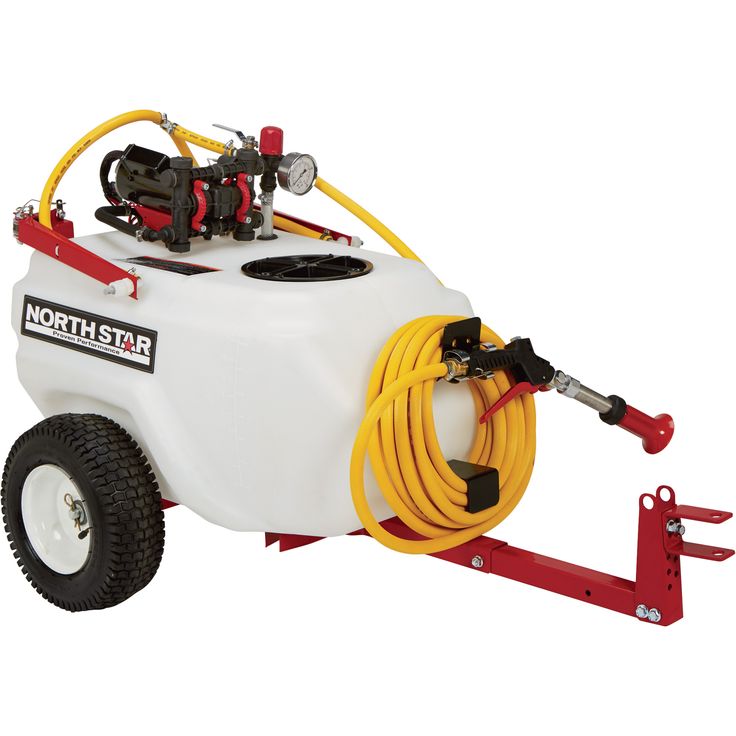
Our property is slowly being taken over by English Ivy and Poison Ivy. I’ve been fighting both for a while now with a backpack sprayer, the brush hog and landscape rake. But it’s not enough and not efficient. It’s time for the nuclear option! After some research, I settled on this 26-gallon NorthStar spot and broadcast sprayer.
I chose this ATV Broadcast and Spot sprayer in part because it looked like it would fit perfectly in the bed of my Polaris Ranger EV and in my tractor carryall.
As of the time of this post, it can be bought on Amazon or from Northern Tool for $269.99. Shipping is $31.58 bringing the total to $301. 57. You can also read the sprayer’s manual. I’m a big believer in reading the manual of products I am considering whenever possible.
What you get for your money is a 26-gallon sprayer, with a 2.2 GPM pump that produces up to 70PSI, runs on 12V DC and requires 8 amps. It can run continuously with a 100% duty cycle.
It has a Regulator for adjusting the output pressure and a pressure gauge. This model as a 2-nozzle boom that they say sprays a 6.7ft swath, but I found that out of the box it was spraying a swath of 10ft, which was good to see. The nozzles are adjustable so I think it can spray wider than 10 feet and it can certainly be adjusted to spray narrower.
Each boom has a flow control valve for fine control of the amount of spray coming from each nozzle.
The spray gun has a maximum vertical spray distance of 19ft and 30ft horizontal.
The sprayer is 15” high, 27.9” wide and 18” deep.
Finally, it weighs 50 lbs.
It ships in a box that’s just big enough for the sprayer and has no extra protection, which is okay except for this side where the pump, regulator and pressure gauge is. In fact, the pressure gauge was damaged, as you can see in the picture below, but it still worked.
I found it easiest to turn the box on it’s end, unscrew the cap and pull the sprayer out. Since it’s going to first be used on my Polaris, I decided to assemble it in the cargo bed. BTW, in case you didn’t know, the Ranger’s tail gate is easily removed to best accommodate the sprayer which makes strapping down the tank easy.
The rest of the pieces are stored inside the tank and the heavier metal pieces are bubble wrapped bubble wrapped.
The manual seems to be well detailed for assembly and use.
And here’s the slightly damaged pressure gauge which I had to bend back into position:
Damaged But Not Broken Pressure GaugeIt seems to work fine but I may request a replacement.
Assembly is straight forward. First the handles go on. They attach with 5/16” bolts requiring a ½” wrench or socket. I’m using an impact wrench only for speed, being careful not to over tighten. The threads in the tank are plastic and would strip out easily.
Next the spray gun clips go on with Philips head screws. Again, not too tight.
The hose wrap is installed next.
Then route the hose under the spray gun clips. Put the hose clamp on the end of the hose. I take the slack out of the clamp first. Then slide the hose onto the regulator output. And tighten the clamp firmly with a screwdriver.
The spray gun snaps into the clips, though not easily the first time. After the clips stretch a bit, it gets much easier.
Next the boom tank mounts are attached. I was pleasantly surprised at the heavy gauge steel used for them as well as the rest of the boom hardware. They are attached using 5/16” bolts and washers, requiring a ½” wrench.
The vertical boom mounts are attached with generous sized locking knobs. Installing the boom assemblies requires 5/16” carriage bolts and a locking knobs.
As mentioned in the specs, each boom has a flow control valve to control of the amount of spray coming from each nozzle.
Then the boom hose threads onto the boom connection port.
The manual says the booms should be 21” from the ground and lo and behold they are. You’d think this thing was made for a Polaris!
The sprayer comes with an 8ft electrical cord with a built-in on-off switch and uses a standard 12v automotive connector in case you need to add an extension to it. The connector plugs into the back of the sprayer. I then connect the alligator clips to the positive and negative terminals of one of my Ranger’s batteries.
Before filling the tank and hitting the trails, the tank must be securely strapped down. This is easy to do with some Lock & Ride anchors and ratchet straps. The rear strap hooks conveniently hook into the steel bed support channel.
Next, I pulled the Polaris outside and put in a few gallons of water to test with and get a feel for the sprayer’s operation. Then I mixed up 26 gallons of a strong batch of RoundUp to try out on the trails.
After some tweaking of the nozzles, I pull into the trail head and turn the sprayer on. The width looks perfect for the trails, covering everything on the trail and a little to the sides. In the picture below the sunlight shows the spray pattern. There’s even a rainbow!
Normally a speed of 4 to 5 miles an hour is optimal for this sprayer.
When I come to any area with no vegetation, I can turn the sprayer on and off as needed.
When I need the spray gun, I switch the valve from the boom to the spray gun. Of course, the video is best for seeing the sprayer in action, but the pictures below will give you get a decent idea of how well the gun works. BTW, that plant in the wire cage is a baby big leaf Magnolia. We have three planted along the creek. The cages keeps critters from eating the leaves. Obviously I have to be careful not to get RoundUp on it!
I think this sprayer and I are going to get along just fine!
After use, if there is any chemical mix left in the tank, I drain it into another container or my backpack sprayer. In fact, it so happens that the drain cap is the same thread as a garden hose so I put a hose valve on it for easy draining. It’s best to run water through the tank before putting it in storage, then drain the spray gun, hose and boomer sprayer.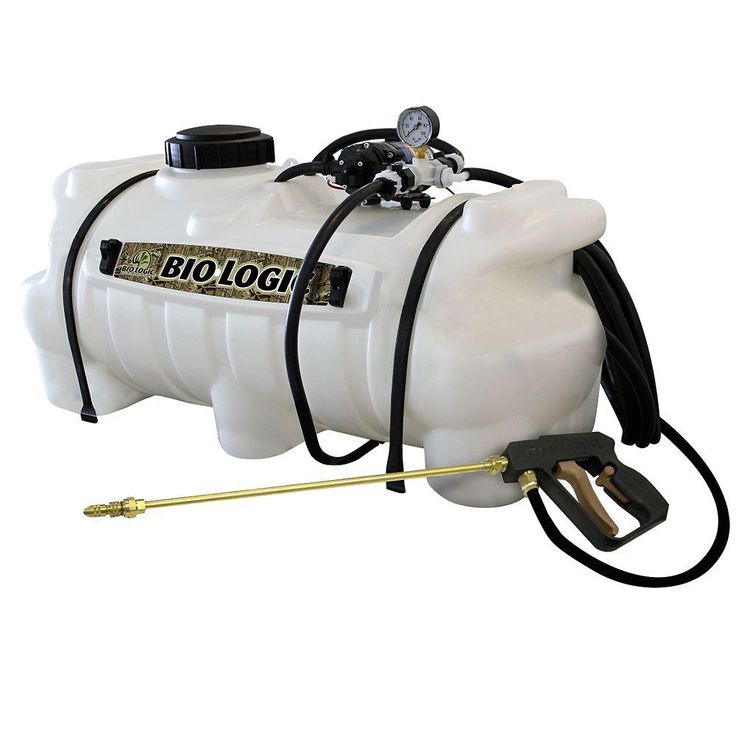 Also, I disconnect the boom hose so that it can drain as well.
It’s a good idea to rinse the intake filter after each use and the small filters behind the broadcast nozzles.
The boom supports come off easily for storage. The best place to store the locking knobs is on the bolts.
I use a cable manager to bundle up the electrical cable and strap it to the gun hose on the top of the sprayer. Then it’s ready to go on the shelf until next time. If you are storing in a place that could freeze follow the manuals instruction for using RV antifreeze to protect the sprayer from freeze damage.
Like Loading. ..
..
By Shane /
When you buy a new tool or piece of equipment, it’s great when it is ready to use right out of the box. When it comes to a sprayer for an ATV or UTV, you will have to calibrate the sprayer before you can use it effectively.
Rockler HVLP Paint Sprayer Review
Please enable JavaScript
Rockler HVLP Paint Sprayer Review
If your sprayer is not calibrated you will have no way of knowing how much product you are applying. You could end up applying way too much or way too little. Too much may cause damage and waste money, too little and you won’t have effective results. Therefore it is important to properly calibrate your sprayer before use.
The goal of calibrating an ATV sprayer is to determine the amount of water it takes your sprayer to cover an acre of land. We use an acre because pesticide labels typically provide you with how many ounces per acre of their product to use.
Once you know the number of gallons of water it takes for your sprayer to cover an acre. You can then add the recommended number of ounces for an acre to the amount of water it takes your sprayer to cover an acre.
The term calibrate may lead people to think this is a complicated process, but it can be quite simple. The key is to make sure that these things are consistent: the speed you travel, the coverage of your boom, your operating pressure, and your spray nozzle size. If one of these things changes then your application rate will change.
If you are unsure about your pressure, speed, nozzle size, or boom coverage, you can jump to this section about how these things will affect sprayer calibration. If you know things are consistent then you are ready to move on to the actual calibration.
Note: If this is a brand-new sprayer, be sure to check for defects before continuing. Manufacturers have been known to miss some things and sprayers can have leaks or missing components. Fill the tank partially full with water and run it to see if there are leaks. Tighten or fix loose connections, and contact the manufacturer if pieces are missing.
Start by measuring and marking off an area to spray for calibration. Because the application rates on pesticides and other products are typically expressed in gallons or ounces per acre, it is easiest to make your test area an acre. This will make the math much simpler.
An acre is 43,560 square feet. If you measure an area 209 feet by 209 feet, you will have just slightly over an acre. If you don’t have that much area, you can calibrate it over a smaller area, like 1/10th of an acre, then do the math to find the gallons it would take to cover a full acre.
Next, you need to fill your tank with 10-20 gallons of water and see how many gallons it takes to cover your marked area. Spray at a constant speed and maintain the same operating pressure. The speed you travel will depend upon your machine and the terrain. For ATVs/UTVs the common operating speed will be between 5-10 mph.
Once you completely spray the area you will know how many gallons of water it takes to spray an acre. Then you can refer to the label on the chemical you will spray. This should provide a per-acre rate of chemical either in ounces or gallons.
For example, it may say 22 ounces per acre. If it took 10 gallons of water to cover an acre, then you would add 22 ounces of chemical for every 10 gallons of water.
The coverage of your boom is not the actual length of your boom or the distance between the spray nozzles. It is the effective coverage of the liquid that is coming out of the nozzles. You can figure out your actual boom coverage by spraying water on a driveway, gravel, concrete pad, etc. Anywhere you can get the ground wet and easily see where the boom has covered. Then you simply measure the width of the ground that is wet.Nozzle spacing vs actual spray width or effective boom coverage.
Each nozzle on a spray boom produces a spray pattern of a certain angle, usually 80 or 110 degrees. The spray pattern of your nozzles will overlap to ensure even distribution. “Boomless” nozzles are commonly used with ATV sprayers. They produce a wide pattern that replaces a traditional spray boom with multiple nozzles. The calibration method is the same. For more details view this post about the differences between traditional boom and boomless setups.
As you spray you will also overlap your previous pass to ensure there are no gaps. It is key to maintain a consistent overlap. This can take some practice. The use of a foam marker can help you see where you have sprayed, and help you maintain the same amount of overlap for each pass.
It is important to maintain a constant speed. If you speed up the amount of liquid you apply per acre is reduced. If you slow down, you increase the volume of liquid applied. Pick a speed that is easy for you to maintain and is manageable over the terrain you are covering.
Most ATVs or UTVs have a speedometer, but if you are spraying with a machine that has no speedometer you can attempt to drive the area you will spray at a constant speed. Note the gear or the throttle level. Time how long it takes you to cover the area.
You can do this multiple times to see how consistent you travel. You should do this test with a half-full sprayer tank as this will be the average weight of your sprayer when in use.
When you have done this a few times at a consistent rate, you can use this formula to calculate your actual speed in MPH: (Distance in feet x 60) x (Time in seconds x 88) = MPH
Knowing the actual speed is not as important as being able to travel at a consistent speed over the area you need to spray. However, if you do know your speed you can use it to calculate changes in your application rate as you speed up or slow down.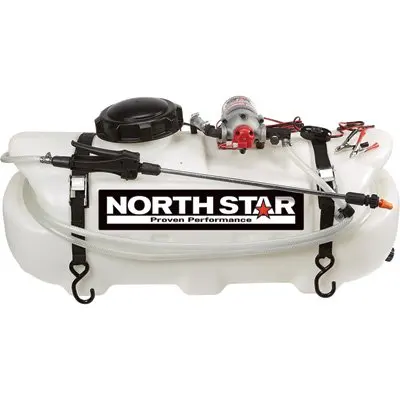
Like speed, you don’t have to know the exact PSI your sprayer is operating at but you do want the pressure to be consistent. Increasing pressure will increase the flow of liquid through your spray nozzles. This means that if your speed is constant but you increase pressure, your application rate will increase.
So how do you know what pressure to operate at? You should operate your sprayer at a pressure that produces a full and consistent spray pattern from each of your nozzles, but does not result in an extremely fine mist that can drift away from your target area. For more information, you can view this post on sprayer operating pressure.
To calibrate your sprayer you don’t need to know your specific nozzle size. You just need to make sure all the nozzles are the same size. You can read about sprayer nozzles and their effect on application rate in this post.
For a new sprayer, this is pretty easy. Sprayer nozzles are color-coded, so if they are new and all the same color, you can assume they are the same size. If the nozzles are old, you will want to do a “catch test” to make sure that all your nozzles are still going to allow the same flow rate. Nozzles wear out over time, and they don’t always wear evenly.
A “catch test” is simply using a measuring container to collect the output of each nozzle for a certain period of time while the sprayer is running. If your nozzles vary greater than 10 percent in their output, then new nozzles will be needed in order to have consistent application.
Once your sprayer has been calibrated you can be confident that your application rate will be consistent each time you spray. However, you will need to recalibrate your sprayer if you ever change your nozzle size, nozzle spacing, spray width, speed, or operating pressure.
Quad bike is a kind of crossover zasib. You can easily wind a keruvate with a quad bike to one who has never once trimmed a kermo in his hands.
Quad bike is a kind of transfer. At the same time, yoga is more and more often possible to practice in the areas of active recovery - on the tops of the mountains or at the deserts. It's not surprising - a quad bike can be a bitch, and a trip to a new one is a hoarse podia. In addition, the building will pass there, for a great car, and then a bigger motorcycle will come to an end. Transport zasіb miraculously suitable for off-road. І for the quiet, who can't get access to transport.
To that, if you are in doubt about the fact that you will have a good time - put your doubts and boldly mount that slick horse!
Quad bike for grown-ups - to make it easier to manage the surplus, as we wrote earlier. And in this article, I would like to tell you about all the subtle nuances, with which you can close your eyes beforehand, having taken care of your transport security.
It would be better, obviously, to think about your safety beforehand. Ale bagatto hto nekhtuє tsimi rules.
Observing these rules, make your trip by reception.
After you told about your safety, go to the knowledge of the management system. Luckily, the ATV's control system is not very foldable, which is why sports models are not safe.
ATVs automatically change gears. Therefore, all management is brought to the point that you need to immediately press on the gas or gallo. Basically, the stench is found in the steering part. Zrіdka in ATVs є pedals. Looking back at you, it is necessary for you to grow up, how to properly trim your hands. Vіd tsogo lie down if your hands get tired.
Older ATVs may not fit properly. Only with an eye on it is it possible to achieve balance and a comfortable trip. The body can be fastened, the legs and arms - the trochs are placed dead. When going down, you should heal forward, and when descending, you should heal back. Keep an eye on it so that the body is not heavily overstressed - if you hit it, it will help you not to fly out of the ATV. Skute body cannot take the blow.
If you are looking for a quad bike, choose turns around the big colo. Come into them on a small swede. Only if you become inspired - go to the bigger narrow turns.
Push the body a little forward, and move the arm at the inner corner of the turn. So it will be easier to trim the jealousy.
Now you've messed up that the controls of the ATV are not foldable. Ale yak and be-yak іnsha on the right, there will be practice that dotrimannya zahodіv bezpeki!
Write a note
Product catalog 00 UAHMini tractor DTZ 5244 HPX
313630 . 00 UAH
Minitractor Jinma JMT 404 N
334 274 . 00 UAH
Mini tractor DW 244 AHT
265 990 . 00 UAH
Minitractor Xingtai XT-454
341 420 . 00 UAH
Mini tractor DW 244 ANXD
273 930 . 00 UAH
Lowers
Kraft Dele KD169 Diesel Generator
-12%
110 000 . 00 UAH
Champion CPG6500E2-EU Petrol Generator
-28%
51 500 . 00 UAH
Diesel Generator HYUNDAI DHY45KE
-13%
520 000 . 00 UAH
ATV riding techniques could be the subject of a full book. In the same article, we want to reveal to you the basics of safe riding. At first glance, there is nothing complicated in driving ATVs - you just need to steer and enjoy riding.
When driving over bumps, for example those of the "wave" type, the driver has to constantly change his position. So, when approaching an obstacle, you must shift your body back, otherwise you can hit the obstacle with your wheels. When driving over a bump, you need to move the body back forward, thus preventing excessive separation of the front wheels, i.e. rearing up the ATV. Then, when the rear wheels come off the ground, you need to move back again, otherwise you can fall out of the saddle, hitting your knees on the steering wheel.

Moving in a straight line at low speeds (up to 40 km/h), you can afford to relax. But at higher speeds or when passing sharp turns and slopes, the driver must move very actively. Indeed, due to the high center of gravity, short wheelbase and small width, ATVs are very prone to rollovers. In addition, if the motorcycle flies separately from the motorcyclist during falls, then the ATV most often covers the driver. Therefore, in order for ATV riding not to end with serious injuries, it is necessary to study the driving rules and strictly follow them.
ATV rider's weight is an important factor that affects machine handling. By shifting their weight, the driver can unload or load the front or rear of the ATV, thus compensating for centrifugal forces.
The first rule you need to learn is that when riding an ATV, you need to relax your arms. When driving, the driver can always let go of his hands, because his legs are holding him in the saddle. As the speed increases, the load on the legs also increases.
Conventionally, three racks are distinguished. The middle stance is used when driving in a straight line without turning. When opening the gas, the body must be moved forward to unload the hands. Thus, the front strut is obtained. When braking and closing the gas, the body, on the contrary, must be moved back, i.e. take a back seat. By the way, the word "stand" comes from the word "stand", and this name is not accidental. When actively riding an ATV, you do not have to sit. Standing on an ATV lowers your center of gravity. After all, there is a huge difference between the weight on a high saddle and the weight on the footrests. And the effect of moving the body in a standing position is much greater than from fidgeting back and forth on the saddle.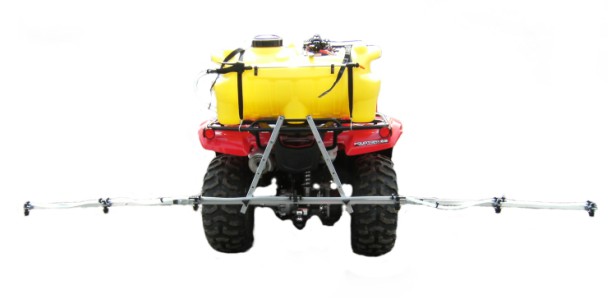
When passing a turn on a motorcycle, it is tilted inward, thus fighting against centrifugal force. But you can't do that with a quad bike. Therefore, it is necessary to use the weight of the driver. The main rule here is to always transfer the weight inside the turn. Moreover, it is necessary not only to tilt your shoulders. It is necessary to hang the entire body, including the fifth point. Only the shin and knee hold on to the saddle. Of course, if you turn at minimum speed, then you can limit yourself to turning the steering wheel.
The correct stance is characterized by slightly bent knees, elbows set apart, and a slightly arched and relaxed back. Why not stand on straight legs or keep your back straight and tense? Because bent knees allow you to absorb shock coming from uneven terrain. By the way, the force of these blows is sometimes quite enough to knock the driver out of the saddle. A straight tense back under such conditions can lead to injury to the intervertebral discs and even a compression fracture of the spine.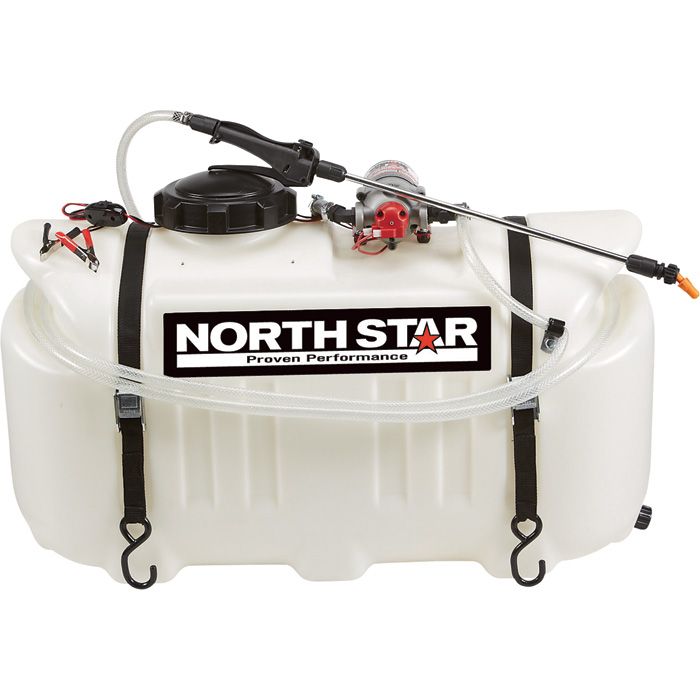 Yes, and the internal organs with the wrong fit will have a hard time.
Active ATV riding requires good physical shape. So, in quad schools, the duration of the lesson does not exceed an hour, and at the end of the lesson, students can literally be squeezed out. And riding an ATV off-road is also an activity worthy of training in the gym.
When riding non-sport ATVs, it is best to avoid jumping. Firstly, this way you can break the ATV. Secondly, in order to safely perform such tricks, the ATV motor must have high-torque and fast response to the throttle. If, nevertheless, the jump could not be avoided, then it is necessary to land in the middle stance, but be ready to move to the back. When the wheels touch the ground, you need to slightly open the gas. It is better not to use four-wheel drive when jumping.
Every time you ride an ATV, you need to practice looking into the distance. This is necessary to develop the habit of evaluating the trajectory of movement in advance. Beginners often do not have time to track the road, and at some point they are not ready to perform adequate actions. And another, very predictable obstacle, can become a problem for them.
| When moving along a slope, it is necessary to move the body in the direction opposite to the slope. On the steepest sections, full overhang should be used, such as when cornering at speed.
|
Before you start climbing, you need to pick up speed. Then the resulting inertia will allow you to smoothly drive into the steepness.