Numerous riders do not know just how to charge their ATV battery correctly.
As a matter of fact, if you do not charge your ATV battery properly, you can do extremely significant damage to it.
If you also are puzzled, then this is your lucky day because I'm mosting likely to show you, detailed, exactly how to charge ATV battery properly.
Table of Contents
The ATV does have a built-in charging system powered by engine. But the current it provides is not very high.
You can charge the battery over long rides, but this is not always practical. Instead, you can use an external battery charger.
I will give you 3 steps on common ways to charge your ATV. By following the 3 steps below, it will not be difficult to charge your ATV.
Before all the work begins, you need to prepare some tools in advance so that you can better charge your ATV. With the right tools, the process is so simple that almost anyone can complete it.
With all the tools ready, let's get started.
The battery as well as the battery charger need to stay dry throughout the entire charging process.
Additionally, the battery should be someplace well-ventilated to air vent out any kind of gases from the charging process.
Overcharging and even just charging a battery causes a chemical process that launches explosive hydrogen gas. With proper venting, you lessen the risk of the gas obtaining stirred up by a spark, which may cause an explosion.
A garage or shed where you can leave the garage door open would be an excellent place.
If you do not have a completely dry as well as a well-ventilated location that will fit your whole ATV, consider removing the battery from the bike to charge it.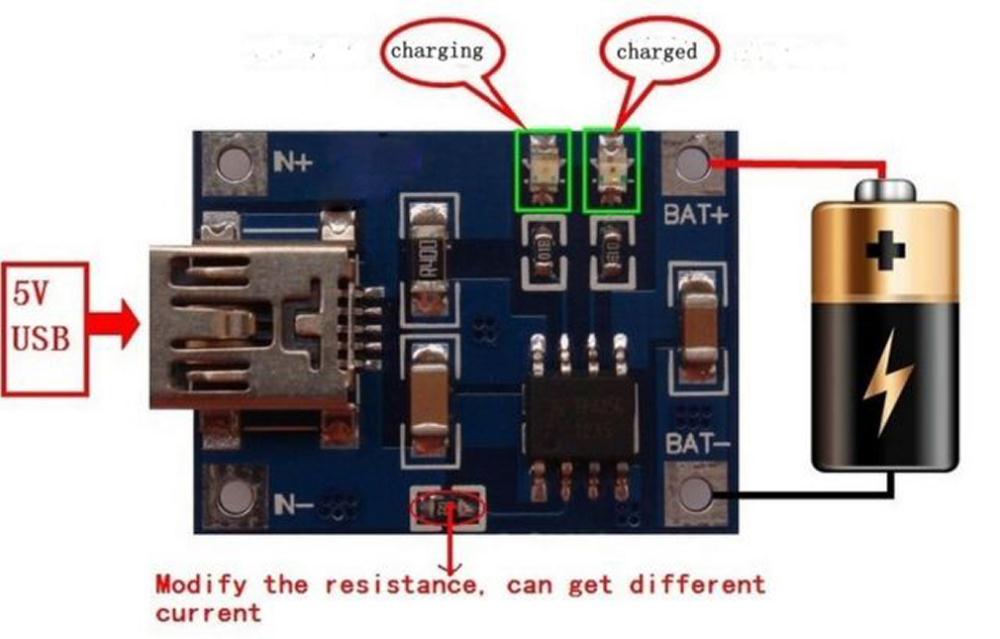
The ATV and all accessories must be switched off when charging to stop sparks.
After you put your ATV near an outlet, you will certainly need to open up the seat of your ATV to ensure that you have access to the battery.
To eliminate the seat of the ATV, you will require to make use of a screwdriver to remove the screws that protect the seat, and then you require to start loosening all the screws that safeguard the ATV battery.
It is very important to make sure that the screwdriver you are making use of is suitable for the screws that hold the seat to ensure that it does not damage the screws, which can end up being very hard to eliminate as soon as damaged.
As soon as you have ended up removing your ATV seat and also have accessibility to your battery, you will require to get rid of the battery covers.
After removing the battery cover, then you must
identify which battery is in your ATV. It should be classified clearly on the side.
If you can't check out the tag or there isn't one, here's just how to tell which battery you have.
If it has fluid inside, as well as has removable caps ahead, that's a flooded lead-acid battery. It'll additionally have partially clear housing, allowing you to keep track of the degree of the fluid inside.
If it has liquid inside, yet has a level top without any caps, that's a sealed lead-acid battery. It can likewise be a VRLA battery.
If the battery looks like a lead-acid battery, however, has a level top and you can't hear any fluid inside, that's a GEL-cell battery or an AGM battery.
If the battery is small and extremely light, that's a lithium-ion battery.
All ATV batteries, despite the type, require a 12V charger that provides a low current of between 1 and 3 amps .
Flooded lead-acid, sealed lead acid, VRLA as well as AGM batteries can be charged with a manual battery charger. Nevertheless, you need to monitor the battery charge utilizing a voltmeter to ensure you do not overcharge it.
This is specifically important for covered lead-acid and VRLA batteries, as there's no way to top them up after overcharging, and also they might obtain permanently damaged.
For Gel batteries, you need a battery charger, especially for this type of battery. The same goes with lithium-ion; try to find a lithium ion-compatible charger.
If you intend to avoid all these problems, we recommend getting an automatic battery charger. Unlike a hands-on charger that requires to be shut off or the current setup altered when the battery gets to a certain degree, you can attach an automatic charger as well as leave.
It instantly identifies the battery voltage and delivers the right voltage and present. It'll automatically quit charging, or go into trickle mode when the battery is full. So you never ever need to worry about damaging your ATV battery.
You can charge the ATV battery while it's still in the vehicle, or you can take it out. Just make sure you charge it in a well-ventilated area. The charging process creates flammable gasses.
If you are making use of a manual charger, check the voltage of the battery using a voltmeter. This will inform you just how low the battery is, as well as how much time it'll take to charge it.
Next off, attach the red lead of the battery charger to the positive terminal of the batter, and also the negative lead to the negative terminal or a piece of steel around the engine location.
Set the manual charger to the ideal charging current. To be secure, choose an existing that's no more than a tenth of the battery's Ah. For a 30Ah battery, set the present on the battery charger to no more than 3A.
Plug in the charger as well as start the charging process. Maintain checking the battery charge level. When it reaches 80%, reject current to half what it is. This enables the battery to fully charge.
When it's fully charged, switch off the charger quickly. If you'll be leaving the battery sitting for a very long time, you can switch on maintenance mode, if the charger has one or acquire a battery tender to keep it charged.
An automated charger is much easier to use. You do not require to check battery voltage or keep an eye on the battery.
All you require to do is choose the kind of battery and also voltage. Many automatic/intelligent chargers come with specialized charging modes for AGM, lithium-ion, Gel, as well as various other types of batteries.
Attach the battery charger to the battery and also leave it to charge. It'll safely charge the battery as well as maintain it completed without overcharging it.
The charging system on an ATV is not as efficient as the one you will find on an automobile, so it will need more time to charge the battery properly.
Unless you do hour-long rides every single time you launch your bike, it will likely draw even more power to start the bike than it will be able to charge while you are running it.
In addition, ATV batteries are reasonably small in both sizes and also able to maintain the total weight of the bike down.
Incorporate that with a couple of power-hungry accessories like your ATV winch, and also you will certainly quickly discover your battery is too low on power to start your bike. Leaving the battery on a low charge in time will additionally create damage to the battery.
That's why it's a good technique to charge it every now and then to conserve you from problems later on.
ATV batteries should be charged whenever the battery voltage drops listed below 12.4-- 12.6 volts. Top off the battery each fall and each spring, and use a battery tender to keep the battery healthy when the ATV is sitting for extended periods without being made use of it.
Car battery chargers commonly output 10 amps of existing, which is too much for an ATV battery. It can overheat and also permanently harm the battery.
Unless the battery charger has a setting to restrict current to less than 3 amps, do not use a car and truck charger.
If you can minimize present to under 3 amps, make use of the very same treatment as a manual charger.
Yes, you can charge your ATV battery with your car, yet only to jumpstart it. This is useful if your ATV won't start due to the fact that the battery is dead.
Use a jumper cable to link the automobile battery to the ATV battery. Do not start the cars and trucks. That could supply way too much power and also damages the little ATV battery.
The vehicle battery has enough charge to revitalize a dead ATV battery. Separate the jumper cable after a few minutes and attempt to begin the ATV once again.
To stress, this technique is just for jumpstarting. Do not use it to charge the ATV battery to ability considering that you can not manage just how much current and voltage it's receiving.
Yes, you can overcharge an ATV battery. This takes place if you use a battery charger that delivers way too much current or voltage. Leaving a manual charger plugged in even after the battery is complete can likewise overcharge it.
Overcharging can damage a battery, usually completely. This is specifically so for sealed batteries, where you can't open caps and restore the electrolyte.
How Long to Charge a Motorcycle Battery(The Unique Guide 2022)
What Does Stator Do On ATV? Most Comprehensive Overview 2022
Rodney L Herron
Rodney L is a technical writer and product consultant with over a decade of experience in the motor industry. Rodney is a fan of performance machines that run fast and loud and an expert in all things custom. His numerous articles and write-ups are available at our knowledge base. Whether it’s something wrong with your motorcycle or you are building a custom bike, you can trust Rodney’s experience.
No matter how big, strong, and capable your all-terrain vehicle’s battery might be, it still needs a recharge every once in a while.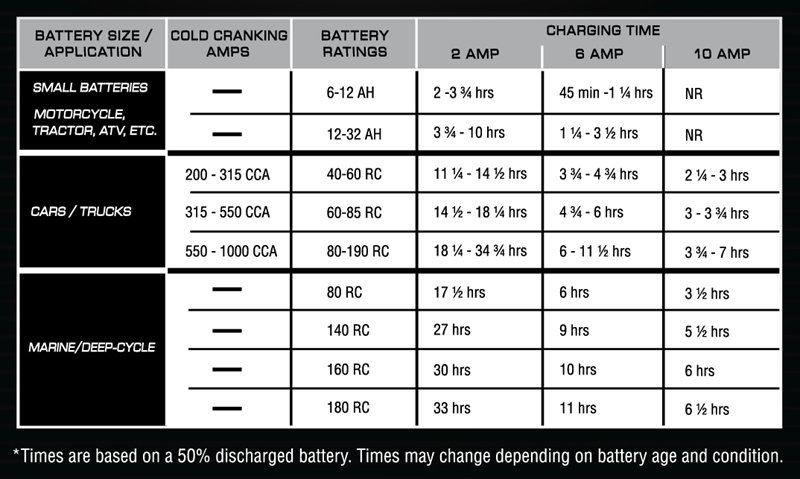 Now, the most popular questions online are “how long to charge ATV battery” and “how can I charge the battery on my own”. Well, that’s exactly why I decided to write this post – to guide you through the process of charging. This isn’t rocket science, but there are still some rules to follow.
Unless you do it properly, you can end up damaging the battery and even the entire powertrain (mostly, the engine). Yep, you heard it right. So, without further ado, let’s get right to it. We’ll start by learning the ideal charging time for ATV batteries and then talk about the actual charging process in more detail, including smart chargers, voltmeters, and more.
The big question is – are there any ideal charging times for ATV batteries, or not? Here are the facts: a full charge usually takes between three to ten hours. This depends on the battery (how old it is, how well you take care of it) and the charger. If you’ve got a high-grade charger, it will need very little time to recharge the battery. Now, it’s important to understand that a “high-grade” unit isn’t the one that transmits a strong current.
It’s actually the other way around. Say, you’ve got a charger that puts out 2 amps. That device will fully recharge an ATV battery in less than four hours. In contrast, a 5-amp charger will get the job done in 9-10 hours. Some chargers have different operating modes. By switching to the float/drip mode, you can expect the battery to reach a full charge in 4.5-5 hours.
The most important thing to remember when dealing with ATV batteries is to make sure you’ve got the right device for charging. I’m talking about voltage, of course. Keep in mind that four-wheeler batteries are pretty fragile. So, if you were wondering – how to charge an ATV battery with car charger – here’s my answer. You shouldn’t really use a regular car charger to “fire up” an ATV battery.
The reason: it usually has a rather high power output (up to 10 amps, or more). That kind of charge will, most likely, cause a quad vehicle’s battery to overheat, which leads to permanent damage and maybe even a malfunction in the engine. Only consider using a car charger if it’s a customizable device that allows limiting the output. If that’s the case, put the threshold/limit at 2-3 amps, and give it a try.
Again, this largely depends on the quality of the battery unit and your maintenance routine. If you want to know the average lifespan, it’s 3 to 4 years. There is little point in buying some of the more expensive batteries because their life expectancy won’t be significantly higher compared to the cheaper options. Some experts claim that the more you charge a battery, the less reliable and durable it becomes.
That doesn’t mean you shouldn’t charge it at all, of course. What I would recommend is to constantly check on the charge levels. There are actually pretty clear instructions for this: only consider charging the battery when its voltage drops below 12.4 volts. If it’s higher, there will be little use in “refilling” the charge. I also want to say that the quality of the charger affects the lifespan of the battery as well.
Alright, so, by now, we’ve talked about the right charging times for quad batteries, learned how long the average battery lasts and familiarized ourselves with some safety precautions. We still have one “stop” to make. With the basics out of the way, let’s go ahead and learn how to charge ATV battery. The best way to do this is to invest in a decent-quality smart charger. These are available for 70-80 US dollars and last for many years, if not decades.
The best thing about smart chargers is that they are compatible with a long line of four-wheelers and have wires-connections for pretty much every single ATV battery on the market. Another big pro: most reasonably-priced smart chargers have a built-in system that stops the charging process once the battery reaches a full charge. That prevents it from damaging the battery (yes, overly long charging times are known to cause overheating, among other things).
The less expensive chargers don’t have this feature, and you’ll have to turn them off manually.
Don’t worry: there’s nothing hard about using a smart charger. You will, however, need a screwdriver (or, at least, a wrench) to remove the plastic side panel and access the “insides” of your quad vehicle. In some cases, the seat will have to be removed as well. At this point, you’ve got a choice to make: either leave the battery where it is or remove it. I recommend taking it out completely.
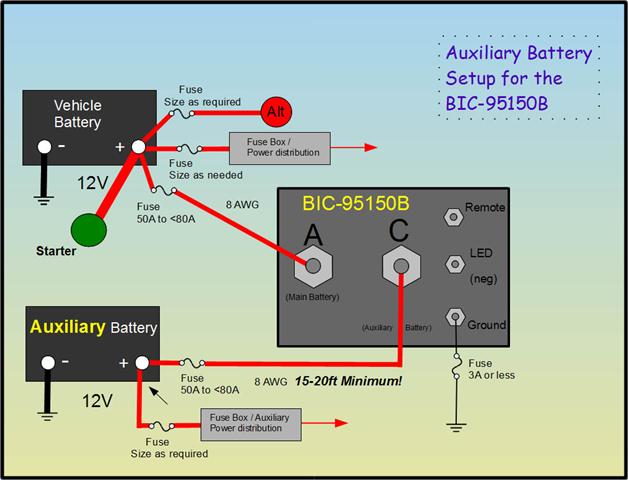
That way, it will be much easier to disconnect it from the ATV. This is important: make sure every single wire is disconnected before charging the battery! Next, use the clamps provided with the charger to connect to the battery unit. The positive lead is colored red and should connect to the positive terminal of the ATV battery. The negative lead, in turn, is usually black and is used for grounding.
A clean, bare metallic surface will do just fine. I usually connect the negative to my all-terrain vehicle’s frame. The connectors should always be sparkly-clean – even the tiniest dust particles can cause some trouble.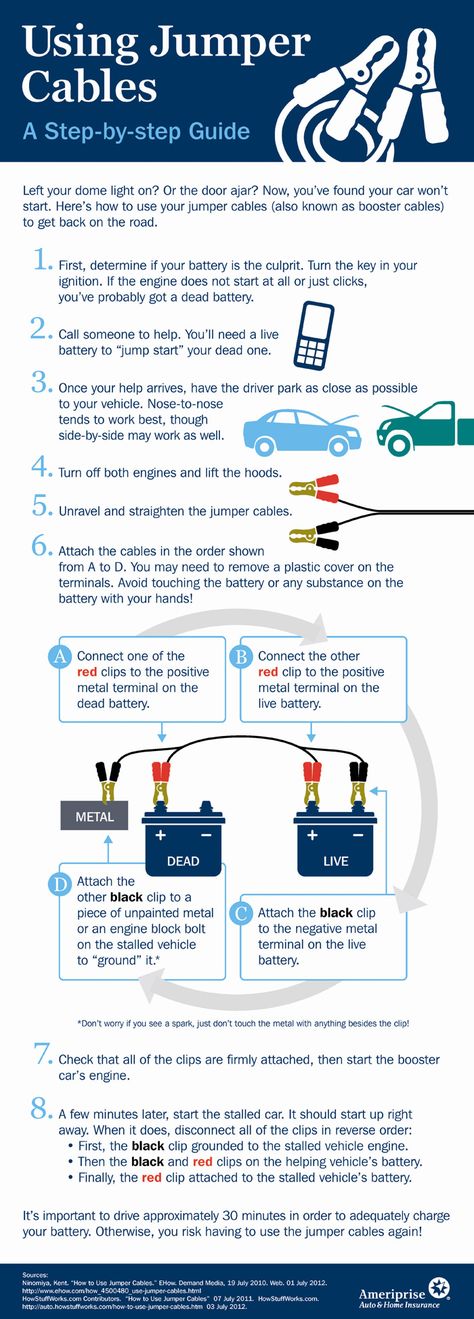 Plus, don’t forget to get a pair of protective gloves and eyewear. The acid inside of batteries is pretty toxic for the human skin.
Once you’re done, disconnect the charger and give the battery a try. I always let it sit for at least a couple of hours before using a voltmeter to measure the charge. If the battery can’t hold the charge properly, chances are, you’re dealing with a dead unit that needs to be replaced.
Ok, that concludes my guide into the world of ATV batteries. If you don’t want to spend big bucks on a new battery or pay a mechanic to charge it, you need to at least know the basics of proper charging. As we learned today, all-terrain-vehicle batteries are pretty fragile and sensitive, which means they need chargers with a specific power output to work correctly. Once you get to know the basics, it will be much easier to do everything on your own.
It’s all about following the rules and using the right equipment and techniques for charging. And if you still have some questions left, don’t hesitate to reach out to me! Or, use the comments section to share your thoughts, tips, and tricks for the less experienced readers. Take care of your ATV, and happy travels!
Electric ATVs are rapidly gaining popularity due to their efficiency and environmental friendliness. But many riders still do not know how to charge an ATV on a battery. Improper charging reduces the battery life or the battery loses its capacity quickly. Therefore, let's figure out how to charge a children's ATV and consider the key recommendations of experts.
There are two ways to recharge the ATV battery. The first and easiest is to connect the charger to the appropriate connector.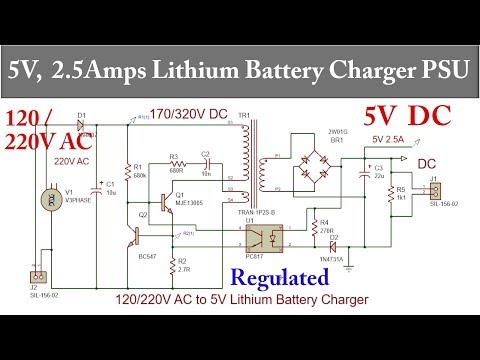 All electric cars and scooters are charged in a similar way, although not all quadrics have a similar socket.
If the ATV does not have a charging port, the rider will have to connect the battery directly to the charging station. To do this, you need:
It is important to note that lithium batteries have a charge control board. This means that after a full charge, the process stops. Although overcharging the battery is still not recommended.
Another important question many riders are wondering is how to charge an ATV battery with an in-car charger. Yes, such a procedure is possible, but you need to properly configure the charger. For recharging, you can only use devices with adjustable charging current and the ability to set its minimum level (0.5-0.7 A).
Important : The optimal current for charging the battery is 1/10 of the battery capacity (in Amps).
Each vehicle's user manual lists the optimum battery charging time. On average, this figure is 6-12 hours. The charging time depends on the generation of the battery, its capacity and the characteristics of the charger. Don't forget to charge the battery, though. If the battery has 30-40% capacity left, the recharging time should be reduced.
But what if you don't know how long to charge your ATV battery? In this case, you need to almost completely discharge the battery and charge it for 8 hours. After that, the battery should be installed on the quadric, and the charge level should be assessed. If the indicator shows 100%, next time you need to charge the battery for 6-7 hours. In this way, you can determine the optimal recharging time.
Also remember that overcharging is the main enemy of batteries. It is strongly not recommended to leave the battery connected to the network for 15-20 hours. This leads to a decrease in battery capacity and, accordingly, a decrease in the operating time of the quadric.
Knowing how long it takes to charge an ATV, you can make a schedule for recharging it. For example, the battery can be connected to the network in the evening or after each trip. You can also purchase a replacement battery, thereby increasing the riding time on the ATV.
The battery of any electrical equipment must be properly maintained. Violation of the recommendations may lead to a decrease in battery capacity or damage to it. To avoid such problems, it is recommended:

Separately, it is worth mentioning the "buildup" of the battery. Immediately after purchasing the equipment, you will need to fully charge and charge the ATV several times (2-3 times).
Most riders store their bikes before winter. And in order for the device to be ready for operation in the spring, it must be properly preserved. Preparing an electric quad bike for wintering is quite simple, you just need to find a warm and dry place to store the quad.
Another important conservation point is battery preparation. Before wintering you need:
Note : If you leave the quad battery in the cold, the battery will simply "leak" and stop working.
11/16/2020 8994
Hello Ivan.
Before answering this question, it should be noted that lead-acid batteries do not have "memory effect". Any special type procedures "Discharge to the end - fully charge" is not required at the first charge. Recharge the battery and send the child to ride.
Please note that the battery must be recharged at intervals of six months during storage. If this rule was violated by the manufacturer or seller of the electric vehicle prior to sale, the battery may already have partially lost its capacity.
And how to properly charge during operation:
1. Cycling battery life measured in cycles charge-discharge. If the battery is completely discharged, it "will last", approximately, 200 cycles. When discharged by 30% - the amount cycles increases by 5-6 times. Therefore, it is reasonable to charge battery after every day of use.
2. Be sure to fully charge the battery before winter storage. If the battery was discharged, due to self-discharge, by spring, it can completely fail.
Use the original charger or, if it is lost/failed, replace it with one designed specifically for lead-acid batteries of this voltage and capacity. Better if the memory is automatic. In this case, it will be able to determine that the battery is already fully charged and will automatically switch to maintenance mode (self-discharge compensation).
Children's motorcycles (as well as children's cars) typically use 6 volt batteries with capacities of 4.5 Ah, 7 Ah and 12 Ah. Suitable chargers for these batteries are shown in the table:
| Battery voltage and capacity | Battery name and photo (example) | Suitable charger from our range |
| 6 V 4.5 Ah | FIAMM FG 10451 | ROBITON LAC6-600 |
| 6 V 7-9 Ah | DELTA HR 6-7 | Leoch LC-2300 |
| 6 V 12 Ah | LEOCH DJW6-12 | East 220-6-2 |
Please note!
The chargers shown in the example are designed specifically for charging batteries, but are not chargers for a children's motorcycle or car. Almost every manufacturer of children's motorcycles and cars uses a connector that is convenient for him, the manufacturer. Very often they are unique and are not sold on the Russian market. The given chargers have either clamps for fastening to the battery terminals, or a mating part of the battery terminals of this type. They cannot be connected to a children's electric car. Accordingly, the battery for charging will have to be dismantled from the children's motorcycle and the charger connected to its terminals.
If it is necessary to replace the memory, you can determine the appropriate one from the data indicated on the battery itself: the front panel always indicates the charge voltage for cyclic use and the maximum charge current for that battery. Or you can navigate by this rule: the optimal charge current is 10-20% of the capacity. The maximum is 30%.
The charging time of the battery depends on the amperage of the charger. If it is 10-20% of the battery capacity, subject to the recommended charge voltage, a fully discharged battery should be charged in 10-12 hours. If the current is less, then the charge time increases inversely.
*****
If the given data did not help you to decide - call ( 8(495)197-78-47 ), write ( info@1000va.