Unless you happen to be a great handyman, performing ATV repairs can be a real pain. Sometimes, it is just easier to hire a professional so you don’t have to waste your time trying to fix something, not knowing if you are actually doing it the right way.
While that can be a relief, there are few things less stressful than thinking you are getting ripped off by a mechanic that knows more than you.
In an effort to put you at ease, and let you know what you should expect, we have compiled general price guidelines for all the common ATV repairs. Obviously, the market you live in is going to play a big part in the price, as well as how reputable the mechanic or dealer is that you are using.
You can also save some money doing it yourself if you are willing to learn how. For comparison sake, I am also sharing the cost of the parts so you know what you would be paying to do it yourself. Just remember, a lot of these jobs will require specialized tools, so factor that cost in if you need to buy new tools as well.
Getting a first service after you buy a new ATV is important because it is required under most ATV warranties. You don’t have to have a dealer do it, as they charge a premium, but you need to keep all the documentation showing it was done if you do it yourself of go to a different ATV mechanic.
Part of the first service includes swapping out the “break-in” oil for regular oil. The rest of it is checking the valves, changing the other fluids, changing the spark plugs, adjusting engine idle speed, inspecting the major systems and other maintenance that doesn’t justify the high cost, especially since I would hope everything is in good shape after just 25 hours of ride time.
How much does the first service cost? It will likely run you $150-350 depending on your dealer and your ATV. ATV riders generally consider this price exorbitant and a definite way for the dealer to try and milk extra money out of you. If you aren’t comfortable doing it yourself, try getting it thrown into the deal for free, or heavily discounted, when negotiation a sale. Getting stuff thrown in is pretty standard when negotiating an ATV deal, as we discussed in this guide.
A basic oil change in an ATV should include an oil filter change, and it shouldn’t be that much more than an oil change in your car. How much does an ATV oil change cost? You can probably expect an ATV oil change to run about $30-55 total.
If you want to change your own oil, the 2-3 quarts of oil you will need is going to run you $10-30 on Amazon depending what you go with. Doing the oil change yourself will only take about 20 minutes once you get the hang of doing it.
Replacing Air FilterMost of us ride our ATVs in dirty conditions. That’s kind of the point right? The problem is it cloggs up the air filter real quickly. A dirty filter lowers your gas mileage and causes poor engine performance. While you can clean it to expand the filter’s life, you will want to replace it fairly regularly.
How much does it cost to replace an air filter? Most dealers only really do it as part of a more full service, so just do it yourself if needed since it is super easy. A new air filter will cost you $5-50 on Amazon or cycle-parts.com, depending what ATV you own and what brand you go with.
How much does an ATV tune-up cost? Generally, an ATV tune-up is going to cost somewhere between $100-400, depending on what services are included. There is a wide range here because of the wide array of what is typically included. You can expect a typical tune-up to include some of the following services. The more that is included, the higher the price is going to be.
Replacement of brake pads should include new pads and the bleeding of the brake system. Both sides should be done at the same time to ensure maximum performance and safety. How much does ATV brake pad replacement cost? About $40-70 per side.
If you want to replace the brake pads yourself, they will run you anywhere from $10-60, depending on your ATV and the brand you choose, if you order them from Amazon or cycle-parts.com.
Top-End Rebuild.A top-end rebuild includes typically includes the valves (including valve seats, shims and guides), piston rings, cylinder wall hone, de-carbonized combustion chambers, replacement and and base gaskets and seals, R&R idler guide or tensioner, and spark plugs. It is designed to improve the fuel economy, efficiency, and overall performance of your ride.
How much does an ATV top-end rebuild cost? Generally, it will run between $500-750. The lower end of the price range is going to apply if you have a 2-stroke ATV, while the higher price range is going to be for 4-stroke ATVs.
Doing this on your own is really going to depend on how much you need to replace, but it is likely going to be in the $200-400 range. If you can get away with just buying a kit from Amazon or cycle-parts.com, it will be a bit cheaper.
An ATV carb overhaul should include the disassembly, cleaning, clearing of all passages, reaming jets, tuning accelerator pump timing and replacement of needed parts. How much does an ATV carb overhaul cost? Typically, it will cost between $75-200. Keep in mind, that is going to be per carb, so you will want to know how many carbs your ATV has.
You can buy your own Carburetor kit from Amazon or cycle-parts.com for $20-40 depending on the model of your ATV.
Clutch ReplacementA standard clutch replacement should include the replacement of the clutch plate and an oil change. The price is going to go up significantly if you are looking at changing out the entire clutch system.
How much does the clutch replacement cost for an ATV? About $150 unless you are doing the whole clutch system, then you can expect $300-500.
Doing it yourself is going to cost you $50-150 depending on your ATV. The time it is going to take is also going to depend on your ATV, as some models, like the Raptor, require you to pull the motor, while some models, like the Warrior, do not.
If you don’t have to pull the motor, you can probably get it done in under an hour. If you have to pull the motor, you are looking at two to three hours.
Valve Job or AdjustmentHow much does an ATV valve job or adjustment cost. You should expect to pay about $100-250 for either.
If you want to do it yourself, a set of valve’s will only cost you $5-15 on Amazon or cycle-parts.com, but you may need a shim kit as well, which could run $50-70 (shim kit is reusable).
Shock rebuildAn ATV shock rebuild typically includes the disassembly of the shock, the cleaning of all components, the replacement of any worn parts, the filling of oil and the bleeding and charging with nitrogen.
How much does a shock rebuild cost? A shock rebuild is going to run about $100-250 per shock. You may be able to get it a bit cheaper if your shocks do not have a reservoir.
The kit to do it yourself is going to run anywhere from $50-125 on Amazon or cycle-parts.com.
Water Pump Seal ReplacementA water pump seal replacement should include the flushing of your coolant system in addition to a new water pump seal. How much does an ATV water pump seal replacement cost? You should expect to pay between $75-150.
To do it yourself, you will need to pay $20-60 for a replacement water pump seal on Amazon or cycle-parts.com.
CV Boot and/or Joint ReplacementConstant velocity (CV) boots keep the lubricating grease inside the joint and the dirt out. So, if you notice a crack in the boot, you want to replace it as quickly as possible.
If the dirt and other bad stuff gets inside the joint, it will grind up all the metal parts inside the joint really quickly. Then, you have to replace the whole joint, which is a lot more expensive.
How much does it cost to replace a CV boot? About $80-125 depending on whether you get an OEM part. How much does it cost to replace a CV joint? About $200.
If you can do it yourself, a CV boot is only about $15 on Amazon or cycle-parts.com. You can expect the job to probably take about two hours.
Coolant ChangeHow much does a radiator coolant change cost in an ATV? Generally, you will pay about $60-100. Changing the coolant yourself will take an hour or two and the coolant will run $20-30. You will need 2 quarts to get get the job done.
Brake Fluid ChangeHow much does an ATV brake fluid change cost? It is likely going to cost $50 each for the front, rear or clutch system. You can flush and replace your brake fluid by picking up some DOT 3 or DOT 4 (don’t mix) on Amazon for about $10-15.
Chain and Sprockets ReplacementA chain and sprocket replacement should include both front and rear sprockets and the chain. It’s always a good idea to replace your chains and sprockets at the same time. You’ll notice a difference in the way your vehicle runs, shifts, and sounds.
How much does an ATV chain and sprocket replacement cost? You should budget between $100-200. The difference is going to depend on the cost of the chain and sprocket kit for your ATV. Those typically run $50-125. You should expect to be charged about $50 for labor.
If you want to do it yourself, it should take just under an hour and the kit will be $50-125 on Amazon or cycle-parts.com.
Chain adjustment and cleaningIf you just have a grimy chain and don’t need a full replacement, you can get it cleaned, lubed and adjusted. This will dramatically increase the life of your chain. How much does an ATV chain adjustment and cleaning cost? It should only cost about $15-25.
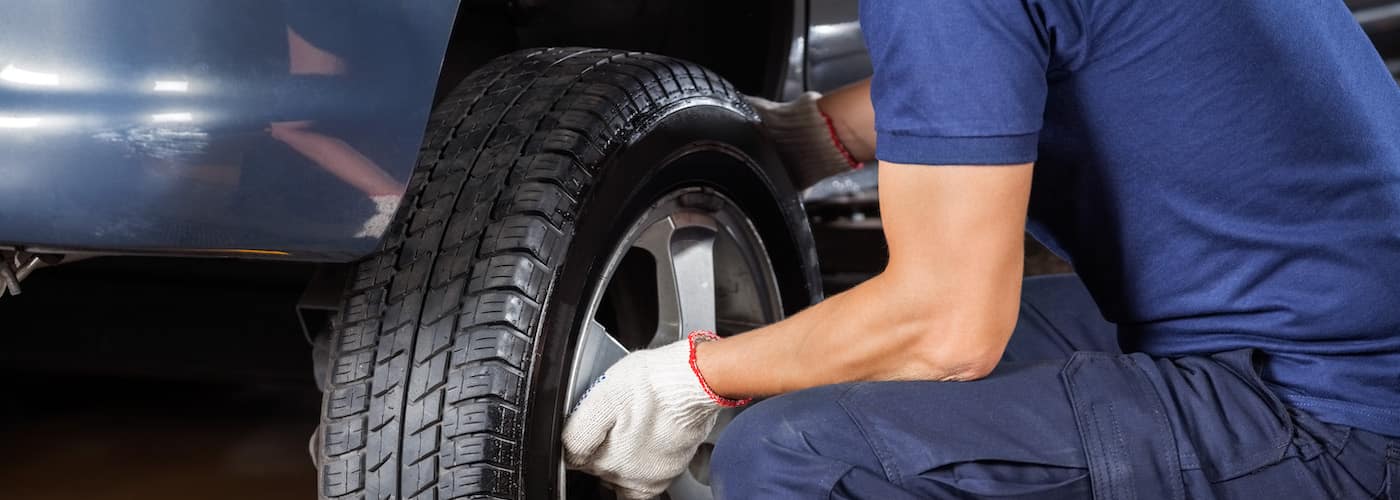
Tire ChangeHow much does an ATV Tire Change cost? The labor should run no more than $25 per tire, but the total cost is going to depend on the tires you get. ATV tires can run anywhere from $20-250 per tire.
The basic tires are going to be cheaper, while your more specialty tires like mud, sand or snow tires are going to be most expensive. Doing it yourself is just going to save you the installation fee.
General wisdom says that you should clean or even partially rebuild your carburetor at least every year if your vehicle is rarely used. In contrast, a complete carb rebuild is usually not required until a lot of wear is noticed on the internal components.
However, as you will see, the carb cleaning/rebuilding intervals depend on many factors like which type of carb it is or the quality of the fuel.
If you want to find out more about this topic, this post is for you.
We at PowerSportsGuide have compiled all you need to know under one roof!
Let’s face it, no matter how precisely you take care of your vehicle, the carburetor is prone to gumming up over time. This buildup of gunk can clog the carb or even find its way into the engine.
What’s more, the carburetor internals, especially the gaskets and seals can also age, which causes various malfunctions.
To avoid these issues, it’s wise to clean or even rebuild the carburetor from time-to-time.
But before we drill into the details, we have to define what a “carburetor rebuild” means exactly.
In a nutshell, rebuilding a carburetor means replacing its internal components, completed by a thorough cleaning. Based on the number of parts replaced we can distinguish between partial and full carburetor repairs.
Let’s get down to the nitty-gritty a look at your options when it comes to carb repair and maintenance:
There’s no question that cleaning is the cheapest and easiest carb maintenance available. This process requires you to pull the carb out, take it apart, and soak the parts in a bath of eco-friendly carb cleaner.
This simple process helps remove the buildups from the carb and restore its former performance.
2. Partial Carb RebuildUnfortunately, a simple cleaning is sometimes not enough to get the carb in good shape.
This is because the needles and jets are prone to completely clogging if too much dirt gets into them. What’s more, the gaskets and O-rings also age over time.
This is where a partial carburetor rebuild comes into play.
As the name suggests, a partial carb rebuild means replacing the defective internal components, but not all of them. These parts typically include the O-rings, gaskets, needles, and jets.
To manage this maintenance, you have to invest in a “partial carb rebuild kit” (a.k.a. “carburetor repair kit”). These affordable kits are sold for almost every type of carb regardless of their age or type.
Just dismantle and clean the carb, but when it comes to reassembling, you can install the new parts from the kit. It’s as simple as that!
3. Full Carb RebuildUnlike a partial rebuild, a full carb rebuild requires you to replace every internal part of the carb. Keep in mind that a full carb rebuild is only necessary if you notice a lot of wear on the major parts like the throttle shaft.
For a complete carb rebuild, you will need a “full carb rebuild kit,” which includes all of the necessary components. These kits typically include needles, jets, O-rings, gaskets, diaphragm, air screw, springs and clips, screws, and metal washers.
Just make sure to double-check the description of the kit before you order it to make sure it includes all the required parts. The exact composition of the kits varies widely depending on the make and type of kit.
Also, if your vehicle features more carburetors, you will need more kits of course.
4. Carb ReplacementSometimes it makes sense to replace the entire carburetor instead of completely rebuilding it. If the throttle shaft has too much play or the plates have worn into the carburetor body, it could be a sign that the entire carb has to be replaced.
Surprisingly, new carburetors are often affordable since they are designed for mass production and sold in large quantities.
Replacing your old carb for a new one is a lot faster and easier than cleaning and rebuilding the old one. A complete rebuild can be especially tiring if you have more than one carb.
Consequently, you may want to consider replacing the carbs instead of completely rebuilding them.
How often should I rebuild my carburetor? – we get this question more often than not.
Although there’s no specific time recommendation for carburetor cleaning and rebuilding, the general rule is that the less often you use your vehicle, the more often its carb needs to be cleaned or even rebuilt.
This is because when the engine sits for an extended period of time, the fuel starts to gum and clog the carbs.
The type of fuel is no less important. Today’s gasoline contains ethanol, which deteriorates the rubber components like seals, gaskets, and the float.
On top of that, the required carb maintenance interval depends on many other factors like the type and design of the carbs, and the way you use the vehicle.
Nevertheless, here are some tips to get some idea of when you should clean or even rebuild your carbs:

Rebuilding a carburetor is considered simple routine maintenance, but it requires some time and patience. The difficulty of the work strongly depends on the design and the number of carburetors since the arrangement and the complexity of these units vary widely.
For example, lawnmower carburetors typically feature a fairly simple design, while high-performance powersport vehicles have much more complex carbs.
For example, certain ATVs and snowmobiles come with special safety features (like Yamaha’s T. O.R.S. system) which adds some complexity to the carbs.
We won’t even mention electronically controlled carburetors, which are more difficult to maintain and rebuild than their regular counterparts.
Can You Rebuild a Carburetor Yourself?You can rebuild a carburetor even by yourself if you have the required tools and a clean, well-lighted place to work comfortably. Best practice is to manage this maintenance on a table where you can sit down.
Besides the above, you will need an appropriate carburetor repair kit, cleaner liquid, rugs, paper towels, and a small container to soak the parts in.
Beware that you will need a lot of patience as you will have to pay attention to the details and cleanliness.
If you are not mechanically inclined, you may want to get the job done by a professional. Keep in mind that after reinstalling the carb you will also have to adjust it for optimal performance.
This process can be tricky if your engine features more carbs since they have to be synchronized, which requires some expertise.
Sometimes it’s worth completely rebuilding a carburetor, while in other cases a replacement is a better choice. This strongly depends on the type of carbs you have, the price of a full rebuild kit, and a complete carb, and the value of your time of course.
As a rule of thumb, rebuilding carburetors cost about $10-$100 per carb if you do the work yourself. A partial carb rebuild kit costs about $10-$20 per carb, while the prices of complete kits range from $20 up to $100. You will also need a can of carb cleaner liquid, which may cost you about $5-$10.
Therefore, you can partially rebuild a simple carb for a couple of bucks, while a complete rebuild of four complex carbs may cost you more than $400.
If you want to get the work done by a service shop, don’t forget to budget for the cost of labor.
Let’s take a closer look at carburetor rebuild kits!
Are all carb rebuild kits the same?
If you are considering rebuilding your carbs, keep in mind that not all carb rebuild kits are the same.
The design of carbs varies from one model to the next, so each carb has its own rebuild kit. What’s more, you can often find different kits for the same carb, which contain different components.
The cheapest carb rebuild kits are usually partial rebuild kits that contain only a few components. On the other end of the spectrum, you can find full rebuild kits that come with everything you need for a complete carb rebuild.
Sometimes you can find “middle-level” kits that fit between these two worlds.
How do you know which carburetor rebuild kit to buy?
To figure out which carburetor rebuild kit you need, you should check your vehicle’s owner’s manual. The manual clearly describes the exact type and model of your carburetor.
If the manual isn’t available, you can also identify your carb by the list number stamped on the side of the carburetor’s body.
Based on this number and your vehicle’s year and specs, you can get the exact type of your carb from part catalogs or online databases.
Can carburetor gaskets be reused?
If the gaskets are in a good condition you can reuse them without any problems.
If you use your vehicle regularly, you can run it for many years without rebuilding the carburetor. However, a thorough cleaning before each season is always a good idea to remove the potentially accumulated gum from the carb.
Rarely used vehicles typically require at least an annual cleaning, or often a partial carb rebuild. This maintenance includes replacing the O-rings, gaskets, needles, and jets.
It’s also wise to partially rebuild the carb on vehicles that have been sitting for a long time.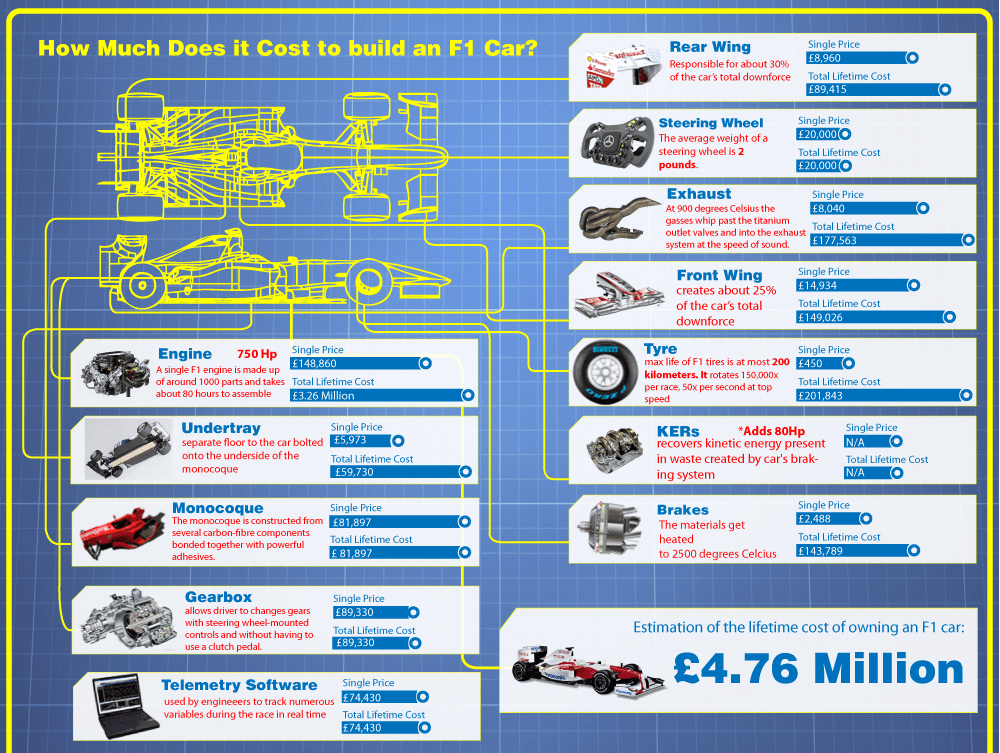
A full carb rebuild is only necessary if there’s significant wear on the major parts.
If you are not mechanically inclined, you can get your carbs rebuilt by a service shop. Your other option is investing in a new carb, which can be a worthy alternative to a full carb rebuild.
References:
Partzilla.com
Briggsandstratton.com
It often seems like an insurmountable task for beginners to tune and adjust the carburetor of an ATV, but in fact, it is far from being the case. Using our instructions, you can easily set up a carburetor with your own hands.
Due to incorrect carburetor settings, problems such as: acceleration dips, jerks while driving, uncertain start of the engine, poor acceleration dynamics, overheating, loss of power, increased fuel consumption, formation of deposits in the combustion chamber.
So what exactly are we going to tune?
Attention! The adjustment is carried out under the condition of a warm engine and a clean carburetor.
First, make sure there is no condensation in the carburetor. First, you need to drain the gasoline from the float chamber, for this you need to close the fuel cock and partially unscrew the screw No. 1, after the gasoline has drained from the float chamber, tighten the screw No. 1.
Let's look at photos of candles with various deposits and defects.
A 100% indicator of a correctly adjusted combustible mixture is carbon deposits on a candle.

Consider the location of the screws for adjusting the quality of the mixture and idle speed of carburetors of different models.
#1 Float chamber plug; No. 2 Mixture quality screw;
#3 Idle adjustment screw.
1 - quality adjustment screw at idle; 2 - fuel inlet fitting; 3 - fitting through which you can sleep fuel from the float chamber; 4 - screw-plug of the float chamber.
1 - ventilation tube; 2 - idle speed adjustment screw; 3 - screw for adjusting the composition of the air-fuel mixture.
ATV carburetor speed and mixture adjustment.
1. Start and warm up the engine until it reaches operating temperature.
2. Adjust the idle screw to set the idle speed to normal. Completely, until it stops, tighten the fuel mixture screw, the engine should stall. If this does not happen, check the tightness of the air supply system from the air filter.
3. Loosen the fuel mixture screw 1 turn. (Turning the screw clockwise, we enrich the mixture, unscrewing it counterclockwise, we lean).
4. Start the engine and, by adjusting the idle speed screw, set the speed slightly higher than normal
5. Slowly unscrew the fuel mixture screw until the engine reaches maximum speed (we unscrew the screw no more than 2 turns, but depending on engine wear and other malfunctions, the range may vary).
6. Re-adjust the idle screw to set the idle speed to normal.
7. Press the throttle trigger several times, check if the idle speed is stable.
Adjustment of the mixture quality with a needle.
Probably you have heard more than once about adjusting the quality of the mixture on the carburetor by manipulating the needle. I note that these are extreme measures, for the initial adjustment, use the mixture quality screw, and only if you do not get the desired result, unscrew the mount and remove the needle. What does she represent? This is the main element that regulates the amount of gasoline supplied to the combustion chamber. Connected directly to the throttle handle through a cable. When you turn the knob, the needle rises higher, opening up a channel for fuel, thereby delivering more mixture, which increases power, which translates into speed.
You will see 5 grooves on the needle at the attachment point. Initially, the retaining ring fixes it in the central position, this is the best option. But sometimes it is not possible to achieve the required quality of the mixture. Then we will need the remaining grooves, 2 on top and 2 on the bottom, this suggests that we can adjust the dose gradually.
Lifting the retaining ring up and locking it in this position lowers the needle, which, in turn, blocks the channel more than usual. Gasoline enters less than air, and the mixture becomes leaner. Lowering the ring down, we raise the needle, and everything happens exactly the opposite.
Be aware that an excessively lean or rich mixture can lead to serious malfunctions from overheating to loss of power, carbon deposits in the combustion chamber and all the consequences that follow from this. Keep an eye on the condition of the spark plug electrodes, this is the main indicator that will help you determine the quality of the mixture.
If you have any questions about the adjustment and tuning of the carburetor, you can ask them below in the "Comments" column.
Every ATV owner sooner or later faces a breakdown. And it doesn’t matter if you decide to buy an inexpensive ATV or a branded device. Of course, this is an unpleasant situation, but most problems can be fixed by hand. So let's figure out what to do if the ATV does not start.
Constant driving to the limit and improper operation of the equipment often causes a number of breakdowns. Due to high loads, it can fail:
But most often, problems arise due to some trifle, such as low-quality gasoline, lack of oil or improper preservation of equipment.
The first thing a motorist needs to do if the ATV does not start or stalls is to check the gas tank. If the fuel is idle for a long time, it may evaporate, and if the tank is empty, gasoline should be added. But if there is fuel in it, it is advisable to drain it. Very often, low-quality fuel comes across, which after a while simply ceases to ignite.
Don't forget the oil. If a low-quality liquid was poured into the system, the device will lose dynamics and may even stall. This problem is especially relevant for four-stroke quads, since their power unit must literally “float” in oil.
Another reason why the ATV does not start is improper preservation of the equipment. Even if you leave the device for a day in the garage, it must be prepared for downtime, otherwise starting the engine will be a real test.
Preservation required:
Many riders ignore this simple procedure, but it is the one that most often causes starting problems. For example, it is almost impossible to immediately start a “cold” engine. Therefore, the driver begins to methodically press the "start" button, and at this time the battery is discharged. After 10-15 attempts, the battery runs out, and it becomes unrealistic to start the equipment.
Important: In severe frost, it is imperative to carry out conservation of the ATV. If this is not done, condensation will collect at the bottom of the carburetor, and the quadric will have to “warm up” for several days.
If this is not done, condensation will collect at the bottom of the carburetor, and the quadric will have to “warm up” for several days.
ATV won't start due to starter or bad contacts. In this case, you should:
But what if the Chinese ATV won't start due to problems with the starter in the field or away from home? In this case, the rider needs to close the relay contacts with a screwdriver. Thus, the rider will be able to start the device bypassing the faulty starter.
No spark is another simple but annoying failure. It usually occurs due to damage to the coil or a break in the wires that go to the candle. Solving the problem is easy. The rider just needs to unscrew the candle, insert it into the cap, attach it with a metal part to the motor and press "start".
Even minor downtime can prevent your ATV from starting, especially if it has been improperly preserved. And in order to “reanimate” the equipment after the winter, you should: