Regular maintenance ensures that your ATV runs smoothly. What about valve adjustments? Valves allow fresh gas to flow into the combustion chamber and spent gas to exit. On average, valves require no more than periodic clearance, inspection, and occasional adjustments, but how often should you perform ATV valve adjustments?
ATV valve adjustments ought to take place every few months for most machines. However, if you own a high-performance ATV, you will want to check and adjust your valves after every 3-4 riding trips or during oil changes.
In this article, you’ll get a quick guide on how often to adjust your ATV valves. In addition, you will also learn the following:
When a valve is closed, you need to have a gas-tight seal in the space between the valve seat and the valve face. To ensure the valve is well-seated, you need to have some valve clearance (lash) between the rocker arm and the valve stem. You can adjust the lash with a screw, shim, or with a hydraulic device.
As the engine heats up, the metals inside expand. This happens to the valve train components too. If the lash between the valve stem and its operating mechanisms is insufficient when the engine is at rest, it will be even more so when it gets hotter.
If the valve clearance is reduced too much, the following occurs:

Again, if you remove the clearance, the valves get to sit a little further from the valve seat. This reduces the seat-to-valve-face contact area, giving combustion gases room to leak past.
By now, the engine might not start, and your valves are badly in need of attention. At this point, trying to start the engine could cause the exhaust valve to overheat or even burn.
Is there a way to tell whether your ATV valves need checking or adjusting without necessarily pulling the top to check the clearance? In other words, are there any particular signs that you need to look out for?
For starters, indeed, the most foolproof way to tell whether your valve clearances are in good shape (spec) is to pull the cover and measure them. Fortunately, there are other ways to tell. Out-of-adjustment valves usually make it easy for you to notice them because:
In a nutshell, they might be noisy – if too loose- or the bike could lose compression or overheat – if too tight.
ATV Valves can lose clearance (slip out of adjustment) due to several reasons, including:

What happens if you don’t adjust your valves? The reason for setting valve clearance is simple; metal expands when hot. Therefore, if the clearance gets too tight, the valve can’t fully sit in the head.
As mentioned previously, this situation can lead to compression loss or overheating. The latter can even lead to the valve’s destruction since the head helps to dissipate the heat from the valve. If the valve is unable to close fully, it loses the chance to transfer enough heat to the head.
And how does this affect your ATV?
If the valve is too tight, the ATV loses compression and performance while your gas mileage suffers. If it gets too loose, it becomes noisy and gets damaged by excessive clearance and metal bits slapping against each other.
Sometimes, if it gets too loose, the valve fails to open fully in a timely manner, and the engine fails to breathe optimally.
Finally, poorly adjusted valves can cause the entire valve train to wear out. Furthermore, if your valves have too much clearance, they can cause valve damage and failure, which can extend to the camshaft lobes and rocker arms. If you notice your valve train components failing, be sure to check the valve clearance.
So, how often should you adjust your ATV Valves, or should you base this on standard maintenance intervals? Well, this depends on your machine type and the manufacturer’s instructions.
High-performance engines require servicing more often than other utility quads. As such, you will find that you need to adjust your ATV valves every 20 hours or so or with each oil change.
There’s a good reason for this too. You see, if you allow the valves to go too far, the intakes become too tight and they start leaking.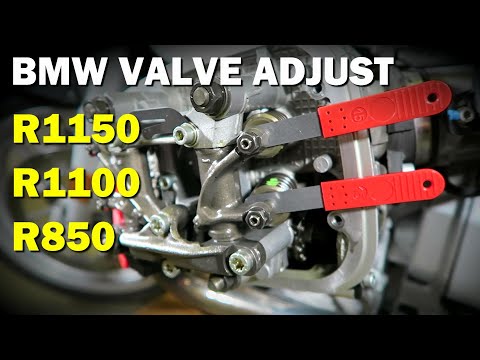 Then, you’ll be setting yourself up for some big-time repairs.
Additionally, depending on the type of bike you have, you might notice that the valves tap slightly when correctly set. Any noticeable sound changes would therefore indicate a need for adjustment.
Even so, the adjustment interval is not cast on stone. Rather, it’s what most manufacturers consider to be a safe bet between the adjustment cost and the heightened risk of valve problems or, worse, decreased engine lifespan.
Consequently, you can decide to either half or double the interval, depending on what works for you. Besides, experience and familiarity with your ATV should also enable you to diagnose valve clearance challenges.
It’s important to note that valves tend to tighten with age. With this in mind, some ATV owners suggest that you are better off adjusting on the looser end than the tighter end of the specs when making adjustments.
For detailed instructions on how to adjust your ATV valves, check out Dirt Wheel Mag’s guide. Alternatively, you can also check out this video:
ATV valve adjustments are an essential part of your ATV’s preventative maintenance. If you fail to perform the adjustment, nothing will happen immediately, but with time, additional wear and tear happen.
Again, by the time your ATV lets you know that you need to do your maintenance – noisy valves, reduced performance, etc. – more often than not, you will have done some damage already.
Sharing is caring!
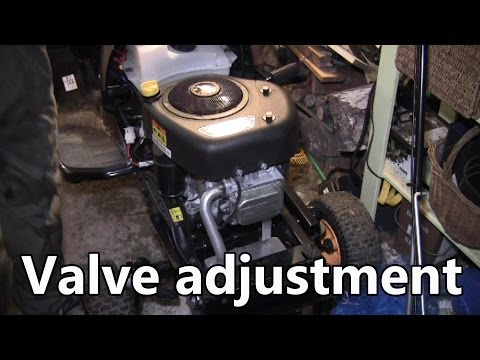
ATV valve adjustment is often forgotten about, and I understand why. Just getting access to the valves on some bikes is a mission in itself. But if you hear a new sound from the top end, it may be time to bite the bullet.
Adjusting ATV valves is a 6 step process:
In this post, you’ll learn how to adjust your valve lash like a professional. If you need to check the symptoms of maladjusted valves, check out this post, “ATV valve adjustment symptoms”
This guide covers the more common rocker-style valve train. If your ATV is fitted with an OHC (Over Head Cam), the procedure is a little different.
Page Contents
Some bikes make it easy to access the valve covers, and some will be a complete pain in the ass. It’s not unusual to remove side covers, seat gas tank and air-box, and ducting. Most ATV engines are single cylinders but will likely have four valves. Two inlet and two exhaust.
When you finally gain access, remove the valve caps. Most will be individual valve caps with an O-ring seal. Each valve will likely have its own cap.
Your engine is a four-stroke unit, and we want the piston at the very top of the cylinder on the power stroke.
The four defined strokes are:
1 Intake stroke – Intake valve(s) opens as the piston moves down the cylinder and closes again as the piston bottoms out.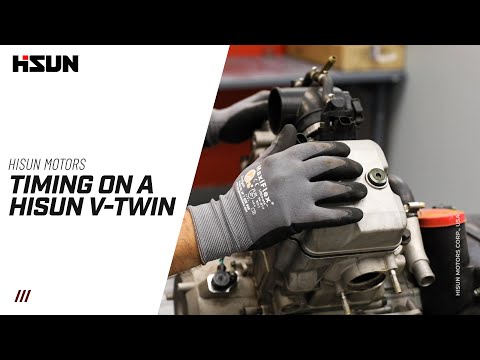
2 Compression stroke – Intake valve(s) now closed as the piston moves up the cylinder, compressing the air/fuel mix into the combustion chamber at the top of the cylinder.
3 Power stroke – The spark plug fires and ignites the compressed mix causing the piston to move down the cylinder under power.
4 Exhaust stroke – Exhaust valve(s) open as the piston moves up the cylinder, pushing the spent gases out. The valve is fully closed as the piston reaches the top of the cylinder, and the cycle starts over.
What is TDC (Top Dead Centre)? It’s when the piston is at the very top of its stroke.
Why is this important? When the piston is at TDC, both exhaust and intake valve springs are unloaded, and valves are fully closed. That’s when we can check and adjust valves.
Begin by removing the spark plug, and on the flywheel cover (if pull starter fitted, go ahead and remove it), you’ll find a timing inspection cap.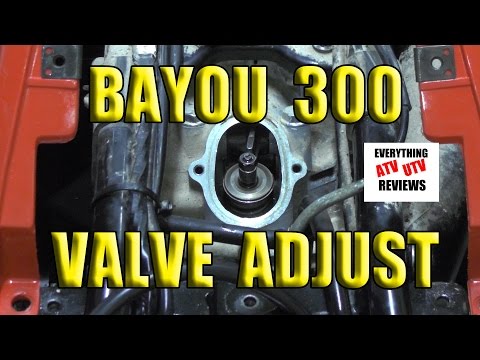 Go ahead and remove it. You’ll also find a flywheel nut access cap, go ahead and remove it too.
Using a suitable deep socket and ratchet, turn the engine over while viewing the flywheel through the inspection hole. TDC is commonly marked by a letter “T” or “Dash” stamped into the spinning flywheel.
You’ll need to rotate the flywheel/crankshaft fully to find and familiarize yourself with your marking. However, the “marking” will pass the viewing window four times in a full four-stroke cycle, but we want to identify the power stroke.
The simplest way to identify the power stroke is to watch the valve springs after the engine passes TDC. When the valves do not compress immediately after TDC (Cam lobes pointing upwards) – You’ve found the power stroke.
With TDC on power stroke located, check the “Mark” again on the flywheel, and you’re ready to begin checking lash.
Note OHC set up shown here, but the logic is the same.
The tools required are primarily basic. But you will need a feeler gauge. You can find all these tools here on the ATV tools page.
What is a feeler gauge? It’s an inexpensive tool used to measure clearances between mechanical components.
It comprises stainless steel strips of various sizes, measured and marked in standard and metric arranged in a fan configuration. If you need to buy a set, know that the standard type feeler gauge fingers are straight, which is fine for working on car engines where there’s a lot more room.
On a bike engine, an off-set feeler gauge is easier to handle, might cost a few dollars more but totally worth it.
All engines will have at least two valves. Some may have four per cylinder. To check lash, you’ll need to identify which valve is which. The intake valve is larger, but that can only be seen by removing the cylinder head, which obviously we won’t be doing. The easiest way to identify the valves is by their location. An ATV engine is small and logical.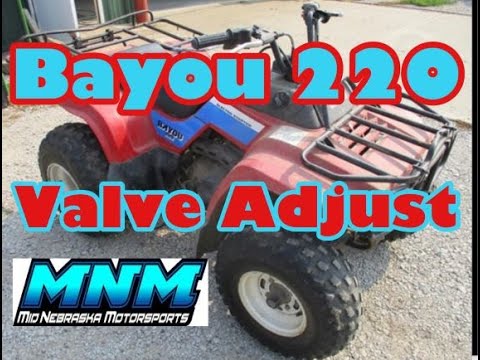
The intake valve(s) will be on the same side of the engine as the carburetor and the valve(s) closest to the carburetor. You may have a pair of intake valves, and if so, they’ll be arranged as a pair.
The exhaust valve(s), likewise, will be the valve(s) closest to the exhaust. Bear in mind. You may have two exhaust valves.
At this point, you’ll need to refer to your engine spec to find your intake and exhaust valve lash measurements. Intake and exhaust measurements will be different. The acceptable measurements may be given as a range, if so any measurement within the range is to spec.
Using the appropriate size blade, (marked on the blade) slide the blade between the valve tip and the cam (rocker). You should feel gentle but constant resistance.
The blade should neither be too tight nor loose. Check intake and exhaust valves. Note the measurements.
The rocker valve lash adjusters vary in style, but the principle is the same. The lash adjuster is a two-part assembly. A lock-nut (usually a nut) and an adjuster screw (usually a screw head or Torx). The lock-nut keeps the adjuster screw at the set height and so must be loosened before any adjusting can take place.
Having identified the valves that need adjustment, go ahead and loosen the adjuster lock-nuts. You’ll need to hold the adjuster screw while loosening the lock-nut, back the lock-nut off a turn.
If you have an OHC, below the bucket you’ll find a pad, swap the pad out to adjust the bucket to cam gap.
Slide the appropriate feeler blade under the rocker and adjust the screw adjuster (Clockwise to tighten and anti-clockwise to loosen). Feel the change in resistance by moving the gauge as you adjust.
When you find the sweet spot with the adjuster screw, you’ll need to hold the screw stationary as you tighten the lock nut.
If you allow the adjuster screw to move while snugging up the lock-nut – the lash will be off.
Test your gauge feel once again after snugging down the lock-nut. If it’s too tight, repeat the adjusting process.
A common mistake is over-tightening and breaking the lock-nuts, don’t be that soldier!
When reassembling, torque the cap or cam cover to spec, replace the gaskets (lube rubber seals) to prevent oil leaks. Nice work!
You’ll find the tools I recommend here on the ATV tools page and you’ll find common spare parts here on the ATV parts page.
You may find the following posts helpful:
How often to service ATV?
ATV parts page
How to tell ATV jumped time?
How often should I start ATV?
Adjusting the valves on an ATV is one of the most important maintenance steps. Ignoring this operation will adversely affect the operation of the engine, make it difficult to start the ATV, and even lead to a number of serious breakdowns. Therefore, it is important for the rider to figure out when it is necessary to carry out the adjustment and whether it is worth performing the procedure on their own or it is better to seek help from an ATV store in Kyiv.
Experienced motorists advise adjusting the valves on the ATV immediately after purchasing the equipment. The fact is that when assembling devices (especially Chinese ones), manufacturers do not pay due attention to this procedure. And the operation of ATVs with incorrectly adjusted clearances leads to:
The second clearance setting should preferably be done when the vehicle is running in. That is, after 300-350 km of the way, the rider should check the cylinder head.
Please note: An operation such as adjusting the valves on an ATV is considered a mandatory maintenance item and should be carried out every 1000-1500 km.
Before adjusting the valves, you need to prepare the quadric for the procedure. To do this, it is recommended to raise the front of the ATV. This will clean the cylinder head oil bath and remove excess fluid.
Then dismantle the body parts that make it difficult to get to the valves. However, it all depends on the model of the quadric, in some devices you can get to the cylinder head without removing the plastic parts and assemblies.
The rider also needs to prepare tools: an 8 wrench (better with a head so as not to damage the nuts), measuring probes (you can find them in any auto shop) and a hammer.
Let the machine cool down before adjusting the ATV's valves. The procedure is performed "cold", so it is better not to start the ATV before adjusting.
In fact, adjustment is a basic operation, so even a novice ATV rider can perform it.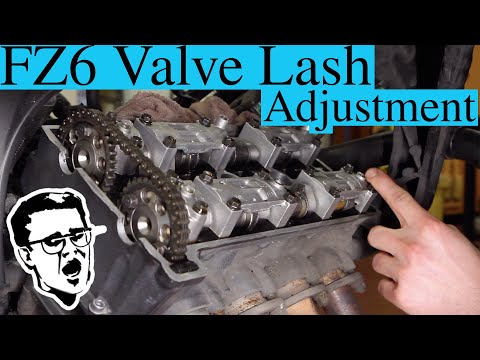 The driver only needs:
 It is important to note that this parameter is individual for each ATV, so be guided by the documentation and recommendations of the manufacturer of the quadric when making adjustments.
 After making adjustments, start the ATV and observe engine operation. It is possible that at first the device will make a slight tapping sound. However, if the knock is strong, then the valves were not set correctly.
Important: Do not load the ATV heavily after adjustment. Carry out a mini run-in (5-10 km). Also, during the trip, listen to the sounds that the ATV engine makes.
02/19/2021 4469
Adjusting the valves on an ATV is a maintenance procedure. As a rule, the first adjustment of valves on modern ATVs is made after a run of 1000 kilometers. We recommend checking the valve clearances of the ATV and, if necessary, adjusting them after 300-350 km.
Very often, especially on Chinese-made ATVs, the gaps are set incorrectly right from the factory, also due to heating and cooling cycles, the valves can stretch and the gap will be broken, which can subsequently lead to damage to the valve plates, deterioration of the timing mechanism and even to valve burnout.
So if you're serious about engineering and want to maximize the performance of your ATV engine, don't be lazy and check the valve clearances during your first service.
How to adjust the valves on an ATV.
Before unscrewing the valve cover, we recommend lifting the front of the ATV with a winch to empty the cylinder head oil sump, this will allow you to stay a little cleaner when removing the cover and not stain the ATV parts with oil. By the way, some ATVs have special adjustment windows to avoid removing the valve cover completely.
You may need to remove the gas tank plastic lining and the gas tank to remove the valve cover.
Attention! When adjusting the ATV engine must be absolutely cold (30-35 degrees).
Next, you need to unscrew the cylinder head cover or windows (it is better to use a head, and not a ring wrench, so as not to damage the edges of the bolts). After all the bolts are unscrewed, the cover may not immediately give in, in order to move it, it is better to lightly hit the bottom edge of the cover with a hammer through a wooden block. Do not attempt to use sharp objects to avoid damaging the lugs on the lid.
After removing the cover, carefully remove the rest of the gasket from the cover and from the head so that they do not enter the engine.
Next, you need to set the cylinder to TDC (top dead center) of the compression stroke. If you are wondering what is top dead center, we suggest you read the article about the ATV engine and its device.
So, in order to catch the TDC, you need to unscrew the viewing window cover, unscrew the spark plug (required) and crank the crankshaft with a manual starter (kick starter) until a special mark appears in the viewing window.
Sometimes the mark is applied incorrectly and therefore it is better to check the TDC control, being safe, by checking the position of the valves. All dead center valves must be closed.
We need special feeler gauges to check the clearance. They are sold at any auto shop.
Next, we need to check the valve clearance, for which the probe is inserted into the valve stem clearance.
Valve clearance is different for each ATV model, and you can find its value in the manual for your ATV.
The stylus should enter the gap freely (should not cause scratching when moving in the gap), but at the same time, a 0.01 mm larger stylus should not enter the gap.
If you notice that the valve clearance on your ATV does not match the manufacturer's instructions, you need to make an adjustment.
To do this, loosen the lock nut and adjusting screw, insert a feeler gauge of the correct size into the gap, turn the adjusting screw until it contacts the feeler gauge, and fix the lock nut. Then check the gap again.
It is not necessary to tighten the nuts hard, a medium hand force on the wrench is sufficient.
After all valves have been adjusted, the cylinder head cover must be reinstalled. To do this, lubricate the tidal surface of the cover with a heat-resistant sealant with a thin even layer (it is not worth saving on it). Let it rest a little (usually within 10 minutes) until the sealant stops staining your hands when touched, but leaves a fingerprint.
Carefully align the head cover and cross-tighten the bolts. Do not forget to put back the cap of the TDC control window. Reinstall all the parts you dismantled.
Start the ATV and listen to the engine, do not pay attention to a small knock that does not stand out against the noise of the engine, but a distinct, clearly audible knock should alert you, since the presence of a knock in the engine indicates that valves are not adjusted correctly.