Knowing how to adjust an ATV chain helps you maintain and operate your ATV at its best. It also saves you a trip to a shop to deal with something easily managed at home. All it takes is some knowledge, focus, and enough time to get the job done.
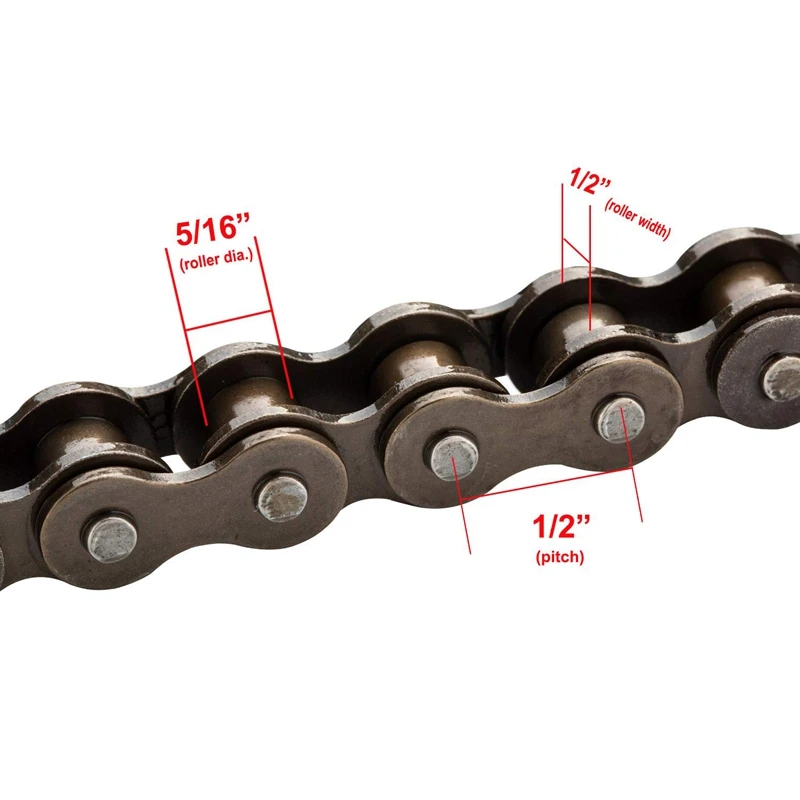
First, to know how to adjust an ATV chain, you must understand what the chain is and why it’s there. An ATV drive chain looks similar to what you would find on a bicycle. Some modern ATVs don’t have a drive chain, so consult your manual if you can’t find one.
When an ATV engine turns over, the transmission causes a front sprocket to rotate. That turning sprocket pulls the drive chain, which in turn pulls the rear sprocket. That makes the rear axle turn, which spins the wheels and propels the ATV forward.
If you hear a strange, almost crunching noise while rolling an ATV forward in neutral or feel resistance outside of the norm, you might have chain problems. A jerky feeling, or power loss and clicking noises while driving, is a sign that your chain is loose. Of course, if the chain falls off, it’s clearly too loose.
It’s wise to check your chain routinely. This part can stretch and become loose through regular wear and tear. Trying to drive with a chain that is too loose can pull off sprockets, break cases, rip gears out of the motor, and otherwise cause problems.
How to Adjust an ATV ChainYou will need some wrenches or sockets, a measuring tape, and a screwdriver. Check your ATV’s user manual to learn the recommended slack. It is usually one to one and a half inches.
Start by putting your ATV on level ground and shutting off the engine. Have someone sit on the ATV to see what tension the chain is usually under with a rider aboard. Measure from the skid plate or chain guard near the center of your swingarm. Take note of the measurement where the chain rests on its own, then pull up the chain and note the measure at the highest point. The difference between those two points tells you what your slack is. If it’s outside of what the manual says, you will know if it’s too loose or too tight.
To tighten the ATV chain, loosen the bolts on the bearing carrier. Then loosen jam nuts on the adjuster bolt(s). Tighten the adjuster bolt to tighten the chain. Go through the measurement process again, with weight on the ATV. Keep measuring and tightening until you are within the range of the user manual. Once the slack measurement is correct, tighten all of the hardware and jam nuts again.
What if you don’t have adjuster bolts on your ATV? The process is similar, with a few differences. You will still loosen the bolts on the bearing carrier. Then, you will find a hole that allows access between the carrier and sprocket. This is where you will insert a screwdriver or Allen key. Put the Allen key or screwdriver in place, then rotate the rear wheels forward to tighten. The screwdriver or Allen key ensures that the chain adjusts while the bearing carrier is rotated.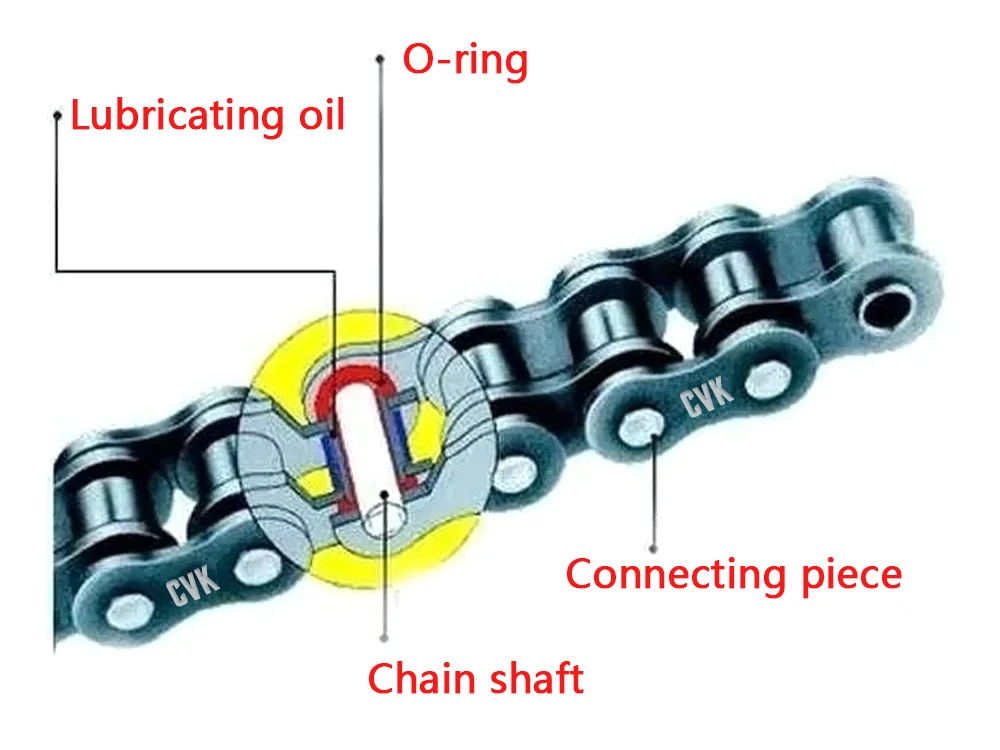 Again, put weight on the ATV and take measurements. Adjust until it is within the right range. Tighten all of the hardware once that process is complete.
An ATV chain that is too tight can wear out sprockets prematurely. While a loose chain is reasonably obvious, it can be trickier to determine that your chain is too tight. One method is to use your hands. If the chain doesn’t give much when you press down on it, it needs more slack.
You can also use your hands as a preemptive measurement tool before every ride. Stack three fingers on top of one another and place them behind the chain slider. With the chain draped across the top of your index finger, it should be taut overall. Anything looser or tighter calls for adjustment.
Luckily, the process to fix it is the same as tightening, in reverse. Instead of tightening adjuster bolts or rotating the bearing carrier forward, loosen. Measure for slack as you would when tightening the chain.
If the chain is still too tight and you cannot loosen it further by adjuster bolts, you may need to lengthen the chain. That requires taking the chain apart and adding a master link to it. You can also shorten a chain if need be by removing portions and using a master link to put it back together.
Disclaimer: While we endeavor to keep the information on our blog up to date and correct, Maxtrade (Coolster) makes no representations or warranties of any kind, express or implied about the completeness, accuracy, reliability, suitability, or availability with respect to the website or the information, products, services, or related graphics contained on the website for any purpose. Any reliance you place on such material is therefore strictly at your own risk.
If you listen to an unusual, virtually grinding noise while rolling an ATV forward in neutral or feel resistance beyond the norm, you could have chain problems. A jerky sensation, or power loss as well as clicking sounds while driving, is an indicator that your chain is loose. The most awful that can occur is the chain coming right off.
Knowing how to adjust the ATV chain will help you maintain and operate the ATV in the best possible condition, and is the solution to the problem mentioned earlier. It additionally saves your time to a shop to handle something easily managed in the house. All it takes is some understanding, emphasis, and also sufficient time to get the job done.
To understand how to tighten ATV chain, you need to recognize what the chain is and also why it's there. An ATV drive chain looks similar to what you would locate on a bicycle. Some contemporary ATVs do not have a drive chain, so consult your guidebook if you can not discover one.
Here's how to tighten your ATV's chain with just the correct amount.
Table of Contents
Let's check out the signs and symptoms of a loosened chain:
If you observe any one of these points happening while you ride, you need to tighten your chain ASAP.
As a matter of fact, you shouldn't allow your chain to get this bad in the first place.
Instead, you need to contrast the slack in your chain to your handbook's standards before it gets negative. As soon as you start seeing these problems, you have actually currently subjected your drivetrain and also gears to too much wear and tear.
You might be experiencing some problems that you're pretty sure are chain-related, yet it might be due to the fact that your chain is too tight.
Having a too-tight chain can trigger:
So don't just assume your chain issues are because of a loose chain. Incorrect upkeep and overtightening can trigger similar drivetrain concerns. Examine your handbook and gauge your slack to see what your chain requires.
Below is just a basic guide for tightening your ATV's chain. A few of the steps may be different for your particular four-wheeler.
Prior to you do anything, get your ATV solution manual and flip to the chain adjustment section for the specific procedure for your ATV. You'll additionally require to recognize just how much slack your ATV can endure.
Next off, gather all the devices you need. You'll need a wrench or an allen key, relying on the sort of screws on the center behind the ATV. You'll likewise require a smaller-sized wrench for the insurer bolt.
Examine your ATV's guidebook for the best device dimensions.
Prior to you adjusting chain stress, you require to check how much slack the producer recommends. This should be stated in the guidebook. It's normally 1 to 1.5 inches.
Examine the factory-recommended slack in your user guidebook.
Have a person sit on the ATV to imitate the tension the chain is under throughout riding.
Then, using a tape measure, inspect the chain's slack according to the directions in the guidebook. Various ATV producers have different ways of gauging slack.
Since you recognize how much slack is in your chain, you understand if it's in fact also loose or if you have actually obtained some other issues going on.
Typically, what you desire is a chain that is not as well tight that you can't move it up and down with your hand, yet not also loose either that it tumbles up and down. It should fit just fine.
There is one pivot screw that holds the H shape axle framework (H-Arm) to ATV's main body frame. Inspect this very first to make certain the screw is tight yet still allows for up and down movement. This pivot screw maintains the H form axle framework as well as the main body framework abreast.
There are 4 bolts (2 leading and 2 bases) at the back ATV that moves the axle. Identify the 4 bolts that hold the rear axle. You'll require to loosen these screws, yet do not eliminate them. So you can relocate the axle back and draw tight the chain.
Make certain the axle is straight (align straight with the body) and also the chain runs right. Also, If one side or the opposite is not tightened (the 4 screws) the chain will fall off once more. Also if the rear end is not straight after that the chain will certainly fall off.
Now, recognize the screw to be adjusted. This is typically located near the 4 screws, however examine your guidebook for the right range for your ATV version.
Tighten up the adjuster screw, after that measure slack once again until you get within the manufacturer's advised variety. Re-tighten the primary screws.
Keep in mind that the chain tension modification process differs from model to model. Examine your solution manual on exactly how to tighten up or loosen up the chain.
Some ATV models do not have adjuster bolts. Instead, you insert a screwdriver or allen key in an opening on the axle. Then you press the ATV back a couple of feet to tighten up the chain, or ahead to loosen it.
In various other versions, you stick a thick screwdriver in a hole after that press the screwdriver upwards or clockwise to tighten the chain.
If your chain's slack is too tight, below's exactly how to loosen it.
An ATV chain that is as well tight can break sprockets too soon. While a loosened chain is reasonably apparent, it can be trickier to identify that your chain is also tight. One technique is to use your hands. If the chain does not provide much when you press down on it, it requires more slack.
You can additionally use your hands as a preemptive dimension device prior to every flight. Stack 3 fingers in addition to each other as well as place them behind the chain slider. With the chain draped across the top of your index finger, it must be taut overall. Anything looser or tighter calls for adjustment.
Fortunately, the procedure to fix it is the same as tightening up, backward. Rather than tightening up insurer screws or rotating the bearing carrier onward, loosen up. Measure for slack as you would certainly when tightening up the chain.
If the chain is still too tight and you can not loosen it further by adjuster bolts, you may need to extend the chain. That calls for taking the chain apart as well as adding a master link to it. You can also shorten a chain if requirement be by eliminating sections as well as utilizing a master link to put it back together.
1. Remove the chain
2. Raise the ATV under the engine electric motor mount location until the back wheels come off the ground.
3. Then see if the H-Arm (back) moves back as well as forth from 1 inch to 2 inches. If the rear H-Arm returns as well as forth, after that the rubber grommets inside the top of the H-Arm (going left to right are shot/bad. The very best method to repair that is placed in a metal pipeline that acts as a bushing (changing the rubber grommets).
Don’t wait until your ATV chain falls off the sprocket to tighten it. Instead, tighten it regularly to maintain tension.
Check your service manual to see if there’s a recommended tightening schedule. But generally, it’s a good idea to check the chain slack every three years, and tighten it if it’s gotten loose.
Also measure the slack after a day or two of particularly hard and rough riding. The chain may have taken a beating and loosened a bit.
If you use the ATV frequently for heavy utility tasks or hard riding, check the chain more regularly – perhaps once or twice a month.
It varies from version to version, yet the basic recommended array is 1 inch to 1.5 inches.
In some ATV models, you measure slack by measuring the travel of a chain from its all-natural relaxing point to the highest point it'll go. Inspect your ATV handbook for how to measure the slack on your particular design.
If you can't find the correct slack array for your ATV, select the advice we have actually given over: adjust the chain until it is tight, but not as well limited that you can stagnate it somewhat backward and forwards.
Keep in mind that both too much slack and absence of slack are bad. The first will certainly create the chain to embark on the sprocket, the second can break the chain.
Chinese quads have been available in a vast array of configurations, so there isn't a standard way to tighten up the chain. Examine the manual that came with the quad.
Yet virtually every ATV, consisting of 110 quads, will have the four screws at the back. Seek those screws and loosen them.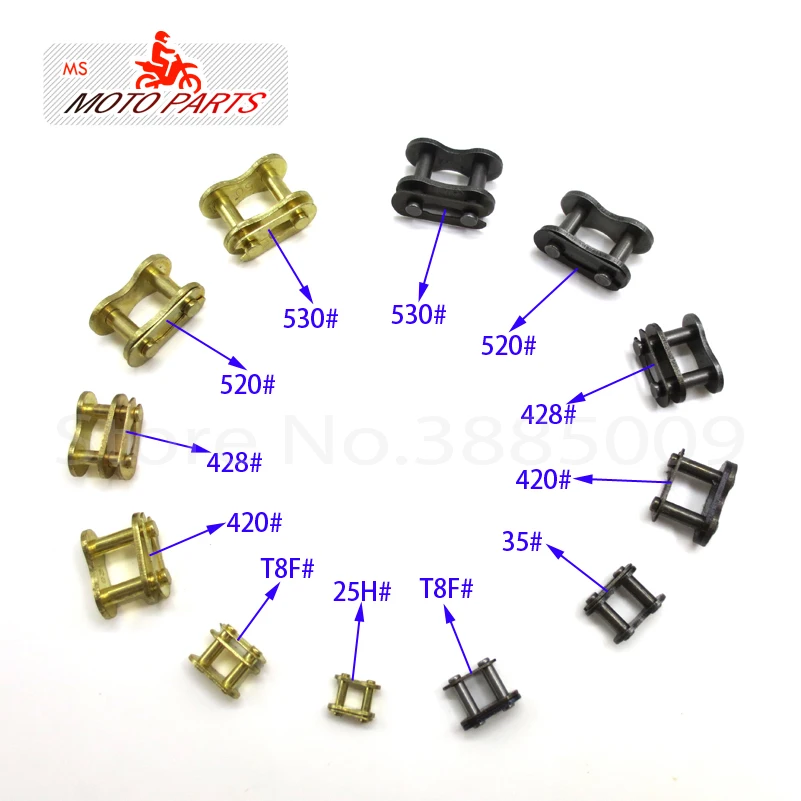
Then, try to find a means to readjust the chain tension. In some quads, you utilize a thick screwdriver to revolve the axle, which tightens or loosens the chain.
Others have insurer bolts that you tighten up to enhance chain tension.
If the handbook doesn't state how much slack the chain should have, opt for the basic suggestion. It should be tight, meaning that you can move it up and down slightly with your finger, but it will not flip up and down.
How To Tighten Motorcycle Chain? Graphic explanation 2022
Rodney L Herron
Rodney L is a technical writer and product consultant with over a decade of experience in the motor industry. Rodney is a fan of performance machines that run fast and loud and an expert in all things custom. His numerous articles and write-ups are available at our knowledge base. Whether it’s something wrong with your motorcycle or you are building a custom bike, you can trust Rodney’s experience.
Despite its simplicity, the motorcycle chain requires regular care and checking the tension.
Chain life on the same motorcycle can vary greatly depending on the conditions of use and care. Harsh accelerations, rear wheel riding and mud lower it quite noticeably.
After work, I often visit an old friend's workshop. A pleasant atmosphere and the ability to tinker with the hardware on your own are very tonic. One day, a new snow-white R6 stops at the entrance and a young guy asks if the service is still working. As usual, he needed to check the chain tension and lubricate it. After 10 minutes, satisfied service workers were shaking hands with the no less pleased Yamaha owner. “What a wonderful client,” I thought then, never understanding why he did not do such a simple procedure himself.
Manufacturers of modern goods purposefully turn us into white-handed people. We don't wash cars, we don't do laundry, we don't hem our own clothes. Many people no longer cook at home. And they are unlikely to cook something edible if all the restaurants in the area are closed..png) Just because they never did. Moreover, some believe that wasting time on such nonsense is beneath their dignity. Maybe so, but I am sure that a person should have a choice. I can not do something because I don’t want to, but not because I don’t know how. And it's worth knowing! To be able to ride a horse, to be able to cook deliciously, to be able to take care of one's own house, to be able to drive a car and a motorcycle well and be able to serve them.
Just because they never did. Moreover, some believe that wasting time on such nonsense is beneath their dignity. Maybe so, but I am sure that a person should have a choice. I can not do something because I don’t want to, but not because I don’t know how. And it's worth knowing! To be able to ride a horse, to be able to cook deliciously, to be able to take care of one's own house, to be able to drive a car and a motorcycle well and be able to serve them.
The chain drive is one of the busiest components on a motorcycle. In powerful motorcycles, the forces arising in it reach several tons. And when accelerating and when braking, they change direction. Often this happens very abruptly, and at this moment the chain is under severe stress. If the chain is loosely tensioned (strongly sags), then at the moment of changing the load, this excess supply of the chain will first be selected, and then, when its free play ends, a sharp blow will occur that is harmful to all transmission elements. By the way, it’s also unpleasant for the driver to drive such a motorcycle that twitches at any opening and covering the “gas”, especially in a sluggishly creeping traffic jam. The second disadvantage of a sagging chain is that with a weak tension, its unloaded shoulder tends to move in a straight line due to inertia, which is why it does not fit perfectly on the sprocket teeth, thereby wearing them out and itself.
Is it possible to tighten the chain so that it does not sag at all? No, because when the rear suspension is working, the distance between the drive and driven sprockets changes. And the tensioned chain will be subjected to huge loads (stretched in the strongest way), if you do not leave it with a small sag, which will be selected during the suspension. (Yes, and shafts with bearings with a tight chain, I note, will have a hard time.) The reason is that the axis of the pendulum and the axis of the drive sprocket on most motorcycles are at a distance from each other, so the maximum tension occurs approximately in the middle of the suspension travel - when the axles of the secondary the gearbox shaft, swingarm and rear wheel lie in the same plane.
There are many ways to adjust chain slack. Shorten or lengthen the chain itself, increase or decrease the diameter of the sprockets, move the swingarm mounting point... All these methods are used during the tuning of racing bikes. But the easiest way to change the chain tension is by moving the rear axle attachment point along with the driven sprocket. It is this solution, familiar from the bicycle, that is used on all motorcycles.
There are basically two ways to move the axle attachment point. The first one is linear. The pendulum of a motorcycle has longitudinal slots along which the axle moves. Tensioners are additionally installed. They come in various designs, but they have a common principle: you turn a screw or a nut - the axis moves along the slot, respectively, loosening or tightening the chain. You just need to figure out the direction. It is also important to understand that while the nut on the wheel axle is tightened, the tensioners should not be turned - they can only be spoiled by breaking the thread (however, after the adjustment is completed, it is harmless to tighten them so that they do not unwind on the road). Therefore, the axle nut must be unscrewed first. There are always marks on the swingarm and tensioners to help keep the wheels aligned. But in any case, I recommend tensioning the chain more or less synchronously, gradually twisting either the right or the left tensioner a little at a time.
If you ride your motorcycle aggressively, like to lift it on the rear wheel, brake hard, the chain may stretch unevenly. Therefore, before checking the tension, hang the rear wheel and scroll in neutral gear. If the chain slack doesn't change as the wheel spins, good. If the chain either stretches or weakens, it means that it is stretched unevenly and the road to it is ferrous metal. Well, if there is a need to “drive” it for another hundred or two kilometers, adjust the sag according to the “most taut” position.
The second version of the chain tensioning system is eccentric. A round hole of a sufficiently large diameter is cut in the pendulum, inside which a sleeve rotates with an eccentrically drilled hole for the wheel axle. Turning the eccentric shifts the wheel axle, allowing you to change the chain tension. More often this option is found in cantilever (one-sided) pendulums, but it also happens in ordinary ones. These systems require a little more dexterity. Adjustment usually requires a large diameter hex key. On older motorcycles, it happens that the eccentrics stick to the swingarm. It is important not to spoil them by applying excessive force, but to patiently pour kerosene over them and try to move them using not too rough percussion instruments.
One of the most frequently asked questions is what position the motorcycle should be in when measuring chain slack. Stand on the ground under its own weight, with the rear wheel off (on the center stand) or under load (with the driver and passenger seated)? And what should this sag be? The recommendation of the vast majority of manufacturers is to measure sag when the empty motorcycle is on two wheels (on a side stand) and the rear shock is loaded only by its weight. Sag for road motorcycles is usually in the range of 30-45 mm, and for off-road with increased suspension travel, it can reach 55 mm.
After the adjustment is completed, it is necessary to check whether everything turned out as it should. If the wheel is straight, the marks on the tensioners on the right and left show the same thing, and the chain has the desired slack, then everything is done correctly. It remains only to lubricate the chain. Here's how you like it more. If you don't have a center stand, the easiest way is to jack up the rear wheel by tilting the motorcycle towards the side stand, start the engine, and shift into gear. When the wheel starts to rotate, direct a jet of lubricant from the cylinder to the inside of the lower branch of the chain. The main thing is to lubricate the inner rollers and seals. Grease on the connecting plates only collects dirt and is generally not needed for the transmission to work. The main thing is not to direct the jet from the cylinder past the chain - onto the rim or tire. The frozen grease is very poorly removed from the rims, but there is probably no need to talk about why it is not necessary to lubricate the tire.
There were also automatic lubrication systems that allowed you to lubricate the chain on the go, but on modern motorcycles they have not taken root, giving way to relatively expensive, but also durable lubricants.
The choice of lubricant is, of course, in accordance with the type of motorcycle and, most importantly, with the conditions of its operation. So, an expensive race bike lubricant will not perform well on the off-road. By the way, the most difficult chain is in mud and sand baths. Therefore, a good lubricant should not only easily penetrate into all cracks, but, when dried, form a strong and not too dust-collecting film. In case of force majeure, of course, any oil is better than dry friction, but remember that, depending on the operating conditions and care of the chain, its service life on motorcycles of comparable power can vary significantly - from 5 thousand km to 30-40 thousand .
Another vital question: to clean or not to clean the chain before lubrication, and if so, how. Of course, only those who have a chain lock with a latch can afford to remove the chain and wash it in the bath with a brush. It is hardly worth removing the pendulum for the sake of this, and there are aerosol cleaners on sale that make it possible to simplify this procedure to the limit: it is enough to rinse the chain from a spray can abundantly and dry it. But for off-road motorcycles, this is often not enough. Only a bath with brushes helps to clean the chain well, through which the chain passes, poured through the nozzles with diesel fuel or a special washing liquid. The liquid, as a rule, is run in a circle, through a fine filter. However, few people have such a device even in the workshop, not to mention the journey. Therefore, many are generally limited only to lubricating the chain - and with regular care, the transmission lives for a long time. The main criterion for good care is that each link in the chain should move freely, without jamming (this is easy to check by slightly loosening the chain). And it is better to do all operations with the chain immediately after returning: the lubricant impregnates the warm chain more easily, and somehow protects it from rust.
Well, that's it. To be honest, reading this article will probably take longer than adjusting and lubricating a motorcycle chain, so think for yourself whether it makes sense to go to a service with such a thing or take care of yourself to the envy of those who can’t do anything themselves.
We determine the tension of the chain by pressing the branch with your finger, according to the difference in readings on the scale of the ruler (tape measure). In this case (in the center of the chain) 58 - 17 = 41 mm.
Recommended tension settings are usually found on a sticker on the swingarm.
The screw tensioner requires at least two wrenches - with one we loosen the axle nut (you may have to keep the axle from turning with another wrench), and with the second we adjust its position.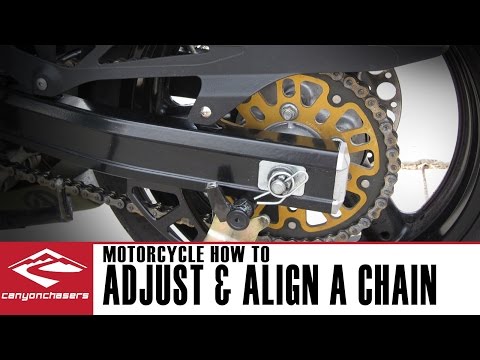
After tightening the axle, always check that the tensioner screws are tight. Otherwise, they can spin on the go.
The volute tensioner is simpler and more convenient: only one key is needed, positioning accuracy is ensured by fixed notches on the volute and stamped dots opposite each number. In addition, the desired chain tension is provided automatically if you turn the “snail” only by hand, without a key. One division roughly corresponds to one link in the chain. That is, in the case shown in the photo, you can easily take the chain 2 or 4 links longer.
When choosing a chain, pay attention to the size of the links (a), their number (b) and the type of seal (c). More details in "Moto" No. 3-2010.
How to check wheel alignment? First look at the motorcycle from the front and, turning the handlebars, ensure that the front wheel is exactly in the center of the rear (if you look along the sides of the front wheel, you can see the equal thickness of the rear tread).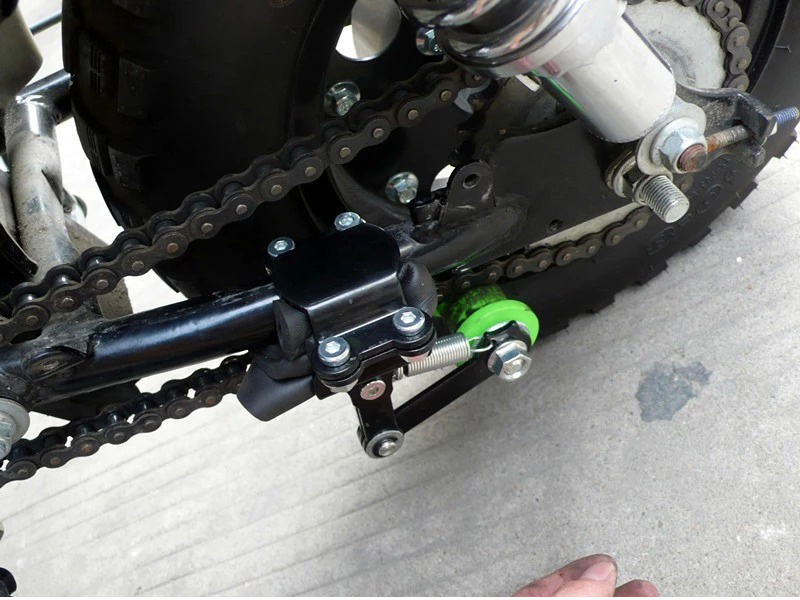
With the front wheel out, look again, but at a less acute angle, so you can see both sides of the rear. Left and right, this angle (it is clearly visible on the front wheel) should be approximately the same. The photo shows that the rear wheel is looking to the left (in the direction of the motorcycle).
The package lists the assembly order with the lock, sag target values and care instructions.
When installing a new chain, it is important that the lower strand does not rub against the chain catcher. When tensioned, the chain always moves away from the trap, so if there is a risk that the chain will touch it, choose a longer chain when buying. In general, if in any doubt, take a longer chain: cutting links from it is much easier than building them up.
To make sure that the trap does not hit the chain, disassemble it and assemble only the insert with the frame - this way you can immediately see all the gaps.
To clean and lubricate the chain, it is convenient to place the motorcycle on the center stand (or hang it on the side stand using the additional support), start the engine and engage first gear. We spray the compositions on the inner surface of the lower branch of the chain, making sure that they do not fall on the rim and tire.
A worn chain is a death sentence for the stars. In order not to mix up the sides when installing, remember: worn teeth are "tilted" in the direction of rotation, and not vice versa.
Question about the causes of chain stretching in motorcyclists comes up all the time. But, despite multiple discussions on forums, written articles, the question remains. You can often see such an explanation: "Yes, this is Chinese raw meat." And how to explain the stretching of the chain of a famous brand? Chinese fake? And if it is known for sure that the original chain has stretched?
We have already talked about the design of the drive roller chain, so we will only touch on general points here.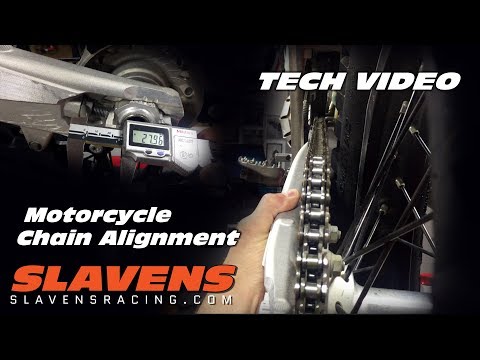 So, the roller chain consists of external and internal links. The inner link consists of inner plates and bushings pressed between them. The outer link consists of outer plates and pressed rollers. The mobility of the links is ensured by the movement of the roller inside the sleeve. The roller is located on the sleeve and rotates freely, providing sliding on the sprocket.
The service life of the drive chain depends precisely on the quality of the joints of the chain links:
As long as there is lubricant between the bushing and the pin, the link will have normal, natural movement. But if there is a fact of turning the sleeve in the inner plate or the roller in the outer one, then friction, heating and increased wear occur. Thus, it is these places that are weak. Moreover, it should be noted. The larger the contact area between roller and plate (roller diameter and plate width), bushing and plate (bushing diameter and plate width), the less risk of twisting.
As a result of turning, the metal gradually wears out, abrades. Increasing the diameter of the holes in the plates by 0.1 mm (0.05 mm radius) per 100 links will increase the chain length by 5 mm. And if the hole in the plates increased by 1 mm on all 100 links? At 50 mm? But this is more than 3 links of the 5xx chain. Naturally, this is more of a utopian situation, but it is a good indication of weaknesses in the drive chain.
Lack of lubrication, poor-quality riveting of rollers and pressing bushings can lead to such consequences. Naturally, the quality of the metal also matters. It is for this reason that chain manufacturers carry out local hardening of the metal in the zone of the plate hole, and for the tightest connection of the roller with the outer plate, four-sided riveting.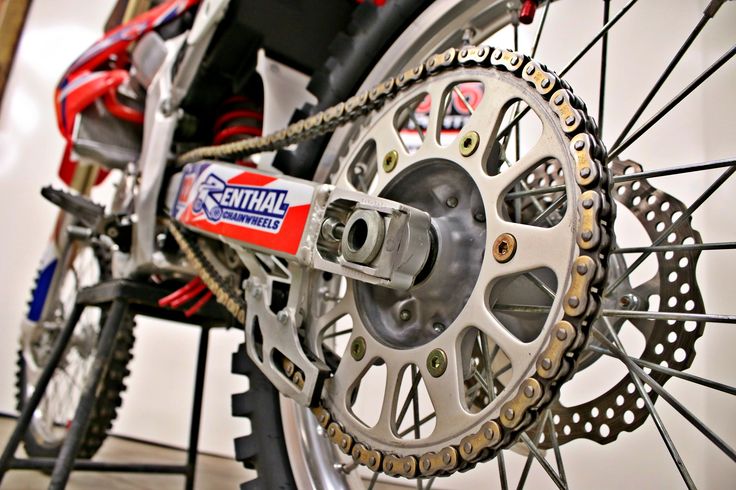
So, chain lengthening occurs due to the gradual wear of the chain elements . But it's happening slowly.
Fragment of a comment on the forum
Motorcycle chain drive is the most common drive method, but its application is associated with a number of difficulties. A motorcycle is not a stationary machine. Even other types of motorcycles, where a chain drive is used, have less difficulties.
The chain drives the rear wheel, which in most cases is mounted on the swingarm. The pendulum is moving. As a consequence, the chain tension changes depending on the position of the pendulum . The point of greatest tension of the chain is different for different motorcycle models. With different loads on the rear shock absorber, when driving on rough terrain, and so on, short-term moments of over-tensioning of the chain may occur, as a result, wear becomes uneven.
As a result, proper chain tension, especially when new, is the most important factor in chain stretching on a motorcycle. An overtightened chain will always cause uneven stretch due to uneven wear.
Motorcycle chain with uneven tension. Tight condition
Motorcycle chain with uneven tension. Weakened state
“What Russian does not like fast driving” - I think that everyone has heard this phrase. Well, how not to drive a motorcycle. And what happens to the chain at this time?
So, imagine a motorcycle standing still, has two points of contact, two wheels (we will not take into account the legs). When the gear is engaged and the gear is released, the drive sprocket moves while the driven sprocket is at rest. Drive chain at the top is experiencing a sharp pull on . There is a famous saying: "Water wears away the stone." In this case, the outer plates pull the roller, while at the place of their mating, a wear gradually appears - the length of the chain increases.
A similar situation occurs with a sharp increase in gas while driving. Accordingly, this also leads to increased wear. The more wear in the joints, the more damage will be caused by each “starting off” of the motorcycle and sharp acceleration, which means that the rate of chain stretching will increase.
It turns out that the driving style of the motorcycle affects the wear of the drive chain, and the power of the motorcycle also affects the force of the chain jerk. If you prefer an aggressive driving style, sharp acceleration, rough terrain, then it is better to choose reinforced chain options.
Many chain manufacturers make tables for their range of chains matching engine size. This is a conditional reference point, you should not focus on the upper limit.
We will not talk about how to adjust the chain tension. There are many articles about this. In general, it is better to focus on the instructions or, as they often say now, the manual for adjusting the chain in a particular model and brand. Since the points of greatest tension in the loaded and unloaded state may be different, and the manufacturer must notify this in the instructions.
A stretched chain leads to increased wear on the teeth of the sprockets, which are worn down so that they begin to push the chain, stretching it, thereby stretching it even more.
It is for this reason that when it is time to change a stretched chain, the sprockets must also be changed. The latter, most likely, are also partially worn out, which means they will provoke stretching of the new chain.
For long life, the motorcycle chain needs to be serviced every 500 - 2000 km. It is necessary to clean the chain from dirt, which only increases the wear of the chain and its stretching. It is also necessary to lubricate the chain and control the degree of its tension. Dirt, lack of lubrication, a stretched chain - all this only stimulates further stretching of the drive chain.