Learning how to adjust your ATV shocks might be the single most important way to improve your ride. After all, properly adjusted shocks can make every bump feel smoother, give you more traction, and give you better control.
The best part, though, is that the way to tweak and test your shocks is by going for a ride! Adjustments take no time at all, and you’ll feel the difference immediately. Talk about instant gratification.
But before we get into the nuts and bolts of making adjustments, we’ll break down exactly what it is that shocks do and how they do it. Knowing why you’re turning this knob or tightening that collar will help you make more sense of what you’re doing and ultimately make you a better shock adjuster.
So let’s dive in.
How Shocks WorkShocks are made up of two key parts:
These two parts work together, or rather against each other, to make sure you have a perfectly smooth suspension.
Springs are designed to keep your wheels on the ground. Hit a bump that sends your tires up and the springs compress so you don’t feel it. Then, they send your tires right back down so you maintain traction, acceleration, and control.
However, if you only had springs in your suspension, your ATV would constantly wobble and bounce like you were riding on a giant water bed. In practical terms, it would buck you like a bronco until you roll over or barf—whichever comes first.
That’s where shock absorbers come in. They’re the center part of your shock and consist of an oil-filled tube with a piston inside. There are valves in the tube that control how fast or slow the oil can move through the piston. The result is that it stops your spring and ATV from wobbling all over the place like a bobble head every time you hit a bump. Instead, it causes your springs to compress and decompress in a controlled way.
When they’re working together, you get all the benefits of a spring without any of the drawbacks. They keep your tires gripping the ground and make bumps smooth.
When they’re not working together… that’s when you have to adjust your ATV shocks.
Shocks use a spring paired with an oil-filled dampener to keep your ride cushy. The dampener keeps the spring from oscillating back and forth so that your quad is more stable. Setting the compression and rebound of the dampener can make or break the feel of your suspension.When it comes to actually adjusting your ATV shocks, there are a few tools at your disposal that are built into many shocks. The most prominent one is the clicker. This is the little knob, nut, or set screw that’s built into the top of the shock.
Clickers affect the flow rate of the oil through the valve inside the shock. When you adjust the clicker, you’re adjusting your shock’s compression (more on that in a bit). They adjust in small increments and make an audible click when you turn them, hence “clicker. ”
”
Different kinds of shocks have different clickers, too. Most just have a single adjuster that affects the overall compression of your ATV shock. Others have a high- and low-speed compression adjuster. The high speed adjuster will affect big suspension hits like landing a jump, while the low speed adjuster affects much smaller hits, like going through whoops or rocky terrain. Some shocks even have a mid-speed adjuster, but those are few and far between.
Most new ATVs have shocks that come with a single clicker on each shock. Factory shocks on older ATVs might have no clickers at all and can only be adjusted using the threaded collar on the shock.
Clickers like this one control the rate that oil can travel through your shock, which changes how fast it compresses. Getting your clicker adjusted to the right spot for you and your ATV is key to a good ride.So now that you know all the different kinds of clickers you could have, it’s time for you to get a handle on what compression actually is.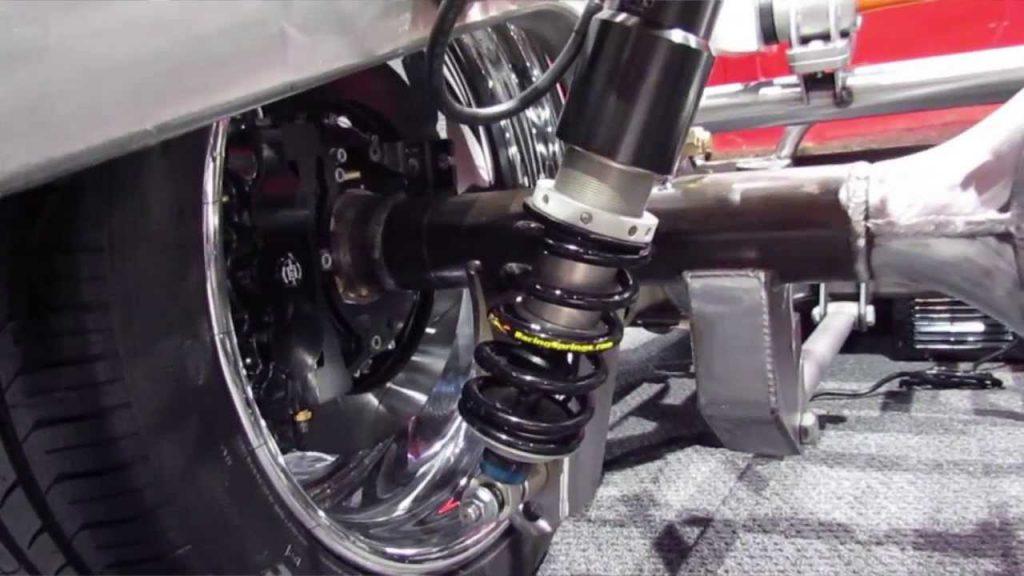
Compression, as the name suggests, has to do with how your shock compresses when you hit a bump or land a jump. This is different than rebound, which refers to the way your shocks act after they’re compressed.
When you’re trying to get your suspension to feel good, you’re mostly just trying to get the compression right. If you make your compression too loose, you’ll get that bouncy motion caused by your springs and you’ll end up bottoming out too often. That’s no good for your ATV or your back.
If you make your ATV shock’s compression too stiff, then you’ll start feeling every bump and rock on the trail—also bad for your back. And having it set too far either way will result in less overall control of your vehicle.
The best compression rate for most is one that will allow your ATV to almost bottom out on a hard hit, but not quite.
Hand in hand with compression is rebound. It’s the rate that your shock decompresses. Not every shock has a rebound adjuster, but if it does, the rebound set screw is located at the base of the shock.
This has consequences when set too low or too high as well. If your rebound is set so stiff that it rebounds slowly, your tires won’t make it back to the ground between whoops. They’ll compress once, then just stay compressed. As you travel through whoops, you’ll be nearly bottomed out the entire time, and you’ll lose speed due to lack of traction.
This is bad, obviously, since your suspension doesn’t really act like suspension at this point.
On the flip side, if you set your rebound too loose, you’ll get that bucking action that can send you ass over tea kettle whenever you hit a bump. Plus, your ATV will tend to bounce up and down even after a single bump as it tries to get back to its resting position. That’s no good.
The perfect position lets your shock rebound quickly without overshooting the equilibrium so that your suspension doesn’t bounce up and down before it settles.
Let’s talk about how to dial it all in.
Adjusting the Shocks on Your ATVNow we’ll go through the steps to adjust your ATV shocks to your heart’s content. Tweaking is best done when you have quick access to a trail or ride area to test out your results. It might sound like a tedious process at first, but trust us—once you get started, you won’t want to stop.
You need to make sure your tires are aired up to the proper pressure before you do anything else.
If your tires aren’t right, you simply won’t be able to adjust your ATV’s shocks properly. They’re the foundation of your suspension, and if they feel bad, no amount of tweaking your shocks will fix it.
The first thing you need to do to your shocks is set your ride height. This is done using the threaded collar or snail cam on your shocks.
First, if your shocks have a threaded collar, check your owner’s manual for the typical that you want to stay within when adjusting. Unless you want your front to be lower than your rear for some reason, you should try to keep the adjustments the same in all four corners.
Then, with your machine lifted, loosen the locking collar on the top and thread the adjustment collar up or down. Tightening it down will increase ride height and give you a stiffer ride. Loosening it will lower ride height, giving you a softer ride. We usually recommend going with the lowest ride height that you’re comfortable with to start.
If you have a snail cam on the bottom of your shock, you will use that to set your preload. With a snail cam, the adjustments are opposite. So adjusting it higher will stiffen suspension and raise your ride height. Adjusting it lower will soften the suspension and lower your ride height. Again, we recommend the lowest height that you’re comfortable with.
Once you have your collars set and tightened up, it’s time to start adjusting your clickers.
You can use the double collars at the top of the shock to set the preload. Refer to your owners manual to make sure you don’t get it too out of spec.Adjusting clickers is where things start to get really fun. If you have high- and low-speed adjusters on your shocks, you should start with the high speed adjuster. This is the one that affects compression with big hits, like landing a jump. If you only have one clicker, you will adjust it just like the high speed adjuster.
First, you need to find something that hits your suspension hard when you ride on it. Try to find something that you think is comparable to a typical hard hit on your average ride. We usually use a small jump.
Hit the jump. If your suspension doesn’t bottom out, turn your clickers two clicks counterclockwise. Remember: righty tighty, lefty loosey applies to your compression stiffness too.
Then, hit the jump again. Repeat the process of loosening your compression a couple clicks and testing it on a jump until your suspension does bottom out. Next, all you have to do is turn the clickers two or three clicks clockwise and you’re good to go. You’ll have nice, plush compression that doesn’t wreck your shocks.
 Adjust Your Low-Speed Clicker
If you have a low speed clicker, adjusting it will take a little more finesse. You’ll need to find a section of bumps or whoops first, and take a run at it at a decent speed.
You need to pay close attention to how it feels. If you feel like you’re rolling forward and backward or left and right while you ride, that indicates that your low speed clicker is set too soft. If every single bump and rock makes your teeth chatter, then the clicker is set too stiff.
In these instances, you’ll need to set your clicker two clicks softer or stiffer and ride it again. Keep making those incremental changes and keep testing it until your ATV glides over the whoops without swaying too much or vibrating you to death.
Your rebound adjuster is located at the bottom of the shock. Like we mentioned earlier, it affects the rate at which your shock extends after it’s compressed.
The best way to test your rebound is to use a small jump, regardless of your ride style. When you land the jump, pay attention to how your suspension settles. If your ATV bounces up and down before it settles, your rebound is too loose. If it feels like your suspension stays compressed too long, it’s too tight.
It’s easier to adjust it properly if you start with it too loose—that is, with your rebound set screw or dial turned counterclockwise.
Hit the jump and feel your ATV bounce up and down. Turn your rebound screw clockwise a bit (sorry, no satisfying clicks on this one) and repeat. When you’ve adjusted it enough and your suspension pops up quickly without bouncing up and down, you’ve got it dialed in.
This is the baseline setting. You can go stiffer or softer depending on your unique riding style. You might want a stiffer rebound if you’re doing anything that’s slow and technical to make sure your suspension conforms to the terrain and doesn’t push you off a boulder too quickly. If you have a specific style that you enjoy, be sure to mess with rebound even more.
That’s all there is to it! With all your ATV shock adjustments made, you have the perfect combination of plush and performance. You’ll have excellent control and traction. And when you’ve put in all the work tweaking and tuning, you’ve really earned it. And it was fun, right? All you’ve got to do is ride and turn some knobs. Not bad at all.
RELATED CONTENT: shocks5
Share
84
Table of Contents
You can either add more spring pressure to stiffen up your suspension or back it off to get a plusher ride.Many shocks have a collar with several slots; turning it changes the spring pressure or amount of preload. Put the ATV on a stand so the wheels are off the ground: This allows the collars to turn more easily.
You need to make sure your tires are aired up to the proper pressure before you do anything else.
If…Set Your Ride Height/Preload.
The first thing you need to do to your shocks is set your ride height. This is done…Adjust Your High Speed Clicker
Adjusting clickers is where things start to get really fun. If you have high- and…Adjust Your Low-Speed Clicker
If you have a low speed clicker, adjusting it will take a little more finesse. You’ll…More …
What is the adjustment on shocks? The adjustment found on most production shocks is a compression adjustment; it helps in the small bumps, G-outs and braking bumps but does not have a huge effect on big jumps. Most shocks use a needle valve. To find out if you have the needle type of adjuster, screw it all the way in until it stops.
What is preload on an ATV shock? Preload, low-speed compression and rebound are the most commonly found on production ATV shocks. Preload. This is the spring-tension adjustment on most shocks. On utility vehicles’ shocks and even some sport quads’ front ends, this is your only means of compression adjustment.
Can shocks be added to shocks? On utility vehicles’ shocks and even some sport quads’ front ends, this is your only means of compression adjustment. You can either add more spring pressure to stiffen up your suspension or back it off to get a plusher ride. Many shocks have a collar with several slots; turning it changes the spring pressure or amount of preload.
What are the parts of an ATV shock? Preload, low-speed compression and rebound are the most commonly found on production ATV shocks. This is the spring-tension adjustment on most shocks. On utility vehicles’ shocks and even some sport quads’ front ends, this is your only means of compression adjustment.
Adapters aside, using a tire pump on your shocks can simply damage them – the goal of a pump that’s made for inflating tires is to move a lot of air with little pressure, while shock pumps do so the other way around.
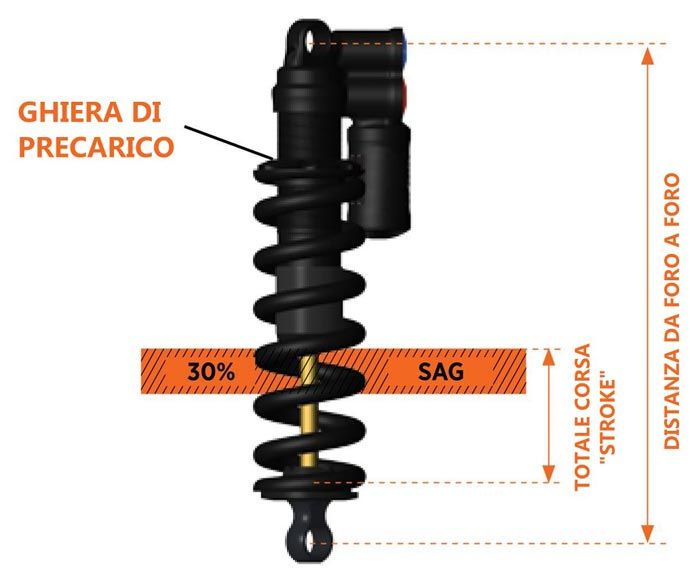
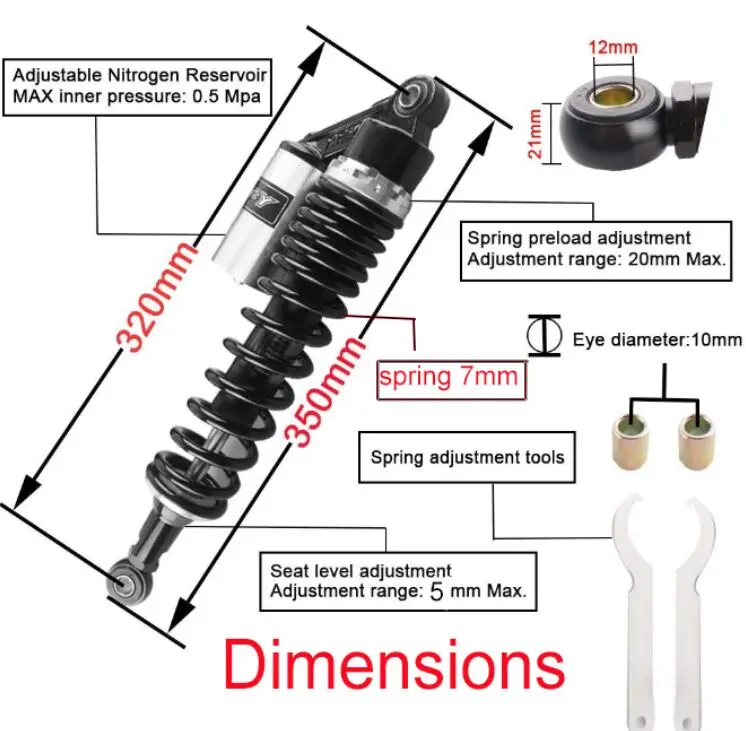
Preload is used to adjust the shock or spring to the correct range of operation within the suspension’s travel-more preload will raise the bike up on its suspension, keeping you near the top of its travel. With less preload, the bike sits lower and closer to the bottom of its suspension travel.
– Use Better Fuel.
– Upgraded Air Filter.
– Adjust The Throttle Limiter Screw.
– Change Tire Size, Weight, And Pressure.
– Add A Nitrous Kit.
– Upgrade The Exhaust.
– Change The Gear Ratio.
– Install A Big Bore Kit.
Air Pressure Guide For All Air Front Suspension Forks
—————————————————–
Rider Weight
<140 lbs.
140-160 lbs.
160-180 lbs.
A good indication that you’re relying on preload too much is if the bike has no sag at all under its own weight (with you NOT on the bike). Ideally, the bike will sag a small amount without you on it (5% or so) and then reach the desired 25-30% sag with you on the bike in normal riding position.
Polaris
– Upgrade Your Gas. Car, dirt bike, lawn mower or ATV. …
– Lighter Wheels. If you’re still riding on stock wheels or somewhere along the way added on steel wheels you can save some serious weight by replacing what you have with aluminum wheels. …
– New Grips. …
– Add a Slip On. …
– Wider Stance. …
– Tire Pressure. …
– Physical Fitness. …
– New Spark Plug.
For the rear shock, start at about half of your rider weight for air pressure. You will have to adjust from here, but you will want to achieve the proper SAG for your frame, as recommended by your frame manufacturer. Typically this is somewhere between 30-40% of overall travel.
– Add Zip Tie. Fit a zip tie around the shaft of the rear shock. …
– Extend The Shock. Fully extend the rear shock and measure the distance between the lip seal and the oil ring to get the figure for the shock’s total travel. …
– Add Air. Re-spring the shock. …
– Know Your Numbers. …
– Add Air. …
– Understand Sag. …
– Check Sag Level. …
– Adjust Sag Level.
To adjust the preload on your bike’s rear shock, you will need a C-spanner to loosen the top locking ring and spin it up the shock to gain access to the adjuster ring.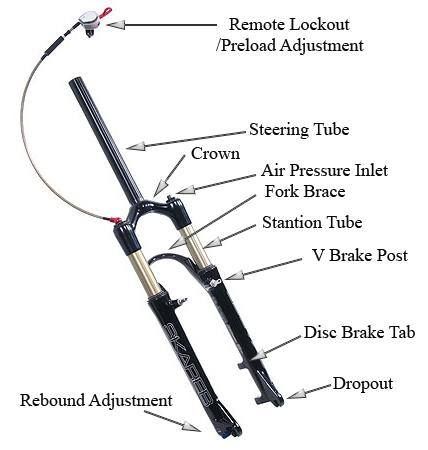 If you want to increase preload so the spring has less travel and to make the bike feel stiffer, turn the adjuster ring clockwise.
Best All-Around ATV – Yamaha Grizzly 700 EPS For the best all-around ATV, the battle rages between the Suzuki King Quad 750 AXi and the Yamaha Grizzly 700 EPS. These two remain the contenders not for being the most powerful, but for being the most powerful while also weighing 100 lbs.
Spring preload pushes the tire down and makes the suspension work. On big bumps at speed the spring preload pushes the tires down to better follow the terrain and make a smoother, more controlled ride. Under articulation the spring preload increases tire contract pressure improving traction.
Back to top of page
The Yamaha Raptor isn't about dirt and touring. This is about professional racing on prepared tracks.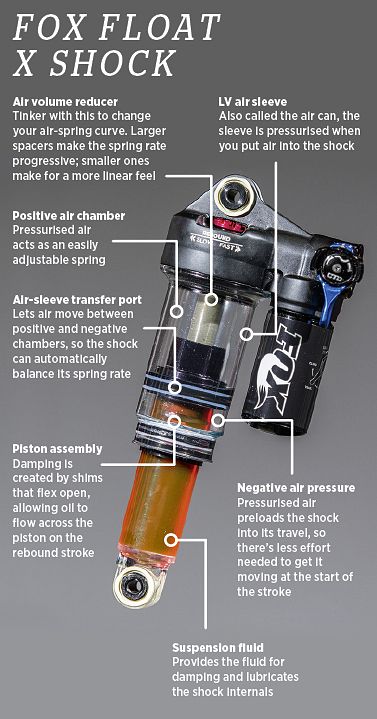 The model is not in vain considered the best in its class: it has won the Dakar Rally more than once.
The Yamaha Raptor lineup features single-seat, rear-wheel-drive ATVs that weigh just 192kg with all fluids. They are considered one of the best in the class at a reasonable cost. To objectively evaluate the Yamaha Raptor, we will compare the model with the Canadian BRP Renegade sports ATVs.
The Yamaha Raptor has a minimalistic design, but sporty and aggressive, with sharp rear fenders raised high. The case is available in blue or red.
There is a protruding metal bracket at the back between the fenders. It will prevent the ATV from flipping backwards: the rider can jump off, and the Raptor will stand upright, on this brace and on the rear wheels. And even the wings will not suffer.
The Raptor's seat is ergonomic, sporty and long enough without any height differences. The rider can move along it, shifting the center of gravity.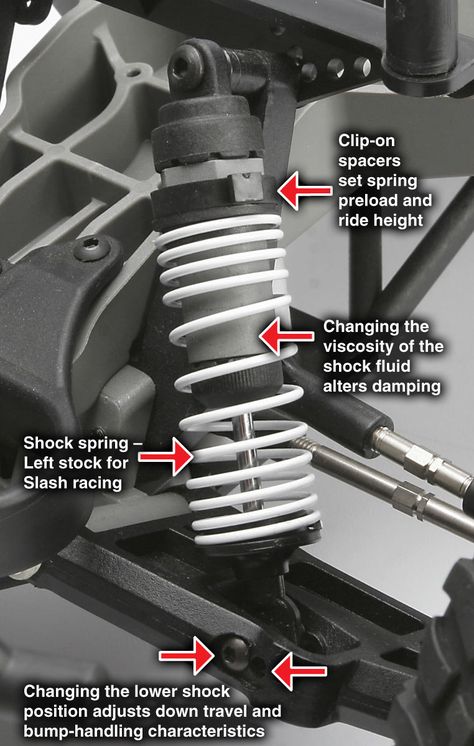
Dimensions Yamaha Raptor - 1845x1170x1130 mm, wheelbase - 1280 mm, that is, the ATV is relatively small. The driver sits at a height of 830 mm, and the ground clearance is only 113 mm. On the one hand, this is a sports ATV, and a small ground clearance should improve handling and stability at high speed. On the other hand, the tracks are not always perfectly smooth, and it will not work to use such a technique on a non-prepared route.
Yamaha Raptor weighs 192 kg with all fluids. At the same time, the volume of the gas tank is 11 liters. That is, you won’t be able to travel far and for a long time: you will always have to have a supply of fuel with you.
BRP Renegade looks noticeably more massive. Its dimensions are 2184x1219x1240 mm. The wheelbase is almost the same as the Japanese: 1295 mm (1.5 cm longer), and the driver sits at almost the same height: 856 mm (2.6 cm higher). But the tires are much larger - 25" for BRP versus 21" for Yamaha. The Canadian has only one color - yellow-black-silver.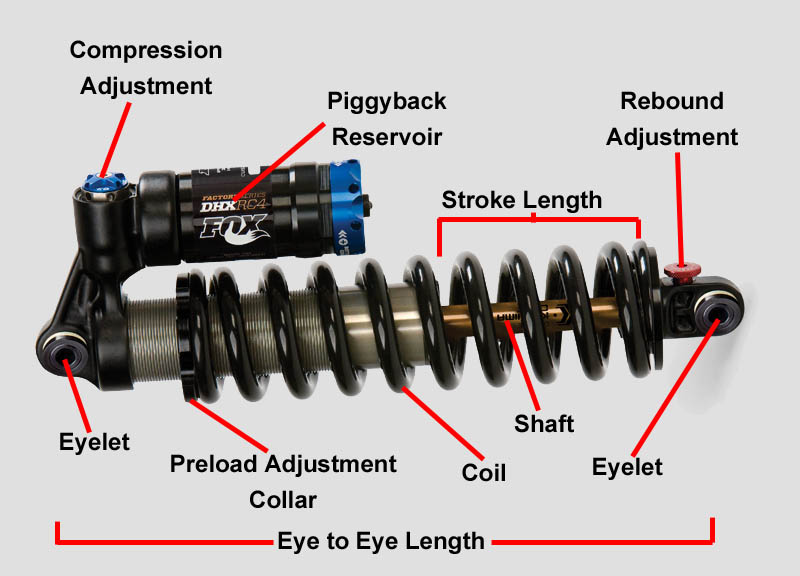
The basis of the Yamaha Raptor is a lightweight steel and aluminum space frame. The subframes are also aluminum, and the rear subframe can be removed to save weight.
The BRP Renegade also has a three-dimensional beam frame with revised and improved geometry. On this point, both models are about the same - it is difficult to single out the winner.
Yamaha Raptor:
Shocks can be adjusted for high and low speed compression, rebound and preload.
BRP Renegade Suspension:
 Shocks - FOX 1.5 Podium RC2. Suspension travel - 233 mm. It is adjusted specifically to reduce the forward lean of the body during hard braking - this will allow the rider to maintain control and reduce the likelihood that he will fly over the handlebars.
 BRP shock absorbers are also adjustable and operate in three modes: comfort, sport and racing.
To sum up, the suspension on the Yamaha Raptor and the BRP Renegade is equally good. Only the lighter Raptor has a softer suspension feel. If we were talking about tourist or work trips, this would be a plus. But since we are talking about speed and sharp turns, too soft suspension can interfere.
Yamaha Raptor has Maxxis 21x7-10" front tires and Maxxis 20x10-9" behind.
BRP Renegade - ITP Holeshot ATR: 25x8-12" front and 25x10x12" rear. The wheels are aluminum, with beadlocks, so that during a sharp turn or acceleration the wheel does not disassemble.
The Yamaha Raptor has dual hydraulic front brakes. The discs are ventilated and the brake calipers have 2 pistons. The front brake is so sensitive that a sharp or too strong pressure at high speed can lead to a stop - the rear wheels of the ATV will come off the ground. This is rather a minus, since you need to get used to it, so that even in an emergency, the rider does not fully squeeze the brakes. Behind is another system: a ventilated wave-type disc with a hydraulic caliper.
The BRP Renegade has the same front brakes with 214mm discs. The rear brakes are slightly different - they have not one disc, like the Yamaha Raptor, but two, with a two-piston caliper.
The Yamaha Raptor has a 1-cylinder 4-stroke engine with a displacement of 686 cm³ and a power of 48 hp. Fuel injection is direct, with a throttle valve of 44 mm. Throttle travel is short and very sensitive.
To avoid vibration at high speeds, the Yamaha Raptor has 2 balance shafts. The ATV picks up speed easily, quickly and without jerks.
The BRP Renegade has a 2-cylinder, liquid-cooled Rotax V-twin engine. The engine capacity of the 650 X XC model is 650 cm³, power is 59 hp. Perhaps, in terms of acceleration speed, the BRP is inferior to the Japanese, but it is better suited for a long trip: even at maximum speed, the BRP engines do not overheat. This is important during long races, when it is not so much a quick start that matters, but endurance and stability.
Yamaha Raptor Engine
Engine BRP Renegade
The Yamaha Raptor has a 5-speed sport manual transmission with reverse gear. The clutch is multi-plate, wet type. The transmission is chain, has an eccentric tension mechanism.
The BRP Renegade has a CVT gearbox with disengageable all-wheel drive and a Visco-Lok clutch that automatically locks the front differential. While it's not fair to compare a rear-wheel drive ATV to an all-wheel drive ATV, all-wheel drive makes the BRP more versatile - it's more off-road and more stable.
The Yamaha Raptor is the top sport quad. It is light and maneuverable, it has been produced for more than a year, which means that possible shortcomings were identified in previous generations and improved. But this model is too narrow. Taking a Yamaha Raptor is only for those who understand why such equipment is needed and where he will ride it.
BRP Renegade is similar to the Yamaha Raptor in several ways: wheelbase length, engine displacement and suspension travel. However, the differences are immediately evident: the wheels of the BRP are larger, the body is more massive, the ground clearance is greater. The Renegade has almost twice the capacity of the gas tank - you can ride it longer.
The BRP Renegade weighs about a third more, so you won't be able to start it so abruptly - but this is not required by everyone and not always. If you plan to ride off-road in addition to racing tracks, the BRP Renegade is the best choice.
+7 (495) 646-25-26
Email: Sales@XZAPADAD .