If your ATVs front end alignment is off, you may notice the ATV pulling to the side while riding, or a shaking and wobbling feeling in the handle bars while on the trail.
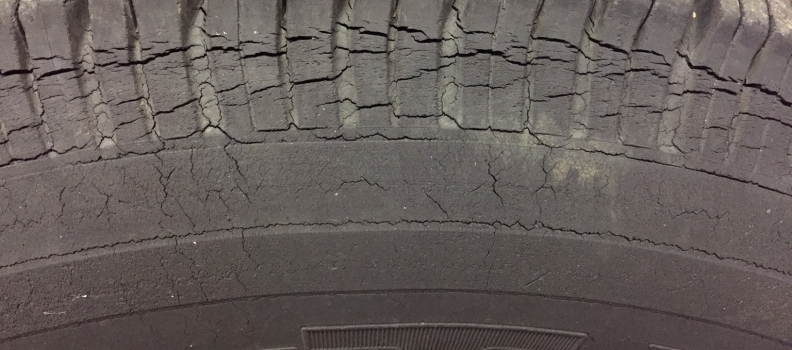
That’s not the only effect you’ll notice either, your tires will wear unevenly and need to be replaced sooner if you’re out of alignment. Not to worry, a front end alignment is a pretty easy task you can do yourself at home with some basic hand tools.
When you buy a brand new quad, the manufacturer recommends you do a front end alignment after the first 30 days. Then, every 3 months after that. To me, that seems a bit extreme. I do mine once a year with my yearly maintenance before I take it out for the season.
You will also want to do an alignment any time you swap out your tie rods, or do any work on the machine involving those parts. Here are the steps you take to do an alignment, I go into more detail on each of these steps below.
First you want to make sure your quad is on a level surface. You don’t need to spend a ton of time on this getting it perfect. But try to get the machine as level as possible, it makes the whole job easier.
If you have a flat spot in a garage or drive way, that would work best. But you could always jack up one side of the machine if you’re on a really uneven area. The quad won’t need to move for you to do the alignment.
As part of this step, make sure your tire pressure is set to spec or to what you normally ride with it set to. The most important factor is that the tire pressure is the same from side to side. Front and back doesn’t need to match, and usually shouldn’t. But make sure the left front tire matches the right front tire at least.
This step isn’t absolutely necessary, but it sure makes everything a lot easier knowing the handle bars aren’t able to move and mess with any of your measurements. If you have someone that won’t mind sitting there holding the handle bars straight that would work.
In fact, having someone sitting on the machine is better because the measurements will more closely match the conditions you have when someone is riding the machine. But if it’s just you doing this job, you’ll have to find another way to secure the handle bars.
I usually just get a ratchet strap and wrap the two hooks on each side of the handle bars and through the grab bar on the back to keep the handle bars from moving at all. It’s really a simple step that will save you some headache later on. Don’t strap it down to tight or you could cause other damage, just enough to hold her steady.
The camber of your front tires is often overlooked. But since we’re doing an alignment, this is the best time check the camber is on point. You’ll want to take a level and place it against the side of the tire vertically. Try to be as close to center near the axle as you can.
Rest the level against the bottom of the tire on the outside of the tire and get the bubble into the center of the level. Now measure the gap between the top of the level and the top part of the tire. You should get somewhere between 0.2 and 0.8 inches distance.
Not all ATVs and UTVs are rated to have the same camber. Check your service manual for the exact measurements, but about 1/8 inch to 3/4 inch is a pretty common standard to go by. If you’re not within those measurements, you should adjust your camber.
To adjust your camber, take the cotter pin out of the castle nut of your ball joint where it connects to the upper A-Arm and loosen the castle nut. Now with the correct size wrench, adjust the ball joint by screwing it in or out to get your camber within the recommended range.
Some A-Arm assemblies require that remove the ball joint from the spindle it sits in order to adjust. Once you’re done with the adjustment tighten back up the castle nut and put back the cotter pin.
If you want to think of the camber as the vertical alignment, then think of the toe as your horizontal alignment. First determine weather your machine calls for a toe-in or toe-out alignment by checking your service manual.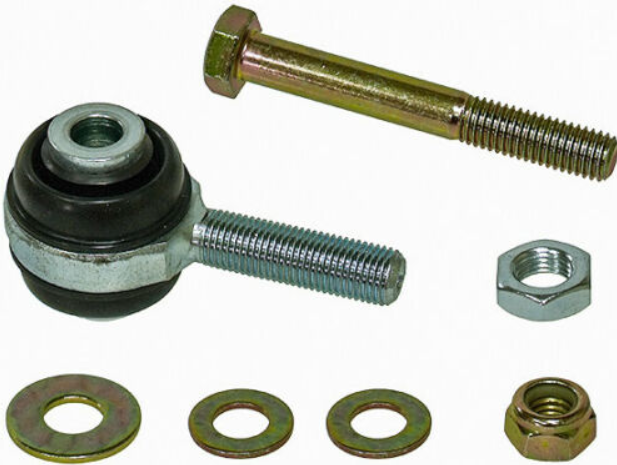 Most quads require a 1/4 inch toe-in alignment.
There are two popular methods for actually getting the toe-in toe-out measurements. I prefer method two because it’s easier to see if only one tire is out of alignment or if both are.
Method 1 is quicker and a pretty straight forward way to get your measurements. You’ll simply measure the distance between the middle point on both your front tires, front and back at axle height.
The distance measurement between the center of the front of the tires will be measurement A and the distance between the center of the back of the tires will be measurement B. You will take your measurements and subtract measurement A from measurement B to find your toe-in. If the measurement is negative, you have a toe-out situation.
I found it easiest to measure the front of the tires, then put a piece of tape or something to mark where you measured. Then rotate the tires 180 degrees by rolling the quad to get the back side measurements.
To find out which wheel is out of alignment, maybe both are, maybe just one is. Take a long 2×4 or something long and straight that won’t bend. And hold it flush with rear tires and along-side the front tires.
Measure the distance the from the 2×4 to the front tires. The distance should be the same from right tire to left tire. If it’s off then you will want to get the adjustments done to the tie rods to get these to match.
For a toe-in alignment you will want the front of the tires measurement away from the 2×4 to be higher than the back of the front tire by about 1/8 inch. Remember that the standard toe-in measurement is about 1/4 inch? Well, that’s both front tires combined.
If you find that you need to make adjustments to your toe, that is all done with the tie rods. Start by loosening the lock nut on the tie rod ends. You will want to use two wrenches to do this part.
One wrench to hold the tie rod in place and the other to loosen the tie rod end lock nut.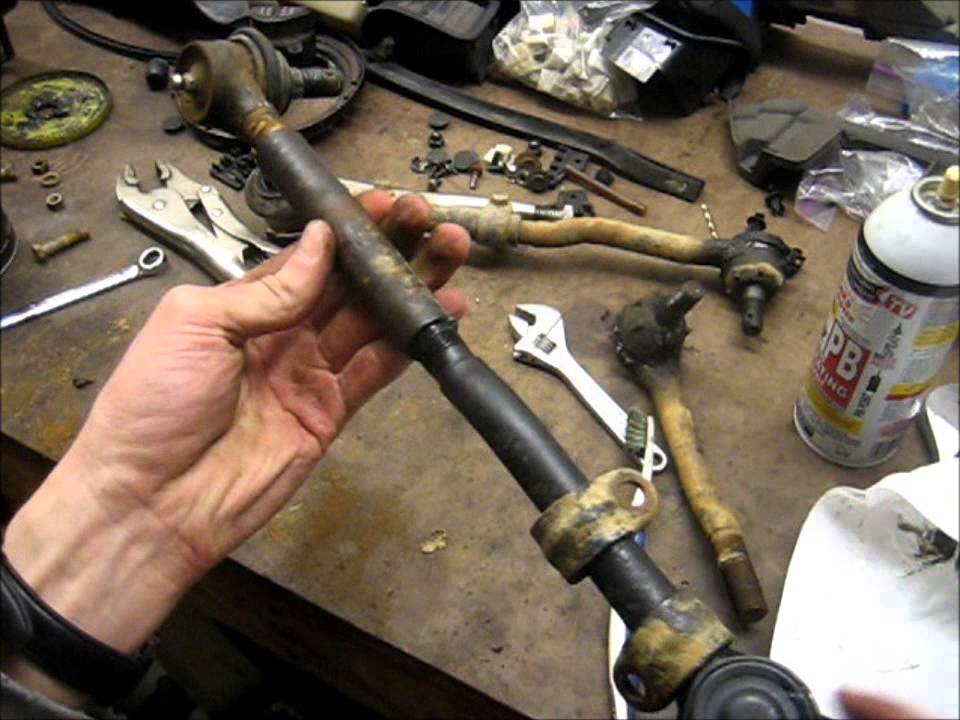 If you don’t use two wrenches you could cause damage to your machine.
Once the tie rod ends lock nut is loosened up, you will be able to adjust the tie rods. Make the adjustments to the tie rod by spinning clockwise or counter clockwise to get your correct toe measurement.
You will most likely need to adjust the tie rod, and take another measurement, repeating until the toe is where you need it to be.
After you’ve got your toe-in or toe-out where you want it, you can tighten the tie rod end nuts back up and you’re good to go. It’s a good idea to take another measurement after you’ve tightened them up just in case it shifted a little bit when tightening.
There you have it, an ATV front end alignment. If you’re alignment is still off after doing this, you may have a bent tie rod or A-Arm. If you notice, the handle bars still wobble or shake, you may just need to Balance The Tires or maybe even Replace The Wheel Hub Bearings.
Sharing is caring!
Better Handling Made Easy
Ever had that feeling your ATV or Side x Side didn’t know where it wanted to be on the trail, darting from one side to the other like a beagle chasing a rabbit and you were just along for the ride? You’ve most likely got a front end alignment problem, but luckily a quick and easy adjustment can keep you on the straight and narrow.
It’s easy enough to determine if your front end is out of alignment. All quads and Side x Sides naturally try to follow ruts, but if your toe-in is set wrong, typically you will notice the front end is very “darty” and won’t hold its line even on a smooth trail as it wanders from side to side. A simple check is to find a smooth trail and take it for a quick ride. If it feels skittish, it’s time to break out the tools.
On a stock ATV or Side x Side, there really only is one alignment adjustment you can make, and unless you’ve got custom built, aftermarket A-arms on your vehicle, all you can adjust is the “Toe-In”.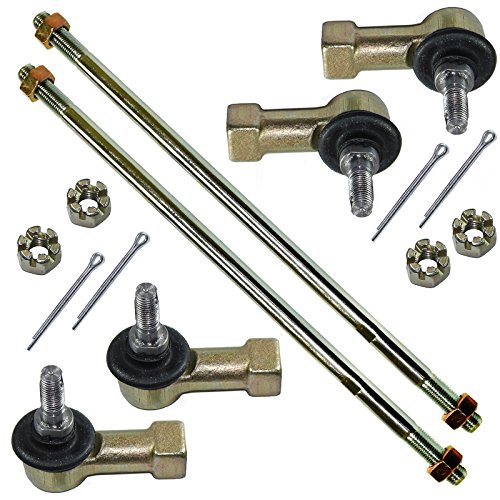 The manufacturers set the caster and camber when they built your machine, but toe-in is the amount the front wheels are pigeon-toed or off parallel to each other. This can be adjusted with the tie rods. A hard hit to the front wheel can change your toe-in, and we’ve even found the toe-in to be out of spec on new machines that were not properly checked by the dealer.
All ATVs and Side x Sides have a routine maintenance schedule in the owner’s manual, but they don’t all list toe-in specs or when to check it. Regardless of whether it is a heavy duty utility ATV, a sport quad, or a Side x Side, the task is essentially the same and with a couple tools and a buddy, a minor adjustment can make a huge difference in handling.
The internet is full of questionable tips and techniques on how to adjust your front end. Most neglect one of the biggest factors in correct toe-in specifications: ride height. For the best handling, you want to adjust your front end for the ride height when it is going down the trail with you and any gear on it. Most internet front end wizards make their adjustments with your machine on a stand or with no load on the front end, and that’s a little like trying to adjust the air pressure in tires that haven’t been mounted on the rim. Here are the steps to better handling.
1. Check Tire Pressure. Set the correct tire pressure as called for in the manual, or to where you normally like it. On most machines we like our tire pressure a pound or two higher on the front tires, and generally one pound higher at the rear. The exception to this would be for the sand dunes or extremely loose terrain where we would be at or below the recommended tire pressure specs for the machine. This would help us maintain flotation. In all other cases, we are a little higher, however. Whatever pressure you prefer, make sure the pressure is identical side to side.
2. Level Playing Field. Get the machine on a level surface. Now is the time to insure proper ride height, and although the suspension will include some “sag” on its own, you’ll want your buddy to hop aboard to get it to your normal ride height.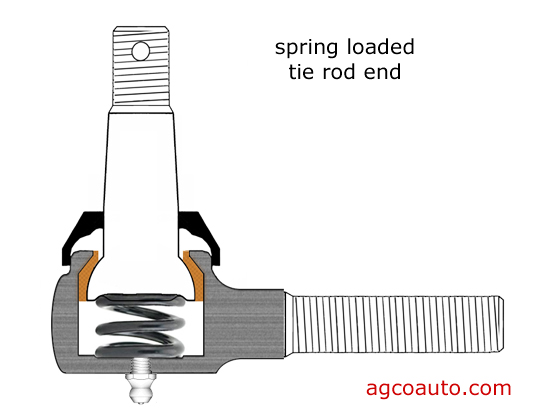 If you usually carry a lot of gear, you’ll want to account for that also. You want the machine to sit like it would with you on it for your normal type of riding.
3. Center the Bars or Steering Wheel Make sure the handlebars or steering wheel are centered exactly and not cocked to one side or the other. It goes without saying to make sure your handlebars haven’t been bent from a crash before you do this as well. It does no good to adjust the tie rods only to have the bars pulled to one side. Usually you can do this with a simple visual check and a careful eye as you compare the handlebars to part of the frame, steering column mounting block, bodywork, etc. Some riders will fasten a tie-down between the bars and the rear racks and measure the distance from the bar ends to a common point on the racks until they are equal.
4. Take a Measurement. This is the time to be consistent and precise. You must take your measurement from the exact height of the axle center (half way up the tire), and you must measure from identical points on the wheel. Some riders like to measure from the center of the wheel tread, but we always measure from the inside of the front wheel rim. It’s a little easier to get a reading from the steel or aluminum wheel than from a rubber edge. To get an accurate measurement, first verify the handlebars are perfectly set, then at the forward most point of the wheel and at the exact height of the axle, measure the distance from the inside of the right wheel to the inside of the left wheel. Remember that dimension. Now move to the back of the wheel, and at that same point at the rear of the wheel (and at the exact height of the axle), again measure the distance from the inside of the right wheel to the inside of the left wheel.
Proper toe-in specs vary, but here are a few guidelines to follow.
Sport Quads Require Toe-In. This gives them nimble, precise handling. We generally want the dimension from the inside of the front rims to be 1/8 to 1/4 inch LESS than the distance at the rear of the rims.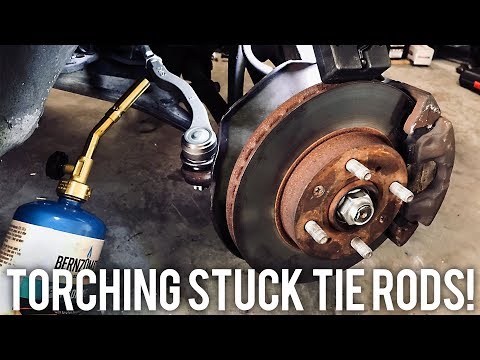
Utility ATVs and Side-x-Sides. Most Utlity ATVs and Side x Sides are toed out from the factory. This adds to stability, especially with a heavy, suspension compressing load on the front, but also makes them wander on the trails. Just because it came that way from the factory doesn’t mean it’s perfect for you, however, and it’s well worth adjusting. We would toe out for stability no more than 1/4 inch, or toe in no more than 1/4 inch for more precise handling.
5. Adjust Toe-In. This must be done on both tie rods equally. First loosen the lock nuts then give each tie rod a small twist using either your hand or a wrench on the small flats. Remember one end of the Tie Rod and locking nut will also have a left hand thread! A little movement goes a long way and a quick measurement check will show how much you’ve moved each tie rod. When you get the toe-in corrected, then retighten the lock nuts as you hold a wrench on the tie rod flats to prevent it from moving.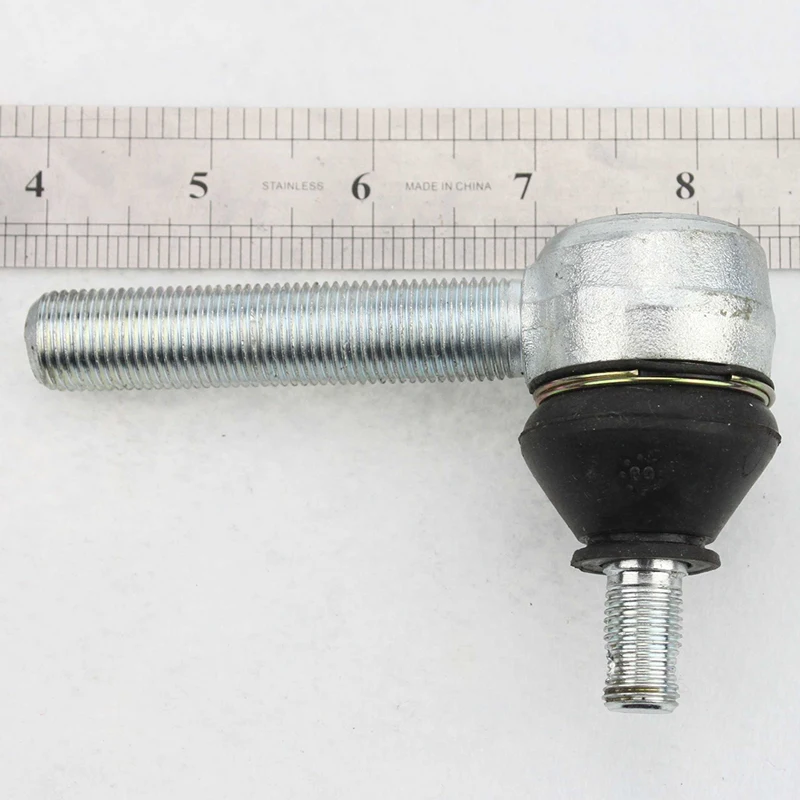 You will also want to verify the rod ends remain flat to the wheel spindle or the steering stem mounting plate and are not cocked to one side which could cause them to bind. With all lock nuts tightened, again verify your measurements to insure nothing has moved on you. Remember to do all this for your correct ride height with your buddy and any load still on the machine just like when you started.
6. Check Ride. Before heading back to the trail, you’ll want to verify both tie rods have approximately the same amount of thread showing. Some manufacturers will even specify the maximum amount of thread and it’s important to have equal amounts of thread for proper handling and to decrease the risk of bending or breaking of either tie-rod. If everything looks good, your measurements have been verified, and everything has been tightened, it’s time to take your machine out for a test ride. Begin your ride slowly to get used to the handling. Hopefully, you’ll feel an immediate improvement.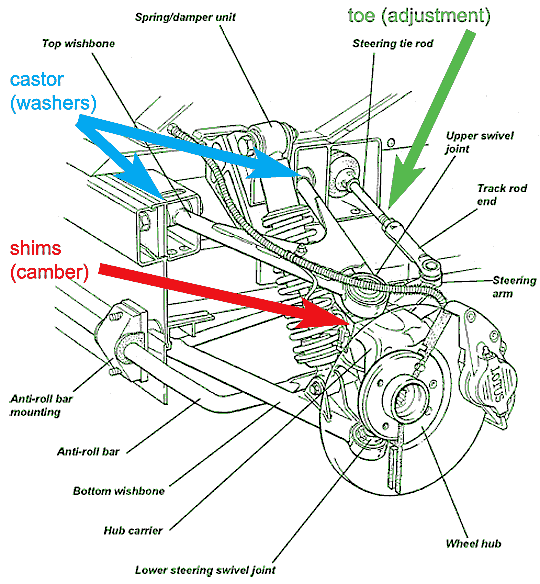
Adjusting your toe-in makes a huge difference in handling, and it’s not only more fun to have more precise control over your machine, it’s also safer. Making adjustments and dialing in your steering and suspension to what works best for you is easy, takes little time, and is part of the fun of ownership.
09/27/2013 #Tie rod end # Tie Rod
Tie Rod Ends – An Important Element of the Steering Gear The tie rod end is the key element of the steering system. Not only the possibility of comfortable driving, but also the safety of the driver and passengers depends on the serviceability of this mechanism, which is responsible for turning the wheels. Therefore, at the first signs indicating a problem with the tip, it is necessary to diagnose and repair.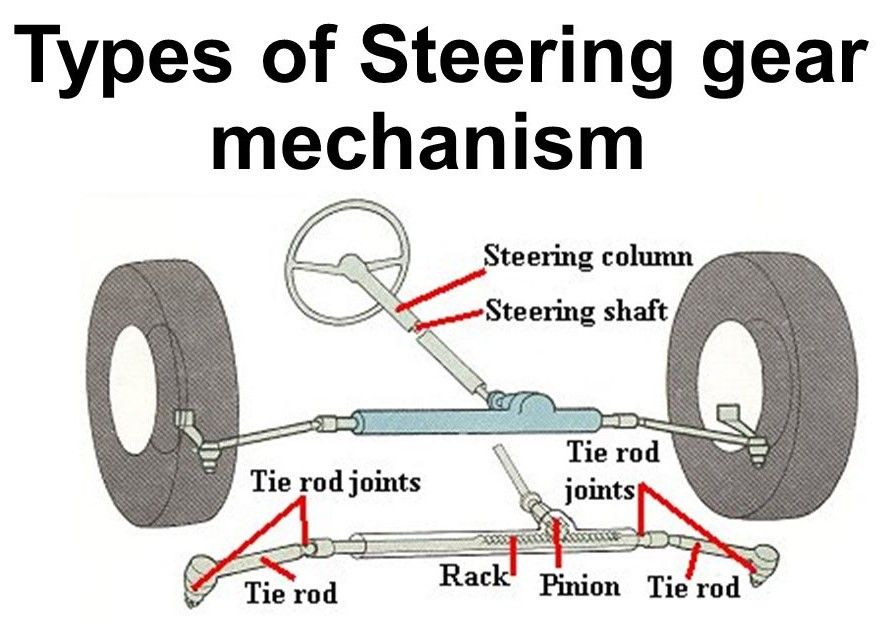 nine0003
The steering system is considered one of the most important elements of any modern car. To ensure a safe and comfortable ride, no matter what road conditions the vehicle is traveling in, all parts of the steering system must work smoothly and smoothly.
Tie rods, which are equipped with special tie rod ends, as well as swivel arms, are the key element of the entire steering mechanism. Tie rods are designed to ensure the mobility of the elements of the steering drive. Only if these mechanisms are fully operational, you can be sure of the smooth operation of the steering. nine0003
Tie rod transfers power from the steering wheel to the wheels. The main function is to control the rotation of the wheels. It is the tie rod end that is responsible for the ability of the car to perform the necessary maneuvers, providing the appropriate angle of rotation of the drive wheels. Thus, the driver gets the opportunity to drive the car comfortably and easily.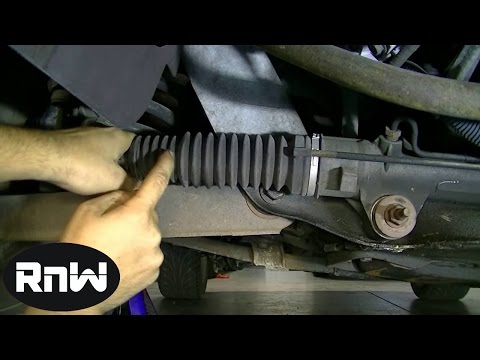
Tie rod end includes such components as ball pin, housing, polymer bearing, boot. It is worth noting that there are universal tie rod ends that are the same for any wheels. But there may be differences that depend on whether the tie rod end is connected to the left or right wheel. nine0003
Tip failures can be caused by malfunctions of the tie rod system as a whole. Failed tie rod ends cause complex malfunctions in the operation of the entire steering system. This, in turn, will begin to threaten the safety of driving this car, since it will become difficult for the driver to control the situation by choosing the necessary trajectory of movement.
To avoid serious problems that can result not only in expensive repairs, but also endanger the safety of the driver and passengers, it is important to diagnose the tie rod ends for problems in a timely manner. If necessary, the tips are subject to urgent replacement. nine0003
Tie rod ends have a certain service life, which depends on many factors.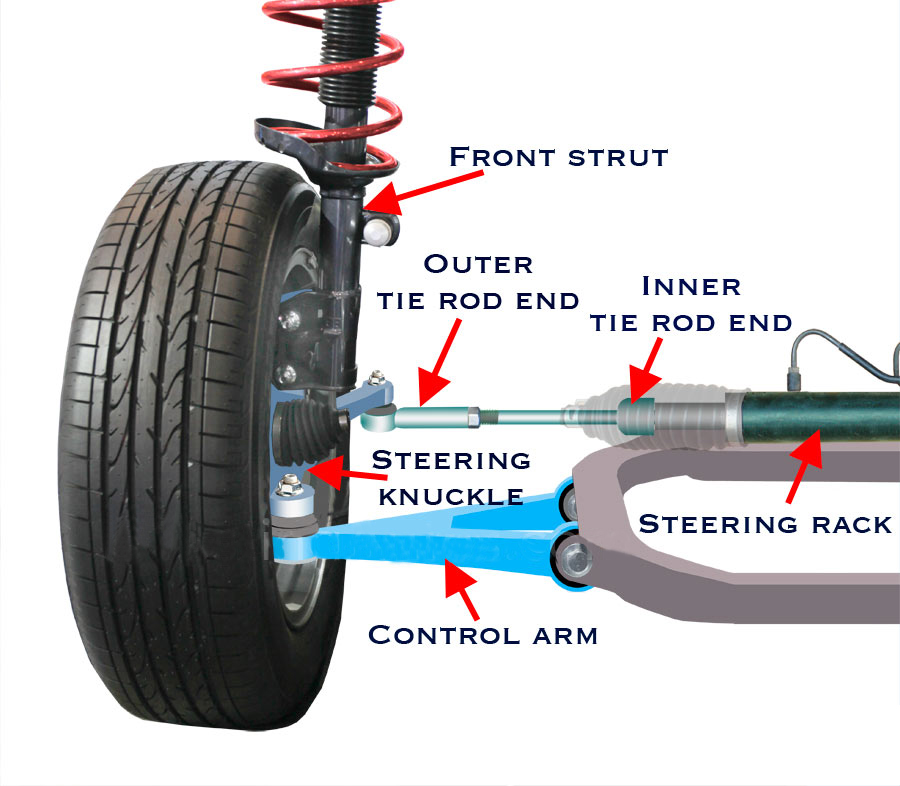 First of all, the quality of the road surface in which the machine is operated affects the duration of the uninterrupted operation of the tips. Of course, don't underestimate the importance of driving style.
Constant driving on bad roads destroys not only the suspension of the car, but also adversely affects the condition of the steering tip, which fails much faster than expected. If we take into account the average figures, then we can say that the tie rod end must maintain the smooth operation of the steering system for 40 thousand kilometers. nine0003
Any driver should be alerted by the sharp knock that occurs when driving over potholes, no matter how small they may seem at first glance. In addition, recoil begins to be felt in the gas pedal. Such signs should alert the driver and cause the steering system to be diagnosed immediately. If play is detected when checking the tie rod, then the tie rod end is defective. In this case, it must be repaired, if possible, or replaced. nine0003
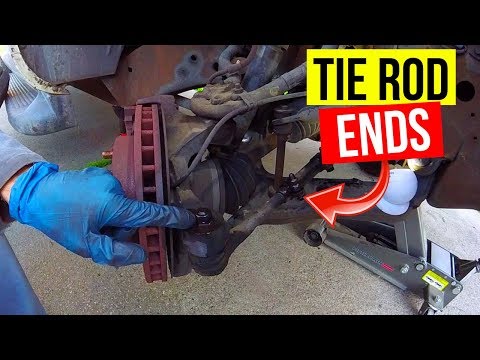
Qualitative replacement of the tie rod end can only be done by experienced craftsmen. Of course, if you have the knowledge and a set of suitable tools, you can replace the tip yourself. To do this, perform the following steps:
- First of all, it is necessary to clean the lock nuts, with which the tip is attached to the swing arm and to the steering rod;
- The steering rod is disconnected from the rotary lever; nine0010 - To make it easier to set the wheel alignment, when the tie rod end is disconnected, the number of turns is counted;
- The new tie rod end is installed in the reverse order, taking into account the number of turns;
- After replacing the tie rod end, the wheel alignment must be checked and, if necessary, adjusted.
#Alternator bar
Alternator bar: fixing and adjusting the car's alternator
09/14/2022 | Articles about spare parts
In automobiles, tractors, buses and other equipment, electric generators are mounted to the engine by means of a bracket and a tensioner that provides belt tension adjustment. About the generator strips, their existing types and designs, as well as the selection and replacement of these parts - read the article.
#Compressor adapter
Compressor adapter: reliable pneumatic connections
8/31/2022 | Articles about spare parts
Even a simple pneumatic system contains several fittings - fittings, or adapters for the compressor. About what an adapter for a compressor is, what types it is, why it is necessary and how it works, as well as the correct selection of fittings for a particular system - read the article. 06/22/2022 | Spare Parts Articles
The chassis of many Japanese Nissan vehicles is equipped with a split type anti-roll bar connected to the suspension parts by two separate struts (rods). All about Nissan stabilizer struts, their types and design, as well as selection and repair - read in this article. nine0003
#Drive V-belt
Drive V-belt: reliable drive of aggregates and equipment
06/15/2022 | Articles about spare parts
Gears based on rubber V-belts are widely used to drive engine units and in transmissions of various equipment. All about drive V-belts, their existing types, design features and characteristics, as well as the correct choice and replacement of belts - read the article.
nine0081 Back to the list of articles
Tie rods connect the steering gear and the wheel, it is through them that the driver transfers the turning force from the steering gear to the wheels.
The only problem is that the steering gear is fixed to the body, and the wheels are elastically suspended and move in three planes during movement. How to connect movable wheels and a fixed steering gear?
The rod is attached to the steering rack rod using an internal tip, to the middle link of the trapezoid - using a swivel joint. The tie rods are connected to the steering knuckle lever through an external steering tip. The inner lugs and ball joints allow the linkage to move in the vertical plane - otherwise the links would break out when the vehicle is driven over uneven surfaces.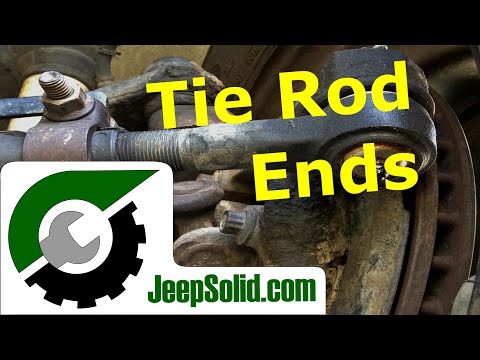 The outer tip ensures the mobility of the rod and the wheel in any plane - so the drive can work normally on turns, pits without damage. nine0003
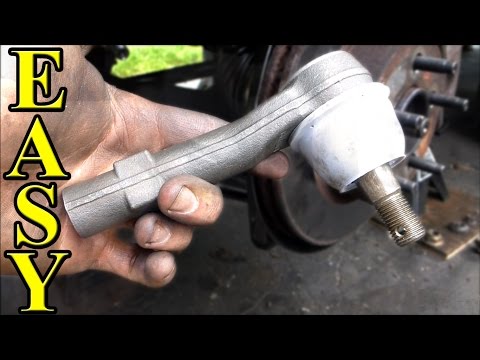
Steering rods and tips
The design of the tip resembles the structure of a human joint: the sphere of the finger rotates inside a hemispherical body with a Teflon, nylon bushing or lubricant that levels the friction of the metal elements and allows the finger to deviate to a certain angle. The entire hinge is protected by a rubber boot. This design allows you to accurately connect the fixed and movable elements of the steering gear.
In general, the steering tip is a reliable, wear-resistant element: the fingers are made by casting or stamping from special steels, the ball parts are carefully ground, wear-resistant anti-friction materials are used as liners, the body is cast under pressure and anodized to further protect against corrosion. There is nothing to say about traction. nine0003
So why do these reliable elements force drivers to go to the service station from time to time?
Scheme of operation of the tie rod end
How and why tie rods break
The tie rods themselves never wear out, well, except that the car will stand forever on the street and simply rot.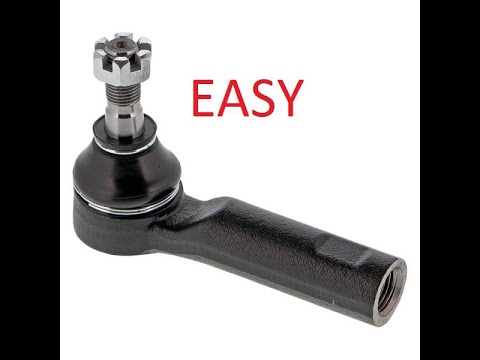 Usually the driver “helps” the rods: he flew sharply onto the curb at speed, hit a stone - the rod was bent. Actually, corrosion and deformation are all possible malfunctions of steering rods. nine0003
Large selection of tie rods
go to
However, bent tie rods cause other troubles - wheel alignment is broken, the wheel angle is broken, the anthers of the tips are torn or the entire tip is pulled out. Therefore, if you ran into something impressive, just in case, go to the service station and check the geometry of the rods. If one rod is bent, both will have to be replaced.
Why steering tips break
The condition of steering tips depends on one factor - the driver: how he drives, at what speed, how carefully to monitor the steering system. Well, and also from the state of the roads, because no one is safe from “suddenly flying into a hole in the dark”. nine0003
Therefore, the first enemy of steering tips is “beautiful” roads and the driver who drives on them.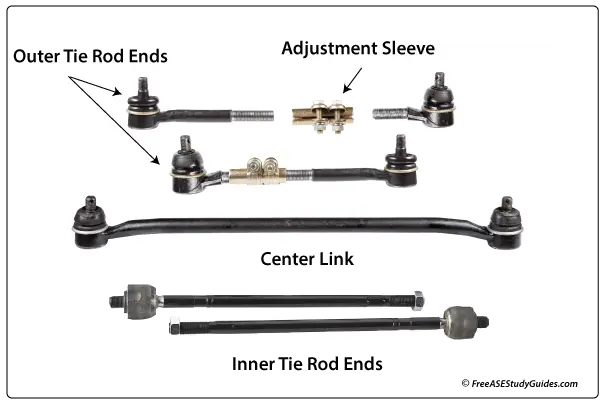 Due to strong impacts, not only the rods bend, but the fixing nut is corny loosened - what this is fraught with, of course. In addition, a strong blow breaks the anthers, displaces the sphere, and that, in turn, breaks the sleeve.
Torn duster - enemy number two. Yes, yes, again the boot (sometimes it seems that this is generally the most important element in the system). Through a torn anther, water and dirt will get into the ball joint, metal elements rust, dirt acts as an abrasive, and water gradually washes away the grease. nine0003
How do handpiece failures manifest themselves?
We have already mentioned more than once that malfunctions of different elements and steering units can manifest themselves in the same way: backlash, knocking, vibrations, tight or loose steering wheel, beating in the steering wheel.
It is possible to assume that something is wrong with the steering tips if:
To be 100% sure that the tips are worn out, you need to raise the car or put it in a pit and shake the rods up and down - the gap should not be more than 1.5 mm. You can ask a friend to turn the steering wheel and watch the tip move - it should not hang out in the seat.
IMPORTANT! Some drivers are still at risk not to change the steering tips, but to restore them. Undoubtedly, now it is a very technological process. However, we do not recommend restoring such an important detail. The fact is that the workshops change the sleeve - i.e. “stuff” a new anti-friction material (the sleeve is designed for a new sphere). And the working surface of the sphere of the finger, meanwhile, has already worn out. To fit the hemisphere and sphere, the new sleeve is pressed in. It turns out that on a cold car the steering wheel is a little tight, but on a heated tip it still knocks. In a word, the game is not worth the candle. nine0003
Change the tie rods and tips
So, we made sure that the tips staggered.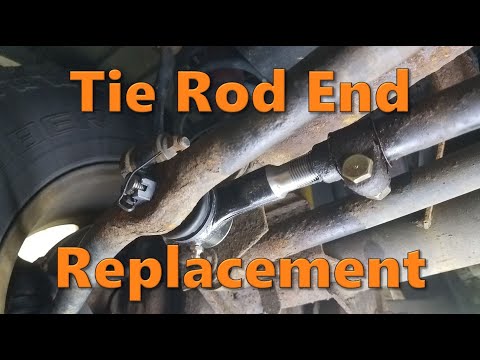 Or the rods are bent. Or both. In general, it will have to change.
How to do it:
Tip without nut
 nine0133
 There is an easier way to mark the position of the tips - just count the number of turns as you twist them and remember.
Large selection of tie rods
Go to the store
NB! Replacing tie rods and ends is only half the battle. After that, it is necessary to adjust the alignment. If you do not adjust the camber, the tires wear unevenly, the chassis does not work correctly and it is difficult to drive the car.