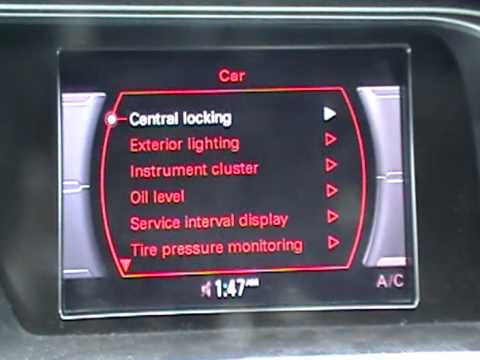
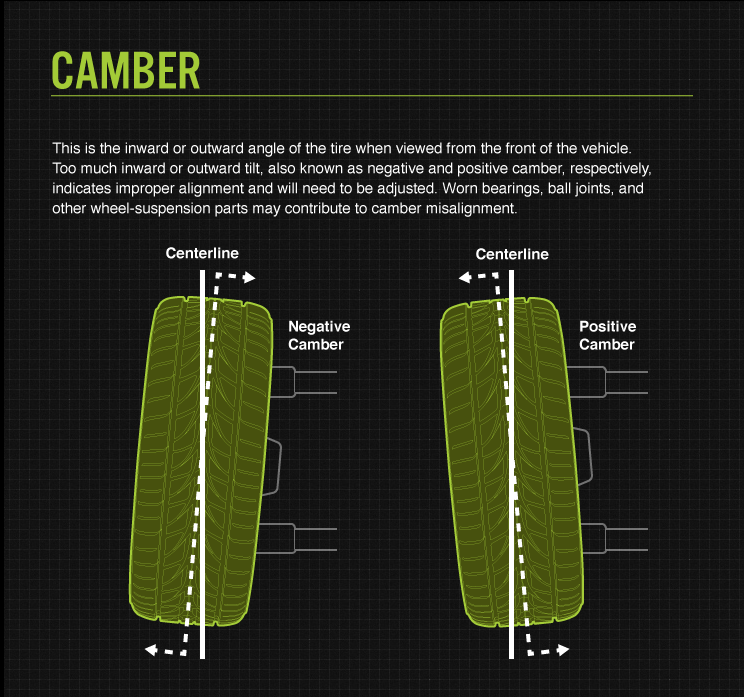
Camber is arguably the most DIY-friendly suspension angle thanks to purpose-built products that allow for easy adjustability.
But it’s not as simple as installing camber plates and making adjustments right away — there’s a ton of preparation and calculation involved.
That said, you don’t have to be an expert to adjust your car’s camber angle. Anyone who’s mechanically inclined can do this at home with the right tools and some creativity.
There are a bunch of different approaches you can take along with many different tools to choose from.
The most challenging bit is getting your car on a level surface and ensuring that your wheels can turn freely while they’re fully loaded — this is crucial for getting the right measurements.
In this article, we’ll discuss how to adjust camber at home, how to prepare your car for the work, and we’ll list some of the equipment you’re going to need.
Consistency is the name of the game when it comes to getting accurate readings. There are some things you need to do to ensure that your measurement tools can give you reliable data:
You need to make sure your car is loaded and parked on a level surface. Most garage floors aren’t perfectly level, but there are ways you can go around this problem.
You could do one of the following:
 Place a digital level-gauge on the same plane where your tire will sit and zero it out (use the angle correction feature) before measuring your camber.
Once your car is on a level platform and fully loaded on turn plates, you can proceed to measure your static camber. Remember to be safe and cautious — always lock your main brakes (not just your parking brake).
To measure your camber, you can either use a spirit level gauge for an analog read-out, a digital gauge for ease of use, or a tire temperature gauge if you’re out on a track.
Whether you use a digital gauge or a spirit level gauge, you’re going to need something that sits flush with your rims and reads the angle of your wheels. This can be done with:
There are various types of camber gauges available on the market, and you can also make one yourself for very little money.
Spirit bubble camber gauges have some obvious advantages over digital gauges. They don’t require any calibration, they’re cheap, and they’re easy to use. The only problem is that you pretty much have to be on a level surface.
With some higher-end digital gauges, you can get away with not being on a perfectly level surface because they correct for the angle of the surface they’re placed on via a calibration process.
Assuming that you’ve prepared your car and your garage using the steps outlined above, here’s how you can use a spirit level gauge to measure camber:
 Make sure it’s secured in place tightly and doesn’t move around.
Even though digital camber gauges don’t require your car to be on a level surface, they need to be calibrated properly before you can trust the readings.
To measure your camber digitally, follow the same steps as you would with a spirit bubble, but use a digital camber gauge instead.
Alternatively, you can use a clamp tool (inclinometer) that has an in-built digital gauge. Our favorite options include:
If you’re out on the track and need a quick way to tell if your camber needs realignment, we recommend using a pyrometer (a thermometer for your tires).
This is a tool that resembles a multimeter, it comes with a cable that has a spike connected at the end. The spike can be used to pierce the tire and get an accurate temperature reading.
If you’re wondering how camber and tire temperature are linked, know that camber adjustments are typically used to maximize traction when cornering. That’s what it all boils down to.
Unlike caster and toe, camber has less to do with steering balance and straight-line stability.
Uneven temperature or wear across your tires is a tell-tale sign of improper distribution of pressure or grip. It’s very important to have an optimal temperature spread across your tires.
For example, if the outer section of your tire is a lot warmer than the inner section, that’s an indication that you need to add more negative camber. But if the opposite is true, then it means that you’re already running too much negative camber.
Aim for temperatures in the optimum operating range of the tire. For most high-performance street tires it’s 160 to 220 degrees Fahrenheit.

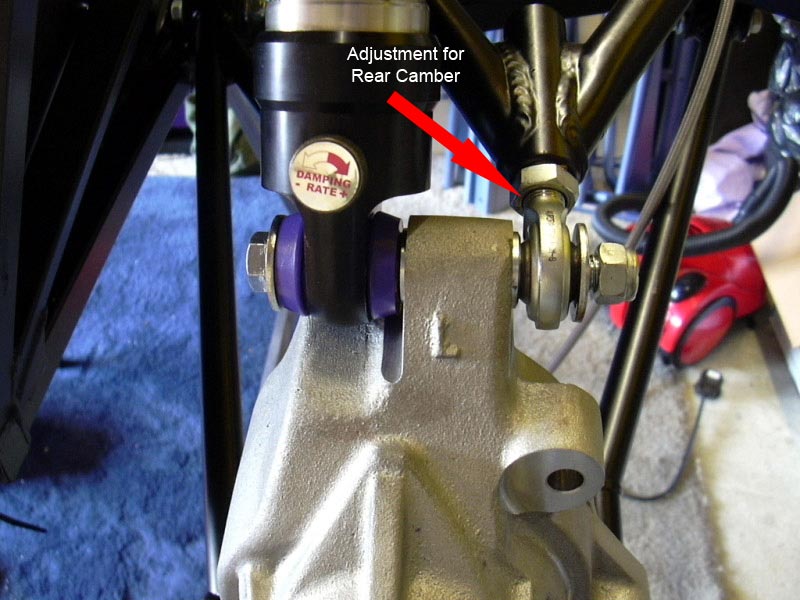
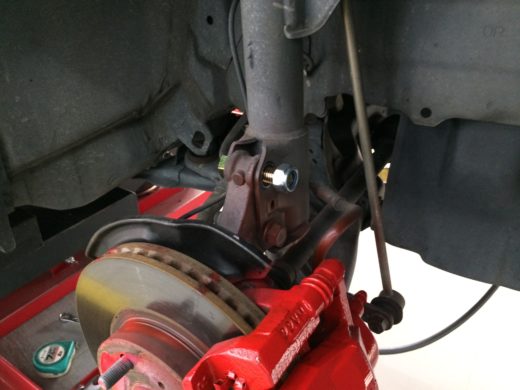
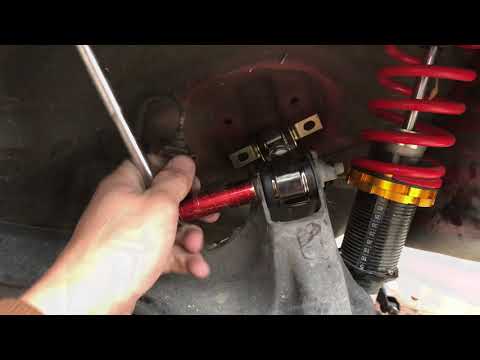
Adjusting camber involves changing the mounting position of the top of your strut and/or how your steering knuckle mounts to the bottom of your strut. This can be done by using camber plates, camber bolts, eccentric bolts, or adjustable control arms.
The amount of adjustability you get depends on what car you drive and how you’ve modified it. But more importantly, it depends on the type of suspension system that’s installed on your car.
Most OEM suspension systems offer limited camber adjustability through eccentric bolts, turn-buckle joints, or shims. Turn-buckle joints are usually seen on rear multi-link set-ups but are also found on front wishbone suspensions.
For MacPherson strut and double wishbone style suspension systems, camber plates and eccentric bolts are most common. Here’s how much adjustability you can expect from these two components:
 5° of adjustment
For anything more than this, you’re going to need adjustable control arms because changing the length of your control arms gives you the most amount of adjustability.
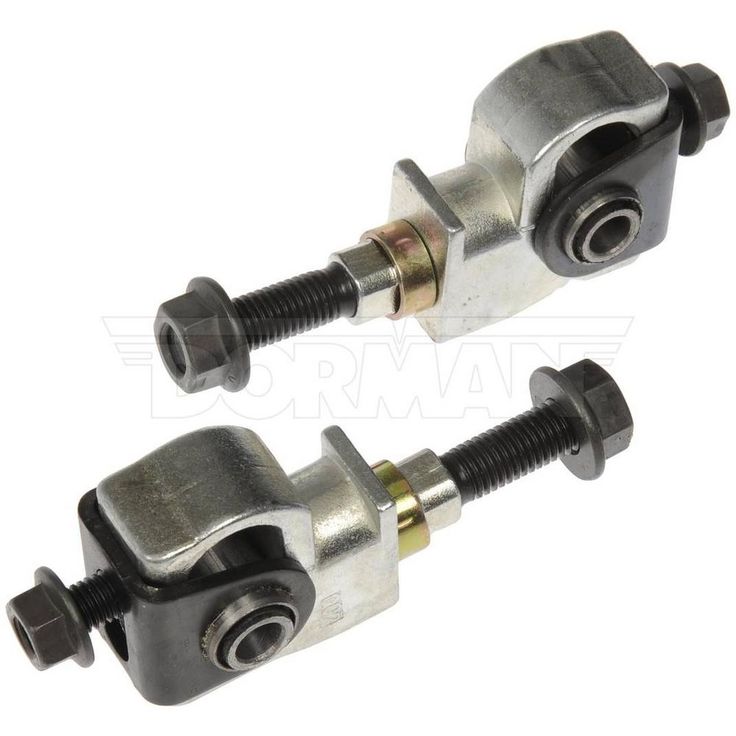
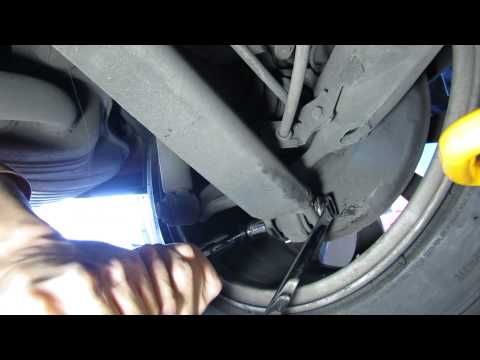
Camber bolts are often seen on production cars but they allow a very small range of adjustment. What makes these work is an offset washer along with an eccentric lobe — a bulge on the bolt that vaguely resembles a camshaft lobe.
When you turn the bolt, the bulge affects the horizontal alignment of your steering knuckle or control arms which impacts the camber angle.
Most production cars have adjustable camber bolts from the factory. However, you can always use aftermarket bolts for a slightly wider range of adjustability.
If your car has a MacPherson strut suspension, you’ll notice that it uses two mounting points. You have the option of running aftermarket bolts in both spindle holes for maximum camber gain.
For double-wishbone suspensions, the best way to adjust camber is by replacing one of the OEM control arms with those that are adjustable. By adjusting the length of your control arms, you can influence the angle of your steering knuckle, and change camber as a result.
However, camber bolts can be used on double-wishbone suspensions to move the upper or lower control arms.
To use camber bolts, start by sourcing the right ones for your car. If your car already has these installed from the factory, you can skip that step entirely and proceed to make the adjustments right away.
The swap is pretty straightforward, but dialing in the right camber settings is a little complicated.
Here’s how to replace and adjust your camber bolts (MacPherson strut):
 Once you reach the desired angle, hold the bolt in place, and torque down the nut from the other side without letting the angle change.
Unlike camber bolts, camber plates allow for a much wider range of adjustment, and they’re commonly paired with coilover-fitted MacPherson strut suspensions.
The idea is to replace your fixed strut top mounts with those that are adjustable. That way you can make your coilovers lean towards or away from the vehicle.
So if you’re wondering how to adjust camber on coilovers, that’s one way to do it. You’ll even find some higher-end options are sold along with camber plates.
Leaning your coilovers towards your car will add negative camber and leaning them away from the car will add positive camber. For this to make perfect sense, you’re going to want to know the difference between positive and negative camber.
Making adjustments with camber plates is significantly easier than fiddling around with camber bolts.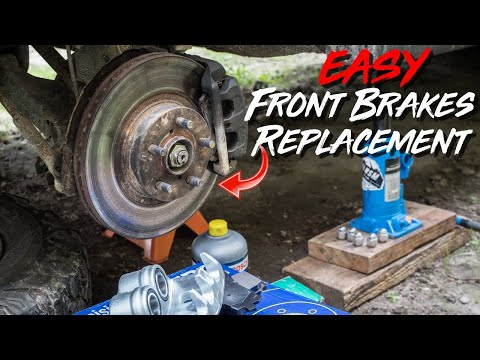 All you need is an Allen wrench. Easily accessible adjustment hardware is another advantage.
Here’s how to install and adjust camber plates:
 Retighten the bolts and you’re done.
Note that the functionality and features of camber adjustment products vary from brand to brand.
The best way to adjust camber is by changing the length of your control arms. OEM suspension arms are usually rigid and don’t offer any adjustability.
That’s where adjustable control arms come in. This upgrade is compatible across various different types of suspension systems and is arguably the most effective way to adjust your camber angle.
Adjustable control arms replace the standard fixed-length arm and can be adjusted in length. This is possible thanks to threaded collars and/or adjustable rose joints. This functionality works slightly differently on A-arms and other types of control arms, but the result is the same.
Camber or alignment bushings are something you’ll see very frequently on trucks and off-road vehicles in general. Just like camber bolts, adjustable bushings feature an offset design that allows for minute levels of camber adjustment.
They’re ideal for perfecting your camber angle. It’s more of a touch-up rather than a primary solution. For a more comprehensive adjustment, we recommend using camber plates or adjustable control arms.
The methods outlined for adjusting camber apply to both front and rear wheels. In principle, you’ll be following the exact same method to measure your front and rear camber.
But when it comes to adjusting the front and rear camber, the steps involved won’t necessarily be the same. Because suspension systems differ from car to car, it’s difficult to zero down on one universal adjustment method.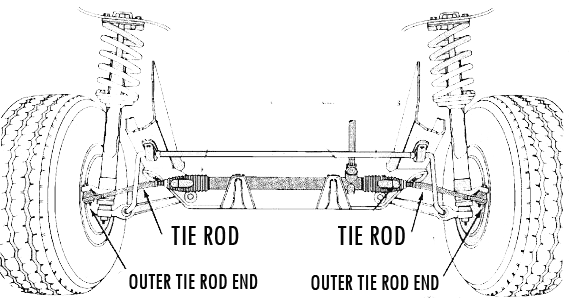
Most camber kits available on the market have everything you need to adjust your front and rear camber angles. You’re going to want to understand what type of suspension systems you have in the front and rear, and then make a judgment call on which is the best way to adjust camber.
As mentioned above, camber plates and bolts work flawlessly with MacPherson struts, and adjustable control arms are the way to go when it comes to double-wishbone or independent multi-link type systems.
It’s important to know that when you make any modifications to your suspension, it completely upsets the suspension geometry. This means your camber, caster, and toe might need realignment. Not only does this dramatically impact how your car steers, but it also impacts how it brakes, accelerates, and corners.
This is most common on lowered cars. When you lower your car without taking into account the unintended camber gain, it won’t drive right. Knowing your way around basic DIY wheel alignment will help you mitigate a lot of the unwanted problems that come with modifying your car’s suspension.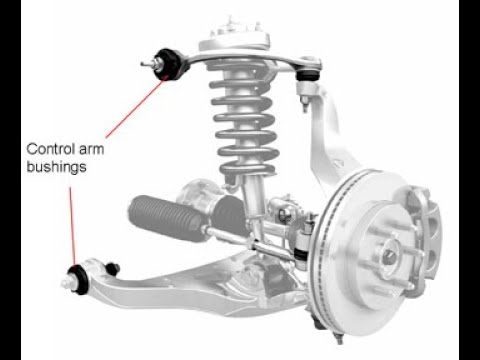
Practise is the name of the game when it comes to wheel alignment. You probably won’t reach alignment shop-level accuracy in your garage, but you can get quite close for not a lot of money.
Whether you drive an economy car, a drift missile, a show car, or a track car, having these skills up your sleeve will pay off in the long run.
What’s your preferred method for adjusting camber? Let us know in the comments below!
Before you can begin to adjust and tune camber you must first be able to measure it and measure how effective a camber change would be to alter the grip. Ways to measure camber are:
There are two main techniques used to measure how many degrees of camber a wheel has. This is in the form of a camber gauge. Camber gauges can be digital or spirit bubble.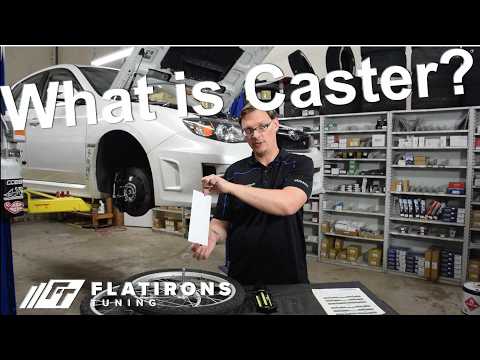 Spirit bubble gauges don’t require any calibration and are an analogue read out. However, they do require the car to be sat on level ground to give an accurate reading. The digital gauge can be used on uneven ground and can be calibrated to the angle of the ground before accurately measuring the wheel camber. A digital gauge usually needs a frame to sit in which can be located on the wheel to give even more accurate readings. The digital gauge often costs more and requires accurate calibration. Therefore, both types of gauge are still heavily used within motorsport.
If you are not at the race track then your camber can be measured using a 4 wheel laser alignment service. This is often carried out at a garage on a ramp using an expensive system of equipment. It uses lasers pointed at pads mounted to each wheel and the deflection point registers in the computer as the amount of camber on the wheel providing the owner with a print out. This system is highly accurate provided the system has been calibrated correctly and frequently.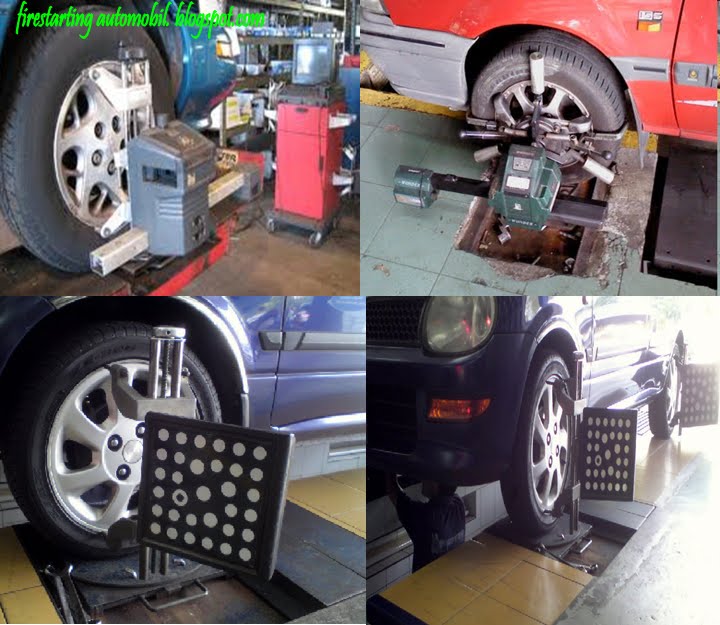
A way of measuring whether you need to adjust camber when out on track can be done with a tyre temperature probe. A tyre temperature probe is a spike connected to a digital box. The spike contains a thermometer and can be pushed into the tread of the tyre across its width. A temperature reading can then be taken across the width of the tyre. Temperature reading should be taken at 3 points across the tyre (outside, centre and inside) as soon as the car comes in off track. If the temperatures are not even then the camber most likely needs adjusting. If one side is hotter and gets cooler towards the middle and then cooler at the opposite point again then the camber needs to be adjusted. It is important not to confuse temperature feedback with the effects of tyre pressure as well. The direction of camber change can be seen below:
| Outside Temperature | Centre Temperature | Inside Temperature | Solution |
| Hottest | Middle | Coolest | Increase Negative Camber |
| Coldest | Middle | Hottest | Increase Positive Camber |
| Colder | Hottest | Colder | Reduce Tyre Pressure |
| Hottest | Coldest | Hottest | Increase Tyre Pressure |
Within high budget motorsports where live data is required to monitor the effectiveness of the wheel camber, temperature sensors are mounted to a rig which will monitor the tyres temperature on track at three different points across its width and data log the information for an engineer to analyse.
Camber gain can also be affected when adjusting camber so is sometimes useful to measure. A simple way to measure the camber gain is to disconnect the spring and damper from the wheel and place a jack under the wheel or upright. Placing your camber gauge on the wheel, the jack can be raised up and down, noting the change in camber through the range of movement. Understanding the amount of camber change through the operating range of the suspension is important when setting your static camber angle.
There are ways to adjust the camber angle of your front and rear wheels on most cars, from standard road cars to high budget racing cars. The main methods of adjustment come in the form of:
Camber bolts are on production road cars and allow a small range of adjustment to be made to camber on the front and rear wheels. An offset washer is mounted to the bolt and is located in the subframe. Rotating the bolt 360 degrees will move the washer through its full adjustment range. The range of adjustment is often small and is limited to the size of the offset washer.
A common way to adjust camber at the front wheels of the car with Macpherson strut suspension is to install adjustable top mounts. These items fit to the top of the spring and damper set up allowing the damper angle to be altered and therefore the camber angle for the front wheel to be altered. If the car had a double wishbone set up then an adjustable top mount would not alter the camber angle of the wheel.
A popular upgrade that can be made to most production cars is an adjustable camber arm for the front and rear of a car. This product replaces the standard fixed length arm and can be adjusted in length often by turning a threaded collar or adjusting the length of a rose joint at one end or both. Increasing or decreasing the length of the arm will change the camber of the wheel giving a much larger adjustment range than a camber bolt.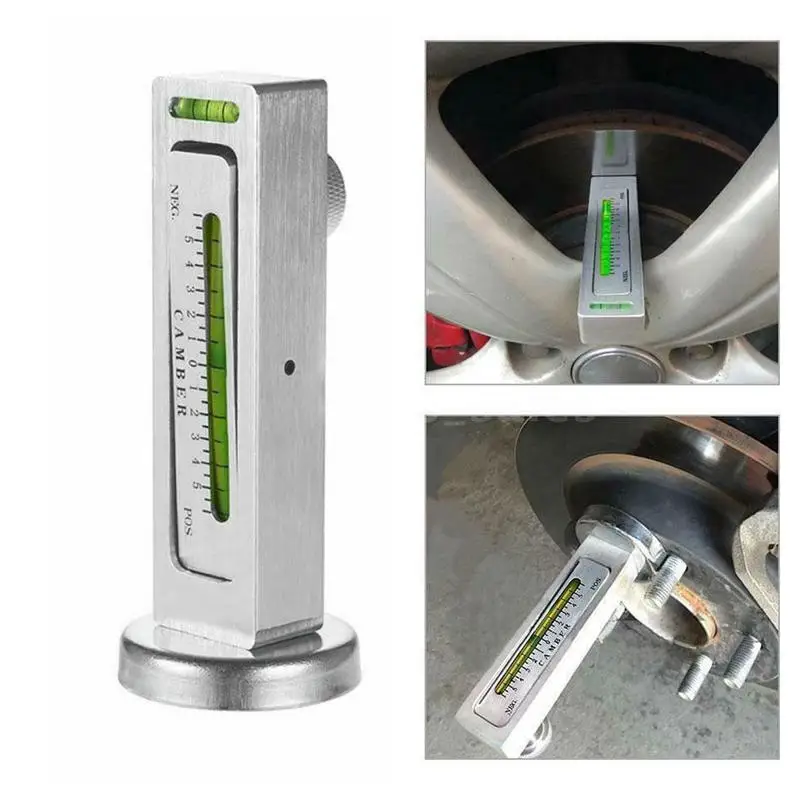 However, changing the length of suspension arms can alter the camber gain of the suspension system. For this reason a separate technique is often used within top level motorsport.
Due to adjustable length arms altering camber gain in the suspension system, high level motorsport where camber gain has been precisely designed needed another way to adjust camber at the wheel. This is done by having adjustable uprights. The most common technique for adjusting uprights is by inserting shims between the upright and the mounting point for the suspension arm. This alters the angle of the upright and wheel without affecting the length of the suspension arm. This technique is also more durable and often stronger than using the alternative adjustable arm. However, it is far more expensive to have a full purpose built suspension kit made for your car.
Running negative camber on the front wheels of a front wheel drive car will decrease potential acceleration but increase the top speed of the car.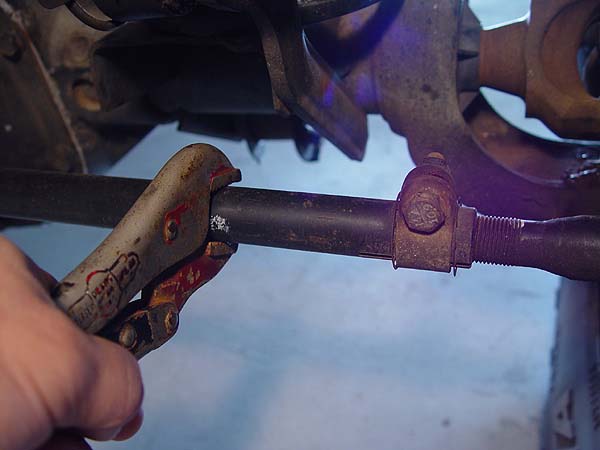 This is due to the reduced contact patch in a straight line giving the front tyres less grip. This means that the engine has a higher chance of spinning the wheels, impacting acceleration. Also, the smaller contact patch reduces the effect of straight line braking as there is less contact patch for the braking force to be transferred through. However, the smaller contact patch reduces drag and therefore increases the top speed of the car.
The dynamic advantages of negative camber are that on a stiff circuit car, the car will roll onto the contact patch during cornering and will roll the tyre flat, generating the maximum grip from the tyre. However, if too much negative camber is applied, then the car will roll back off the contact patch on corner exit and not have enough grip to put maximum power down so will have to wait until later in the corner to apply the power. For this reason negative camber on front wheel drive cars will not often be set to more than -3 degrees of camber. Also, having some camber in the front wheel swill generate some camber thrust in the tyre which is also helpful for generating more grip.
Running positive camber on the front wheels is very rarely seen and has more disadvantages than advantages. Similar to negative camber, the initial acceleration will be reduced and the top speed will be slightly increased both due to the reduced contact patch of the tyre in a straight line. The braking efficiency of the tyre will also be reduced. However, in a scenario where a front suspension system has a soft set up and a lot of camber gain, starting with some positive camber will allow the tyre to gain camber to zero camber under braking conditions and would improve the braking. However, the downsides when cornering overrule this slight advantage. Tyre life will also be reduced.
Dynamically, setting the front wheels with positive camber will be bad for cornering. When the car turns in, the caster will give the outside wheel some negative camber, however, this negative camber gain will likely not be enough to contend with the action of the car rolling towards the outside tyre which will raise the inside of the tyre, reducing grip even further.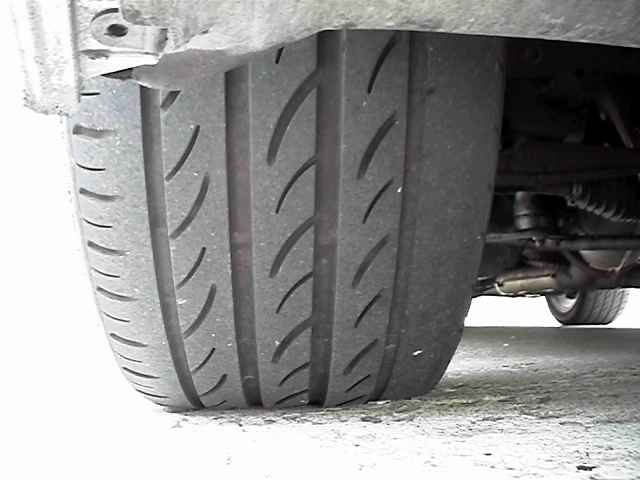 For this reason, positive camber is widely avoided in front wheel drive suspension set ups.
Having neutral camber at the front wheels will increase the acceleration of the car and reduce the top speed slightly. This is due to the full contact patch of the tyre being in contact with the ground in a straight line. This allows the maximum grip form the tyre and therefore the maximum amount of throttle to be used for acceleration. The tyre life is also increased due to all of the tread sharing the load of the car. The braking potential is also increased as all of the tyre can be used to transmit braking force in a straight line.
Neutral camber can be used in applications where high amounts of caster are installed in the steering set up. This is due to the increased negative caster generating more negative camber gain on lock for cornering. However, in most cases of front wheel drive racing, the tyre would still be rolled off in corners with a stiff suspension set up, reducing grip and developing understeer.
However, in wet conditions where cars have their suspension softened and cornering forces and speeds are reduced, neutral camber can work very well. This is because the car no longer has the lateral load from the cornering forces to roll onto the tyre; therefore, reducing the negative camber back towards neutral camber will increase the cars grip in the wet.
Negative camber on the rear wheels of a font wheel drive car will increase the acceleration and the top speed of the car. This is due to the reduced contact patch generating less rolling resistance and therefore less drag. The rear brakes will have less effect and will lock up the rear wheels with more ease, so a brake biased valve is advised for front wheel drive cars with negative camber at the rear. Tyre life is also reduced due to the small contact patch.
Having negative camber on the rear wheels on a circuit car will allow the car to roll onto the contact patch and generate maximum grip during cornering. On the rear wheels you can run more negative camber than on the fronts as the tyre is not needed to transmit power to the ground. Therefore, a stiffer rear end can be used with more negative camber to utilise the roll during cornering to full effect and get the maximum grip from the rear tyres; which allows the car to enter corners at higher speed and carry the speed through with the increased rear grip. Rear ends have been seen so stiff on front wheel drive cars that they lift the inside wheel. In these cases large amounts of negative camber are used due to the high amount of roll onto the contact patch.
Positive camber would increase the acceleration and top speed of the car as well due to the reduced contact patch similar to negative camber. The braking effects are also reduced and tyre life decreased in similar ways to negative camber. However, positive camber has far less dynamic benefits.
Having positive camber at the rear wheels of a front wheel drive car would reduce the grip when cornering drastically and would get increasingly worse through the first section of the corner as the car settles in to the bend.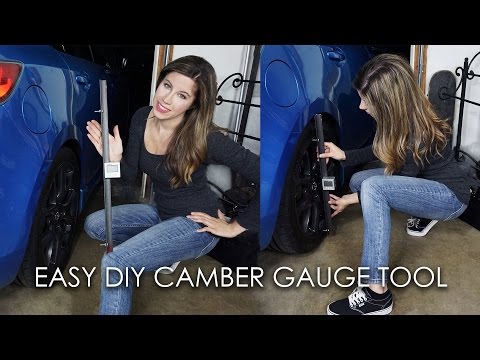 This is due to the car rolling onto the outside wheel and lifting the inside of the tyre. As positive camber is set statically with the inside of the tyre lifted, the effects would get worse and the contact patch would further decrease. This would result in the car oversteering in the corner and slowing down a lot. The only scenario where positive camber would work at the rear wheels is if the car had a very soft suspension set up with a lot of negative camber gain. That way the car would reduce the positive camber towards neutral for the soft suspension to utilise the full contact patch of the tyre in the corner. This would only really be seen in rallying where road cars have been modified to race.
Running neutral camber on the rear wheels would decrease acceleration and top speed in a straight line due to the full contact patch being in contact with the ground generating the maximum rolling resistance and drag. However, the braking force would be able to be larger therefore, allowing the brakes to be applied later without locking up the rear wheels as easily.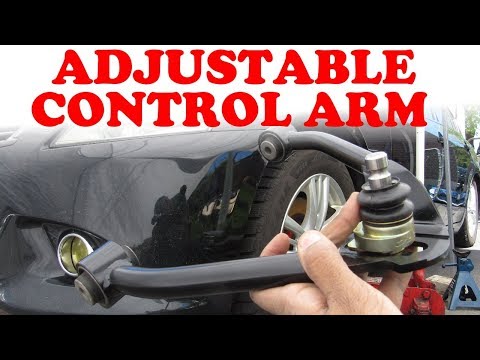 Also, the tyre life would be increased due to the full amount of tread distributing the cars weight.
Having neutral, or zero, camber at the rear wheels of a front wheel drive car would reduce the cornering grip of a stiff circuit car. This would be because the mass transfer during cornering would roll the car onto the outside wheel and raise the inside of the tyre, reducing the contact patch. Therefore, the rear wheels have more grip potential in a straight line than in the corners; which for the non-driven wheels of the car would impact on performance and cause the car to start oversteering.
However, a more neutral set up is often used in very wet or icy conditions where the cornering forces are reduced and suspension set ups are softened due to the lack of grip in the corners. Therefore the mass transfer is reduced and the amount of roll onto the contact patch is reduced. At this point, having a more neutral set up will benefit the cornering grip giving more cornering speed and stability in the wet conditions.
Negative camber on the front wheels of a rear wheel drive car is the most common set up to have. The set up can range from -1.5 degrees all the way up to -8 degrees of camber depending on the chassis stiffness, spring rates and type of motorsport. Running negative camber will increase the acceleration and top speed of the car. This is due to the front wheel not being driven, therefore having negative camber will reduce the contact patch size in a straight line and reduce the rolling resistance of the car; allowing it to accelerate and hit a higher top speed. However, the negative camber can reduce the braking efficiency of the car due to the braking force going through less of a contact patch. Tyre life is also reduced.
The dynamic effect of running negative camber is that during cornering, a car with a stiff set up will roll onto the outside tyre. Therefore, the car will roll onto the outside wheel and onto a flat contact patch through the corner.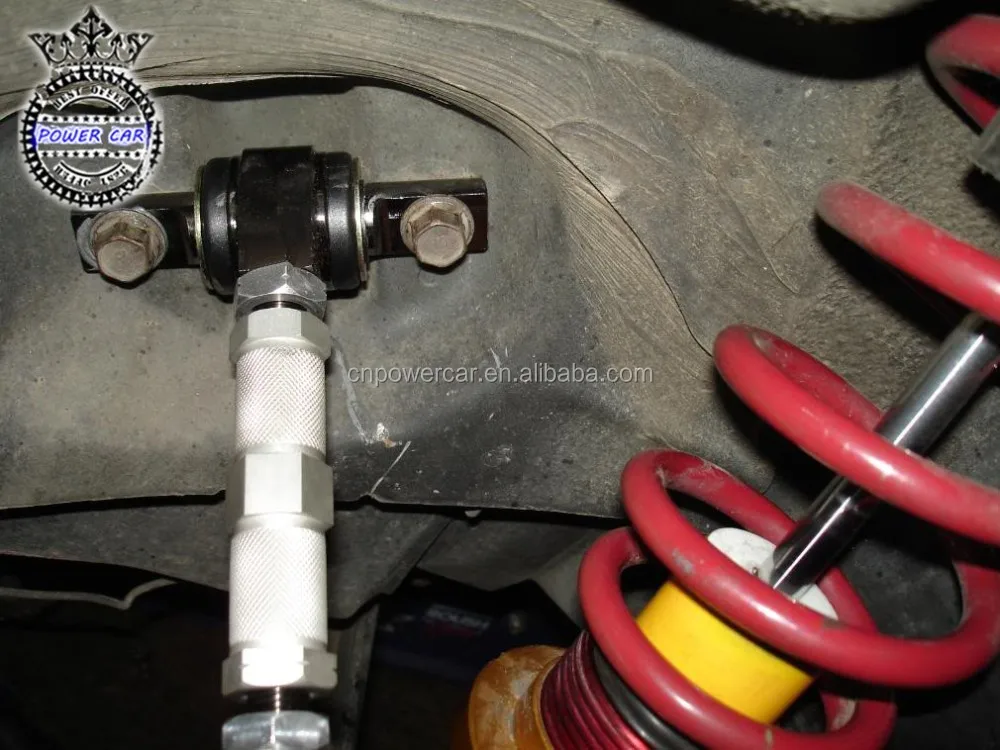 This increases the front end grip of the car and reduces understeer. This rolling effect occurs the stiffer the setup of the car is. The suspension set up needs to be stiff in order for the chassis of the car to roll onto a tyre instead of just moving the damper and staying level.
Positive camber on the front wheels of a rear wheel drive car is extremely rare. The positive camber would increase the acceleration and top speed of the car due to the reduced contact patch much the same as negative camber would. The braking efficiency would also be reduced due to the lack of contact patch. However, if the front suspension was soft, and the front suspension had a lot of camber gain, then the positive camber could turn to neutral camber under braking when the front of the car squats. This would increase the contact patch and improve braking. However, the dynamic effects would over shadow this one rare advantage. However. Tyre life is reduced with positive camber.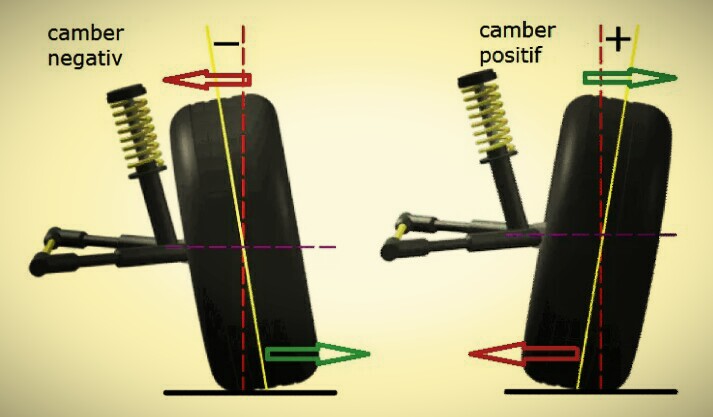
Running positive camber on the front wheels becomes a problem when cornering quickly, particularly with a stiff set up. As the contact patch is already reduced, turn in would have less front end grip. As the car settled into the corner more, the grip would reduce. This is because the mass of the car would cause the chassis to roll onto the outside tyre. This would increase the positive camber of the tyre and reduce the contact patch further and further. This would result in severe understeer and is not recommended to use. One of the rare environments where positive camber is used on the front wheels is within oval racing such as NASCAR for reasons explained in the Motorsport Applications section.
Neutral or zero camber would decrease the acceleration and top speed of the car in a straight line. This is because the full contact patch of the tyre is in contact with the ground in a straight line. Therefore, the maximum amount of rolling resistance is present from the tyre at a time where the grip is not required. However, having neutral camber is good for tyre life and braking conditions. Due to this, it is a common set up on road car applications.
The dynamic effects of neutral camber depend on the set up of the car. If the car has a soft set up and zero camber gain then it would increase front end grip. Generally, in most motorsports with a stiff set up, neutral camber will decrease cornering grip. This is due to the car rolling onto the contact patch during cornering. If it is neutral then it will roll into a positive set up lifting the inside of the tyre and reducing grip and giving the car understeer. Neutral camber is also often almost run in wet conditions in most motorsports, due to the grip level being reduced and softer suspension set up being used. This means that the car does not roll onto the contact patch as much and instead operates the full suspension range to find grip in the wet conditions. Therefore, reducing negative camber back towards neutral is advised to make full potential of the contact patch in these instances.
Running with negative camber on the rear wheels of a rear wheel drive car would likely reduce the acceleration and increase the top speed of the car. This is due to the contact patch being reduced and therefore, the grip and rolling resistance. Having a small amount of negative camber would generate some camber thrust in the tyre which can be beneficial to acceleration. The tyre life and braking efficiency of the tyre would also reduce with the more negative camber that was installed.
The dynamic effects of negative camber is that cornering grip would be improved on a stiff suspension set up. This is due to the car rolling onto the contact patch of the tyre when the suspension is stiff to prevent body roll. This action of rotating onto the tyre would flatten the contact patch and increase the grip on corner entry and exit allowing more speed to be carried into the corner and an earlier application of power on corner exit. The rear negative camber is often much less than the front wheels due to the tractive force needing to go through them on the straights. This set up is also coupled with a slightly softer rear end to prevent the contact patch rolling over towards positive during fast cornering.
Unlike on the front wheels of a car, positive camber can be sued to an advantage within motorsport, but only in particular circumstances and only a few areas of motorsport. The positive camber would reduce initial acceleration and increase the top speed for similar reasons to negative camber. The braking efficiency of the rear tyres would be reduced and the tyre life also reduced.
On a stiff suspension set up with zero to little camber gain; having positive camber on the rear wheels would reduce the grip when cornering as the contact patch would reduce as the car rolls off the tyre even more through the corner, leading to unwanted oversteer.
However, in situations where a car has a soft suspension set up and camber gain in the suspension system, such as a lowered road car, having positive camber gain as static can increase the contact patch when the throttle is being applied and during cornering. This is due to the rear of the car squatting under acceleration and the camber gain decreases the positive camber and makes the tyre flat with the ground. This will give maximum acceleration form the tyre. Also if the suspension is soft, then during cornering, the loaded tyre will be moved up in the arch, and will generate negative camber to roll onto the tyre to generate maximum cornering grip. This scenario can be seen in categories such as rallying, rally cross and drifting.
Neutral camber on the rear wheels of a stiff rear wheel drive car would increase acceleration and decrease the top speed of the car. This is due to the full contact patch being in contact with the ground in a straight line. Therefore, maximum grip is enabled from the tyre allowing for maximum power to be transmitted to the ground for acceleration. The top speed is reduced due to the increased rolling resistance of the tyre fighting against the engines power at top speeds. The braking force is also increased as the full tyre is able to be used to transmit the braking force to the ground. Tyre life is also increased due to the full tyre wearing evenly.
If a car has a stiff set up then during cornering, the chassis would roll onto the outside tyre and would introduce positive camber. This would lift the inside of the tyre and reduce the available grip form the rear tyre when cornering. This would introduce unwanted oversteer and would also mean that the driver would have to wait slightly longer on corner exit to apply the throttle to not spin the rear wheels.
If wet weather conditions occur during a race, the suspension systems are often softened and cornering grip is reduced. Therefore, the car no longer rolls onto the contact patch as much. In these conditions, rear neutral camber is reduced back toward a neutral set up to increase the grip through the wet corners.
Also, if the car has zero camber gain and a soft suspension set up, then neutral camber can be beneficial as the chassis will not roll onto the contact patch as much due to the damper and spring compressing as well as the anti-roll bar flexing; all doing most of the work preventing the chassis from rolling onto the contact patch. In this instance a neutral set up would benefit cornering grip. This style of set up can be seen in scenarios such as rally and drifting.
Having negative camber on the front wheels of a four wheel drive car will reduce acceleration and increase top speed. This is due to the front wheels being driven by a percentage of the engine and requiring the full contact patch to put full power to the ground. The tyres will also wear faster and breaking efficiency will be reduced due to the reduced contact patch.
Negative camber will allow the car to corner faster on track with a stiff suspension set up. Due to the front wheels of a four wheel drive car usually having a smaller percentage of power transmitted through them than the rears, more negative camber can be used. This is beneficial as the front suspension can be stiffer and roll the car onto the contact patch to carry maximum speed through the corner by increasing the contact patch.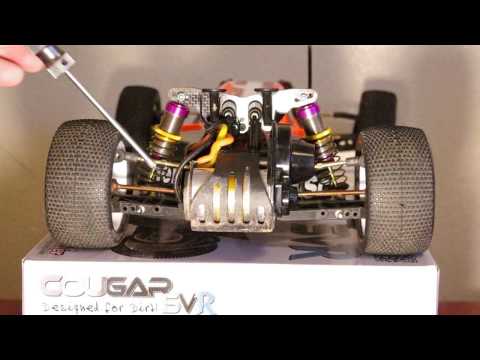 However, less negative camber is used than on rear wheel drive cars due to the tyres still needing to grip well in a straight line.
Positive camber on the front wheels would reduce acceleration and increase top speed similarly to negative camber. This is due to the smaller contact patch but is at the outside of the tyre as oppose to the inside. The braking of the car is also reduced on a stiff set up. However, some positive can have a positive effect on braking if the car has a very soft suspension set up and some camber gain at the front wheels. With this set up, the car will dive under braking. This will decrease the positive camber to zero and increase braking forces. This style would only work on cars as soft as rally cross cars.
Dynamically, the positive camber at the front wheels would reduce the cornering grip of the car. This is due to the car leaning onto the outside wheel and rolling the tyre outwards. However, if the tyre is already leant outwards in the form of positive camber, the contact patch will only reduce during cornering therefore reducing front end grip and causing the car to understeer.
Neutral camber on the front wheels of a four wheel drive car would increase the acceleration and reduce the top speed. This is because the front wheels are transmitting power to the ground through the tyres so require as much contact patch in a straight line as possible. However, the increased contact patch will increase the drag on the car and reduce the very top speed slightly. The braking of the car will also be improved as the full contact patch is in contact with the ground able to use the entire grip of the tyre so prevent the front wheels from locking under braking. Furthermore, the life of the tyre will be increased as the full amount of tread is distributing the mass of the car.
Having neutral camber on the front wheels would slightly reduce the capable cornering speed of the car. Due to the car rolling outwards in the corner, the contact patch would reduce as the inside of the tyre lifts on the outside wheel. This is why small amounts of negative camber are more favourable over a neutral set up in the dry.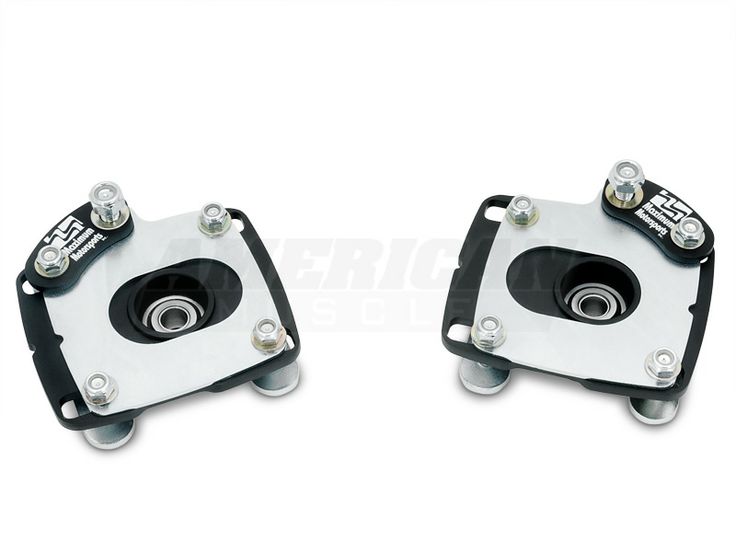 However, in wet weather conditions where the car is carrying less speed through the corners due to the reduced grip from the tyres, a neutral set up on the front wheels is favourable. This means maximum grip can be used I a straight line and a car running larger amounts of caster will increase negative camber gain on the outside wheel during cornering often enough to support the full contact patch in the corner.
Furthermore, for four wheel drive cars with very soft suspension set ups such as in rally or rally cross, and where no camber gain is present in the suspension, having a neutral set up is ideal. This is because the suspension is so soft to account for the terrain; the car tends to slide rather than lean through corners. Therefore, the neutral camber is the best option to maintain full grip through the corners.
The effects of negative camber at the rear wheels of a four wheel drive car are very similar to that of the front wheels.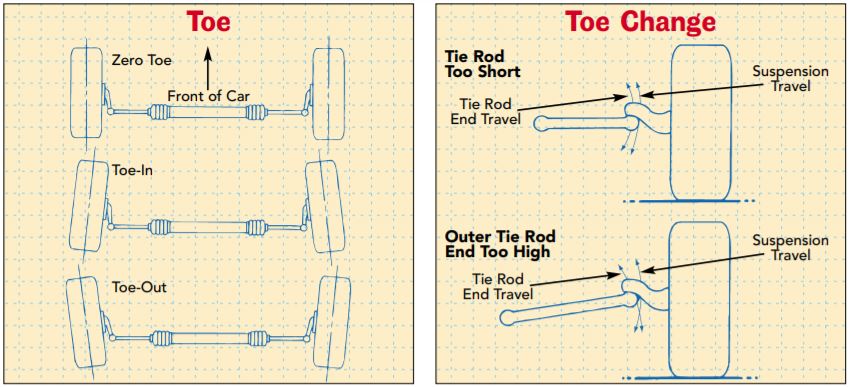 This is due to the rear wheels also transmitting power to the ground so too much negative camber would ultimately reduce precious straight line grip which is required.
Due to the rear wheels of a four wheel drive usually transmitting a slightly higher percentage of the power to the ground, less negative camber can be run in order to not impede on the grip levels required for power delivery. An area where negative camber might be dialled into the rear tyres would be if the car was understeering round corners and did not have tuneable anit-roll bars installed. In this scenario negative camber at the rear wheels could be increased to reduce rear end grip in order to reduce the understeer.
Again positive camber has very similar effects on the rear wheels as it does the front due to all the wheels being used for power delivery. Similarly, only in a motorsport category with a very soft suspension set up and with camber present in the rear geometry could positive camber be installed. This would be due to when the car is on throttle, the rear end of the car would squat and reduce the positive camber to make the contact patch flat and generate maximum straight line grip. Also if the suspension was that soft with relatively soft anti-roll bars then this effect would work during cornering too where the large suspension travel would cause the outside, loaded wheel to gain negative camber and increase cornering grip. Four wheel drive categories that require set ups this soft are ones such as auto-grass or lower level rally cross that use modified road cars to compete in.
Once again the effects of having neutral camber at the rear wheels are very similar to the effects of it at the front wheels. With a stiff set up, having the rear closer to neutral camber is beneficial to extract as much straight line grip as possible. Having a slightly softer roll bar on the rear with this set up would also allow the car to not roll on the tyre as much and allow the rear end to grip in the corners for earlier power delivery.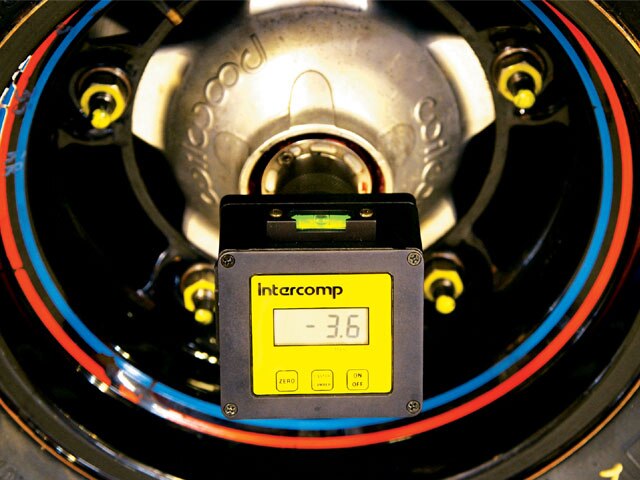 Furthermore, running neutral in the wet is highly beneficial due to the reduced grip in the conditions and the lowered lateral load transfer, allowing the car to use the full contact patch in the corners.
Like Loading...
The choice of tires, tires and their installation is the key to the comfort and safety of your vehicle (V). If you let at least one of the steps go by itself, the car will lose ease of control, it will become difficult to enter turns, third-party sounds will appear in the cabin, and tires may wear out ahead of time. What to do with it? Let's deal with the issues of self-adjusting the camber-toe angles (RS) of the front and rear wheels together.
We recommend that you test all parts of the suspension and steering system after replacement of components, an accident or related problems.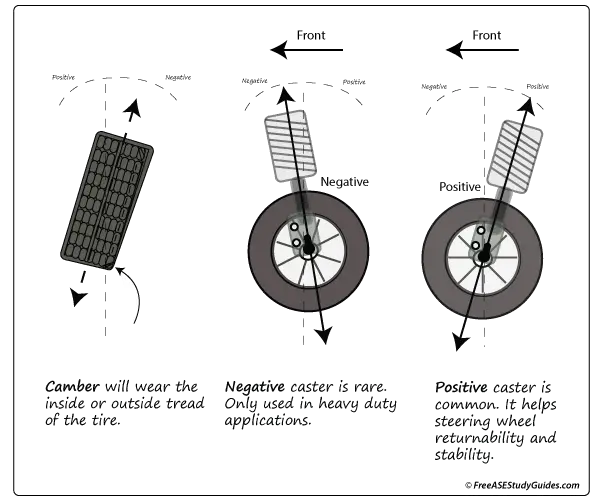 This will help save time, money and nerve cells, as well as not become a regular visitor to the nearest car dealership due to savings on diagnostics.
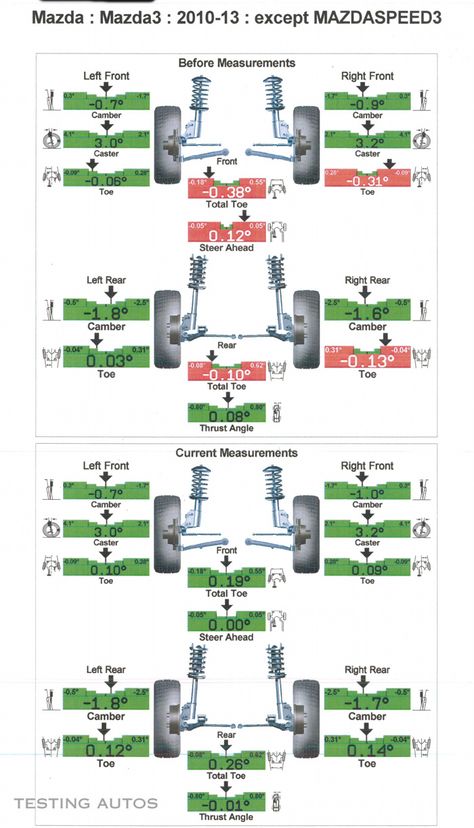
Adjustment will help you check and, if necessary, correct the position of the tires relative to the road and each other. RS indicators are expressed in degrees, minutes, millimeters and are set by the car manufacturer separately for each model. The exact figures that are relevant specifically for your vehicle can be found on the Internet.
There are three main CCCs:
 The wheels can be absolutely parallel (at 0°), and the convergence is also called positive when turning the tires inward and negative when turning outward (in the latter case, a discrepancy can also be diagnosed).
There is one more concept - axis reversal. This is one of the options for incorrect convergence. It lies in the fact that a pair of tires, often rear, with a flat steering wheel, synchronously “looks” not directly, but to one of the sides. Of course, handling suffers because of this and the car can significantly "drive" on the road. Here is what the problem looks like when viewed from above:
Now that we have figured out what RS is, we will explain why the verification procedure needs to be carried out regularly, and also consider what the consequences can be if this is forgotten.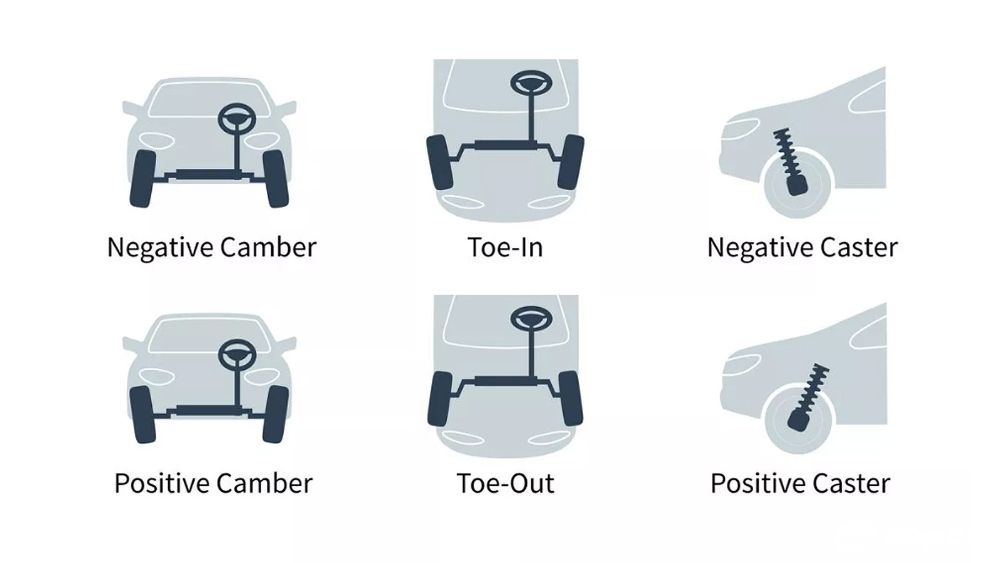
 Too positive camber may be the culprit. There is another reason that is much easier to check is insufficient tire pressure. Pump up the air, align the “atmospheres”, and then make a test run. If there are no changes, go to the service station.
 Any steering problems require an urgent visit to the service station, diagnostics and front camber adjustment, if the problem is not something else.
Many specialists who want not only to help you with the problem, but also to earn money, offer to carry out additional useless procedures. These often include the adjustment of the RS. If you are not sure about the need for the assigned services and do not know when you can refuse and not adjust the wheel alignment, remember:
Don't be fooled by the tricks of car service employees and avoid wasting money. It is better not to skip scheduled diagnostics, be observed by trusted mechanics and get rid of problems immediately.
You can go one of two ways:
Most motorists know how a vehicle behaves with correctly calculated wheel alignment.
Regularly carrying out the procedure allows, firstly, to save money, and secondly, increases driving safety.
In many salons, the procedure has long been computerized, so you can not talk about the accuracy of the results - this is the main plus.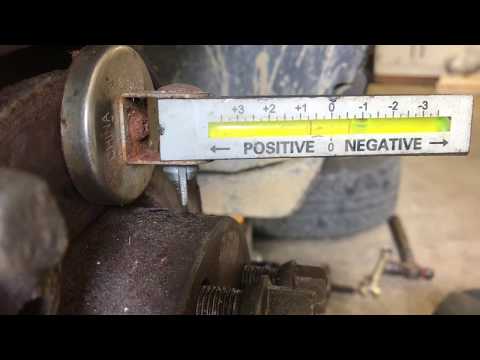 We also note:
The main disadvantage is the following: they rarely come to the service station just for the alignment adjustment procedure. Usually it is offered or even imposed by repairmen, claiming that the car will fall in half at the first turn of the steering wheel. But sometimes it is worth listening to the recommendation, especially if you have not carried out a scheduled inspection for a long time. It is recommended to do it at least once every 30 thousand kilometers.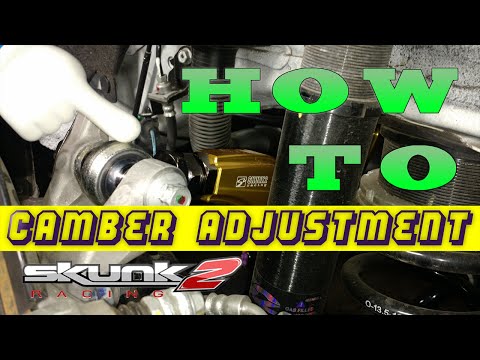
Self-taught, of course, can carry out the procedure as well as specialists, especially if you have all the tools, experience and knowledge on the topic in stock. But without skills, you will only harm the transport and spend even more money on its restoration. There are many disadvantages of self-repair:
The main and, perhaps, the only plus of this option is that it is free.
Indirect causes may be:
After getting into any of these situations, the car may break down, in which it is not recommended to go even to the service station. Otherwise, we recommend regular preventive checks. Best of all - twice a year, because all parts of the nodes wear out naturally and gradually become unusable. Due to the constant vibration, the UUK can arbitrarily deviate.
Even a professional and experienced car mechanic is not always able to set the angles recommended by the manufacturer. This can be prevented by parts that are already worn out and need to be replaced. Their use in the car leads to backlash. It is for this reason that any good master does not take up the alignment of the geometry before he at least conducts a visual inspection of the entire chassis.
Another possible explanation is different body deformations. This is caused by strong corrosion processes on the body, the consequences of an accident that appeared during the operation of a dent.
There is also a nuance that you can even check on your own - these are car tires. They often show uneven wear, bulging, or balance problems. You can correct the situation after a complete replacement of the wheels, or at least their rearrangement. As a result, the car will stop driving or take it away in the other direction. In the latter case, there is only one way out - SRT.
Here are some recommendations:
Sometimes the angles change the set position literally the day after the adjustment. Motorists find such explanations:
Once again, we give advice: check the entire chassis in the complex, and not just the PC indicator. Or contact the specialists, such mistakes are not allowed in the salons.
Do the following:
Procedure:
Let's watch a video in which there is a detailed description of all processes:
The further technology advances, the more devices are created to quickly and accurately check the technical condition of the vehicle.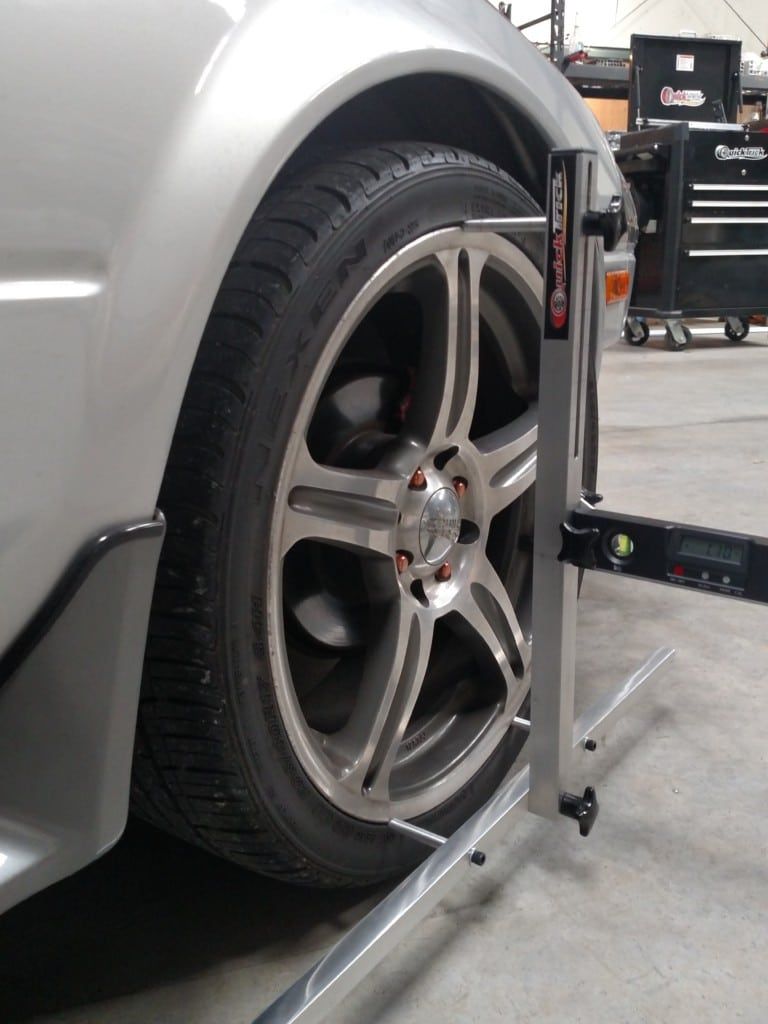 Consider the most popular and effective of them.
The first method that allows you to project the position of tires on the screen and diagnose wheel alignment. To do this, special tubes are attached to the rubber, emitting light beams. There is only one problem - the option is only suitable for diagnosing the front axle.
The laser allows you to get more accurate results and check the condition of the UUK of each part of the suspension. But this system is also a bit of a thing of the past, because it is replaced by the next view.
Here digital sensors are used instead of obsolete emitters for analysis. The received information is automatically systematized and displayed on the screen in the form of diagrams and diagrams. There are several types of stands:
They differ in the way data is transferred and processed.
The software can track wheel movement points, analyze them and compare them with a reference model. This allows you to quickly and correctly set the corners.
In the article, we have discussed how to do wheel alignment correctly, and now you know everything you need to carry out the procedure yourself and will be able to check the results after contacting the service station. Recall that the indicators directly depend on the wear of tires. If the rubber has already worn out, order high-quality tires for trucks in the online store vezikolesa.ru.
Material worked on:
Mikhail Rudnev
Auto mechanic
The chassis of our car must work clearly and smoothly, and it is of great importance to be able to adjust the wheel alignment with your own hands, if you suddenly cannot get urgent qualified help. The angles of location, namely, they are set during this operation, play a big role in ensuring the handling and stability of the car, and also affect tire wear.
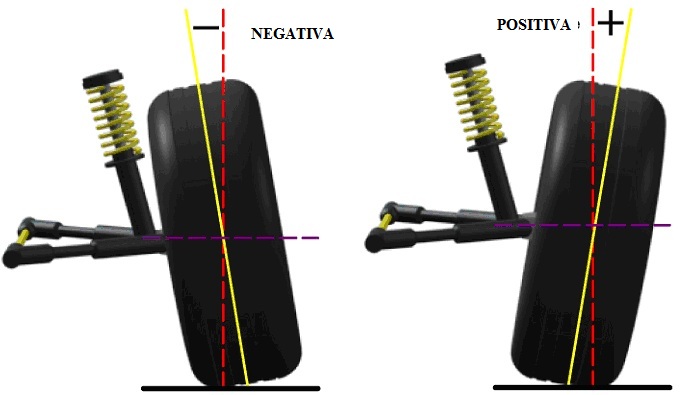
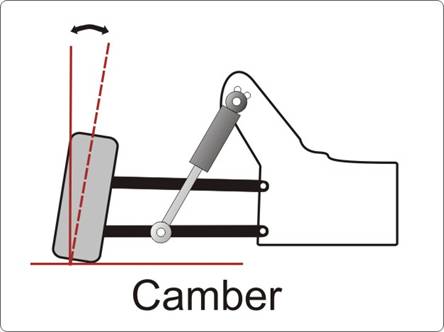
Camber is the angle formed between the plane of rotation of the wheel and the vertical. This value varies during roll or when the vehicle's load distribution changes. In such cases, the correct truck alignment will directly affect the performance of the machine. Convergence is another important indicator, which is the angle between the plane in which the wheel rotates and the direction of movement. In many cars, in addition to the front wheel, the wheel alignment of the rear wheels is also regulated.
In normal camber, tire treads have the best contact with the road surface, and toe-in has the greatest effect on tire wear.
Most often, after a long run, signs appear that indicate a violation of the correct camber and toe angles. You will find visible wear on the rubber, and the car itself will become noticeably less stable. Poor road conditions cause premature wear of the undercarriage and, consequently, the violation of many adjustments.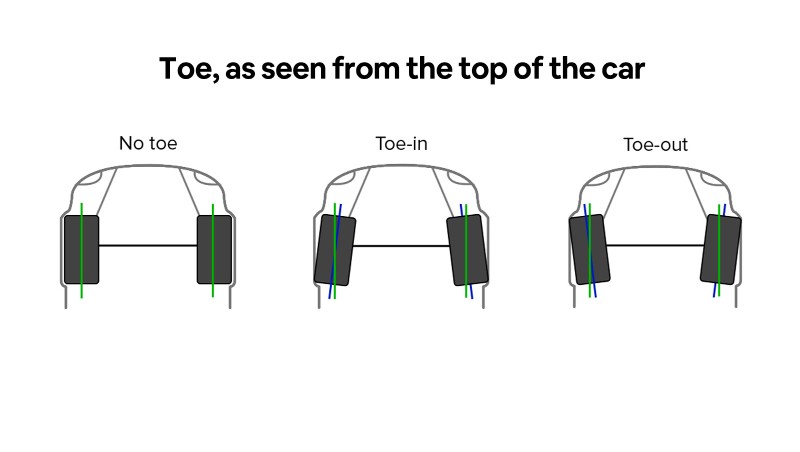 Therefore, after any, even minor, repair in the chassis, wheel alignment is immediately regulated. In addition, this operation is carried out with a change in clearance and a violation of the normal operation of the steering, as well as after a seasonal change of tires.
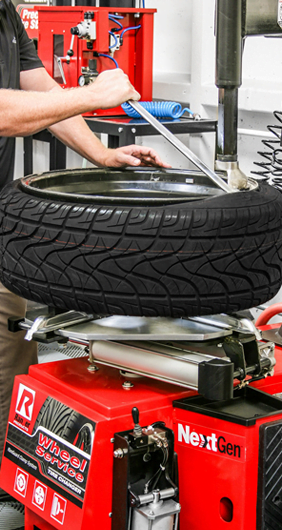
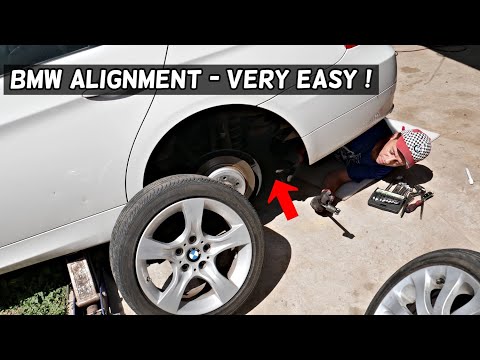
Special equipment is installed at the service station, the alignment on which is adjusted quickly and efficiently. But sometimes situations arise when there is no service station nearby, and this indicator needs to be urgently adjusted. This operation is not very complicated, however, not every driver can perform it, so we will try to help with advice. Do-it-yourself wheel alignment adjustment requires standard locksmith tools and special measuring devices, more on that below.
In order to make all the necessary settings yourself, you need to perform a series of sequential operations. First you need a flat area where there is a car lift or a pit. Before adjusting the convergence, the steering wheel is checked.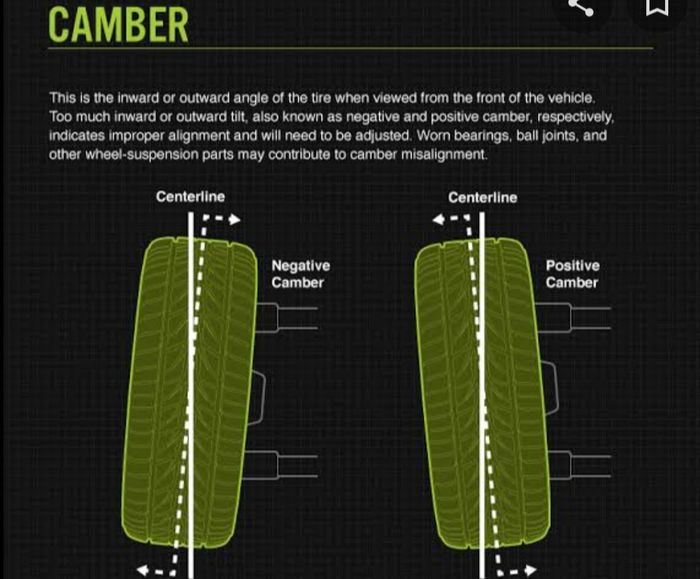 During rectilinear movement, it should stand straight, and the number of revolutions in both directions should match. Tire pressure is brought to the same value.
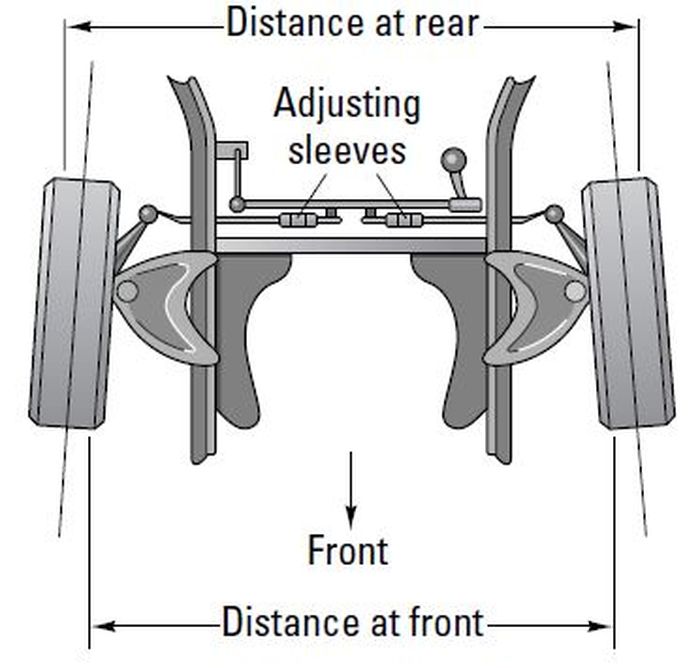
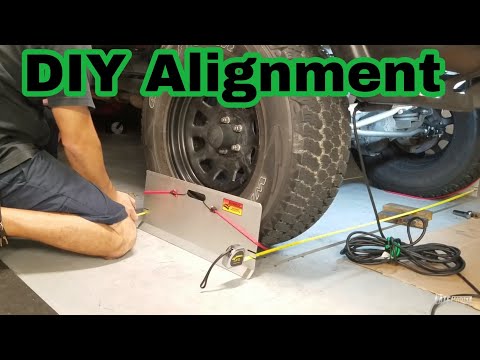
To determine the toe value, the difference between the geometric axis and the points on the rear of the wheel must be calculated. Measurements are carried out using a special chain, which has a ruler, or a tensioner with telescopic tubes, control chains and a scale. How to use these devices and make adjustments, we will consider further. We focus on the fact that the camber is set first, and only after that the convergence.
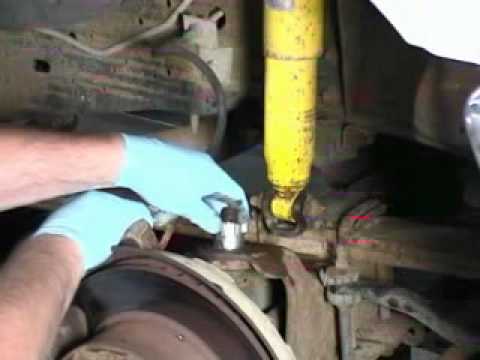
To adjust the camber, the vehicle is lifted up without the tires touching the ground. After that, points of equal runout are calculated on the sidewalls of the tires. Having fixed the suspended wheel over a stationary object, for example, a straight spoke, they push it and monitor the deviations of the rim from this indicator.