Delivery options and delivery speeds may vary for different locations
Sign In
or enter a zip code
Email * Password *
REPAIR & HOW TO
MAINTENANCE
TROUBLESHOOTING
GUIDES
TIPS & TRICKS
ALL ARTICLES WATCH VIDEOS ABOUT US SHOP PARTS CONTACT US
Unbalanced wheels and tires on a motorcycle lead to rapid tire wear, poor fuel economy and increased danger to the rider. For these reasons alone, you should know how to balance your bike’s tires.
But if you’re in the habit of installing your own tires, knowing how to balance motorcycle tires is absolutely essential. Here's how to balance motorcycle tires and wheels.
The first indication of an unbalanced tire is a vibration when riding at certain speeds. That the vibration only occurs at specific speeds and isn’t constant shows that it’s caused by a wheel/tire imbalance and not a mechanical issue. The other sign that a bike’s wheel and tire is unbalanced is accelerated and uneven tread wear.
If your motorcycle has a tire and wheel imbalance, don’t lower the tire pressures to soften the ride, or increase the pressures to try and reduce the effects of the imbalance. Riding on pressures other than those specified on the tires is dangerous, and will heighten the negative effects of unbalanced tires.
Balancing a Motorcycle Tire and WheelTo make balancing a wheel on your motorcycle much easier, first make sure the tire is fitted correctly on the wheel rim. Motorcycle tires have a colored dot (usually red or yellow) on the sidewall. This dot is the balancing mark and indicates the lightest point of the tire. A correctly mounted tire will have its balancing mark aligned with the valve stem on the wheel rim. The most accurate method of balancing a motorcycle wheel and tire is by using a wheel balancing stand. However, you can balance tires with the wheels still on the motorcycle if you absolutely have to.
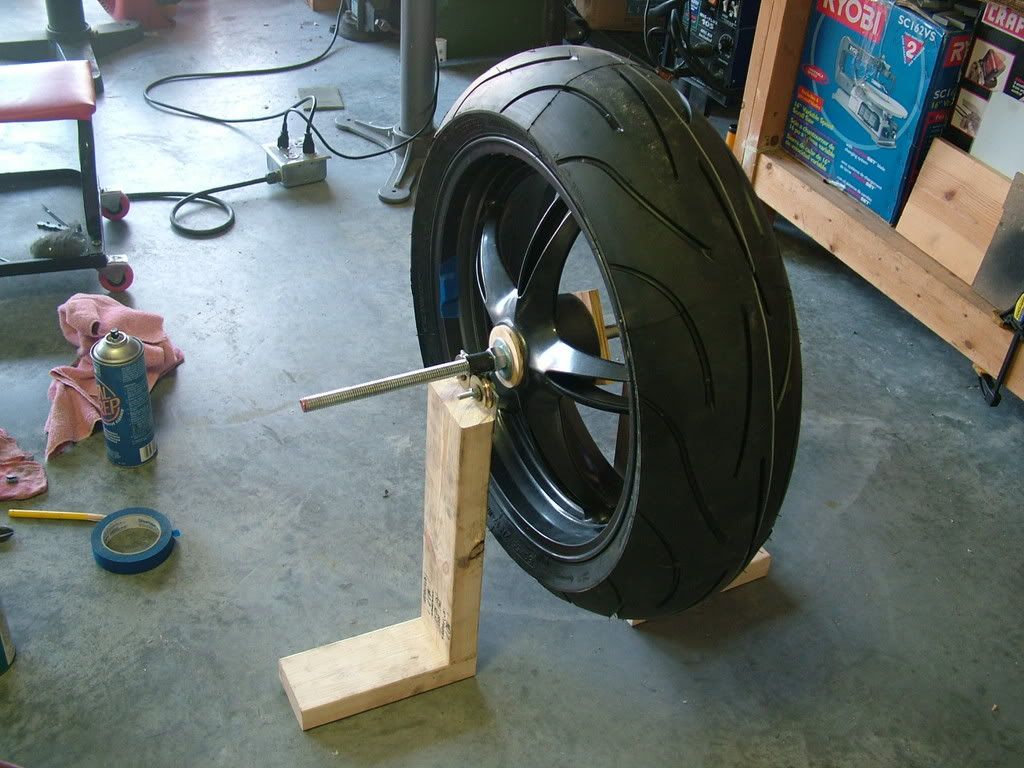
Step 1. Put the balancing stand on a flat, stable surface. Use a level to check the balancer is set correctly.
Step 2. Remove the wheel from the motorcycle.
Step 3. Clean the wheel of any dirt that might affect its balance, which also provides a clean surface for the wheel weights to adhere to. Remove any old wheel weights from the rim.
Step 4. Slide the balancing stand’s axle through the wheel, insert the centering cones into the wheel bearings and secure the cones in place.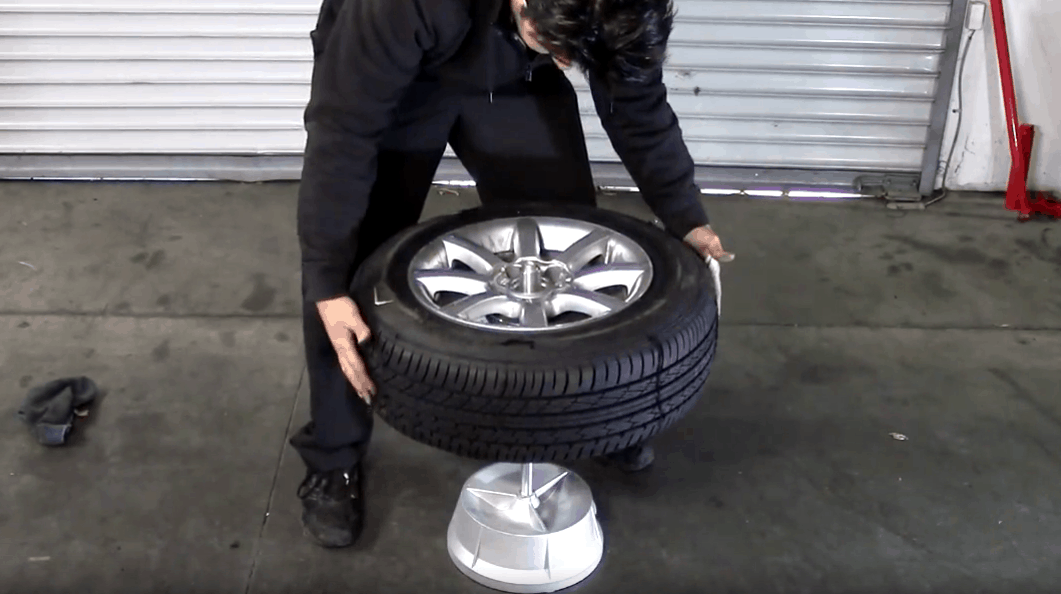
Step 5. Place the wheel into the balancing stand, and make sure it spins smoothly and freely.
Step 6. Gently spin the wheel so it rotates a few times and gradually comes to a halt. The wheel will naturally stop with its heaviest point at the bottom. Mark this point with a piece of tape. Spin the wheel again to check that it comes to a halt with the tape mark at the bottom.
Step 7. Tape a wheel weight to the inside of the rim at the very top of the wheel directly opposite the tape mark. Don’t remove the protective strip from the wheel weight’s adhesive backing just yet, because you may need to add more weights or use a lighter weight.
Step 8. Rotate the wheel 90 degrees so the tape mark is at 3 o’clock and the wheel weight at 9 o’clock.
Step 9. Release the wheel so the heaviest point can again fall to the bottom. If the tape mark falls to the bottom, you’ll need to add more weight to the wheel, and if the side of the wheel with the wheel weight(s) falls to the bottom, you’ll need to remove some weight(s).
Step 10. Repeat Step 9 until the wheel remains in place when you release it and neither side falls to the bottom. This indicates a perfect balance, and when you gently spin the wheel it should come to a halt at a neutral point without the tape mark falling to the bottom.
Step 11. Remove the protective strip from the wheel weights’ adhesive backing and attach then to the wheel rim.
Step 12. Remove the wheel from the balancing stand and reinstall it onto your motorcycle.
Balancing a Motorcycle Tire and Wheel Without a Balancing StandFront WheelStep 1. Remove the brake caliper and (if applicable) the speedometer cable so there is nothing dragging against the wheel. If anything prevents the wheel from rotating freely, you won’t be able to accurately balance the tire.
Step 2. Loosen the front axle pinch bolts and the axle nut so there’s nothing binding against the wheel bearings.
Step 3. Clean the wheel.
Step 4. Follow Step 6 through Step 11 from the previous section to balance the wheel.
Step 5. Tighten the axle nut and pinch bolts. Reinstall the brake caliper and speedometer cable.
Rear WheelStep 1. Remove the brake caliper, and the chain or belt from the rear sprocket.
Step 2. Follow Step 6 through Step 11 from the previous section to balance the wheel.
Step 3. Reinstall the chain or belt over the rear sprocket, and reinstall the brake caliper.
As mentioned earlier in this article, unbalanced wheels and tires can lead to rapid wear on your bike’s tires. Watch the video above to learn how to inspect motorcycle tires for tread wear.
body
Tips And Tech
Balance is key
By Mark Zimmerman
May 11, 2016Whenever a new tire is mounted, the wheel should be dynamically balanced. However, if you’re doing it yourself that might not always be an option. Here’s the quick and dirty way to static balance your wheels.
Make sure the wheel is free to spin with no drag on it, if you're balancing the front wheel, you can usually just unbolt the caliper(s) and, if need be, the speedometer cable. If it's the rear tire, you'll have to remove the chain or belt as well. If you've got a shaft, or it's too much hassle to remove the rear drive, you'll need to build or buy a balance stand to support the rear wheel.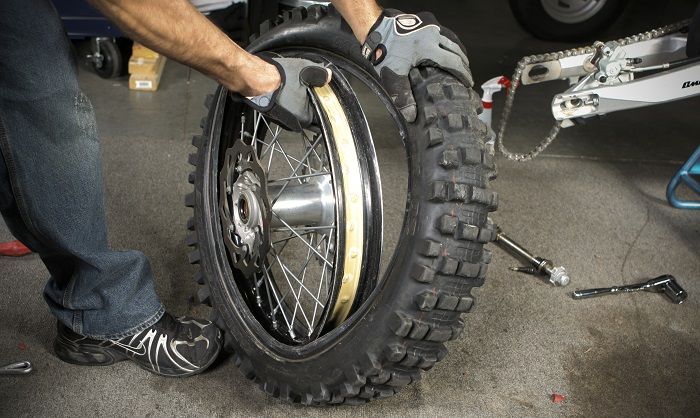 With a little imagination a serviceable one can be carved out of 2x4s or angle iron.
Allow the wheel to rotate slowly pulled only by its own weight. If it won't move on its own, rotate it 90 degrees. If it still won't rotate it's either in balance or there's some drag on it.
Assuming it's not in balance and there's no drag on it, give it a light spin, the wheel doesn't have to complete a dozen revolutions, put it should rotate a time or two. The wheel should come to rest with the heaviest spot at the bottom. Most of the time this will be the valve stem portion of the tire.
Mark that portion of the tire with a crayon for reference and recheck it, if the same spot returns to the bottom you're ready to add weight. If it doesn't repeat the test, if a different spot comes to the bottom each time, the wheel is in balance.
Add some weight to the spot opposite your heavy spot, how much takes some feel.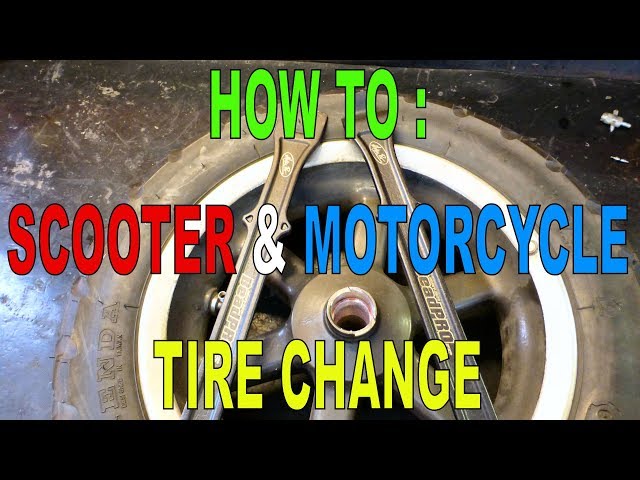 If the wheel moved very slowly towards the heavy spot maybe a 1/4 of an ounce, if it moved quickly maybe 3/8 to a half. You can use solder, stick on or spoke type weights. If you use stick on weights use some masking tape to hold the weight in place until you're sure it's the correct amount, before permanently sticking it to the rim.
Repeat step #4, if the wheel returns to the heavy spot add a little more weight to the light spot. If it comes to rest at the original light spot remove a little weight. If it comes to rest at a random spot, retest. If it comes to rest in a random spot each time or if it'll stay in any given position you place it in (presuming there's no drag), then it's in balance.
By the way, because their balance is affected by the driveline, rear wheels, are as a rule somewhat less sensitive to balance. I'm not saying you shouldn't balance the rear, but I am saying it's not quite so crucial a matter as the front if it's not perfect.
Tips And Tech
How To Be a Woman in a Motorcycle Dealership, a Guide
Tips And Tech
5 Questions to Ask Before Buying a Used Motorcycle
Tips And Tech
Tips on Installing a Helmet Communication System
Tips And Tech
How to Prepare Your Motorcycle for Winter Storage
Tips And Tech
All the Motorcycles Offering Apple CarPlay and Android Auto
Tire pressure
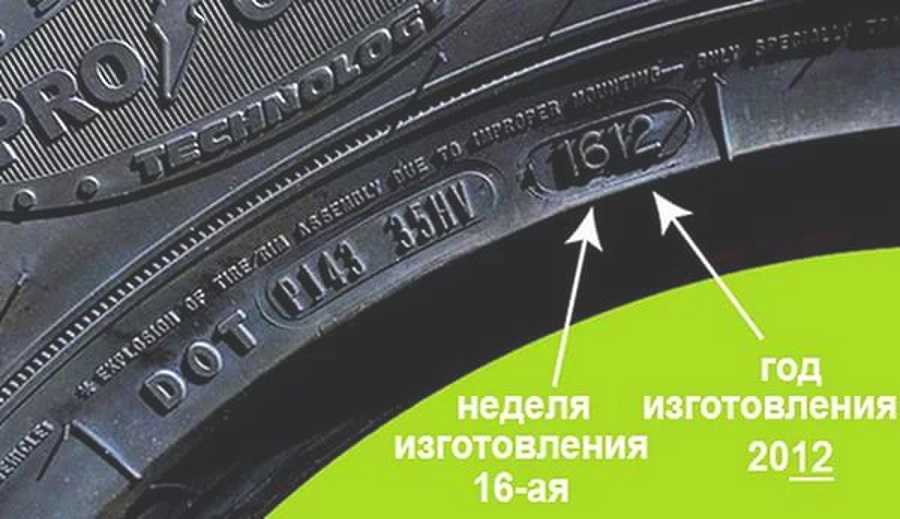
Sooner or later, the owner of a motorcycle is faced with the need to replace the rubber on the disks of his steel horse. Doing it yourself, even if you have never encountered this problem before, is simple. But one important point should be taken into account - balancing motorcycle wheels, which is almost impossible to do with your own hands. So what to do when you can handle it yourself, and when to resort to the help of specialists?
A motorcycle is a very versatile vehicle, depending on its type, tires with different treads can be used. Rubber for modern two-wheeled vehicles is:
Rubber of this type is purely civil, designed to be able to move at an average speed on public roads. The tread has the necessary number of sipes to ensure reliable grip even in heavy rain.
Road-sport tires warm up quickly, allowing the rider to maintain increased speed with confidence. This comes at the cost of reduced maneuverability in the rain.
Touring motorcycle tires allow you to feel good on the pavement, but not be afraid to move off it if necessary. Here the tread has a clear uniform pattern, the directionality of which is designed to facilitate movement in the mud.
Real off-road tires behave very badly on asphalt, they are “noisy”, uncontrollable in the rain. But the directed grooves of the tread are able to “gnaw” the ground, self-clean from dirt, and allow you to get off the road.
The type of tires is selected based on the conditions of use of the motorcycle, its power, season.
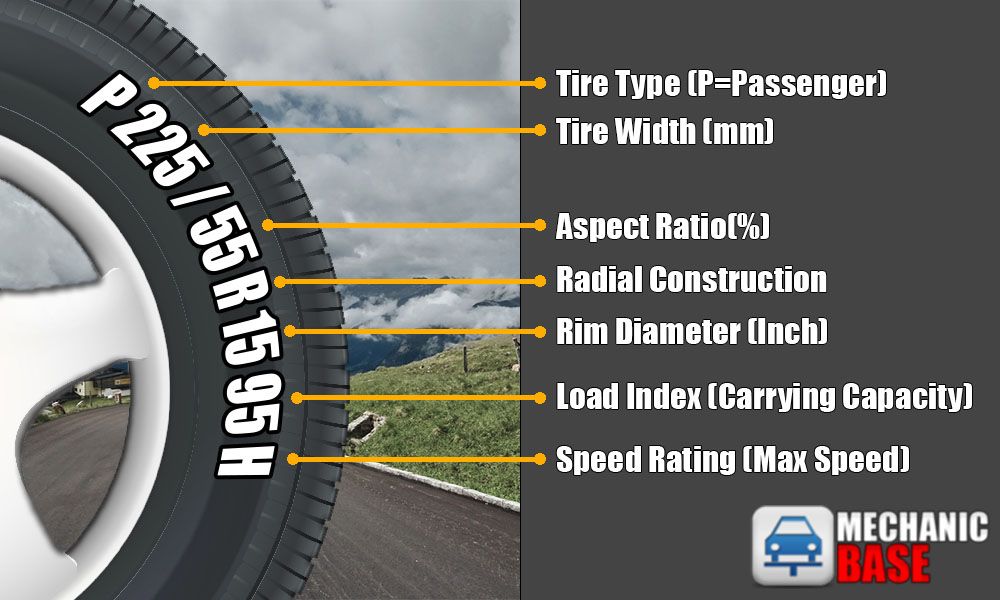
You can learn more about tire marking HERE, and how much to pump according to the motorcycle model HERE!
In the operation of motor vehicles, a characteristic feature is that 99% of their owners do not ride in winter, therefore, with the change of season, tires are not replaced on a motorcycle. Although studded tires for motorcycles are produced, they are not very popular. Based on this, the change of rubber occurs in several cases:
Tire rupture or puncture is especially dangerous if tubeless tires are used on a motorcycle, the wheel may explode, which is fraught with loss of vehicle control. The reason for the appearance of cracks is usually driving on road tires over rough terrain, or driving onto curbs, steps, etc. And regular loads and high mileage contribute to an increase in cracks, which leads to the fact that the tire becomes unusable.
Due to natural aging, tires must be replaced when the motorcycle has not been used for a long time. Such wear of rubber contributes to a long downtime on flat tires, or riding a motorcycle with overload. In the latter case, the tire at the point of contact with the road takes an unnatural shape for it, “breaks”.
Tread wear limits for each tire model are prescribed by the manufacturer. At the same time, for different models, depending on the type of tire, this value can be radically different. Therefore, when choosing wheels for your motorcycle, it is worth making allowances for the likely riding conditions. It must be remembered that traffic rules regulate the minimum allowable limits for the remaining tread. Thus, the height of the tread pattern for legal movement on public roads should not be less than 0.8 mm.
1. To replace tires, you will need a very simple set of tools, tools, which are best purchased once and then used as needed. First of all, in order to pry the rubber, you will need a mount, and preferably two, since it is much more convenient for one, without an assistant, to be controlled by two.
2. A soapy solution will come in handy, it will help put the new rubber on the rim, make it easier to “pull” the old one off it. Without it, you can accidentally break the tire, if the old one deteriorates, then it's okay, it will be a pity for the new one.
Soap and water must be mixed in unequal proportions to form a thick liquid.
Special lubricants can be used instead of a soap solution, but this is not really practical, they are much more expensive, and they are needed every few years.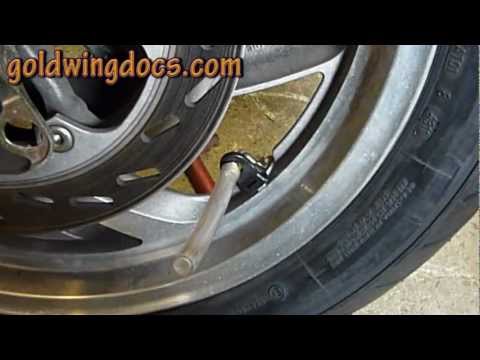
3. In addition, you will need a special cap to unscrew the nipple, quickly release air from the wheel.
4. You also need the usual set of tools. Replacing wheels on a scooter or motorcycle is more difficult than on a car, where 4-5 bolts need to be unscrewed to remove the tire. Here you have to tinker, it is advisable to get instructions from the manufacturer for the correct analysis of the necessary nodes.
If you briefly go through the tire replacement algorithm, it consists of the following items:
Now, in order. First of all, you need to deal with removing the wheel from the motorcycle, you have to change the rubber on the front and on the rear wheel. It is better to first pay attention to the factory documentation, so as not to spoil something out of ignorance. It must be borne in mind that removing the front disc is easier than the rear one, for this you do not need to dismantle the chain and other drive mechanisms. Let's take a look at the front wheel as an example.
Motorcycle tire replacement.
The first step is to loosen the wheel axles while the vehicle is still on the ground. After that, you need to put the motorcycle on a kind of stand so that the front part is hung above the ground. In this case, the bike must be firmly fixed to prevent it from falling while it is standing without the front wheel. Next, you need to carefully unscrew all the fasteners, dismantle the disk with the tire from the motorcycle.
The next step is to release the air, in order to do this you need a special cap, on the other end of which there is a “fork”. She can unscrew the nipple from the valve of the chamber or tire. After the air is deflated, you can proceed to dismantle the tire from the disk.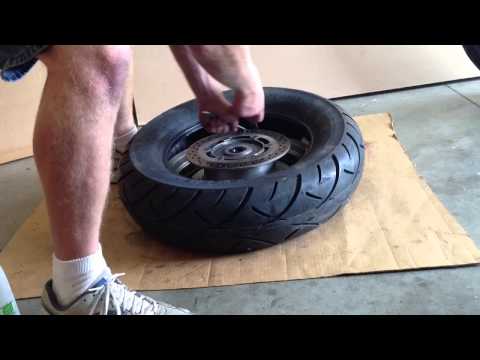 Separating the flat of the tire from the rim can be tricky. If the rubber is no longer subject to use in the future, you can gently tap it with a heavy hammer, or simply “kick” it with your feet. Doing this is important so as not to damage the rim.
Do-it-yourself disassembly.
After the tire still "unsticks" from the rim, take a pry bar and pry it, but this must be done carefully, otherwise the disc may be damaged. It's ideal here to have a second pry bar so that you can go around and take the tire out. Having done this, carefully remove the camera, try not to damage it. After that, you can again go around the mounts in a circle to finally remove the rubber.
First of all, if the wheels are spoked, check the condition of the rubber that protects the tube from the spokes, replace if necessary. On a new tire, you need to pay attention to the tread of motorcycle tires, find an arrow that indicates the direction of its movement. There is also a mark that shows where the camera nipple should be located.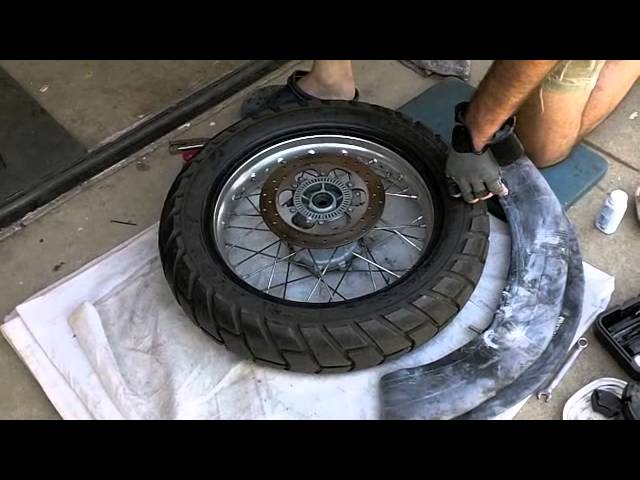 Lubricate the new tire liberally with soapy water, fold one edge over the rim, then insert the tube, lay it down, straighten it and then start the second edge. Now screw the nipple back into the valve, pump up the wheel and assemble in the reverse order. The tire pressure values are usually found somewhere on the motorcycle plates. The final tightening of the fasteners should be done on a motorcycle already installed on the ground, it is absolutely impossible to do this on weight.
Inserting the tube into the tire.
If the wheel has been in use for a very long time, separating the rubber from the rim can be a very difficult task. At home or in the garage, you can try to take any action, use the tool, but what if the repair needs to be done on the road? It is unlikely that there will be a mount for repairs with you, you will have to ask for help from passing cars. If you are traveling not alone, but with a company of motorcyclists, here you can apply a kind of "life hack".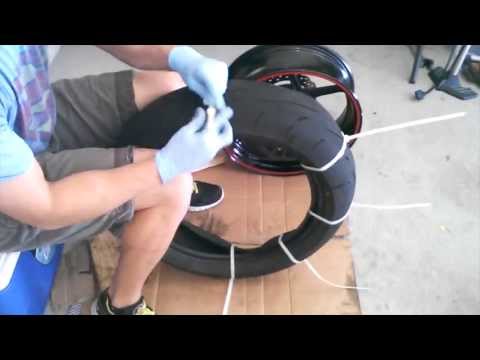 You need to open the footboard of another moped, put it on the rubber of the removed wheel, using it instead of a mount.
Alloy motorcycle wheels, especially those with spokes, bend extremely easily when hit by bumps in the road. You need to be aware that a severely deformed rim cannot be repaired, it is better to replace it. And it is generally not recommended to repair spoked motorcycle wheels on your own, because you may encounter such problems:
Non-repairable motorcycle wheel.
If there is a desire to repair spoked wheels on your own, then you should understand that the ideal - "zero" - radial runout may be unattainable, and you need to focus on generally accepted tolerances:
 2 - 2 mm for choppers, enduro and domestic motorcycles ;
 The whole point of the adjustment is to change the position of the rim relative to the wheel hub by shortening or lengthening each spoke. You need to understand which of them are subject to adjustment. To change the length of the spokes, you will need a special wrench and a stand to check the runout. Having fixed the disk in it, you need to place a piece of chalk next to it and turn the wheel. Where the chalk leaves a mark on the rim, this will be the most protruding area, although on a heavily deformed disk the “eight” will be visible to the eye.
Spoked motorcycle wheel.
Now you need to loosen the spokes on the side that does not have a mark, and on the opposite side, tighten them. In the central part of the deformed arc of the rim, tighten the spoke by 4-5 turns and, moving in both directions, tighten each of them a quarter of a turn less.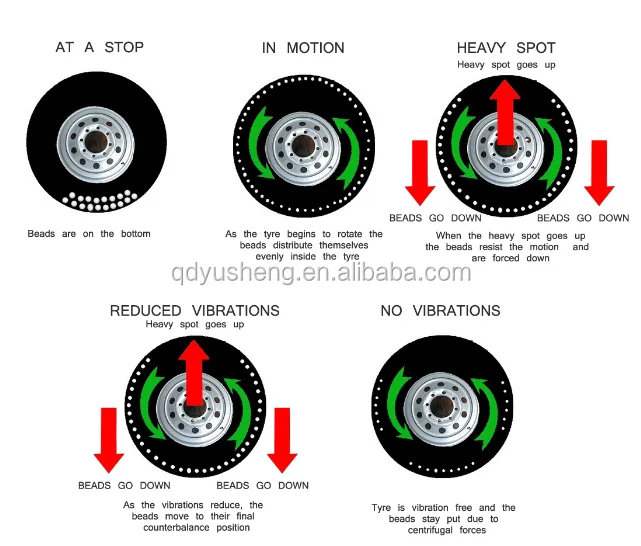 After that, you need to check whether those weakened knitting needles have stretched by themselves, on the other hand. If not, the tightening must be repeated in the same sequence.
After all the steps, you will have to put the wheel back into the stand and check how the situation has changed. You probably won't get it right the first time. It should be borne in mind that for such actions you will have to disassemble the wheel, disassemble the motorcycle, all this will take a lot of time. If you need a scooter every day, and you have never encountered such a repair before, then it is definitely better to turn to specialists so as not to waste your time in vain.
DIY needle adjustment.
There are pros and cons both in independent replacement and when contacting specialized motorcycle tire shops. The positive points when replacing with your own hands are:
However, there are obvious disadvantages. Firstly, you will have to spend more time, especially for those who do it for the first time. You also need to buy all the necessary tools. And if there is no garage or other premises, then you will have to do it on the street, which is not very convenient. And the biggest disadvantage is that you don’t have a wheel balancing stand in your garage, and you won’t be able to make a full and high-quality tire replacement. However, there is one important point - unlike a car, a motorcycle does not have a spare tire, and on a long journey, the experience of replacing it yourself will be very useful.
On the other hand, by turning to professionals, you will receive:
Despite the advantages of doing this task on your own, not every motorcycle owner is ready for this. Therefore, it is really easier for many to turn to specialists. Plus "tire fitting" in the presence of equipment and experienced staff. There, the motorcycle is fixed on a special stand, both wheels are immediately removed. The wheel breaking stand makes it easy to remove the tire from the rim, and the wheels can be immediately balanced. But even here there are drawbacks, unlike car workshops, which are everywhere, motorcycle “tire changers” are not so common. In a small town, you still need to try to find such a place. The price is also associated with low prevalence - such services are slightly higher than similar ones for cars.
Which rubber should I choose with spikes or Velcro?
Operation of winter tires
Changing wheels on a car
Repair, replacement of studs on winter tires, studding
How to choose winter tires for crossovers
Replacement of summer tires for winter. Tips
Tire pressure sensors
Which wheel locks to choose?
Truck tire repair
Bicycle tire marking
How to install a tire in the direction of the tread pattern
What is the life of the tires on cars
Wireless charging smartphone holder
Unique in-car smartphone holder with…
↑
The wheels of a motorcycle must be balanced in the same way as the wheels of a car.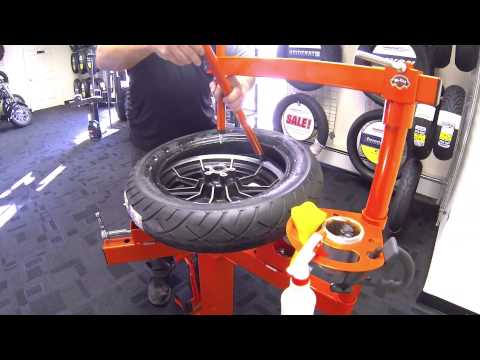 This is a simple operation that you can do at home with the help of a special tool if you wish, and it will prevent vibrations, especially when we shoot at high speed. You can also entrust this work to a specialized workshop.
The most common cause is usually poor tire condition or insufficient tire pressure. Remember to check the pressure on cold tires.
faster wear of shock absorbers, bearings, steering rods and tires, deterioration of vehicle handling and increase in braking distance, deterioration of road grip, decrease in driving comfort.
Wheel bearings have an average life of 136.000 to 160.000 km (approximately 136.000 to 160.000 miles).
There are several easy ways to diagnose the handlebars on your bike. Performing a visual inspection is the easiest way to determine if the rods are damaged or not. If you notice a lack of lubrication when braking, they may be damaged. The first thing to check is the chassis.
Tires should be checked when they are cold (or when they have traveled less than two kilometers).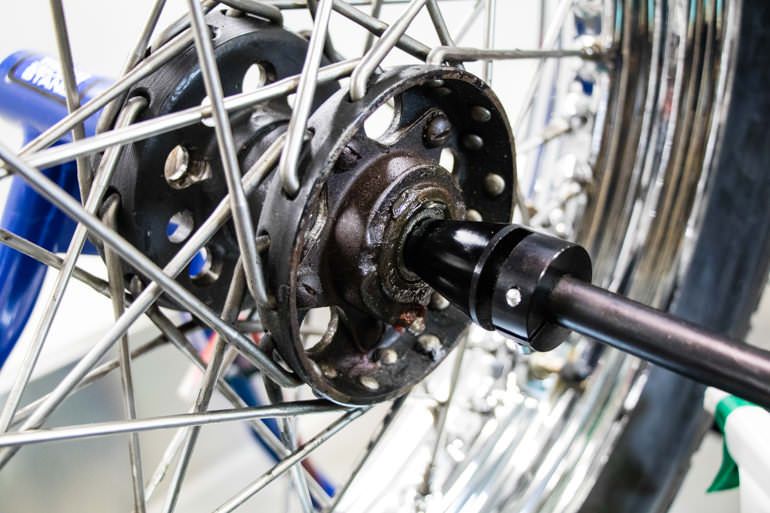 If you need to drive more than two kilometers to check the air pressure, measure the pressure before leaving, and when you arrive at a service station equipped with an air pump, add the necessary pressure.
All vehicles have a tire pressure label. It is also most commonly found on a label on the driver's door and may appear on the gas cap or in the vehicle's owner's manual. This is the correct way to test it for accuracy.
One of the main reasons a motorcycle loses power is that it is poorly carbureted, which means the engine is not getting the power it needs. In 80% of cases, this is the reason, although there may be others that we will see below.
Experts recommend aligning the car's steering every 15.000 km or when new tires are installed. Other reasons to adjust the steering are: If the steering wheel is difficult to turn. If the car goes one way more than the other.
Unbalanced tires can cause vibrations that lead to driver fatigue, uneven or premature tire wear, and unnecessary wear to the vehicle's suspension.
The cost of wheel balancing can be from 10 to 20 euros per tyre; although most specialty stores include it in the final price if you bought tires from them.
This is usually because the fork and/or shock has very little rebound (damping), so they work in the hardest part of the travel, i.e. from the third part down, so when getting one hole after another, they never there is no full tour.
As a general rule, every five years or 60,000 kilometers it is recommended to replace the shock absorbers with new ones.
If we notice that when the friction wheel rotates, a sound is heard (something is scratched), this means that the wheel bearing is in poor condition and must be replaced. We can also insert a wheel.
If the condition of the bearing is not satisfactory, the consequences may be damage to the brake system and jolts in the chassis, which are perceived as vibrations and which, in more serious cases, can cause the vehicle to go off track.
By active safety features on a motorcycle, we can understand that they all work optimally to prevent accidents of any kind; in the case of passive safety, it consists of components that minimize the consequences when a collision is unavoidable.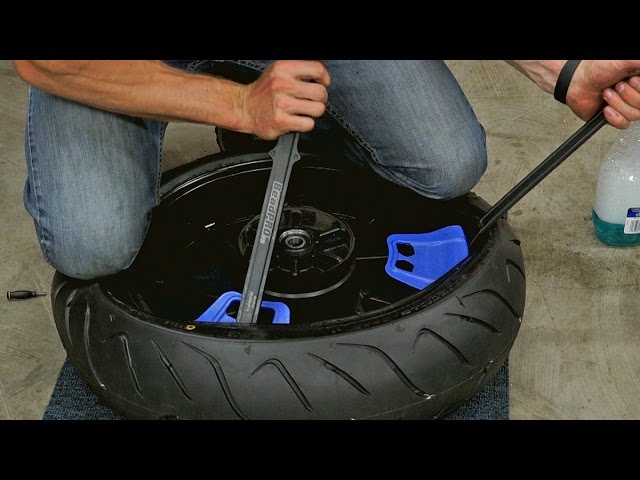
It is normal that this is due to the weakening that the anchors and existing connection points between the various elements and, above all, between the ball joints of the suspension have acquired over time. It can also be related to the steering knuckle or shock absorber tie rods.
To find out what air pressure is right for your tires, read your vehicle manufacturer's manual, on the sticker on the driver's door frame or in the glove box.
This is an abbreviation for pounds-force per square inch, abbreviated as psi for "pound-force per square inch", which is the Imperial or Anglo-Saxon unit of pressure.
It is important to note that this is usually not noticeable when the tire is not properly inflated. When you see a flat tire, it means that it is severely underinflated, much more than it should be. An improperly inflated tire can cause many problems, primarily safety related.
Answer to the second question: wait 15 minutes and the tire will be ready for cold pressure.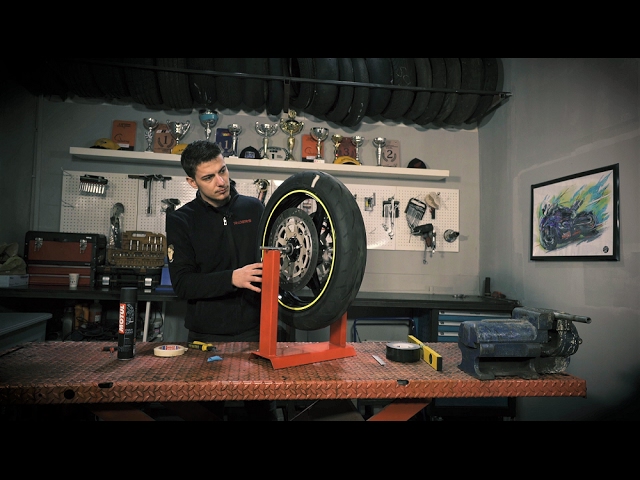 Tip: Be very careful with brake discs, after a good section of curves with them they burn like hell, as we were able to verify in our own skin due to the rush of the test.
In this sense, it is important to know that the new motorcycle will not develop its maximum speed in the first kilometers precisely because of the lack of shrinkage. And it should be emphasized that if this process is not followed, the life of the engine will be shortened, forcing you to change parts due to premature wear.
Gallardo explains that usually when a motorcycle stalls at full throttle, it is due to the wrong mixture of gasoline and air, which causes an explosion inside the engine's combustion chamber.
The main suspension angles to be measured and adjusted are: caster angle, camber angle, toe and traction angle.
Shock absorbers, springs, ball joints, tie rod ends, etc. can be components that are in poor condition and will eventually damage tires due to their poor performance.