Home
Shelves
DIY Tire Rack Plans
Jack Sander | Shelves, Storage |
This step by step woodworking project is about diy tire rack plans. Saving space in the garage is important, especially if you have several cars. A good starting point would be to build a nice tire rack, so you keep them organized. My plans come with step by step instructions and you can easily adjust all the dimensions to suit your needs. See my other DIY projects HERE.
We recommend you to invest in the best materials you could afford. Therefore, you should buy weather-resistant lumber, such as pine or cedar. Always take accurate measurements before adjusting the size of the components at the proper size.
Drill pilot holes trough the components before inserting the wood screws, to prevent the wood from splitting. See all my Premium Plans in the Shop.
building-a-tire-rack
Building-the-sides
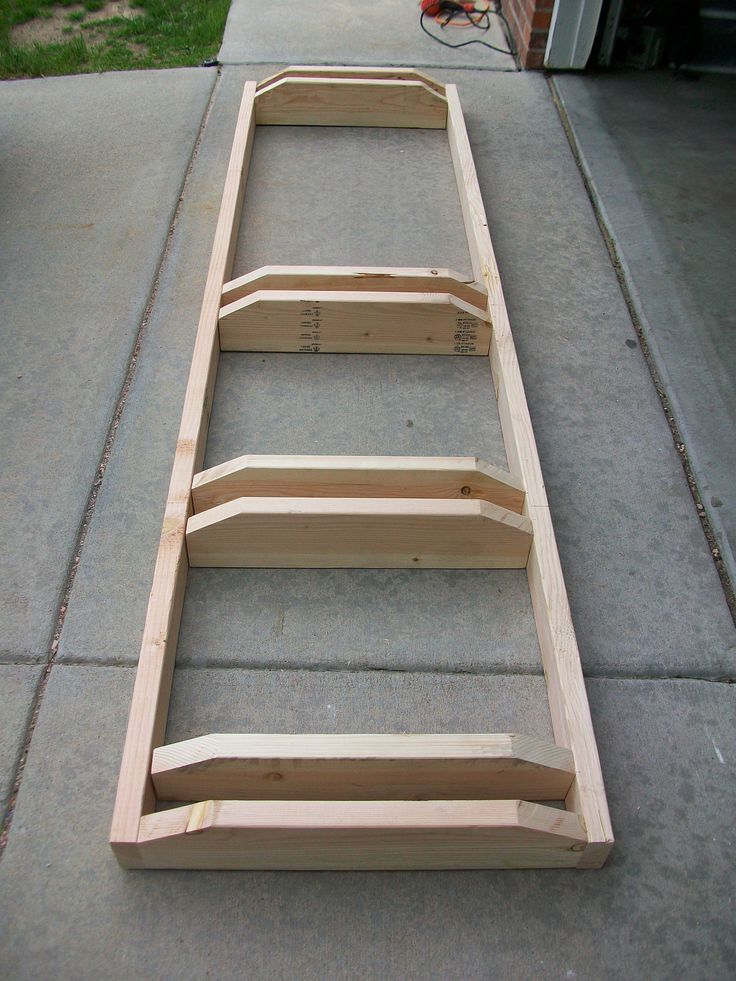
The first step of the project is about building the sides for the rack.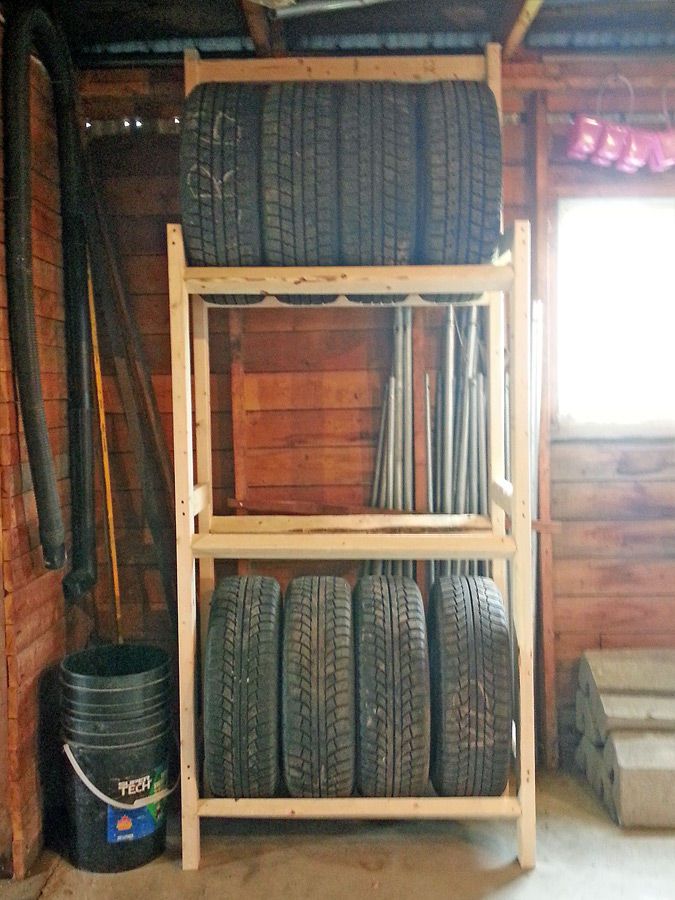 Cut the components from 2×4 lumber at the right dimensions. Drill pocket holes, as shown in the diagram. Align the edges flush, making sure the corners are square. Insert 2 1/2″ screws to lock everything together tightly.
Assembly-the-tire-rack
Afterwards, you need to assemble the tire rack by attaching the horizontal components. Drill pocket holes at both ends of the 43″ long supports and insert 2 1/2″ screws. Add glue to the joints and make sure the corners are square.
How-to-build-a-tire-rack
Fill the holes with wood putty and smooth the surface with 120-220 grit sandpaper. Apply a few coats of paint or stain to enhance the look of the project. Remember that you can easily adjust the size of the rack to suit the dimensions of your tires.
Diy-tire-rack-plans
If you want to keep your tires organized and to save space in your garage, check out this project. If you like my project, don’t forget to SHARE it on Facebook and Pinterest.
Smart Tip: Don’t forget to share your projects with me, as I love seeing what you guys are working on. Send me the pics HERE. In addition, take a look over the rest of my DIY projects HERE.
Get PDF Plans
Thank you for reading our project about diy tire rack plans and I recommend you to check out the rest of the projects. Don’t forget to LIKE and SHARE our projects with your friends, by using the social media widgets. SUBSCRIBE to be the first that gets our latest projects.
error: Content is protected !!
Categories
Blog archive
Popular blog tags
Secure Rooftops with Access Ladder Guards We Stay Late, So You Don’t Have To…
At Unistrut Service Company we like to say, "if you can imagine it, you can probably build it with Unistrut.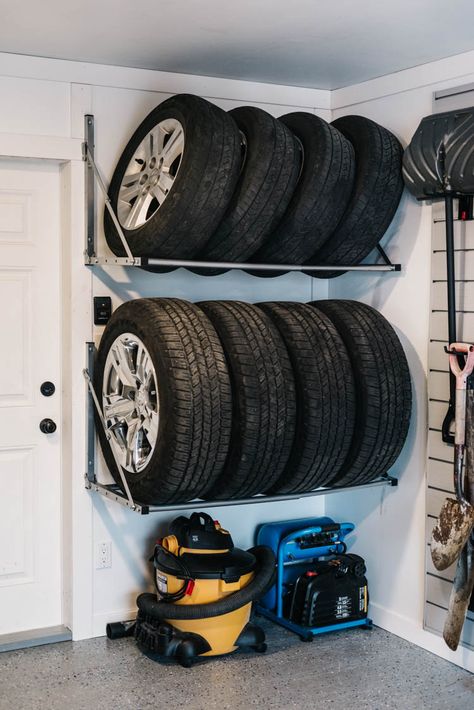 " One of the best parts of the versatility of our product is seeing how far the imagination takes our customers. For Tom B. in Albany NY, this means all the freedom to design his racing garage exactly how he likes.
Racing for around 20 years, Tom used Unistrut to design and complete tire racks for his racing garage. Utilizing a handful of products, Tom built a 40+ tire storage rack fairly easily. One additional benefit of storage systems such as these is adjustability. If your needs change, the material can be reconfigured and re-used to make a new storage rack.
As for the system itself, you can see in the photos below, the racks are made of mostly our P1000T channel. Our angled P2484 fittings support the horizontal struts and P1031s are also used to make strong connections. Tom also included red plastic end caps to match the color-scheme of his garage.
P1031:
P2484:
P2860-10-VY:
This application is just one of the countless creative ways our customers use Unistrut. Thanks to the wide range of channel and fittings found in the Unistrut Engineering Catalog, you too can make a tire rack or other garage storage system with ease. Unistrut structures are easy to design and install, and best of all, our service representatives can lend a hand with anything you’ll need along the way. See what you can come up with today!
If the tire changer is far away and you have time to make a custom car tire changer, then read how to do it. Nothing complicated, but the result is no worse than at the service station.
Table of Contents
With a simple homemade tool made from scrap metal, changing a tire on a wheel rim is no problem. Even a novice auto mechanic will cope.
Read also: Armature bender from a connecting rod with a finger and scrap metalA self-made machine as a reduced copy of the factory one allows you to work with wheels of different diameters in manual mode.
The efforts of special mounting devices are quite large, so it is better to firmly attach the homemade tire fitting to the surface.
A detailed process of manufacturing a tire changer and the features of its operation can be seen in the video below.
#1 DIY home tire changer / tire home with their own handsUsing a homemade tire changer, you can quickly disassemble and bead the car wheels with your own hands.
Thus, when changing tires seasonally, as well as in case of their repair with punctures and cuts, there is no need to go to the service station - tire fitting work can be done in your garage.
Read also: Crowbar for laying laminate from improvised materialsChannel sections can be used as a base.
Cut three blanks to the desired length and then weld them together. We clean the welds with a grinder.
We also recommend reading an interesting review article on the topic: a home-made device for straightening a car body and removing dents. This homemade product will come in handy in any garage.
The next step is to weld the round tube post to the base. A piece of the rim is rigidly attached to the upper part of the rack by welding.
Read also: Garbage can with a hinged lid from an old gas cylinderA car wheel will be mounted on this "mushroom" for further disassembly and flanging. To perform tire fitting work, you will need a “mounter”, which can also be done by hand.
In addition to the rack, a lever with a stop is attached, with which it will be possible to tear the tire off the disc itself.
After the device is assembled, all that remains is to clean the metal with a grinder with a petal circle and then paint the homemade product.
For details on how to make a tire changer with your own hands for a garage, see the video on our website.
TIRE FITTING WITH YOUR HANDS - REAL???Andrey Vasiliev
Ask a question
Content of Article
Many owners of empty garages sooner or later think about the rational use of the premises. Some use it as a warehouse for various things, and some seek to organize a profitable business that will constantly or seasonally generate income.
In this article we will talk about tire fitting in the garage, how to open this type of activity and what equipment you need to have.
Any own business begins with the registration of permits in the administration of the garage cooperative and tax authorities. First of all, you need to register as an individual entrepreneur and regularly report on your activities.
If you decide to start your work illegally, then if the tax inspectors come, you will have to pay a decent fine and still formalize your activities.
For your information. The price you pay for illegal work can be many times higher than the profit, which at the initial stage can be very low until you acquire regular customers.
The dimensions of the room at the initial stage do not matter, however, it must meet the following requirements:
Another important point is the location of the garage. The best option would be the location of the garage near the gas station or the roadway with the possibility of free arrival of vehicles. A large garage cooperative will also be an advantageous place.
Please note. If the garage is located far from the road in a place of minimal human activity, then you should think carefully before opening a tire shop. In this case, it would be better to organize seasonal storage of tires or rent a garage.
Tire Fitting Equipment
In order to provide quality service and get regular customers, you need to equip the premises and purchase equipment that will match the services you provide. An example of arranging a garage is shown in the photo above.
Of the mandatory equipment you will need:

For your information. Tire fitting equipment is quite expensive and at the first stage it is recommended to rent it. You can find equipment that is rented with the possibility of subsequent redemption.
If you decide to buy new equipment, it is better not to regret and purchase units from well-known manufacturers. With a limited amount of funds, you can opt for cheaper Chinese-made machines, however, under heavy loads, the equipment may fail.
Each machine must have instructions for use and safety regulations for operation.
Advertising sign to attract customers
If you do not have experience with tire changing equipment, you will need to look for a qualified person who will do all the work himself. If you plan to do all types of work with your own hands, without experience, then you can take an internship at a large service center or hire a specialist for a while who will carry out all the work and at the same time share experience.
Important. In cases of hired workers, it is not uncommon for workers to provide services without recording part of the income. In order to avoid this, carefully select staff and establish a trusting relationship with each other.
Once you've set up a tire garage, hired staff, and officially started working, you need to start an advertising campaign to get people to know about you. You should not save money on advertising, because at the first stage your income directly depends on it.
Advertise in local newspapers, place ads on city websites and car forums. Install advertising signs of the appropriate content and be sure to make a sign for the garage itself.
It is very important to provide high-quality and fast services, this will help you get regular customers who will recommend your services to their friends on the principle of word of mouth.