Posted by Jefferson Bryant Know How
Flat tires tend to happen at the worst time in the worst places. If you are on the road or outside of normal business hours when your vehicle has a flat and the spare is missing or no good, you might feel stranded, but there is an option—a tire plug kit. This is something that anybody can do, you just need the right parts.
Liquid tire repair might get you down the road, but it could make your tire repair difficult and possibly damage the TPMS (Tire Pressure Monitor System) unit inside the rim itself depending on the formula. The best solution for an emergency tire repair is a tire plug. Made from cork and a gooey adhesive that keeps it place and seals the tire, a tire plug repair is an excellent way to get your car back on the road until you can get to a tire shop for a proper internal patch.
Installing a plug in your tire works for pierced tread area only. You cannot fix sidewall damage, compression breaks (from potholes, gravel roads or curbing) or any other type of catastrophic tire damage. The most common road hazards you will find are punctures from nails and screws. Fixing these issues are perfect for the good old fashioned tire plug. If you are wondering how long does it take to plug a tire, then the answer is just a few minutes. Most of the time is spent preparing to perform the plug itself. Here’s how to plug a tire with a plug kit.
You will need the following to make a tire plug repair:
There are all kinds of tire plugging kits, but you want the most complete tire repair kit which comes with the plugs, the installation tool, and the reamer tool. Some flat tire repair kits just come with the plugs and installer, but the reamer tool is a necessary component to a good repair. Some tire plugging kits also come with liquid cement. You can use it or not, but the cement helps make a more permanent repair.
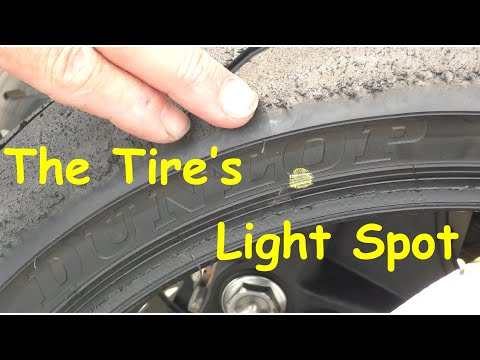
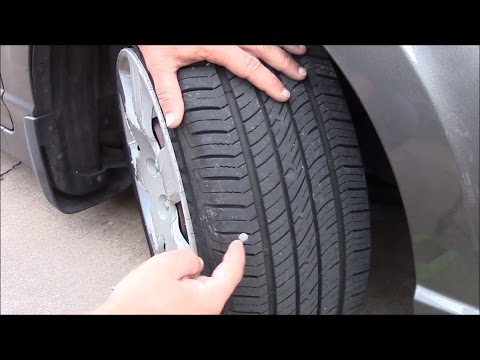
Locate the puncture. If you don’t see or hear the puncture, spray some soapy water on the tire and look for bubbles.
This is a small staple that was dropping tire pressure by 20 psi in about 12 hours. It needs to go.Remove the offending item. This is usually easy, but sometimes the nail or screw is worn down, making it hard to get a bite on it. This is where the side-cutters come in really handy. You will want to position the tire where you get the most leverage.
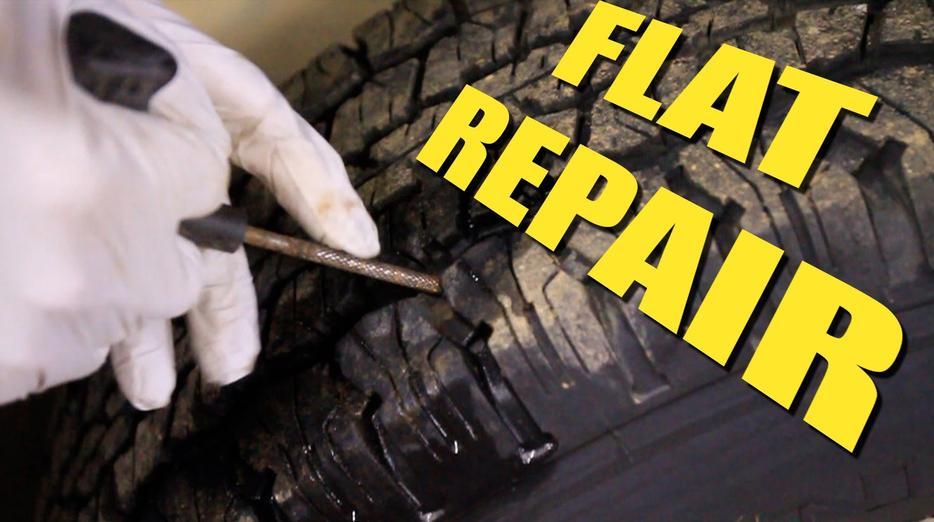
Side cutters work best for removing these items, as they can grip small round objects better than regular pliers.Insert the reamer.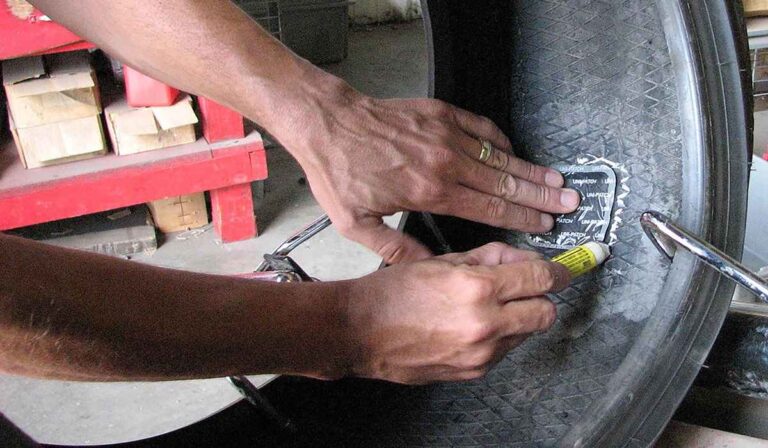 This will take some effort, as you have to push it through the steel belts. Use a twisting motion and push it into the tire. Once the reamer is through, saw it in and out of the tire a few times to really make a nice hole for the plug. Yes, it is counter-intuitive, but it is necessary.
Push the reamer all the way and then saw it in and out a few times to make a clean hole.
Prep the plug and installer. Pull a plug off the strip and push it through the eyelet of the installer tool. The pliers will make this easier. Push a little through, grab it with the pliers and pull the plug halfway through the eyelet.
Pull a cork strip from the tire plugging kit and grab the installer tool, which looks like a large needle with a slit in the eye.Threading the sticky cork tire repair plug is not easy, but if you can get it squished into the hole, you should be able to pull it on through.
 The side cutters might help.
Insert the plug into the tire. If the kit has liquid cement, apply some to the plug before inserting it into the tire. Simply push the installer into the hole in the tire until the plug is about 3/4 of the way in. Twist the installer tool 90-degrees and pull it out. The plug will stay in the tire and the tool will come out nice and easy. You may trim away the excess plug or leave it to wear away as you drive.
Push the tire plug into the hole. Don’t twist the plug as you push it in, just go straight down and stop when there is about a 1/2-inch exposed.This is what you should see when the tire plug is installed.
Once the tire repair plug is in you can now twist the handle 90-degrees and pull the tool out.
Fill the tire to the proper PSI. If you have a portable air compressor, this will make things easy. However, if you do not, you need to get air very soon.
All done. You can trim the tire plug or leave. You will need air, so don’t go driving until you have the tire aired up.
Every automobile you own should have an emergency tire plug repair kit in the tool box, along with a portable air compressor. These emergency repairs are quite good, but for a long term repair, you should take the vehicle to a tire shop for a proper repair as soon as possible. They will know the best way to patch a tire for your type of damage.
Check out all the steering & suspension parts
Categories
Know How
Tags
emergency repair, flat tire, flat tire repair, patch flat tires, sealant, tire maintenance, tire plug kit, tire pressure, tire safety, tire wear, tires, wheels
A life-long gearhead, Jefferson Bryant spends more time in the shop than anywhere else.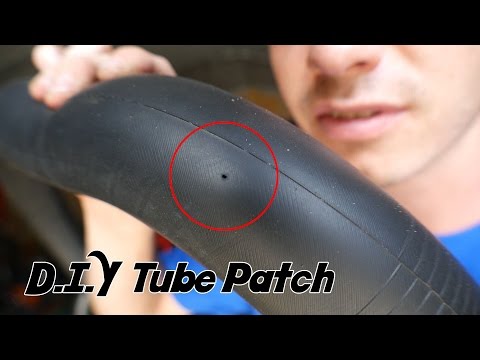 His career began in the car audio industry as a shop manager, eventually working his way into a position at Rockford Fosgate as a product designer. In 2003, he began writing tech articles for magazines, and has been working as an automotive journalist ever since. His work has been featured in Car Craft, Hot Rod, Rod & Custom, Truckin’, Mopar Muscle, and many more. Jefferson has also written 4 books and produced countless videos. Jefferson operates Red Dirt Rodz, his personal garage studio, where all of his magazine articles and tech videos are produced.
Ask a question, get an answer ASAP!
GET A QUOTE
Spare Tire Installation Cost
Service Location
Price range for all vehicles
Getting a flat tire can put a damper on your day and your wallet.
Tires can go flat due to many issues including:
The most common cause of a leaking tire is a puncture from a nail or screw.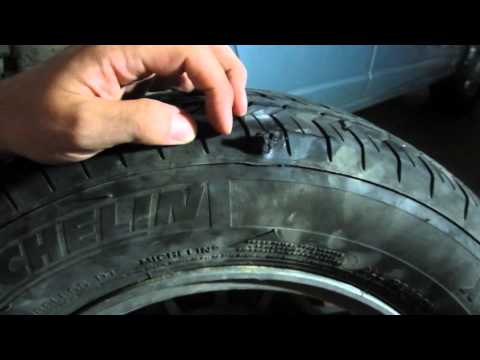
When a nail punctures a tire, it can either stay embedded in the tread or can enter and come straight out. The tire pressure leaks from the puncture hole and the tire eventually goes flat.
In either case, a puncture can be repaired if it occurs in the tread section of the tire.
Tip: If you have a slow leak in your tire, have it repaired soon after. If you top up the tire pressure without repairing the puncture, rust and corrosion can form in the steel belt layer, causing further damage such as belt separation and steering wobble.
Note: A proper tire repair includes removing the rubber tire from the wheel rim. While kits are available on the market to plug a tire from the outside, it is not an approved repair method and does not meet Department of Transportation (DOT) standards.
A proper tire repair can be done in one of two ways:
Here’s how to perform a tire repair with a combination patch.
Use the following steps to check your tire for any leaks and determine the location of the puncture.
Materials Needed
Step 1: Spray soapy water over the tire with a spray bottle. Focus on areas that are likely to have a leak such as the bead, the valve stem, and the tread section.
Coat the tire a little at a time with soapy water. You’ll know where the leak is when you see big or small bubbles forming in the soapy water.
Step 2: Locate the leak. Mark the location of the leak with a tire crayon. Mark the location of the valve stem on the sidewall as well so that you can orient the tire properly when you reinstall it.
You will need to remove the tire from the wheel rim in order to be able to fix the puncture.
Materials Needed
Step 1: Deflate the tire completely. If your tire still has air, remove the valve stem cap, then remove the valve stem core with the tool.
The tire will take less than a minute to completely deflate with the valve core out.
If your tire is already completely empty of pressure, skip to the next step.
Step 2: Break the bead. The smooth lip of the tire seals tightly to the rim and needs to be separated from the rim.
Lay the tire and rim flat on the ground. Place the bead breaker bar snugly under the lip of the rim on top of the tire and pound on it with a heavy hammer, wearing eye protection and work gloves.
Continue around the whole tire bead in the same fashion, moving along once the bead begins to move. When the bead is fully unseated, it will sink loosely downwards. Flip the wheel over and repeat the process for the other side.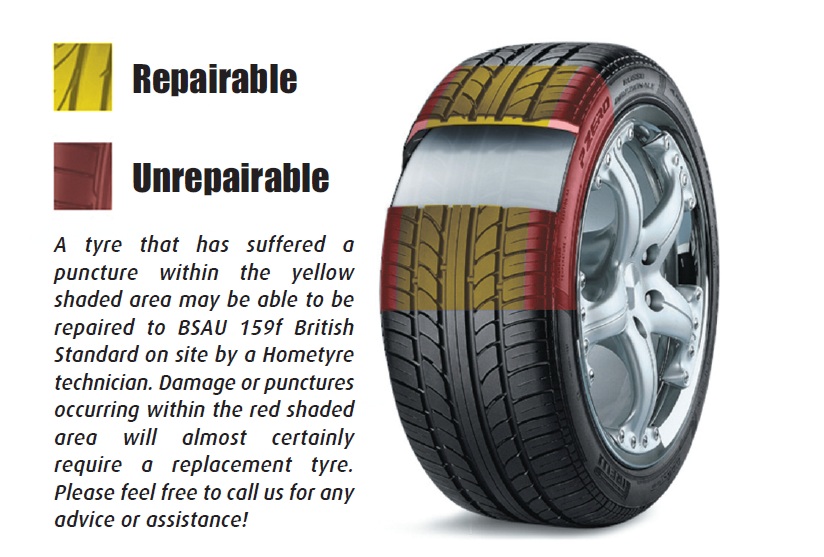
Step 3: Pry the tire off the rim. Place the end of the bar under the lip of the tire and against the rim and pry the tire upwards. A section of the rubber lip will be above the edge of the rim.
Using a second bar, pry around the rest of the bead until it is fully above the edge of the rim. The second lip will come easily off the rim with a bit of wiggling. Use a pry bar to lift it above if it’s not coming off easily.
Apply the patch and plug into the puncture to fix your flat tire.
Materials Needed
Step 1: Evaluate the tire’s condition. If there are black pebbles or dust inside the tire, or if you see cracks or cuts on the inside of the tire, that’s an indication the flat tire was driven for too long.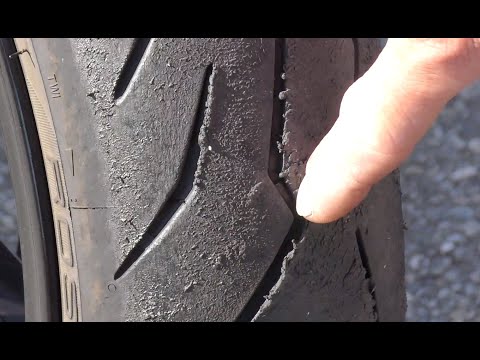 In this case, discard the tire and replace it.
If the inside of the tire is shiny and free from debris, continue with the repair.
Step 2: Ream the puncture hole. Locate the hole inside the tire opposite the mark you made on the tread. Insert your reamer into the hole from the inner side of the tire, pushing it deeply into the hole and back out at least six times.
Step 3: Rough up the inside of the tire at the hole. Use a manual rasp or a piece of diamond-grit sandpaper to rough up a spot just larger than the patch area. Brush away any loose rubber that may have formed.
Step 4: Apply a generous layer of rubber cement. Brush the cement over an area just larger than the patch. Let it set according to the instructions on the container.
Step 5: Push the plug part of the patch into the hole.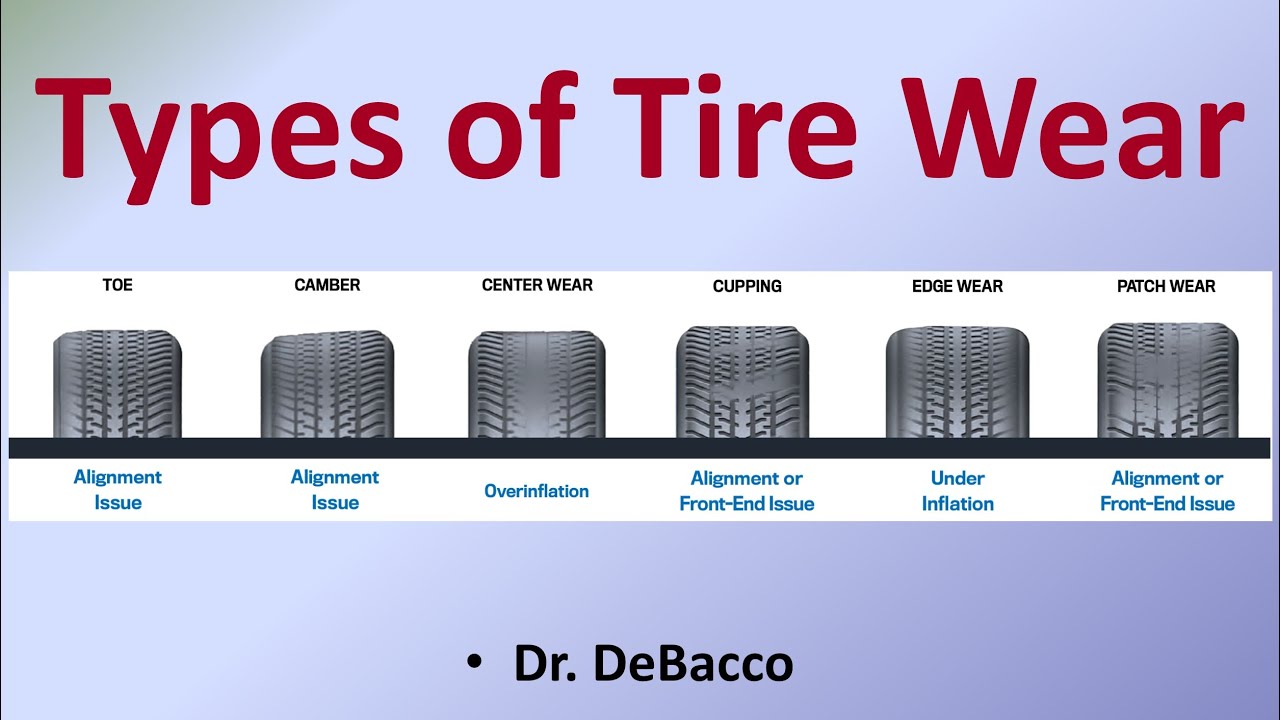 Pull the protective backing off of the patch, then insert the plug into the hole. There is a stiff wire at the end of the plug. Insert it into the hole, pushing it through as far as you can.
Note: The plug needs to go deep enough that the patch rests fully on the inner tire liner.
Tip: The fit will likely be tight, and you may have to pull the plug the rest of the way with a pair of pliers. Pull on the wire part to fit the plug correctly.
Step 6: Seat the patch with a roller. With the combination patch all the way in place, seat the patch in the rubber cement with a roller.
Step 7: Cut the protruding plug flush with the tire tread. Use a utility knife to cut the plug flush with the tire surface. Don’t pull on the plug when cutting it.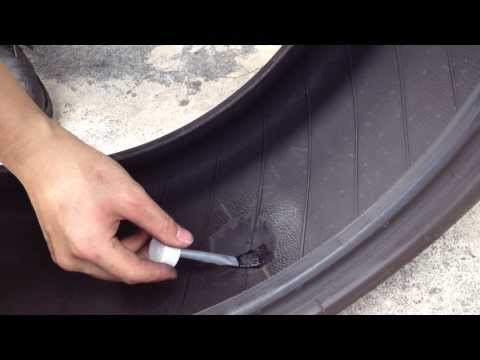
After repairing the puncture, you need to put the tire back on the wheel rim.
Materials Needed
Step 1: Orient the tire in the proper direction. Use the valve stem marking to line it up on the correct side and position in the rim.
Step 2: Install the tire back onto the rim. Press the tire over the rim and wiggle it into position. The bottom side should drop easily into place. The top side may take some effort like twisting the tire or putting pressure around the bead.
If necessary, use a bar to pry the rubber back under the rim.
Step 3: Install the valve stem core. Make sure the valve core is snug to prevent leaks.
Step 4: Inflate the tire. Use a compressed air source to put air into the tire. Inflate it to the recommended tire pressure for your vehicle, found on the driver’s door placard.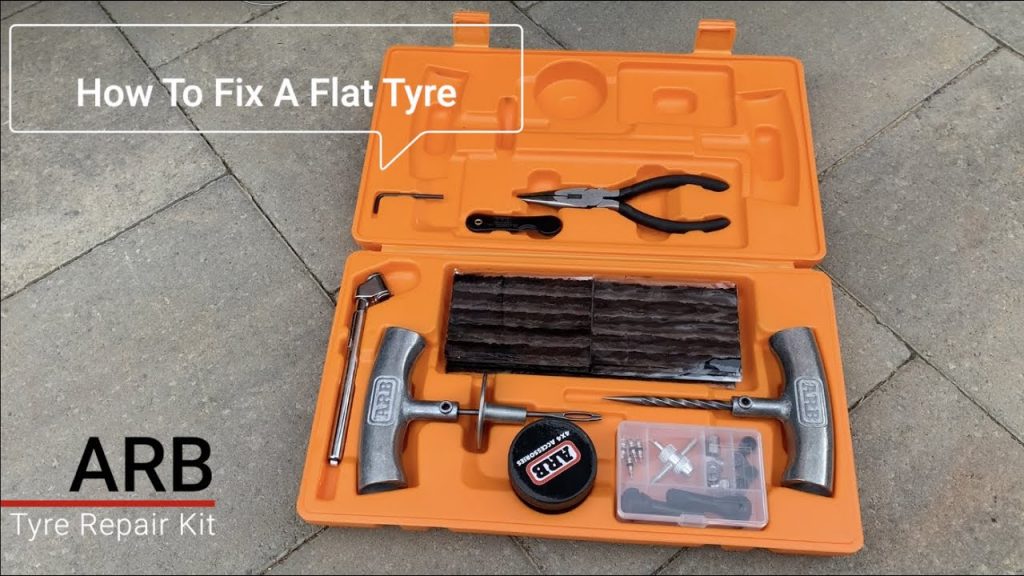
Step 5: Recheck the tire for leaks. Spray the tire with soapy solution to confirm the leak is repaired and the tire is seated on the bead.
Even though a tire plug might be sufficient by itself, national road safety agencies caution against using only a simple plug.
In some situations, relying on a plug might be less effective.When the puncture hole is near the tire’s sidewall, many experts recommend a patch as a simple plug may not be enough to completely seal the damage. When the puncture is diagonal and not straight, a patch will need to be applied. A plug-patch is the ideal solution to such situations involving a flat tire.
If you find that your tire is not inflating properly even after repairing the puncture, get a certified mechanic, such as one from YourMechanic, to inspect the tire and install your spare tire instead.
The most popular service booked by readers of this article is Spare Tire Installation. YourMechanic’s technicians bring the dealership to you by performing this job at your home or office 7-days a week between 7AM-9PM. We currently cover over 2,000 cities and have 100k+ 5-star reviews... LEARN MORE
SEE PRICING & SCHEDULING
Tires
flat tires
The statements expressed above are only for informational purposes and should be independently verified. Please see our terms of service for more details
4.2 Average Rating
Service Hours
7 AM - 9 PM
7 days a week
Phone Number
1 (855) 347-2779
Phone Hours
Mon - Fri / 6 AM - 5 PM PST
Sat - Sun / 7 AM - 4 PM PST
Address
We come to you at no extra charge
Guarantee
12-month/12,000-mile warranty
Our certified mobile mechanics perform over 600 services, including diagnostics, brakes, oil changes, scheduled mileage maintenances, and will come to you with all necessary parts and tools.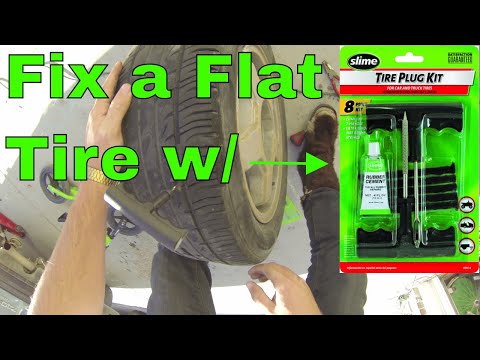
Get a fair & transparent quote instantly before booking.
SEE REVIEWS NEAR ME
11 years of experience
585 reviews
Request Nicholas
Nicholas
11 years of experience
Request Nicholas
by Gloria
Toyota Camry V6-3.0L - Spare Tire Installation - Knightdale, North Carolina
Nicholas finished an earlier appointment which enabled him to come by earlier than originally scheduled. I'm very grateful he chose to reschedule. While replacing a flat with my donut spare, he instructed me on how to safely drive to the tire shop for the repair. More importantly to have the shop add air to the donut spare. Nicholas did an excellent job. He as very professional. Thank you
by Jairus
Ford E-150 Econoline - Spare Tire Installation - Durham, North Carolina
I was VERY pleased with Nicholas' expertise and was more than delighted that he was so prompt. He was very polite and friendly, and he did a marvelous job. If I ever need any repairs to my vehicle in the future, I would definitely ask for Nicholas.
29 years of experience
91 reviews
Request Luis
Luis
29 years of experience
Request Luis
by Saravana
Toyota Prius L4-1.5L Hybrid - Spare Tire Installation - Prospect Heights, Illinois
Luis attended my car today and help in fixing the issue quickly. He is nice and friendly guy. I will recommend him for any services.
11 years of experience
106 reviews
Request Hugh
Hugh
11 years of experience
Request Hugh
by Laura
Toyota FJ Cruiser V6-4.0L - Spare Tire Installation - Castle Rock, Colorado
Hugh came to change out a flat tire for my spare today. I have to say that I feel sheepish for calling someone to come help because I know how to change a tire but I was at work and on shift until 2 am and he came to my place of work. Instead of just installing my spare, he took the time to evaluate the situation. I had a nail in my tire and he took the tire to get patched and my vehicle drove better on my way home than when I left this morning. It was snowing sideways when he showed up to help me. He was a bit of a godsend in the moment and I would recommend him to anyone. I was just distressed because I did not have enough tip to give this guy for overachieving when I needed it. Huge five star review. I only hope to pay his generosity forward. He was more than worth the cost and he did a phenomenal job.
26 years of experience
88 reviews
Request Jonathan
Jonathan
26 years of experience
Request Jonathan
by Adam
Honda Civic L4-1.7L - Spare Tire Installation - Smyrna, Georgia
Jonathan was very punctual, friendly, and transparent. He clearly explained everything he did and provided detail about any additional work he recommended. Great work!
Our certified mobile mechanics make house calls in over 2,000 U. S. cities. Fast, free online quotes for your car repair.
GET A QUOTE
GET A QUOTE
How Do I Check My Tire Pressure?
Checking Checking air pressure on your tires is part of basic car maintenance. Check your tires once a week and before any long trips. You may use a tire pressure gauge to measure accurately, or just look closely to see...
How to Fix a Flat Tire
Knowing how to fix a flat tire on a car is part of being a safe driver. Driving on flat tires is dangerous so it's smart to repair flat tires quickly.
How to Handle a Burst Tire
Tires burst when the tire pressure is too low or too high, there is a mechanical defect in the tire itself, or a foreign object damages the tire.
Car wobbles in the rear.
You could have a bent rim or a bent hub.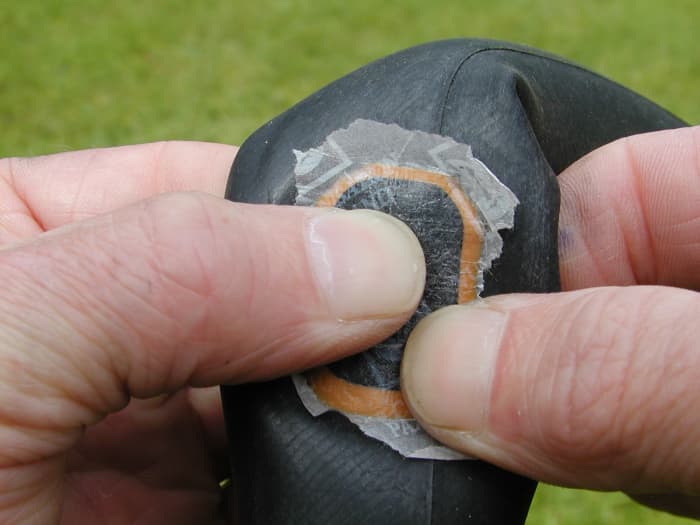 I would have the rim and hub checked to see which one is bent. I would recommend having a mechanic, like the certified ones at YourMechanic, come and check it...
All 4 tires on my car have premature tread wear
You will have work through Firestone. This is the link to the warranty info (https://www.tirerack.com/images/pdf/warranty/BFS0514.pdf) for the F740 tire and on page 23 is the contact information to their customer relations department.
Car pulls to the right after replacing the driver side rear tire.
Logically, if the car started pulling immediately AFTER you put a new tire on the rear, it would seem unlikely that the pulling is due to an alignment issue. Uneven tire inflation will cause pulling so do check to make...
Cities
Maintenance
Estimates
Our service team is available 7 days a week, Monday - Friday from 6 AM to 5 PM PST, Saturday - Sunday 7 AM - 4 PM PST.
1 (855) 347-2779 · [email protected]
Read FAQ
GET A QUOTE
To learn how to seal a puncture in a tubeless tire, it is worth considering that there are several ways to perform this procedure. Most often, tire repairs are performed using a tourniquet, a fungus patch, and special sprays that tighten the puncture site and stop air leakage.
If you want to learn how to seal a tubeless tire at home with a repair harness, you should follow the instructions:
The machine must be put on the parking brake, and a chock can be used to fix the position of the transport. Next, the car is jacked up and the wheel removed.
You need to carefully inspect the surface of the wheel to find the puncture site. Damage could occur as a result of piercing the wheel with a nail, self-tapping screw or glass shard. In this case, the head of the nail or the edge of the glass will indicate the cut. The foreign object must be removed with pliers. If the puncture site is not visible, you can pour water on the tire, which will cause the air that comes out of the hole to attract attention with a hiss. The puncture site must be cleaned of dirt and marked with chalk or a marker.
Next, you need to take an awl with a screw tip and apply special glue to it. After that, the awl is immersed in the puncture hole and several reciprocating movements are made. The tool should not be removed from the hole.
Then, a repair harness (a strip of raw rubber) is installed in an awl with a needle hole. From two parts there should be identical strips, on which a thin layer of glue is applied.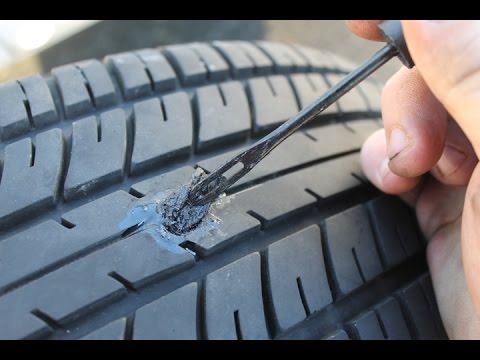 To perform a short-term repair of a large damage, you can apply two rubber strips at once.
The first awl is removed from the puncture, and a tool with a tourniquet is placed in its place. Outside the tire, the edges of the strip remain (1-1.5 cm long). Next, the awl is pulled out of the hole after the tourniquet passes through. A strip of rubber that has folded in half will remain at the puncture site, and its ends should be cut off.
Having learned how to properly seal a tubeless tire with a tourniquet yourself, and after completing this procedure, you need to inflate the tire to the optimum pressure, after which the wheel can be returned to its place. This method is considered relevant if you need to seal a tire tread puncture, and the hole diameter is up to 10 mm. As for side cuts, the elimination of such a problem should be entrusted to professional specialists working in a car repair shop.
If you are looking for an option on how to seal a tubeless tire with a repair kit yourself, you can perform this procedure using a patch fungus. For this method, you will need to remove the wheel and tire from the disk. You also need to purchase patches in the form of fungi, sandpaper and glue. The repair procedure is as follows:
It is necessary to clean the puncture site, rinse it and remove dirt, as well as foreign objects that damaged the tire.
Next, the puncture site is cleaned from the inside to give it a roughness. For this task, you can use sandpaper or a drill with a special nozzle.
At the next stage of work, a fungus of the required diameter and size is selected (patches can be purchased at auto parts stores), based on the size of the puncture.
The patch is covered with glue and placed on the puncture site, after which it must be firmly pressed.
Then the patch must be allowed to dry, after which the wheel can be assembled.
If you are looking for an answer to the question of how to seal Michelin tubeless tires or tires from another brand, you can use the easiest and most effective way. You can use a spare in a can. Sealant allows you to quickly seal the wheel. To apply it, you need to unscrew the nipple (this action is not always required). The contents of the vial must be squeezed into the opening of the nipple and returned to its place. Within 10 minutes after inflating the tire, you can continue on your way.
To see how to seal a tubeless tire in a video, you can watch a YouTube video with detailed video instructions: https://www.youtube.com/watch?v=PpnKzfpkeoQ.
Based on the method of repair, certain tools and fixtures will be selected. To repair a tire with a tourniquet, you will need a repair tourniquet, two awls (one of them with an eyelet) and glue. When using a patch fungus, you will need a patch, sandpaper (or a drill), and glue. Among other things, repairs can be carried out with tire sealant. Also, when repairing tires, it is worth using a portable compressor (for inflating tires), a repair kit, a jack, pliers, a wheel wrench, a knife and anti-recoil fixing auto devices.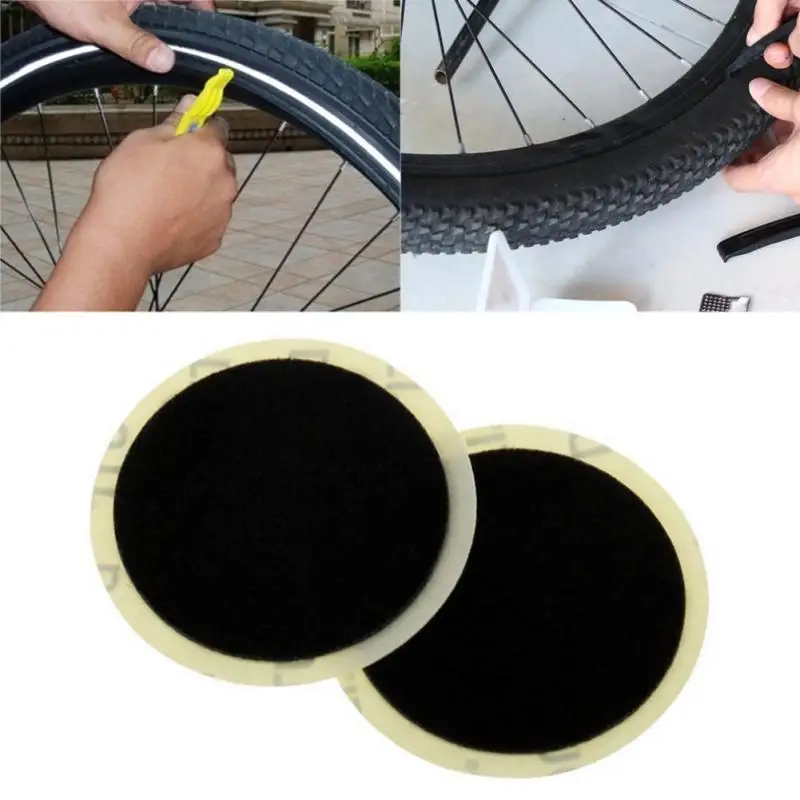
When choosing a repair method, take into account the degree of damage to the tire and follow the instructions so that the work is done as efficiently as possible and the wheel returns to its previous operational state.
esportby.com
An easy way to quickly restore tire tightness and continue your journey. True, for this you need to have the right wheel repair kit with you.
Maxim Stroker
“Catching” a nail, screw or piece of wire on the track on the track is a trifling matter and somewhere even everyday. However, it turns into a serious "trouble" if this happens, for example, at night or a couple of tens of kilometers from the nearest tire fitting point. In theory, in this case, you need to put a spare wheel and go further. Although, in the case of a family trip on vacation, the process of digging it out from under a pile of junk in the trunk can turn into an adventure that deserves a separate story.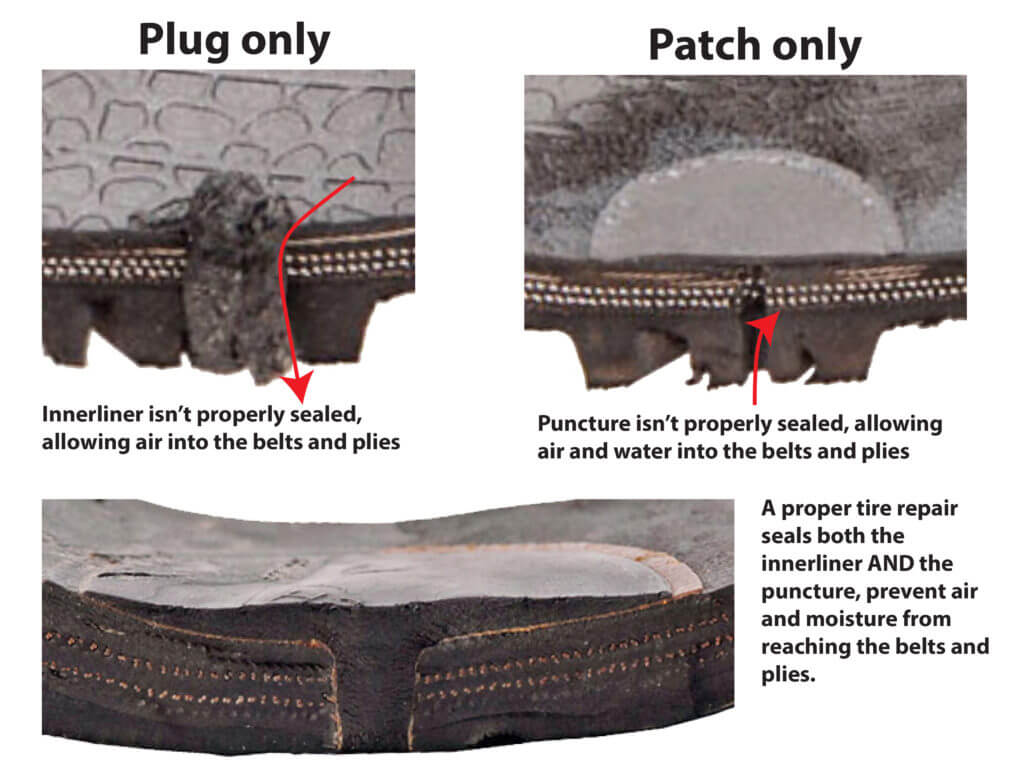 Be that as it may, often the trouble does not come alone and the spare tire can be broken literally on the next kilometer. After all, where one carnation fell on the road, there may well be another one, and another, and another ...
With a couple of crippled wheels, you'll either have to wait an unknown amount of time for a tow truck to be sent down by the Conductor, or fix it yourself. Therefore, in a not particularly urbanized area, it makes sense to carry a repair kit with you to eliminate punctures in tubeless wheels. In principle, it can be of any manufacturer. The main thing when choosing it in the store is to make sure that the “drill” included in the repair kit is not very toothy and sharp. After all, his task is simply to clear a puncture hole in the tire, and not to break its metal cord. The second recommendation: the flagella, which are supposed to close the puncture hole, should be plump and reinforced with thin wire or plastic threads.
n-i.kiev.ua
And the third criterion for choosing a wheel repair kit is the obligatory presence of a tube of glue in it. Yes, yes: there are also “glueless” sets on sale, which are essentially useless.
So, we notice that the wheel is flat (or has already blown off) and proceed to eliminate the problem. Most often, the hole in the rubber is not visible. Therefore, to begin with, we hang out the damaged wheel by raising the car on a jack, and inflate it with a pump or compressor to 3-4 atmospheres. If even after that it is not possible to detect damage by the whistle of escaping air, we methodically and consistently wet the entire surface of the wheel and look for bubbles at the puncture site.
Having found a puncture, we take the “drill” from the set and pierce the damaged area several times with it. So we clean the surface of the hole before gluing. Next, we smear the “drill” with glue from the set and again immerse it in the hole. We repeat this operation and, leaving the “drill” sticking out in the hole smeared with glue, we take out the flagellum and insert it halfway into the eye of another tool - the “overgrown needle” (sometimes called the “awl”), also available in the repair kit.