If you have an old ATV that has been sitting for years, it can be difficult to decide what you need to do to get it running again. Let this article act as a guide for you to follow to get your machine out on the trail again.
After a quad has been sitting for a while the oil in the engine, and the gas in the tank will start to separate. Your tires will go flat, and the battery will die. If it’s been sitting out in the weather, you could have worse problems like rust and corrosion.
Here’s a quick list of the things you should be looking to check on. And then I will go into more detail about each, and how to get your ATV running again.
Assuming your ATV doesn’t look like this one below, these steps should get you up and running again. If not, I have some trouble shooting steps to follow later on. But first, lets go over these steps in more detail.
If the ATV has been sitting for more than 6 months, you will need to get fresh gas in it. Over time fuel will degrade, become less combustible, and start to gum up. Also, water can condense and collect inside a fuel tank that has been sitting for too long, especially fuel with ethanol in it.
It’s best to drain the gas tank completely and clean out any gelled or gummed up gas. This gel like gas residue could also be affecting your fuel lines and other parts in your ATVs fuel system.
Check the fuel filter, and replace it or clean it out if you have to. Also make sure the petcock valve or fuel on/off valves are all working properly. Turn them to make sure they move nicely and aren’t leaking.
If you have a metal fuel tank, the water condensation over time may have rusted out the inside of the fuel tank. I have had good luck emptying the tank and putting a little diesel gas and some small metal BB’s in the tank and shaking it around. The metal BB’s will knock off most of the rust from the inside the tank with the help of the diesel fuel.
If your ATV has a carburetor, you will want to clean that out completely. You may want to just get a carburetor rebuild kit since you will have the carb already taken apart. Just spraying some carb cleaner in there may not be enough, you will probably need a rebuild kit.
They are pretty cheap and it’s recommended you rebuild the carburetor on a quad that has been sitting anyway. Here’s the link to a Carburetor Repair And Rebuild Kit on Amazon to give you an idea of you can expect to pay.
Check the fuel line coming from the tank and going to the carb. If you can get fuel to flow through the fuel line, then great. If you don’t have a nice continuous flow of fuel, will will need to clean out or replace the fuel lines.
If you are still having problems with the fuel system on the machine, check out this ATV Not Getting Fuel, Common Reasons And How To Fix article where I go into a lot more detail about the fuel system. But if you can at least clean the tank and the carburetor, you’ll probably be fine.
If the air filter is in pretty good shape you might be able to re-use it. But for the most part, I would say it’s best to just replace the air filter altogether. Unless you have one of the re-usable type air filters like a K&N.
Getting a new air filter isn’t going to brake the bank, I recommend just replacing it. But if you do want to try salvaging the existing air filter, or you want to clean a re-usable air filter, check out my How To Clean The Air Filter On An ATV article, where I go through step by step how to get your existing air filter up to snuff on your machine.
Either way you need to make sure the engine is not going to be pulling in dirt, dust, or debris through the air intake. Even small amounts of sand can scratch the cylinder walls and cause you major problems with the engine. Since most ATVs that have been sitting tend to have dust, sand, and dirt collected, you have to sort out the air filter.
The oil in the engine will usually take longer to go bad than the fuel in the gas tank will, but the additives in the oil will eventually degrade over time. Since you’re supposed to regularly change the oil in the engine anyway, it’s a good idea to do an oil change before trying to start an ATV that has been sitting.
I suggest trying a synthetic blend or a full synthetic oil like this Castrol Power1 10W-40 Full Synthetic 4-Stroke Motor Oil. The reason I would choose synthetic oil is because it was made for older engines. The synthetic oil has additives that will help swell your gaskets, which will help prevent leaks and loss of compression in the engine.
Also, change the oil filter. A lot of people over look this simple step. Every time I do an oil change I change the oil filter out too. The filter could be holding gunk and other things that will contaminate your fresh oil change.
This is a good time to make sure the pistons aren’t rusted into place and the engine isn’t seized up. I like to add a little penetrating oil or deep sea foam into the cylinder head and let it sit in there a while. Simply remove the spark plug to spray a little sea foam into the cylinder head through the spark plug hole.
After letting it sit a couple hours (overnight if it’s real bad looking), I will try to turn it over with the spark plugs out to make sure everything moves the way it should. Since this is easiest done with the spark plugs out, lets talk about that next.
Change The Spark PlugsThe spark plugs on the ATV may be fine and not need to be changed. I know I change spark plugs all the time, and on a quad that sat for a while I would change the plugs out. But this step is really about making sure you are getting spark to the engine.
To do a quick check, simply remove the spark plug from the engine, insert it back into the spark plug wire, hold the electrode on the plug close to the engine or frame, and try to start the quad. If you’re seeing spark jump from the electrodes on the spark plug, you’re probably good to go.
If you aren’t getting spark, try a new plug. If still no spark, you should check out my ATV Not Getting Spark, How To Fix article, where I go more in depth about the spark plugs and the electrical system troubleshooting on the ATV. Also, make sure you get the right spark plugs for your year, make, and model and that they are gapped correctly.
Change Differential Fluid (4X4)This step is only needed for 4X4 ATVs, and even then you may not need to do this. I usually do it just because I’m already changing all the other fluids anyway, so why not. Besides it’s just as easy as doing an oil change.
You will have a front and a rear differential, you’ll want to change the oil in both. The important thing for differential oil is to use the one that is recommended for your machine. You’ll have to look through your service manual or call the dealer to find out.
There are a few different types and different manufacturers recommend using different oils.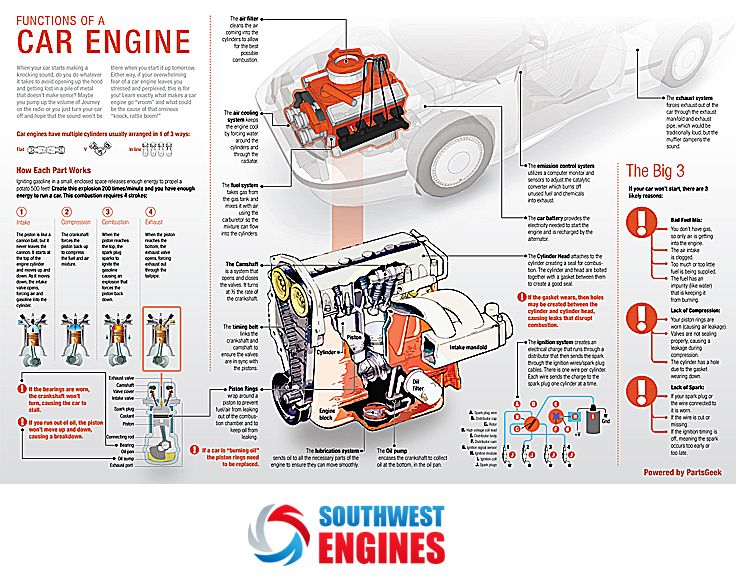 Using the wrong one might cause damage to your differential. Once you have the right diff oil, all you need is some socket wrenches and a drain pan.
There will be a drain plug and an inspection plug for both front and rear differentials. First remove the drain plug and let all the diff oil drain. If you notice metal shavings in the oil, you could have a gearing problem. If you notice water or mud in the oil, you may have problem with the seals.
Once the oil has drained put the drain plug back in and remove the inspection plug. This is where you fill the differential with new diff oil. If the oil bottle doesn’t have a fill spout, you may need a funnel for this part.
Fill the differential with oil until it starts coming out of the inspection hole. Let it drain out until it is barely trickling, then replace the inspection plug. That’s it, follow those steps for both front and rear and you should be good to go.
Charge Or Replace BatteryDepending on how long the ATV has been sitting, you may be able to use the existing battery, it will just need to be charged. But if it sat for anything over a year, you’ll probably need to replace the battery all together.
If you need some tips on what charger to use or how to charge an ATV battery, check out my How To Charge An ATV Battery article. But most likely, this won’t help you all that much and you’ll end up needing to get a new battery.
You can usually get an ATV battery at your local auto parts store or at an ATV dealer. But I’ve been able to get batteries online for cheaper than they charge in the store. If you can wait for shipping, just get an ATV Battery On Amazon.
Alright, you’ve done the tune up, now it’s time to try starting up the ATV. Put some fresh fuel in the tank, make sure the kill switch is on run, the key is on, and give it a go.
ATVs that have been sitting may be a little harder to start, especially older models. Give it some time and be patient, but not so much that you kill the battery trying to start it.
If you do get it running, I suggest putting some fuel system cleaner in with the gas and letting it run with that in it for a little bit. That way it can really clean out the rest of the engine. I use this Gumout Complete Fuel System Cleaner in my quads about once a year, and it works great.
If you still can’t get the ATV running, you may have bigger problems you need to dive into. Most likely you have a problem with spark, fuel, or compression. Those are the most common reasons an ATV fails to start up.
To get more in depth step by step instruction to troubleshoot why your ATV still won’t start up, check out my ATV Won’t Start, Common Problems And How To Fix article. That article will solve 90 percent of the reasons an ATV won’t start.
Sharing is caring!
This guide will help you troubleshoot the most common causes for an ATV that won’t start. Some issues are easy to fix at home, while others require assistance from a mechanic.
These are the main reason why an ATV will not start:
To identify what is causing your ATV’s starting issues, you need to notice how it behaves when you attempt to start it. Choose the topic below that describes your bike’s behavior best to begin your troubleshooting.
Page Contents
If your ATV doesn’t crank when you’re trying to start it, there are a few basic things to consider.
You’d be surprised how often the solution to an ATV that won’t start is forgetting to turn on the kill switch.
Also, if your ATV has a tether pull-cord style kill switch, ensure it is connected properly.
Many ATVs are designed not to start when in gear as a safety precaution.
The battery should read 12,6 – 12,8V. Use a multimeter or a voltmeter to check the voltage.
If the voltage drops too low, the battery won’t have enough charge to start the bike.
Charge the battery or replace it if it’s dead. An easy way to test your battery is by checking the voltage drop with a multimeter as you try starting the bike. If your fully charged battery drops below 11,5 volts under load (while you crank the starter), it needs to be replaced.
Most ATVs have a main fuse; your user manual will help you locate it.
If your battery is charged, but you still get nothing when turning the key, you may have a blown main fuse. Replace it with the right size fuse and try starting again.
The solenoid works as a switch that sends a high current to your starter when you push the start button or turn the key. For it to work, you need to make sure it is getting power from the battery.
The solenoid should make an audible “clicking” sound each time you hit the starter. If it does, you know it is getting power, and the problem is likely with the solenoid itself or possibly the starter. Solenoid and starter issues will be covered later in the post.
If you do NOT hear a clicking sound, you can use a multimeter or voltmeter to verify that the solenoid is, in fact, not getting power.
The solenoid is usually located near or on the starter.If you don’t get a reading, you need to trace the wiring back to your battery to wind where the connection is broken. Look for loose or corroded terminals or shorts from damaged cables.
A gasoline engine needs three essential components to start and run:
If the plug is dry, the bike is not getting fuel and you need to continue the troubleshooting as described below.

Alternative method: If you don’t have a spark tester tool, you can do a visual test to check for spark. Please note that this method may cause electric shock if done incorrectly.
You will find the proper steps for troubleshooting an ATV that is not getting a spark further down this post.
If the spark plug is still dry after cranking the engine for a few seconds, you know that fuel, for some reason, is not getting to the cylinder.
It’s often either an issue with the fuel-pump or that the fuel supply line is clogged up somewhere between the gas tank and the carburetor.
Old or unstabilized gas tends to gum up over time and may create a clog. Dirt and debris getting inside the tank is another common culprit for a clogged-up fuel supply.
The easiest way to identify the cause is through a process of elimination.
Note that if you find contamination such as dirt or gummed-up fuel at one spot, the whole system is likely dirty and needs a complete clean for the best result.
The steps involved are slightly different depending on whether your ATV has EFI (electronic fuel injection) or a traditional carburetor system.
There is either a vent in the gas cap or a separate gas tank vent tube. Make sure neither is clogged and allows air to flow freely.
Fuel needs to be replaced with air as it gets pumped out and used. If the vent is blocked, the fuel pump may not be able to suck fuel out of the tank.
Older ATVs, and some of the cheaper models still today are designed with a traditional carburetor fuel-system.
There should be a shut off valve at the lowest part of the fuel tank. Make sure it is turned on.
This step will help you narrow down the possible causes of why fuel is not reaching the cylinder.
With the fuel valve open, disconnect the fuel line from the fuel inlet of the carburetor. Turn over the engine to see if gas is coming through the fuel line.
If it is very little or no fuel coming from the fuel line, you likely have either:
If there is a steady or pulsating stream of fuel you know that
Continue your troubleshooting based on the results of this initial test.
Fuel exits the fuel tank through a shut-off valve at the lowest part of the tank. Inside this valve, a mesh screen is supposed to stop dirt and debris from entering the fuel lines.
Disconnect the fuel line from the valve to see if gas comes through. If fuel does not flow freely, you need to remove the valve to clean it.
All of the fuel left in the tank will drain as you remove the valve. Use a bucket to collect the fuel.
Use carb cleaner, some fresh gas, and a toothbrush to clean the valve and mesh screen. Pour some fresh gas in the tank to flush out any remaining gummed-up old fuel or debris before installing the valve.
If the gas in the tank is old or contaminated, you should not put it back in the tank after cleaning the valve.
Not all ATVs have serviceable fuel filters, but some do. Trace the fuel line all the way from the fuel tank to the carburetor. Look for a cylindrical canister unstalled in-line anywhere on the fuel line.
Fuel filters are cheap and easy to replace, so it’s worth doing if you suspect that something disrupts fuel flow.
ATVs with traditional carburetors usually have a vacuum-operated fuel pump. They are run by vacuum/pressure pulses created in the crankcase. The negative pressure pulls fuel in, while positive pressure pushes fuel out.
If the pump is still not working, you may need to replace it.
Alternatively, you can pull it apart to give it proper cleaning and a rebuild. Inside there are check-valves that may get suck if dirt enters the pump. There is also a rubber diaphragm that may stretch or crack over time.
Some ATVs have a vacuum-operated shut-off valve that is designed to open only when the engine is running.
Identify the vacuum line that goes to one of the inlet ports. Disconnect the line and draw a vacuum to the disconnected port. The valve should now open and allow fuel to flow.
Inspect the vacuum line to make sure it is correctly connected at both ends and has no cracks that will draw false air.
If you suspect that the valve is not working, put it in “prime” as this will override the vacuum-operated valve. This will tell you if the valve is working or not.
Old unstabilized fuel and debris from the gas tank may completely gum up the carburetor or block the jets so that the engine is not getting any fuel.
I recommend using a product like Seafoam or similar to see if it will dissolve the gummed-up fuel before embarking on a more thorough cleanse. Leave the choke wide open to allow maximum flow.
Click this link for instructions: https://seafoamsales.com/uploads/2018/12/HOW2_Gummed-Up-Carburetor.pdf
If Seafoam doesn’t work, your best bet will be to remove and disassemble the carb to clean it properly. This job may not be for everyone. Consider asking a mechanic if disassembling the carb seems intimidating.
 Ensure the float assembly is not stuck and pull up the float needle.
I recommend these links for a more detailed and illustrated guide on how to disassemble and clean a carburetor (external links):
How to disassemble and properly clean a carburetor:
https://www.rockymountainatvmc.com/rm-rider-exchange/clean-carburetor-motorcycle-atv/
Clean a carburetor by using chemical carb cleaner:
Fuel-injected engines use an electronic pump to feed pressurized fuel through fuel injectors and into the engine.
Troubleshooting a fuel-injected ATV is a bit trickier than carbureted ATVs, but it’s possible:
Most fuel-injected ATVs do not have a serviceable fuel filter.
Instead, they have a non-serviceable screen or a sump-filter located inside the gas tank. Note that some EFI ATVs also have an inline external fuel filter.
The screen or filter is one component of the complete full fuel pump assembly located inside the tank. These filters are not meant to be serviced but may still clog up.
You need to remove the whole fuel pump assembly to access the filter.
Begin by removing any plastic covers to access the top of your gas tank. There you will find a large plastic locking-ring that connects the entire fuel filter assembly to the fuel tank. You may need a set of large pliers to remove the ring as they tend to bind.
Be careful so that you don’t damage any fragile plastic components as you remove the pump assembly.
The filter will be at the very bottom of the assembly. You will generally need to replace the whole assembly to replace the filter.
If you want to save some money, consider looking up a suitable replacement filter on-line.
Electric fuel pumps tend to fail for no apparent reason from time to time. Before they break completely, they may be getting weaker gradually due to wear.
A worn fuel pump may not create a high enough fuel pressure for the injection system to mist the fuel properly, which may prevent the ATV from starting. Aftermarket fuel pumps are available for most ATVs, but replacing them is not for everyone.
Also, you have possible fuel pressure regulator issues or bad o-ring seals.
The best way to test an electric fuel pump is by measuring the fuel pressure at the fuel rail. This will, however, require a specialist tool that the average home mechanic does not have.
A clogged fuel filter or clogged fuel lines may cause too low fuel pressure as-well.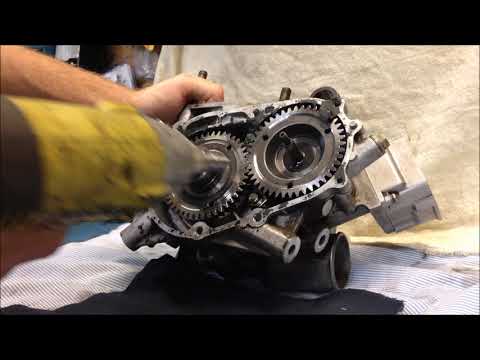
Before replacing the fuel pump assembly, it’s worth making sure the bike is charging correctly, as a low voltage will negatively impact fuel pump performance.
Modern EFI ATVs may provide an error code indicating fuel injector issues. Troubleshooting fuel injector problems, however, is a task that often gives even seasoned mechanics a headache. I recommend you save this job for a dealer.
Here are a few things to try out if your ATV is not getting a spark:
When you try to start the ATV, the engine seems to crank just as normal. But the engine will not start. All you get is one or several loud bangs coming from the exhaust.
These bangs are known as the ATV backfiring, usually caused by the air/fuel ratio being too rich or too lean.
If you forget to engage the kill switch before trying to start the bike, it will pull gas into the carburetor, but there is no spark to ignite the fuel.
When too much gas enters the carburetor, there won’t be enough space left to mix the required air/fuel ratio for the bike to start and run.
If you have the time, let the bike sit for a couple of hours before trying to start it again.
Alternatively, you can remove the spark plug while turning the engine over for a few seconds. Any excess gas will escape through the spark plug hole. Wipe the plug clean and put it back in. Then try starting the ATV as usual.
Spark plugs are considered consumables that may need replacing from time to time. A spark plug that has gone bad may prevent the ATV from starting and only cause it to backfire.
Replace the plug with a new one according to the manufacturer’s specifications.
A clogged air filter will restrict airflow and, therefore, significantly impact how rich your ATV engine operates. Too little air will cause an overly rich mixture, resulting in symptoms like the ones you experience.
Clean or replace the air filter with a new one before trying to start the bike again.
Another possible cause of these symptoms is that your valve clearance is incorrect. As the engine gets some hours to it, the valves may seat deeper in valve seats and may need adjusting.
Checking and adjusting the valve clearance on an ATV is not that hard to learn, but it is recommended that you ask for guidance from someone more experienced the first time you do this job. If you do it incorrectly, you risk causing permanent damage to your engine.
Your bike’s timing is what tells the bike when to pull air and fuel into the cylinder, when to ignite the fuel and when to discard exhaust gasses out the exhaust. If one cam is off by just one tooth, you may run into starting issues accompanied by the occasional backfire.
If you’ve been working on or removing some of the timing components, you need to make sure that everything is reassembled correctly. Lookup a timing diagram for your specific ATV and make sure all the timing marks line up.
If the task of aligning the timing marks sounds intimidating, you are probably better off leaving the job to a mechanic.
The timing might be off even if you did not work on any of the timing components. What often happens is that the timing advance key, also known as a rocket key, has sheared and needs replacing.
The timing key plays a crucial role in timing your bike’s ignition as it locks the flywheel in the right position on the crankshaft. If it breaks, your bike’s timing will be off immediately.
This little metal part is designed to break to protect other engine components. From time to time, it may break even if there is nothing else wrong.
Luckily they are not that expensive or time-consuming to replace. It is not a job everyone will be comfortable doing for themselves. Still, nothing an averagely skilled home-mechanic can’t manage after watching a couple of youtube videos for their specific brand and model.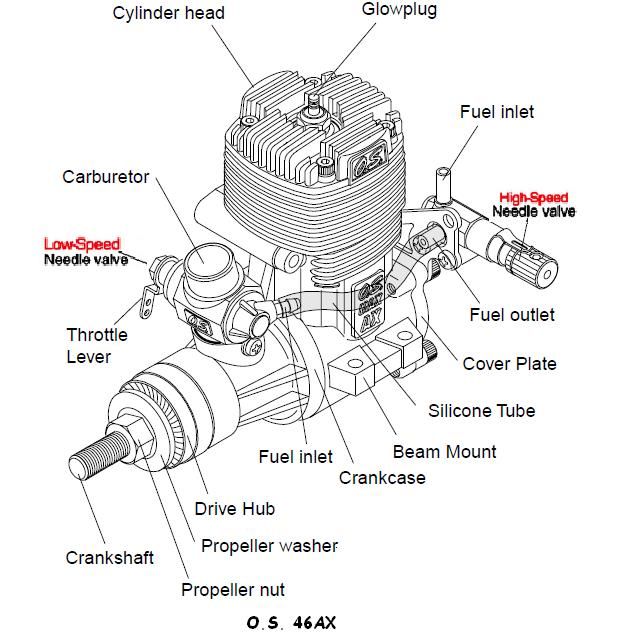
The key is located on the crankshaft. You need to unbolt and remove both the flywheel-cover and flywheel (the flywheel on an ATV is actually called a generator) to access it. A flywheel puller may be required.
If the key is sheared, remove all pieces from the old timing key and install a new one according to factory spec. Ask your dealer to make sure you get the right one. Install the flywheel and flywheel cover before trying to start the bike.
Make sure the timing marks are lined up correctly. The timing mark layout will be different from model to model. Please refer to your service manual.
A dirty carburetor may prevent enough fuel from getting to the cylinder, causing a lean backfire.
Due to the backfire, you know that at least some fuel is getting through. Please refer to step 3 on how to clean the carb.
Before spending money on a mechanic, it may be worth draining your gas tank and adding fresh gas.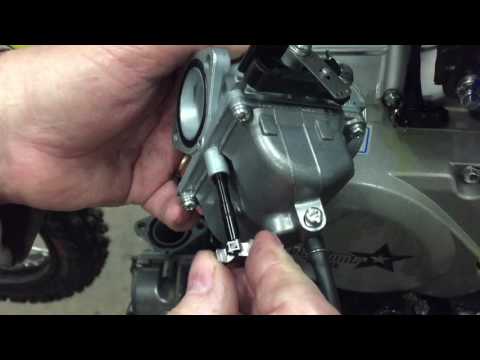 Gas may go bad if it sits too long, or it may get contaminated with water due to condensation.
Most gas tanks will have a removable drain plug or on/off switch at the bottom. Your next best option is to pump or siphon the fuel out of the tank.
If a valve has stuck open, the compression will be too low, and the bike will not start. Repairing a stuck valve is usually a task for a trained mechanic.
If all you hear when turning the key is a buzzing sound, it is usually because your battery is dead or needs charging.
The buzzing sound you hear comes from the starter solenoid relay that won’t kick in due to low voltage.
The solution is usually quite simple. Charge the battery or replace it if it is dead.
Also, make sure all of the power wires going from the battery to the solenoid are correctly connected and not corroded. Put a test light across the connection you are testing as you activate the starter.
If the problem is not battery-related, you may have a bad starter or even a seized engine, preventing the starter from engaging. After ruling out a bad battery, it’s recommended to have further troubleshooting done by a mechanic.
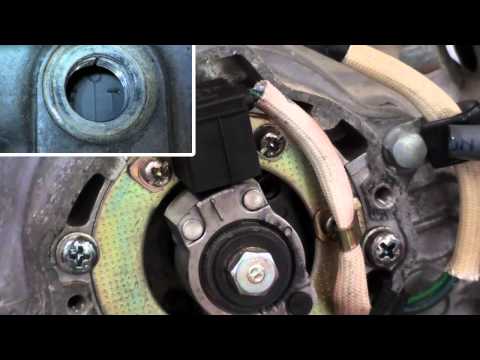
When activating the starter, the engine won’t turn. All you can hear is a clicking sound each time you press the starter button. The clicking sound is coming from the starter solenoid.
A solenoid that is working correctly will provide an audible click as you activate the starter. But the solenoid may be bad even if it clicks due to internal corrosion.
Use a multimeter to test if the solenoid closes the circuit as you try activating the starter.
Put your multimeter to DC Voltage. The red lead goes to the starter side of the solenoid. The black lead goes to ground. There should be no reading when not pressing the starter button.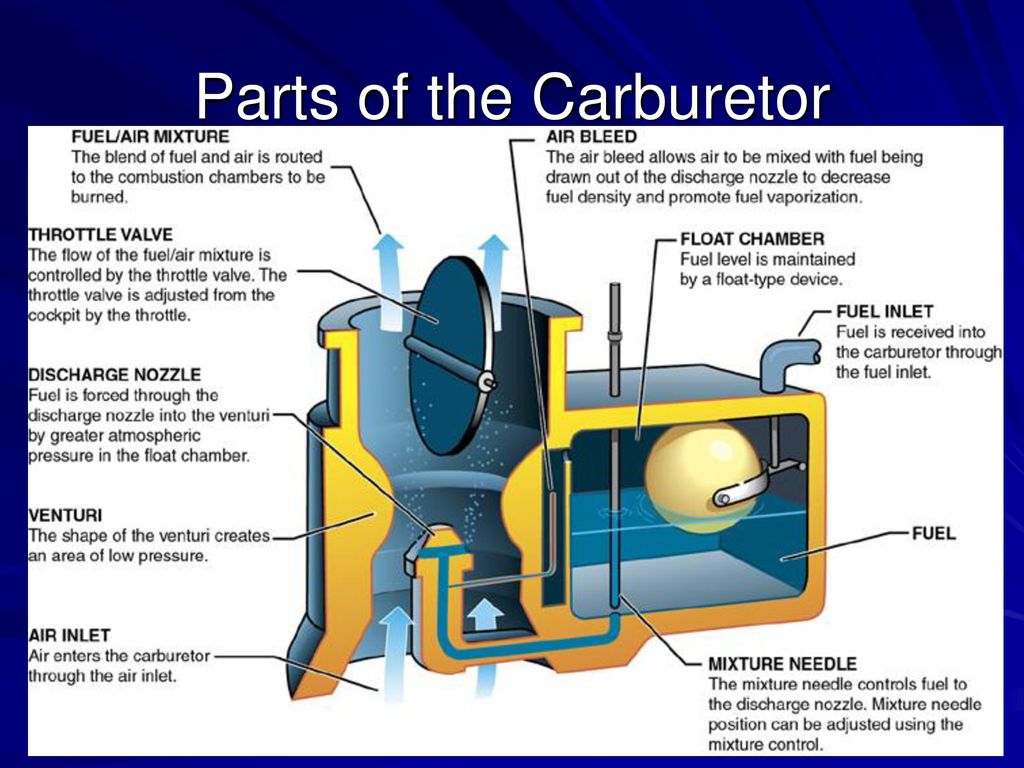 But when you activate the starter, you should get a voltage reading of 12V or more.
If you don’t, your solenoid is probably bad and needs replacing.
As an alternative method, you can use a piece of cable to jump your solenoid. Make sure the cable you use can handle the high current. If the ATV starts when jumping the solenoid, you know that the solenoid is bad and needs replacing.
If your solenoid is good, the problem is likely with the starter. Starters may wear out due to old age, or they may go bad from a busted seal that will allow oil or water to get inside of the starter.
To test the starter, you need to remove it from the ATV. It’s connected with a few bolts. You will also need to remove the cable coming from the solenoid.
Use a fully charged battery and a set of jumper cables to test if the starter will spin as it’s supposed to. First, you should use the positive lead to connect the positive battery terminal with the positive (red) starter cable. Then attach the negative lead to the negative battery terminal.
Hold the starter firmly in place and complete the circuit by connecting the negative lead to where your starter ground to the engine.
The starter engine shaft should start spinning freely with no signs of drag or scraping. Replace the starter if it is bad.
After running your ATV completely dry, you may find that it won’t start even after filling it up with fresh gas.
If it was running fine before you ran it dry, your problem is likely fuel-related as running the bike dry will not cause damage.
The fuel pump will need some time to suck up fuel after the bike has run completely dry. Fuel-injected ATVs, in particular, can be extra tricky.
Not all ATVs have one, but if yours has a primer pump, you should use it to pump fuel back into the carb manually.
Look for a button on the side of the carb that may look like a choke knob. You will need to pump it several times for it to have any effect.
Switching to “Reserve” and letting the bike run completely dry may allow dirt and gummed-up fuel that has set on the bottom of your gas tank to be sucked into the carburetor.
The same applies to gas contaminated with water, which is heavier than gasoline and will fall to the tank’s bottom.
Clean the carburetor, as described in step three.
Remove the spark plugs and pour a dash of gas into the spark plug holes. Reinstall the plugs and try starting the bike.
This will provide enough fuel so that the ATV starts and begin sucking fuel on its own. You may need to do this 2-3 times before you succeed.
Blowing with a steady pressure into the gas tank vent tube while running the starter may help the fuel to start flowing.
Running the bike dry won’t harm the spark plug per se, but contaminated fuel may. You may need to replace your spark plug to get going again.
Some ATV fuel pumps cant take being run dry. When run dry, the RPMs will go up, and the pump will burn out due to a lack of cooling and lubrication from the fuel.
Try removing the pump and check for internal resistance with an ohm-meter. If there is no resistance, the pump is likely bad.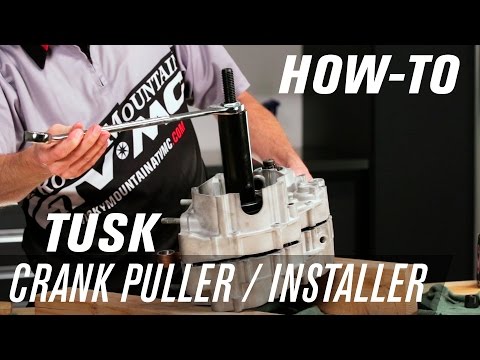
First of all, it is not really recommended that you use starter fluid on your ATV in the first place. Starter fluid evaporates very easily, and the vapor is highly flammable. Both you and the ATV can catch fire from a spark caused by a short.
It’s much safer and just as effective to carefully pour or spray some gas straight into the cylinder through the plughole. A couple of ounces should be enough before installing the spark plugs and starting the bike.
As long as the spark plug provides a bright blue spark and fuel is entering the cylinder, you may suspect that your compression is not good enough. Use a compression gauge and check if the bike’s compression matches factory spec. If it doesn’t, the engine might need an overhaul.
If the spark seems weak, the problem may be with the pick-up coil. Look for cracks or any other visible damage. If the coil is damaged, replace it with a new one. Note that the coil may be bad even if you’re getting a spark.
Most ATV manufacturers recommend that you not use a pressure washer to clean your ATV, which may damage electrical components. Instead, it would be best if you washed the ATV by hand using only a garden hose and mild soap.
Here are a few tips to try if your ATV won’t start after washing it:
I’ve dedicated an entire post on how to repair an ATV that’s been submerged in water.
You’ve just installed a new battery, but the ATV still won’t start.
Then, refer to the other topics in this post according to how your ATV is behaving. Does the engine turn over? Does it make clicking or buzzing sounds? Start from the top and work your way down if you are not sure where to begin.
If you cannot jump-start your ATV, it may not be a dead battery that is causing your starting issues. Make sure you are following the proper procedure for jump-starting an ATV.
If the ATV starts with the electric starter, it should start with a pull starter as-well. I recommend that you begin troubleshooting as if the turns over but won’t start.
Every ATV owner sooner or later faces a breakdown. And it doesn’t matter if you decide to buy an inexpensive ATV or a branded device. Of course, this is an unpleasant situation, but most problems can be fixed by hand. So let's figure out what to do if the ATV does not start.
Constant driving to the limit and improper operation of the equipment often causes a number of breakdowns. Due to high loads, it can fail:
But most often, problems arise due to some trifle, such as low-quality gasoline, lack of oil or improper preservation of equipment.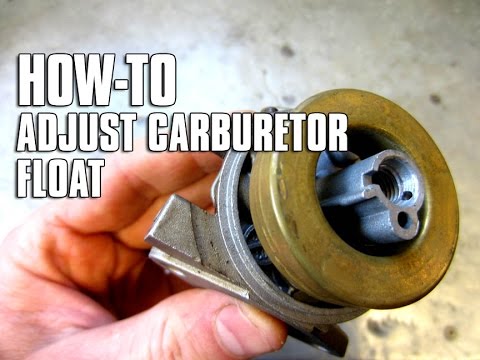
The first thing a motorist needs to do if the ATV does not start or stalls is to check the gas tank. If the fuel is idle for a long time, it may evaporate, and if the tank is empty, gasoline should be added. But if there is fuel in it, it is advisable to drain it. Very often, low-quality fuel comes across, which after a while simply ceases to ignite.
Don't forget the oil. If a low-quality liquid was poured into the system, the device will lose dynamics and may even stall. This problem is especially relevant for four-stroke quads, since their power unit must literally “float” in oil.
Another reason why the ATV does not start is improper preservation of the equipment. Even if you leave the device for a day in the garage, it must be prepared for downtime, otherwise starting the engine will be a real test.
Preservation requires:
Many riders ignore this simple procedure, but this is the one that most often causes problems with starting equipment. For example, it is almost impossible to immediately start a “cold” engine. Therefore, the driver begins to methodically press the "start" button, and at this time the battery is discharged. After 10-15 attempts, the battery runs out, and it becomes unrealistic to start the equipment.
Important: In severe frost, it is imperative to carry out conservation of the ATV. If this is not done, condensation will collect at the bottom of the carburetor, and the quadric will have to “warm up” for several days.
ATV won't start due to starter or bad contacts.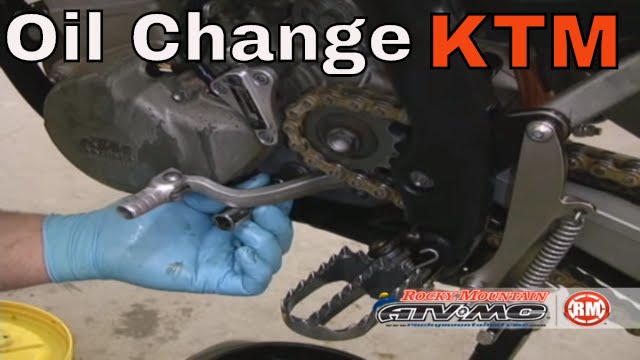 In this case, follow:
But what if the Chinese ATV won't start due to problems with the starter in the field or away from home? In this case, the rider needs to close the relay contacts with a screwdriver. Thus, the rider will be able to start the device bypassing the faulty starter.
No spark is another simple but annoying failure. It usually occurs due to damage to the coil or a break in the wires that go to the candle. Solving the problem is easy.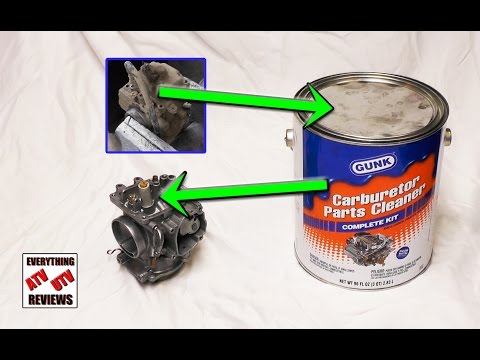 The rider just needs to unscrew the candle, insert it into the cap, attach it with a metal part to the motor and press "start".
Even minor downtime can prevent the ATV from starting, especially if it has been improperly preserved. And in order to “reanimate” the equipment after the winter, you should:
Note: In winter or during the cold season, the rider is advised to open the choke to enrich the fuel mixture. This makes it easier to start the engine in cold weather. After the device has started, the damper must be returned to its original position.
06/16/2020 14025
Contents
New models of ATVs are equipped with an electric starter. Therefore, problems with starting almost never arise. But in older models, manual kick starter can be installed. With him, beginners sometimes have difficulties.
To start the ATV, do the following:
 You need to squeeze the clutch (if any), and then set the switch to the "neutral" position. The light on the control panel usually comes on at this point. You can also try pushing the ATV. If the wheels are spinning, then everything is done correctly.
 Start the CFMOTO 500 ATV with a manual starter?
Watch this video on YouTube
Paradoxically, but sometimes the owners of ATVs simply forget to pour gasoline into the tank. Therefore, before proceeding with the diagnosis, it is worth checking the fuel level.
It is not uncommon for the cause of the problem to be insufficient battery charge . It can be charged at home. If the ATV is small, you can purchase an additional battery. The cost of batteries for budget models is relatively low.
How to start an ATV?! If the battery is dead!? Life hacks! Subscriber reply | Irbis Atv 250s | SJ8Pro
Watch this video on YouTube
If the battery is good, but the starter does not work, it may be worth looking for the cause in the starting system. It is necessary to try to close the contacts , which are located on the starter relay. To do this, you need to use a screwdriver. The relay is usually located under the seat. Two thick wires are connected to it.
If you need to find a way to start the ATV without a key, you can also follow these steps.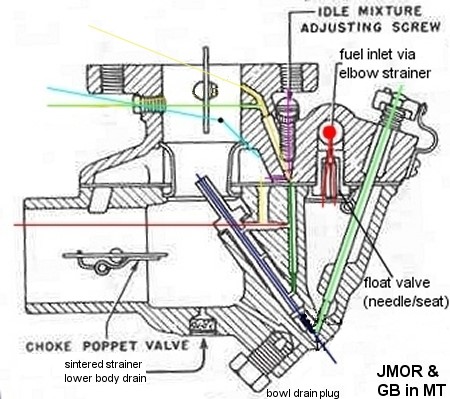 This technique will be effective only if the system is not controlled by the central computer . Otherwise, blocking will work.
If, after the manipulations, the engine starts up, then the problem is in the launch system . Otherwise, you will need to look for the cause of the malfunction further or visit a service center.
Each ATV has a stop button on the steering wheel. Usually it is red. This button is responsible for turning off the ignition, they turn off the engine . If you do not bring it to its previous position, the engine, of course, will not start. Therefore, it is worth checking in what position the "Stop" button is located.
Another security system provided in ATVs is a special check. This is a cable that is attached to the ATV at one end and to the driver at the other. If the latter falls off the ATV while driving, check flies out and the ignition turns off.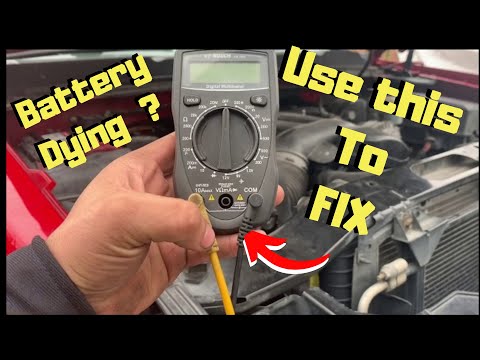 You won't be able to start the vehicle without this receipt either. If this part is lost, you will need to look for the appropriate contacts and close them directly.
Another possible reason why the ATV won't start is a blown fuse. If the ATV is small, there is usually only one fuse. He is located next to the battery . The suitability of this part for operation can be assessed visually. The cost of the fuse is cheap, so it is better to have several of these parts in stock.
If there is no spare fuse, and the failure happened away from home, you can insert wire instead. This is a temporary solution that will allow you to get home. It is impossible to constantly replace the fuse with wire. You can burn much more expensive elements of the system.
This part is located under the seat or next to the motor (depending on the model). It's a small box with wires coming out of it. They are connected to the ignition coil. It is difficult to assess the health of this part, so it is better to contact a service center with a similar problem.
If the spark plug wire is broken or the ignition coil is broken, it will not be difficult to check the performance of these systems. The candle is unscrewed and inserted into the candle cap. Next, you need to attach it with the metal side to the engine and press the starter button. If there is no spark between the electrodes, this is a sign of a breakdown. Try cleaning the spark plug electrodes and adjusting the gap between them.
If there is a spark, then the problem lies either in the candle cap or in the candle. You need to buy a new part and change it.
It will be possible to eliminate many malfunctions and start the ATV even in the forest. For models with a manual transmission, you can try to start the engine from the pusher.


(1).jpg)