Off-roading and camping out in the wilderness can be lots of fun. However, you need to always keep your eyes open for any emergency situations. Now, this might come as a surprise, but the biggest headache for four-wheeler owners isn’t the mud or the expensive fuel. Most drivers complain about losing their keys. And, since they rarely (if ever) carry any spares, all that’s left to do is call for transportation.
But that usually costs a lot. The good news is – there’s more than one way to get around this. Normally, the ignition switch doesn’t send the engine a signal to run without a key. But, as you’ll learn today, it is very well possible to “trick” the system and start the vehicle with no keys. So, join me, and let’s talk about this in more detail!
Alright, we begin our “How to start an ATV without a key” guide with the old but reliable technique of bypassing the ignition switch. Most ATV ignition switches are pretty easy to make sense of. They are usually connected to the engine with two wires. One of the wires is responsible for the ignition. But, that only happens when there’s a key inserted. Now, what you should do is outmaneuver the vehicle by cutting the wires.
Some experts recommend physically removing the ignition switch, but it’s not actually necessary. What’s more important, when cutting each wire, you need to be very careful not to overdo this and leave enough of it to bring the switch back to life and reconnect it. With the wires cut, connect them to each other. And please remember to disconnect them once you’ve arrived at your destination. Otherwise, you’ll end up with a drained and (potentially) dead battery.
A quick note: if you own a brand-new four-wheeler, it probably has more than a pair of wires. In that case, remember to only cut the red and the black wires and leave the rest be – that’s pretty much it. So, if you were wondering how to bypass ignition switch on Honda ATV (the latest editions), this is how you do it.
The next method may seem a bit violent, but it’s pretty effective. As you’ve probably already guessed, the screwdriver needs to go directly into the ignition switch. Yes, it will serve as a key – don’t forget to turn it! This technique is largely used by thieves and teenagers that try to take their dads’ cars for a spin. There’s a catch, though: unless you’re super careful, chances are, the screwdriver will damage the ignition switch.
A new one doesn’t cost much, but still – this can cause some inconvenience. If there isn’t a screwdriver lying around, scissors can do the trick. Use one of its blades, insert it, turn it, and the ATV will start. The best thing about this approach is functionality. What I mean by that is you’ll probably have something to stick into the ignition in your backpack when stuck with no keys.
Disclaimer: this only works on all-terrain vehicles with an electric start. If your ATV doesn’t have that, just skip to the next part. And if it does, find the solenoid. It should be hidden somewhere between the wiring harness and the battery unit. Can’t seem to locate it? I bet there’s a panel in your way – remove it gently. There should be a bunch of wires staring at you now. Don’t mind the tiny ones, only focus on the big wires.
The main wires come in a pair, and the idea here is to connect them using something metallic. A wrench or a screwdriver will do. As you know, metal is a very good conductor, and, once the two wires are connected, it shouldn’t be hard to start the four-wheeler. Remember: the wrench should ONLY be touching the wires, nothing else. If it gets in contact with the frame or some other metallic tools, the ATV’s engine will get damaged.
Only the electric parts will be affected, but that can be enough to ruin the motor.
Does your vehicle have a built-in alternative start method? If the answer is yes, you’re in luck, because this is one of the easiest and most effective ways to get the ATV going. I would strongly recommend using a dedicated user manual as your guide for this because different quad vehicles follow a slightly different routine. The basics are the same, though, and won’t take long to complete.
First of all, pop the hood that’s protecting all the electrical components of the ATV. Can you see the wire that’s running from the engine to the ignition switch? Take out the plug that’s leading the wire into the ignition switch. Put the hood back on and engage the pull or kick start, depending on your quad’s model.
Last, but not least, consider making a spare key. Obviously, if you need a right here and right now decision, this one won’t help. Therefore, remember to make a replacement key before your next trip into the wilderness. To answer a potential question, no, these keys can’t just be bought from a local store. You’ll have to go to the nearest ATV dealer and ask them for a spare key.
They’ll require a unique code (usually stamped on the master key).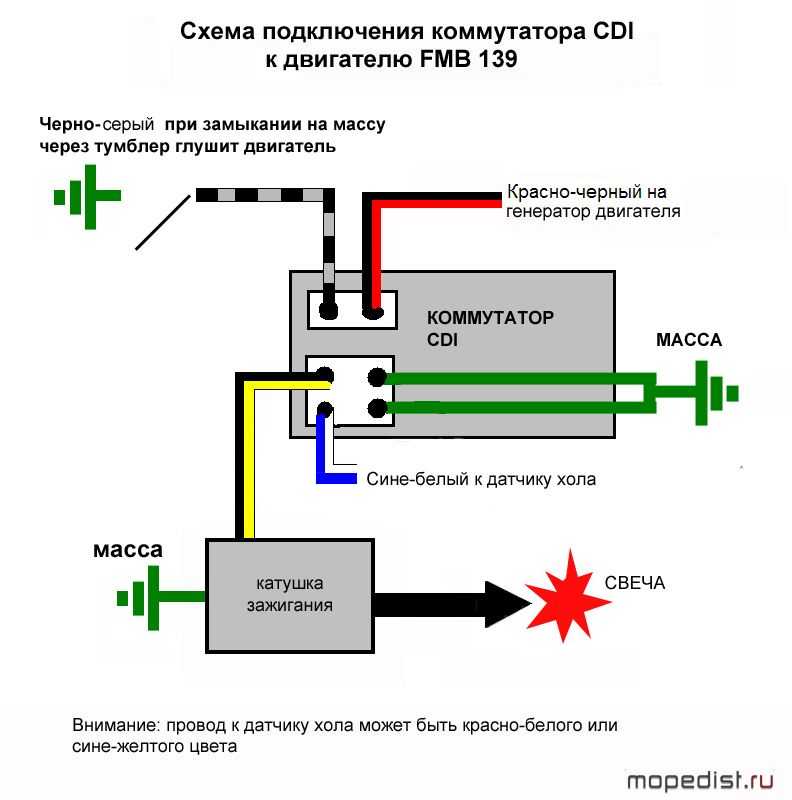 In some cases, the staff will also request a VIN (vehicle identification number) to make sure they get all the tiny details right. And if for some reason, the code isn’t anywhere to be found, a locksmith might be able to help with this.
If all your attempts at making a new key fail, it might be a good idea to buy a new ignition switch. As I already mentioned, these are available at a very reasonable price. The installation process is pretty straightforward as well and shouldn’t cause you any inconveniences. Or, just ask the dealer to handle the installation. Again, they won’t charge a lot for this.
Bypassing the ignition switch to start your ATV without a key is a pretty cool trick. If there are no fellow riders nearby, and you’ve lost your one and only key, a fun trip can quickly turn into a nightmare. I’m confident that my guide will be of great help and allow you to start the engine swiftly on your own. Thanks to the universal design of all-terrain vehicles, most of these techniques can be used on any ATV.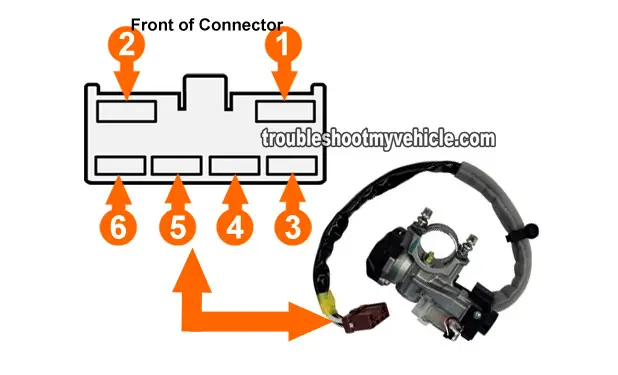
The make, model, and year don’t matter that much. So, if you were looking for instructions on how to bypass ignition switch on Chinese ATV or European ATV, use everything that we learned today to get yourself out of a dire situation. There aren’t any significant differences between quads developed in different countries.
Don’t let losing or forgetting your ATV key stop you from enjoying your quad. In this article, I’ll show you a few ways to start your ATV or UTV without the key. You can do any of these methods with basic hand tools found in most garages.
Your ignition switch is simply a break in a circuit telling your electrical box when it’s ok to start or not. When there’s no key in the ignition, no power can be sent to the rest of the needed components to start the engine..jpg) There are some pretty simple ways to get around this though.
There are some pretty simple ways to get around this though.
Of course the easiest way is if your machine has a pull start or kick starter on it. A lot of the newer quads being made don’t have this functionality anymore unfortunately. If you do have this option, simply unhook the ignition switch from the cdi or electrical box. That way the engine will start without needing a key inserted, then start the engine.
This method may work without a pull start or kick start if you can push your machine to a good pace and pop it into gear. Your other options are:
This is my preferred method to starting an ATV without the key. Most ignition switches will only have two wires going into it. On wire is sending power in, and the other wire sends power to the electrical box if the key is inserted.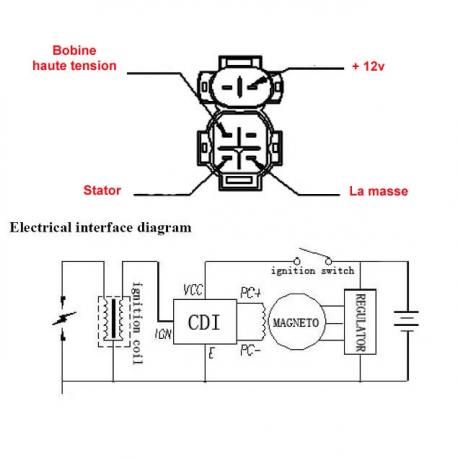 Telling the machine that it’s ok to start.
Simply remove the ignition switch from the equation. You can disassemble the switch or just cut the two wires leading to it. Be sure to leave enough slack in the wire just in case you want replace the ignition switch later on.
Now connect the two wires and your electric start should work like always. Remember to connect the wires on the side leading to the engine not the side leading to the ignition.
You have to remember to disconnect the two wires when you’re done riding or you’ll drain the battery dead. I would recommend you put a simple switch here in place of the ignition, a simple on/off switch will work perfect.
Some of the newer quads have more than two wires coming out of the ignition switch, not to worry. A lot of times there will also be a ground wire or something like that. The two wires you should focus on are red and black. Cut those two wires and tape them together. Make sure you tape together the ends of the wire leading to the engine not to the ignition.
You may also see a black with white stripe and green wire. These two wires are shorted together when the key is in the off position. You will need to open that short by cutting the black with white stripe wire and tapping off the end.
Once the black with white stripe is cut and taped, and the red and black wires and spliced together and taped. You should have power to your quad as if the key was turned on. You can use your normal electric start and everything the way it is.
Remember to disconnect the black and red wires when you’re done to avoid killing the battery. You could also tape the black with white stripe wire back together to prevent anyone from easily starting the quad.
This doesn’t work on all ATVs, only machines with an electric start option only. Your solenoid should be near your battery and wiring harness. On some quads you have to remove a side panel to access it.
Your solenoid will have two main wires coming out of it and possibly some other smaller ones, we only care about the two big wires. You need to lay a wrench or something metal across the two connectors of the main wires. Then, you should be able to start the quad.
I don’t use this method myself because you have to be real careful the wrench or piece of metal is not touching anything else that could short it out. If you accidentally touch the frame or something when doing this, you could cause damage to your electrical parts of the engine.
Desperate times call for desperate measures, and that’s what this method is. This trick is mostly used by thieves, so if you’re driving around the trails with a screw driver sticking out of the ignition and get stopped by trail enforcement, be ready to get asked some questions.
Basically you just hammer a screwdriver into the ignition and turn it on as if it were the key. The screwdriver will brake the pins in the lock allowing you to turn the ignition on.
I don’t recommend this method because you could damage the ignition and not get the quad to start anyway. And even if you are successful, you’re now riding around with a screwdriver sticking out.
This is obviously the best method in the list. Of course if you forgot your key and you’re already way out on the trail, then there’s no way you can order a part and do the replacement. This is more for someone who lost their key, or broke their ignition trying the screwdriver method.
Here’s a decent Replacement Ignition Switch found on Amazon to help get your search started. If you can find a replacement from the manufacturer for your specific machine, that would be the best route, but probably a lot more expensive.
One thing I want to mention is that it’s always best practice to tape up any wires you cut and exposed. You may have gotten the hotwire job done correctly, but if any of those wires hit the frame and short out you could have bigger problems.
Leave enough slack in the wires to work on them again later on.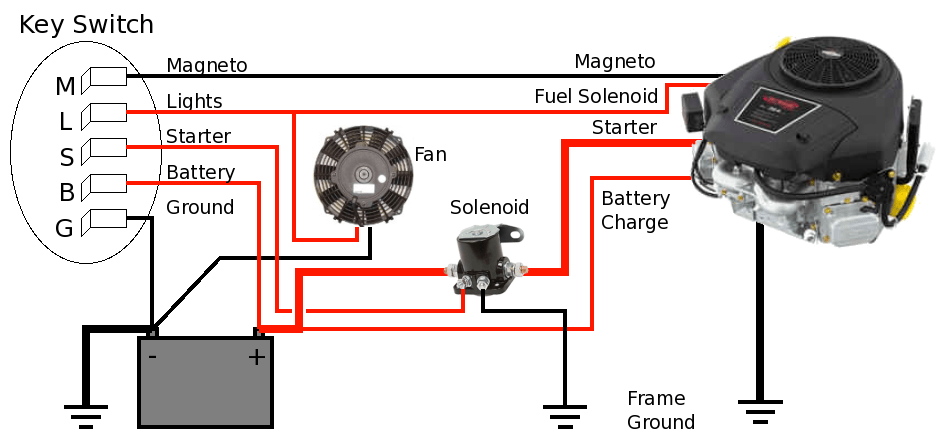 Try to avoid cutting the wires to the ignition real close to the ignition itself, or somewhere that makes it hard to get to the wires. You may want to work on it later on, like putting in a new ignition switch or on/off switch.
Don’t tell everyone how easy you hot wired your quad and how you did it. Maybe you’ll be safe to do this, but I lean a little more to the cautious side when it comes to my machines.
Sharing is caring!
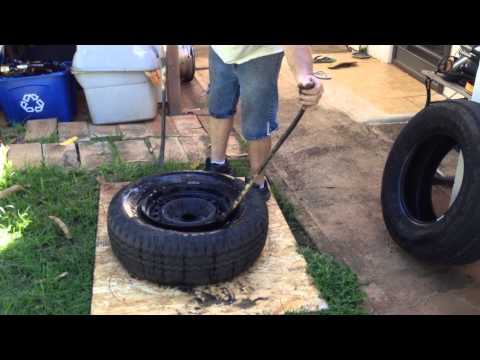
Photo: carstuckgirls
Clicked the button, stuck it, and turned it. And even started it at all, without taking the key out of the bag. This is how engine start systems work in a modern car. However, the abundance of electronics and the human factor can very quickly turn comfort into complexity and waste. Don't believe? But in vain . ..
Eduard Raskin
It is not enough to open a car, you also need to start it. From the soothing noise of the internal combustion engine, which means that everything is fine and we will go soon, we are separated by only one device - the ignition switch, a simple breaker, by closing which the driver starts the engine. Even with a key, even with a key - the meaning is the same. It would seem that everything is extremely simple. However, the ignition lock, both the classic one with a key and the newfangled one with a button, has its own subtleties that you need to know. Otherwise, the engine will not purr.
Let's start with the classics. The key must be turned carefully and carefully, dashing strength or circus dexterity is not needed here. Otherwise, there is a chance to be left with a broken key in your hand. In order to pull out the “sting” afterwards, you will need to try hard and call on all the surrounding luck to your side. Otherwise, a replacement.
Sudden movements can damage not only the key, but also the lock itself. The mechanism should work smoothly and turn very easily, so any “biting” is unacceptable. Oddly enough, the ignition lock needs to be lubricated periodically so that the internal mechanical parts, starving for attention over the years of operation, get their share of fuel and lubricants. In a word, penetrating lubricant has never harmed anyone, and the blue bottle, where without it, is probably lying in the trunk. By the way, you can’t do without a straw in this matter.
Photos from open sources
The reverse side of biting and jamming is the excessive laxity of the castle. This effect can only be achieved by driving for several years with a huge bundle of heavy key rings on the keys. Year after year, they loosen the castle, so that one day it will succumb. However, once is enough.
A badly worn assembly can fail on the move, locking the steering wheel and turning off the engine. Then only the lucky one can get out of the water dry: a car with a locked steering wheel and without a brake booster is difficult to control.
![]()
To prevent this from happening, automakers transferred all the functionality of the lock to the immobilizer, leaving the driver with only a button. But we know: the less electronics in a car, the more reliable it is. A host of wires and pads lead to the fact that every extra drop of water in the cabin leads to problems. So, in fact, it happens with an electronic ignition lock: over time, the wires oxidize from moisture, the connections turn sour and turn green, and instead of starting the engine, it will happen ... Nothing will happen. Silence.
The last point is again about wiring. Starting the engine is a power surge in the power grid, and a rotten wire may not survive this. The block, as a rule, is located directly under the steering column, so the current windshield will quickly destroy the connections: even a simple touch with your hand will leave a bunch of blue vitriol on your fingers. If this happens, know it's time to call an electrician.
Trying on fresh new clothes for an aristocratic Briton
18412
Try the aristocratic British fresh new new newve
18412
Subscribe to the Autovzglyan channel:
A person who just bought a moped does not know how to start this technique in other ways than using ignition keys. But sometimes there are situations when you have lost the keys to it, and at the same time you urgently need to go somewhere. In the article, we will tell you in detail about the known ways to start the engine without a key.
Contents:
First you need to make sure that there is gasoline in the gas tank. Now you need to put the moped on the footboard and turn the ignition key to the “on” position (sometimes marked with English letters “on”). If everything is done correctly, then the panel should light up, and the arrow on the speedometer will rise and fall. Then tilt the kickstarter leg and press it sharply with your foot, you should continue until the engine starts. This method of starting a moped always works, for the most part it is used with a heavily discharged battery. Also, after the winter, the moped should only be started from the kickstarter, since the battery could lose its charge a lot.
The standard way to start a moped
If there is gas in the tank and the battery is good, starting is usually done with an electric kickstarter. Be sure to turn the ignition key to the “ON” position, then you need to hold down the brake handle, and only after that you can press the start button. Do not release the brake until the engine starts.
Driving a moped is not that difficult, anyone can handle it. On the right side there is a lever for controlling the front brake, and on the left side the rear. On the instrument panel there are auxiliary controls for the moped.
There is a handle on the right side that can be used to add gas. This is done by rotating the handle, turning the gas towards you is added. There are also additional switches, for example, to turn on the lights and turn signals. There are also buttons for horn and starter.
We strongly recommend that you always have a spare key for just such cases. If you purchased a moped from your hands, then immediately make a couple of duplicates.
If you have such a situation, but there are no keys, then you will have to get out of it like this. It is best to call a specialist - he will be able to competently replace the ignition switch, while it will take him a little time to do such work. If you are sure that you can handle it without specialists, then below we will share with you information on how to start a moped without a key.
To get to the ignition switch, first remove the shield protecting it. There you will see 2 bolts that secure the contactor. Unscrew them carefully. Insert a flat and strong screwdriver into the contactor, and then slowly but firmly turn the core. This position is also called "safe start", the fact is that in this mode the moped will not take off quickly from a place.
If you are unable to disassemble the ignition lock, carefully remove the chip from it. Under it should be a contact pair. By closing the contacts with a piece of wire, you can start the moped. Remember, all recommendations do not guarantee 100% success, you perform all actions at your own peril and risk, because with such manipulations you can completely break the ignition switch.
There is another way, but it is more dangerous, as it turns off all the electrics of the moped. To do this, you need to remove the headlight, and find under it a bunch of wires coming from the ignition. Among them, usually, there is black and white (or completely green). He is what we need. We just pull it out and try to start the moped from the kickstarter.
Although there are two main ways to start an engine, there are many other options as well.
The first step is to get to the generator, which is located on the back side, in any way that is harmless to the equipment. We find an impeller there - you need to wrap a rope around it 5 times clockwise, for this you can tie a knot at the end of the rope and insert it from the very beginning between a pair of blades. And then you will need to pull it hard, you may not succeed the first time, so you will most likely have to make several attempts.
You can learn more about this method from the video:
People have an opinion that if a moped with a variator, then it is impossible to start the engine in this way. In fact, this is just a myth, experts have repeatedly carried out test tests - nothing bad will happen.
For this method to work, you need to get to the clutch bell, to do this, carefully remove the protective cover of the variator. Next, we will need to lock the bell and clutch together. This is done as follows: take the nut from the protective cover of the variator, and then insert it with force so that it locks there. To implement this method, you will definitely need an assistant. He will push the moped, and at the right time during acceleration you must press on the variator strap, so you can turn the wheel. When the engine starts, the nut will fall to the ground on its own, so you won't lose it - you don't have to worry about that.
This method should be used in the most urgent case, when you really need to go somewhere. The fact is that you will be able to start a moped, but only in the future you will have to replace the ignition switch.
The crudest way to start a moped without an ignition key
For this starting technique, we only need a screwdriver. It should be pushed into the well with force, and then turned. You can not remove the screwdriver, in which case the engine will definitely start and not stall. This option is also used by some motorists when there are no other solutions.
The method is to turn off the switch, but it only works on scooters and mopeds of Japanese and sometimes Chinese manufacturers.
To disable it, you will need to remove the protective cover of the ignition switch. Under it there are 4 wires according to the standard, white, black, red and green - these wires supply power. The remaining wiring is the switch, after turning it off, the moped can be started using a kickstarter.
Attention!
Be careful, as removing this wiring can turn off all other wiring of the moped (turn signals, headlights, etc. )
You can see more about this method in the video: There is no snow at all on motorways in the winter season, so you can drive along them without any problems. But not always the "iron horse" is ready to start up easily at low temperatures. Now we will tell you how to properly operate a moped in winter.
The first step in winter is to refuel with fresh gasoline, and be sure to change the mineral oil to synthetic. If left, the mineral oil will constantly be thick in the engine, and this will adversely affect its operation. To start, it is better to use a kickstarter, and not an electric starter, since the battery voltage sags heavily under the influence of cold. When starting, add a little more gas than usual, so the engine does not stall. Sometimes, when the oil thickens, some smart people heat it up with a gas burner. In modern vehicles, this usually does not happen if the oil is synthetic.
If you follow all the recommendations for starting, the moped will start at a temperature not lower than -20 degrees Celsius. When you could already start it, we advise you to let the engine warm up for at least 5-10 minutes.
Wires may vary in color, so you perform all actions at your own peril and risk. Remember, in case of incorrect actions, all electronics may fail.
This problem is very common among motorcycle, moped and scooter owners. If it is not possible to start the engine from the button, then the problem lies in the fuse. It is located in the battery compartment, to check its performance we need a multimeter.
The multimeter knob must be turned to measure DC current. Measure the voltage at the ignition key with and without fuse. The instrument readings should be the same in both cases. If you find a voltage deviation of 2 or more volts, then the fuse must be replaced immediately. A malfunction can also be hidden in the engine start circuit, for this you need to determine the integrity of the wires going to it. The multimeter has such a function, so it is possible to check it yourself.