Updated: Jun. 09, 2022
Next Project›
Family Handyman
Follow these simple steps for replacing a punctured bicycle tube. You can even fix the flat on the go if you have a spare tube, tire levers and a pump.
By the DIY experts of The Family Handyman Magazine
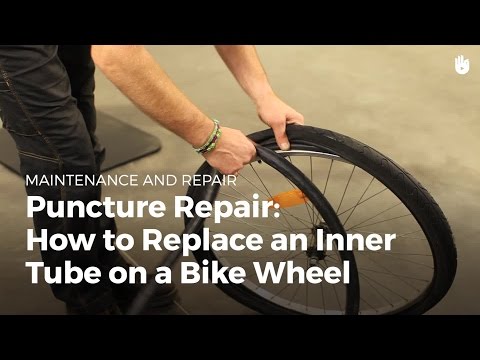
Step 1: Remove the tire and old tubePry under the bead of the tire with one of the tire levers and hook it to a spoke. Move over about 4 to 6 in. and insert the other tire lever. Pry it down and then slide it along the rim to release the tire.
The first step of how to change a bike tire is to release the brake and loosen the axle nut so you can remove the wheel from the bike. Most bikes have a quick-release mechanism on the brake and a quick-release lever on the axle. If you’re not sure how to remove the wheels on your bike, check the manual or visit your local bike store and ask someone on staff to show you how. Do this before you have a flat so you’ll be prepared. For a guaranteed trouble-free fix, buy a new tube rather than patching the old one (see “Valve Types” below).
After removing the wheel from the bike, the next step is to take one edge, or bead, of the tire off the rim so you can remove the damaged tube (Photo 1). Pull out the tube. Then remove the tire completely from the rim, put it around your neck like a necklace and turn it inside out while running your fingers along the inside to feel for sharp objects. Be careful, though—there could be bits of glass lodged in the tire.
If you don’t want to walk home after having a flat, here’s a tip: Assemble a tire repair kit like this. A repair kit is one of the most valued bicycle accessories you’ll want. You can put it in a resealable plastic bag and tuck it in a knapsack or buy a small pack that straps under your bicycle seat. Not including the seat pack, the kit cost us about $38.
Partially inflate the new or patched tube and insert the valve stem into the hole in the rim. Then work the tube into the tire.
Press the bike tire back over the rim, being careful not to pinch the tube. If it’s too tight to push the last section by hand, use the tire levers to pry the bike tire onto the bike rim.
After checking the tire, put one bead back on the rim, leaving the other side loose so you can install the new (or patched) tube (Photo 2).
Photo 3 shows how to push the second tire bead back onto the rim after the tube is in place. When the tire is completely installed, check all around on both sides to make sure the tube isn’t pinched between the tire and rim. To do this, push against the bead and look into the space between the tire and rim to be sure it’s clear.
Now you’re ready to fully inflate the tire. But there’s one last thing to watch for. Occasionally the bead may not seat properly on the rim, so stop before the tire is inflated to full pressure and rotate the wheel while you inspect the area where the tire and rim meet. If you see a spot where the bead isn’t seated in the rim, let a little air out and work the bead into the rim with your fingers. Then inflate the tire to the pressure listed on the side. Reinstall the wheel and spin it to make sure it’s centered between the brakes and rotates freely. If you’ve done an emergency repair using the CO2 cartridge, you may not have enough pressure. When you get home or to a bike store or gas station, fill the tire.
When you go to buy a new tube, take the old tube with you and match the valve. Presta valves have a nut on a threaded shaft that seals the air in and must be loosened to inflate the tube. You need a pump that’s compatible with a Presta valve to inflate these tubes. If you have Presta valves on your bike, keep a Presta-to-Schrader adapter with you so you can use a gas-station air pump to inflate your tire.
Next, check out how to change a car tire.
Originally Published: August 28, 2019
ⓘ
istockphoto.com
Experienced cyclists know punctures occur frequently, so it’s important to learn how to change a bike tire even if you are a more casual cyclist. When your bike tire is punctured, you may be able to repair it yourself. But if the damage is too extensive, or the tire is already severely worn, then replacing the tire may be necessary.
Typically, bike owners cannot repair large breaks, splits, or punctures with a tire patch kit.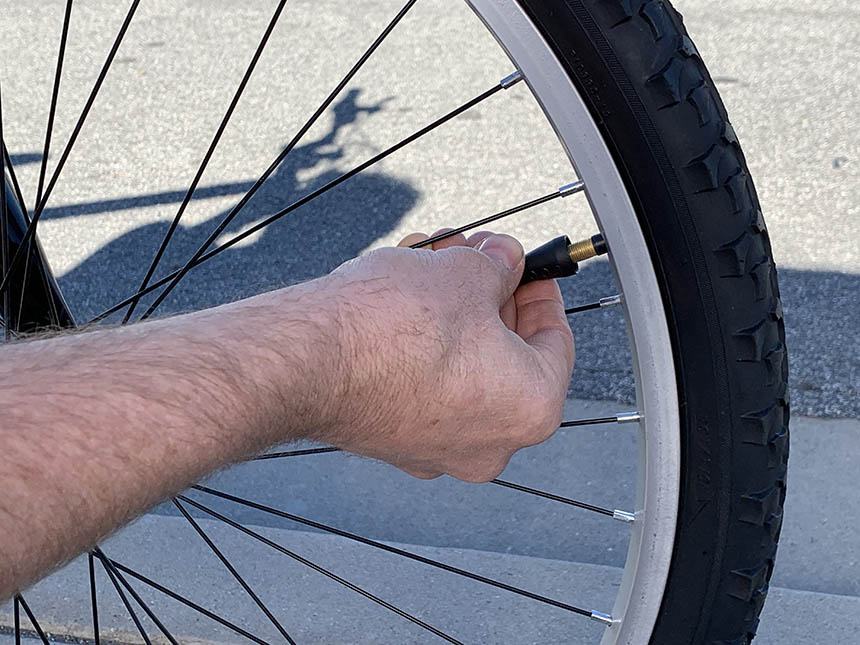 Similarly, any significant signs of tire wear, strain, or cracks should indicate it’s time to replace a bike tire. Most cyclists learn how to fix a bike tire to deal with minor punctures and replace one after more severe damage has occurred. If you need a refresher, are new to cycling, or are getting into bike maintenance, then follow the steps below to learn how to change a bicycle tire.
To access the bike tire, either put the bike on its side or stand it upside down, resting on the handlebars. However, some cyclists avoid placing the bicycle upside down because this position could damage the handlebars or seat. Choose the position with which you feel the most comfortable. Another option is to invest in an upright bike stand that can position the bicycle off the ground while you work. If you are laying the bike on its side, make sure the chain side faces up.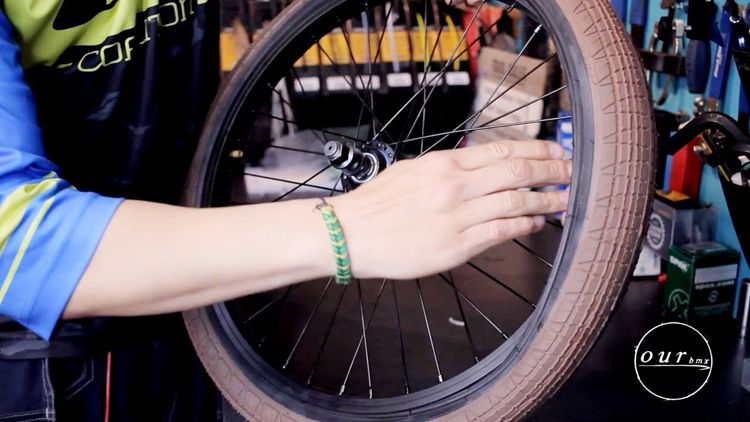
Advertisement
If you are replacing the back tire, then it’s important to adjust the gears to the smallest ring beforehand to make it easier to remove the tire. The smallest ring is the outer gear of the bike.
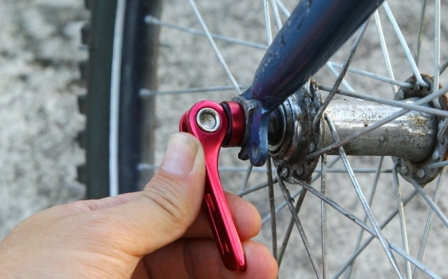
If the bike includes a quick-release lever, it will be located in the center of the bicycle wheel. Loosen and remove the lever by pulling up and turning the lever 180 degrees. Then set it aside for reinstallation. This should free the wheel to allow the damaged tire to be replaced. However, many bikes don’t come with a quick-release lever. If this is the case, then a wrench is needed to loosen the nut in the center of the wheel.
Typically, a 15 millimeter wrench will be the correct size to loosen and remove the wheel nut. Keep in mind that you can also check the bicycle manual or the manufacturer’s website for details on how to remove your specific bicycle tire. Additionally, if the nut is seized, WD-40 or a similar lubricant can be used to help loosen the threads and remove the nut.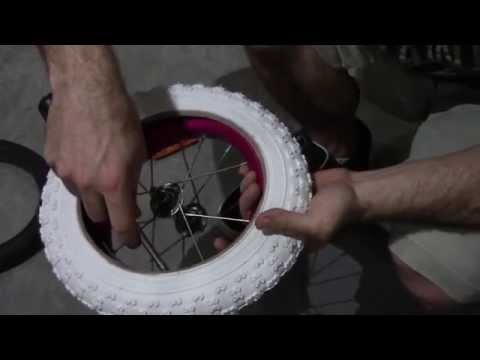
RELATED: How to Change a Car Tire Like a Pro
istockphoto.com
If you attempt to remove the wheel without detaching the brake cables, the force can damage the cables. On some bikes, the brake cables will disconnect automatically when the quick-release lever is removed, but the brake calipers must be squeezed in order to release the cables in most cases.
Don’t forget to lift the chain off of the gears when replacing the rear wheel on a bike. Once the chain and brake cables are disconnected and the wheel nut or quick-release lever has been removed, you can lift or pull the tire out of the forked slot where it usually sits on a bicycle.
Advertisement
To remove the rubber tire from the metal wheel, the tire needs to be deflated completely. Take off the air valve cap and set it aside for reinstallation. Release the air from the tire with a wrench by pressing down on the plunger inside the air valve. Alternatively, your bike may have a Presta valve or a Dunlop valve; these need to be pulled up to release the air.
If the air valve has a retaining nut or lock ring securing it to the wheel’s rim, then loosen and remove the part, placing it with the air valve cap for reinstallation at a later stage in the process.
The deflated tire will still be difficult to remove from the rim of the wheel. First slide a tire lever between the rim and the tire, then use leverage to pop the edge of the tire up out of the rim. Secure the tire lever to the spokes of the wheel and use a second tire lever on another section of the tire. Work the second tire lever around the rim of the wheel until the entire side is free. This should give you enough space to reach inside the tire and pull out the inner tube.
Once you have removed the inner tube, you should be able to take the tire off the metal wheel by rolling or twisting the tire over the edge of the rim with your hands. Work your way around the outside of the wheel until the tire is free, and inspect it for any serious damage. In many cases, only the inner tube needs replacing, but if there is severe damage to the outer tire, then it will also need to be changed.
Advertisement
RELATED: 15 Clever Bicycle Storage Ideas for Any Space
Take the new tube out of the packaging, making sure to remove the dust cap, lock ring, and valve cover. Unfold the tube and check to make sure it has no pre-existing damage, then connect it to a bike pump or tire inflator to add air to the new tire tube. Do not fill the tube all the way just yet.
The purpose of adding air at this stage is to help the tube hold its shape and avoid damage caused by pinching, bending, or twisting the tube while reinstalling it. Put any small parts in a safe spot to make sure that they are not misplaced.
istockphoto.com
Whether installing a new tire or refitting an old tire with a new inner tube, it’s recommended to inspect the inside and outside walls of the tire for any existing damage, severe wear and tear, or sharp objects that could cause additional damage before installing the inner tube. Refit one side of the tire on the rim of the wheel, ensuring the tread is pointed in the correct direction.
Slide the air valve through the valve hole and feed the inner tube into the hollow space inside the tire and wheel rim. With the tube in place, twist the outer edge of the tire so that it slips into the wheel rim. Try to start near the valve and finish across from it—the tire will be looser in this position. If the tire resists too much, you may need to let some air out of the inner tube or use a tire lever to help position the last section, where the tire is the tightest. Also, remember to reinstall the lock ring or valve retaining nut if your bike has one.
Advertisement
RELATED: 5 Bike Racks to DIY on the Cheap
Use a bike pump or home air compressor to fully inflate the inner tube. If the PSI is not written on the tire, you can refer to the bicycle manual or manufacturer’s website for the appropriate air pressure. Don’t forget to put the cap back on the air valve to prevent accidental tire deflation during use.
Slide the wheel back onto the bike and secure it with the quick-release lever or wheel nut, as applicable. Reattach the brake cables and lift the chain back onto the gears if you replaced the rear tire. Rotate the wheel to ensure it spins freely, then place the bicycle upright and test the repair with a short ride. Make sure to clean up any old parts and dispose of old tires through local recycling facilities. Some bike and car shops also have programs for accepting old tubes and bike tires.
istockphoto.com
Regular bicycle maintenance and proper storage can help keep a bike in top condition over years of ownership. Always replace or repair any tire damage as soon as possible to avoid bending a bike’s wheel.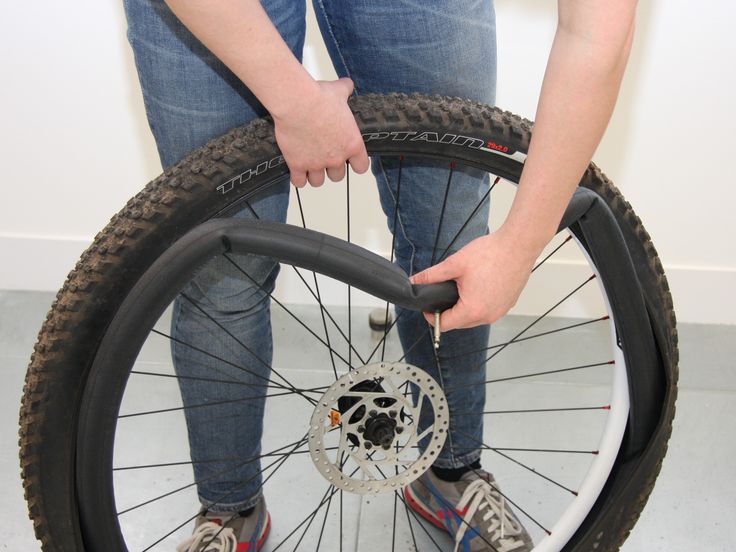 Also, during the repair or replacement process, make sure to keep track of all small parts, like nuts, lock rings, or valve caps. While small in size, their purpose is essential to the bicycle’s function, and losing one during a repair can create another problem needing to be resolved before the bike can be used again.
Advertisement
A wheel puncture on a bicycle is a fairly common occurrence, especially when riding on rough terrain or using substandard or worn tires. Such an unpleasant incident happens to a cyclist at least once a season, and some are "lucky" to change the camera two or three times in a short trip.
And if it takes five minutes for an experienced cyclist to change the tube on a bicycle, then for some reason beginners are very afraid to remove the tire on their own and most often drag their bike to a service or to friends.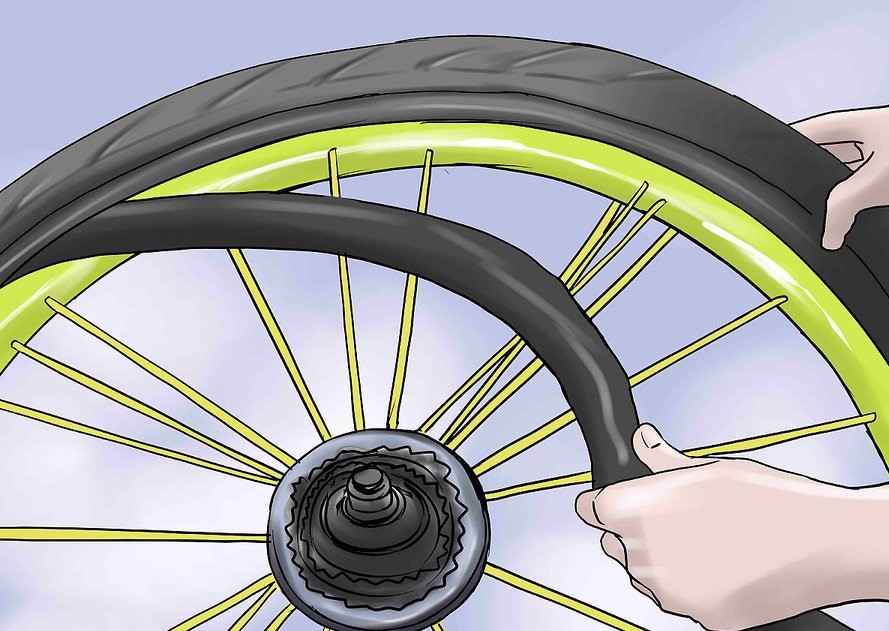 It's actually very easy to change the inner tube:
 It is also worth remembering that if you press too hard on the rim, you can damage it. As an example, in this manual we will use ordinary wrenches as montages, which were the first to come to hand - not the best, hiking option.
 In order to pull the tire out of the rim, you need to pick up its edge with the first "wire" and pull it out of the rim. At the same time, the mount must be held so that the tire does not end up inside the rim again, and the mount itself does not fly into your forehead.
After that, with the second mount, similarly pull out the edge of the tire next to the first mount. Don't forget to hold the first montage while doing this!
 In many cases, this can even be done by hand.
 If the tire tension is still high after using two mounts, the third mount should be used in the same way.
You should end up with one end of the tire completely out of the rim.
Done. Now you can start sealing the damaged camera or just install a new one.
 In case of any doubt, the installation of the camera should be stopped.
  Then inflate the wheel to the required pressure.
 I hope this article will help you learn how to change the camera yourself. Happy rides!
| Recommended reading: | GPS navigator for bike | How to choose a bike | What to do if the chain slips |
Published: 06/09/2010
201117 views
Tired of riding around your city? Our bike tours are much more interesting!
Need a bike? A great way out is to buy a bike in our bike shop!
Bicycle broken? It's not a problem - we have bike repairs in our shop.
To be fit in winter? buy a simulator.
03/05/2013
Probably the most common failure for a cyclist is a tire puncture, especially if he rides in an aggressive style. Either he hit the glass, then a nail, and sometimes he just ran into the curb at speed. Experienced cyclists can change the camera in the bike with his eyes closed, but what about a beginner who can't even take off the wheel, let alone change the camera. The main thing is not to despair! If you are traveling a long distance (and always better), take a pump with you, a spare tube, or, in extreme cases, a "bike first aid kit" for the wheel. Someday she will save you from the fate of pulling the bike "on yourself".
So, if you punctured the wheel , first you need to get off the bike, in no case continue to move on a flat tire . Firstly, you will tear the tube even more, and secondly, you can ruin the tire, and in the worst case, the rim.
How to change the tube on a bicycle
1) If the wheel has not completely deflated, deflate it to the end, to do this, unscrew the nipple (spool) cap. If you have a nipple (spool) the same as in the car, press something sharp on the small button in the middle and hold until the tire is flat. If you have a cap with a key for the spool, then just unscrew it. If you have a nipple (spool) like in old bicycles, unscrew the lamb and take it out.
2) Remove the wheel. If the wheel is on an eccentric, removal will not cause difficulties, if not, then keys will be needed (depending on the bike and wheel - 13-17).
3) If you have "pliers", use them to remove the rim from the wheel, if there are no pliers, you can use an improvised tool (wrenches, etc.), but it is advisable not to use objects with a sharp edge - this can lead to damage to the tube or rim. Tear the tire with your tool and, resting it against the rim, press down until the edge of the tire comes out of the rim, then take the second key or mount and do this action again, while NOT removing the first key. When you feel that the keys do not lean back when you release them - just try to move the second key in a circle away from the first key.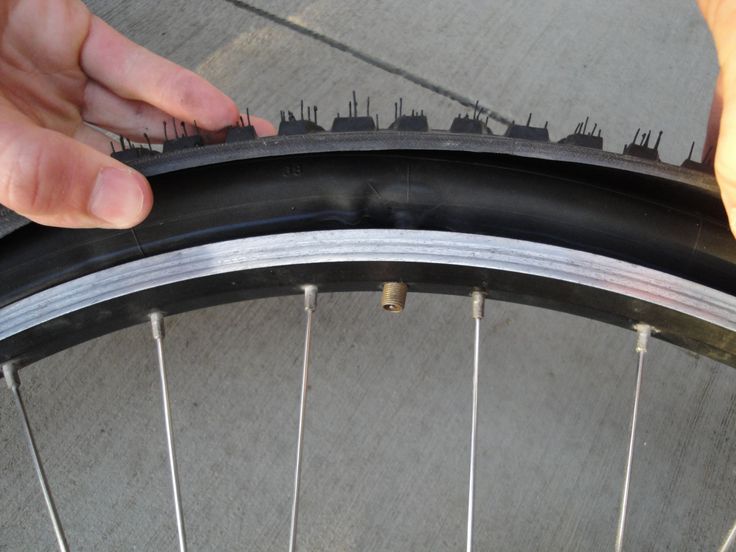
4) Remove the camera by simply grasping it with your fingers. Grasp the opposite side of the nipple (spool).
5) In principle, you can insert a new tube, but I recommend removing the tire completely (this can be done by hand or with pliers (wrenches)).
Check the condition of the rim: there are no metal burrs inside, check the condition of the rim tape, look inside the tire. This should be done if you change cameras frequently and don't know where you might have blown a tire.
How to install the tube in a bicycle wheel
.d.)
2) Lightly inflate it, if you removed the tire completely, put it on one rib (if the rubber is directional - make sure you install it correctly (you can peek at the rear wheel if the treads are the same)). Roughly mark where the hole from the nipple (spool) is, put the chamber into the tire without twisting or breaking it. Insert the spool (nipple) into the hole and screw on the cap.
3) With your hands (if the tire is soft) or using the same tool, slide the second rib of the tire onto the rim.