If your ATV isn’t getting spark from the spark plugs at the engine, you’re basically dead in the water. This can be an extremely frustrating spot to be in because the engine won’t turn over and won’t give any hints as to why. I’ll tell you exactly how to check for spark on an ATV, and if you’re not getting any, how to diagnose the electrical components to find out exactly where your problem is.
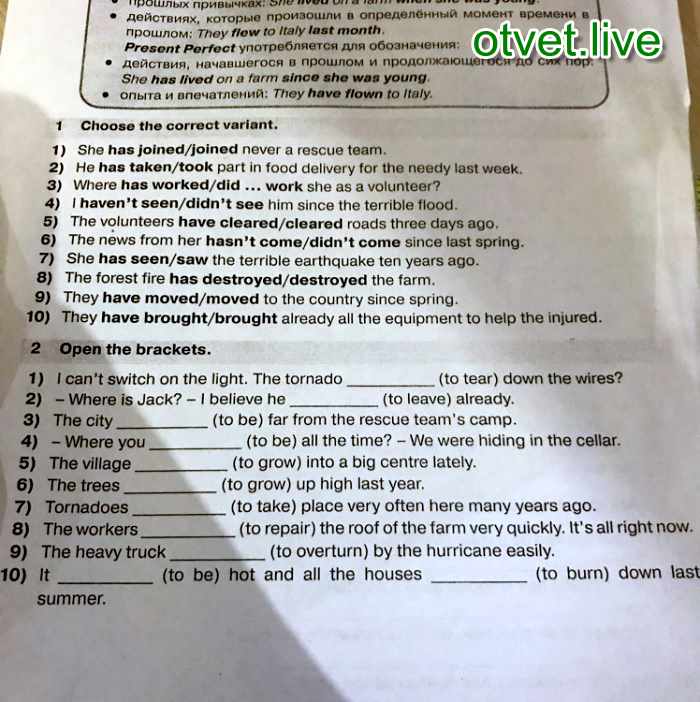
To quickly tell if your ATV is getting spark, remove the spark plug from the engine. Reinsert the plug back into the coil wire. Hold the electrodes of the spark plug close to the engine to ground it, and try starting the engine. If you see spark coming from the end of the spark plug, your ATV engine is getting spark.
Keep in mind, on some models you will need to have the handle bar switch in the run position and the rear brake applied. Look for any other red buttons or kill switches that might have been pressed. A lot of quads have fail safes you need to think about when trying to start the engine.
If you have a hard time being able to tell if you can see a spark or not, you could always have a buddy hold the electrodes of the spark plug. If he yells when you try to start the engine, you have spark.
There are a few reasons an ATV won’t be getting spark from the spark plugs. The electrical systems on these quads can get a little tricky sometimes. Your best bet is to just check one thing at a time making your way down the list until you’ve found your problem.
The most common reason an ATV is getting no spark is a bad spark plug, either the wrong plug all together or just not gapped correctly. Or the spark plug just went bad, that happens quite often and it’s normal.
If you find out you need to replace the spark plug, you can usually find them easily on Amazon here: ATV Spark Plug.
If you know your spark plug is good and gapped correctly, then you’ll want to check for a loose wire, a bad switch, a bad connection, the ignition coil, or a problem with the stator.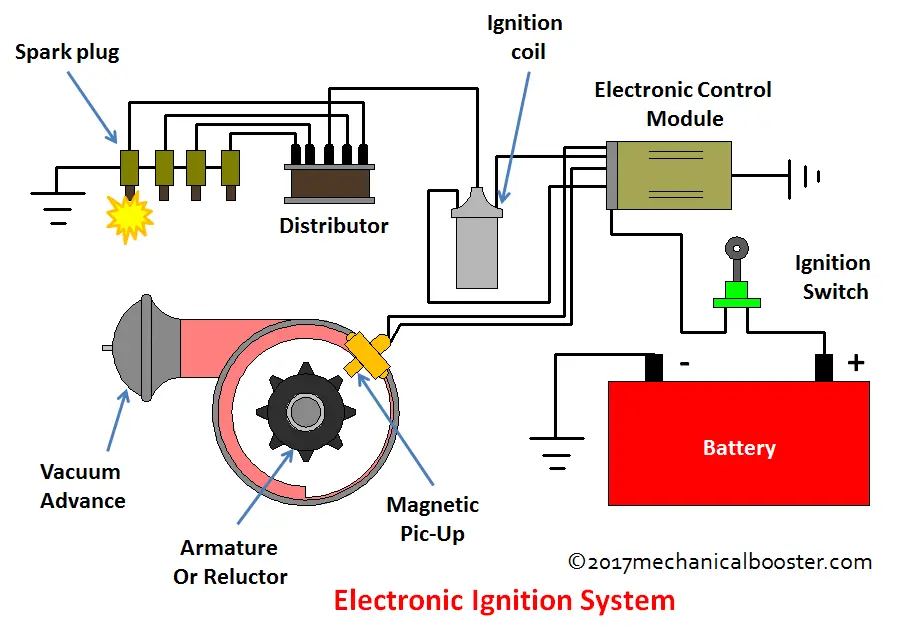 Lets go over how to check these one by one.
First, you’re gonna want to check the condition of the spark plug wire or ignition coil wire. This is the wire that hooks up to the spark plug when it is bolted into the engine. Sometimes these wear out because the wire itself is usually exposed to dirt, rocks, and debris while riding.
If the spark plug wire looks good, the next step is to check for bad connections or bad switches. To do this, disconnect the main electrical connector coming out of the engine. Doing this will unhook the kill switch, ignition switch, and all the wiring associated with those switches. Check to see if you get spark now.
If you got spark after unhooking the main electrical connector, then your problem is one of those switches or the wiring for one of those switches. Now your task is to go through and disconnect each switch one at a time to find the problem part. It will help to have an ohm meter to check each switch and each wire separately.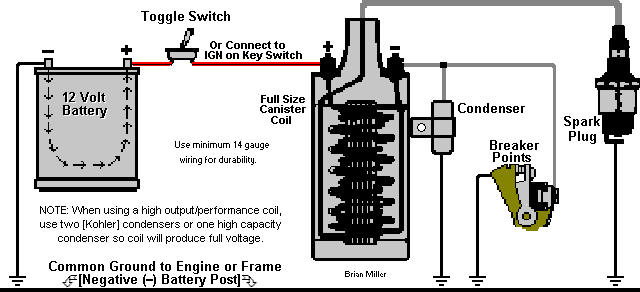
First off, you’re going to need a digital multi-meter to test the electrical components of your ATV. If you don’t know what that is, check out this Fluke 115 Compact True-RMS Digital Multimeter on Amazon. That’s the one I have and use, and I recommend it if you’re in the market for one.
You will also need basic tools to get the ignition coil on and off the machine. If you want to be extra safe, you could unplug the battery before starting. But I find it’s ok to just unplug the wiring to the ignition coil before removing it.
To locate the ignition coil, simply follow the wire connecting to your spark plug. Once you have the ignition coil out, you can hook your multi-meter up to it to begin testing. Start by testing the primary side of the ignition coil, where the ignition coil was wired, not the side that goes to the spark plug.
You should see between 0.2 and 5 ohms of resistance. That is a wide range because it varies from machine to machine.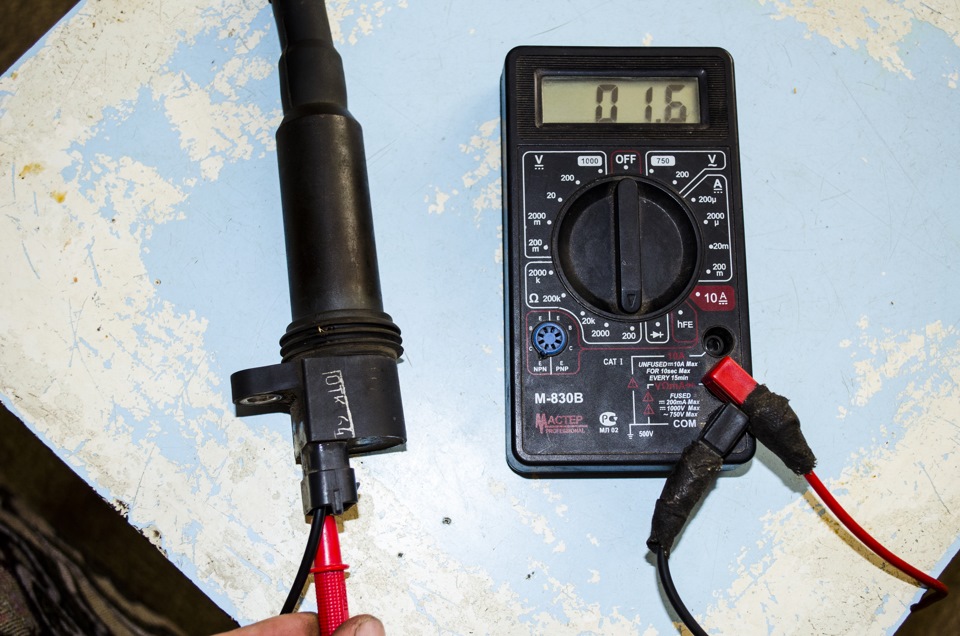 It’s best to look through your service manual to see what your ignition coil should read on its primary.
Next lets test the secondary side of the ignition coil. This is the side with the spark plug caps. If your ignition coil has two spark plug caps, simply put the red test lead in one and the black in the other. Look for around 16k ohms resistance, but again you should check your service manual for your specific measurements.
If you only have one spark plug cap, you will take one multi-meter lead and connect to the spark plug cap and the other to the primary side power connector.
Use the spark plug cap as if it’s the negative side of the primary for this test with that type of ignition coil.
Again you will need a multi-meter and basic hand tools to remove the stator. You either have a single phase or a three phase stator. Three phase is the most common, and probably the type you have.
To make sure, check the wiring harness coming from your stator, If you see group of three wires of the same color (usually white, yellow, or black) you have a three phase stator. A single phase stator will not have that set of three wires.
To start with the three phase stator, set your multi-meter up for ohms. Now get the connector with those three same colored wires we talked about before. You are going to be testing each of those wires against each other. So leg one vs leg two, leg two vs leg three, and leg three vs leg one.
You can do this by simply inserting the multi-meter leads into the connector. You should typically see between 0.1 – 1 ohms for each measurement. But check your service manual for your specs on your machine.
If your meter reads OL, that stands for open line, and you will need a new stator. To check if your stator is shorting to ground, simply hook one lead to a stator leg (through the connector) and the other to the stator body or chassis ground on your machine. You should not get any reading on your meter. If you do get a reading on any of the legs, you will need to replace your stator.
You can do this testing while the stator is still on the machine if you’re able to access it.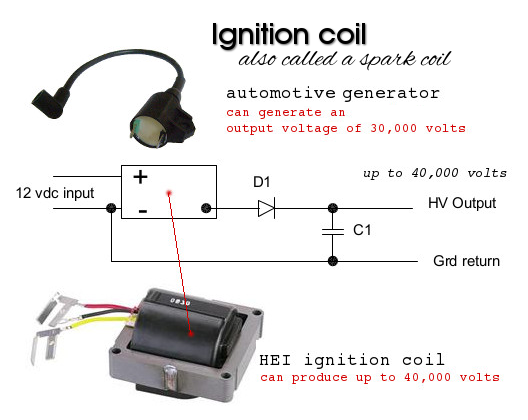 I find it easier to remove the stator to do the actual testing, but that can be a pain all on its own.
That’s it for the most common electrical problems you’ll see with your ATV. It’s usually something like a bad kill switch or loose wire or connection. Hopefully you find your issue with out too much trouble.
Electrical problems can be some of the most time consuming. If you have the money to spare, it may be worth it to just bring your machine to a shop if you don’t feel like messing around with all the potential causes.
Even then, it doesn’t hurt to quickly look over some connections before calling in a professional.
Sharing is caring!
So you’ve established that your ATV doesn’t have a spark or only has a weak spark. But now what?
Troubleshooting an ATV with no spark can be quite challenging and mildly frustrating, but it doesn’t have to be.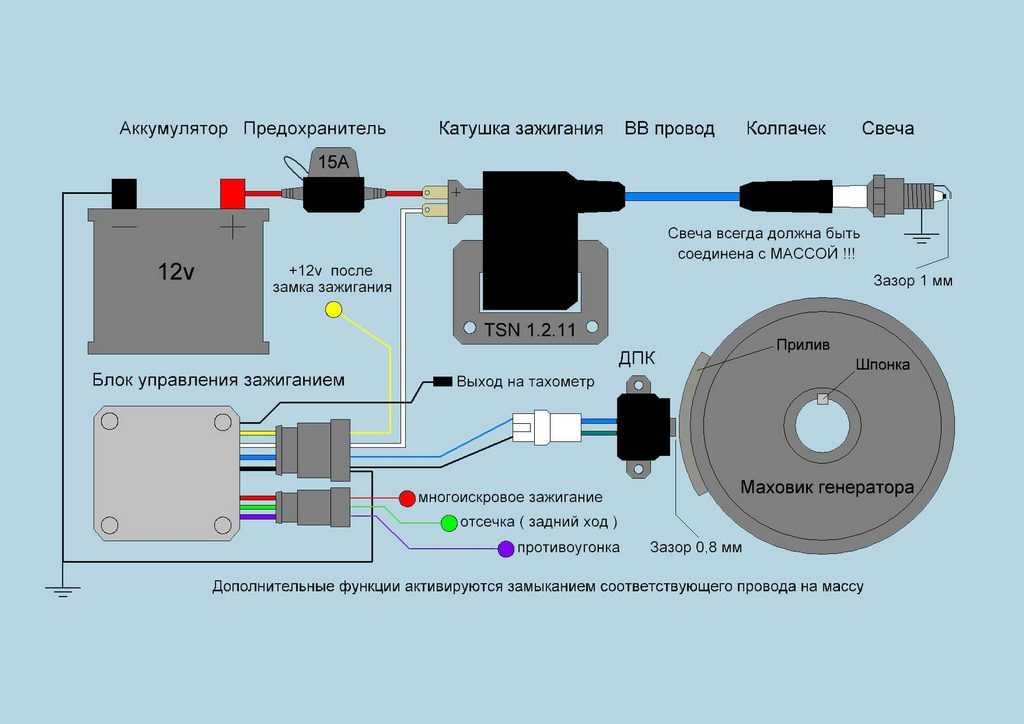 That’s why I’ve made this simple step-by-step guide to help you identify why your bike is acting up.
Page Contents
Your bike’s ignition system consists of various components that work together to create a spark. Each component in the system is just as important as the other. They all have to function correctly, or there will be no spark, or the spark will become weak.
When your ATV is not getting a spark, the problem is with one or more of these electrical components:
The easiest way of identifying which of the listed components is failing is through a process of elimination.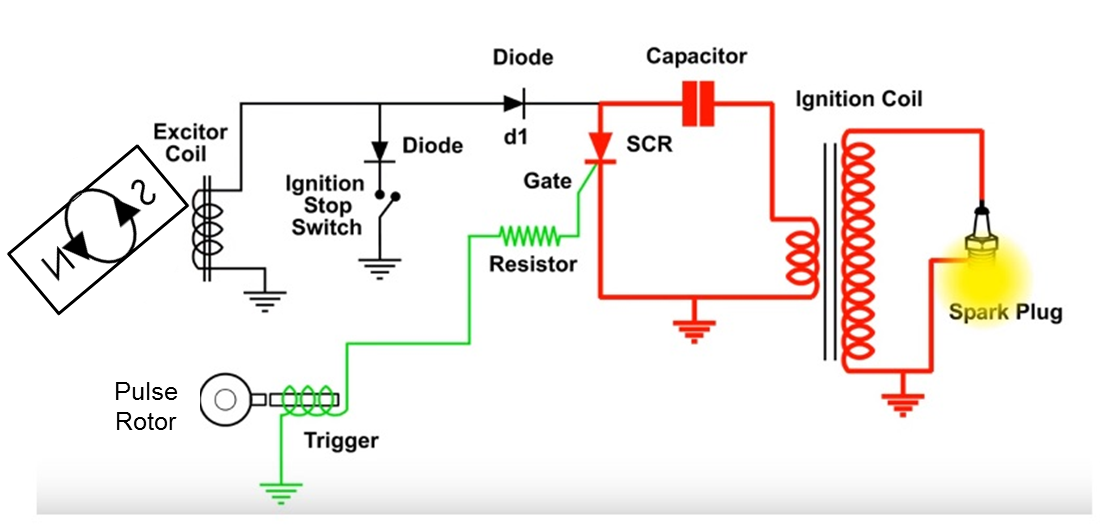
With electrical issues, it is always better to check the most straightforward stuff first. If you assume the worst and you begin by removing the stator, you may have to reassemble a bunch of components you didn’t have to take apart.
More often than not, you will find that there is a problem with the spark plug, the kill switch, a wire, or a connector.
You should be able to pinpoint which component is faulty by performing various tests. Before you’ve established which part is acting up, there is no need to focus on one single component.
You may or may not already have done this step, but you must verify that the ATV actually has no spark before troubleshooting.
While you may feel confident that a lack of spark is the issue, remember that other starting issues could be causing similar symptoms. Therefore it’s not enough to assume the spark is not there; you need to test it.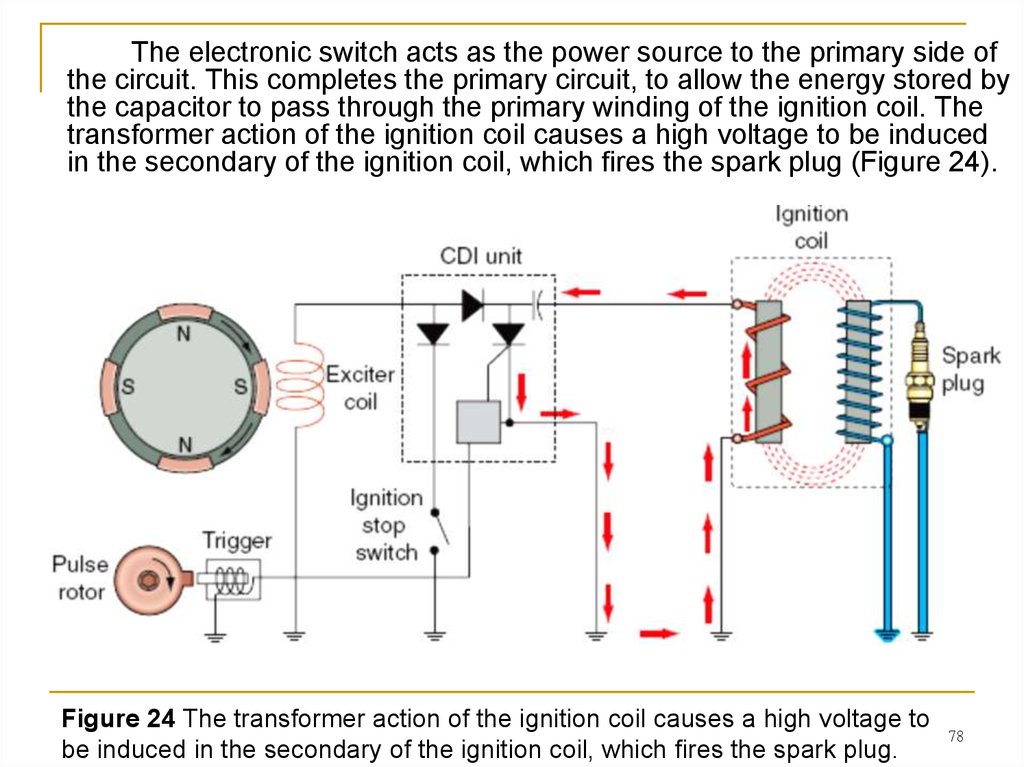
An ATV needs fuel, air, and a spark to start. If you are not sure whether your bike not starting is caused by a lack of spark, or something else, we recommend you read this guide.
 This will ground the spark plug so that it can create a spark.
 Alternatively, you can test the plug by using a spark plug tester. Spark plug testers come in various styles, but here are two of the most common.
With the first spark plug tester style, you place the tool’s grooved part over the spark plug wire while the engine is running. The bulb inside the tool will flash to indicate a spark and how powerful and consistent it is.
Pen-style spark plug tester.The second style of tester connects where the spark plug normally would be. Remove the spark plug boot from the spark plug and connect it to the tool. The tool has an alligator clip that connects to ground, such as the engine or an exposed metal part of the frame.
If there is a spark, it will appear inside the see-through tool casing, jumping between the tho metal leads. If the spark is good, it will have a regular purple-blue color. If the spark is weak, the spark inside the tool will appear yellow-red and have a more inconsistent spark pattern.
Now that you have verified there is no spark, it’s time to begin the actual troubleshooting.
The ATV will not create a spark when the kill switch is off. However silly it may seem, you’d be surprised how often people forget to turn it on before attempting to start their ATV.
ATVs with electrical starter motors won’t even crank the engine if the kill switch is off. So if the engine will crank, you know that the issue is likely not with the kill switch.
On the other hand, pull start or kick start ATVs is another story. No matter how much you try, the ATV will not start with the switch turned off. So make sure the switch is turned on before you end up pulling until you’ve wet-fouled the spark plug.
While some ATVs will run without a battery, others need a healthy battery to power the ECM (electric control module) and the electric fuel pump. The ECM is a small computer that tells the ignition coil when to create a spark.
If the battery holds an insufficient charge, the ECM may not power up and, therefore, will not tell the ignition coil to create a spark.
Read the battery voltage by setting your multimeter to DC volts, placing the red lead to the positive battery terminal and the black lead to the negative terminal. A healthy battery should read 12.45volts or more when fully charged.
If you want to learn how to charge your battery correctly, please head over to this guide.
To test the battery ground, you should place the black lead on the engine block or an exposed metal part of the frame. The red lead goes to the positive battery terminal. If the battery ground connector is good, you should get a reading close to or identical to the one you got when testing directly to the battery.
If you get a reading indicating bad ground, ensure the main engine ground is properly fastened and has not corroded. You find it by tracing the big black wire coming from the battery.
Spark plugs are cheap and easy to replace. They are considered consumables that may go bad for no apparent reason.
Be careful not to crank the engine for too long before checking the plug, or you risk overheating and possibly damaging the starter motor.
Whether the spark plug gapping is incorrect, the plug has gone bad, or it’s the wrong plug altogether for your engine, it may no longer be able to provide a spark. Note that a spark plug may have gone bad even if it still looks good.
The easiest way of testing if the issue is a bad plug is by replacing it with a new one and then testing for spark as described above. You don’t even have to remove the old plug. Just pull off the bott, insert a new plug, and test for spark.
If your new spark plug isn’t creating a spark either, you know the problem is not with the actual spark plug.
A bad electrical connection in a connector may prevent the ignition system from working as it should. Ensure all connectors in the ignition system wiring harness are not damaged from corrosion, are not full of dirt, and are properly connected.
Check all connectors, especially the ones that connect the kill switch or ignition key.
Now test if this has fixed your no-spark issue.
If a wire gets damaged, exposing the metal leads, you may get a short to ground.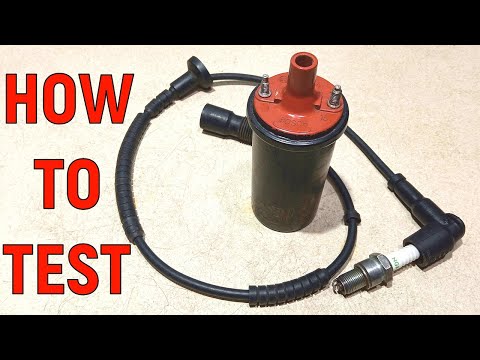 Trace all the wires connecting the various components of the ignition system. If you find a damaged wire, repair or replace it.
If the kill switch internals fails, it may stay off even when in the “on” or “run” position.
You can test the switch by performing a continuity test using a multimeter, a test light, or a simple continuity tester.
Insert one probe into each of the two cables going into the switch. There should be no continuity when the switch is off and continuity when it is on.
Alternatively, you can do this simple test:

If your ATV has a 5-pin CDI box, you can use it to identify a safety switch issue. This test only works on 5-pin CDIs, typically found on cheaper Chinese youth ATV models or older ATVs.
The ignition coil generates the electrical pulses of current sent to the spark plug to create a spark.
With a multimeter, you can read the ohms resistance of the primary side and the secondary side of the ignition coil. Each of these readings can tell you whether the coil is okay.

Test the primary side:
Test the secondary side:
 Your typical reading will range from 10k to 15k ohms. Most of the resistance comes from the spark plug boot. That’s why you typically will get a lower reading on single-lead ignition coils.
 While modern ATVs nowadays have ECM/ECU, many cheaper Chinese youth ATVs and older ATVs use 5-pin CDI boxes to control the spark.
There aren’t any good ways of testing these boxes at home. A CDI is relatively cheap, so your best bet is to replace it and try again.
ECUs, on the other hand, are more expensive. You’re likely better off testing or replacing your ignition coil and stator before possibly replacing the ECU.
The stator is what creates the electricity on your ATV. It is located behind an engine cover, but luckily you can test it without removing it.
There are two main ways you can test the stator. A static test, where you test internal resistance when the bike is turned off, and a dynamic test, where you read voltage while the engine is running.
If the stator fails any of the tests, you may have a defective exciter coil inside the stator, and the stator needs to be replaced.
The crankshaft position sensor (CKP-sensor) registers and tells the engine exactly where the piston is as it moves up and down. This information is necessary for the CDI or ECU to tell the ignition coil when to power the spark plug.
The CKP sensor is either built into the stator assembly or located separately on the engine.
Look for damaged wires going to the sensor or a cracked or bent sensor bracket if you have a separately located sensor.
You can test the sensor by using your multimeter to measure its resistance:
ATV tires
SPARE PARTS
Sale of ATV parts.
ATV Service and Repair
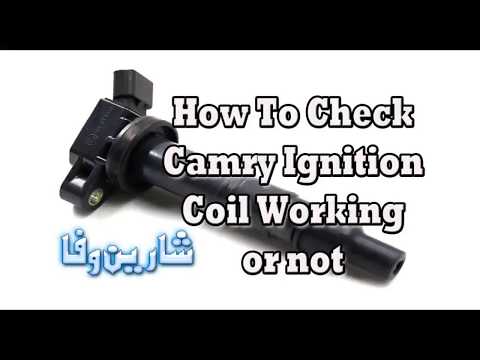
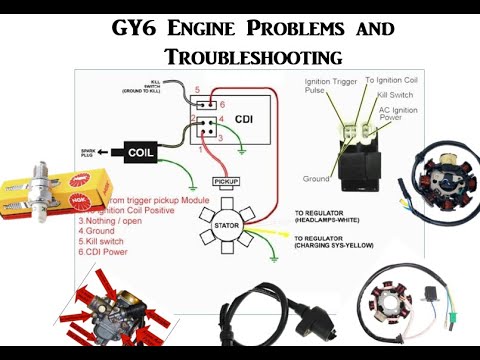
How to Check the Ignition Coil on an ATV
When a spark fails on an ATV, many motorcycle owners, in the old fashioned way, consider the first thing to do is to replace the ignition coil. In fact, this problem is very unlikely to be related to the high voltage coil. In addition to the ignition coil on an ATV, there are other blocks, such as the generator stator, hall sensor, switch, which can be associated with a lack of spark. The high-voltage ignition coil, of course, can also be faulty, but before buying a new coil, we will tell you how to check the ignition coil for serviceability. nine0005
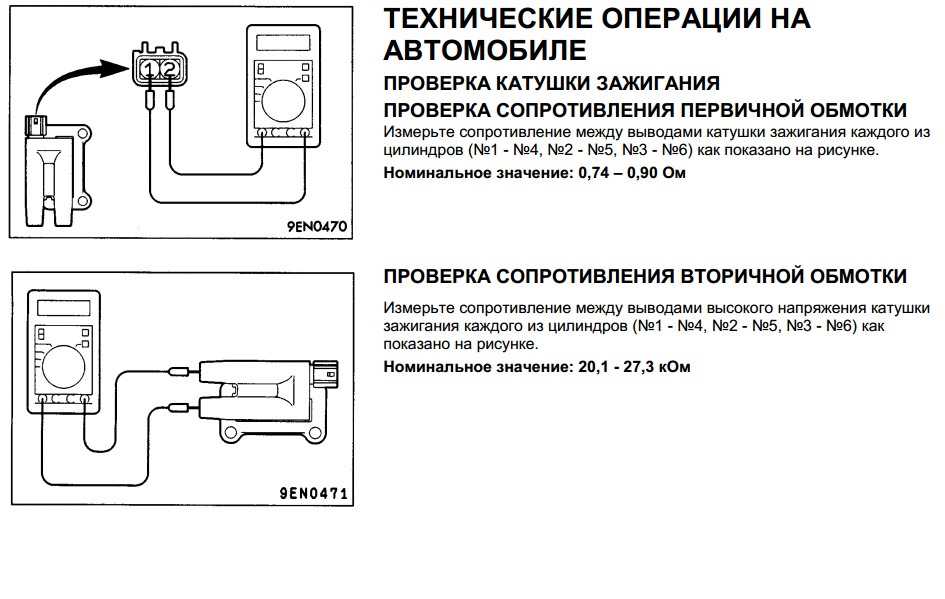
This article will discuss checking the ignition coil using the Sagitta Orso 200 ATV as an example. First of all, disconnect all the wires from the coil and unscrew it from the ATV mount. Next, you will need a multimeter with which you can check both windings of the coil itself, a high-voltage wire and a candlestick (candle cap). It often happens that the coil itself is working, but the high-voltage wire going from the coil to the spark plug cap or the cap itself is faulty. To check them, we unscrew the cap from the high-voltage wire on one side and the high-voltage wire itself from the coil. Next, set the multimeter switch to the continuity position and check the wire and spark plug cap for an open circuit. If there is no break, then these parts are working and we proceed to check the high-voltage coil. nine0005
The high voltage coil on the ATV has two windings (primary and secondary). The primary winding is a ground wire and a control wire, here the resistance ranges from 5 to 8 ohms. The secondary winding is the mass of the coil and the output to the high-voltage wire. On the secondary winding of the coil, the resistance should be from 3 x to 5 kilo-ohms.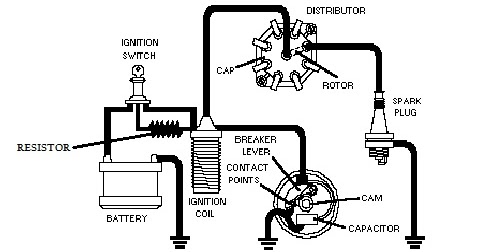
This tests the ignition coil on many ATVs. This method will allow you to determine the health of the ignition coil to make a further decision on buying a new coil in the store. nine0005
Search - Products
Search - Categories
Search - Contacts
Search - Content
Search tapes
Search
We wish you a pleasant shopping!
Please wait
When placing an order in the online store, the client will be sure to fill in the "choose delivery" field. What...
Summer is just around the corner and it's time to think about how to prepare. ..
..
To the attention of the owners of Chinese ATVs Sagitta Orso 200, Armada 200L, Jianshe-Yamaha Puma 250. In early April we expect...
We are pleased to announce...
26.04.2019
The assortment of the QuadroMarket store was replenished with the necessary additional equipment...
I don't know why this is, but most owners of scooters and motorcycles equipped with a CDI ignition system, if there is a problem with a spark on a candle, they immediately sin on the ignition coil. To all my reasoned arguments in favor of the fact that, in addition to the coil in the electrics of the scooter, there are still a bunch of devices that provide sparking between the electrodes of the spark plug: a generator, an induction generator sensor, a switch, wires in the end - they make glass eyes and repeat their signature phrase as one : "Can't you call her?" You can't, my dears, you can't! nine0005
No, of course I can make a smart person and, for solidity, poke a coil in front of you with a tester, as collective farm gurus do.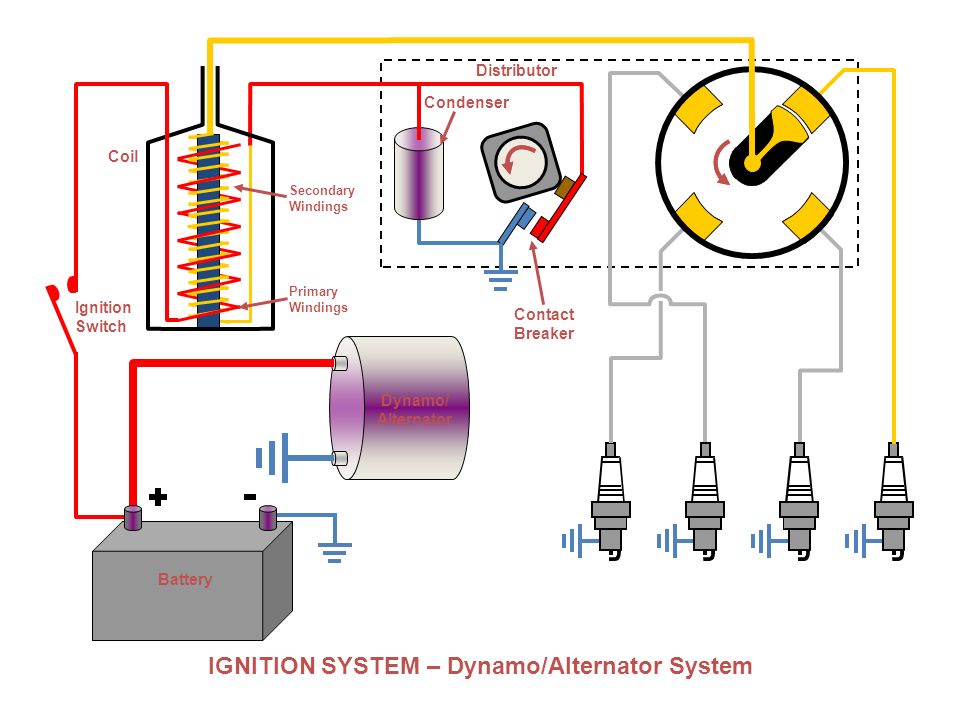 But I won't do that today. For one simple reason: you can “ring out”, measure the resistance of the coil windings, but what will it give us? .. Well, the tester will show us the treasured numbers on the display, so what? And if there is an internal turn-to-turn short circuit in the coil windings, a factory defect, or the winding of one of the coils burned out. Do you think with the help of a tester you can determine all these malfunctions? I assure you not. nine0005
Therefore, since it comes to that and you are inclined to believe that the absence of a spark can still somehow be connected with the ignition coil - we will go from the opposite. Namely: today we will not learn how to check the coil itself, since it is useless and does not give anything, but we will check the electrical parameters of the devices that ensure the operation of the ignition coil. This approach to diagnosing such devices is more effective than the usual “ringing” of the windings for a break or resistance measurement. nine0005
The CDI ignition coil is a classic two winding high voltage transformer. The work of which is based on the effect of magnetic inductance.
Inside the ignition coil there is a cylindrical or rectangular core over which a large amount of the thinnest copper wire is wound in a strictly defined order, which is the secondary winding. On top of the secondary winding, a thicker copper wire is wound through the insulation layer, which is the primary winding. nine0005
Both windings are connected at their ends to each other and have one common terminal on the body in the form of a ground terminal (green). The second ends of each of the windings have separate outlets on the body in the form of a power terminal and a central contact of a high-voltage wire.
For more clarity, let's break the case and see what's inside.
During engine operation, the alternating current generated by the high-voltage winding of the generator is supplied to the switch in which it is accumulated in a special capacitive storage (capacitor) - this current accumulation principle applies only to AC CDI switches. There are even less common DC CDI switches that use direct current from the battery for storage. nine0005
Hence the name of the CDI system, from Capacitor Discharge Ignition - loosely translated, it sounds something like this: “ignition from a capacitor discharge”
the moment of sparking, a special element in the switch (thyristor), which acts as an electronic key. Further, the following happens: the thyristor, under the action of an alternating pulse from the induction sensor of the generator, opens and the current accumulated in the capacitor in the form of a pulse shoots through it to the primary winding of the ignition coil. nine0005
When a pulse passes through the primary winding, magnetic induction occurs, under the influence of which an electric current is induced in the secondary winding, many times higher than the current supplied to the primary winding. In fact, in the ignition coil, there is the most transformation of current from a lower (incoming) to a higher (outgoing) current.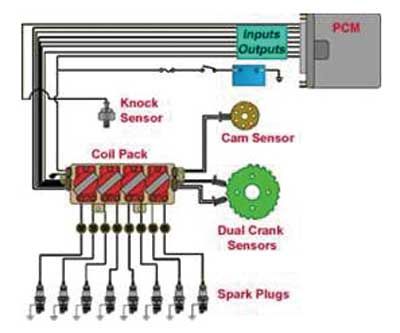
The current formed in the secondary winding, through a high-voltage circuit, enters the spark plug and, due to its high voltage, about 18,000 - 20,000V, easily overcomes the air resistance between the electrodes and forms a spark. nine0005
Malfunctions as such in the CDI ignition coil are very, very rare, contrary to popular belief. And all of them are mainly associated with damage to the case, burning of the windings, or an internal break, short circuit of the wires.
In all my hard practice, I have only once come across a really faulty coil. And this despite the fact that the owner of the scooter himself ruined it: he forgot to connect the ground to the engine and turned on the starter button ... A very high starting current went straight through the coil to the starter ... And where was he supposed to go? .. There was no mass on the engine. Naturally, the coil could not stand such mockery: it heated up and burst. nine0005
To work, we need an ordinary tester with a sound “ringing” function, a 3W control lamp, a piece of thin wire or a carnation, a piece of insulated wire, a screwdriver and, of course, a desire . ..
..
Herself verification is not particularly difficult even for beginners. And it will be connected with measuring the supply voltage supplied to the coil, checking the mass, which must necessarily fit the engine, switch and coil, and checking the integrity of the wires supplying current to the consumers of the ignition system. nine0005
Another point: the technique that will be described here can be safely applied not only to a scooter, but also to any other type of vehicle equipped with a CDI ignition system, be it a motorcycle, an ATV, a scooter or even a walk-behind tractor - it doesn’t matter.
Whether the power (impulse) goes from the switch to the coil or not - it directly depends on whether the coil will produce a spark to the candle or not. Power is power, without it, no electrical consumer can work. Therefore, any check should begin with a power check - is it there or not? And only then, depending on the result, finish the check or move on. nine0005
We release access to the coil and without removing the terminals from it - we connect the control light to the power wires: green and black and yellow and turn the engine with a starter. In the mode of cranking the engine with a starter, the control light should burn to the floor of the glow.
Coil light on - switch 100% operational.
If your light is off, check the switch and if it is working and there is no voltage at the coil terminals, look for the cause in the wires supplying power to the coil.
The voltage on the switch is checked in the same way as on the coil: touch the green and black-and-yellow wires, turn the engine with a starter and look at the light bulb.
The light on the switch is on, it means it is 100% working. nine0005
Another common cause of coil failure when there is power at the coil terminals is poor or no ground. The mass on the coil is checked simply: we put the tester into the sound “ringing” mode, touch any metal part of the engine with one probe, and the green ground terminal with the second.
This spool has good ground.
Malfunctions in the high voltage circuit often leading to a complete or partial (interruption) failure of the ignition system are mainly associated with damage, contamination or breakdown of the spark plug cap housing or breakdown of the insulation of the high voltage wire. nine0005
As I said: the current generated by the secondary winding of the ignition coil is very high and it is not uncommon for the current supplied to the spark plug to break its way through cracks in the cap body or a layer of dirt, dust, cracks in the insulation of the high-voltage wire. Which leads to a complete failure of the ignition system. These malfunctions occur very, very often and in most cases lead to a complete or partial (interruption) failure of the ignition system.
In order to check the high-voltage circuit, do the following: We twist the cap from the high-voltage wire; insert a thin nail or piece of wire into it; we bring the nail to the metal case of the engine at a distance of 2-3mm ( This is important! The distance between the end of the wire and the motor housing should be 2-3mm, otherwise screw the switch ) and turn the motor.
We check the high-voltage wire in a similar way: We unscrew it from the coil and screw in any other piece of insulated instead of it (The wire must be insulated! Otherwise, it will get so bad that it won’t seem enough!) wires, bring it to the engine housing at a distance of 2-3mm and turn the engine.