Click! Click! Click! Don’t let it spoil your day. I’ll bet we can have her up and humming in no time at all.
The most common cause of a repeating click sound when attempting to start an ATV is a flat battery. However, a single click sound suggests a faulty starter solenoid. A complete list of common causes include:
In this post, you’ll learn about all the most likely causes of your ATV click sound. You’ll learn how to diagnose it and what you’ll need to do to fix it.
Page Contents
Loose battery connections cause high resistance, which prevents battery voltage from getting to the starter motor. It also prevents your battery from receiving a proper charge. A common symptom of an ATV battery issue is a repeated clicking sound when you hit the start button.
Loose connections will mimic the sound of a flat battery. You can still start your ATV if your engine is fitted with a pull starter.
It’s a common fault and a really simple fix. A battery is pretty heavy, and if a battery isn’t secured firmly with a bracket, the cables tend to work loose as the battery is moving about.
To check, give the battery cables a little wiggle and see if they’re loose. Tightening will solve the problem, and you’ll need to secure the battery if it’s loose.
After checking for loose connections, go ahead and check that they’re clean. Rusty battery wires or white acid corrosion on the battery posts will cause high resistance.
You’ll need to remove them to clean them thoroughly. The acid will burn the skin, so gloves and eye protection is advised.
To easily remove the white crusty corrosion, sprinkle some baking soda on the terminals and add a small amount of water. This will neutralize the acid and remove the corrosion.
Use a wire brush to clean the surface. Now remove the terminals and clean around the poles and the terminals. Apply a coat of petroleum jelly to help protect against corrosion.
This is the most likely cause of the clicking sound as you hit the key. A flat battery is sooo common, especially in ATVs that lay up for a time. Batteries usually give the most trouble in the colder months of the year.
To test a battery we’ll need to run two tests, a volt test and a crank test. We’ll need a DVOM (Digital Volt Ohm Meter). But if you don’t have one, just go ahead and turn the lights on (if fitted) if they’re dim. You can bet you found your problem – a flat battery.
If you have a DVOM, then go ahead and connect it up, set the meter to 20v DC – Red test cable to positive (+) pole of the battery and the black test cable to the negative pole (-) of the battery.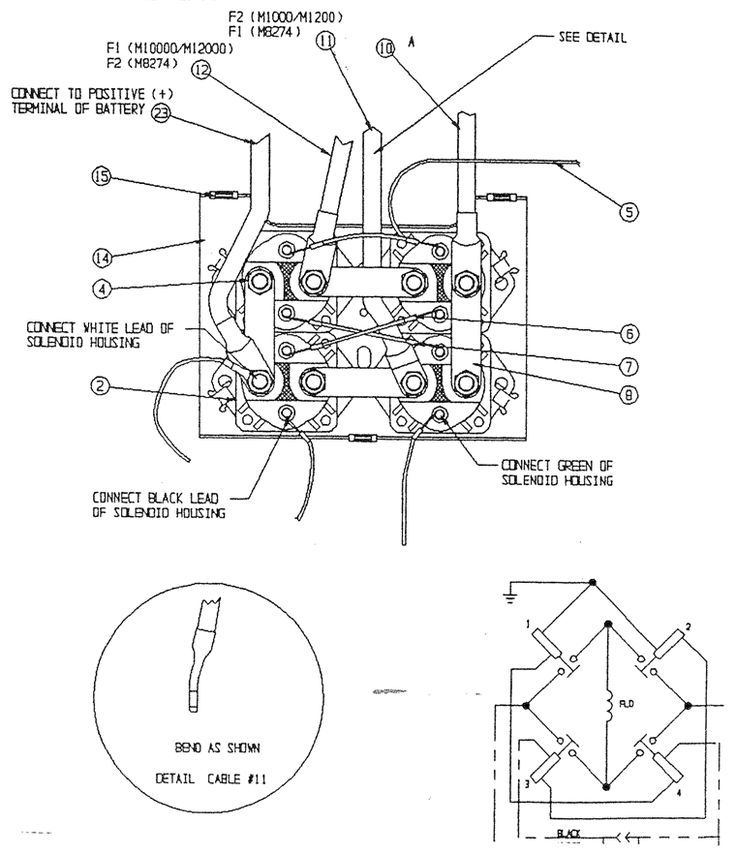
Your ATV is likely has a 12-volt system, even though your battery actually measures 12.65 volts when full. But you can confirm the battery size by checking the label on the battery casing.
Hold the test leads firmly on the battery and record the reading.
A reading below 12.4 volts and your ATV may struggle to crank the engine.
If your battery is low, you can attempt to jump-start from another vehicle or charge your battery with a battery charger, see jump-starting below.
The second battery test is the crank test, this test loads up the battery and measures battery strength. The reason we run this second test is because the battery may show a full 12.65 volts when tested unloaded, however, it may actually fail when loaded.
The crank test is covered below in “Checking ATV Battery Health” However, to run this test the battery must show at least 12.5 volts, if that’s not the case, see battery charging below.
All batteries need to be charged and discharged. It’s what keeps them healthy and alive. Batteries hate the cold, and they hate being left to discharge. It’s not uncommon for a battery to prematurely die because it wasn’t used regularly.
If you have a battery charger, they’re easy to attach. Ideally, you’d disconnect the negative terminal, but it won’t hurt if you don’t. Just don’t attempt to start the engine with the charger attached.
Connect the charger Black to the negative battery pole and Red to the positive pole before plugging the charger in. Your battery may take 2-3 hours to charge fully, depending on the amp rating of the charger and how low the battery is.
If you don’t have a battery charger, consider buying a smart charger. It will charge your battery and is designed to be connected to your ATV when not in use.
The smart charger charges your battery only when needed without risk of overcharging, and you’ll avoid that disappointing click click click!
If your battery is totally discharged, your charger may not turn on. This is a safety feature of the battery charger and will need to be overridden. Here’s the hack –
Your ATV is a 12-volt system, as is your car, truck, and riding mower. All can be safely used to boost start your ATV. You’ll need a good set of jumper cables and obviously a donor vehicle.
Position the vehicle so that the cables reach your ATV’s battery posts comfortably. Connect your jumpers in the following sequence:

Battery failure is common these days. Batteries seem to only last 3 to 4 years, but when I was a lad…..
Checking the voltage is only part of checking your battery health. Your battery will need to be at least 75% charged for this test. So if it’s soft, you’ll need to charge it.
Cranking Battery Test – It is possible for a faulty battery to show a full 12.65 volts. For this test, we’ll connect a DVOM to the ATV and have a helper crank it over. If the battery voltage on the DVOM reads below 9.6 volts while cranking for 3-4 seconds, you’ll need to make a trip to the auto store.
Use Min/Max DVOM setting to catch the min voltage on crank.
ATV starter solenoids give tons of trouble, and it doesn’t surprise me. The places they bolt these things, honestly, I find it hard to understand. Some of them double as a mud flap.
A common symptom of a faulty starter solenoid is a single click sound when you hit the start button, if this sounds like your problem, then suspect your solenoid is faulty.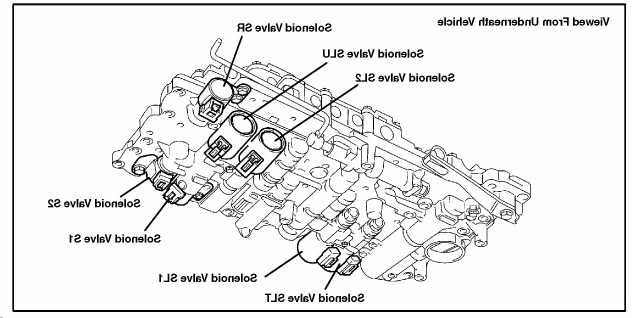 There are however other faults that produce this same symptom and so we’ll run a couple of tests below to confirm our suspicion.
To locate your starter solenoid, follow the positive wire from the battery, and you’ll eventually reach the starter solenoid.
Corrosion on the connectors is common, as is broken or corroded wiring on older bikes. The wiring might not be noticeably damaged, but internally the copper wiring corrodes. You can try the wiggle test as you hit the start button to see if it makes a difference.
Testing is straightforward. Make sure your bike is in neutral with the brake applied. We’re going to attempt to crank over the engine by hot wiring.
Your engine won’t start unless you want it to. If you do want it to start, turn the ignition switch on, but for this test, you can leave it off. We’ll use two jumper wires with the power jumper wire fused.
Two results are likely:
1 The engine cranks over as normal – this suggests high resistance in the control wiring, such as loose, damaged, corroded connectors.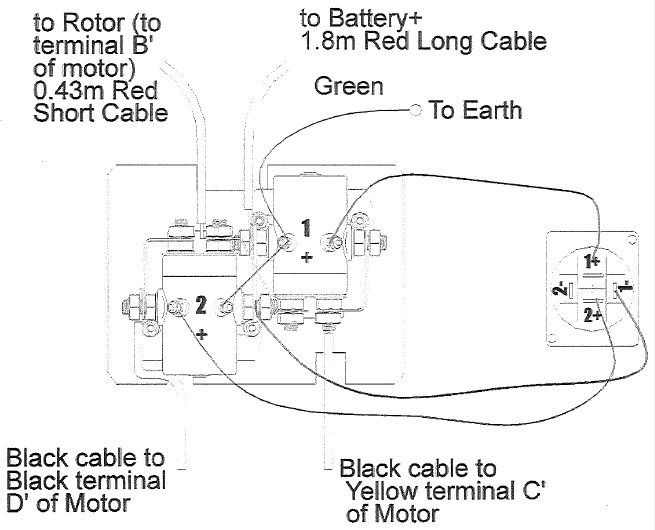 Run a volt drop test to isolate the problem.
2 The engine just clicks, same as before – this suggests a faulty solenoid, replacing will most likely fix the problem. However, there are still a couple of other possible causes and to eliminate them follow this quick test.
Caution – If your solenoid is located close to the battery as per the picture below, do not cross the solenoid. Batteries vent combustible vapors and crossing the solenoid causes arcing, which poses a risk.
Two results are likely:
1 The engine cranked over without issue – go ahead and replace the solenoid.
2 The engine still won’t crank over – if you are sure that your battery is OK, then see the list of possible causes below.
However, if you are not sure you checked the battery correctly, you can eliminate it as a possible cause by connecting to a known good battery and repeating the test.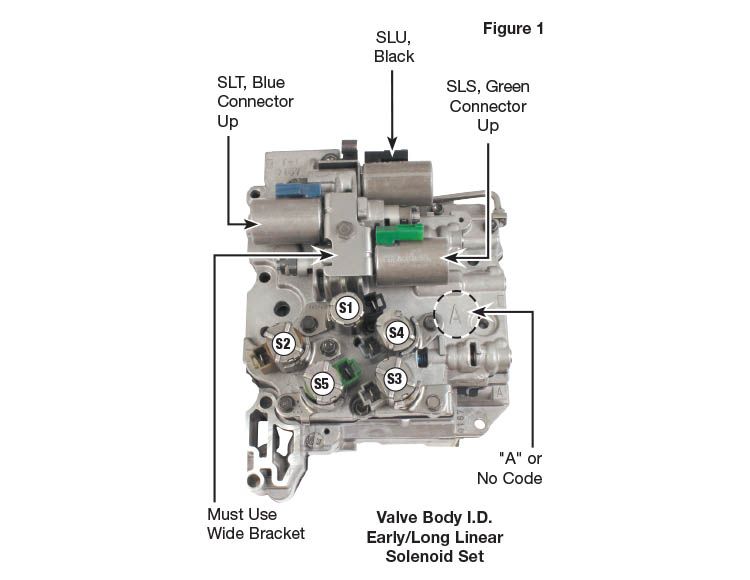 See jump starting above.
If the engine still doesn’t crank, you may have one of the following problems:
Hydro-locked engine – cylinder full of water or gas, commonly caused by a leaking carburetor needle seal. Remove the spark plug to check and release the fluid.
Jammed starter motor – starter motor caught in the ring gear, remove the starter, test, repair, and refit. See below.
Jumped timing could cause the engine to lock, check the engine turns over, use a wrench or go ahead and check the timing marks. See “How to tell ATV jumped time?”
Starter motors wear out like any motor. They have a pretty tough job. Symptoms vary from intermittent starts to no sound when you hit the button, and starter motors can seize.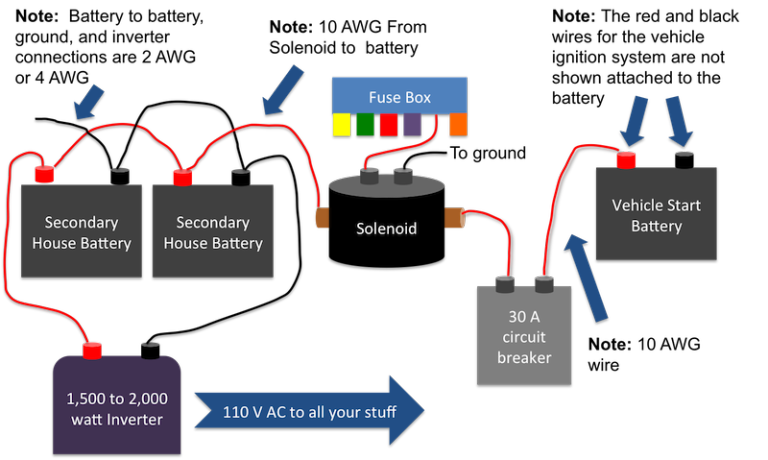
Remove the spark plug, and if you have a pull start on your engine, try to turn it over and check the starter again by crossing the solenoid. If it still won’t crank, remove the starter for bench testing.
The starters are easy to remove but be mindful of the O-ring seal when removing. With the starter on the bench, try turning it with your hand. It should be free to turn.
If it’s not, you found your problem, have the starter reconditioned or replace it.
If your starter does turn freely by hand, get a set of jumpers and a battery.
This isn’t a hugely common complaint, but I’ve had a few that have tested my patience. The start button is, as you know, right out there when it comes to catching the weather, as are most others don’t get me wet electrical kit.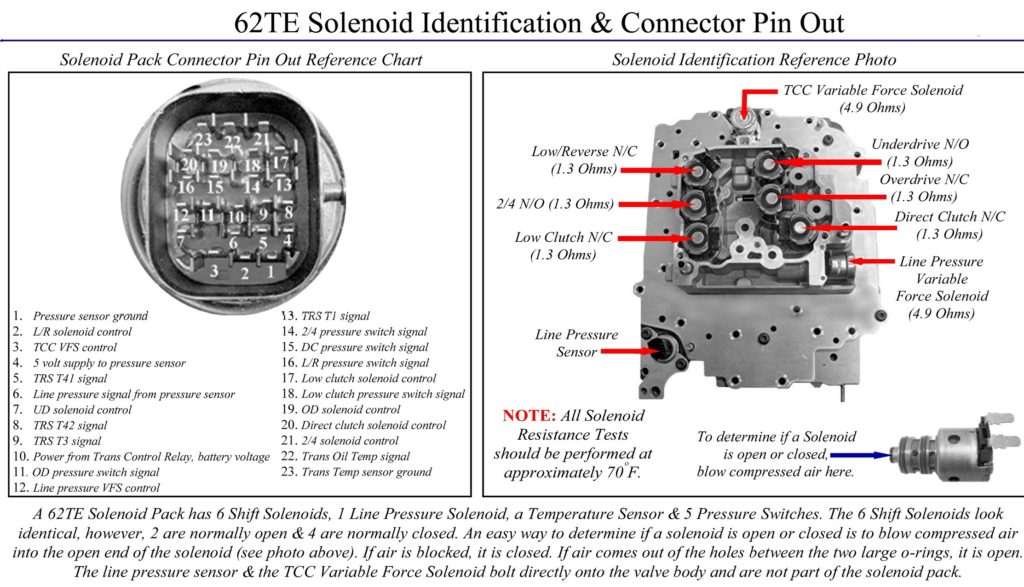
Moisture and wiring don’t work well together. A loose, corroded, or almost broken wire/terminal or dirty fuse, or bad grounds will all cause high resistance. This means when you load the circuit, it fails.
Troubleshooting these kinds of problems isn’t hugely complex, but it can be tedious as you trace wiring and strip components to check and verify. A DVOM and volt drop testing will locate the issue.
A wiring diagram for your model will make life a lot easier, but it isn’t essential.
Try the wiggle test before investing a lot of time. Often wiggling the wiring loom around the ignition switch, start button, steering loom, solenoid, and relays will reveal the problem.
Are ATV batteries 12 volts? Most ATV batteries are known as 12 volt systems. The battery voltage actually measures 12.65 volts when fully charged. Your ATV can be safely jump-started from a car or truck, as they too run 12 volt systems.
You may find the following posts useful:
How do kill switches work?
Will bike start without a kill switch?
John Cunningham
John Cunningham is a technical writer here at ATVfixed. com. He’s a Red Seal Qualified Service Technician with over twenty-five years experience. He’s worked on all types of mechanical equipment, from cars and trucks to ATVs and Dirt bikes.
When you try to start your ATV and you hear a click instead of the engine roaring to life, it’s more than annoying. Instead of joining your friends as they go mudding, you now need to figure out how to make your quad start. So, what can you do when your ATV doesn’t start?
Your ATV most likely clicks when you try to start it because of the battery. The reasons for this are numerous, from loose connections to a current draw that drains the battery. If the battery is not the cause, the ATV probably has a faulty starter solenoid.
Your ATV is meant to be ridden, not sitting in the driveway, so let’s get to troubleshooting.
This is an easy solution to check for and fix.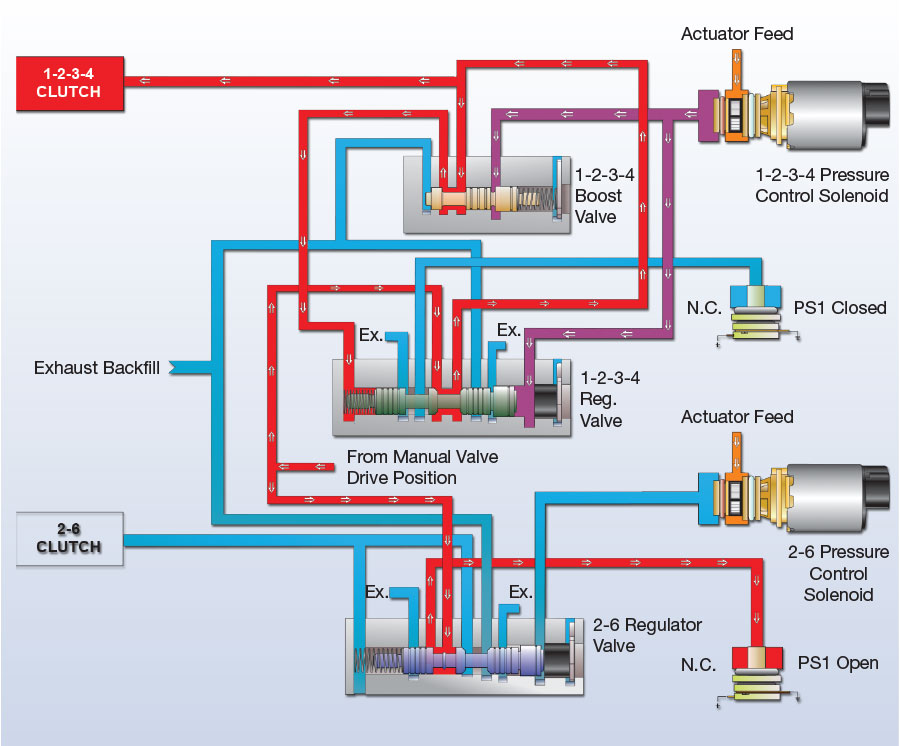 Examine the connections to the battery and the starter. Sometimes the connections get knocked loose, especially if you’ve ridden some rough trails. Also, check for corrosion on the battery terminals, and if you find some, clean it off.
If the connections are clean and tight, then it’s time to move on to the next possible problem.
Battery problems are the number one reason ATV owners hear the dreaded click when trying to start their quads. ATVs give batteries a workout, so it’s not uncommon for one to go bad after a couple of years.
Your climate, how well you maintain it, and the quality of the battery affect its longevity. If you bought a cheap battery, do not expect it to last for more than a year or two.
One sign that the battery doesn’t have enough of a charge is multiple clicks in rapid succession. If there is a single click, then you may have another problem with your ATV—the starter solenoid. We will talk about that in a bit.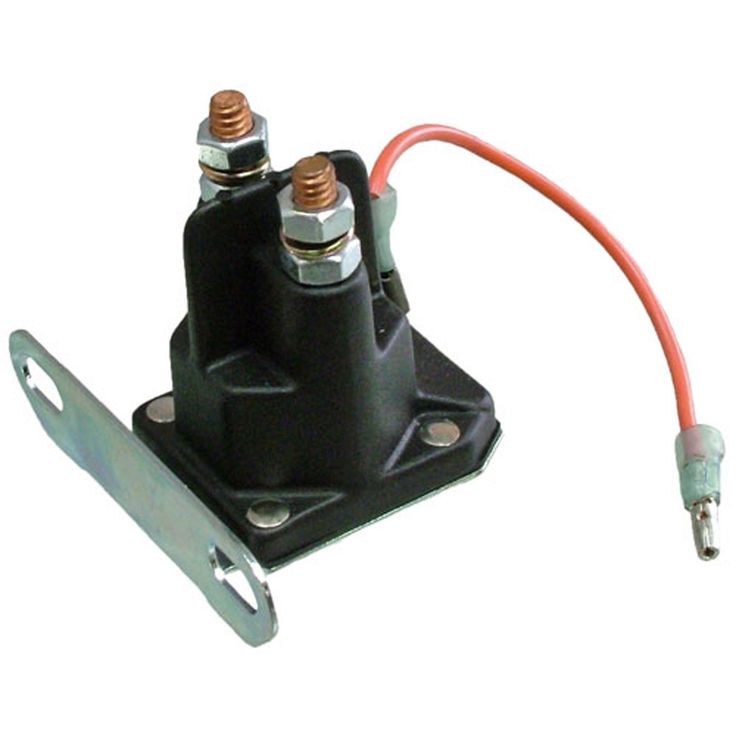 For now, we’ll assume the battery is the issue.
Here are a few reasons this could be happening:
To test for this, unplug the battery and charge it completely. Then measure the voltage using a multimeter. Let the battery sit unused for a day or two and recheck the voltage. Significant loss of voltage means you most likely it is time to replace your battery.
Before you go out and buy a new one, you might want to do some additional troubleshooting. Check out, How To Keep an ATV Battery Lasting for more info.
Let’s say you charged up your battery. After riding for a couple of hours, you stopped. When you tried to start your ATV, you heard the click (or silence).
If your battery can’t hold enough of a charge, then you should do a load test. For this, you need a multimeter and a load-tester if you want the most accurate results.
First, charge your battery to at least 75% (typically 12. 4 volts). Use a multimeter to check the levels.
Reconnect your battery. Try to start your quad and check the battery’s voltage. A number below 9.6 volts means your battery doesn’t hold a charge.
Perhaps you made sure your battery was charged in the evening, but it is dead the next morning. Something in your ATV is using current. Parasitic amperage draw is the term for when a vehicle’s component is drawing electricity when it shouldn’t (i.e., the engine is off.) Typically this is due to a bad relay or fuse.
This used to be a more common problem when most ATVs had lead-acid batteries. If your quad has one of those batteries, then a fluid check is required. However, most ATVs come with an AGM (absorbed glass mat) or SLA (sealed lead-acid) battery, which cannot be topped off.
If you need to check fluid levels, clean the outside of the battery first to keep crud and dirt from falling into the battery.
Open the covers and check for the fluid levels then fill the battery cells so that the plates are covered and replace the cover.
Charge the battery and see if it can hold its charge. If not, buy a new one. And when you do, buy a higher quality AGM or SLA.
Another problem with lead-acid batteries is they suffer from poor performance in cold weather. Since you can’t do much about the weather, once your lead acid battery no longer performs well, you have to replace it.
Here’s a helpful video showing how to test an ATV electrical system:
Have you left your four-wheeler sitting idle too long? Cars use an alternator that charges the battery while it is running. But most ATVs use a stator, which is designed to provide electric power.
Unlike alternators, stators do not recharge the battery.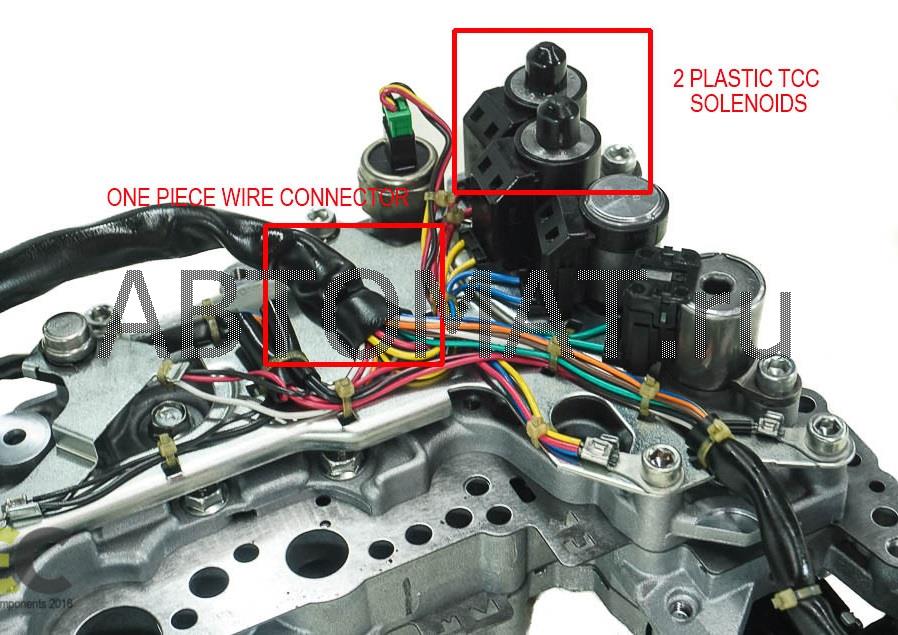 This is why a four wheeler’s battery needs to be charged while a car’s does not.
So if you forgot to charge the battery, it might have a little juice left, but not enough to start your vehicle.
In that case, you need to charge the battery. You can do this with another ATV battery or a car battery. Do not turn on the car if you use a car battery. You will risk frying your ATVs’ electronics.
If you haven’t already invested in a jump box, like the NOCO Boost Plus (link to Amazon) this is a good time to do so. Jump boxes are designed to connect safely to 12-volt batteries. The USB ports are handy for charging phones and other devices as well.
Since the number one cause behind an ATVs failure to start is the battery, keeping your battery healthy is essential. Follow these tips to keep your battery healthy:
How To Charge an ATV Battery will walk through all the steps to keep your battery charged and lasting a long time.
I like to use the Ctek Smart Charger found here on Amazon if the ATV is going to be sitting for more than a couple weeks. That way the battery is good to go when I need it.
If you have checked the battery, charged it, or replaced it and the ATV still does not start, it could be due to a bad solenoid. Also called a starter relay, the next most common reason an ATV doesn’t start is a bad solenoid, also known as a starter relay.
A solenoid provides the contact point between the battery and the starter. It works like this: when the starter switch is activated, amperage is sent to the solenoid. The amps cause the armature inside the solenoid to move, which completes the starter and battery circuit.
When you try to start your ATV and hear a single click, chances are good your starter relay is the problem. But there are a few other signs that the solenoid is the cause of the clicking.
You will have to replace it. The starter solenoid will have two wires going from the battery and a pair of smaller cables going to the fuse housing. Before taking it off, make sure the battery is not hooked up. Otherwise, you are risking getting shocked.
ATVs with an electric starter can sometimes be jumped with the wrench trick. Locate the two wires coming from the electric starter. They should be positioned in such a way that you can use the wrench to jump-start your quad.
The number one reason an ATV clicks and doesn’t start is the battery, so you should troubleshoot that first. If your battery is functioning correctly, the next common source is the starter solenoid or a bad starter motor. Occasionally you could have hydro-locked your engine, or the fuses have failed.
The good news is that isolating battery problems is usually straightforward and replacing them is easy. The hard part will be parting with your hard-earned cash.
Sharing is caring!
Depending on the design features, the following main types of winches are distinguished:
Each version has its own advantages and features. So, although the manual mechanism requires some effort to pull the car, it is quite reliable.
Will never let you down at the right time. Installing a winch on a field with an electric drive requires a more serious approach and investment.
This mechanism is powered by a battery, so it must be powerful enough. The most attractive is the hydraulic winch.
It is this that provides maximum traction and consumes minimum energy from the battery.
Wiring diagrams for various winches, motors, consoles, solenoids, contactors, radio blocks.
Honestly stolen from Forosenko and made more readable
Almost all motors are connected in the same way. There are 4 contacts on the motor: Ground, A, F-1 and F-2 In addition, the contacts may have color marks: A - red F1 - Yellow, F2 - Black.
On most winch motors, the terminals are as follows: A at the back of the motor, F-1 and F-2 at the front of the motor, F-1 towards the back of the winch and F-2 towards the front.
Class 8-12000 winches are connected with 25 and 35 square wires. The shorter the wires, the lower the losses.
When installing the winch, the battery must be at least 65Ah and not older than 1 year. Battery terminals must be new or in good condition.
The ground from the winch motor is connected to the battery terminal and nothing else. Installation of this wire is MANDATORY.
Plus, it's better to make winches disconnectable from the battery terminal - it's safer that way.
The control module switches the circuit in this way: Rewinding - F2 is supplied with "+"; A is switched to F1 Unwinding - “+” is applied to F1; And it is switched on F2
Solenoids of new generation are made by one block.
Box the size of 2 packs of cigarettes contains two contactors, terminals for the console wiring and power outputs for the motor.
The module is relatively sealed.
This module is compatible with all Warn, T-Max, Runva, Ramsey, Stokrat winches, etc.
One such solenoid replaces 2 old Com Up, T-Max, etc. relays and 4 old Warn solenoids.
When connecting the solenoids, be sure not to confuse the “+” and “A” wires. This will not affect the operation in any way, but in the event of an error, the winch motor will be under constant voltage and in wet conditions this can lead to breakage of the stator windings. There was an error in some factory circuits. Correctly, when the contact of the wire "A" under the nut.
Wiring diagram of the universal monobloc solenoids:
Wiring diagram for the remote control connector, radio unit and solenoid in the old T-Max unit.
Scheme of new control modules T-MAX:
Scheme for connecting the control unit on two old solenoids of the old-sample:
The scheme of the solenoid unit:
9000 Wiring diagram of the Solenoid (contactor) - monoblock winches ATV (2000, 3000, 3500, 4000) For motors with permanent magnets (two contacts).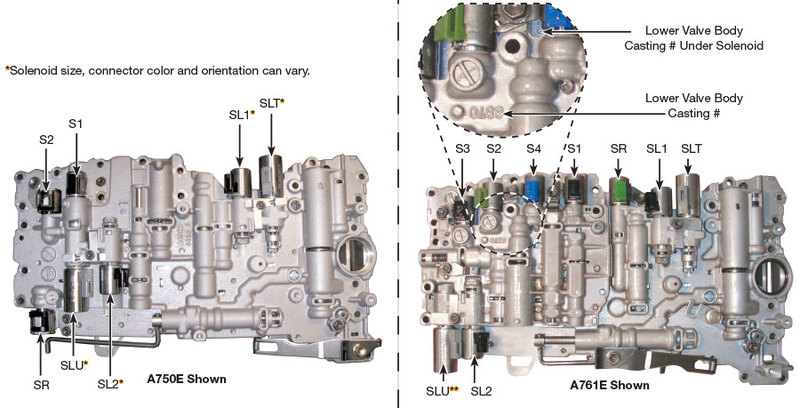 The scheme is also true for automobile winches of the 5000, 6000 and 8000 series with permanent magnet motors.
Warn ATV Wiring Diagram:
Warn Solenoid Wiring Diagram:
Steps to achieve high build quality:
In order to comply with traffic safety requirements, the legislation of the Russian Federation requires registration of any change in the design of the vehicle. To install a stationary winch on a car, the vehicle must undergo a preliminary inspection at the traffic police. After obtaining the permission of the traffic police and installing a winch, the vehicle undergoes a secondary examination in the traffic police, and the necessary changes are made to the technical documents of the vehicle.
The winch must be installed on the original bumper so that it does not protrude beyond the line of the bumper. There is also a penalty for violating this requirement if the winch protrudes beyond the bumper, as it is prohibited to install projections of steel and similar materials on the vehicle that protrude beyond the bumper.
Hand winches do not require permanent installation on the vehicle. They are lightweight and many drivers keep them in the trunk. They deal with simple situations quite easily. They need to be attached to some fixed object, such as a tree, and on the other hand, you need to attach a hook to the car. Further, everything is elementary. If this is a lever model, then it works by pulling the lever, if it is a drum model, then by rotating the handle.
Among the electric winches are the portable models , which also do not require permanent installation. They, as a rule, are not as powerful as stationary ones, but cope with problems of medium complexity easily. They, like manual models, are stored in the trunk in a special bag and installed under emergency circumstances. They are mounted under the hood of the car using a special carriage and are powered by the car battery.
0113
Message Tamboff ”June 31, 2015, 11:25
Tamboff message 31 Jan 2015, 11:26
Tamboff message 31 Jan 2015, 11:27
message A_P_S ”Jan 31, 2015, 11:30
Tamboff message 31 Jan 2015, 11:34
Fantomer message » 31 Jan 2015, 11:48
Post by a_p_s » 31 Jan 2015, 11:48
The key is always attached to the circuit breaker. By definition, it is not capable of getting lost.
The circuit breaker itself, when it is without a key, is closed with a standard rubber plug.
It is impossible not to touch upon several issues of winch application separately. Firstly, it can be permanently fixed to the car, most often in front. However, in this case, its mechanism is exposed to dust, dirt, moisture, which does not benefit it. To avoid this, many drivers practice the use of a portable winch, usually stored in the trunk of a car and removed if necessary. Such a winch can be installed not only in front, but also in the back of the car, as, for example, in the photo below.
As a rule, it is only necessary to install an additional platform on the bumper (front or rear) to which the winch is attached.
A few words must also be said about how to connect to the battery. An electric winch is a powerful consumer of energy, and therefore, with its frequent use on the road, it can become quite real when the native “battery” is completely discharged. To avoid this, in some cases it is worth thinking about an independent battery to power such a device.
Powerful and fast winch-for constant use and for competitions
|
| 6500 LBS / 29500 LBS / 29500 LBS / 29500 LBS / 29500 LBS / 29500 LBS / 29500 LBS / 29500 LBS / 29500 LBS / 29500 LBS | Winch weight | 30 kg |
| Engine power | 5.5 HP |
| Rope length | 24 meters |
| No load speed (1 layer) | 11 m/min |
| speed at 6000LBS | 2.8 m/min | Type |
 T-max 6500 is recommended for installation if frequent use of the winch is expected or the vehicle is being prepared for participation in competitions.
 I want to share my experience with connecting a winch with you. The installation process of the winch is quite standard - I installed it in a frame, on an improvised platform from two corners. For half a year of operation, this design showed its best side.
There is a lot of controversy about connecting a winch and a lot of theories and methods have been created. Having studied all the pros and cons, it was decided to transfer the block of solenoids under the hood and additionally go through it with a sealant. The main problem in this version is that the standard wires that come with the kit are not long enough. There is also a common problem that must be solved without fail - opening the plus power of the winch. This is necessary to protect the machine from the winch itself))) The solenoid that controls the voltage supply to the winch can stick under certain conditions, which will lead to uncontrolled winch operation. As a result, it will first bend the rollers or clews, then the bumper, and then simply burn out.
I connected my winch using welding wires with a cross section of 35 (ideally 50, but I did not find it), as well as with Zilov ground disconnectors (1300.3737). These breakers have two types of control - electrical and mechanical. They have a large rubber button for manual on / off, as well as two contacts for connecting control from the button. For myself, I decided that I would open both plus and minus, so that it would be possible to completely de-energize the car with a standard mass switch. Switch photo:
These breakers were connected in parallel to the control toggle switch, which was brought into the passenger compartment. The circuit is standard - minus from the battery, plus from the toggle switch through the fuse.
As a result, it took me 5-6 meters of welding wires. I connected the circuit breakers and the battery with standard wires from the winch.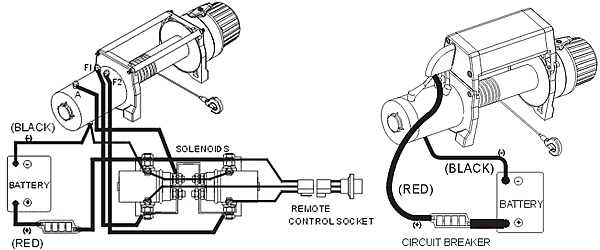 I don’t see any point in putting fuses in this case, and to be honest, I don’t know car fuses for 200-300 amperes)))
The winch control unit was opened, sealed and installed under the hood. General view of the structure below:
I'm sorry for the dirt, fotkal after pokatuh — meat grinder did their best to splatter the entire engine compartment. Oh yes, I forgot to say - my winch is simple - Electric Winch 12000 with remote control. With long loads it heats up (20 minutes of continuous running), so I monitor the temperature. Once the brushes stuck - cleaned, lubricated, additionally sealed the winch body (naturally leaving a regular hole for ventilation). Otherwise, everything is fine and I am completely satisfied with it.
We plan to make a transparent protective cover over the winch so that rain and moisture do not fall on the cable and drum once again. In the distant plans - the transition to synthetics)
Issue price: 3 000 ₽
 0 SSW
0 SSW For Niva with serious off-road training - power in a compact package.
|
| |
| Winch pull | 8000 lbs / 3630 kg |
| Winch weight | 31 kg |
| Engine power | 5.5 HP |
| Tride length | 24 meters | Speed without load (1 layer) | 10.8 m/min | at 6000LBS | 2.8 m/min |
| Type Type Type Type Type Type | Steel |
Go to product Consultation
Stokrat's engineers managed to create a winch with a pulling force of 8000lbs in a compact body. This winch uses the same power motor as the T-MAX 6500 and a slower 216:1 gearbox. Despite this, the winch not only outperforms its closest competitor in terms of power, but also demonstrates the same winding speed according to the manufacturer's assurances. This model went on sale in 2020, replacing the 6000lbs winch.
So let's start with the fixed installation of electric car winches, as they are the most popular among jeepers. Electric winches are usually mounted on the front bumper of an SUV. It is also possible to install it on the rear bumper, also on both sides, if this does not contradict the requirements of the traffic police, but we will talk about this a little later. To begin with, we will tell you how the winch is installed on a regular bumper.
1. To begin with, the bumper is removed and the steel platform is mounted on the frame with tacks using bolts.
The place where the platform is to be installed must be strong, secure and capable of withstanding a load of at least the maximum capacity of the winch.
The platform must be fixed on 4 sides, so if the holes do not match, additional holes must be drilled. After installing the site, it is worth trying on a bumper, since the dimensions of the site may not match the dimensions and features of the bumper, in which case it is necessary to cut off the protruding parts of the site with a grinder.
2. After installing the platform, you need to mount a cable guide on it, through which the cable with the hook will go out. If there is no room on the bumper to pull out the hook, then you will need to cut the window to the desired size.
3. Next, install the winch, which is attached to the steel platform using the bolts included in the kit.
4. When the winch is mounted, it's time to connect the electrical control box and wind the rope. It is recommended to install the electrical unit near the battery, away from dirt and moisture. If the space inside the bumper allows, then the block is installed directly on the winch. Next, the positive cable of the winch is connected to the positive, and the negative cable to the negative terminal of the battery.
5. Many models of electric winches operate with a wired remote control. After mounting and connection, the winding of the cable begins, which is connected to the hook and installed on the winch before connecting the electrical unit. It is recommended to wind the cable onto the drum slowly to avoid uneven winding and the risk of the cable touching parts of the car.
Winches are complex devices, the installation and connection of which must be carried out by qualified specialists in special service centers. Incorrect installation of the winch may result in damage to the device, the vehicle, as well as harm to people and objects around.
Russian winch for domestic vehicles!
|
| |
| Wheel Carry | 6000LBS / 2720kg | 25 kg |
| engine power | 1.6 l. |
| No load speed (1 layer) | 5.2 m/min |
| Speed at 6000lbs | 2 m/min |
| Rope type | Steel |
Go to product Consultation
Compact and lightweight winch has a unique design. A special motor allows you to abandon the mechanical brake in favor of an electrodynamic one, which certainly increases the fault tolerance of this model. Another advantage is the low power consumption of the winch under load. The 4-speed gearbox has a ratio of 336:1. A cast-iron hawse is used as guides for the steel cable. Claimed 2.5 tons, the car winch pulls without difficulty.
Consider the example of WARN. Unpacking from the package. The platform is attached to the quadra frame, and the winch is directly attached to it. It is necessary to disassemble the front of the ATV and install the platform.
After reading at the end of the post, I advise you to watch a video about step-by-step installation, where everything is clearly depicted and shown to the smallest detail. What modifications are needed during installation?
Remove the front protection. The platform itself is attached to the frame in different ways, who fastens it, others weld it. Each method has its pros and cons. Installing the platform with bolts allows you to return the ATV to the factory state, when you weld it, the factory one will not work later, you can say - forever.
So, the installation of the winch itself requires convenience, before work we will raise the ATV with a jack and proceed to the installation of the platform. Remove front cover. The platform is partially attached to native fasteners, partially to the frame with special clamps, which should be included in the kit. We turn off the native bolts from the bumper - there will be one of the attachment points of the platform. We attach the platform with a bolt and, according to the instructions, begin to bait. If all the fasteners fit, we begin to stretch it.
The most important thing is to make sure that the clamps stretch without distortion, so we tighten the nuts one by one. The platform has been set up. It's time to install the quinoa itself. Be careful, it is heavy, it can fall, squeeze your fingers, so you need to be careful.
The instruction asks to install on different bolts. Some are 20 centimeters, others 25. We take 25 and fasten them through the brackets to the bottom mount. Note that the brackets can be of different sizes. This is surprising, because the copy is not Russian-made))), but unfortunately a fact. Therefore, in such cases, you will either have to unbend the bracket or drill it so that the holes fit under the mount.
Did everything fit? Now you can pull. The procedure is not very convenient, but doable. We pass the cable into the "lips". When using the cable, we have it at different angles. These lips allow us to keep the cable alive with the help of rollers, freeing it from friction on the part of the all-terrain vehicle. Of course, over time, these rollers wear out, crumple and stop rolling. But it won't affect performance much. Next, fasten the lips to the fastener. So, the installation of the winch is almost completed. For those who don't understand, open the video.
Proceed to the laying of new wiring. Wires are included, power. Part goes from the battery to the solenoid, and part from the solenoid to the swan.
Power supply solenoid. We install it on the site. We run the wires from the battery directly to the solenoid. To do this, you will need to disassemble the lining. Part of the lining is fastened with latches, the rest with bolts.
Now let's see where the wires will go. It is necessary that they are not frayed or burned anywhere. Power wiring, preferably, we hide the corrugation for protection in order to avoid a short circuit. We place the block under the steering wheel and fix it with plastic clamps
It is important that all wiring is tightly tightened to the frame. We put rubber caps on the wires to avoid a short circuit in the water, and fasten
We install the winch control on the steering wheel and connect the wires from it to the wires of the ignition switch. All is ready. We can assemble everything in reverse order and check the work.
installing a winch on an ATV video
We have such a completely new and stock unit.
brought just such a winch, the name was erased so as not to think what.
We put the control panel, we drag the wire.
We begin to disassemble slowly
got to the wiring, We are looking for the wires we need.
We drag the control wires under the seat, high-voltage wires into the front of the ATV, we fix the winch control relay. There were 2 holes made in the bar holding the battery. How do you mount this crap. (Customer approved)
Everything according to the instructions.
Next, we begin to make a bracket for mounting the winch itself. We take a corner, and Romanian
Then we cook and paint, there is no photo, so we take our word for it. Next, we make a fitting of our collective farm. The bracket is made in such a way that it can be mounted on regular bolts, and has 3 attachment points.
Putting a new part in place
First we connect the winch and check if it works at all, it turned out that it works
We screw it to the place where it should be
Side view, something like this.
And from the front, it seems like it even looks like something
And now the most interesting thing is the tests, in short, we got into a small snowdrift, got stuck in it, pulled it out at once. clung to the pole, pressed the brakes and began to reel, puffs up but pulls itself (on dry pavement) All fasteners without deformation, there are even no signs of vomiting. There are no photos of the process of bullying the quadric, so we take our word for it.
In order to comply with traffic safety requirements, the legislation of the Russian Federation requires registration of any change in the design of the vehicle. To install a stationary winch on a car, the vehicle must undergo a preliminary inspection at the traffic police. After obtaining the permission of the traffic police and installing a winch, the vehicle undergoes a secondary examination in the traffic police, and the necessary changes are made to the technical documents of the vehicle.
The winch must be installed on the original bumper so that it does not protrude beyond the line of the bumper. There is also a penalty for violating this requirement if the winch protrudes beyond the bumper, as it is prohibited to install projections of steel and similar materials on the vehicle that protrude beyond the bumper.
Hand winches do not require permanent installation on the vehicle. They are lightweight and many drivers keep them in the trunk. They deal with simple situations quite easily. They need to be attached to some fixed object, such as a tree, and on the other hand, you need to attach a hook to the car. Further, everything is elementary. If this is a lever model, then it works by pulling the lever, if it is a drum model, then by rotating the handle.
Among electric winches there are portable models
which also do not require fixed installation. They, as a rule, are not as powerful as stationary ones, but cope with problems of medium complexity easily. They, like manual models, are stored in the trunk in a special bag and installed under emergency circumstances. They are mounted under the hood of the car using a special carriage and are powered by the car battery.
Once you've installed your electric winch, it's worth testing it out on level ground before driving off-road. Using a winch requires certain knowledge and compliance with safety rules. Below, we’ll cover what you need to know when winching your ATV out of a pothole or mud.
When working with a winch, all safety rules specified in the equipment passport must be observed. Do not approach the cable and winch in working condition and allow other people to approach it. A cable arrester must be used, as if it breaks, it can damage people and objects around.
Before use, make sure that all elements are in working condition, that they are not broken or damaged, and that all fasteners are fixed securely.
After using the winch, it must be cleaned of dirt, dried and lubricated with special oil.
In order to comply with traffic safety requirements, the legislation of the Russian Federation requires registration of any change in the design of the vehicle. To install a stationary winch on a car, the vehicle must undergo a preliminary inspection at the traffic police. After obtaining the permission of the traffic police and installing a winch, the vehicle undergoes a secondary examination in the traffic police, and the necessary changes are made to the technical documents of the vehicle.
The winch must be installed on the original bumper so that it does not protrude beyond the line of the bumper. There is also a penalty for violating this requirement if the winch protrudes beyond the bumper, as it is prohibited to install projections of steel and similar materials on the vehicle that protrude beyond the bumper.
Hand winches do not require permanent installation on the vehicle. They are lightweight and many drivers keep them in the trunk. They deal with simple situations quite easily. They need to be attached to some fixed object, such as a tree, and on the other hand, you need to attach a hook to the car. Further, everything is elementary. If this is a lever model, then it works by pulling the lever, if it is a drum model, then by rotating the handle.
Among electric winches there are portable models
which also do not require fixed installation. They, as a rule, are not as powerful as stationary ones, but cope with problems of medium complexity easily. They, like manual models, are stored in the trunk in a special bag and installed under emergency circumstances. They are mounted under the hood of the car using a special carriage and are powered by the car battery.
A car's transmission has many complex moving parts. Each one serves a unique purpose in driving a car and helping it move. One detail you may not have heard of before is transmission solenoids, and they play a key role in driving automatic transmission vehicles.
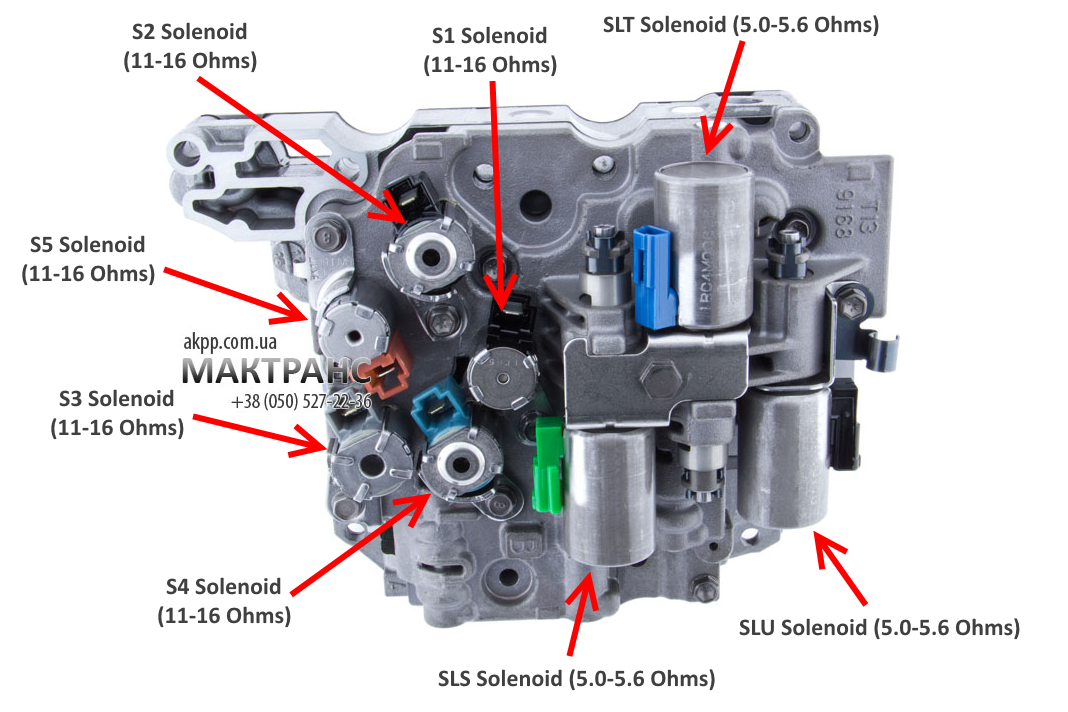
Most manual transmissions do not have solenoids. However, in automatic transmissions, they are used to facilitate gear changes. Solenoids are electro-hydraulic valves that operate one or more gears depending on the transmission and vehicle design. They control the flow of transmission fluid by opening or closing it based on electrical signals from the control unit.
When the solenoid opens or closes, it changes the pressure in the transmission, allowing gear changes. While the driver controls gear changes in a manual transmission car, automatic transmissions rely on the vehicle's speed sensors and the engine control unit (ECU) or transmission control module (TCM).
Vehicle speed sensors constantly monitor the vehicle's progress and analyze what needs to be adjusted. For example, they determine the moment when it is necessary to shift gears in order to obtain the necessary power and speed. Speed sensors work with the ECU or TCM and send signals through them to the solenoids to open or close them. Such a system allows you to switch gears.
Transmission solenoids have a spring-loaded piston inside that is wrapped in wire connected to the speed sensors and the ECU or TCM. Through this wire, they receive signals to regulate the flow of hydraulic fluid in the transmission.
Generally, a solenoid failure will not require emergency repair, and you will most likely be able to continue driving for a while. However, you will notice certain signs of a malfunction.
If you suspect you have a bad solenoid, especially if the check engine light is on, you need to take your vehicle to an experienced mechanic who will review the error codes and make a proper diagnosis.