Wheels and tires can make or break the look of a car. You can have a clapped-out, rusty Camaro with a nice set of wheels, and it will typically look pretty cool. On the opposite end of the spectrum, a bad wheel choice can make a fully-restored and painted showpiece look less than spectacular.
Keep in mind, when measuring, the car needs to be at ride height. We have the car on a lift to make it easier for you to see where we take our measurements.
When choosing wheels for your ride, there are two major factors to consider when making your decision — looks and fitment. Since the right “look” is a personal preference, we can’t tell you what wheel you might like. As for fitment, that’s where we can help to make sure you get it right. Rims and tires, even when choosing a less expensive kind, can still be costly, so buying a set that does not fit will definitely put a damper on your day. A disconcerting feeling is an understatement when you order new wheels and tires, only to find out they rub or simply do not fit.
The first measurement we took was to verify our overall width. This will let us know how wide our tire section width can be. If you decide to trim the inner fender lip to increase tire clearance, that modification can be worth up to 3/4-inch. If you are not interested in cutting the wheel lip on your car, you can roll the lip under.
If your car is close to stock, then you can probably find a lot of opinions about what will fit a certain application. But, what if you have modified things like spring location or widened wheel tubs, then what? What if you want to stuff the largest wheel and tire package possible under your car? Do you know what measurements you need to take? If not, you had better educate yourself on how to measure the car to find the right specs for your new rollers. That is exactly what we plan to do here.
What Brought This On & What You’ll Need
We were hanging out with Aaron Linquist at Ratchet Garage in Lakeland, Florida, when the discussion turned to measuring for oversized wheels and tires.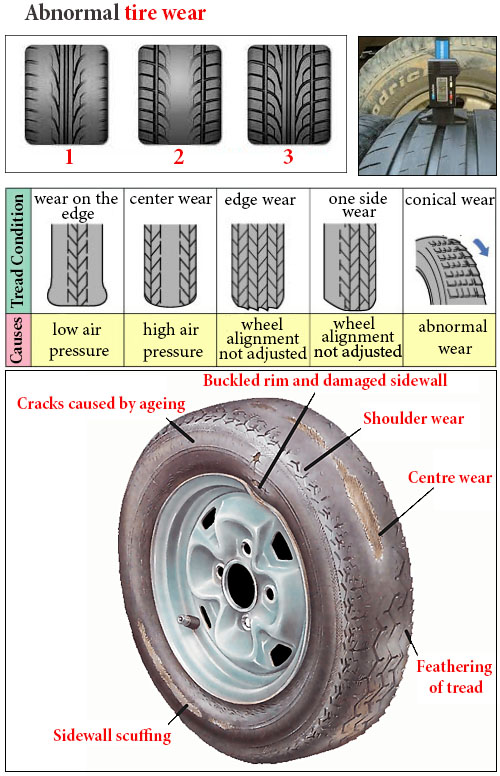 As luck would have it, there was a 1970 Nova on the rack that we could use to show you guys exactly how to measure for upsizing your wheel and tire package on the rear of your ride. What’s more, we are going to show you how to find all these measurements with nothing more than a straight-edge and a tape measure.
You don’t need fancy tools for this, but you do need to have some knowledge of what, and where to measure. According to Aaron, “people ask me all the time, ‘what is the biggest tire that will fit under my car?’ I first tell them if you have a straight edge and a tape measure you can find out. Then I have them bring their car to the shop so I can show them.”
The next measurement we took was to find our total available backspacing. This measurement will not be the amount of backspacing your wheel needs to have, but rather the total room you have to work with.
Stuffing fatter tires with short, stiff sidewalls under the rearend is a little easier than, let’s say, a racing slick. One big reason is that the sidewalls on these lower profile, larger diameter tires tend to stay put — unlike tall, two-ply wrinkle-wall drag tires that flex, stretch, and move around a lot.
This measurement gives you the total available room from the rim mounting location to the leaf spring. Typically, the tire will rub the inner fender before it hits the spring.
It is always a good idea to measure both sides of the car when fitting tires, because the two sides will typically not possess identical measurements. This is more prevalent with older musclecars. It’s been our experience that the rear axle tends to be offset more to the passenger’s side.
On the inboard side of the wheel opening, the wheel tub is usually the first point of contact, but tire-clearance limitations can also occur at the leaf spring, so we also measure for that distance. There are several aftermarket companies that offer offset-shackle kits for specific cars. For early Camaros and ’68 through ’74 Novas, Detroit Speed offers an offset-shackle kit (PN 040901) that moves the springs inward, so you can gain additional clearance.
…If you have a straight edge and a tape measure you can find out. – Aaron Lindquist, Ratchet Garage
When measuring to find your available area, there are several variables that come into play that will affect tire clearance. The most important one is ride height. Why measure the car for tire clearance, purchase the tires and wheels, and then decide to lower the car? If you are even contemplating lowering the car, do it before you purchase new tires and wheels. Let’s say for example, that you have an early Camaro that is at factory ride height. With this stance, you might be able to accommodate an upsized 255/50R16 tire on a 16×8 wheel. After you install those new wheels and tires, lower the car by 1-inch. Now, the available area you had is decreased, and your combination will likely no longer fit your car.
The tire on the left is a bias-ply, DOT-approved racing tire, and is very flexible. This type of tire will require more clearance than the radial on the right, as it will flex and move more than the radial.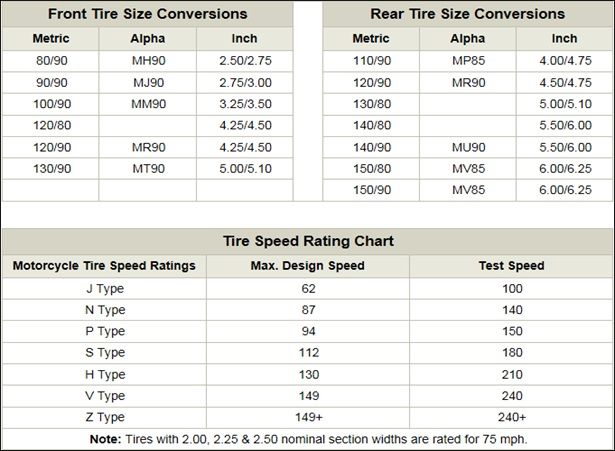
When measuring rear tire clearance, you must also keep in mind that unless you have a good set of sway bars, or a performance-handling suspension, your car will experience body roll when cornering. If you minimize body roll, this will allow you to run a larger rear tire with less clearance. This is because most rear axles will articulate when they encounter an uneven surface, or when cornering.
Okay, this is an exaggerated experience, but body roll can and will occur, and needs to be taken into account.
This can occur when you enter a steep driveway at an angle, or a sharp turn at a fairly high speed. The body leaning will cause one tire to dive into the rear wheelwell more than the other.
When it comes to actually measuring for wheel and tire clearance, there are three major factors that come into play:
Rim Diameter
Rim width is not measured at the outermost edges of the rim, but rather, by the face area where the tire seats into the rim.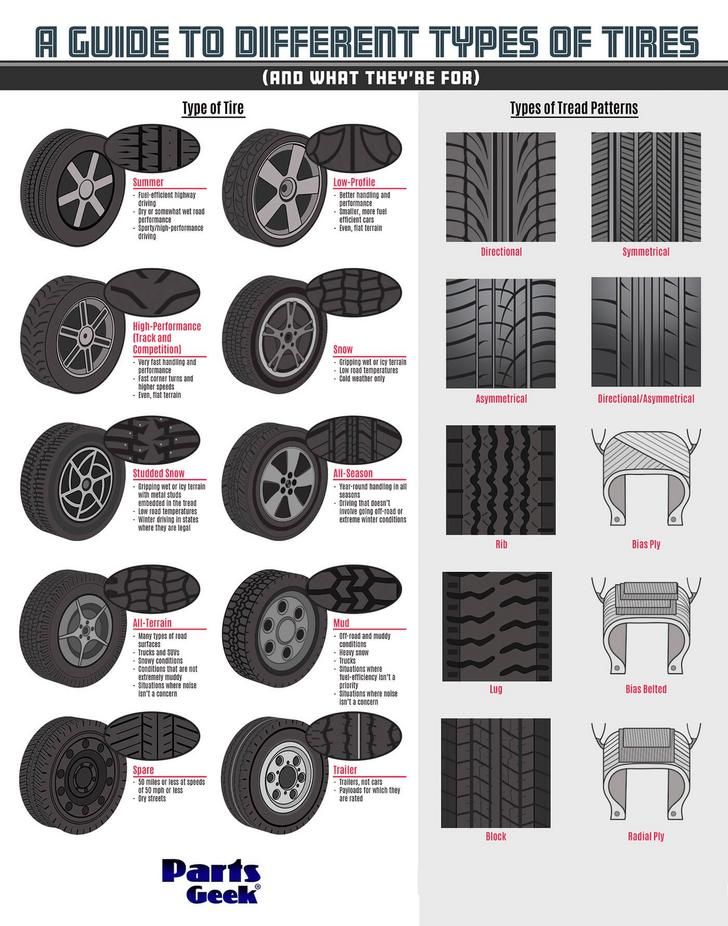
The first thing we need to decide is what diameter wheel and tire you would like to use. This is the measurement of the diameter of the wheel from where the tire bead sits if you are viewing the wheel from the front, back or top. Rim diameters are generally stated in inches (15, 16, 17, 18, etc.). Typically, by choosing a wheel with a larger rim diameter, the sidewall of the tire gets smaller.
Rim Width
Rim width is the measurement taken from bead face to bead face, not across the entire lip-to-lip surface of the wheel. In general, the rim lip (flange) will be approximately a 1/2- to 3/4-inch wider than the rim width, so a rim width of 8 inches makes the overall width of the wheel from lip-to-lip 8 1/2 to 9 inches.
Backspacing
You’re reading this article because you are interested in mounting larger tires under your car, which also means larger wheels. Most guys understand wheel diameter and width, let’s face it, these two dimensions are easy to measure.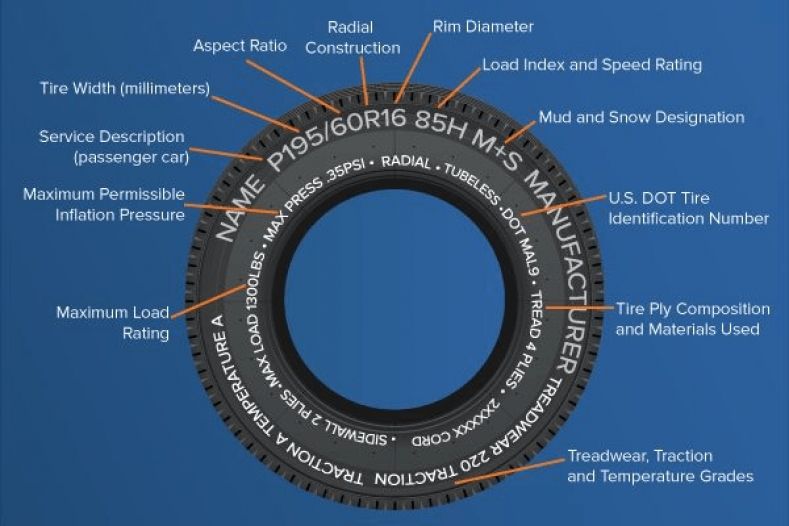 But when it comes to stuffing bigger tires under a classic, it’s all about the backspacing. Backspacing is the measurement between the wheel-to-axle mounting flange, and the inner lip of the rim. Sometimes referred to as ‘offset,’ we’ll try to keep things consistent, and call it backspacing.
Backspacing is the measurement of the wheel from the hub mounting point, to the tire lip.
For example, let’s say you have a 15×8-inch wheel, and it has 4-inches of backspacing. This places the mounting flange in the middle of the wheel’s width. Even older musclecars — with a relatively narrow wheel opening — still offers room for installing larger wheels and tires, if the wheel is equipped with more backspacing. As backspacing distance increases, the mounting flange moves closer to the outside edge of the wheel, which is called a positive offset. Decrease backspace, and the result is a negative offset.
When measuring for backspacing, the straight edge needs to be on the bead 'face' area, not the outermost edge of the wheel.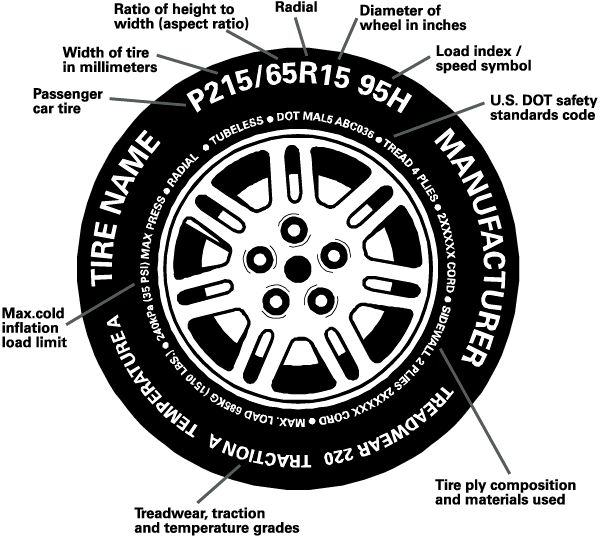
The inside diameter of the wheel is also important if your car happens to have a big brake upgrade. Some brake companies are vague about minimum wheel diameter clearance, because each wheel company’s dimension for a given diameter varies with the style of the wheel. What this means is that you can’t assume that all 15-inch wheels will clear a set of Wilwood brakes with 12.19-inch rotors.
If you’re not sure about taking measurements, Percy’s has engineered a wheel measurement tool that allows anyone to find the correct offset, backspace, diameter, width, and tire profile in a matter of minutes. The Wheelrite tool can accommodate width measurements from 6 to 11 inches, tires between 15 and 30 inches, and backspacing up to 10 1/2 inches. It is designed for use on both 4 or 5-lug-wheel bolt patterns, measuring from 98 to 130 mm.
Tire Section Width
Although impossible to measure clearance for this without a tire mounted on a wheel, it is an important consideration.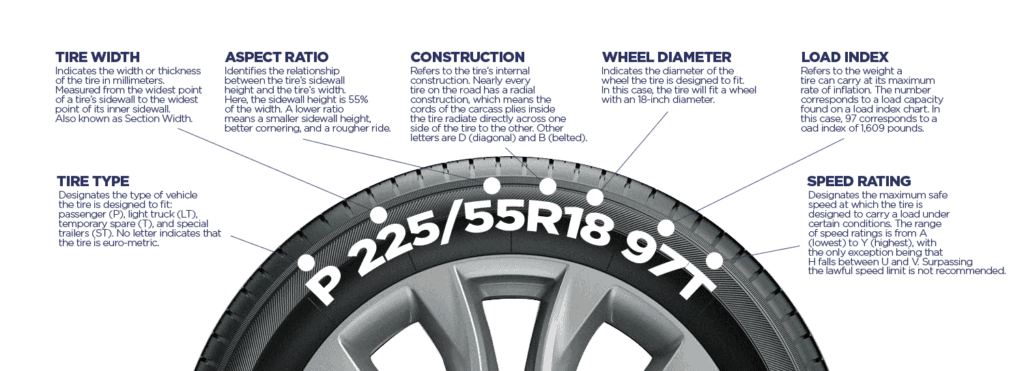 Tire manufacturers publish section-width information based on a given wheel width, so that can help. Section width is the distance measured across the mounted tire at its widest portion of the sidewall on a given wheel width. The section width measurement will change slightly, depending on the width of the wheel. Again, the tire companies publish dimensions of each size tire based on a given wheel width.
Let’s take a look at Mickey Thompson’s Sportsman S/T radial tire in size 275/60R15. When mounted on a 8-inch wheel, it has a section width of 10.7 inches. As a general rule of thumb, for every 1/2-inch of wheel width change, the section width will vary by roughly 1/4-inch. That means if we mount that same tire on a 9-inch wheel, the section width would be 11.2 inches. As with all tires, there is also an ideal wheel width range for any size tire.
Keeping it simple, the tire’s section width is the distance of the two sidewalls of the tire after being mounted and inflated. Section width is almost always wider than the actual tread and rim width.
Whatever you do, do not assume that all same-size tires have identical section widths. While tire diameter is closely maintained, section width has a tendency to vary between manufacturers. We have heard of the same size BFG, Firestone, and Goodyear tires that are mounted on the same wheel, yet having major differences in section width.
Installing larger, racing-style tires does involve a little more room consideration. This is because the taller-sidewall on these tires do exhibit much more lateral sidewall movement. This will require much more clearance than short-sidewall tires. With DOT-legal drag tires, you need to be careful when researching rear tire dimensions. Remember to always check the clearances at ride height, not with the car sitting on jack stands under the frame and the suspension in full extension.
A good rule of thumb is that you want to have at a minimum, 1/4- to 1/2-inch of space between the tire’s sidewall, and anything in the wheelwell. If the dimensions of your new wheel and tire cross into that space, you might have clearance issues.
Hopefully, we have answered your questions, and with this basic guideline of how to measure for tire and wheel clearance, the only task left for you to do is to go out to your garage and find out how big of a tire will fit under your ride.
Our Nova has a set of 275/60R15 radials mounted in a set of 15×8 wheels with 3 1/4-inch backspacing. The rearend has also been narrowed 1-inch on each side.
| How-To - Wheels and Tires
It’s pretty safe to say that wheels and tires can make or break the styling of a car. You can have a clapped-out rusty turd with a nice set of wheels and it will look pretty cool. On the opposite side, a bad set of rollers can make a fully restored and painted showpiece look less than spectacular.
There are two major factors to consider when choosing new rollers for your ride—style and fitment. Since style is such a personal preference, we can’t tell you what you might like. As for fitment, that is where we can offer some knowledge. Rims and tires, even on the cheap end, are still expensive. Trust us when we tell you ordering new wheels and tires, only to have them rub, hit, or flat out not fit is a bummer.
Now if your car is pretty much stock, then there will be ton of forums where you can do research and find a common fitment for your car. What if you have modified things, then what? Well, you best educate yourself on how to measure the car to find the right specs for your new rollers to come.
That is exactly what we plan to teach you here, since we had to go through the entire process to get the right rims for our ’56 Bel Air. We recently upgraded the suspension with Heidts components, including its independent rear suspension, narrowed tubular arms, and coilovers up front. All these new goodies moved things around enough that we are not confident in letting the Internet tell us what we need. We know we want an 18-inch diameter rim, so our Nitto tire selection is the best, but we didn’t know much more than that.
We contacted B-Forged, a brand of Billet Specialties, to ask what was needed when ordering a set of the company’s modular three-piece rims, and what we got back was a pretty extensive ordering form with all kinds of required measurements. Since this form covers just about every parameter necessary, we are going to show you how to find all these measurements with nothing more than a few squares, a tape measure, a couple of clamps, and a piece of string.
1. Here is the order form from the B-Forged division of Billet Specialties. It’s pretty extensive and once completed will give you and the wheel manufacturer a clear path to getting the right size and spacing on the car. No matter whom you are going to get rims from, it’s a good idea to have all this information before ordering to prevent a costly mistake.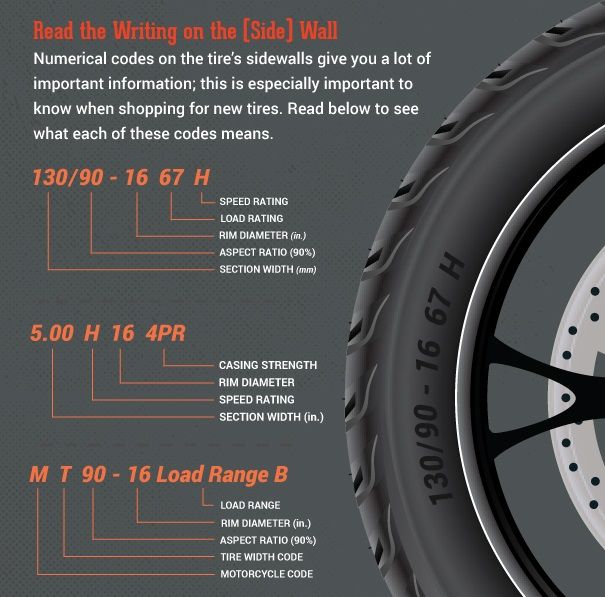
2. Here are the simple tools we used to get all the measurements. It’s basically just a selection of squares, two rulers, a few clamps, a set of calipers, and a homemade plumb bob. Preparation is the key for accurate measurements. Make sure the vehicle is level and the suspension is at ride height before measuring. (Jacking up only one side and using the plumb-bob will change the measurement you are getting.)
3. The first measurement we need to get is mounting surface to first obstruction on the frame side. We clamped one of the rulers to the studs with it flat against the rotor. We positioned the ruler so it protrudes 9 inches from center to emulate one half of the 18-inch rim diameter. Then we clamped one more ruler to that end and rotated the rotor till it made contact with something. At this diameter, our first point of contact was the tie rod end, which was 51⁄2 inches.
4. The next thing to find was the distance from the mounting surface to the fender. To do this, we taped our string and washer combo to the fender. Then we used a square to find the distance...
5. …which came out to 63⁄4 inches.
6. Our digital calipers made measuring the hub diameter simple. We got 2.65 or 213⁄20, but the closest yet larger common fraction is 221⁄32 inches.
7. The square made quick work of finding the brake diameter, which is done by measuring from the top of the caliper to the center of the hub and then multiplying by 2. We have a measurement just shy of 71⁄2 inches.
8. To find how much the caliper protrudes past the mounting surface, we clamped one square, making sure it was flat on the surface of the caliper, and then used another to measure the distance as shown. This ended up being 9⁄16 inch.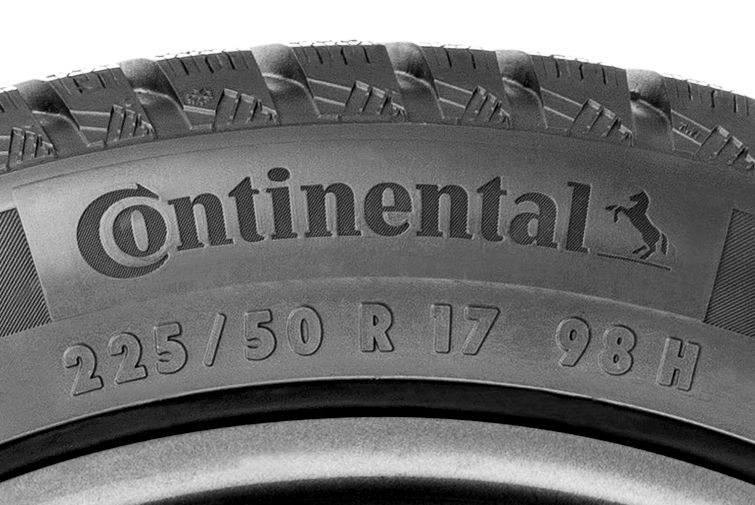 These last two measurements are crucial to getting proper caliper clearance so the inside of the rim doesn’t hit the caliper.
9. Now for the hub length. It was pretty simple: Just place the ruler and read it. Most hubs are much more shallow than the Wilwoods, but these are 23⁄4 inches. This measurement lets the wheel manufacturer know if the center cap will fit.
10. The last one in the front was fender height to center of the hub. Again, a large square made this pretty much cake and showed we have 133⁄4 inches. This tells us that with 9 inches of rim (half the diameter), we have room for 43⁄4 inches of tire sidewall. This will help us pick the correct tire od (not that we will need that much sidewall on this low-slung car).
11. The last thing you will want to provide your rim manufacturer is a brake system diagram if it’s available. Wilwood has these for all its systems, so all you need to do is go to the Wilwood site and search with your system’s part number.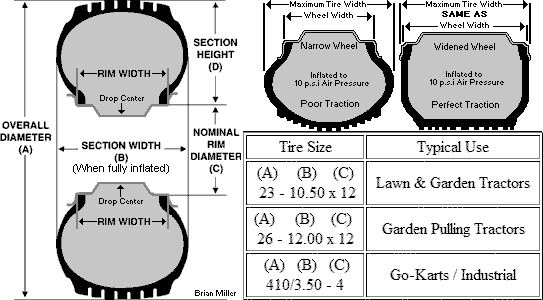 If you have factory brakes, then you probably won’t need something like this.
12. The rear follows the same procedure as the front. Ours is a bit different than most, as we have the Heidts independent rear end setup. It’s stock width, but because of the control arms and other stuff, we have more limitations than a straight axle. Here we see the first contact point with an 18-inch rim, which is a lower control arm pivot bolt. We found this bolt was 53⁄8 inches from the mounting surface. If we upsize the rear rims to a 20-inch diameter, then our first contact would be the actual framerail.
13. Mr. Makeshift Plumb Bob was used to find that we had 65⁄8 inches till we hit the rear fenderwell.
14. The rear hubs are a bit more standard but still different than a normal rear end since we have the CV shaft hardware protruding out. The main part of the hub was 13⁄16, while the CV shaft was 11⁄4 inches.
15. Fender height to center of hub was a bit less in the rear because the ’56 has low swept arches. We have 93⁄8 inches.
16. The last thing on the form is a current wheel and tire size. To find the backspacing of our current rims, we clamped two squares together and then used a third to measure our backspacing. Backspace is always measured from the mounting surface to the very back edge of the wheel. (This is what would come in contact first with any obstructions.)
17. With a stamped steel rim like our 17-inch Rallys, there are two possible starting points. Up on the rim edge like this…
18. …or down inside. We didn’t know which B-Forged wanted, so we measure both. We had 41⁄8 down in and 41⁄2 up on the edge. We suspect the 41⁄2 is the proper number, but it’s better to have all information so you don’t have to go back during the ordering process.
19. Another thing to consider when trying to find the current rim size is to see if it’s marked, and ours was—clearly stamped 17x8.0 on the fronts and 17x9.0 on the rears. If they didn’t have marks, we would have to measure the width by running a tape measure through one of the slots and measuring from bead to bead.
20. We sent our filled out order form to B-Forged, along with our request for an 18x8 with 4 inches of backspacing for the front and 18x10 with 51⁄4 inches out back. For the actual style of rim, we decided to go with the 450 three-piece forged wheel, which has a staggered set of spokes that, to us, is a modern take on the straight spoke rims of the gassers back in the day. Since it is a three-piece design, the finish options are just about endless, but we decided the car wanted a matte black center and rear band and chrome outer band and hardware.
21. The three-piece design of this rim allows for dang-near endless widths, backspacing, and caliper clearances. There are 25 rims in the B-Forged lineup right now that feature forged 6061-T6 billet aluminum centers, precision-spun aluminum rim halves, and racing-grade hardware. B-Forged wheels are exceptionally strong and lightweight. Modular three-piece construction offers shallow and deep concave profiles. We went with a shallow concave profile for the front and a deep concave profile for the rear for a nice staggered look.
22. Once the rims arrived, we followed the B-Forged instructions/warning label and test-fit the rims before we mounted up the tires.
23. In the front, we made sure to spin the rim and also turn the steering from lock to lock to make sure there were no clearance issues. Since we made so many measurements, these rims fit perfectly.
24. To make sure the car rides smooth and yet still has grip, we chose to run the Nitto NT555. We have used these tires for a few years in our Super Chevy Suspension & Handling Challenge, so we’re pretty familiar with them. The NT555 is a high-performance street tire designed with increased traction and handling capabilities. They have a large contact patch, which provides improved dry performance while cornering, braking and accelerating. One thing we really like about this line of tires is there are 44 different sizes from 235/45ZR17 to 295/25ZR22 and 15 different sizes in the 18-inch diameter. That allowed us to dial in the size perfectly. One more reason we chose these was the simple-looking tread design. We think this complements the car instead of being so busy that that’s all you can see.
25. In the front, we went with a 245/40ZR18, which has a 93⁄4- inch-wide tread face and a 251⁄2-inch diameter. These are spec’d to run on 8-inch-to-91⁄2-wide rims, so we are on the bottom of that parameter. That gives us the widest tread the rims will support and a little extra meat around the sidewall to protect our rims from hitting the curb if we park by braille.
26. To keep the 502’s horsepower in check, we strapped a set of 285/40ZR18s out back. These have an 111⁄2 inch-wide tread face and almost a 27-inch diameter. These are spec’d to run on 91⁄2-to-11-inch-wide rims, so we fell right in the middle of that range. These also have a nice little bit of balloon on the sidewall to protect the rims.
27. Here’s the payoff: The rims fit perfectly, they don’t rub, and the tires fill the wheelwell just right. The B-Forged rims are premium pieces that will stand up to the rigors of performance driving while looking sweet as pie. The black center and chrome band match the car’s paint and chrome scheme to a T. The Nitto 555s will provide good grip and lateral stability and should wear pretty well. We hope we have given you enough information that you feel confident in measuring your own car for your next rim and tire purchase. While you are doing that, we are going to take the ’56 on a nice trip along the coast.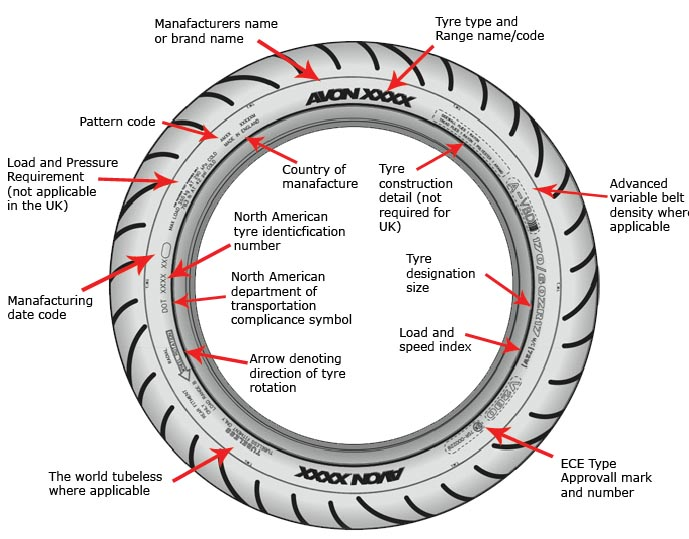
How to choose the right tires for your car? In the off-season, for many drivers, this is the most pressing issue. The necessary information about the dimensions, speed and loading characteristics of tires can be easily found in the car's operating manual. Sergey Mishin, head of the tire test group of Za Rulem magazine, talks about how to navigate the tire markings and what threatens mistakes in choosing winter and summer tires.
Related materials
Tire test group ZR answers questions
The main "metrics" of the tire are hidden in a set of numbers printed on the sidewall. Take, for example, 195/65R15.
The first (195) indicates the width of the tire section in millimetres. The second (65), after the slash, is a series of tires. In fact, this is the height of its profile, indicated as a percentage of the width. In more familiar millimeters, it will be: 195 × 0.65 = 126.75.
The letter R indicates the radial design of the tire. And the last digit (15) indicates the landing diameter (not the radius!) of the tire in inches. Converting it to millimeters (15 × 25.4 = 381) and adding twice the height of the profile (or sidewall) in the same units (126.75 × 2 = 253.5), we get the main overall size of the tire - its outer diameter: 381 +253.5 = 634.5 mm.
The owner's manual will tell you which tires are suitable for your car. The lazy ones will find a label with allowable sizes and recommended pressure on the end of the driver's door or the B-pillar.
If the tire diameter is less than optimal, this will lead to a decrease in ground clearance, and the use of tires with a larger diameter is limited by the dimensions of the wheel arches. Rubber should not touch the body or chassis elements - especially when turning the wheels left and right and driving with a load on uneven roads. Any deviation of the diameter from the recommended one also affects the speedometer readings.
Related materials
What do the inscriptions and labels on tires say
Related materials
"Behind the wheel.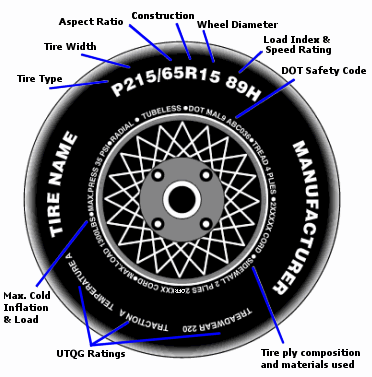 RF" found out how readers relate to bald tires
If the car manufacturer allows you to vary the size of the tires within certain limits, please note that wider tires are preferable for summer: the wider the contact patch with the road, the better the tires cling to it. But the wider the tire, the greater the rolling resistance. In addition, on such tires, the car handles worse in small radius turns - the tread has to slip due to the fact that its opposite sides pass different paths. Another disadvantage of wide tires is the tendency to hydroplaning (loss of contact with a wet road).
The high sidewall softens bumps well, but makes the tire more pliable. When turning, it deforms and does not respond so quickly to taxiing. Therefore, in terms of handling and stability, a low profile tire is preferable. But it is stiffer and has less durable sidewalls.
In winter, on the other hand, the specific pressure in the contact patch should be higher, which improves grip on ice and snow. So, narrower tires are preferable here.
In the marking, as a rule, there are a couple more numbers that are rarely paid attention to, for example, 91H, 95T. These are indices of carrying capacity and maximum permissible speed. According to special tables, it is not difficult to convert them into specific values of load (in kilograms) and speed (in kilometers per hour).
Here is an example calculation for a maximum speed of 185 km/h. We increase the figure by 15%, since such an increase is possible when driving on a long descent or with a strong tailwind. 185 x 1.15 = 209,3. This number according to table No. 1 is between the values 190 and 210. We round it up and get the index H.
). But in no case should you exceed the speed limit of tires - they will not withstand a large centrifugal force.
Now about the load capacity. The number 82, for example, indicates that the tire is capable of carrying a load of no more than 475 kg. Determine the minimum required for your vehicle based on the maximum axle load at its full weight. Divide this value by two and in the tables (they are shown in the photo gallery at the bottom of the article) select the nearest value, rounding it up. Some tire and car manufacturers recommend increasing the calculated value by 20%, creating some kind of margin.
On some tires, this set is supplemented by some more symbols.
Related materials
Supertest 18 sets of winter tires: driving into winter
Related materials
What drivers are guided by when choosing tires
XL is a pure bluff, designed to suggest that tires have an increased load capacity. But the real load is determined only by the index described above.
The symbols SUV or 4x4 (depending on the manufacturer) mean that the tires are designed for crossovers or all-terrain vehicles. Their main features are a more powerful frame and shoulders reinforced from the inside.
The letter C in the marking (for example, 185/75R16C) refers to light commercial vehicles (minivans and light trucks). Such tires are distinguished by a double index of load capacity (for example, 104/102Q), where the first digit indicates the load capacity of the wheel in a single-wheel version, and the second - in a two-wheel version.
Run-flat tires are able to cover some distance without losing air. They also have a distinctive marking, which is shown in the table (you will find it in the photo gallery below).
There is an opinion that on bad roads it is better to use tires with a high speed index: they are supposedly stronger. There is an element of truth here. An additional reinforcing "padding" between the breaker and the carcass makes the tires a little less vulnerable to impacts. The payoff for this is increased rigidity, sometimes also noise.
In fact, in difficult conditions, tires with a higher load index are preferable. They not only have an additional backing, but also reinforced sidewalls.
Choosing tires: what do the codes on tires mean (INFOGRAPHICS)
Choosing tires: what do tire codes mean (INFOGRAPHICS)
Choosing tires: what do tire codes mean (INFOGRAPHICS)
Choosing tires: what do the ciphers on tires mean (INFOGRAPHICS)
Our new video
Were export Zhiguli better than usual? Debunking the myth
Another GAZelle competitor: cheap! Even more!
Frame, four-wheel drive, transparent hood (and 224 mm under it) — the Chinese surprised again
Like this article? Subscribe and you will always be in the know!
Driving in Zen
News smi2.ru
So, you are planning to replace car tires - no matter for what reason, maybe the old tires are out of order or you are thinking of changing the look of your car - the first thing you will need to decide is to decide what size car tires required for your vehicle. Only after that you will be able to choose a suitable tire model in the online store. Understanding the marking of rubber is not as difficult as it seems - just read the information in this article.
The vehicle type for which each tire is designed is indicated by numbers or letters on the tire. Typical tire operating conditions can be seen here.
Let's consider an example - size P 225/45R17 91S.
The letter "P" used on car tires indicates that the product is intended for passenger cars and is present in the P-metric system, which began to be used more than 40 years ago and is still in use today. Passenger cars include passenger cars, minivans, pickup trucks and light (parquet) SUVs. The carrying capacity of vehicles for which tires with the P mark are intended should be in the range from 250 to 500 kg per 1 wheel.
If the rubber marking does not start with a letter and three numbers, this means that this tire is made according to a different dimensional system - Euro-metric, which is common in European countries and applies to car tires for passenger cars, vans and light SUVs. The size range in the P-metric and Euro-metric systems is almost identical, the differences exist only in the ultimate load.
Consider another example - T125/90D16 98M.
Tire markings beginning with the letter T indicate that the tire is a spare tire and can only be used during tire fitting work on the main tire.
If the tire marking begins with the letter designation LT, this indicates that the product belongs to the Light Truck-metric size system, which is used to designate the size range of automotive rubber installed on large vehicles, pickups, vans, powerful SUVs with a load capacity of 750 up to 1000 kg.
If the marking of a car tire ends with the letter LT, this means that the tire belongs to one of three marking systems - flotation (Flotation), numerical (Numeric) or wide base (Wide Base). These systems apply to tire sizes for heavy trucks and trailers. For such vehicles, rim diameters start at 16.5 inches, with the help of a large tire, the car easily copes with the most difficult and difficult trails. In this category, you can pick up tires for cars weighing from 500 to 1000 kg.
In the Euro-metric system, the letter designation may come after the number, for example, the letter C in this example is /70R15C 104/102R. This means that this rubber is intended for use on commercial vehicles - trucks, trucks or vans. In addition to marking C, the letter designation B or D may be allowed, which also corresponds to a certain load range.
A tire label that begins with the letter ST, eg ST225/75R15, indicates that the tire is intended for general or special purpose vehicle trailers. Tires with this marking are not permitted on cars, trucks, vans and pickup trucks.
To more accurately determine the choice of tire sizes and the most suitable modification of rubber for your car, a specialist from our company GOOD WHEELS can always help you - just make a call to the indicated numbers or leave a request on the website - you will be given a detailed consultation on the model and size range. We recommend that you have at least basic knowledge in this area - this knowledge will always be useful to you and you can learn it by asking a consultant of our tire center.
Everything is much simpler here than with letter designations. The three-digit number after the letter indicates the size of the tire width in millimeters. For example - 225/45R17 91S. Here the number 225 is the width of the tire from outside to inside when measured directly on the wheel after installation.
The next two digits indicate the numerical value of the ratio of the height of the tire to the width of the profile. For example, in this case - 225/45R17 91S figure 45 means that the height of the tire is 45 percent of the profile width. Height is measured from the outer edge of the wheel to the seat rim. That is, the higher the number, the larger the sidewall of the tire. If we know that the tire width is 225 millimeters, and the digital value is 45, then this means that the profile height is 101.25 mm. In another example - 225 / 70R16 - the ratio is slightly different, with a width of 225 mm, the height is 70 percent, that is, 157.5 mm.
In this example - 225 / 45R17 - the letter R indicates that the cords in the carcass are located radially, that is, the tire has a radial design. The radial type of tires is the most common and sold. More than 98 percent of all produced and sold car tires are of radial design.
Tires designed for light duty vehicles will use the letter D instead of the letter R. This tire will have a diagonal carcass type.
Tires marked B are practically non-existent and rarely produced - these are tires with a diagonal carcass and tread reinforcement with special belts. This design is called Belted and is a rarity in car shops and tire centers.
The letter Z can be added to the letter designation R - as in this example 225/45ZR17. Now it is rare to find tires with such a designation, but nevertheless, the speed index is displayed in this way - Z-speed rated.
The speed index can only appear after the numbers indicating the percentage of height to width ratio and after the letter R, indicating the type of internal tire construction - but this is rarely used, since 1991 the speed index marking has been indicated in the service description.
After the letter R (D or B), manufacturers indicate a number that indicates which rim diameter this tire fits. For example, in the marking P225 / 45R17 91S number 17 means that this rubber is intended for a disk with a diameter of 17 inches.
The numerical designation can be from 8 to 28 - what number, this should be the size of the disk to install this particular tire on it. Common designations are 8, 10, 12, 13, 14, 15, 17, 18, 19, 20, 23, 24, 26, 28. This size range allows you to choose tires for cars and trucks, minivans, vans, SUVs.
Less common but still used sizes are 14.5, 15.5, 17.5 and 19,5. These dimensions are suitable for heavy-duty trucks and covered vans.
Sometimes the size markings are given in millimeters, for example - 190/65R390. Such a system is called millimetric. Michelin uses this system for the TRX range.
Michelin also uses its own original integrated tire labeling system called the Michelin PAX. Under this system, tire dimensions and rim dimensions are indicated in millimeters. For example - 235 / 710R460A 104T, here 235 is the size of the profile width in millimeters, 710 is the outer diameter of the tire in millimeters, 460A is the rim diameter, the letter designation A means that the tire has asymmetric beads, with different diameter sizes.
Understanding the nuances of the manufacturer's label when purchasing new car tires, especially if these are ultra-modern tires created using the latest innovative technologies, can take forever.