This tutorial shows how to draw nine different eye expressions. It explains how the eyes tend to change with each expression and provides six drawing steps for each example.
Eye expressions drawingAs shown above the expressions included in the tutorial are:
Please note that as this tutorial focuses on getting a certain expression the examples show a somewhat simplified drawing of the eyes. For drawing more detailed eyes see:
How to Draw Eyes Step by Step
While the provided examples are fairly simple it’s still recommended that you do the tutorial in pencil and make light lines that you can easily erase in case you make a mistake. The lines in the examples are dark simply so that they are easier for you to see.
You can darken your lines in the last step of the drawing before adding the shading.
It’s also highly recommended that you read over the drawing instructions for the normal expressions even if you don’t plan on drawing it. It provides some information that is not included in the other examples (to avoid repetition).
One important thing to be aware of before drawing any of the expressions below is the spacing between the eyes. Generally this should be enough to fit another eye in between them (as shown in the above example) Remember that this space also includes the width of the tear duct.
Finally also keep in mind that the distance between the eyes should remain the same regardless of the expression.
This first drawing is of the eyes in their natural relaxed state. This example is what the rest of the expressions in the tutorial will be based on.
Begin with the outline of the white of each eye without any of the other details.
The shapes and angles of the eyes can vary between different people. In this case they will be angled slightly downwards towards the nose.
For drawing different types of eyes see:
How to Draw Different Eye Types Step by Step
Be careful that you position both eyes on the same level so that one is not too high or too low in relation to the other. You can optionally draw a straight horizontal line right above where you want to draw the eyes to help you do this.
Inside the outline of each eye draw the irises with their tops slightly covered by the upper eyelids and their bottoms just touching the bottom eyelids.
Again this can change depending on the person but generally drawing the irises in such a away will help show a normal/relaxed eyes.
Just like the eyes the shape of the eyebrows can also change from person to person. Usually however eyebrows will tend to be thicker towards their inner ends and thinner towards their outer ends. Also towards the outer ends they will tend to have a bit of a bend in their shape.
Taking these things into account draw the eyebrows just a little bit above the eyes as shown in the example.
For more detailed examples of different types of eyebrows see:
How to Draw Eyebrows Step by Step
It’s important to note that the lines that outline the white of the eyes are technically the eyelids also. So when this tutorial refers to the “eyelids” it’s actually talking about the top of the upper eyelids and the bottom of the lower eyelids. The reason for this is to simply keep the steps a little more organized and to avoid some repetition.
For a fairly basic drawing of the eyelids first add a pair of curves to show the upper and lower eyelid of each eye as can be seen in the example above.
You will usually want the curves that define the lower eyelids to be lower down in relation to the eyes when compared to the upper eyelids.
Also please note that these are somewhat simplified drawings of the eyes there is no need to draw the individual eyelashes. You can however extend the upper outline of each eye to go slightly past it’s outer corner. You can also make this line slightly thicker than most of the other lines. Doing this will create the impression of eyelashes. You should however save thickening the line for when you are almost done with the drawing (right before adding shading).
To finish the line drawing add the pupils as well as a pair of highlights (one for each eye).
the pupils should be positioned directly in the center of the irises while the position and shape of the highlights can vary depending on the light source and other factors. As the focus of the tutorial is on showing eye expressions it will not go into this in too much detail.
You can simply make the highlights oval in shape and draw them slightly overlapping the pupils (as is often the case).
Even a little bit of shading can help a drawing stand so to finish you can add some as shown in the example. Before doing this you can also tracer over your lines with a darker stroke. As mentioned earlier make the line that defines the upper part of the white of the eyes thicker to create an impression of eyelashes. You can also give a slightly thicker outline to the irises.
For the shading fill in the pupils with black (or very dark pencil shading) and make the irises and eyebrows a dark grey (keep the little highlights white).
Once done you should have a basic drawing of the eyes with some very simple shading.
This expression shows “thinking” eyes. Kind of like when a person is trying to make a decision or to remember something.
Begin with the outline of the whites of the eyes. You can draw these the same as you would for a normal expression.
Draw the irises rolled upwards and to one side. A good part of them should be covered by the upper eyelids.
Draw the eyebrows very slightly raised compared to the normal expression. Especially their inner ends.
Draw the eyelids the same as you would for a normal expression.
Add the pupils in the center of each of the irises and afterwards add the highlights.
Finally again darken your lines and add some basic shading as explained in the first example.
This drawing of the eyes shows a surprised expression.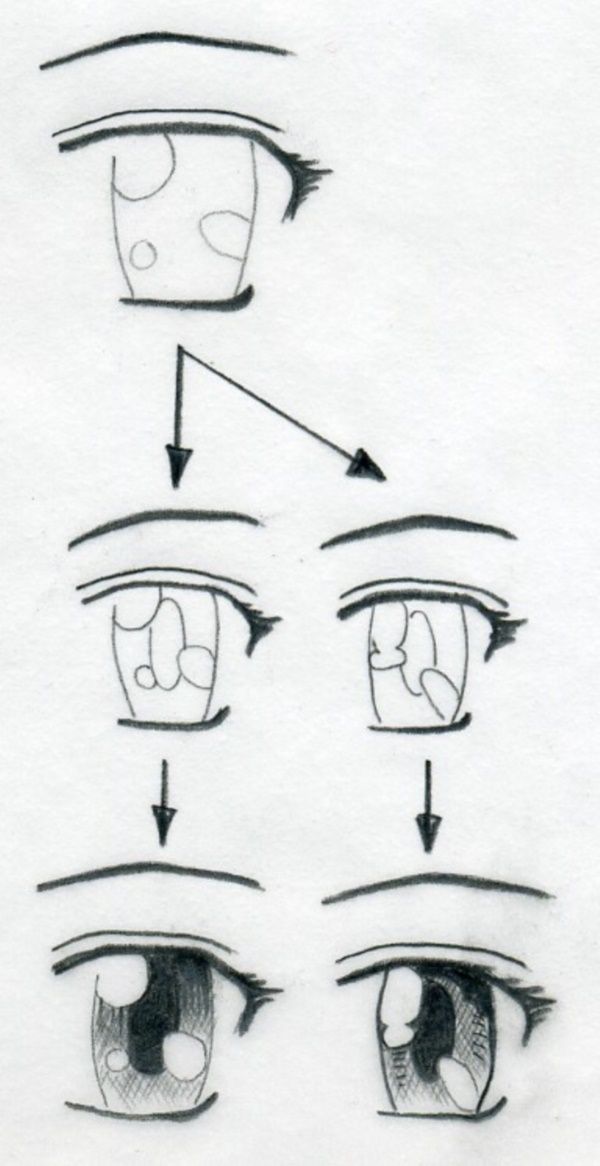 It can also be sued to show a scared expression although there is also a different variation of a scared expression shown later on in the tutorial.
For this expression draw the eyes wide open. Make them vertically much wider than for a normal expression. However don’t overdo this as you can end up with eyes that look like they belong to a cartoon character.
Draw the irises not touching the upper or lower eyelid. This is very important as it will help create the surprised look.
Draw the eyebrows raised. In addition to simply drawing the eyebrows higher up you should also draw their inner end significantly raised in comparison to a normal expression.
Draw the line that defines the upper eyelids higher up than you would for a normal expression. However the distance between them and the whites of the eyes should also be narrower than normal.
You can draw the line for the bottom eyelids just a tiny bit lower down.
Draw the pupils in the middle of the irises same as you would for a normal expression and then add the highlights.
To finish darken your lines and add some basic shading as described in the first example.
This drawing is of an angry/unhappy expression but a similar setup can also be used for a serious expression.
Draw the outlines of the eyes slightly vertically narrow than you would for a normal expression.
As the eyes are drawn slightly narrower the irises should also be a tiny bit more covered by the eyelids than in a normal expression.
Draw the eyebrows lower down with their ends lowered even further forming a bit of a wave in their overall shapes.
Draw the eyelids with their upper outlines slightly lowered and their lower outlines slightly higher up.
As the eyebrows are pushed both downwards the skin around their inner corners will wrinkle. The number and pattern of the wrinkles can change from person to person. In this case you can draw one big wrinkle down the middle and two more large wrinkles sort of wrapping around the inner shape of the eyebrows. You can then add a pair of smaller wrinkles in between them.
Draw the pupils in the middle of the irises being slightly overlapped by the highlights.
Finally darken your lines and add some basic shading as explained in the first example.
The “skeptical” expression is somewhat different form the other examples in this tutorial as it will have the two eyebrows in different positions.
For this expression draw one eye much narrower and the other one just slightly so.
Draw the irises with a large part of the one in the squinted eye covered by the eyelids. The one in the other eye should also be slightly more covered by the eyelids than in a normal expression.
Draw the eyebrows with the one over the narrowed eye lowered, especially it’s inner end. Draw the outer end of the second eyebrow raised and it’s inner end lowered (compared to a normal).
Draw the upper eyelids in pretty much the same place as for a normal expression for both eyes.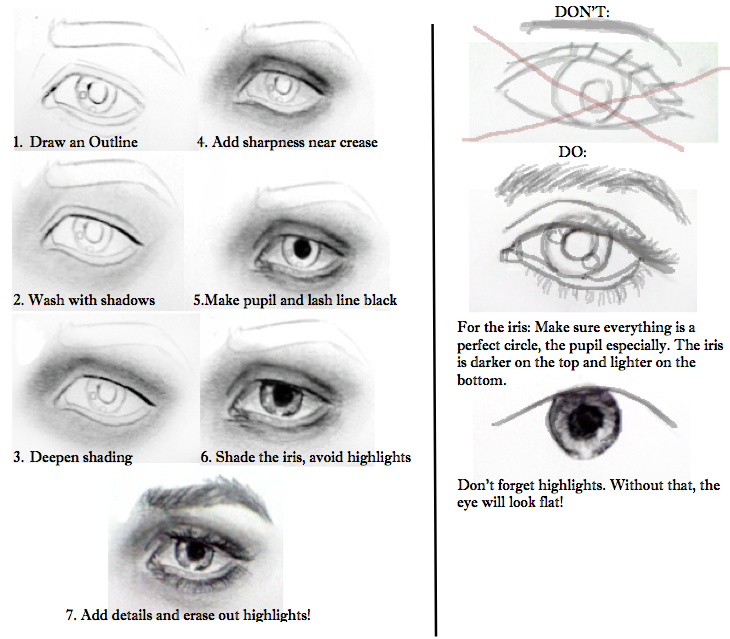 Draw the lower eyelid over the squinted eye slightly raised (pulled up).
Next you can add just a hint of wrinkles around each of the eyebrows.
In the middle of each iris draw the pupil and afterwards add the highlights.
Finish by darkening your lines and adding some simple shading. You can again refer to the first example of the tutorial for details.
This eye expression can be used to show focused or once thinking eyes. However while the other expression can be more of a daydreaming look this one is more for showing someone who is trying to solve a problem.
For for eyes with a “thinking” expression draw their outlines much narrower than normal.
Draw the irises with a good portion of their tops and bottoms covered by the eyelids.
Draw the eyebrows lower down (particularly their inner ends) and slightly closer together than normal.
Draw the eyelids with their upper outlines a tiny bit lower and the lower outlines slightly raised (pulled up by the squinting of the eyes).
Similar to the previous example of “angry eyes” draw some wrinkles in between the eyebrows. However in this case make the wrinkles slightly more vertical in their direction as the eyebrows will be more squeezed together with this expression than pushed down.
Draw the pupils in the middle of the irises slightly overlapped by the highlights.
Finally darken your lines and add some basic shading to finish the “focused eyes” drawing.
The scared eye expression is somewhat similar to the surprised one but with a few important differences.
Draw the outlines of the white of the eyes wider than normal.
Draw the irises touching the bottom eyelids with some space between them and the top eyelids. The eyes should be looking slightly downwards.
Draw the eyebrows slightly lowered, especially their inner ends. You can also draw them a tiny bit closer together than normal.
Draw the lower eyelids in pretty much the same place as for a normal expression
Draw some wrinkles in between the eyebrows similar to the angry/focused expression. But make them slightly smaller as the eyebrows are not as squeezed together as in those expressions.
The “happy eyes” expression is created when a person is smiling. Although you don’t see the actual smile the expression of the mouth will actually effect how you draw the eyes.
For this expression draw the eyes much narrower than normal.
Draw both irises with a large portions of their tops and bottoms covered by the eyelids.
Draw the eyebrows in pretty much their natural state (same as for a normal expression).
With this expression the eyes will tend to have more wrinkles around them. This is due to the cheeks being raised which causes the skin around the eyes to become more “squished” creating folds.
Draw the top line of the eyelids a tiny bit lower down than normal. Draw the bottom outline of the eyelids higher up and extend them with slight downwards curves at their outer ends to show wrinkles.
You can also extend the lines that define the white’s of the eyes/bottom of the upper eyelids to go further from the outer corner of each eye (again the show wrinkles).
To finish you can throw a few more wrinkles at the outer corner of each eye near the bottom eyelids.
Inside each of the irises draw the pupil and the highlight.
Finally darken your lines by tracing over them and add some basic shading. You can again see the first example of the tutorial (the normal eyes) for more explanation.
The final example is of eyes with what can be a tired or sad expression.
For this expression draw the whites of the eyes with the upper part sort of “squished down”.
Draw the irises with their tops significantly more covered by the eyelids.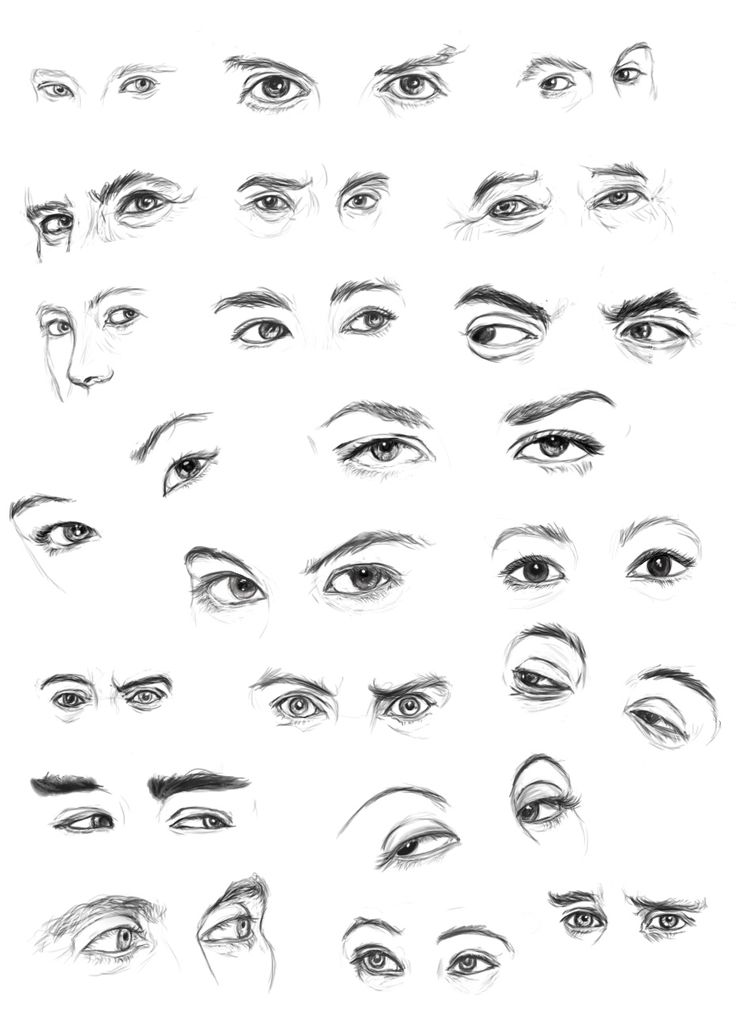
Draw the eyebrows in the same position as for a normal expression.
Draw the eyelids same as normal.
Inside each iris draw the pupil and part of the highlight. About half of each highlight will be covered by the eyelids.
To finish trace over your lines with a darker stroke and add some basic shading.
Some eye expressions can be shown in different ways, in addition to that the shapes of eyes can also vary depending between different people. However this tutorial still provides a good general guide for achieving some of the most common expressions of the eyes.
Whatever emotion you are trying to draw try and think of how the eyes, eyelids and eyebrows will move/shift when making it and where wrinkles might form. It can of course also be helpful to look at some photos or ask someone to pose for you.
If you enjoyed this tutorial and would like to try some more like it also see:
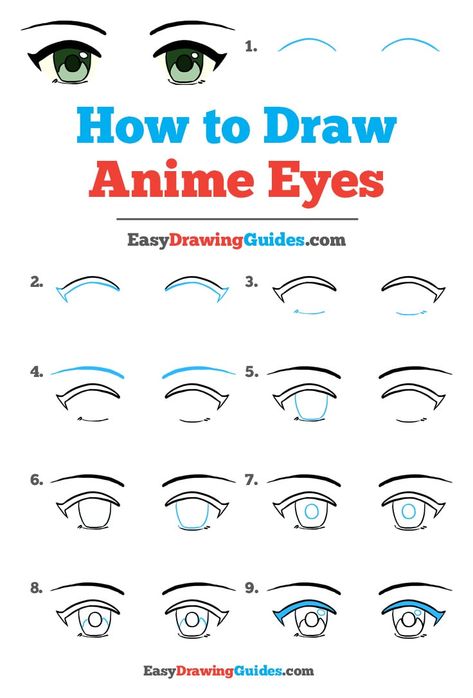
Welcome to a tutorial on how to draw eyes. As usual, there isn’t just one single method of drawing anything. But, there are a few tips and tricks that can be very useful toward developing and improving your own technique and approach. I have summarized here as many of the tips as I could, and I’ll try to explain them in as enjoyably a way as possible.
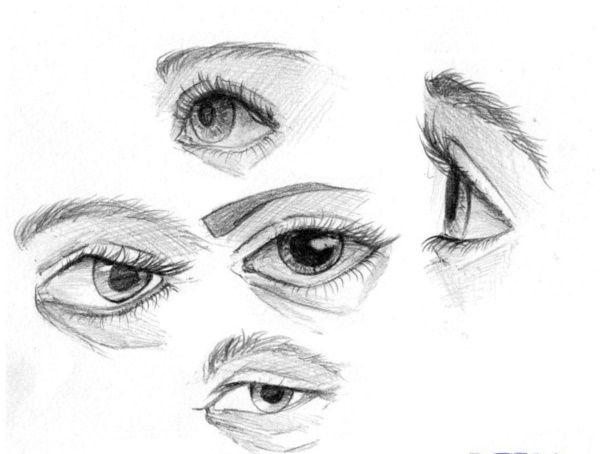 How to Draw Eyes - Understanding the Eyeball
Everyone who has ever painted a face before has probably started by putting two dots or strokes for the eyes. After a few attempts, it probably turned into two circles with dots in the middle. This abstract representation actually sums up pretty precisely what eyes are all about: They are two spheres and each sphere has a pupil indicating the direction of vision. As a next step, we intrepid illustrators felt like we needed to express emotions through the eyes. So, we added an upper eyelid in the eye circle shape. We soon realized that downward pointing eyelids tend to look angry or evil, and upward pointing eyelids tend to look sad or meek.
There’s good reason that this basic type of eye representation is a cartoon, comics, and animation classic: These cartoon eyes can portray a pretty wide range of emotions. And if we look closer, it becomes obvious that cartoonists have given a lot of thought to the shape of the eyes - even if they choose what at first appears to be a simple form of representation.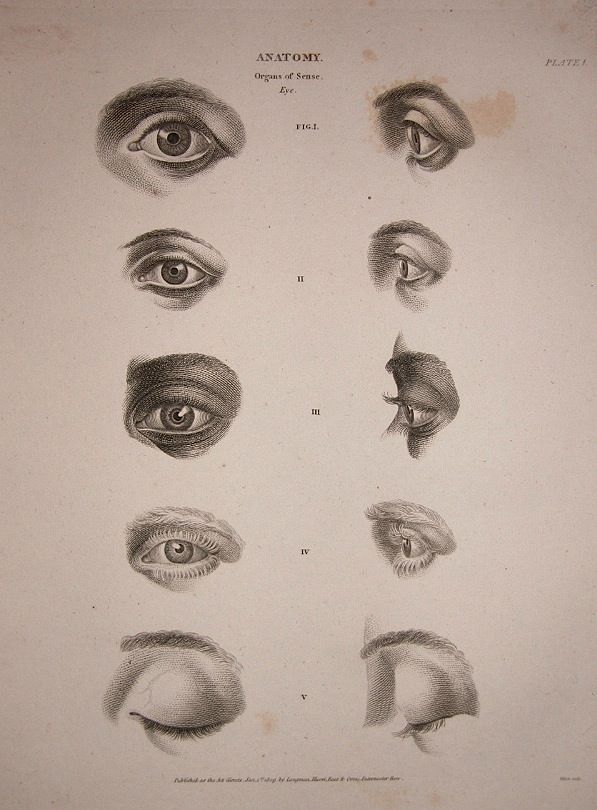 Let's keep that in mind as we explore the next steps.
First, let's try to understand the actual structure of the eye. Understanding the structure doesn't mean that every drawing has to have all the details of the eye. You will need to decide for yourself which details you want to emphasize, and which aspects you want to leave out. Your own style will develop out of these choices.
But now to the structure of the eyes:
As we know, the eye is a ping pong ball sized sphere sitting inside the head. So, let's get started by drawing this sphere. By giving the sphere horizontal and vertical axes, we show that it is not merely a circle, but a 3-dimensional sphere that is, in this case, turned slightly to the left and up. When you draw in the two axes, make sure that they are ellipses that end at exactly half the height or half the width of the circle.
Viewed from the front, the iris is about half the size of the whole eyeball.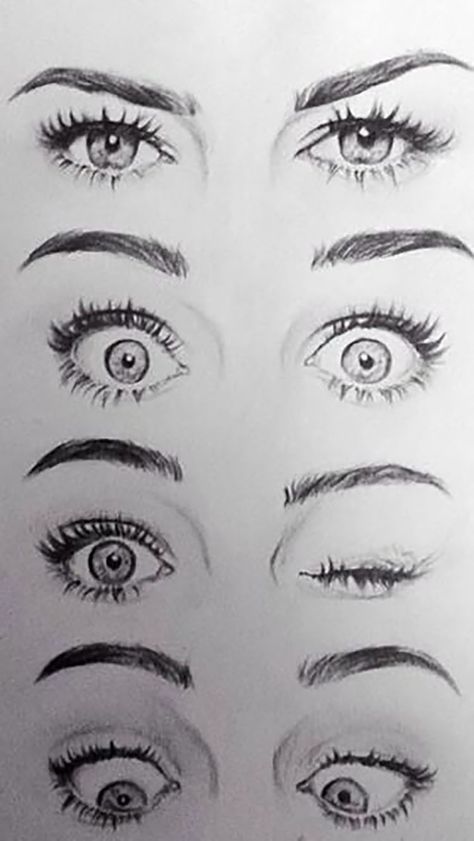 The size of the pupil varies from person to person, and it also depends on the light situation and the mood. In addition, the iris is not painted flat onto the eyeball. Rather, it is raised a bit like a contact lens would be. When we draw an eye from the front, we don’t need to worry about this detail. But, the farther the eye is turned, the more prominent this iris “bump” becomes. Technically, the pupil is not actually a black dot, but a small hole through which light enters the eyeball. It is centered behind the iris lens, instead of on top of it. That's why when an eye looks to the side, you’ll move the pupil a little bit towards the center of the eye.
The picture shows the eye turned in three directions. Notice what happens to the iris and pupil:
Next, we will look at the shape of what we artists actually mean by the "eye". What we are referring to is actually the opening through which a part of the eyeball peaks out - or the space between the edges of two eyelids. In principle, the edges of our eyelids are shaped like two flattened U’s turned inward toward each other. Let's look a bit more closely at the two U’s.
Even experienced drafters often take a moment to mentally plan before drawing the line of the upper eyelid in an expert sweep. This is because even a very slight deviation of this line can completely transform the expressions of the face. This trick will help: divide the upper eyelid into 3 sections. (By the way: this trick of dividing difficult lines into several sections doesn’t only apply to eyelids - any line can be pre-sketched in this way.) The lower eyelid can also be divided.
However, it is best to use only two strokes here instead of three. For some mysterious reason, the eye ends up looking more dynamic if we divide the top eyelid into three and the bottom only twice.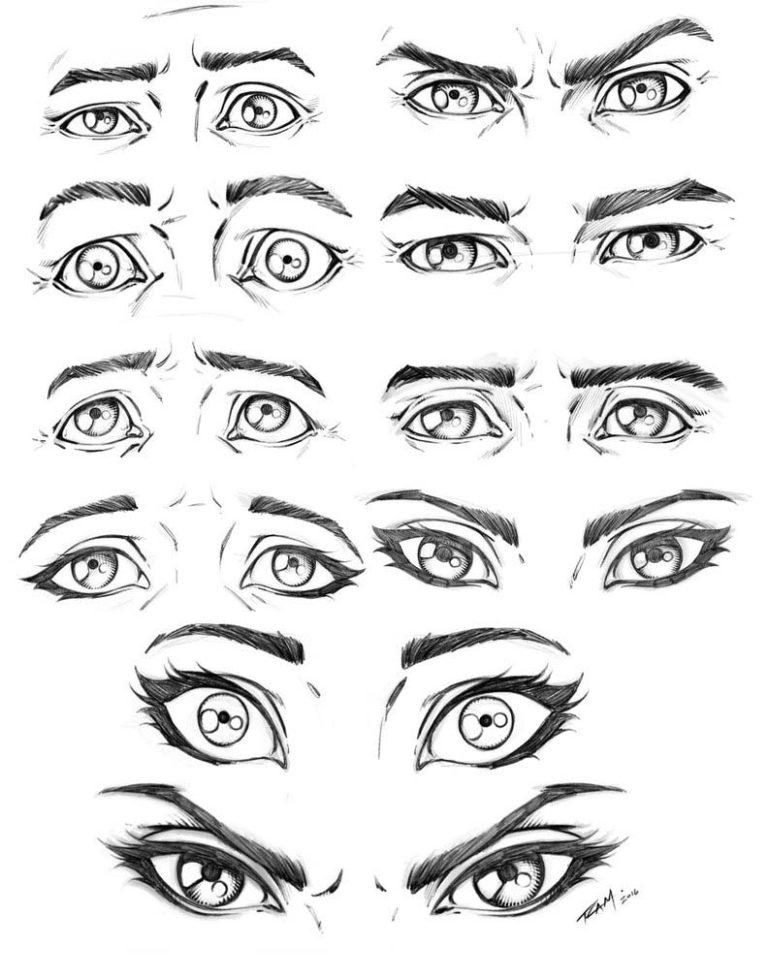 Some artists do it the other way around, with two strokes at the top and three at the bottom. Try it out.
At the middle section of the eye - here on the right – you’ll see what is known as the tear duct.
It varies from face to face, and sometimes isn’t even there at all.
Now that we have pre-sketched the eye shape, we can either round off the corners of the subdivision lines a bit, or try drawing the two eyelid lines in two clean sweeps.
This 5-line concept offers a wealth of possible variations. Depending on the length ratio and angle of the lines, you can create very different types of eyes expressing a wide range of moods. Of course, these lines are primarily for pre-construction, and it is up to you in which style you want to continue with on your eyes. However, implementing the 5-lines concept can be a really interesting stylistic device..
Next, we should keep in mind that the two eyelids have a certain thickness too.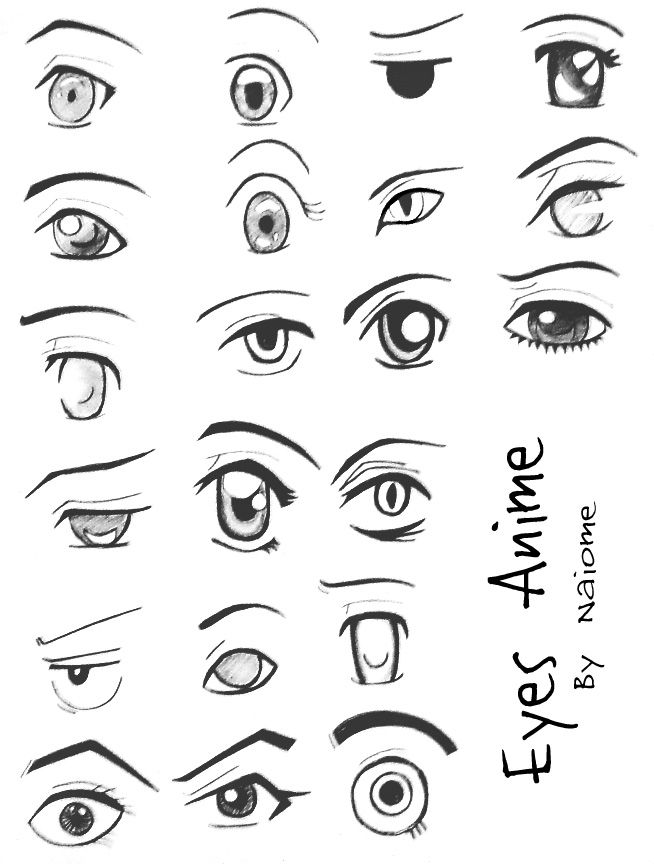 On one hand, this makes the eyelids to protrude from the face a little farther than the eyeball when viewed from the side. On the other hand, a narrow edge will be visible all the way around, almost parallel to our 5 lines from before. If you might want to draw a crying eye at some point, you might be interested to know that tears collect on the narrow ridge of the lower lid. Neither area is always visible – it depends on whether we are looking at the eye from above or below, and on what the eye is doing.
The eyes – including the eyelids – can be constructed from every conceivable perspective in this way. Start with the sphere and imagine the eyelids wrapping around the sphere. Use the 5 lines to work out your basic shape. You will need to adjust the lengths and angles of your 5 lines depending on perspective. In some perspectives you may only need 2 or 3 of the lines because the rest are hidden behind the eyeball itself (e.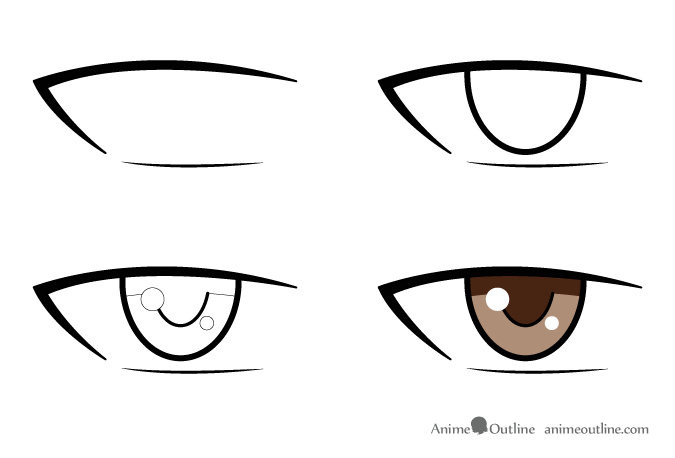 g. in profile). At which points does the narrow area of the eyelids become visible? Which of the lines do you want to emphasize, which can be ignored? We will get into this in more detail below as we position the eyes on the face.
Now that we know all sorts of things about the eyes themselves, let's try to fit them into different headshapes. If you can already draw the headshape from different angles, then great! If not, I’d highly recommend the previous tutorial on "How to Draw a Human Headshape". I'll be using the same headshapes from that tutorial. These heads are a very handy starting point, but you don't necessarily need them.
In order to define the eye area, I like to start with the small, almost triangle-shaped area above the nose.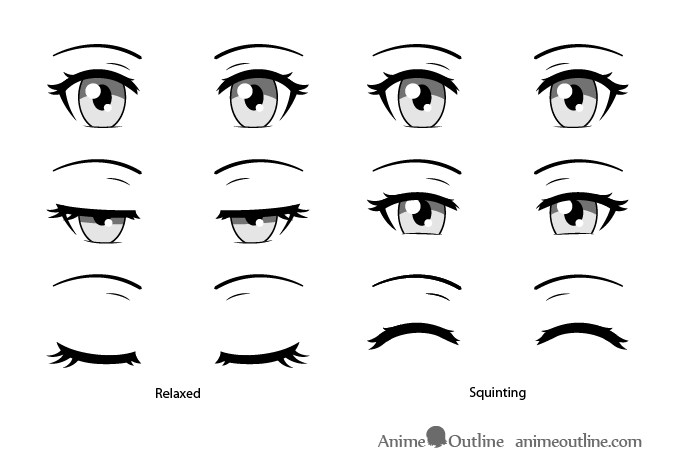 As you can see, the triangle shortens when the head is looking down and lengthens when looking up. In profile, The triangle seen from the side simply becomes a line.
By the way, when you draw the triangle onto your headshape, you can use the guides at the center-line of the headshape for easy orientation.
Next, and very simplified, we want to define the shape of the bones around the eye, because they are very important. They protect our eyes from blows and soccer balls. ;) The easiest way to define the bones around the eye is to use the Batman mask. Our triangle serves as a starting point here.
Just like our eyelid construction, the Batman mask consists of 3 lines at the top and 2 at the bottom. Each of the outer edges meets the cut out areas of our headshape exactly. When you transfer the Batman mask onto the tilted heads, notice what happens to the angles, and which lines appear shortened. In profile we can see only part of the mask, of course.
The eyeballs are obviously not glued onto the front of the face. Instead, they are located quite deep inside our head. Therefore, in placing our spheres into the Batman mask, we have to offset them a bit. How big the offset depends on the perspective. You can see this particularly clearly with the head tilted up. In profile we see this very easily. From the front, the depth of the eyeballs isn’t visible at first.
There is no general rule about how far apart the two eyeballs have to be. But if you are not sure, just think of a third sphere (or a little more) between the two eyeballs. This will give you a good distance.
Never underestimate the importance of what we learned earlier about the pupil and iris. Even a tiny bulge in the iris can enhance the realism of your eyes. From the front of course, you don't need to embellish. But as soon as the eye is not looking straight on at the viewer, remember to curve the iris and the deepen pupil.
Now let’s get to the eyelids. First, mark each of the two outer edges of your eyes level with the headshape guide lines. Then, draw in the pentagon. If you have already constructed the spheres neatly, everything else almost draws itself. Here again subtle changes to the angles and lengths on the sides can be made depending on how you’re viewing the headshape. When the views are pushed to extremes, the pentagon might also form interior angles, such as here in the picture with the two heads looking up and down respectively. In profile, the iris covers half the pentagon.
The second eyelid line is a nice way to emphasize the perspective you decided to depict the face from.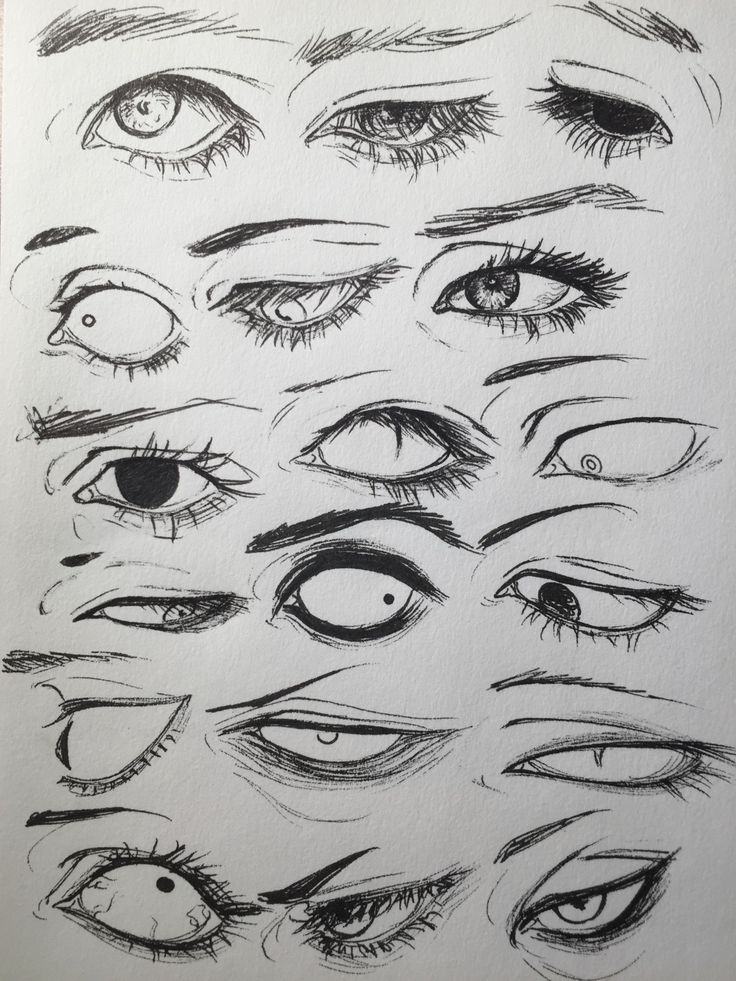 Pay close attention to which parts of the narrow eyelid surfaces are facing the viewer. They will be thicker than the others. For example, with the head looking up, only the upper eyelid is visible. But then with the head turned to the side, different areas of the eyelid surfaces become visible around each of the eyes.
The two eyelid creases are the boundary between the eyelid and face. The upper crease in particular lends your eyes increased depth. Here, you can use the sphere as a guide. It's also worth holding on to the subdivisions from the eyelid design at this point. If you don't want your face to look old or tired, draw the lower eyelid crease a little softer and shorter than the upper. You can even hint at it just slightly.
Eyebrows tend to express the mood of your face very clearly.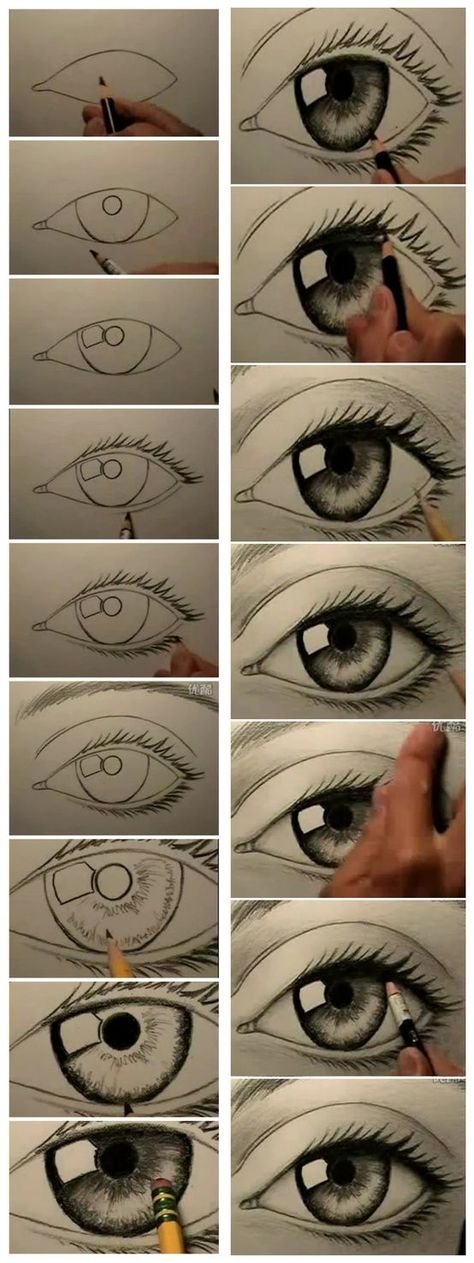 In a neutral, resting state, the eyebrow starts at the top of the triangle, rises slightly, and then tapers down again. The edge of the eyebrow is again the cut out areas like in the original headshape design.
It's best to define the shape of the eyebrows with outlines first. This will simplify later steps. You can also indicate the direction of hair growth with small lines within the brow shapes. Start in the middle with steep lines, and flatten them out closer to the edges.
We can now finally harvest the fruits of our labor. From here on, your own style input is necessary. Every draftsperson has their own unique lines and handwriting. Maybe you’d prefer a more sketchy style, or maybe you want to start working with surfaces or colors straight away. Naturally, this is entirely up to you. From this point on, you have a ton of opportunities to develop your image. But since we're not talking about different styles or coloring in this tutorial, let's develop our eyes using entirely clean lines.
As you can see, the two upper eyelid lines can also be combined into a single thick line. This is especially true if you want to create a shadow. For the lower eyelid, it's a good idea to use the outlines a bit more sparingly, because usually shadows do not occur here when the light source is from above.
For the iris and pupil, I am going to give you a simple (but very effective) solution when using a graphic tablet: Reduce the opacity of your brush to about 30% in order to paint the iris. This is easier if you use a brush that is just a touch smaller than the iris itself. Next, let’s give the iris a little sparkle by reducing the brush size and hardness to lighten the center of the iris with white. Now you can fill the pupil in black. Of course, make sure that you offset it a bit from the center of the iris, depending on the view angle. Now you can use white again to set a light reflection point. Preferably, this will be slightly offset from the pupil. It doesn't always have to be a dot. You can experiment with different shapes. To add a final touch to the iris, show the shadow on the upper lid that it casts on the iris. And if you like, you can also throw in a little more detail to the structure of the iris by drawing (preferably on a separate layer) subtly alternating black and white lines from the pupil to the edge of the iris. But – just little tip – only make this effort if the eyes you are drawing are actually big enough to be able to notice this level of detail.
Eyebrows can go quite easily from being shapes that look painted-on to looking like actual eyebrows.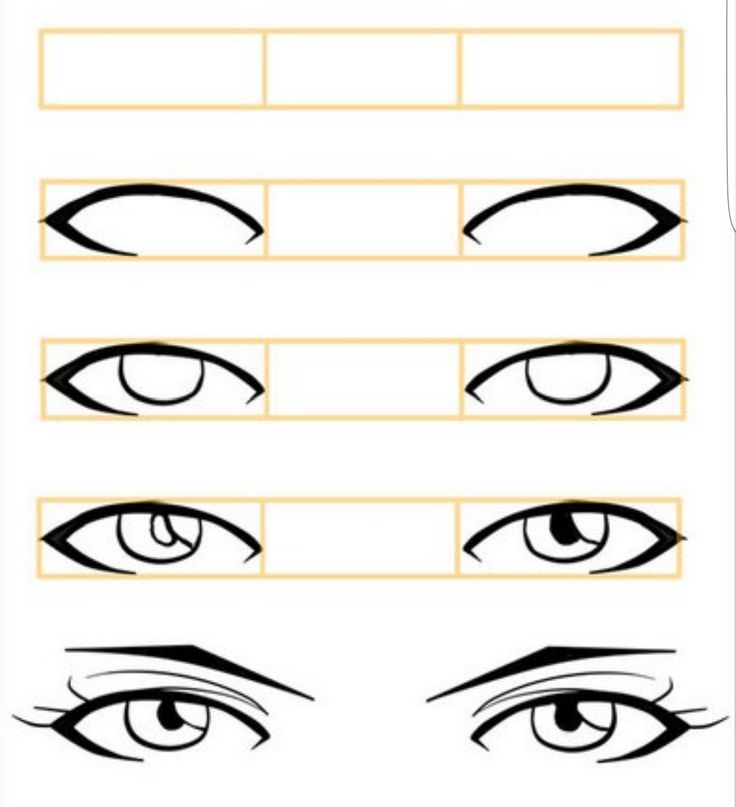 And you can do this with the “Smudge” tool. In order to do this, always wipe in the same direction as the hair growth so the hard edges of your shapes deform into a light, zigzagged line. Be careful not to make the zigzags either too even or too messy. When you're satisfied with the result, lighten your zigzags a bit, and finish off the brows with some hair. The same fine line between order and chaos applies to hair. Draw the individual hairs with as quick strokes as possible. It’s best to use slightly curved lines that taper off and change direction often, while still paying attention to the direction of hair growth in the eyebrows.
Last but not least, here’s a little challenge. Lashes will usually take a couple tries and a bit of practice. A few little tips might make this task a little easier: Eyelashes grow on the second (or outer) eyelid line. They tend to be longer towards the outer edge of the eye. The lower lashes are shorter than the upper ones and towards the middle they usually become quite fine, almost invisible.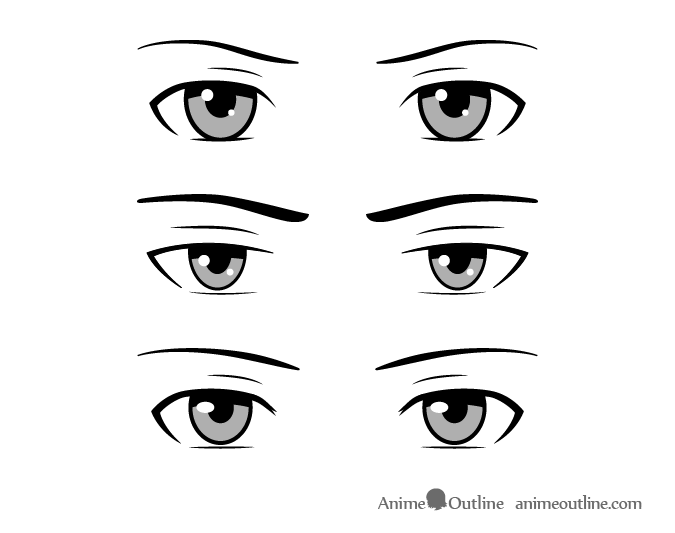 In addition, eyelashes are always curved. The direction of this curve is based on your perspective of the curvature of the eye. This means that the curve decreases towards the center of the eye, and that the eyelashes curve in opposite directions on both sides of the eye. That may sound really complicated, but it’s actually quite easy to understand from the picture.
When drawing eyelashes, it can be helpful to use a 2-step process: First, draw in only about ten lashes per eyelid. Take special care that all the eyelashes bend at the correct angle. And, pay attention to the lengths and allow them to taper just like the eyebrow hairs. In the second step, use the spaces between the initial lashes to insert the "chaos lashes" (shown here in grey). Vary the length and direction of curves slightly, and occasionally let several lashes come together to make little clumps.
Depending on how you turn your head, the direction of the lashes will change too. This may require a brief moment of spatial reflection. Take your time. Think carefully about where the eyelashes need to point.
This brings us to the end of a challenging tutorial. You needn’t internalize and apply everything we have done here immediately. But, you will find pretty much every tip that you need to draw eyes in this tutorial. You'll no doubt pick up one or two!
Have fun drawing, and see you soon!
Spoiler alert: Some of the eyes we so painstakingly just constructed will simply disappear behind the nose in the next tutorial.
Wacom One creates a familiar pen-on-paper feeling, thanks to a 13.3” screen with natural surface friction and minimal reflection. The pen feels light and natural in your hand and transforms into a pencil, paintbrush or chalk in your selected software. All you need for drawing realistic eyes. Creative software comes included, along with the ability to connect to your computer, as well as certain Android devices.
Wacom One 13 pen display
Draw, design and create directly on a high resolution screen with a precise pen.
Shop Wacom One 13
Sketch, draw and edit images with a responsive pad, a precise pen and see your creations appear on screen.
Shop now
Draw, design and create directly on a high resolution screen with a precise pen.
Shop now
Create anything, anywhere with enhanced computing power, a precise pen and an awesome display.
Shop now
Write with pen on paper and convert your handwritten notes to digital.
Shop now
Write and quickly note ideas on your mobile device with a Wacom stylus.
Shop now
Wacom’s vision is to bring people and technology closer together through natural interface technologies. This has made it the world’s leading manufacturer of interactive pen tablets and displays as well as of digital styli and solutions for saving and processing digital signatures. The advanced technology of Wacom’s intuitive input devices has been used to create some of the most exciting digital art, films, special effects, fashion and designs around the world and provides business and home users with their leading interface technology to express their personality. Founded in 1983, Wacom is a global company based in Japan (Tokyo Stock Exchange 6727) with subsidiaries and affiliate offices around the world to support marketing and distribution in over 150 countries.
Learn more about Wacom
Back to top
A+ A-
How to draw arrows, make lips plumper and other tricks that Lena K. uses in makeup.
No, well, let's be honest. I am not a makeup artist, although I completed courses. My makeup skills are average. I can screw up without blinking. But there are people who think that I'm doing well. Julia believes that I don’t need to go to any salon before shooting - I’ll put on makeup myself. Yana Z. is convinced that I wake up with arrows and, at every opportunity, make jokes on this topic. On Instagram, they also sometimes ask me how I line my eyes.
And, in general, here are a few life hacks that I discovered myself or overheard from one of the greats and tested for myself. I thought: if they help me, maybe someone else will be useful?
I draw intuitively, but I will lay it out step by step. Firstly, I look into my eyes :) Visually divide the length of the ciliary contour into three equal parts. I figure out where the part that is closer to the outer corner begins. (Approximately where the border of the iris is.) I put an eyeliner or pencil at this point and draw the outer corner along the contour with a line of medium width.
I draw a ponytail: my eye is open, I can barely squint. I stretch the skin at the outer corner. I do this with my left hand, going from above (as if hugging my head)), so as not to interfere. I draw a short straight line: 5-7 millimeters maximum. I can always lengthen.
The direction of the line follows the angle of the eyebrow and continues the trajectory of the lower eyelid.
What happened: the outer contour of the eyelid was drawn and a straight line goes from it, a draft of the ponytail. It remains to connect. I make a jumper line between them. How do I draw a triangle?
The size of the triangle determines the width of the arrow. The smaller the triangle, the thinner the arrow. And vice versa.
What makes it bigger or smaller? Depends on which dots I connect. They can be widely spaced. The arrow is graphic.
Points can be located nearby. Then the arrow will turn out thinner, softer, with a bend.
A little more about the jumper line: it doesn't have to be straight. May be soft, slightly concave. Depends on which arrows I want.
You might want to lengthen the ponytail. I extend it with a jerky stroke without any pressure at all. And if he, an infection, does not want to be thin, with a needle, I stubbornly force him. I run a brush pen or a finger along the lower border of the very tip, pulling it to the temples.
Life hack: if you are a beginner or have not held a pencil in your hands for a long time (after the vacation, I forgot how to paint at all)) - make a short sketch arrow, and then twist it with forceps and make up your eyelashes. Their bend will be a guide to where the tail should look, and will help not to miss its length. In general, I paint my eyelashes and double-check - does the arrow point to the right place? Need to extend the ponytail? After that, I lengthen-expand-saturate the color.
It's easy. If I draw with a pencil, and such half-arrows suit me (usually yes), I slightly extend and shade the beginning so that the line does not suddenly appear out of nowhere.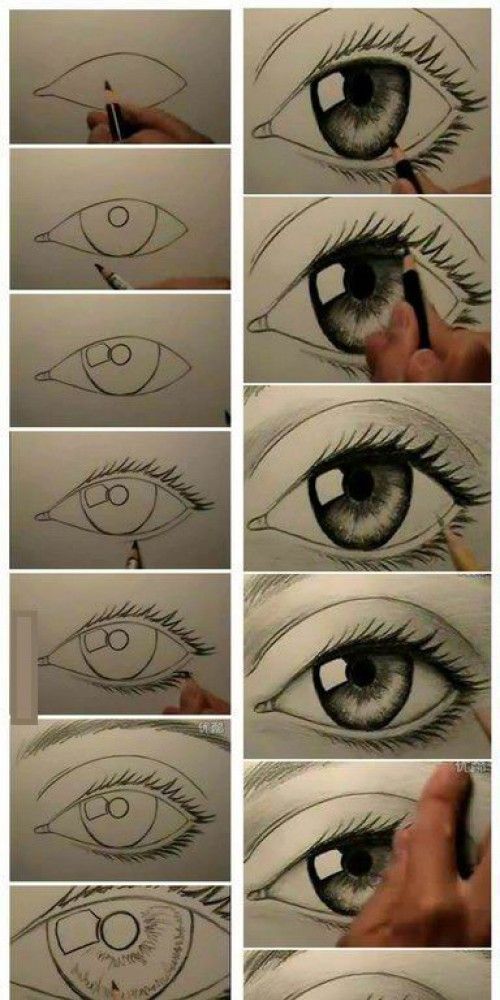 If I want arrows, arrows, I bring the ciliary contour to the innermost corner.
If the eyes are asymmetrical: yes, I have. However, probably like most. First of all, I make a perfect arrow on the "simple" eye, and only then I try to repeat it on the "problem" one, taking into account the anatomical features of the eyelid. (Under the problematic one, I call the left eye, its outer corner is slightly lower than that of the right one. Bringing it up, I stop a millimeter from the edge and start drawing a ponytail from this point.)
I used to think that a black pencil at the roots of the eyelashes makes the eyes look heavier: either arrows or smokey are required. Nothing like this. I just didn’t understand what an inter-ciliary contour is, and where, sorry, it exists. Not over lashes. Not under lashes. And between - just between them. No wonder makeup artists spend time on this. I, as they say, felt the difference when Olya Komrakova, international makeup artist Clarins, applied ordinary beige shadows, but filled in the voids with a pencil.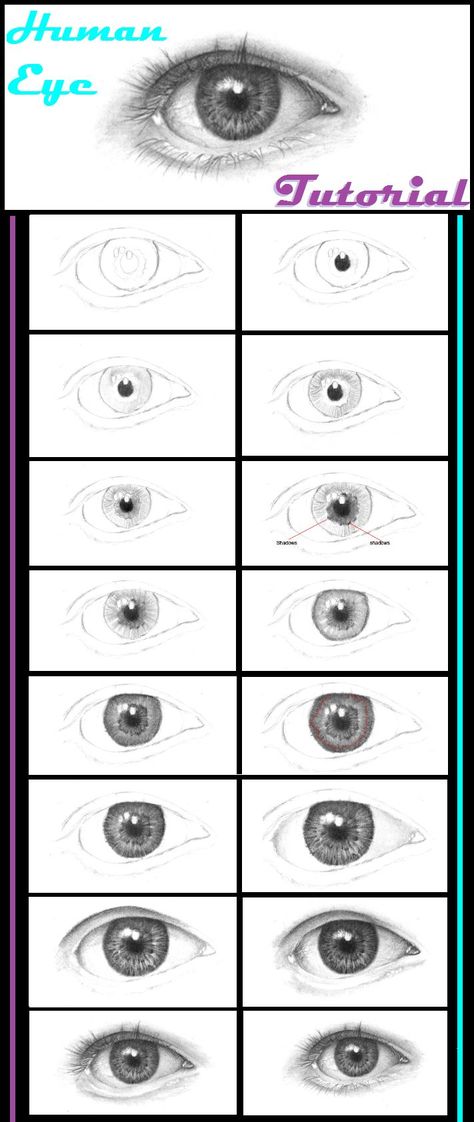 Nothing seems to have changed: watercolor makeup remained light. But the eyelashes are immediately thicker, all the attention is on the shape of the eyes.
Now, in addition to what I usually do, I often add an interlash. And I advise everyone to try.
The easiest way to find and paint over the inter-eyelash contour is to place the mirror not directly in front of you, but lower. Until the fine motor skills of the hands reached automatism, this helped me a lot.
My eye structure is such that no matter what I draw on the moving eyelid, the shadows hide in the crease and are not visible. (Probably because of this, I learned how to make arrows early:) Ernest Muntanyol, the leading makeup artist for Chanel in Russia, and other beauty superheroes do this. First, shadows are applied to the moving eyelid, and then they ask me to open my eyes and look straight ahead. With a fluttering movement without pressure, they brush along the orbit - and a little higher.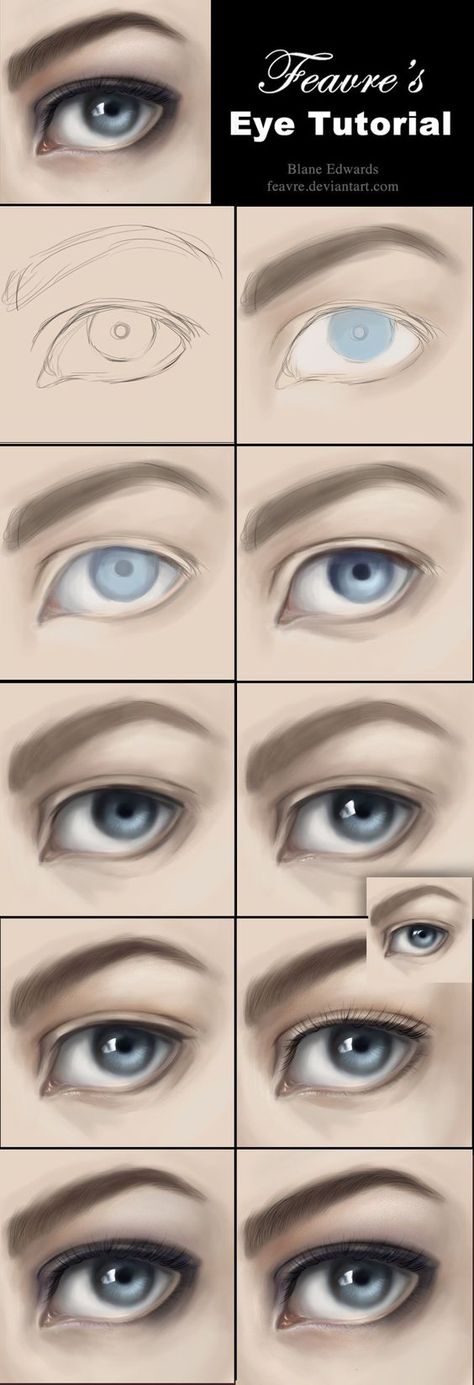 (In general, pressing the brush imprints the shadows so that it is difficult to blend them later. Softer, even softer :) I close my eyes again so that the makeup artist finalizes the sketch.
I repeat the same at home. I take a fluffy medium-sized shading brush and, without squinting, I walk along the crease. Hooray, I put on makeup with shadows, and you can even see them!)
And again - no makeup artist will leave the lower eyelid bare if it is not a conscious technique, for example, creative or some kind of arrows. Because it's like painting the top half of a picture and throwing it away.
It took me a long time to get used to painting the lower eyelid, and I couldn't figure out what the trick was. It seemed, on the contrary, narrows rather than widens the eyes. I began to carefully look at my makeup after filming: both Lena Motinova (international makeup artist Estee Lauder) and Katya Dolgova (now former international makeup artist Tom Ford) do not save shadows for the lower eyelid. I carefully drew a narrow strip, but you must not be afraid and not shrink. Almost to the tips of the lower eyelashes - half a centimeter - this is the width of my shading. It really visually enlarges the eyes, and also beautifully emphasizes the curve of the inner corner.
Here's a technique with which I managed to overcome the psychological barrier “I'm afraid of the lower eyelid” :): I put shadows on the upper eyelid, I paint my eyelashes - the makeup, in general, is ready. After that, I crawl under the lower eyelashes with a brush. (Not only at the outer corner, in the center and at the inner one too! This is important.) You can’t get too deep: the roots of the eyelashes interfere. This is a kind of insurance against the "reduction" of the eyes. And, most importantly, shading itself comes out the desired width. To screw up, you still have to try)
If the shadows stained the eyelashes, it's okay. You can attach a brush to them to return the black color.
A few more nuances:
 I use flat, but not narrow (these are different things))) Annbeauty B9. It is medium in size, it is convenient for her to apply, and immediately shade the shadows, and crawl under the eyelashes.
Some makeup artists recommend adding volume where the lips do not protrude, just above the corners. I don't like this technique. Lips become rounded dumplings. I watched what Yura Stolyarov, Lena Motinova and others are doing:

Zhenya, thank you!
I honestly don't understand the benefits of primers for the face. For the life of me, in my opinion, they do not add an iota of durability to tonal - if not to say the opposite. Increase the risk that the structure will smear or leak. (The only two I respect are Skindinavia sprays and Ren serum.) I've never seen makeup artists prep skin with primers—precisely primers, not products—unless it's some sort of timed shoot.
In my opinion, there is nothing better than simply applying a foundation to a moisturizing serum before it is completely absorbed. It spreads evenly and blends into the skin perfectly. In this sense, my favorites are Chanel Hydra Beauty Micro Serum and Swiss Line Aqua-Vitale Gel-Serum.
I didn't think about it before, but now I realized that it is important for me in what sequence to do makeup. Eyes are last on this list. Strictly speaking, they do not occupy such a large area on the face :) For me, beautiful skin and a fresh look in general are much more important. Therefore - tone, eyebrows, light bronzer and blush. Possible alternatives: sculptor, highlighter, red lipstick. I look in the mirror, I see the picture almost entirely and I enter into it the eye makeup that is suitable for saturation. As a result, it is not over-loaded.
The evening make-up has the opposite rule, because when I enter a room with dim lights, the only thing that will be visible is my eyes and lips. So, I even out the tone, shape the eyebrows and immediately move on to the eyes. Bright, noticeable, sparkling? The rest of the elements dance to match.
I think bronzers as a format are underestimated by the public.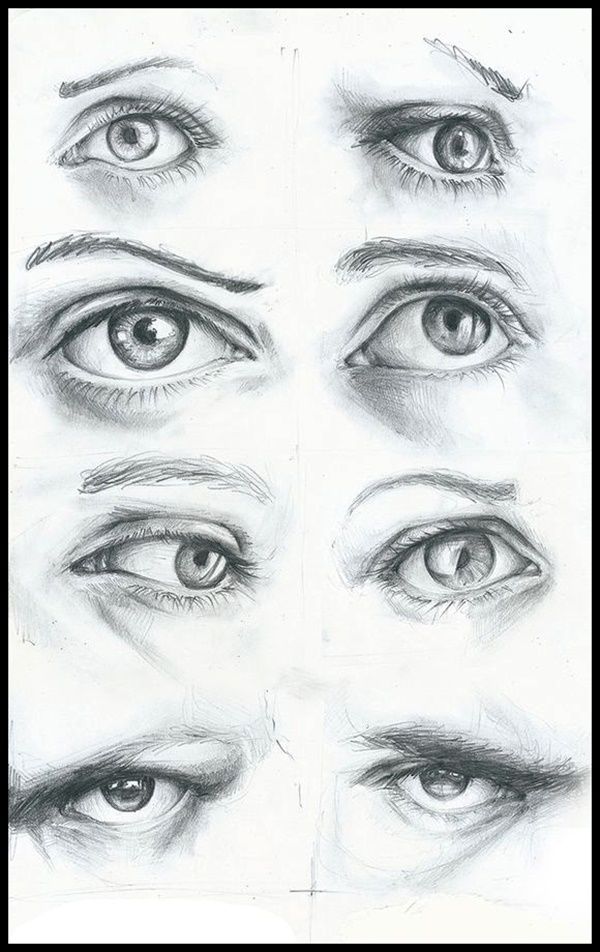 Probably due to the fact that there are not many of them, and successful ones happen even less often. Marketers feel that the interest of buyers in bronzers is secondary and do not give the team to develop a novelty. In short, a vicious circle. But if you dig into the stands and find the right one, this is a miracle thing! (No, bronzers are not only dark and yellow. A competent shade, in my opinion, is a little brighter and warmer than skin color.)
I apply it on the cheekbones, nose, chin, sides of the forehead and upper eyelids: who here, you say, hasn't slept? Complete with peach or pink blush is generally super.
Smith&Cult palette, Chanel Les Beiges blush.
The most obvious point, but when did I get normal made in Japan brushes? Recently. But was it earlier on websites and in magazines that brushes should be of high quality?.. They wrote, of course. And I even read it all. What were you thinking? That they are trying to sell me an elephant, but in fact I am doing quite well with those that are. There is nothing to compare with! In addition, good brushes are not cheap, and if you buy, then you will definitely have a set right away (my greatest delusion!). “I’d rather buy a palette” - I walked, bought, often put it aside, because # it didn’t work out. (Amazing why?))
Applying makeup with good brushes is like turning on a new phone after suffering from an old one that always freezes. Oh brave new world.
There are only three brushes on my living wage. But they are the perfect size for my eyes and can do just about anything. So: flat...
From above - not universal, this imprints shadows. Bottom - correct :) Simultaneously with application - blends the shadows. The shape of the cut is also important. I can put the lower one to the outer corner of the eye, like a stamp. It remains only to shade the borders.… torch,
I've been looking for the right blending brush for a long time. I realized that two points are important: it should be small and have a tapering tip.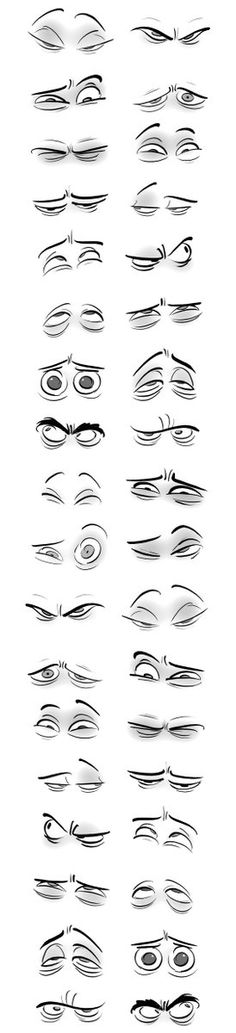
Brush for powder-blush-sculptor-highlighter and everything.
Top brush - no. Lower - yes:)Artists. In fact, they are the color geniuses. In Pushkin or D'Ors I photograph paintings and fragments in which I was struck by combinations of shades. Of course, after that I don’t draw Picasso arrows and Pissarro pastel smokes :) It’s just that memory is a tricky thing. And the feeling of color is still a feeling. Suddenly, out of nowhere, ideas appear to mount sandy pink with low-contrast green, yellow with white.
In general, when the make-up crisis is ripe, there is a lot of cosmetics, but I don’t know what to wear - I go to the gallery, not to the store.
Read also:
Every artist at least once wondered: how to draw a portrait so realistic that a person seems alive? The fastest and most effective way is to draw the eyes well.
And in this article we will analyze in detail all the subtleties of drawing eyes, write down each eyelash of your hero, and in the end we will add features to it.
Human eyes are located in the recess - these are eye sockets or pyramidal cavities that have a base, apex and four walls. The muscles of the face and the skin are attached to the latter, the folds of which form the upper and lower eyelids.
The outer part of the eye consists of the pupil, iris, sclera and cornea.
The pupil is the hole in the iris, which we see as a black dot in the center of the eye. And the colored part around it is the iris. Its color depends on the amount of pigment: if it is small, the eyes are blue, if there is a lot, brown.
The iris consists of vessels and small fibers arranged in a grid. That is why macro photography of the eye shows incredible patterns.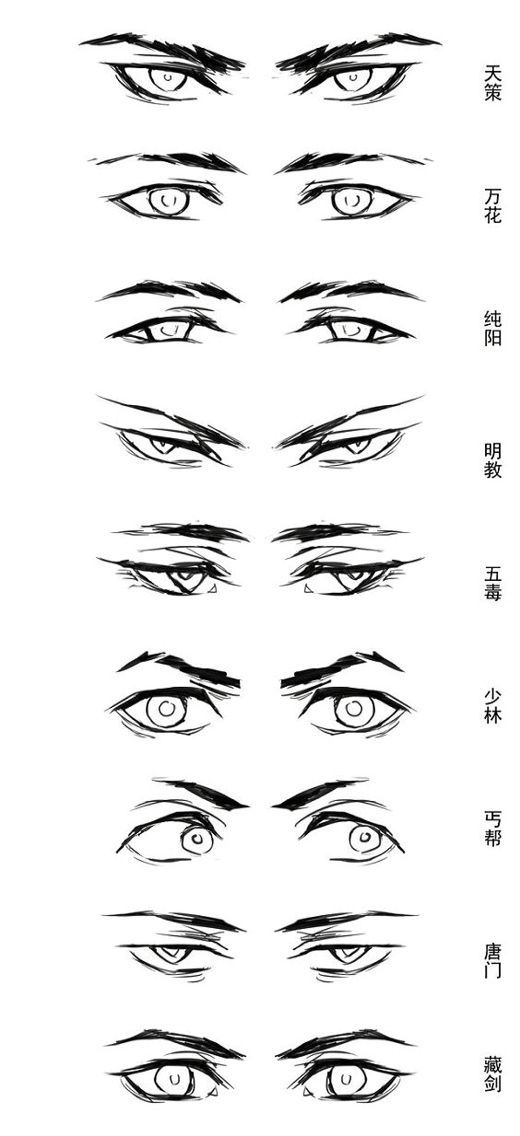 Each iris is as individual as a fingerprint.
The sclera is the white part of the eye that surrounds the iris. However, it is spherical in shape, so there is no pure white color on it. The pupil, cornea and sclera are covered by the cornea - a transparent shell of a convex shape.
The inner corner of the eye consists of a pinkish mucous membrane, in which there is an opening for the release of tears. Surround the eyeball of the upper and lower eyelids. Eyelashes grow along their edges in two or three rows, twisting upwards.
Anatomy of the human eye
Eyebrows grow on the bony arch above the upper eyelid and frame the eye socket. Men tend to have thicker, flatter eyebrows. Women's eyebrows are thinner and have an expressive curve.

Simplifying the shapes helps you learn to draw faster and saves you nerves. The superciliary arch, for example, is easier to depict with a rectangular block, the foreground of which is the forehead, and the lower part is the upper wall of the orbit. The eyeball is a sphere that is located in the deepening of the skull and is covered with folds of skin.
To correctly add highlights, imagine that the cornea lies on top of the iris, transmits light and has an outward-curved lens shape. It is better to draw the iris concave inward to create additional depth.
Let's imagine that the light source is located in the upper left corner. The iris will be filled with light in the upper left area. The cornea, as an outwardly curved object, will have the opposite light and shade pattern - draw light glare in the upper right area.
Since the cornea is transparent, only the highlight will be visible. It lies on a shaded area, which is located on the opposite side of the light source. Here we will add a shadow from the eyelids, reflected light from the mucous membrane and, voila, our voluminous eye is ready!
Two variants of Asian eyes are common:
 Actress Kim Go-eun has this type of eye shape.
Europeans have a more open look, but residents of western and northern European regions may have a special crease on the outside of the eye, which makes the eyes look droopy. It also occurs in older people in combination with many pronounced facial wrinkles. For example, Alan Rickman (Snape from Harry Potter) has this type of eye.
In Asians, the superciliary arch has a more superficial and soft outline. And the bone base of this area is flatter than that of Europeans. As a result, the superciliary arch, as a rule, does not give a shadow on the upper eyelid. But there are always exceptions: for example, the sharp features of Hanzo from Overwatch.
Have you ever wondered what exactly causes the peculiarity of the eyes of Asians? Their eyeball is the same size as that of Europeans. But the structure of the eyelid is different: in Asians, it is “beveled” and looks lowered, and the eye itself is tilted (almond-shaped).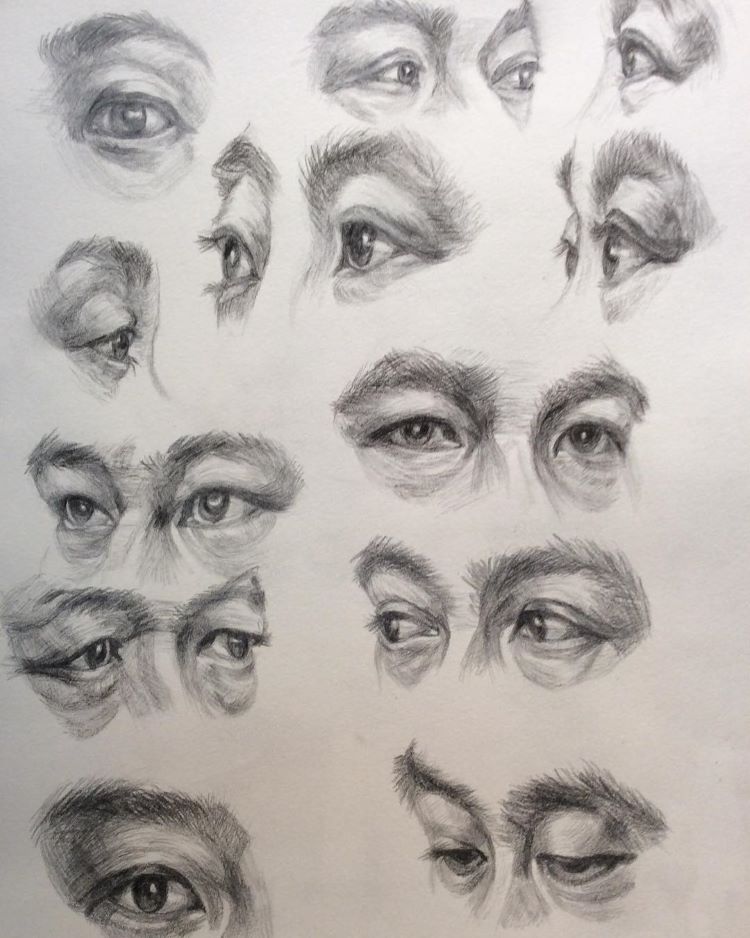
A similar type of eyelid is found in Native Americans, but most of them have more western eyes (a pronounced crease at the outer corner of the eye).
There is a theory that such a structure is an adaptation to life in dry steppes and semi-deserts, where eye protection is needed. You can develop this idea further, for example, when developing the concept of a race of people or other creatures living in the desert. You can be inspired by the manga "People of the Desert" (Hayao Miyazaki).
Desert People comic book cover
To create a childishly naive and cute character, it is worth understanding the features of children's eyes. In newborns in the first year of life, the eyes are bluish-gray due to insufficient pigment. In addition to this, in the first three years, the eyeball grows rapidly. When it acquires the size of an adult, the eyelids remain small and we see only part of the sclera.
Thanks to this feature, babies can often resemble the image of aliens from popular culture - huge irises and pupils, and a round head. Use these characteristics to create the concept of alien races, or just charming children, depending on what mood you are in.
With age, the eyeball moves deeper into the orbit, and the eyelids themselves look swollen. The facial muscles weaken, because of this, the lower eyelid lags behind the eyeball, and the upper sags in the area of the outer corner of the eye. Age-related changes in the eyes also include:
In the outer corners of the eyes, the eyelids gather into mimic wrinkles - “crow's feet”. Often, this facial pattern is taken as synonymous with the character's kindness.
If you want to use such a positive association with the audience, add this detail to your elderly hero. And also rounded shapes in the outlines of the eyes and face, and then our character will become as expressive as, for example, grandfather from the cartoon "Up".
A shot from the cartoon “Up”
Have you ever heard a rather hackneyed phrase about the mirror of the soul? Eyes really reflect the true emotions of a person. Pay attention to the frame from the movie "The Shining". From the eyes of the heroine it is clear that behind the scenes is clearly not a plush rabbit. Use this technique to scare the viewer without showing the source of the fear. Empathy is a good tool for escalating the situation.
Also, do not forget that our pupils instantly react to lighting: in a dark room they expand, and in bright light, on the contrary, they narrow to protect the retina from damage. Also, the pupil can respond to the distance to the object. Narrowing - when focusing on objects near, and expansion - when looking into the distance or a strong attack of fear.
Blindness has long been synonymous with wisdom and psychic ability in pop culture. To depict a blind eye, you need to understand that the surface itself becomes matte, and instead of a pupil, a white cloudy mass forms. As an example, look at the image of the hero Storm from X-Men. You can play around with the matte effect and replace it with a specular glow, like, for example, Vin Diesel from The Chronicles of Riddick.
If you change the color to dark, you can achieve the demonic effect from the Supernatural series. Due to the lack of sclera, the look instantly becomes deeper and empty. This is the best fit for characters from the other world.
If your character has had too much coffee or is angry, he will have red blood vessels on his sclera.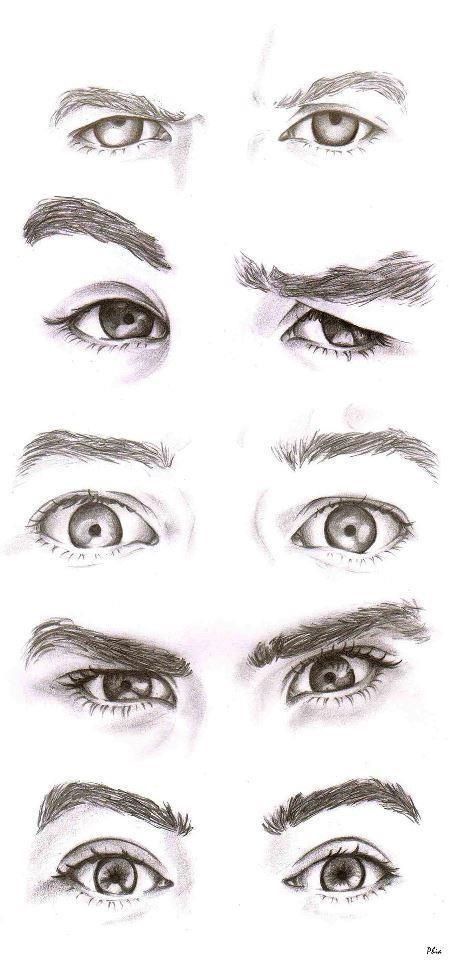 To depict this effect, you can draw capillaries in the form of a crown of trees, diverging around the iris.
The number of branches of the "tree" and their saturation depends on the degree of eye fatigue. Place the capillaries in the shape of a ball - that is, along the eyeball.
If you want to add even more frightening details, darken the iris to dark brown or black, and add red spots around the edges of the sclera. As a cheat sheet, take the image of Dracula from the 1958 film of the same name.
If you are a fan of vampires and do not want to stop on cracked capillaries, we suggest you take a chance and use a more expressive image from the film adaptation of Bram Stoker's 1992 novel Dracula.
To do this, paint the iris red, make it matte in places, the pupil is best made narrowed to a small point. We make a bloody halo around the iris.
Done! Anyone would be afraid of such a look.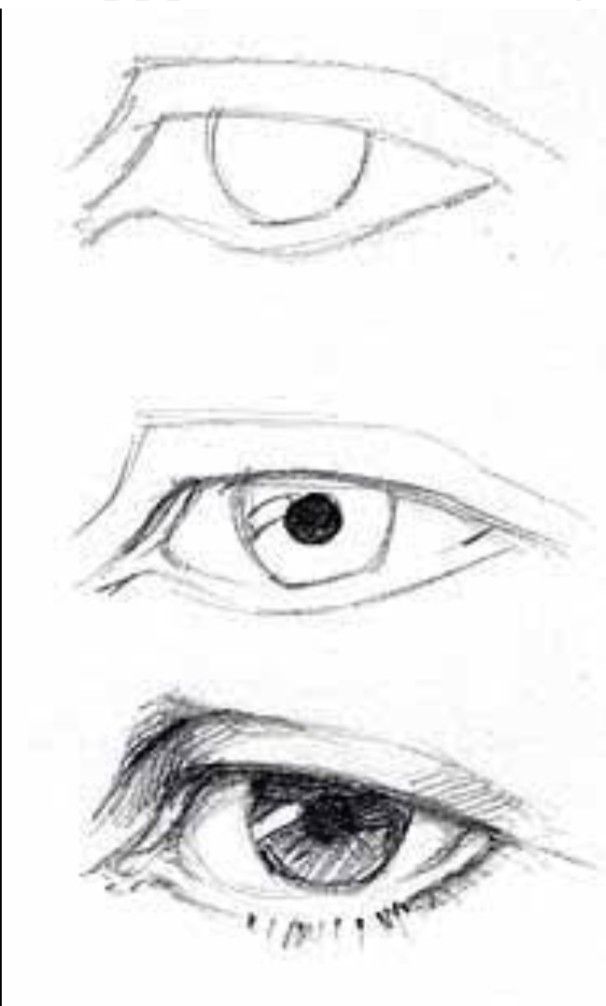
Albinism is the congenital absence of pigment in the iris, hair and skin. Eyes with this disease can be of three colors: red, blue and purple. Albinos in Africa are born more often than in other countries. This is not surprising, because the mutation originally appeared in these latitudes (the “founder effect”).
You can use this pattern as an idea for the concept of a new race of people or mythical creatures.
Heterochromia is a congenital condition in which the irises of the eyes are colored in different colors due to an uneven amount of pigment. In nature, the color of one eye is blue, and the other is brown. A similar detail was added to the character of Johnny Depp (Grindelwald) in the movie Fantastic Beasts: The Crimes of Grindelwald. Thus, the creators emphasized his duplicity and inconstancy.
The skin around the eyes is much thinner than elsewhere on the face, so it can sometimes show through. Make-up artists have long taken note of this and are not afraid to use it as an addition to the image of the hero. For example, Geralt drinking a magic potion (Netflix's The Witcher series): to depict this effect, you can also schematically draw capillaries in the form of a tree crown diverging around the eye.
A bruise is an accumulation of blood under the skin as a result of an injury. It consists of different colors, and the shape of the damage depends on the object that was injured.
To add history to the drawing, you can draw a long rope outline, or a rounded outline from a fist. This will add a few points to the credibility of the drawing. The color of the bruise depends on the depth of the lesion and the stage of healing. Usually dark purple shades are present in the center, and yellow closer to the edges.
The texture brush is best for this effect, as it is important to show the broken capillary tangle pattern and the gaps between them.