 8X4.1R15
 9R15
9R15 3x8.9R15
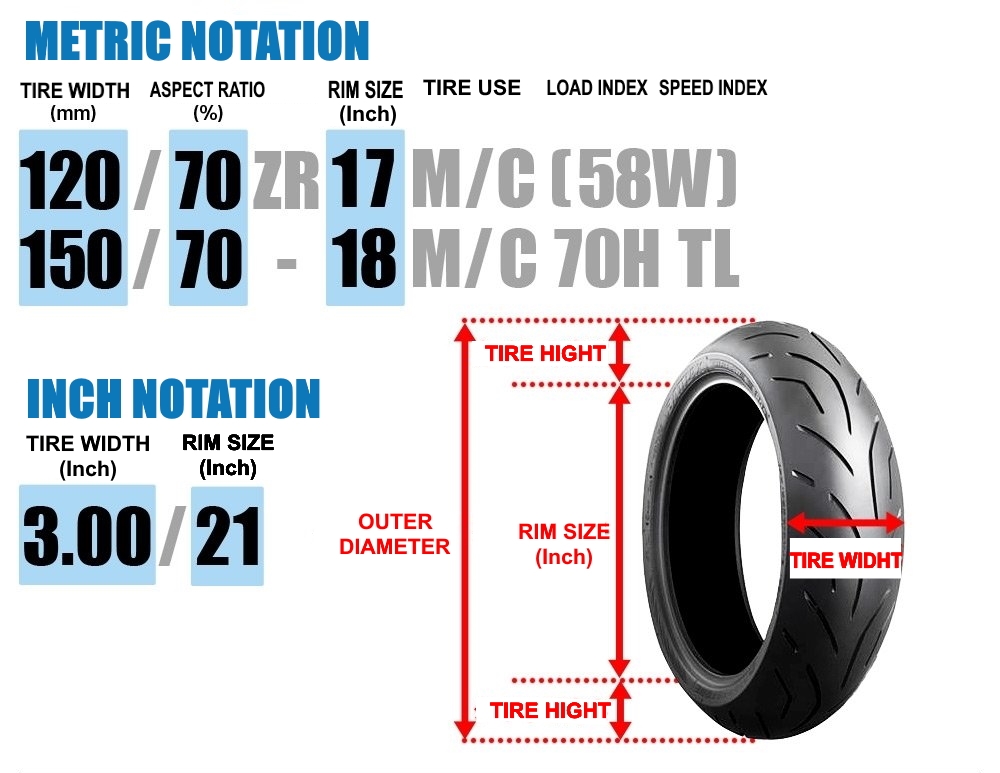 5R15
5R15 5X13.5R15
 7x9.6R16
 7x8.5R16
 1x10R16
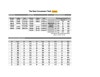 5R16
5R16 5X16R16.5
 1x8.9R17
 4X6.5R17
 8x9.3R17
 5R17
5R17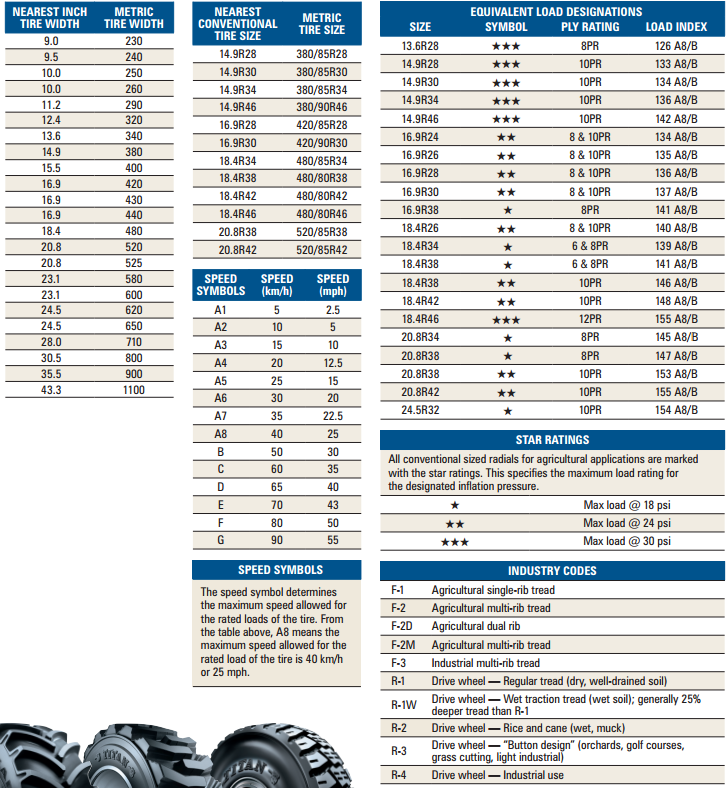 4X5.3R18
 6x9.6R18
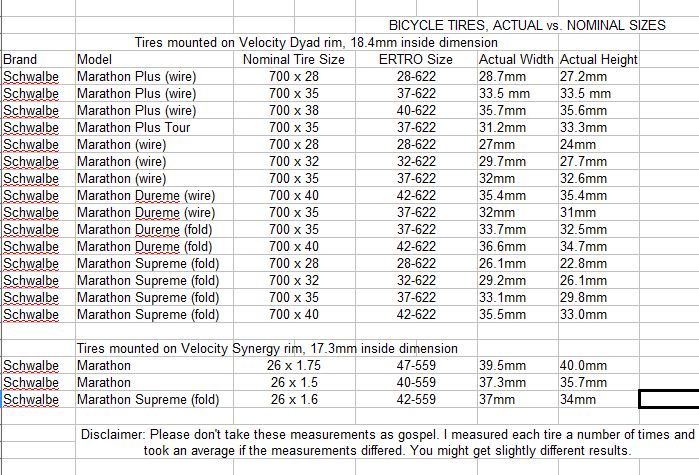 5x10.4R18
 5R18
5R18 4R19
4R19Tire size can be confusing. Some numbers on the sidewall are listed in millimeters while others are inches. Plus, the right size for your car, truck, or trailer can differ depending on where and how you drive.
You can see your original equipment tire size in your owner’s manual or on the placard generally located on the driver’s side door jam. This is the sizing recommended by the vehicle manufacturer.
If you’re interested in switching out your tires for a different look or performance, a good place to start is the numbers and other indicators on your existing tires’ sidewall. Next, have a tire professional help you determine a tire size range that will fit your vehicle and driving needs.
Here’s what those numbers and indicators on the sidewall indicate and how to understand them:
A: TIRE TYPE The first letter in the code tells you what class of tire it is.
P stands for passenger vehicle tire. P-class tires include cars, SUVs, crossovers, minivans and smaller pickup trucks.
LT means light truck tire, designed for vehicles that are capable of carrying heavy loads, towing trailers, or for those looking for an extra heavy duty option. These are often equipped on three-quarter or 1 ton trucks and SUVs.
ST stands for Special Trailer. These tire sizes are meant for trailers, including fifth wheels and other travel trailers, as well as boat and utility trailers.
If there’s no letter before the first number, you have a metric tire most commonly referred to as European size. It’s also measured in millimeters but may have a different load capacity than a P or LT tire.
B: TIRE WIDTH The three-digit number following the letter is the tire’s width (from side to side, looking at the tire head on) in millimeters. This may also be referred to as the section width.
C: ASPECT RATIO The forward slash separates the tire width number from the two-digit aspect ratio. The bigger the aspect ratio, the higher/taller the tire’s sidewall, or “profile” as it’s sometimes called.
The aspect ratio is indicated on the tire sidewall as a percentage. It’s the height of the sidewall measured from wheel rim to top of the tread, expressed as a percentage of tire width.
In this example, the aspect ratio is 65, meaning the sidewall is 65 percent as high as the tire is wide. To get the sidewall height, take the tire width of 215 mm and convert it to inches (8.46). Then multiply this by 65% (.65). This gives you an answer of 5.5, the sidewall height in inches.
D: CONSTRUCTION TYPE This single letter tells you about the internal construction of the tire.
R is for radial tires, the industry standard for most tires today. They have better road grip, lower rolling resistance for better gas mileage, ride comfort and durability than previous generations of tires. In a radial tire, the plies — layers of strong cords made of a blend of polyester, steel and fabric and coated with rubber — are laid perpendicular to the direction of travel.
D is for tires built with diagonal (crisscrossed) plies, called bias-constructed tires. They are also called conventional, x-ply, or cross-ply tires. Some motorcycle and trailer tires still use this internal construction.
Some run-flat tires are identified with an F followed by the type of internal construction.
E: WHEEL DIAMETER This two-digit number specifies wheel diameter in inches. It’s the distance between the two bead seat areas (where a tire gets tightly sealed onto the wheel).
F: LOAD INDEX The two-digit or three-digit number that follows the gap specifies tire load index. The load index symbol indicates how much weight a tire can support, based on the following standard chart. In our example, the load index is 89, which indicates the tire has a load capacity of 1,279 pounds, when inflated to the tire’s maximum air pressure rating.
G: SPEED RATING The last letter is the tire speed rating. This indicates the top speed it’s safe to travel at for a sustained amount of time. A tire with a higher speed rating can handle heat better and provide more control at faster speeds. The maximum operating speed of a vehicle is no more than the lowest speed rating of all tires mounted on the vehicle. (Of course, you should always abide by speed limits for safer driving.) Speed rating is usually, but not always, a single letter (see the chart).
Below you will find several charts that will help you understand tire sizing numbers, including a load index chart and speed rating chart.
A tire size calculator is a quick way to see whether the tire size you’re considering will likely fit your car, SUV, sports car, light truck or crossover.
But remember that is only an estimate. It’s important to stay within the sizing tolerances of your vehicle. Tires that are the wrong size could cause some pull in the steering wheel, rub against the suspension or body of your vehicle, reduce clearance on hills, or result in a stiffer or noisier ride.
If you’re considering mounting a different tire size on your vehicle, check with a tire expert. Find out whether the tires and wheels you have your eye on are the right fit for your vehicle’s suspension, gearing, and bodywork. And ask how any differences in revolutions per mile, tire speed, load index, and speed rating will affect your ride quality and vehicle performance.
See how new tires and rims will look on your car or truck using our Virtual Wheels simulator, available at any Les Schwab.
Find Your Store
41
The tables in this chapter show the timings for all cycles explained in the previous chapter. All times are given for SYSCLK = 8 MHz, therefore, if the designed external board must work in computers with a SYSCLK frequency up to 16 MHz, then the requirements for the speed of the external board should be at least twice as tough as those given. For resources, all times are measured at the access resource connector. Time in the range of 0...11 ns has been added to account for the propagation time of the signal along the bus. In some cases, the signal is returned from the resource that was the source of the signal, synchronized with the one returned, in which case 0...22 ns is added. Time "0" means the theoretical minimum possible time and is used only as an estimate when determining the cycle time.
NOTE: Only the -MEMR and -MEMW signals are shown in the tables and timing diagrams, not -SMEMR and -SMEMW. The -SMEMR and -SMEMW signals are generated with a delay of 0 to 10 ns relative to the -MEMR and -MEMW signals in cases where the CPU, DMA controller, or regeneration controller is the master on the bus. If the master on the bus is an external board, then the delay can be increased to 22 ns.
NOTE: In all timing tables, TCLK denotes the bus clock period.
Table 6.1. Timing relationships for cycles with 0 wait cycles, normal and extended, for 16- and 8-bit memory resources and
bits.
| N | Designation | Master | Resource | |
| pair |
| on tire | Access | |
| m- |
| (ns) | (ns) | |
| Etra |
| Min Max Min Max | ||
|
|
|
|
| with |
| 1 | LA<23. | 61 |
| 50 |
| 2 | BALE pulse width | 61 |
| 50 |
| 3 | LA<23...17> saved after BALE | 26 |
| 15 |
| 4 | LA<23...17> set before command for 16-bit | 120 |
| 109 |
|
| memory [1] |
|
|
|
| 5 | -MEM CS16 true from LA<23...17> |
| 102 | 66 |
| 6 | -MEM CS16 held after LA<23...17> | 0 | 0 |
|
| 7a | SA<19. | 39 |
| 28 |
|
| memory |
|
|
|
| 7b | SA<19...0> is set before the command for 16 or 8- |
| 102 | 91 |
|
| bit UHV |
|
|
|
| 7c | -SBHE set before instruction for 16-bit memory | 49 |
| 38 |
| 7d | -SBHE set before command for 16 or 8 bit | 112 |
| 101 |
|
| UVV |
|
|
|
| 8a | Duration of write/read commands when accessing 16- | 250 |
| 239 |
|
| bit memory (normal or extended cycle) |
|
|
|
| 8b | Duration of write/read commands when accessing 16- | 187 |
| 176 |
|
| discharge air blower (normal or extended cycle) |
|
|
|
| 8c | Duration of write/read commands when accessing 16- | 125 |
| 114 |
|
| bit memory (0 cycle wait cycle) |
|
|
|
| 8d | Duration of write / read commands when accessing 8- | 530 |
| 519 |
|
| 42 |
|
|
|
|
| bit resources (normal or extended cycle) |
|
|
|
| 9 | SA<19. | 40 |
| 29 |
| 10a | Data settling time after read signal 16- |
| 209 | 187 |
|
| bit memory |
|
|
|
| 10b | Data settling time after read signal 16- |
| 132 | 110 |
|
| bit UHV |
|
|
|
| 10c | Data settling time after read signal 16- |
| 132 | 110 |
|
| bit memory for cycle with 0 wait cycles |
|
|
|
| 10d | Data settling time after read signal 8- |
| 489 | 467 |
|
| bit UHV |
|
|
|
| 11a | Data settling time in write cycle to 16-bit | 29 |
| 40 |
|
| memory |
|
|
|
| 11b | Data settling time in write cycle to 16-bit | 33 |
| 22 |
|
| UVV |
|
|
|
| 11c | Data settling time in 8-bit write cycle | 33 |
| 22 |
|
| resource |
|
|
|
| 12 | SA<19. | 22 |
| 11 |
| 13a | Command shutdown time when accessing 16-bit | 125 |
| 114 |
|
| resource |
|
|
|
| 13b | Command shutdown time when accessing 8-bit | 187 |
| 176 |
|
| resource |
|
|
|
| 14 | Read data settling time until command is removed | 40 |
| 62 |
| 15a | Data hold while reading | 0 |
| 0 |
| 15b | Write Hold | 30 |
| 30 |
| 16 | Transition of SD<15. | 32 |
| 32 |
|
| removal team |
|
|
|
| 17 | -0WS true from command | 40 |
| 18 |
| 18 | -I/O CS16 true from SA<19...0> |
| 126 | 90 |
| 19 | -I/O CS16 held after SA<19...0> removed | 0 |
| 0 |
| 20a | I/O CH RDY to "0" from 16-bit instruction |
| 66 | 44 |
| 20b | I/O CH RDY to "0" from 8-bit instruction |
| 378 | 356 |
| 21 | I/O CH RDY duration in log. | 1560 TCL 1560 | ||
|
|
| 0 | K | 0 |
| 22 | Remove command signal after enabling I/O CH RDY | TCL |
| TCL |
|
|
| K |
| K |
| 23 | Enable BALE after removing command | 50 |
| 61 |
| 24 | Clock period (TCLK) | 125 | 167 | 125 167 |
| 25 | Data set before I/O CH RDY enabled |
|
| 63 |
| 26 | LA<23...17> held after command 9 enabled0003 | 41 |
| 30 |
|
| memory accesses |
|
|
|
| 27 | Duration -0WS | 125 |
| 125 |
| 28 | -0WS set to falloff SYSCLK |
|
| 10 |
|
| 43 |
|
|
|
|
| 29 -0WS held after SYSCLK fall |
|
| 20 | ||
|
| NOTE: (1) LA<23. | ||||
| bus is not the CPU. |
|
| Tab. 6.2. | ||
|
| Timing for the memory refresh cycle. | ||||
|
|
|
| |||
| N | Designation | Controller | External | ||
| pair |
| regeneration | board (ns) | ||
| m- |
| (ns) |
|
| |
| Etra |
| Min | Max | Min | Max |
| 1 | Duration -MEMR/-SMEMR | 250 |
| 239 |
|
| 2 | SA<19. | 125 |
| 114 |
|
| 3 | SA<19...0> held after completion | 10 |
| 21 |
|
|
| teams |
|
|
|
|
| 4 | I/O CH RDY to log."0" from -MEMR/-SMEMR |
| 81 |
| 59 |
| 5 | -MEMR removed after I/O CH RDY permission | 125 | 250 | 125 | 261 |
| 6 | -REFRESH set to -MEMR | 250 |
| 239 |
|
| 7 | -REFRESH held after inhibition -MEMR | 125 | 250 | 125 | 211 |
|
| (1) |
|
|
|
|
| 8 | SA<19. |
| TCL |
|
|
|
| state after inhibition -MEMR |
| K |
|
|
| 9 | Duration log. "0" I/O CH RDY | TCLK |
| TCLK |
|
| 10 | Bus control return delay after | 2TCLK |
| 2TCL |
|
|
| prohibitions - REFRESH |
|
| K |
|
NOTE: (1) The -REFRESH signal can be held for a long time to perform multiple memory refresh cycles.
44
|
| Timing ratios for RAP cycles |
| Table 6. | ||
|
|
|
|
| ||
| N | Designation | External | External | ||
| par |
| board as | board as | ||
| -etra |
| source | receiver | ||
|
|
|
| or | (ns) | |
|
|
| controller |
|
| |
|
|
| MAP (ns) |
|
| |
|
|
| Min | Max | Min | Mac |
|
|
|
|
|
| with |
| 1 | -DACK, AEN set to -I/OR, -I/OW | 145 |
| 134 |
|
| 2 | Address set before command | 102 |
| 91 |
|
| 3a | -I/OR installed before -MEMW | 235 |
| 224 |
|
| 3b | -MEMR installed before -I/OW | 30 |
| 19 |
|
| 4a | Data set from -I/OR(1) |
| 230 |
| 241 |
| 4b | Data set from -MEMR(1) |
| 261 | 272 |
|
| 5a | Data set before permission -MEMW |
|
| -21 |
|
| 5b | Data set before permission -I/OW |
|
| -214 |
|
| 6 | Read command held after inhibition | 50 |
| 39 |
|
|
| write commands |
|
|
|
|
| 7 | Address held after commands disabled | 50 |
| 39 |
|
| 8 | Data held after inhibition | 50 |
| 39 |
|
|
| teams(1) |
|
|
|
|
| 9 | I / O CH RDY to log. |
| 125 |
| 90 |
|
| memory (1) |
|
|
|
|
| 10 | T/C set before command | -60 | 60 | -49 | 49 |
| 11 | T/C held after command disabled | -60 | 60 | -49 | 49 |
| 12a | Duration -I/OR | 700 |
| 689 |
|
| 12b | Duration -MEMR | 450 |
| 439 |
|
| 13a | Duration -I/OW | 400 |
| 389 |
|
| 13b | Duration -MEMW | 650 | 639 |
|
|
| 14 | -DACK held after command disabled | 60 |
| 49 |
|
| 15 | AEN held after command disabled | 60 |
| 49 |
|
| 16 | DRQ active from command enable |
| 119 |
| 141 |
| 17 | Duration log. | TCLK | TCLK |
| |
NOTE: (1) Not for RMA controller, but for external board.
Table 6.4.
Tire capture cycle timings
|
| 45 |
|
|
|
| N | Designation | CPU, |
| External |
| par |
| controller | fee (ns) | |
| -etra |
| RAP, |
|
|
|
|
| controller |
| |
|
|
| regeneration |
| |
|
|
| (ns) |
|
|
|
|
| Min | Max | Min Mak |
|
|
|
|
| with |
| 1 | DACK enabled after DRQ (1) enabled |
|
|
|
| 2 | Delay -MASTER from -DACK 0 |
|
|
|
| 3 | PMA controller sets its outputs to third | 0 | 49 |
|
|
| state |
|
|
|
| 4 | AEN withheld after authorization -MASTER | 0 | 49 |
|
| 5 | External board starts generating signals |
|
| 60 |
|
| addresses, data and command signals |
|
|
|
| 6 | -MASTER signal held after inhibition |
|
| 100 |
|
| DRQ |
|
|
|
| 7 | -DACK signal held after inhibition | 0 |
| 0 |
|
| DRQ (2) |
|
|
|
| 8 | External board transfers its outputs to the third |
|
| 0 |
|
| state before signal inhibition -MASTER |
|
|
|
| 9 | CPU starts generating its signals after | 0 |
|
|
|
| inhibit signal -MASTER |
|
|
|
| 10 | DRQ held inhibited after |
|
| 0 |
|
| prohibition -DACK |
|
|
|
NOTES: (1) The exact time intervals are determined by the DMA controller. (2) The DRQ signal shall remain disabled while the -DACK signal is enabled.
6.1 - 6.8 shows the timing diagrams of the ISA bus in various modes.
46
Fig. 6.1. 16-bit memory access cycle with 0 wait cycle.
47
Fig. 6.2. Normal and extended write/read cycle of 16-bit memory.
48
Fig. 6.3. Normal and extended write/read cycle of a 16-bit I/O device.
49
Fig. 6.4. Normal and extended write/read cycle of 8-bit memory.
50
Fig. 6.5. Normal and extended write/read cycle of an 8-bit I/O device.
51
Fig. 6.6. Normal and extended refresh cycles: 1 - The -REFRESH signal resolution time can be extended to allow for multiple refresh cycles; 2 - The current master on the bus must triage the address and command signals before the -REFRESH signal is enabled.
52
Fig. 6.7. Normal and extended RAP cycles: 1 - DRQ can go negative at any time after -DACK; 2 - -IO/CH RDY is disabled for inserting additional wait clocks. Each additional wait cycle consists of two SYSCLK cycles; 3 - The DMA controller activates the TC signal during the last data transfer.
53
Fig. 6.8. Bus capture cycle: (1) - PDP controller; (2) - External board.
The theme of this post was inspired by a mailing list from Sherlock Ohms - stories about non-trivial engineering problems that arose during the diagnosis of various electronic devices are periodically posted there. So I thought, why not? Although I understand perfectly well that the topic is quite specific, it requires very specific highly specialized knowledge and is unlikely to be of interest to a wide range of readers, but it can deliver a few pleasant minutes to a narrow circle of connoisseurs of hardware puzzles. So, for those who know what a data bus is and how it works - a story in which there will be ships, shoes, sealing wax, and cabbage palms.
In the process of designing a device based on the MK 1986BE1T, which I already wrote about, it became necessary to interact with external FLASH memory chips through a fairly fast interface, preferably a parallel one. Fortunately, in the MC under consideration, such an opportunity is present, and to organize access to devices mapped to memory, but not included in the MC itself, you can use the full (32 bit address, 32 bit data, 2 control signals, 4 tracking signals) external bus, and the exchange for the user program looks absolutely transparent. As always, thanks to the developers for including such an option, and, as always, dissatisfaction with the apparently insufficient documentation, although the post is not about that. Due to a number of design features and the controller, not the entire width of the data bus was used, but only 8 bits, starting from 03, which is absolutely insignificant for describing the detected problem. Mk, together with all output buffers, is powered by +3. 3, in addition, to ensure the operation of other devices, pull-up resistors of 2 kΩ were connected to a voltage of +5 on the data bus. After assembling a prototype of the device, debugging began and the first test cases (of course, or, as they say, of course) did not work, after which they took (hereinafter, the plural is used, since we carried out this work with a young colleague who, for some reason, categorically does not want to write posts on Habré) an oscilloscope and climbed to look at the makeshift. And here an interesting phenomenon was discovered. The expected oscillogram of signals on the data bus should look like this (red and green colors - I didn’t come up with it, it just happened when uploading to Habr):
The fragment of the waveform marked with the number 2 is the expected behavior of the bus in the absence of an addressed external device (achieved by setting the sample input to an inactive state). The MK removes data from the bus (black line in the upper diagram) and the voltage on it begins to be pulled up to power through the supply resistor. After some time, the MC generates an active level (zero) of the read signal (green signal in the lower diagram) and at this moment the external device must transmit data (since it is inactive, the pull-up continues), then after a certain time the active level of the read signal is removed, the external device releases the bus, the further state on the bus is indefinite, in our case, the tightening continues. Everything is logical and understandable, but the fact is that the diagrams shown in section 1 were initially detected. In this case, before the read signal was given, the MK gave the bus a high level and continued to hold it during the reading time and even beyond, only after a significant time (on the order of milliseconds) the data bus went into a disabled state. Somewhat unexpectedly, but at first I reacted to the situation without due attention - I decided that somewhere there was an error in the pin settings and I had to look for it (since the program was written by a young colleague, it was easy for me to assume the presence of possible errors in it, now if I wrote it , then the situation would not be so unambiguous :) ).
The strong belief in the presence of a configuration error disappeared after it was established that ALL 16 data lines (out of 32) were configured the same, and there were failures on only 4 of them, and these are bits 4,5, 8 and 11.
Thinking further and experimenting. An idea arises that it is impossible to read immediately after writing (this is not reflected in the documentation, but when working with Milandrom we are already used to guessing something), so we do 2 consecutive readings, in the hope that the second one will pass correctly.
data=*buffaddr; data=*buffaddr;
And here the most interesting thing begins - the second reading really goes right, BUT the first one also becomes right - a very interesting phenomenon - I can’t imagine its mechanism at all - that is, I can’t imagine a reasonable mechanism for the influence of the subsequent command on the previous one. A quick look at the generated assembler code gives a hint - the location address of the first reading command has changed due to the peculiarities of the linker - it's already better, it's easier to come up with a mechanism for influencing the address on command execution. In order to investigate the behavior of the MC, we select the fragment related to the exchange with the external bus from the general program by removing everything unnecessary. And we get another surprise - incorrect reading is not observed even with a single access, although the command address remains unchanged. By inserting the deleted fragments back, we find out that when the CRC16 calculation function is connected, an incorrect reading is observed, and if it is absent, it is not, and this function obviously does not interact with the external bus in any way and cannot influence the reading in reasonable ways. Further experiments showed that it is not the CRC16 calculation function as such that is important, but the presence of a subtotal data block in it, moreover, the size of this block, that is, with the code:
static CRC16Buff[256]; an error is observed when static CRC16Buff[215]; (and less than 215) - no access error
How can this fragment affect the code executed in a completely different place? We find that the only change is in the value of the stack, since the required space for global variables has changed. That is, it turns out that mishandling occurs when a command is executed from certain places with certain stack values, and the number of erroneous bits in a word is small? It's time to remember the first rule of an engineer - "There are no miracles in the world." It can be assumed that this is a remnant of some kind of VHDL debugging function, which signaled certain situations and was not removed from the release. It looks like the thought of a heavily stoned developer, but so far there is no other hypothesis, since we reject divine intervention. Another thought - "here you are, reindeer" - we found a BOOKMARK, however, quite meaningless, but who can understand them, the guys from the NSA.
We continue our research and discover with amazement that moving the command to different addresses (by adding NOP) does not lead to anything - the error does not appear, or, accordingly, does not disappear for different stack values, that is, the hypothesis with the address should be rejected. But how then does the addition of the second command affect the first? We look at the assembler code more carefully and find more changes, namely, with a single read, the compiler generates
mov r0, sp ldrh r1,[r4] strh r1,[r0]
And with two readings in a row, he performed optimization:
mov r2, sp ldrh r1,[r4] strh r1,{r2] ldrh r1,[r4] strh r1,[r2] It was hard to believe, but we really further establish that an incorrect reading takes place if, and only if, a very specific value lies in the register r0, and it does not matter whether this register will be used in the future. Compared to the previous completely crazy hypothesis about the connection between the stack pointer and the program counter, we observe clear progress. Further experiments establish that the forced erroneous high level is observed on data bits that were written to in the last cycle, and in which register r0 was written to, moreover, the phenomenon is clearly triggered - it occurs during the first reading after recording and is retained for a certain time, and this time is in no way related to the frequency of the MC (within the observation error), but has a clearly pronounced relationship with the temperature of the crystal (as the temperature rises, the retention time increases) .