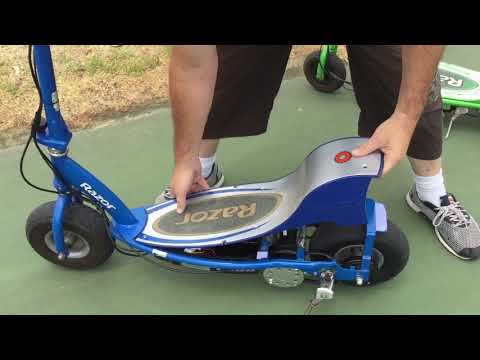
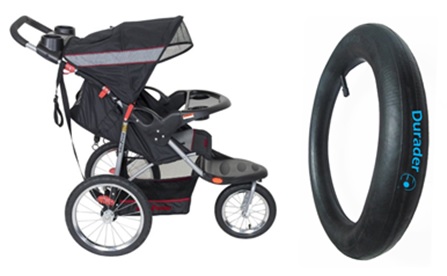
If your BOB Stroller, Yak or Ibex Trailer has a flat tire you may need to replace the inner tube. The inner tube is what holds the air and gives shape to the tire when pumped up (see also Anatomy of a Stroller Wheel). Simply replacing the tire will not solve the problem. We recommend using bicycle tire levers to remove and install a tire, not screw drivers or sharp tools.
Most times you can use your tire again, but it is a judgement call on your part. If the tread is worn or there is a large hole or rip in the tire then it may be prudent to replace it. Thoroughly inspect the tire to make sure what ever punctured the inner tube is not still stuck in the tread of your tire. You will need to remove the tire and inner tube from the wheel to properly inspect your tire. Visually inspect the outside of the tread and then gingerly run your fingers along the inside of the tire to feel for anything poking through.
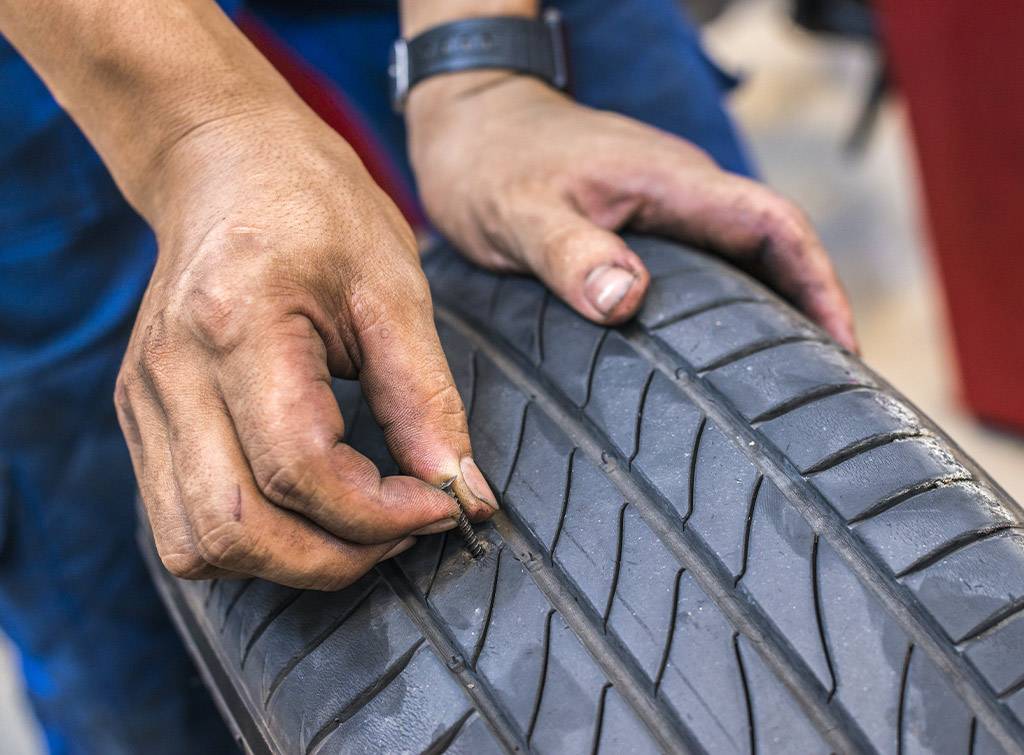
If you locate a compromising object (thorn, piece of glass, etc.) you can remove it with tweezers.
You can even patch the punctured inner tube if it's a small hole. Locate the puncture by pumping up the tube and submerging in a sink or large bowl full of water. Where the bubbles originate is the location of the puncture! Keep your eye on that hole, wipe the spot down and draw a circle around the puncture with a marker. Now you can patch it up!
If you keep sustaining flat tires and you have determined that the culprit is not a foreign object poking through the tire or a damaged inner tube valve stem, then it may be something on the wheel or rim. You will want to closely inspect your wheel after the tire and inner tube have been removed for any inconsistencies (burrs, etc).
If you have an aluminum wheel (BOB Ironman Strollers, BOB Revolution AW 12", BOB Revolution CE, or older model BOB Sport Utility D'Lux Strollers, BOB Yak & Ibex Trailers) and the Rubber Rim Strip is missing, exposing the spoke nipples, that could be your problem. It is very important to keep the spoke nipples covered. The Rubber Rim Strip acts as a barrier between the metal spoke nipples and the inner tube. If the spoke nipples are exposed, inner tube punctures are possible. Add or replace the rim strip if damaged or use duct/wheel tape.
NOTE! Rubber Rim Strips are specific to the aluminum wheels. They are not needed if you have any BOB Stroller with the polymer (black plastic) wheels.
Simple Inner Tube Mounting Instructions

Tips for Step 8 & 9: After partially inflating tube, prior to inserting in between the rim of the wheel and tire, rub a little talcum powder on the tube. This may lower the risk of pinch flats during installation. Install one side of the tire at a time and try to do this by hand. Tools should be used only if necessary. Always make sure no part of the tube is visible or exposed once the tire is seated back onto the rim before inflating.
SPECIAL NOTE ON 12" WHEEL/TIRE/TUBE INSTALLATION!
The 12" tire can be very tight when installing on the associated wheel and can pose a significant challenge to the inexperienced. If you do not feel comfortable installing a 12" tire and inner tube onto these smaller wheels, we strongly recommend taking the parts into your local bike shop mechanic to have it done. Otherwise, you run the risk of "pinch flatting" the inner tube if you are not diligent in the installation process.
Tubes sustaining pinch flats due to improper installation can not be returned or warranted.
Caution! To avoid damage to tire or tube, and to prevent injury do not use screwdrivers or other sharp tools to mount tires and tubes. Never use high volume gas station pumps to fill low volume stroller tires.
Having walked thousands of miles with the jogging stroller – I wish I had it before
I wonder why moms don’t extensively use technologies to meet their everyday needs?
High performance products make our lives so much enjoyable !
I believe many moms know how embarrassing it is to get a puncture in your stroller’s tire.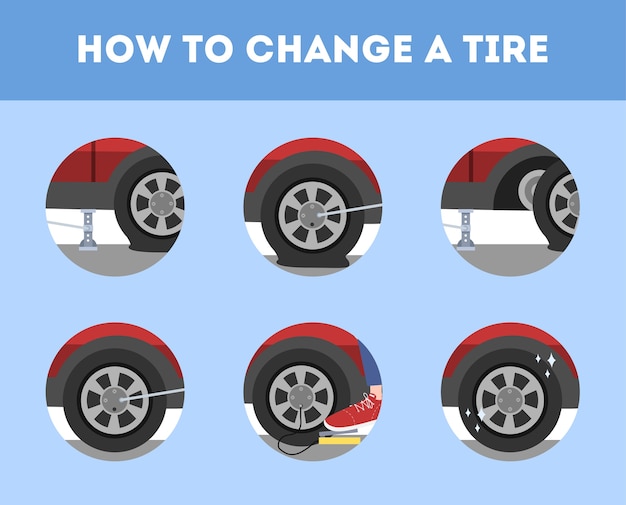 This unpleasant moment spoils your mood as you need to round up a nice walk in a park and rush to a bike store for repair. If you are lucky it will be fixed quickly, if not then it might take a couple of days. If you are a pro in walking, running or rollerblading with the stroller, you need to treat your machine properly.
These liquids save plenty of nerves and time for moms who have jogging strollers with air-filled tires!
Slime Bicycle Sealant or SlimePro Tubeless Sealant – both work the same way: they create a thin layer inside a tire or tube; so if you get a puncture, the tire remains inflated. Even if you happen to get several punctures: the tire will be inflated. No repair is needed. If you use sealants, your stroller’s tires will never go flat.
These sealants are non-hazardous and non-toxic. SlimePro has even a nice tropical scent!
See the reel how it works:
[youtube http://www.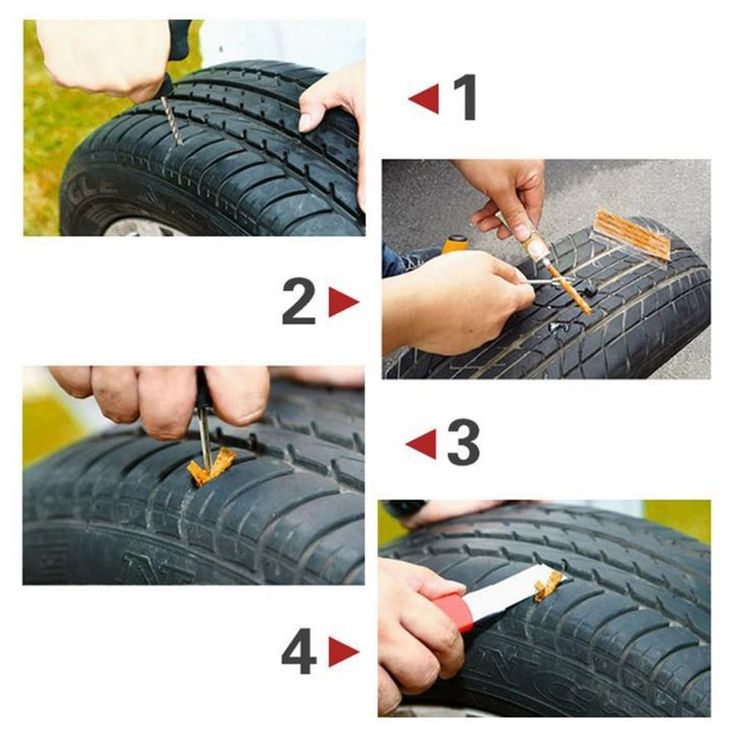 youtube.com/watch?v=i_ebsmd1voo]
There are two types of sealants:
Tubeless like SlimePro Tubeless Sealant – it contains latex which dries out after plugging up a hole.
Tube Sealants such as Slime Bicycle remain liquid inside a tube of the punctured tire.
Slime Pro Tubeless Sealant is used only for tubeless (pneumatic) tires – the ones that don’t have separate inner tubes. (all of Top 5 Best Jogging Strollers have pneumatic tires. Read your stroller’s manual to double check).
The other – Slime Bicycle Tube Sealant is for inflated standard tires with inner rubber tubes.
Sealant is easy to apply: 1/3 of a bottle of Slime Pro or Slime Bicycle is enough for one tire.
How to apply: deflate the tires, fill in a small amount of Sealant (a bit less than 1/3 of a bottle) then inflate the tires back. As simple as that. Done!
[youtube http://www.youtube.com/watch?v=zxA8rgavySI]
What end-users say about sealants:
The leaks were repaired, and the tires never leaked again.
The product was easy to use. The instructions were clear. I’m super impressed.
This stuff works! I load it in, pump up the tire and drive around the block a couple of times to see if it holds. I’m elated!
To round up I would like to say: Dear moms, don’t be afraid to use the benefits of high performance production and get professional products for our service! Have a wonderful ride!
http://youtu.be/wBp-x_cCC5o
Click to rate this post!
[Total: 0 Average: 0]
90,000 repair of the wheel of a baby strollerFor independent replacement of tires in a baby stroller we will need:
So let's get started. To facilitate the process of changing a tire or tube, remove the wheel from the stroller. Usually this is not a problem. On modern wheelchairs, it is necessary to press just one button in the middle of the wheel and the pins on the hub will move apart, freeing the rear wheel from the grooves:
If it is a front steered wheel, it must be removed along with the fork. To do this, clamp the metal tab and pull the wheel from the baby stroller down:
Then you need to unscrew the right and left screws from the front wheel fork using two Phillips screwdrivers and remove the axle by pushing it out. Now the wheel can be removed and nothing will interfere with us when replacing a tire or camera. Some front 10 inch wheels have split rims. It is necessary to unscrew the screws and the wheel rim will be divided into two parts.
After removing the wheel from the baby stroller, remove the cap and deflate the chamber inside the tire by pressing the spool (thin pin) inside the nipple.
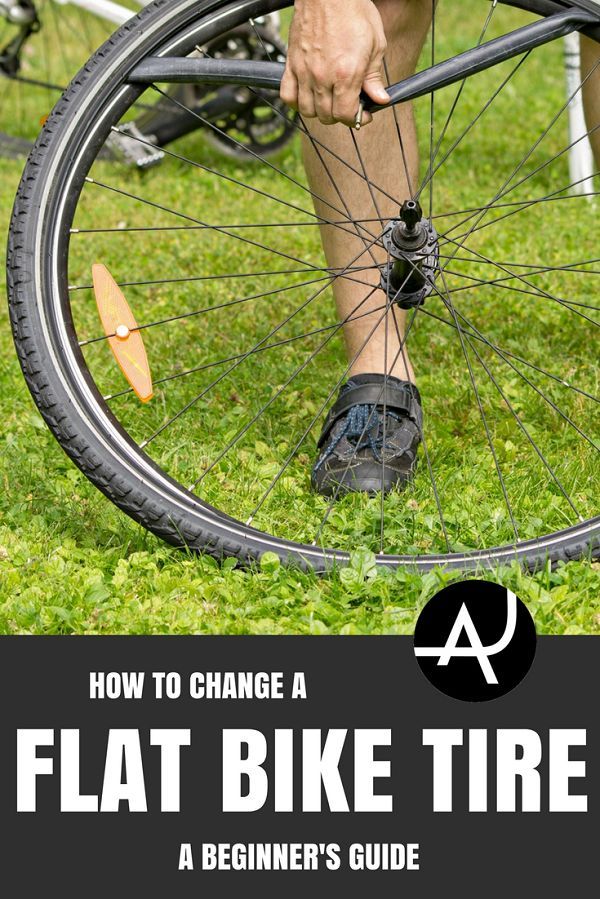
Removing the tire
Now we need the mounts. Pry off the tire with one pry bar, tucking it between the rim and the tire. At a distance of about 10 centimeters, insert the second and remove the first, but so that the cord does not jump back. Insert it further in a circle and pry the tire of the baby stroller again. Do this until the entire side of the tire is out of the wheel rim.
Use your finger to push the nipple into the wheel rim so that it does not interfere with the tube removal.
Remove the camera.
The entire tire can then be removed from the wheel rim without much difficulty.
Perform a visual inspection of the tube and tire. If the wheel has deflated before, immerse this chamber in a basin of water and identify the place from which it releases air. This place can be sealed with a patch, but it is easier and more reliable to change the old one for a new one by ordering it in our store.
Putting back together
 Make sure it is perpendicular to the wheel rim.
 Make sure that the pressure is 1.8-2 atmospheres, otherwise the tire will quickly wear out and tear.
You can visually see how the process of replacing the tire and the camera of the front (steered) wheel, using the example of the Zippy baby stroller:
The following video shows the replacement of the tire and the camera of the rear wheel using the example of the Zippy baby stroller:
Both videos are from YouTube, user Malysh Servis
That's it. We hope that our article will make it easier for you to repair the wheel of a baby stroller. Walk to your health!
Stroller - transportation is not cheap, especially branded. But regardless of its cost, the wheels often fail. We will understand the reasons for this, find out how to minimize the likelihood of repairs and what can be done at home.
Known that the weakest points of wheelchairs are wheels and any articulated connections, for example, on the handle. The former bear the greatest burden, and the latter are often stressed.
Basic reasons why wheels fail:
1. Failure to comply with operating conditions. The instructions clearly state maximum weight for which the stroller is designed. If you, in addition to walking use it for shopping, consider it. Many parents love load the basket at the bottom with an unreasonable weight. It is not right. Stroller not designed for large purchases.
2. Off-road driving. Not every stroller is designed for country roads. This is indicated in the instructions. Choosing transport carefully check out its specifications. analyze where you will be most often walk with the baby. If these are trips to the beach, then the stroller should have corresponding wheels.
3. Road condition. Every resident of Russia knows that the road to snow cover and after it melts are completely different things. We we can never guess what the paved path will turn into at home with the onset of spring. Often the coating comes off with the ice.
To to avoid damage, it is necessary to regularly inspect all parts of the stroller and do prevention. It includes:
1. Cleaning of all moving parts from dust, sand, dirt.
2. Wipe frame.
3. Check wheels, bearings, shock absorbers.
4. Lubrication with oil or grease if necessary.
Basic breakdowns are:
1. Flat tires on inflatable wheels.
2. Broken bushings, hubs or bearings.
3. Abrasion of the surface of the plastic wheel.
4. Bent disc or spokes.
Easier just at home to solve the problem of the camera. Many bike owners know how to take it out and how to glue it. Let's tell you more.
1. Remove the protective cap from the wheel.
2. Disconnect the wheel according to the instruction manual. At Most strollers have a latch mechanism.
3. Remove the tire and pull out the tube.
4. Inflate it and put it in a bowl of water. This is how you locate puncture (where bubbles appear).
5. Dry the surface thoroughly.
6. Cut out a suitable piece from an old bicycle inner tube and glue with adhesive or sealant.