It’s not uncommon for some of us to leave our cars parked for long stretches spanning days, weeks – sometimes even months. If you’re one of these people, you may notice a slight ride disturbance or vibration the first time you drive the car, but it will usually disappear after a few miles of driving.
This phenomenon is known as flat-spotting, a condition that occurs when a tire has been stationary under vehicle load for a prolonged period. The tire has a flat spot in the area where it was in contact with the ground. Alarmed? Don’t be. Let’s dive into the causes of flat-spotting in a little more detail, plus tips on how to prevent it.
As you drive your car, each tire rapidly rotates on the wheel from a “relaxed state” to a “loaded state” approximately 480 times per kilometer. This constant motion generates heat, which makes the rubber in the tires more supple – this is standard behavior for your tires.
Once you’ve stopped and parked your car, however, the contact patch of the tire can flatten slightly where it is in contact with the ground as the tires cool down. It’s especially likely to occur when the tires experience a dramatic swing in ambient temperatures, the car is parked overnight in cold temperatures, or the vehicle is in storage for a long time. Another factor is tire pressure, and whether the tires are underinflated or overloaded.
There are two types of flat-spotting: temporary and semi-permanent. The severity of a tire flat spot will depend on factors like size, load, internal structure, the ambient temperature, and the amount of time it is stationary.
In the majority of cases, flat-spotting is temporary. If a vehicle has been stationary for a few days or weeks – for example, if you’ve been away on vacation and parked the car at the airport – drivers may experience some slight vibrations during the first few miles of their journey.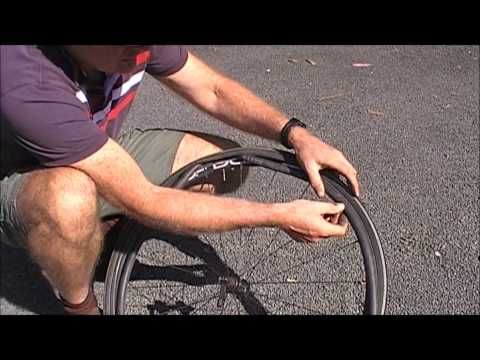 The flat spots will disappear once the tires have reached their operational temperature and regained their normal shape.
Semi-permanent flat-spotting will occur if the tires have been standing still under vehicle load for a month or longer. A typical situation where this can happen is if you’re storing your vehicle away for the winter months, or if it’s being transported overseas. The long standing times, especially in tandem with high temperatures and low tire pressure, can result in more severe flat-spotting that normal driving won’t remedy.
If you suspect that your tires have semi-permanent flat-spotting, you should contact your local tire specialist or garage in the first instance, and they’ll guide you through the options on how to fix it.
Maintaining the correct tire pressure is an effective strategy to mitigate the chances of flat-spotting happening.
Tires that are underinflated are more susceptible to a flat spot, and it’s generally advisable not to operate your tires when they’re underinflated or overloaded.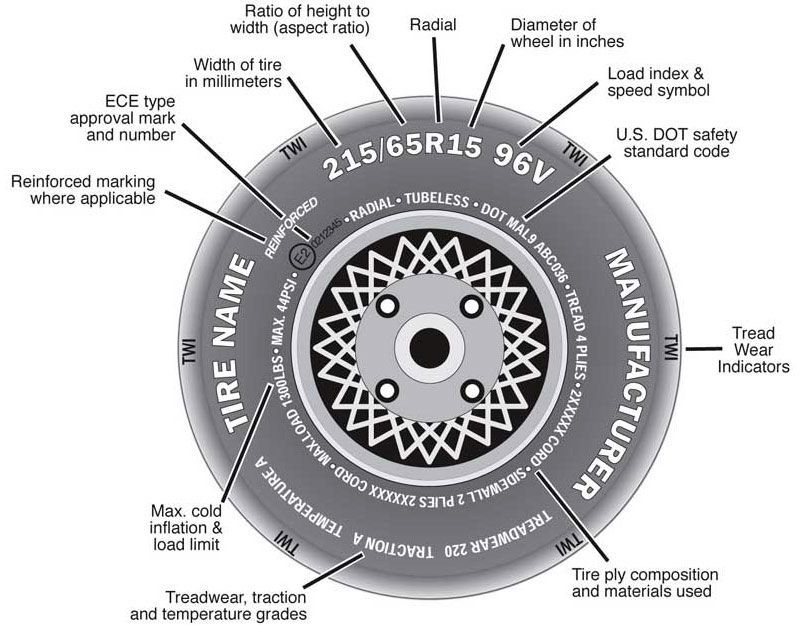
If you’re about to undertake a long-distance journey at high speeds with heavy loads, then you should increase the inflation pressure of your tires in line with the vehicle manufacturer’s recommendations.
Did you know that a slight increase of +0.2 bar in tire inflation pressure results in lower tire running temperatures? In turn, this decreases the likelihood of flat-spotting.
Similarly, if you’re about to park your car for a long time without driving, then slightly increasing the inflation pressure of the tires by +0.2 bar before parking will help to reduce the chances of flat-spotting.
In both instances, however, it’s important to remember that you should never exceed the maximum recommended cold inflation pressure for your tires.
Dealer Locator
There are many reasons for someone to leave their cars parked for days, weeks, or even months at a time. If you're one of these people, you might notice a minor ride disturbance or vibration.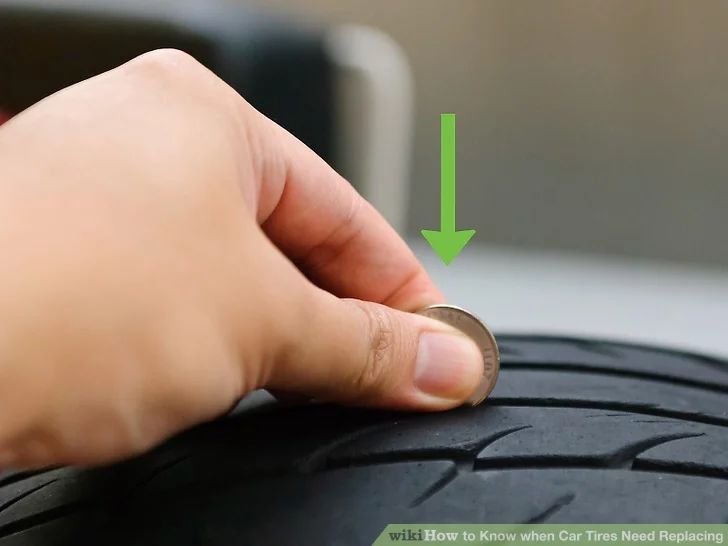 Alarmed? Don't be. We've researched flat spots on tires as well as tips to solve the issue.
Flat spots on a tire that cause vibration in your car can be fixed in several ways:
Continue reading to learn how to fix vibration caused by flat-spotting. We'll also discuss the flat spot in a deeper sense. Finally, we'll talk about its prevention tips. Stay tuned for everything you need to know about keeping your tires well maintained.
Before you continue reading, let us say we hope you find the links here useful. If you purchase something through a link on this page, we may get a commission, so thank you!
What Does A Flat Spot Mean?Flat-spotting occurs when the rubber of your tire meets the ground surface (tire's contact patch), forming a flat and rigid patch.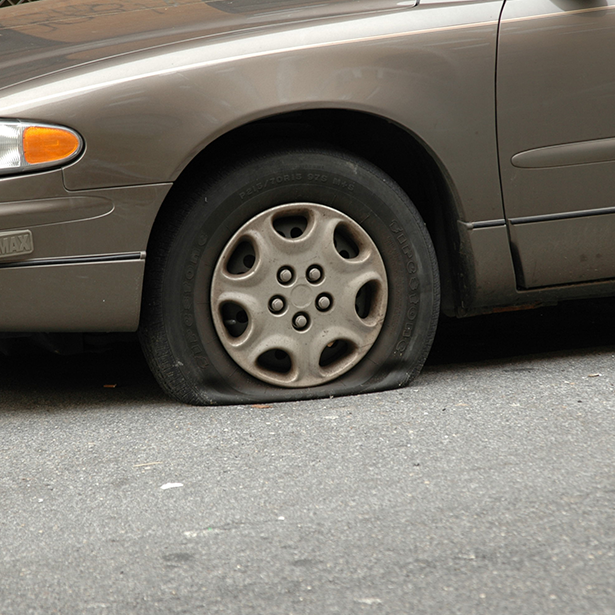 It is common after long-term parking because the weight and pressure of the car bearing down on the same contact patch continuously.
Aside from long-term parking, flat tires are more common in cold climates or when the temperature fluctuates from high to low. Low temperatures can cause air pressure to drop, resulting in low tire pressure.
Moreover, flat-spotting in tires can be also caused by sudden and hard braking. The friction from the tire that meets the road can wear down tire treads if you hit the brakes hard enough to skid across the pavement.
Flat-spotting is divided into two categories: temporary and semi-permanent. The severity of a tire flat spot is determined by several factors including its size, load, internal structure, ambient temperature, and the length of time it has been stationary.
Flat Spots: Temporary Vs. PermanentAll permanent flat spots begin as temporary flat spots, and both are annoying and can cause a bumpy ride when you get back into your car after a long period of inactivity.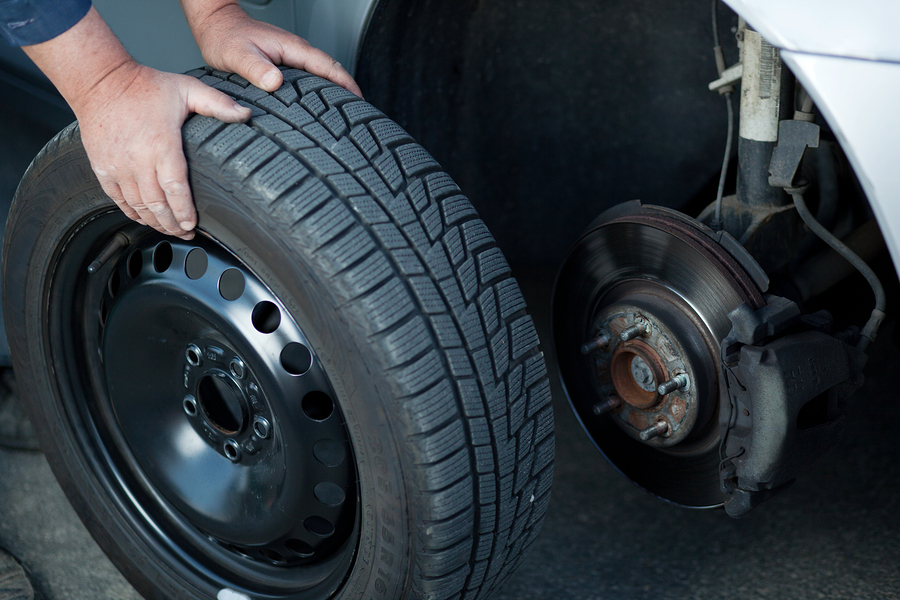 Flat spots fade as the tires heat up on the road and active pressure is applied to round the tire up.
Permanent flat spots are more difficult to detect because they are less obvious than transitory flat spots and present as vibrations or rattles when your vehicle reaches a particular speed.
The bad thing about chronic flat spots is that you might not be able to figure out what's causing them straight away, which might lead you down a rabbit hole of trying to fix the problem by replacing other elements of your car.
What Are The Symptoms Of Flat-Spotting?Tire flat-spotting usually compromises the tire's integrity, causing an entire area to become worn in and uneven. It's possible that this will result in some noticeable symptoms.
Tire Flat SpotsWhen the car has been sitting idle for a long time, a flat spot on the tires can sometimes be seen. The flat spot in a flat-spotted tire remains in the same place as the tire rotates, unlike a deflated tire that has been punctured.
Tire flat spots aren't always visible, so examine the treads side-by-side and compare them to each other to spot unusual wear patterns.
ThumpingWhen driving on a tire with a flat spot, you may hear a bumping noise. The flat spot may make a rhythmic thumping sound as it hits the road. Thumping can be caused by a variety of car problems, so it's best to seek professional assistance before determining what's wrong with your vehicle.
Steering ProblemFlat-spotting is a type of uneven tire wear that can cause your tires to become unbalanced, throwing your steering capabilities for a loop as well!
When driving on flat-spotted tires, you may notice that maneuvering your steering wheel becomes more difficult in certain situations, such as when the tires are cold when the car is first started or when driving at higher speeds.
VibrationsFeeling a vibration while driving is a red flag for tire flat-spotting. As you drive, the tires may "shimmy" quickly or slowly depending on your speed. A vibrating sensation in your car, on the other hand, can be a sign of a variety of problems. To be sure, seek professional advice.
Having a car forces you to deal with this issue. Flat-spotting cannot be avoided, whether permanently or temporarily. Below are some tips you can follow if you experience flat spots:
Drive The CarDrive at highway speeds until the vibration is no longer present. Flat spot vibrations are usually gone after 15 minutes of driving. If the vehicle has been sitting for a long time without moving, it may be necessary to drive it at highway speeds for up to 30 minutes. No further action is required if the vibration goes away during the test drive.
Lift The VehicleIf the vibrations aren't completely gone after the test drive, lift the vehicle so that the tires are not loaded. You can lift the vehicle using jack stands at all four corners. This will fully remove the weight from the tires.
Click here to see this pair of steel jack stands on Amazon.
For an alternative, you can use FlatStopper which uses a curved form to support the tire, transferring the vehicle's weight evenly.
Click here to see these tire saver ramps on Amazon.
Rotate The TiresRotating tires is another effective method. You can also visually inspect your tires for damage during rotation. Tire rotation is a smart strategy to guarantee that your tire tread wears evenly on all four wheels.
You can swap the tires on your front and back wheels. This ensures that all of the tires on the axle wear out at the same rate and that your best tires are on the back axle for greater handling and safety.
Inflate The TiresUsing the air compressor, inflate each tire to the maximum level indicated on the sidewall of the tire. Using the tire gauge, double-check that the pressure is correct.
Click here to see this digital tire pressure gauge on Amazon.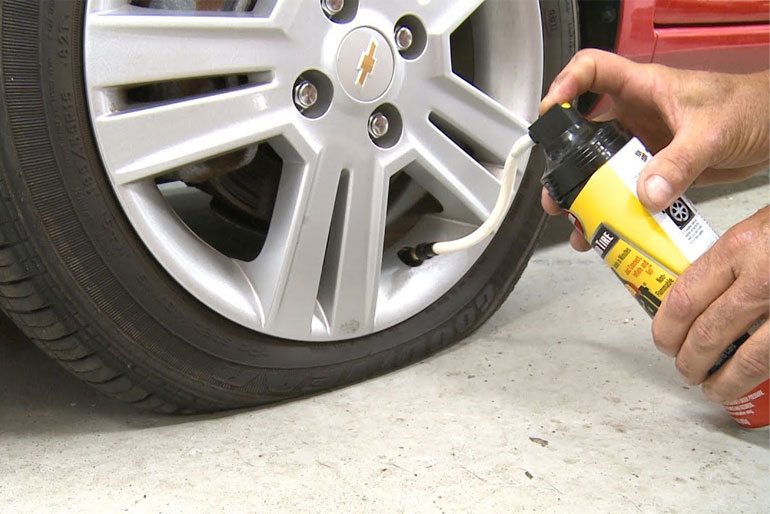
If you believe the problem is not getting better, you should consider replacing the tire. Also, if the flat spots are permanent, you'll need to consider replacing them to prevent future harm to your vehicle.
Visit Your Auto TechnicianTake your car to a tire shop. Tire shaving machines are available at most dedicated tire shops and will shave the tread off the tire until the flat spot is gone. For a flat spot caused by a long skid, this is the only option. In the first instance, you should contact your local tire specialist who will walk you through the possibilities for repair.
Flat-Spotting PreventionIf you are planning to store your car for a long time, below are the preventive measures to avoid flat-spotting in the future:
Clean The TiresBefore storing your car, wash the tires to ensure that dirt and debris do not impact them. During normal everyday use, tires gather dust, dirt, and other debris.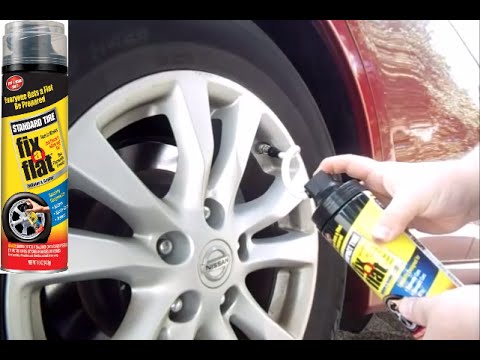 And if they are stored dirty, those particles may begin to break down your tires.
Because cold temperatures can cause pressure dips, fill your tires to the proper pressure and check them occasionally while the vehicle is being kept.
Plus, you never know whether you have a slow leak that you were previously unaware of. Some drivers swear by overinflating their tires to the maximum psi specified on the sidewalls, but this can be unsafe and compromise your tires in other ways.
Keep Tires Away from Direct SunlightWhile in storage, keep tires out of direct sunshine to avoid UV degradation, which dries out and deteriorates rubber over time. This can be accomplished by tinting your garage windows with UV film or covering your tires.
Tire SupportsTo retain the tire's natural curve, use tire supports. Tire cradles, such as FlatStoppers, allow you to drive right onto a concave cushion and maintain proper tire shape regardless of the weather.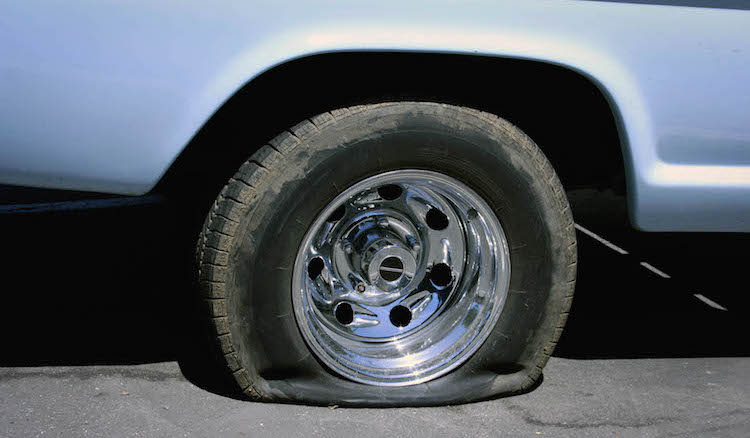 They're a terrific, hassle-free option that doesn't require you to move your car every few weeks as some other options do.
Remove the tires fully and replace them with inexpensive winter tires, or use jack stands or a lift to raise the vehicle. However, there is one exception to this method, and that’s when you remove your vehicle from storage, the suspension may appear elevated for a short while.
Drive The Car As Little As PossibleIf you have the space in your garage or storage unit, drive a little every two weeks.
Wrapping Things UpKeeping your tires in good condition is a big deal regardless of whether it is permanent or temporary. On a regular basis, you should diagnose your car as well as the tires. Vibration is caused by a flat spot on the tire. You should always keep an eye out for this issue in order to avoid major incidents.
For more information about vehicles tires, check out these other posts:
Should You Deflate Tires For Storage?
Should Tires Be Stored Flat Or Upright?
Can Tires Go Flat From Sitting?
Tires are the only thing that connects a motorcycle to the road. Handling, dynamics, comfort, motorcycle cross-country ability ... and the safety of the driver himself depend on their design and condition. And his concern is to monitor the health of tires and be able to repair them, often in the field.
THREE SIDES OF THE ONE MEDAL. Any tire is a more or less successful attempt to combine the incompatible. Or, in other words, the conscious deterioration of some tire properties for the benefit of others. This is precisely the difficulty for designers when creating a tire. This is also the difficulty of choice for the consumer. Here are the three main properties that a road tire should have.
The first is to ensure reliable traction. On asphalt, soft rubber has the best grip (which is especially important in corners). But it quickly wears out, losing its properties. Moreover, tires with a soft compound are very demanding on their own temperature and seriously lose in a cold state.
The second (for the rear wheel) is to realize a large moment. It is because of this that the rear tires on modern motorcycles are at least thirty percent wider than, say, motorcycles twenty years ago. But again there was a minus - due to the increased width, the maneuverability of the motorcycle worsened.
The third (more for the front wheel) is informative. The tire should “inform” the driver about the state of the roadway, which is especially important for those who like to drive fast. The disadvantages of "detailed information" are an excess of vibrations transmitted from the road and discomfort. The choice of a specific tire for a particular motorcycle depends on many factors - the rider's riding style, his skills, and finally, the budget. Practice shows that the more experienced and skillful the driver is, the less attention he pays to a specific brand (all world-famous manufacturers mainly offer products of a similar level) and more to the condition of the tire and the pressure in it. Of course, if you are the owner of a sportbike, you should not install purely tourist tires on it, but sports pseudo-slicks for driving on wet city streets are not suitable either.
MOTORCYCLE TIRE CONSTRUCTION. By design, motorcycle tires are radial and diagonal. Radial tires are marked with the letter "R" (for example, 180/55 R17), diagonal tires with a "-" sign (100/90 - 19), and diagonal tires with a stiffening belt with the letter "B" (150/70 B17).
On road and sports motorcycles, radial (RADIAL TYPE) tires are mainly used. They are the most resistant to deformations that occur at high speeds and loads, provide a more regular contact patch and lower internal rolling losses. The carcass threads of a radial tire are located in planes passing through the axis of rotation of the wheel and, accordingly, do not cross. Above the frame is a strong, usually multi-layer breaker with a base of steel or synthetic threads, which perceives and distributes loads. A radial tire has less internal friction, hence less heat.
Bias (BIAS TYPE) tires are much simpler and therefore cheaper to manufacture than radial tires. They are more durable on bad roads, but heavier and have greater internal friction losses compared to radial ones. "Diagonals" have proven themselves well on enduro and motocross bikes.
In a diagonal tire, the carcass threads are at an angle to the direction of travel and cross, in contrast to a radial tire. The number of plies in a carcass is often indicated on the tire label (usually 2 to 6). The larger it is, the more load the tire can withstand. There are also BIAS-BELTED tires. They have an additional reinforcing belt on top of the carcass, just like radial tires.
The first two digits in the oval indicate the week, the last two indicate the year the tire was manufactured.
The first two digits in the oval indicate the week, the last two indicate the year the tire was manufactured.
TIRE FIT AND DIMENSIONS. It is believed that rubber stored for more than a year loses its hermetic properties. In fact, this layer is not. Thomas Bischoff, Market Development Manager for Eastern Europe at Metzeler, explained that in the past, rubber did crack quite quickly when exposed to sunlight. But for more than twenty years, thanks to special additives, the tire can be stored without loss of properties for at least five years. Even on the street. The only type of tires that this does not apply to are racing slicks. It is believed that they do not stand on a motorcycle for a long time, and there is no sunlight in the warehouse. Therefore, “extra” components are not added to their compound.
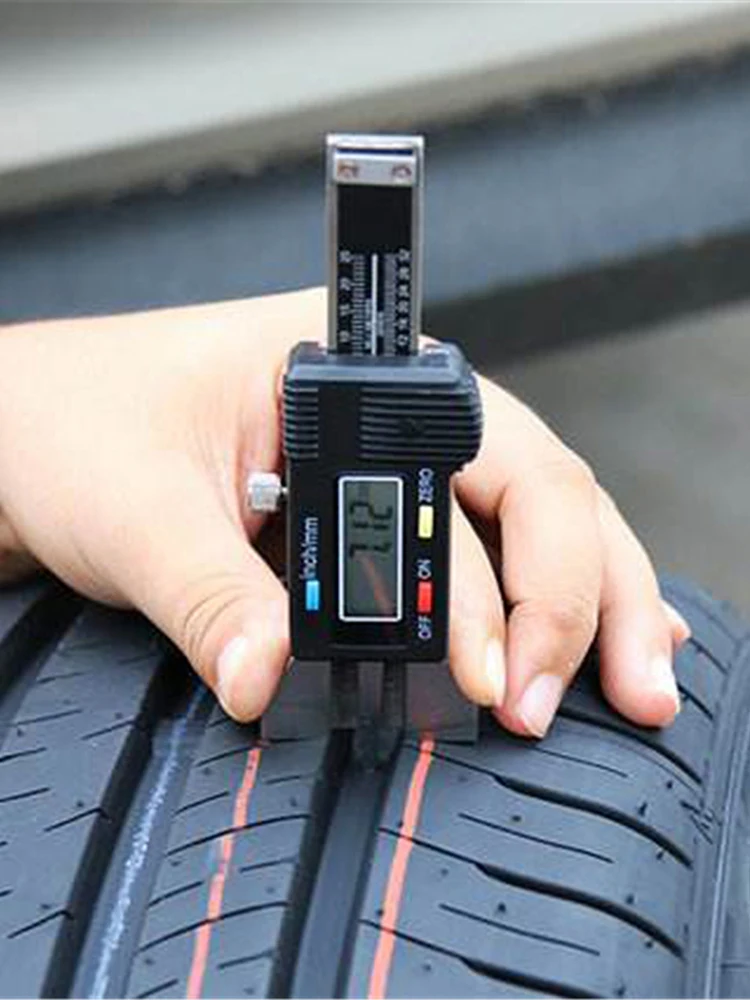
Each tire has tread wear indicators. As a rule, these are visible “bulges” (bridges) in the tread grooves. On the sidewall opposite these indicators are the letters TWI (Tread Wear Indicator). If the indicator has begun to wear out at least in one place, the tire must be replaced immediately. Without regret!
Each tire has tread wear indicators. As a rule, these are visible “bulges” (bridges) in the tread grooves. On the sidewall opposite these indicators are the letters TWI (Tread Wear Indicator). If the indicator has begun to wear out at least in one place, the tire must be replaced immediately. Without regret!
HOW MUCH TO DOWNLOAD? On any production motorcycle you will find a plate that will indicate the pressure when driving alone and with a passenger. In everyday life, you can safely follow these instructions. But in some cases, recommendations will have to be deviated from. First of all, this applies to multifunctional motorcycles - enduro. Typically, indications on them refer to road tires. When replacing tires with off-road tires, the pressure is usually lowered.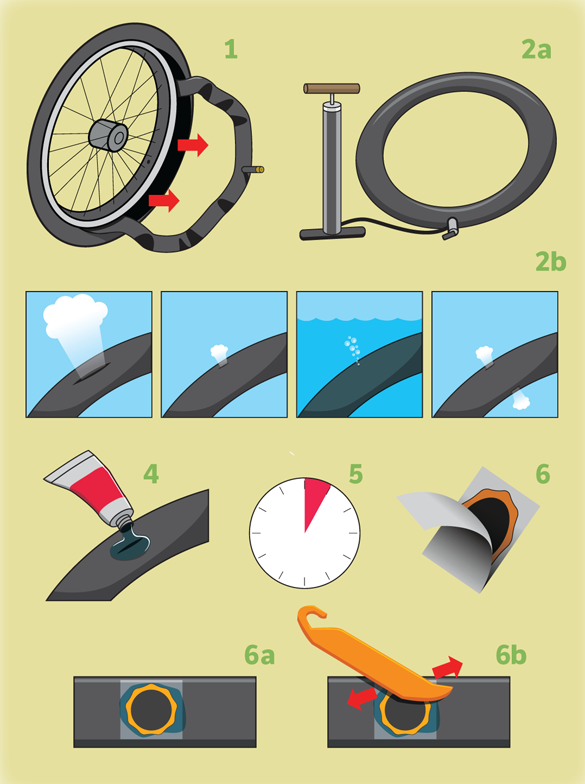 As a rule, it should not exceed 1.8–2 atm (for light enduro there are hard tires in which it is recommended to maintain 1 atm). Off-road tires with a pressure above 2 atm behave disgustingly both on asphalt and on a country road! But on them you can carefully get to the place of repair and in case of a puncture - if the tire does not turn on the rim.
When using sports bikes on the track, the pressure must also be reduced. A "stove" for light vehicles can be considered 2.0 atm in the front and 1.8 atm in the rear wheel. Reducing the pressure allows you to increase the contact patch of the tire with the road, which is especially important in corners. And don't forget to inflate the wheel after training on the track! Driving with low pressure on the motorway will lead to increased tire wear and may be unsafe (after all, the tire heats up on the track, due to which the pressure still rises). When traveling on a loaded road bike, to increase the life of the rear tire, the pressure in it can be increased to 3 atm. But don't do this if your route is through winding mountain roads or if you are traveling in cold weather.
Replace tires that are unevenly worn from long freeway driving. Tires that are flat in the middle and virgin along the edges behave very insidiously in turns and on uneven roads (especially in ruts and on longitudinal sections of asphalt), and in the rain they generally cease to hold.
Replace tires that are unevenly worn from long freeway driving. Tires that are flat in the middle and virgin along the edges behave very insidiously in turns and on uneven roads (especially in ruts and on longitudinal sections of asphalt), and in the rain they generally cease to hold.
REPAIRING A TUBELESS TIRE. Flat tire. If this happened while driving at high speed on the highway, you will not notice that the pressure has dropped. Centrifugal force at speeds over 160 km/h will prevent the tire from being pressed to the rim.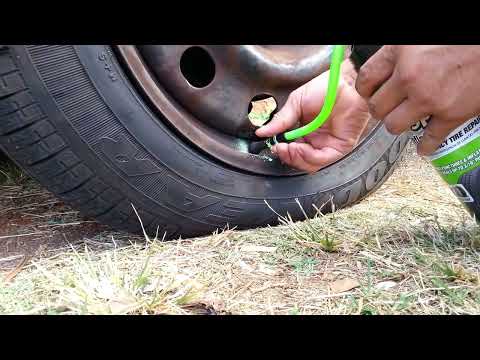 (On the other hand, the same force can release air from the wheel by “squeezing” the valve of the nipple inward. Make sure that the cap with a sealing rubber gasket is always screwed on the nipple!) Trouble will show up at the most inopportune moment - during braking. Most often, the culprit of a puncture - a nail, a screw, or a piece of glass - gets stuck in the tire. If you do not have a special kit for repairing tubeless tires with you, it's bad, but do not rush to remove the self-tapping screw from the wheel. All is not yet lost. You can try to ask a good car enthusiast for a pump, pump up the wheel to the maximum pressure and rush to the nearest tire service. (You need to find out about his whereabouts before you start pumping a leaky tire, because you will have no more than seven minutes on the road.) Focus failed? We call a tow truck.
Tubeless tire repair kit.
Tubeless tire repair kit.
If you did not hope for a chance and stocked up on a repair kit, there is a chance to leave on your own.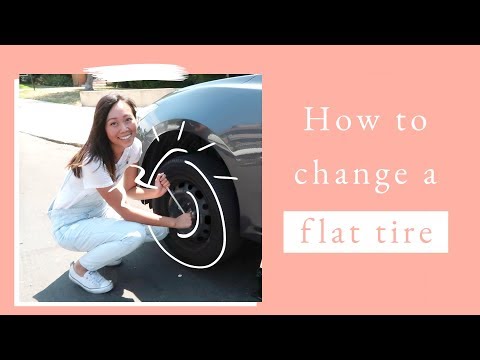
Carefully remove the self-tapping screw (nail, glass) from the hole. We take a special hook from the set - a needle file and insert it through the hole into the tire cavity. We process the inner surface of the hole with reciprocating movements. We don't get carried away! The tool should pass into the hole with a slight but perceptible resistance. Squeeze out the glue from the kit into the hole.
Carefully remove the self-tapping screw (nail, glass) from the hole. We take a special hook from the set - a needle file and insert it through the hole into the tire cavity. We process the inner surface of the hole with reciprocating movements. We don't get carried away! The tool should pass into the hole with a slight but perceptible resistance. Squeeze out the glue from the kit into the hole.
We take a rubber band (they are both round and in the form of a figure eight), also coat it with glue, hook it onto the hook of a universal tool and insert it into the hole with a confident movement.
We take a rubber band (they are both round and in the form of a figure eight), also coat it with glue, hook it onto the hook of a universal tool and insert it into the hole with a confident movement.
The further process is a real art, the culmination of the whole action, and each master performs it in his own way. Someone pulls smoothly, gently swaying, someone drags boldly and sharply. The point is to remove the tool from the hole so that the inserted tourniquet remains inside. A few crampon workouts in the garage will help a lot, and on the road you will effortlessly handle repairs.
The further process is a real art, the culmination of the whole action, and each master performs it in his own way. Someone pulls smoothly, gently swaying, someone drags boldly and sharply. The point is to remove the tool from the hole so that the inserted tourniquet remains inside. A few crampon workouts in the garage will help a lot, and on the road you will effortlessly handle repairs.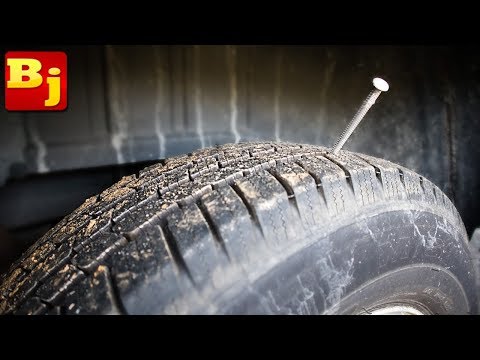
After removing the tool, cut off the sticking out residue of the flagellum.
After removing the instrument, cut off the protruding remnant of the flagellum.
Now it remains to inflate the wheel from cylinders with compressed gas. You need to carry at least two of them, since one is not enough for the rear wheel. Remember, when inflating a tire, the balloon cools down - do not touch it with bare hands. In Europe, it is generally accepted that a repair with a flagellum does not give a 100% guarantee, since under the action of centrifugal force at high speeds, the flagellum can leave the tire. And despite the fact that I have not seen this in practice, I advise everyone to listen to the opinion of European colleagues. Look into the service and ask to change the tourniquet for a more securely fixed “fungus” or patch from the inside of the tire. But it is useless to repair a puncture with a diameter of more than 5 mm either in the side part of the tire, or a “hernia”. It's a shame, you will have to part with such a tire.
HOW TO BALANCE? When picking up a motorcycle from a tire shop, it is worth checking the work of the master. First of all, make sure that the arrow drawn on the side of the tire corresponds to the direction of rotation of the wheel. At the same time, the type and shape of the tread should not confuse you in any way. It is also important that the marking of the lightest part of the tire (usually a bright circle painted on the sidewall of the tire) is near the valve. Otherwise, the wheel will have to be weighted with additional balancing weights that spoil the look of the motorcycle.
Too many motorcyclists torment tire workers in an effort to achieve perfect dynamic wheel balance. In vain! First of all, the width of the motorcycle rim (even the rear one) is relatively small, as is the possible dynamic imbalance. Moreover, it has been experimentally verified that a motorcyclist cannot feel a weight less than 50 g on the rear and 25 g on the front wheel.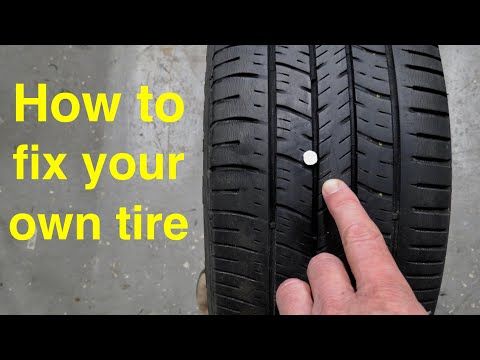 That is why, in many motorcycle factories, regular weights are attached to the middle of the rim, and not to the rim, like in cars. Moreover, even in world-class competitions such as WSBK, tires are manually balanced by rotating the wheel in special cones and gluing a weight against the rim that is below. An imbalance of 10–15 g can be considered normal and the balancing should be stopped at this point.
REPAIRING A TUBE TIRE. A tire puncture should not embarrass a true endurist. After all, he has with him everything necessary "for autonomous navigation", including the tool needed to remove the wheel and tire fitting, as well as strength, dexterity and experience. In the absence of the latter, this article will be of help. In addition to the tool, you will need a spare chamber (if you take one, it is better to take the front one - it can also be used in the rear wheel, but the opposite will not work) and a pump. On a long trip, it is better to take patches and glue, and now special patches are sold that are designed for a long service life (cut out from the chamber are considered temporary, that is, not very reliable, especially at high loads and temperatures).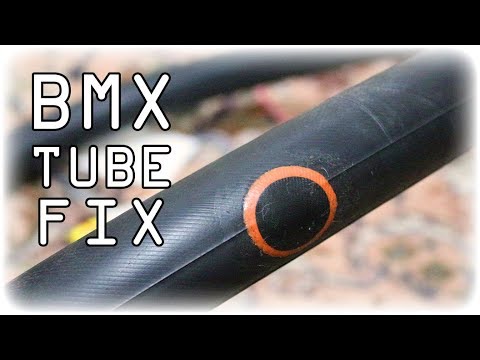 There are also special cans for tire repair, including tube ones, on sale. Their advantage is that they seal the damage and inflate the tire at the same time. Cons - "disposability", the inability to repair a large puncture and the price. Sometimes you can do without tire fitting by pouring water into the chamber (50-100 ml is enough). With luck, you can drive this way for several hours. And if a rigid diagonal tire is installed on the rear wheel, then on a flat road it allows you to move with a puncture, especially for one driver on a light motorcycle. You just need to balance the speed with the heating of the tire - otherwise it can exfoliate from overheating. Such a trick will not work from the front - the motorcycle will be uncontrollable.
It is very important to have the right mounts - not too long, "hooky", but also without sharp edges. Experienced travelers sometimes make their own mounts from wrenches for axle nuts.
It is very important to have the right mounts - not too long, "hooky", but also without sharp edges. Experienced travelers sometimes make their own mounts from wrenches for axle nuts.
To remove the rear wheel, we need a wrench for the rear axle nut; the second key (to hold the axis) is usually not needed. Sometimes the nut sticks to the thread or is simply tightened with a long wrench, and it cannot be touched with a frail regular tool. When tightening the axle, do not overdo it - a torque of 8–10 kgcm is sufficient. By dragging, instead of getting a reliable connection, you will simply ruin both parts. To remove the rear wheel on an off-road motorcycle, it is not necessary to loosen the chain, but it is still good to have keys with you to tension it (on some motorcycles, the chain is tensioned by a “snail” that does not require keys). When collecting a set of tools for the road, try in the garage to do the procedures for which you take them. After all, in an open field (or a dirty swamp) there is nowhere to wait for help!
Remember to loosen the pinch screws on one of the fork legs before removing the front axle.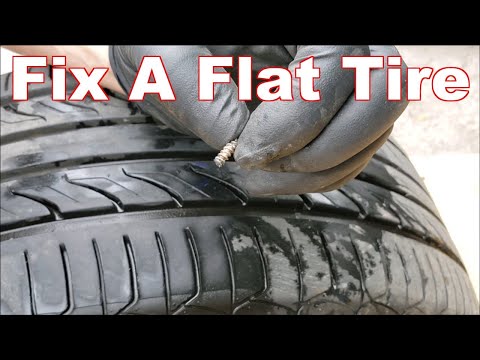 On some motorcycles (where there are two brake discs) you will also have to unscrew the brake calipers, otherwise the wheel cannot be removed. It is advisable to place a set of tools not on the ground, but on a spread cloth.
Be sure to loosen the pinch screws on one of the fork legs before removing the front wheel axle. On some motorcycles (where there are two brake discs) you will also have to unscrew the brake calipers, otherwise the wheel cannot be removed. It is advisable to place a set of tools not on the ground, but on a spread cloth.
Loosen the rear axle nut...
Loosen the rear axle nut...
... and remove the chain from the sprocket.
...and remove the chain from the sprocket.
Light enduros do not have center stands. Therefore, to remove the wheel, you can lean the motorcycle on a stump or bump. If they don't, no problem. We find a clearing more evenly, close the gas valve and lay the motorcycle on its side so that the axle is pulled up. If you're looking after a motorcycle, the axle comes out easily. But woe to those who are lazy! If the axle is rusted to the spacer bushings (or inner rings of bearings), you can't get it out of there without kerosene (WD-40) and a decent-sized mallet.
Light enduros do not have center stands. Therefore, to remove the wheel, you can lean the motorcycle on a stump or bump. If they don't, no problem. We find a clearing more evenly, close the gas valve and lay the motorcycle on its side so that the axle is pulled up. If you're looking after a motorcycle, the axle comes out easily. But woe to those who are lazy! If the axle is rusted to the spacer bushings (or inner rings of bearings), you can't get it out of there without kerosene (WD-40) and a decent-sized mallet.
It is important not to mix up the bushings (they are not the same everywhere) and not to stain them.
It is important not to mix up the bushings (they are not the same everywhere) and not to stain them.
If a large nail does not stick out of the wheel, the search for a puncture should be postponed. We put the wheel with an asterisk on the underlying fabric (or with a rim - but not with knitting needles! - on two logs) so that dirt and sand do not get into the bearings. We unscrew the “shoe” fastening nut (if any), press on the bolt so that the “shoe” moves away from the edges, loosen the nipple. Now you need to press the tire from the rim. The longer a tire has not been changed, the harder it is to do so. We boldly step with the heel of the motorboat on the sidewall closer to the rim and ... bounce.
If a large nail is not sticking out of the wheel, the search for a puncture should be postponed. We put the wheel with an asterisk on the underlying fabric (or with a rim - but not with knitting needles! - on two logs) so that dirt and sand do not get into the bearings. We unscrew the “shoe” fastening nut (if any), press on the bolt so that the “shoe” moves away from the edges, loosen the nipple. Now you need to press the tire from the rim. The longer a tire has not been changed, the harder it is to do so. We boldly step with the heel of the motorboat on the sidewall closer to the rim and ... bounce.
Sooner or later the tire will come off. (Sometimes the sprocket is far enough away from the edge of the rim and does not allow you to firmly press the wheel to the ground. In this case, you can put the edge of the wheel on the motorcycle swingarm, using it as a stop.) Now we need to squeeze both tire beads so that they dive into the recess in rim. This makes it much easier to remove the opposite side of the bead from the rim.
Here and below, in the green frame - the correct position, in the red - incorrect.
Here and below in the green frame - the correct position, in the red - incorrect.
We begin to remove the tire bead from the nipple so as not to damage the rubber around it by the tire bead (yes, it will not drown properly at the nipple). If the edge of the tire cannot be pulled over the bead, then the opposite edges have not fully entered the recess.
We start the first mount under the tire, hook the edge, turn it out.
We start the first pry bar under the tire, hook the edge, turn it out.
Now, if the length of the mount allows, we bring its rear part under the brake disc. If the mount is short, you will have to hold it with your knee.
Now, if the length of the mount allows, we bring its rear part under the brake disc. If the mount is short, you will have to hold it with your knee.
Then, with the second mount, we sequentially pull out the edge of the tire.
Then, using the second pry bar, pull out the edge of the tire in sequence.
After one side of the tire is completely removed from the rim, you can remove the tube. It is worth noting which side it was installed inside the tire.
Once one side of the tire has been completely removed from the rim, the inner tube can be removed. It is worth noting which side it was installed inside the tire.
After examining the chamber, we find a puncture.
After examining the chamber, we find a puncture.
When removing a nail or a screw from a tire, it is important not to injure yourself. To make it easier to find tire damage, we combine the chamber nipple with the hole in the rim.
When removing a nail or a screw from a tire, it is important not to injure yourself. To make it easier to find tire damage, we combine the chamber nipple with the hole in the rim.
Sometimes sticking out ends of the spokes or burrs on their nipples are the culprit for a puncture. This usually happens when the special rubber seal is torn or dislodged, exposing the spokes. If we put a regular patch on rubber glue, we cut it out with an allowance of 15–20 mm from a puncture. We sand the camera and the patch, degrease it (with gasoline or glue, removing the dried layer), apply a thin layer of glue, dry for 5-10 minutes, and then press with all our might (you can even wash it with a motorboat) - you're done! If the camera is rubbed against a defect in the tire, during installation we put a piece of an unnecessary camera there. It’s enough to get home, but it’s better to throw away such a tire.
Before inserting the tube into the wheel, it must be slightly inflated.
Before inserting the inner tube into the wheel, it must be slightly inflated.
This will help the camera to correctly orient itself inside the tire and reduce the likelihood of hooking and tearing it with a mount or squeezing it with a “shoe”.
This will help the tube to properly orient itself inside the tire and reduce the chances of it getting caught and torn by the pry bar or squeezed by the “shoe”.
Having installed the nipple in the hole, screw the outer nut onto it without tightening it.
After installing the nipple in the hole, screw the outer nut onto it without tightening it.
Let's help the camera lie down inside the rim by adjusting it with your fingers.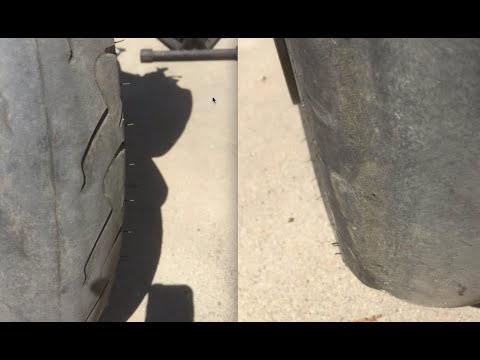 The edges of the chamber must not stick out.
Let's help the camera lie down inside the rim by adjusting it with your fingers. The edges of the chamber must not stick out.
Now you can insert the tire bead - first with your knee, then with a pry bar, with a small step.
The tire bead can now be inserted, first with the knee, then with the pry bar, in small increments.
It is very important not to “bite” the camera when working with mounts. To do this, only grip the edge of the tire and never raise the mount more than 90°.
It is very important not to “bite” the camera when working with mounts. To do this, you need to grab only the edge of the tire and never raise the mount more than 90°.
We finish the installation again at the nipple.
We finish the installation again at the nipple.
Since the rubber is thicker in the nipple area, the tube in this place can get under the edges of the tire. If the nipple pin does not go inside the wheel, then this is what happened. After making sure that the chamber lies freely inside the tire, we inflate the wheel. If the tire does not adhere to the rim in some place, it is better not to be too lazy to check the assembly once again. After all, we don’t have a second spare chamber with us ... Well, the tire holds pressure.
It remains to install the wheel - and go!
It remains to install the wheel - and go!
Roadside repair
 And his concern is to monitor the health of tires and be able to repair them, often in the field.
 Roadside repair
Another season of changing shoes is approaching. And you may remember that on one of the tires after the last winter/summer there is a jamb - a small bump. I don’t want to run to the store for the sake of one new tire. We understand. Or maybe it looks even better if repaired?
Yes, not every wheel that has met with a nail, rebar sticking out of the ground or a sharp stone on the road is considered damaged. Everything, of course, depends on the scale of the damage and its location on the tire itself. Some are easily repaired, while others are simply impossible to do - the tire can only be sent to the trash.
A bulge on a wheel, referred to by drivers as a bump or bulge, is the most common tire sidewall defect.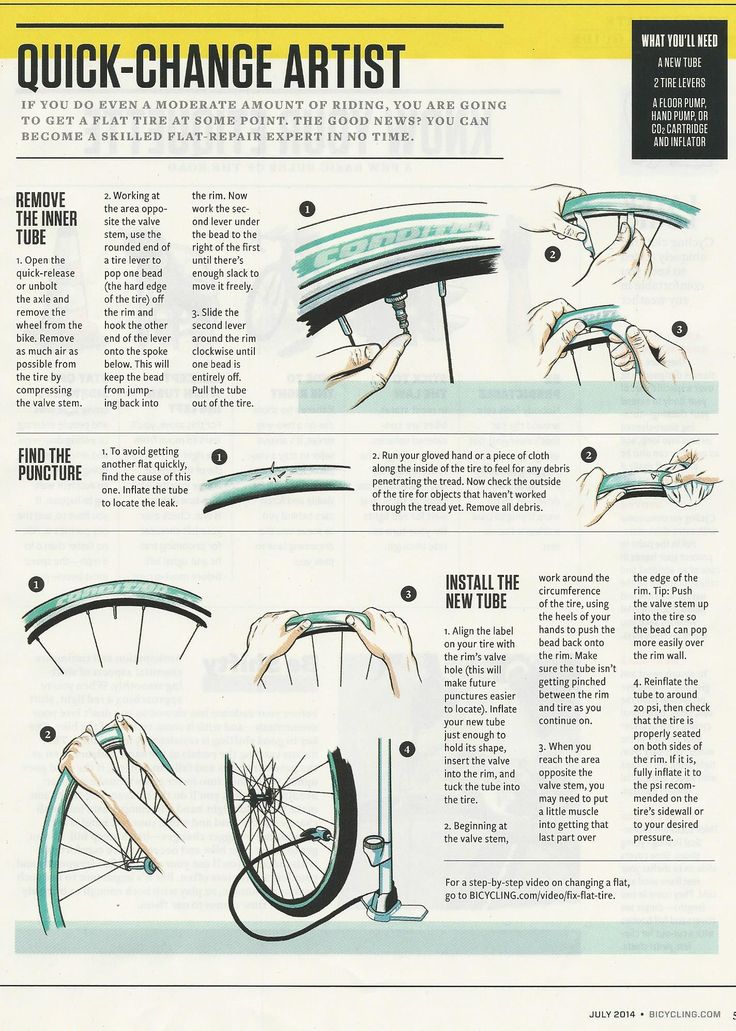 It appears due to a collision with an obstacle or after falling into a pit, more often at high speed. The threads of the sidewall carcass are easily damaged by impact, and the tire at this point can no longer hold the load and air pressure - swelling appears. A small bump sooner or later turns into a big one, and driving with such a defect is dangerous - the wheel can shoot at any moment. At high speed, this is fraught with loss of control, departure from the road and a rollover.
The quality of roads in Kazakhstan contributes to the appearance of bulges on tires
Some types of bulges are repairable, although this is a temporary measure. Not a single patch can restore the factory rigidity. Ideally, change the tire.
Special cord patches can extend the life of a tire with a herniation, even if the swelling has appeared on the tread. The sidewall is a different story. If the swelling appeared at a distance of more than 40 mm from the side, it can be repaired. If not, then the wheel needs to be replaced. Blisters on low profile tires are most often non-repairable.
For maximum safety when riding with a repaired bump, insert the tube. This is an inexpensive and reliable solution. On our market, you can find cameras made in China and Russia, the latter are slightly more expensive, but also of better quality.
The elimination of a side cut is a serious operation, therefore, as in the case of a bump, you will have to go to the professionals. We need cord patches, fortunately in our time they are of different sizes and with a different number of layers. And if you do it wisely, then you can't do without special tools and vulcanization.
A cut, by the way, cannot be healed in all cases. If the gap is in the shoulder area of the tire, it is unlikely that anyone will undertake to repair it, since no guarantees can be given here. However, our Kulibins take on even the most difficult cases, cutting out parts of the sidewalls from the tires and even weaving the cord on their own.
Tire overhaul. We would not put such a wheel on ourselves
Low profile tires can be repaired, but more difficult. A tear in the sidewall is easier to seal on tires with a medium or high profile.
Sometimes a cut is confused with a pluck. This is when the outer layer of the sidewall caught on something sharp, a tear formed, but the frame itself remained intact. There is nothing wrong with that, although the drivers at the tire fitting company successfully repair the cut, for which they take it accordingly.
If a piece of rubber remains on the sidewall, then glue it with ordinary superglue (101st). If it came off, then it is better to cover it with raw rubber and vulcanize. Leaving the pluck bare is not recommended, because the tire carcass, often consisting of a metal cord, will quickly corrode.
In Europe, defective or used tires are perforated before being sent for scrap to prevent their resale and possible operation. But they don’t know that we have such holes on the sidewall patched once or twice
Cuts and hernias are not the only possible damage to the side of the tire. You can also spoil the side ring, in the process of changing shoes, for example. If it’s for garlic, then such a tire is already dangerous. Sooner or later, the tire pressure and the load in motion will start to squeeze the rubber off the rim - a wheel explosion can occur.
This ailment is repaired if the wire ring - the base - is intact. There are no special technologies and materials to correct this particular problem, but most often craftsmen use a two-component composition for chemical (also called cold) vulcanization. After mixing, the mass is pressed into a fat-free damage. Compound manufacturers recommend waiting 72 hours before mounting a tire. Of course, our masters do not pay attention to this condition - they put the tire right away. And it’s good if the wheel is flat because of this at night in the parking lot, and not on the road.
If the side ring tears are barely noticeable, but the wheel still deflates, then you can use a special liquid - a bead seal designed to seal a tubeless tire.
These seals have been used in motorsport for some time. In particular, in the American Formula D Drift Series, drivers used compounds to keep the tire on the rim even with minimal tire pressure. Now they are banned.
Pay attention to the left rear wheel of the Nissan Silvia S13. Due to too low pressure, it was literally taken off the disk under load
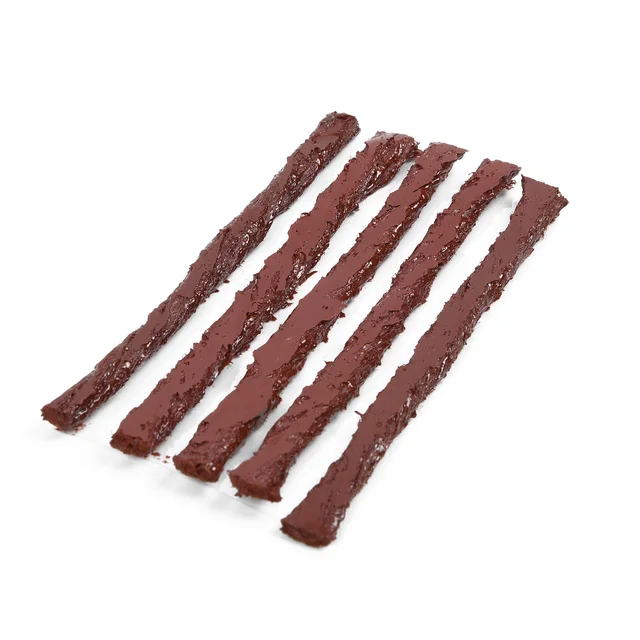
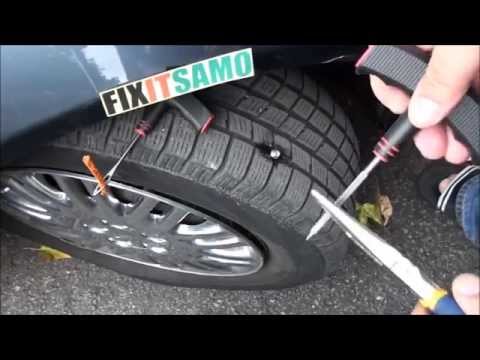
Every schoolchild faced this problem when patching the inner tube of his bike after hitting something sharp. Repairing a car tire puncture with your own hands will also not be difficult even on the road. But for this you will need a pump (or compressor) and a universal tire repair kit with harnesses. All this is sold at any car market or gas station.
Repairing a tire on the side of the road with harnesses
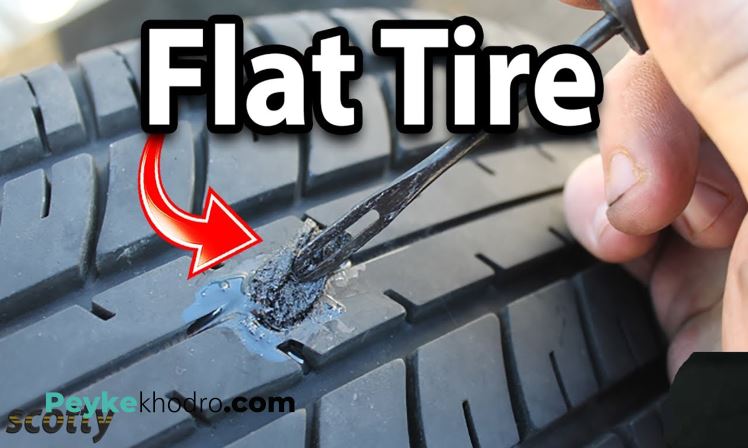
The process is simple.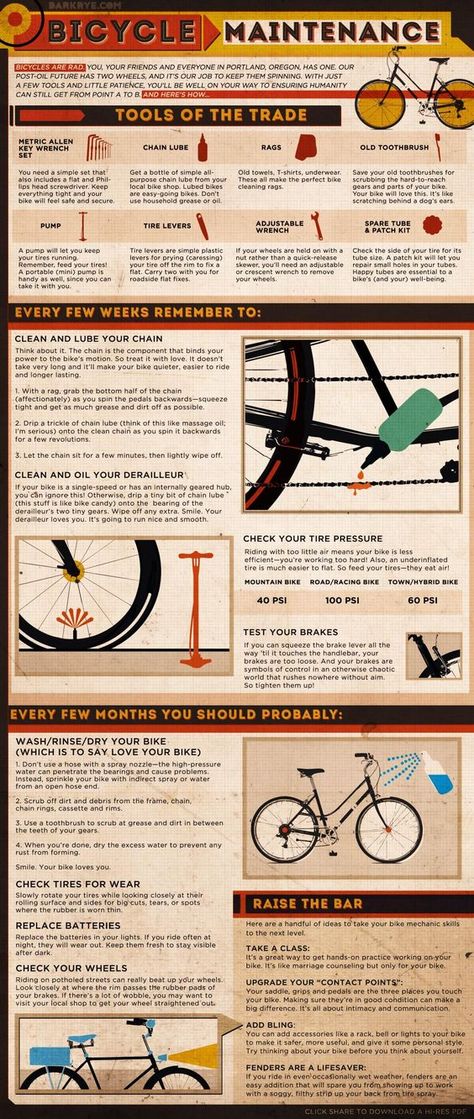 If we are talking about the front wheels, then in most cases the wheel can not even be removed, it is enough to turn the steering wheel in the right direction, find the puncture site and carry out repairs. First, the hole is cleaned with a helical awl from the set. The tourniquet itself is smeared with glue and tucked into the eye of the awl, after which it is inserted into the tire hole. With a sharp movement, the tool is removed, and the tourniquet remains in place and clogs the hole. The tails are cut with a knife, but not at the root, it is recommended to leave about 20 mm. The tire is inflated and checked.
Sometimes a nail or self-tapping screw clogs the hole by itself, remaining in it. If you see a hat in a tread, do not rush to pull it out. While the pressure is holding, move to vulcanize. And sometimes they drive with a screw in a tire for weeks.
Repair of a puncture at a tire shop
Punctures are also repaired with harnesses at a specialized service, although among professionals such repairs are not considered long-term.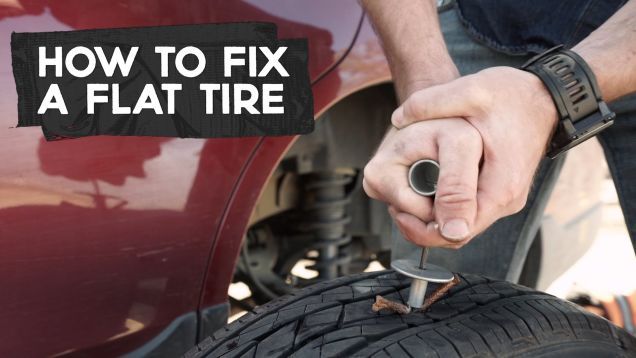 After a few months, the flagella dry out and can let air through. There are more advanced methods like cold and hot vulcanization. The latter is more reliable. In this case, the hole is sealed with an elastic patch, and the funnel from a foreign object is filled with a special compound. After that, a vulcanizer is put on the tire, it heats up the rubber and solders it.
In addition to the plaster, the puncture is also repaired with special cord fungi. Craftsmen process the puncture site: drill it and treat the surface with a tool to roughen it. Then the repair area is lubricated with glue (it is also called cement) and a fungus is introduced. This is done from the inside of the tire. The cap of the fungus is rolled, and the excess legs are simply cut off from the outside.
Puncture repair with sealant
With the advent of tubeless wheels, and later run flat tires, many automakers began to abandon spare wheels. Instead, repair kits with compressors are supplied with the machines. A repair kit is essentially a bottle of pressurized sealant. Later, such spray cans began to appear on the shelves of ordinary car dealerships.
This method has not taken root in the CIS, because the condition of the roads makes it necessary to have at least a stowaway in the kit, but it can also be considered as a method of repair on the road.
The car must be jacked up and sealant must be pumped into the damaged wheel through the nipple. Next, you should spin the wheel, then pump it up, lower the car and drive a few hundred meters. If the tire tightness has not been restored, repeat the procedure.
For commercial vehicles, cutting the tread with a special device (regrower) is a common thing. Moreover, such tire retreading is provided by the factory (marked REGROOVABLE on the sidewall) to increase the service life. But there are entrepreneurs who undertake to deepen the grooves in tires for passenger cars. But they are not intended for such an operation. Often used tires for sale are “refreshed” in this way. Be careful!
What is the danger?
The worst option is that the retreaded tire will shoot out on the road, as the master can damage the undertread layer when deepening the grooves. Such a tire will not be able to hold pressure at some point. There will be a boom! At best, the tire will indeed last a little longer, but is the game worth the candle? We think it's not worth it.
How is cutting done?
A regrower is used to cut the tread. Roughly speaking, this is a large soldering iron with interchangeable tips of various shapes. It goes through rubber like a knife through butter.
If the tire is for passenger cars, then it is worth taking on a regrower only in one case - when part of the tread pattern was welded with "new" rubber during repair. This is where threading comes in handy in order to restore the grooves and symmetry of the tread.