MAD-RAMPS is about efficiency and safety, which is why we provide you with the revolutionary, space saving MAD-MOUNT system. In just 4 easy steps, you can install your MAD-MOUNT storage system so your MAD-RAMPS are always ready to go when you are.
Your MAD-MOUNT system comes in two pieces: the Upper Mounting Plate and the Lower Mounting Plate. These two plates are not interchangeable, so make sure you follow these instructions!
Before you begin installation, make sure your work area is cleared of all possibly hazardous objects. You’ll need 30 square feet of wall space to properly install your MAD-MOUNTS – 6 feet wide by 5 feet high. We suggest choosing a low-traffic area of your garage, shop, or shed to avoid any curious, climbing kids.
You’ll need a few tools to get started:
– measuring tape
– level
– pencil
– drill
– 3/16″ drill bit
In your MAD-MOUNT box, you should find the Upper Mounting Plate with 4 individual hooks and the Lower Mounting Plate with 2 individual hooks. Two fastener hooks for each plate (a total of 4) are also included. Your plates also have predrilled holes to accommodate wall framing on 16 inch and 24 inch centers. Do not use drywall anchors or other fasteners as they are a potential safety hazard – only secure the MAD-MOUNT to your wood-framed wall with the studs and fasteners MAD-RAMPS provides for you.
– Measure five feet up from the ground and make a mark on the wall. Using your level, draw a straight line across this wall (about 36″). Now, locate the studs in the wall and mark each one that intersects with the reference line you just drew. These are the marks that must line up with the predrilled holes in the Upper Mounting Plate.
*Note: Walls framed 16 inches on center will use the outer predrilled holes and will span 3 studs (32 inches). Walls framed 24 inches on center will use the inner predrilled holes and will span across two studs (24 inches).
– Now line the bottom edge of the Upper Mounting Plate on the horizontal line you drew in step 1. Make sure that your predrilled holes line up with the wall studs, then pre-drill holes in your wall studs using the 3/16″ drill bit. Next, take two of the provided fasteners to secure the Upper Mounting Plate to the wall studs by using the provided T40 Torx Bit.
*Before moving on to the next step, make sure that both fasteners are completely tightened to the wall studs.
– Measure 10 1/2 inches down from the top edge of your Upper Mounting Plate and make a mark. Use your level to draw a straight line across the wall (again, about 36″). You’ll use this line to install the Lower Mounting Plate.
– Line up the top edge of the Lower Mounting Plate with the line you just drew. Make sure the predrilled holes line up with the wall studs. Now, pre-drill the holes into your wall studs using your 3/16″ drill bit. Then, take the two fasteners and secure the Lower Mounting Plate to the wall studs using your T40 Torx Bit. Make sure your fasteners are completely tightened to the studs.
You’re ready to store your MAD-RAMPS Pivoting Ramp System! Have questions about installation or any of your other MAD-RAMPS accessories? Contact our team today.
SaveSaveSaveSave
SaveSave
How-To Guide
Updated on: July 20th, 2020
How-To Video
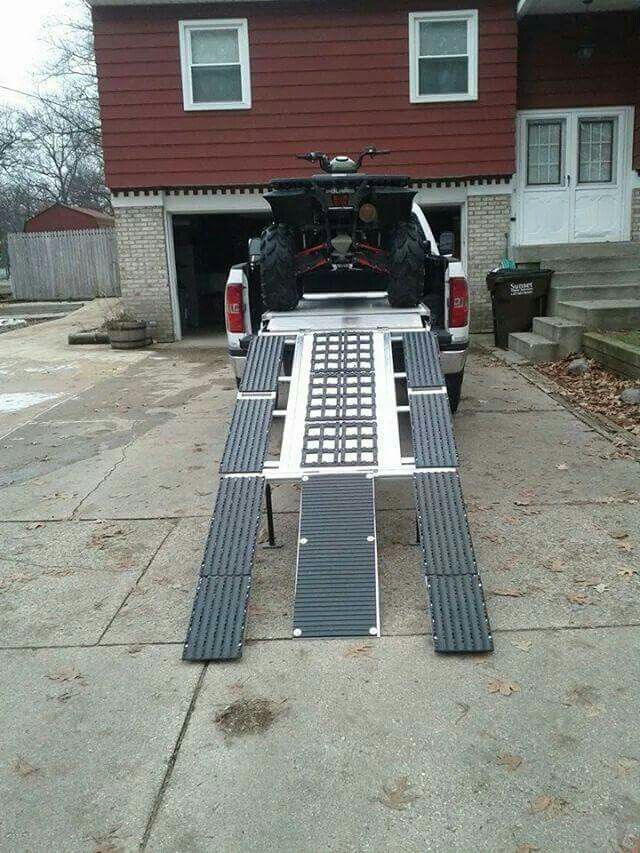
Securing your loading ramp to your vehicle is very important for safety. If an ATV’s rear tires begin to spin while the front tires are already in the pickup bed, loose ramps can potentially shoot out from underneath, flipping the ATV backwards and landing on the driver. Ramp safety straps should always be used when using a loading ramp.
1
After positioning the ramps on the lip of the tailgate or trailer, locate the point of the ramp where the second rung closest to the tailgate and the center rail meet. Feed the hook end of the safety strap though the strap’s looped end, so the strap is wrapped around the center rail below the second rung.
2
Unfold the ramps and place the finger or plate ends on the edge of the tailgate. Then, use tie-down straps to secure the ramps to the truck via the bumper (steel bumpers only) or trailer hitch safety chain loops. This step is important! If the tie-down straps are not secured to the truck, they may slide out while you and the tractor are on the ramp.
3
Locate a secure spot underneath the vehicle, such as the inside of the bumper or the receiver hitch, and attach the hook end of the strap. Make sure to attach the strap to a metal area only, since any plastic construction, such as the bumpers on some vehicles, will not hold it securely and may cause damage to the vehicle.
4
Pull the loose end of the strap until it is tight and the ramp feels stable and secure. Make sure the ramp cannot move backward, retightening the safety strap if necessary. You are now ready to slowly load your machinery!
1
Place the lip of the ramp on the tailgate or trailer. Loosen the nuts on the safety cable’s U-bolt, and adjust the length of the cable so it reaches the underside of the vehicle’s bumper or hitch.
2
Attach the S-hook end of the cable to the bumper, receiver hitch, or other metal area. Do not hook the cable to the bumper if it is constructed of plastic, as it may cause damage to the vehicle.
3
Make sure the lip or fingers of the ramp are completely on the tailgate or trailer and then pull the cable tight to remove all slack. Tighten the nuts securely. If the lip of the ramp can be pulled away from the edge of the tailgate, go back and retighten the slack in the cable and nuts. You are now ready to slowly load your machinery!
Share This Article
Top Related Articles
More How-to Guides and Articles
Calendar
| 28 | 29 | 30 | 1 | 2 | 3 | 4 |
| 5 | 6 | 7 | 8 | 9 | 10 | 11 |
| 12 | 13 | 14 | 15 | 16 | 17 | 18 |
| 19 | 20 | 21 | 22 | 23 | 24 | 25 |
| 26 | 27 | 28 | 29 | 30 | 31 | 1 |
Detailed calendar
Sections (List)
Subscribe to newsletter
Latest news Is it possible to equip multi-apartment buildings with ramps, which wheelchair users and parents who raise and lower strollers with small children really need, and, if possible, how to do this? - the people of Megion ask in social networks.
Ilgizar Bariyev, Deputy General Director for General and Legal Affairs of the Housing Maintenance Company LLC, clarified this issue.
- The decision to install ramps should be taken at a general meeting of the owners of an apartment building by a majority of votes, and at the same meeting the procedure for financing the work is determined, - said Ilgizar Farukovich. - At the same time, housing legislation provides that for the equipment of a ramp in the entrance where a wheelchair user lives, the consent of the majority of neighbors who own housing is not required. But it must be borne in mind that in this case, the disabled person and his relatives must themselves find an external source of funding: either obtain consent from the social protection authorities to pay for work, or find a sponsor so that the costs do not have to be shifted to other owners of the apartment building.
Some houses in Megion have already installed so-called folding ramps, which are attached to the wall, and for the passage of a disabled person in a wheelchair, they go down to the flight of stairs over the steps. But it must be borne in mind that in most Megion houses such equipment cannot be installed: the angle of inclination of the flight of stairs exceeds the norms allowed by the safety rules of the ramps.
IA "Megion News"
#SolvingTogether@ofmegion
#MegionAccessible environment
Return to list
December 2, 2022 (views: 6109)
Timetable for route No. 151
December 2, 2022 (views: 2015)
December 1, 2022 (views: 6607)
December 1, 2022 (views: 6841)
November 28, 2022 (views: 1782)
The organization of safe and comfortable living conditions not only for healthy citizens, but also for people with disabilities is a sign of a civilized society. It is important that every person, regardless of their gender, age, state of health or social status, be able to freely visit shops, clinics, educational institutions, as well as any other public places. One of the main elements of the "safe environment" are special ramps for the disabled.
A ramp is a special inclined platform with which surfaces located at different heights are connected. Its purpose is to provide safe and free access to various buildings and structures. It is thanks to the ramps that the disabled and the elderly get the opportunity to freely overcome not only flights of stairs, but also any other physical barriers that go unnoticed by the average person, while becoming a serious obstacle for the elderly, pregnant women, and the disabled.
The manufacture and installation of ramps is mandatory not only for residential buildings, but also for public, commercial or industrial buildings. If, for technical reasons, the installation of lifting structures is not possible, a call button for an employee who will help the citizen to overcome the flight of stairs should be installed at the entrance to the organization.
All structures that exist today, designed for the vertical movement of people with limited mobility, can be divided into several categories.
Stationary
Stationary ramps for the disabled are designed for a ten-year service life. They are installed as part of the entrance groups to residential buildings, shops, entertainment, shopping centers, shops, pharmacies. In accordance with current building standards, it is possible to design or build a public building without a special inclined platform at the entrance group only in violation of SNiP.
Outwardly, they represent one or more inclined surfaces that duplicate the stairs, along which handrails are installed. It is extremely important to maintain the optimal slope of the structure, which can guarantee a safe ascent / descent of the steps.
Hinged
Most often, they are installed where it is technically or structurally impossible to mount conventional platforms. For example, it can be a flight of stairs in a residential, high-rise building, the width of which does not allow the installation of a stationary structure for the free movement of wheelchairs. In this case, the easiest way is to use a special lifting mechanism that can unfold or fold the structure, ensuring its compact storage.
Visually, folding platforms for the disabled look like a compact platform with rails, which is attached to the wall using a special lock or building loops.
Removable
They are mobile structures, the installation and dismantling of which takes a minimum of time. Such lifting platforms are quite compact, which means they do not take up much space during storage and transportation. To reduce the weight of mobile structures, they are made from aluminum or any other light metals.
There are the following types of removable ramps:
A ramp is a compact, low structure designed to overcome rapids. With the help of ramps, parents with small children and the disabled get the opportunity to quickly and easily overcome small obstacles. The ramp is made of stainless steel and rubber, if necessary, it can be quickly installed and then dismantled.
Ramp - ramp - with its help it becomes possible to overcome artificial or natural barriers up to 15 centimeters high. The structure has a fixed width and height, outwardly it resembles a wedge. As a rule, the ramp is mounted on both sides of the obstacle.
Roll is a modern, high-tech design, consisting of several sections interconnected. To adjust the size of the roll, sections can be added or vice versa removed. When folded, it looks like a compact roll that can be transported in the trunk of a car. Telescopic ramps - they are distinguished by relatively low weight, high strength and increased load capacity. The design is based on telescopic technology, which allows you to quickly increase or decrease the size of the inclined platform.
Regardless of the type and specific features, all ramps are equipped with anti-slip surfaces, which minimizes the risk of wheelchair wheels slipping off them.
When installing ramps for the disabled, close attention is paid to safety and ease of use. According to the current regulatory documentation, the main characteristics of the design are:
Maximum allowable slope;
Dimensions of the structure - length, width;
The presence of handrails, railings, other fences.
These and many other characteristics are set out in GOST and SNiP. In accordance with the provisions of SNiP 35-01-2001, the following requirements are imposed on ramps for the disabled:
The maximum height of one inclined platform cannot exceed 80 centimeters; The angle of inclination of the structure cannot be more than 8%. This figure can be increased if the height of the site does not exceed 20 centimeters;
The width of the structure for the free movement of one wheelchair user cannot be less than 1 meter;
If the project provides for two-way traffic, then the width of the inclined section of the stairs increases to 1. 8 meters;
The horizontal section should allow wheelchair users to freely turn in the right direction, so the size of such a platform should be at least 1.5 meters.
SNiP also establishes requirements for the material from which the ramps are made - it must be durable and fire resistant. Structures with a height of more than 45 centimeters are equipped with handrails with a height of 70 or 90 centimeters.
At a distance of at least 60 centimeters before the beginning of the inclined surface, an area painted with bright yellow paint or having a relief surface should be placed. To prevent slipping of the legs, crutches or canes of a disabled person, SNiP also establishes a requirement for arranging a small, five-centimeter rim along the structure.
In 2012, a revised and somewhat tightened joint venture 59.13330 was adopted, which establishes a number of rules regarding the construction of ramps for wheelchair users. The most important provisions of this joint venture are:
The maximum allowable length of the lifting structure is 90 centimeters;
The permissible width of the inclined platform between the handrails is 90 centimeters;
If the height of the lifting structure is more than 3 meters, it is necessary to provide for the installation of an automatic lifting mechanism - an elevator.
GOST R-51261 officially establishes the requirements for the design of individual staircase elements that provide access to the building for people with disabilities:
The lifting platform must be equipped with a canopy, drainage system;
If the climate of the region is characterized by sudden changes in temperature, due to which the surface of the steps and the ramp is iced over, it is necessary to provide ways to remove ice from the platform during the development of the project;
Taking into account the opening of the front door to the outside, a flat area intended for maneuvering should have the following dimensions - 2 * 1. 4 or 1.85 * 1.5 meters.
GOST R 51261-99 establishes requirements for equipping ramps with handrails. Their installation is mandatory, in a situation where the lifting height is more than 15 centimeters, and the size of the inclined surface is more than 1.8 meters.
Handrails can be installed both on both sides and in the middle of the lift, if, for example, it is designed for two-way traffic. A prerequisite is a reliable, durable fastening of railings and handrails. For safe operation, the shape of the handrails should be rounded, easy to grip.
For violation of the current requirements for the manufacture and installation of ramps, officials of state and municipal organizations, heads of legal entities bear administrative responsibility.
The issues of organizing a safe and accessible environment for the disabled, older people, pregnant women, young mothers have been given the closest attention by the Government of the Russian Federation over the past few years. However, despite this, up to the present day, access to various public places, residential buildings, government organizations, shopping, entertainment, sports centers is still difficult for people who, for example, move around in a wheelchair due to lack or errors allowed during the installation of ramps. Violation of existing standards often turns ordinary stairs into insurmountable obstacles that significantly complicate the lives of certain categories of citizens.
The most common mistakes that are made when installing ramps for the disabled are:
Too steep angle of inclination;
Incorrectly selected width of the rails, due to which it is not possible to install the wheels on the platform;
The absence of handrails that make the descent / ascent not only safe, but also comfortable;
The presence of physical obstacles on the line of movement;
Insufficient size of turnaround areas;
The presence of steps at the congress.