Toggle Nav
Search
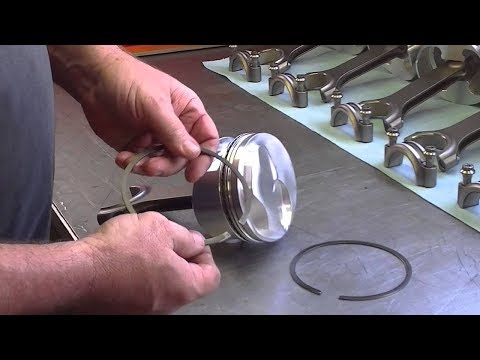
With years of performance piston experience, JE knows ring operation is just as important as piston quality. Follow along with our complete, step-by-step guide to installing rings on your motorcycle or ATV piston(s).
The correct installation of the piston rings is an essential aspect of rebuilding any four-stroke engine. This task is perceived by many to be simple. However, there are vital aspects of ring installation that should not be overlooked. Improper installation of the piston rings can result in limited engine life, reduced power, and high oil consumption. In this article, we’ll walk step-by-step through the ring installation process so that the next time you’re rebuilding your engine, you know exactly what to do and what to watch out for.
For starters, never attempt ring installation without the appropriate documentation available for reference. At JE Pistons, comprehensive instructions are included with most new piston kits. This ensures the engine builder has the necessary information available to do the job successfully. The machine’s factory service manual should also be on hand throughout the build so that things like torque specs, service limits, and procedures can be referenced.
Process Overview
Before diving into installation details, a quick recap of the process will be helpful to understand what’s to come. Shown below is an outline of the major steps you’ll go through.
Not sure which piston ring set you need to order? Check out our guide here.
Time for a new piston kit? Find one here!
Step-by-step ProcessMeasure Ring End Gap
Before installing the rings onto the piston, it is imperative that the ring end gaps are checked and verified against the specs provided with the installation instructions or factory service manual, whichever is applicable. If more than one compression ring is used, confirm any design differences between the two by referencing the installation instructions. Chamfers on the inside edge of the ring or different markings at the ring ends are common identifiers used to denote ring differences. Need clarification on all the markings used on JE rings and pistons? Click here.
To check the ring end gap, simply install the appropriate ring into the cylinder bore and position it near the top of the bore.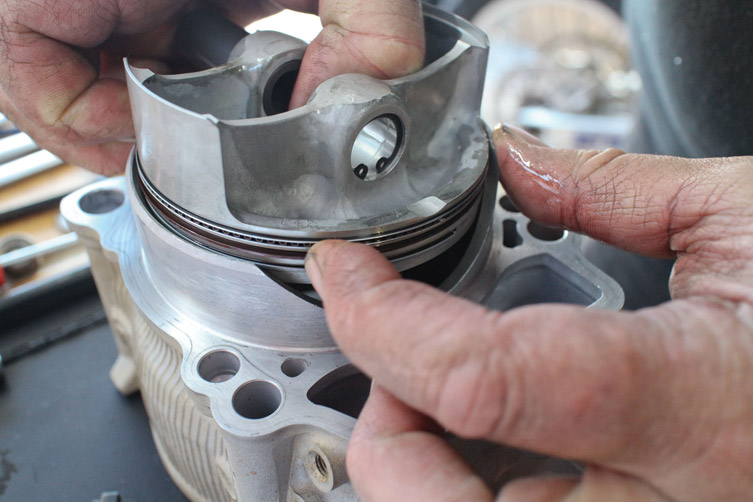 Use the depth rod end of a caliper to ensure the ring is square to the bore. Next, use feeler gauges to measure the ring’s end gap. Carefully insert various thickness feeler gauges between the ring ends until the gauge just begins to drag between the ring ends. Note the thickness of the gauge and compare it to the end gap specifications provided. This process can be repeated for any additional compression rings used.
At JE Pistons, the ring end gaps are preset at the factory to fall within spec when installed in healthy cylinders used for normal applications. The end gap of the first compression ring should always be less than that of the second compression ring. If the end gap specs are outside of range, first double check your measurements and verify the cylinder bore is the correct diameter. Assuming no issues are found with the measurements or cylinder bore and the end gap measured is too tight, the rings can be carefully filed. To do so, use a small file and file one end of the ring. Be sure to maintain parallelism to the other ring end as you remove material. Remove small amounts of material and check the end gap periodically so that you don’t remove too much material.
Clean
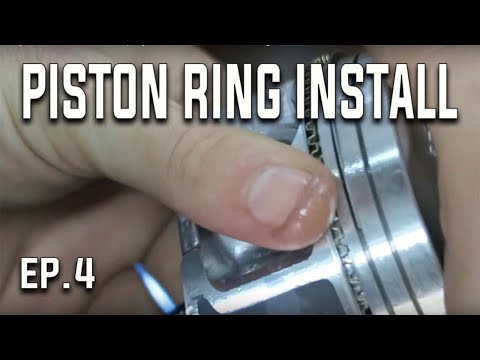
All piston rings should be cleaned before being assembled onto the piston. Before cleaning, confirm the ring ends are free of burrs. Any burrs present can carefully be dressed by gently breaking the edge with a small file. Next, use your preferred parts cleaner to wipe down the rings and piston.
Make sure your rings are clean and free of any debris or burrs.Mark the Piston
Review the instructions provided with your piston kit and note the specified positions of the ring end gaps. Use a marker to mark the edge of the piston crown with the intended ring end positions for the oil control and compression rings.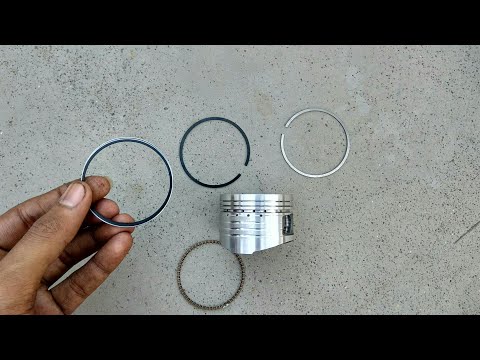 Doing so will help ensure no orientation mistakes are made upon ring installation.
Oil Control Ring Installation
Modern oil control rings typically utilize a three-piece design and consist of two side rails and an expander ring. Three-piece oil rings can be challenging to install if the ring design and methodology are not understood. The expander ring is the waffle shaped ring and features a stepped edge on the top and bottom of the ring. The side rails are the two small, thin rings which complement the expander. When properly installed, the side rails sit on the top and bottom of the expander ring against its stepped edges. For this reason, the expander ring must be installed first.
The other feature of the expander ring worth paying attention to is its ends. Due to the expander’s accordion-like shape, it is possible for the ring ends to overlap in the ring groove. For proper installation, it is imperative that the expander’s ends butt and do not overlap.
To install the expander ring, lightly coat it with engine oil. The expander ring is non-directional, so it can be installed in any orientation. Carefully work the ring past the compression ring groove into the oil ring groove. Adjust the expander ring as necessary, so the ring ends are correctly positioned. Ensure the ring ends butt together and don’t overlap.
Start by installing the expander ring after lightly coating with oil.The side rails are also non-directional. Lightly lube the side rails then install them on the piston. Make sure the side rails sit correctly against the stepped edge of the expander ring and that their end gaps are positioned properly. Once the side rails have been installed, double-check the end gap positions of all three rings that comprise the oil control ring assembly.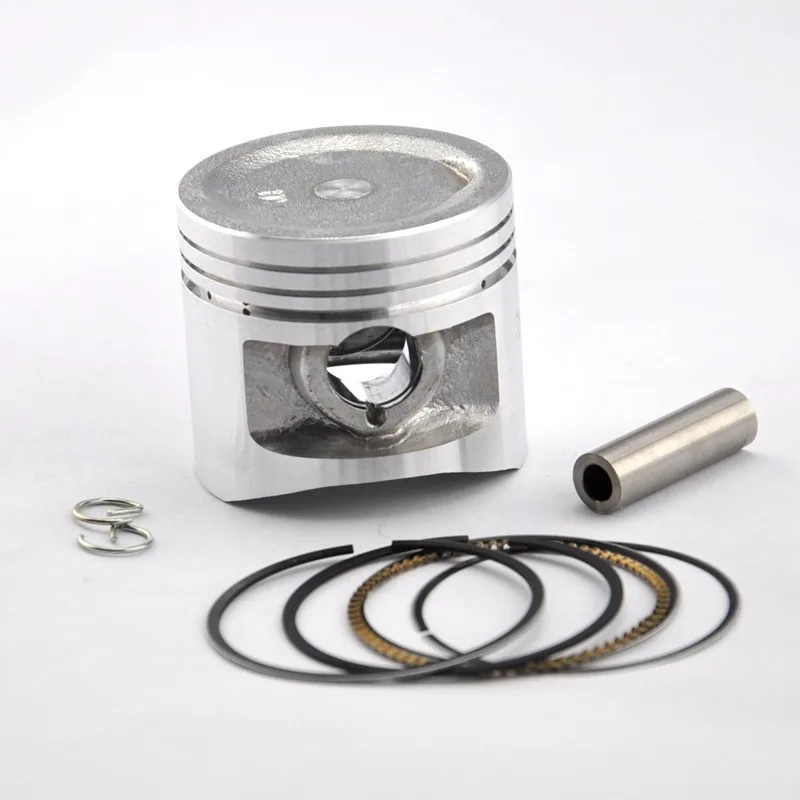 Ensure the expander ring’s ends are not overlapped and ensure the assembly moves freely within the oil ring groove.
Compression Ring Installation
If the piston utilizes two compression rings, the second compression ring should be installed first. Refer to the installation instructions to determine the proper orientation of the ring before installation. Typically, dots or letters will be marked near the ring end, which denotes the top of the ring. Internal edge features such as chamfers may also be used to identify the ring and its correct orientation. Lightly oil the ring and then carefully work it over the piston into its appropriate groove. Adjust the ring’s end gap position so that it aligns with the mark you made for it on the piston crown. Repeat this process for any remaining compression rings.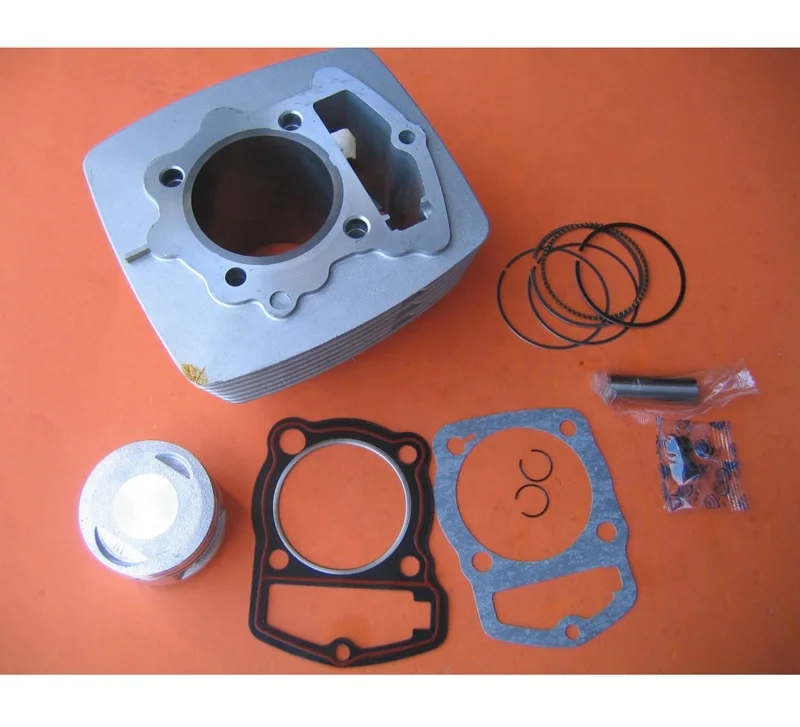
Confirm Groove Clearance
Once the compression rings have been installed, the ring-to-groove clearance should be checked. To do so, insert a feeler gauge between the ring and groove. The clearance can be identified by finding the feeler gauge that drags ever so slightly between the ring and groove. Note the groove clearance and compare it to the specification provided in the installation instructions or factory service manual.
One of the final measurements to take after the rings have been installed is compression ring to groove clearance. Use a feeler gauge for this and find the size that has slight drag. Compare this spec to what's outlined in your instructions or owner's manual.At this point, ring installation onto the piston is complete, and subsequent steps can be taken to complete the engine build.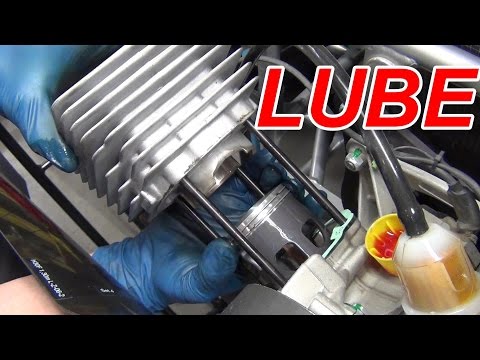 While installing the piston rings onto the piston is a critical step in the build process, it can be performed by anyone when the proper steps are taken. The process simply requires the correct measurements are taken, cleanliness is ensured, and installation techniques are used.
In search of a quality, performance forged piston for your bike or ATV? Click here to see what's available for your application.
COPYRIGHT © 2022 JEPISTONS ALL RIGHTS RESERVED. JE PISTONS IS PART OF THE RACE WINNING BRANDS FAMILY
Failure to ensure the correct ring gap can cause the ring tips to move and
engine damage can occur.
A torque plate must be attached to the engine block or cylinder (if applicable) and tightened
torque which according to the specifications shall be.
2. Check the ring gap by placing the ring in the cylinder.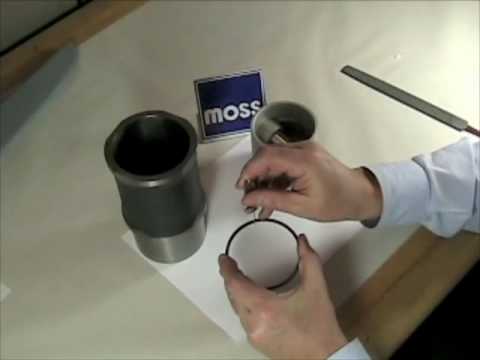 The cylinder bore must not be narrowed. Use the piston to straighten the ring in the cylinder bore and check the end gap with a blade gauge.
3. See the table below for the correct ring gap for your engine.
4. The oil scraper rings do not need to be modified / sanded but the gap should be
at least .010 ”.
1. This chart is in inches. If you are measuring in millimeters, you must do so by converting to inches. Then divide the measure by 25.4.
2. Multiply the bore in inches by the "Bore x" column to obtain the ring gap for your engine.
Example: For the upper ring of an ATV with a 4.0" bore, multiply 4.0 X 0.004 = 0.016"
1. The chart above is a general guideline. Each piston ring must be mounted in the specific
cylinder where they are to be installed and adjusted accordingly.
2. The gap on the second ring should always be larger than the upper ring gap, this
helps reduce top ring flutter.
1. The recommendation is to use a designated tool to file the piston rings. An electric ring sander or manual ring sander
2. Always file from the outside of the ring and in to avoid damage to the ring coating.
File only at one end, use the other as a reference.
4. Be sure to keep the ring end square.
5. Sand a little at a time until the desired ring gap is reached.
6. Remove all sharp edges and burrs. This is very important to remove as burrs and sharp edges can cause engine faliure.
Simple but very important information on how to install piston rings correctly. Study the pictures carefully and read the instructions below for a better understanding.
1. Check each ring in the corresponding piston groove to ensure correct axial and radial play.
Axial clearance approx. 0.001"- 0.002"
Radial play must be at least 0. 005"
005"
Oil rings: Place the spring ring of the oil ring on each side of the oil ring in the lowest groove of the piston with the ring ends 90° from each end of the piston bolt.
Make sure that the ends of the spring rings are visible and properly mounted. If the ends of the spring rings
overlaps, the engine will smoke due to this.
The oil ring can be installed with each side up. Using a ring expander,
install the ring in the piston ring groove between the expander ring / spring rings. The piston ring ends should be placed at least 90° from each other.
Once the oil ring has been installed, check that the scraper ring spring rings are
are properly mounted as described above.
Second ring:
Install the second ring using a piston ring expander
The marked side should be up.
If you have an unmarked 2nd ring with an internal chamfer, the chamfer is installed downwards. If the ring is not marked in any way, it can be turned in both directions.
First ring:
Install the first ring using a piston ring expander.
The marked side should be up.
If you have an unmarked 1st ring with an chamfer, the chamfer is installed upwards (opposite ring number 2.). If the ring is not marked in any way, it can be in both directions.
Sooner or later your engine will wear out and require either a change of piston rings or the piston as a whole.
It seems that changing piston rings is an ordinary task available to anyone who is more or less familiar with the device and principle of operation of a primitive four-stroke engine. But, unfortunately, people are afraid to spend 15 minutes of their incredibly precious time reading literature and stuff everything into the engine according to the principle (and it was ... probably it will work).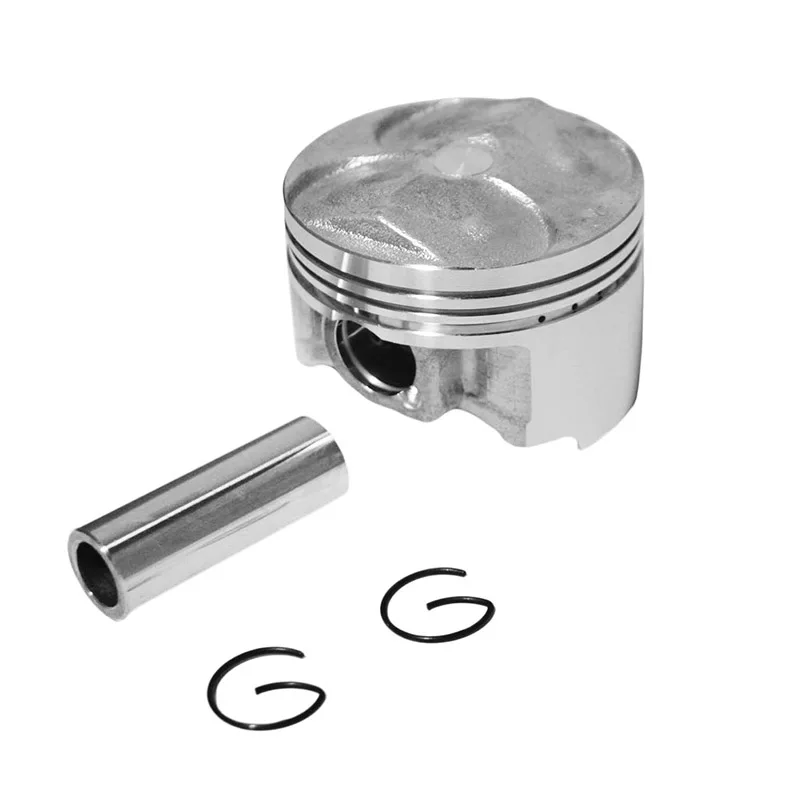 Well, the flag is in your hands and contact the service as soon as possible.
Well, for those who care about how their motor will work after a bulkhead, you should read this article.
So, we take the piston and see 3 grooves for the installation of piston rings. There are no restrictive stops on 4-stroke engines, as on 2-stroke engines, for example.
There are two types of piston rings on 4-stroke engines. The first two, which are installed in the two upper grooves, are compression. Even from the name, it is clear that they are responsible for the presence of compression in your engine and must contain the gases that are formed at the time of the flash due to the combustion of fuel in the combustion chamber.
The next three rings are oil wipers. Here, too, their purpose is immediately clear. They are responsible for skimming off the oil that coats the cylinder walls as the piston moves back down. If these rings are leaking, then the oil will remain on the walls of the cylinder, and this is fraught with the fact that the engine will start to burn oil, and, naturally, smoke will appear.
How to install initially? Yes, in principle, as they stood from the factory, in the same order, but in order to avoid mistakes, we show it again.
Initially, we put the main oil scraper ring: the one that has a wave-like structure. Installing it is nowhere easier, since it is the most elastic of all.
Next, put the upper and lower THIN oil scraper rings. They are a bit firmer, but fitting them shouldn't be a problem either.
Now we put the piston compression rings: those that are thicker and "harder". Install the bottom one first, then the top one. Putting them on is a little more difficult, as they are less elastic and harder. You are unlikely to be able to break them, but with completely crooked hands, bending them is nowhere easier.
Do you think that's it? Not!
The fact is that the rings still need to be correctly positioned on the piston so that the locks of the rings (the cut point) do not fall on each other. Simply put, the bottom ring kerf should not be located directly above the top ring kerf.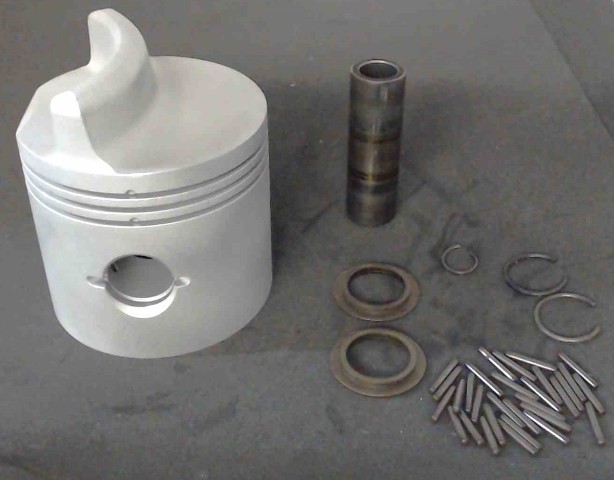
Starting with the top piston rings.
We place the lock of the lower ring in the middle above the valve cavity, for example, inlet (you can also outlet, there is no difference).
The lock of the upper ring is located strictly in the opposite direction from the lower ring. Accordingly, if the lock of the lower ring is above the cavity for the intake valve, then the lock of the upper ring is above the cavity for the exhaust valve.
Now on to the oil scraper rings. These rings must be positioned in the same way so that not a single lock matches. Therefore, we place the upper ring above the hole for the piston pin, on the right side.
The second one (the one below) is located on the opposite side, also approximately in the middle of the hole for the piston pin.
We put the last wavy oil scraper ring in any of the four resulting sections between the hole for the finger and the cavity for the valve.
And now to your question: what kind of nonsense is the author telling us here? And why so painstakingly expose the position of all 5 rings?
We explain.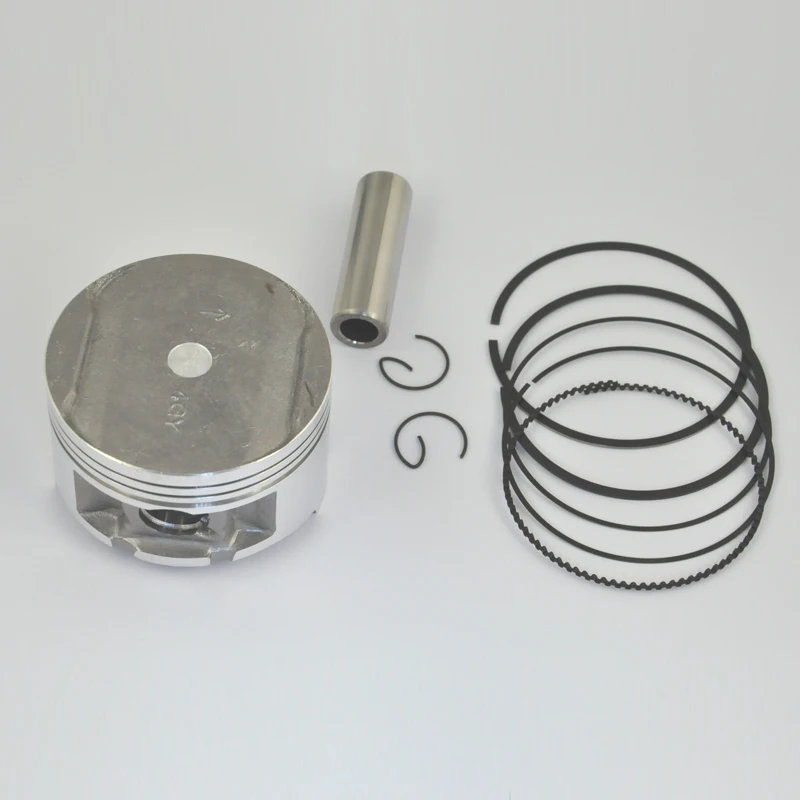 We did all this so that when one lock was located above the other, gases did not pass through these locks (in the case of piston rings) and no oil remained on the walls (in the case of oil scraper rings).
What is the threat?
If we take into account the piston rings, then this is a loss of compression and the passage of hot working gases to oil scraper rings, which are not designed for such sudden high operating temperatures. As a result, the rings may burn out after a certain time.
If we turn to the oil scraper rings and the coincidence of the locks on them, then we will not completely remove the oil: it will reach the piston rings, which will lead to coking of the grooves of the rings, and as a result, they will lie down and then burn out.
As a result, you will get burnt rings and piston wear.
Bottom line: setting the locks of the rings before installation is a matter of 2 minutes, and this operation can extend the life of the motor by tens of hours.
How to put piston rings on a scooter
Decreased traction, drop in maximum speed, blue smoke from the muffler and weak scooter dynamics are a sure sign of worn piston rings or a worn cylinder-piston group. Most often, it is piston rings that wear out, because. the diameter of the piston group in scooters is small, the working area of the rings is very small and therefore they do not go so long.
So, if you are faced with the need to replace piston rings on a scooter, and in addition to the main problem that they need to be changed, there is another one - this is how to put the rings on the piston correctly. You can't just take any ring and put it in any of the "grooves" on the piston. You need to understand which ring is the upper compression, which is the lower compression, as well as how to properly install the oil scraper ring.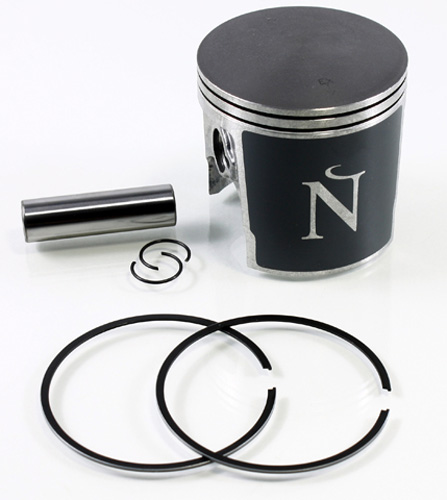
Installation of piston rings on a 4-stroke Chinese scooter. The photo below shows where the piston ring is.
As you have noticed, the piston ring set consists of two compression rings (upper and lower), as well as an oil scraper which consists of two ordinary (thin) rings and a central expander.
Second compression ring in dark black color and unique (bevelled) geometry.
The color of the rings may vary for different manufacturers, for example, for CMR firms - the lower compression ring has red color.
The following diagram shows the correct position of the rings.
On the compression rings you can see the inscriptions, they may be different depending on the brand of the rings, but their essence is the same - the installation of the rings must be done with the inscriptions UP ! Those. the inscriptions must be directed towards the cylinder head.
There are usually no inscriptions on the oil scraper (two thin) rings, so they can be placed on either side, the main thing is that a so-called expander is installed between them, as shown in the photo below.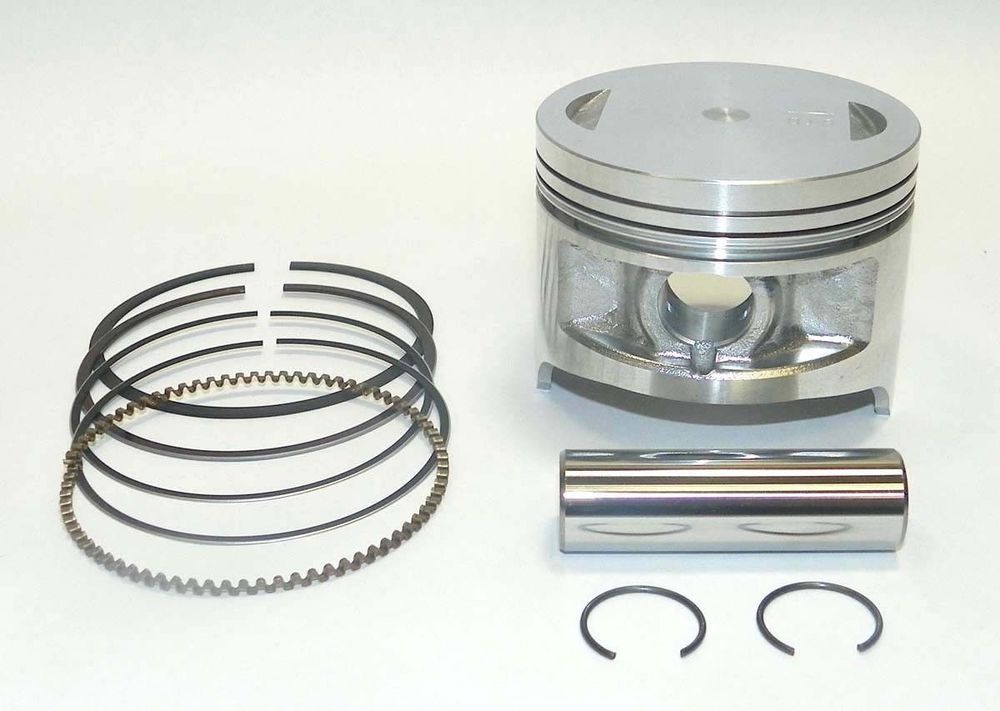
We will omit the process of installing the rings on the piston, because there is nothing complicated there
the rings are made of ductile iron and a strong tensile force can lead to breakage of the rings
If you did everything right, the piston rings should be installed as shown in the next photo.
Further, before installing the piston in the cylinder, it is necessary to spread the locks of the rings to the correct distance.
On this, all the features of installing piston rings on a four-stroke scooter are announced, now you can put the piston in the cylinder, having previously lubricated the rings and the cylinder with oil.
Installation of piston rings on a 2-stroke scooter. So, let's say you have purchased a new piston with rings and want to install it on a scooter. Only two compression rings come with the piston on a two-stroke scooter.
In some cases, depending on the model of the scooter, there may also be a so-called expander or, as it is also called, an expander complete with rings. Such an expander is installed under the second (lower) ring.
Before proceeding with the installation of rings on the piston, it is necessary to understand where the upper compression ring is and where the lower one is. Because the rings are very different in geometry, incorrect installation of one of the rings will break it
Please note that the top ring has an internal bevel, carefully inspect each ring before installation. Below is an installation diagram, which clearly shows where which ring should be, and also where the expander is installed, if one is included in the kit
It is important to note that the rings have an inscription on the surface, which must be UP! Those. the inscriptions must be directed towards the cylinder head
rings are very fragile. Try to carefully slide the rings into the grooves, without a strong effect on the stretch.
In conclusion, I would like to note that two-stroke pistons have pins that prevent the rings from turning.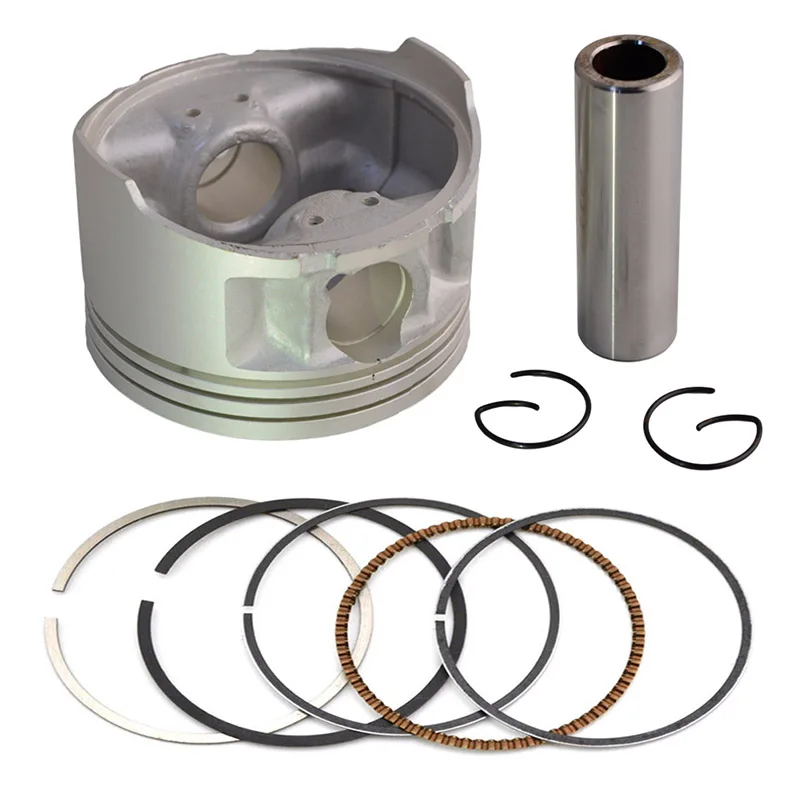
Therefore, when installing the rings in the grooves, pay attention to the locks of the rings - they must converge on the pins, as shown in the photo below
rings and cylinder oil.
Start by cleaning the scooter from dirt, sand, dust. The work itself must be carried out indoors, where there is no risk of debris entering the mechanisms from the outside. It is allowed to carry out operations in the open air, but subject to the following conditions:
For fasteners, you will need to prepare a box with cells for each type, so as not to lose or confuse varieties. The work can take about an hour depending on the level of preparation. In the absence of experience, it is better to call another person for help and carefully record what was removed (and in what order) in order to assemble the vehicle correctly after everything.
Installing rings on the piston of a two-stroke scooter, however, as well as a four-stroke, is not difficult, and many people know this. But most scooters who have only recently acquired such equipment have no idea how to replace the piston on a scooter, how to properly install the rings on the piston, where the arrow on the piston should look, and much more.
In this lesson, I will tell you how to properly put the rings on the piston and assemble the piston into place. Since we have already talked about four-stroke engines before, here we will only talk about two-stroke engines. So, our piston has worn out and needs to be replaced.
The rings and piston wear out first and usually only these need to be replaced.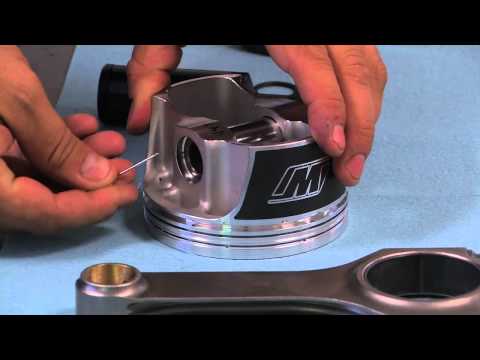 With severe piston wear, it is required to bore the cylinder. It is also bored when the piston is wedged in the cylinder, forming deep scratches on the walls of the latter. There's nothing wrong with that, and if your new cylinder has been properly bored (for which you only need to shell out about $10), it will need a repair kit of rings with a new piston. Such rings are indicated by marking 0.25. The second bore is 0.5, respectively, etc. up to one.
After purchasing the piston, it must be assembled. In the kit, as a rule, you will find the piston itself, two compression rings, a third thin corrugated ring (more on its purpose later), a piston pin and two piston pin circlips.
Now about the third ring in the set. Its purpose is to spring the lower compression ring. It installs it under it itself, and usually does not bring any benefit during operation. You can throw this ring away, or you can put it on, it doesn't matter. Many piston manufacturers do not have it at all in the kit.
It's time to put everything back together. Depending on the model of scooters, compression rings may be the same or vary in thickness and cross section. Most pistons for Honda scooters, for example, have different rings, where the top is thinner than the bottom and has a different section.
This must be taken into account when installing, the top is thinner and ground at an angle. Also pay attention to the inscription on the ring (usually the letter T or the size of the repair), the inscription should always be on top, that is, opposite from the finger
Put on the bottom first, then the top. There is no need to stretch or bend them. These manipulations must be carried out carefully
Also pay attention to the inscription on the ring (usually the letter T or the size of the repair), the inscription should always be on top, that is, opposite from the finger. First you need to put on the bottom, then the top
In this case, you do not need to stretch and bend them. These manipulations must be carried out carefully.
The grooves for the rings have locks that prevent the rings from turning during operation, so the clearance of the rings must be exactly in these locks, otherwise you will not stick the piston into the cylinder.
And the last important point is the arrow (1) on the bottom of the piston or the inscription EX. Both the arrow and the inscription must be directed towards the exhaust (2). In this case, the locks of the rings will be located on the side of the reed valve. If the locks are placed in the direction of the exhaust, the piston will not last long, the rings will be pulled out into the exhaust window and gradually grind it down.
With all the manipulations with the piston, it is necessary to put a rag into the crankcase window so that nothing accidentally gets there, we still need a crankshaft with bearings.
When installing the piston pin, pay attention to the condition of the separator (bearing), it may need to be replaced. Before installing the piston pin, install the retaining ring on one side before the piston is installed (usually on the side where you will not be able to insert the pin and the second retaining ring)
click.
That's all, now put on the cylinder, not the piston (remembering to check the condition of the gaskets and lubricate the piston and cylinder walls with engine oil), the cylinder head and tighten the bolts alternately in a cross pattern.
You can also read other articles on the topic:
If you have a 157QMJ series engine, do the following: unscrew the plug on the tensioner housing; we insert a thin flat screwdriver into it and begin to tighten the bolt until the tensioner rod goes inside the housing.
Without releasing the screwdriver while holding the tensioner body, with free fingers, insert the tensioner into the cylinder, fasten it with bolts, and only then release the screwdriver and screw the plug into place.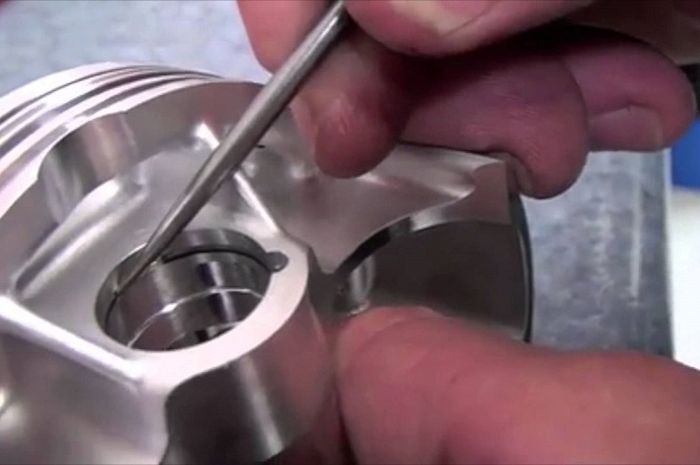
If you have a 139QMB series engine, then do this: unscrew the plug from the tensioner housing and remove the spring; we push the rod inside the body; install a tensioner in the cylinder; insert the spring into the housing and wrap the plug.
After installing the piston, do not forget to adjust the thermal clearances of the valves and run the engine in.
It is worth noting that the long-term and trouble-free operation of the piston largely depends on the correct installation of the rings. In this case, haste and dirt is absolutely useless. Do everything carefully (for yourself, after all), slowly, and most importantly: keep it clean!
First, let's take a look at what a standard four-stroke scooter piston ring set is. The standard kit consists of: two compression rings (upper and lower) and one oil scraper, which in our case has a collapsible design.
A set of piston rings for a two-stroke scooter engine, differs from the previous one in the absence of an oil scraper ring, also a set of rings for a two-stroke engine may include an expander (marked with an arrow).
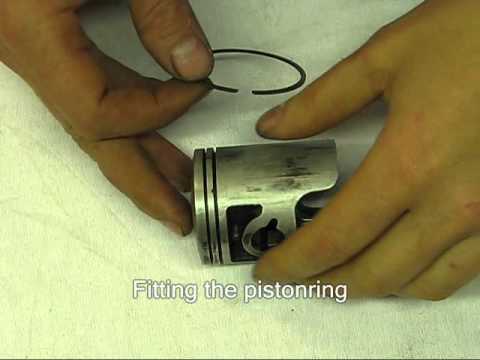
So, we have more or less figured out the kits - it's time to get down to business. We prepare in advance small strips of tin or thin plastic, with their help we will put the rings on the piston.
Thoroughly wash the rings and the piston; when installing new rings on a used piston, do not forget to clean its grooves from carbon deposits, otherwise the new rings will not enter the cylinder. We prepare a clean workplace and carry out the installation.
We take the oil scraper ring expander from the kit and put it in the lowest groove of the piston.
In the same way, we install the expander from the kit for a two-stroke engine (if any), with the only difference that the expander lock must be located in the zone of the locking pin (marked with an arrow) of the piston groove.
We are looking for marks on the rings, apply pre-prepared strips to the piston, very carefully and slowly, as it were, pull the rings along our strips onto the piston, in this order: first we put on the oil scraper ring, then we put on the second oil scraper ring, then we put on the lower compression ring ( dark) and only then put on the upper compression ring (light).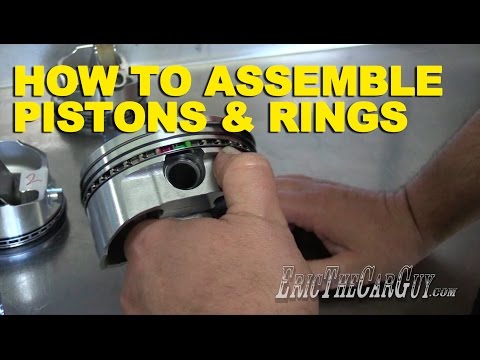 The marks on the rings after installation should be located up to the cylinder head.
We straighten the rings so that they stand strictly opposite their grooves and slowly pull our strips out from under them. Now the main thing: after you have pulled out the strips and the rings have fallen into their grooves without fail - check each ring for mobility. The rings in the piston grooves must rotate freely in different directions.
After installation, the oil scraper ring should look something like this:
Just before installing the piston in the cylinder, the piston ring locks must be separated in the correct order. It is done like this:
We turn the upper compression ring so that its lock is displaced relative to the axis of the piston pin by about 45 degrees, we turn the lower compression ring so that its lock is displaced by about 180 degrees relative to the lock of the upper compression ring.
We turn the lock of the upper oil scraper ring 90 degrees relative to the lock of the lower compression ring, and we turn the lock of the lower oil scraper ring 180 degrees relative to the upper oil scraper ring.
The photo shows how the piston ring locks of a four-stroke engine should approximately stand:
The red marks indicate the locks of the compression rings The blue marks indicate the locks of the oil scraper rings .
We take a new piston kit for 72 or 80 cubic meters (piston diameter 47mm or 50mm, respectively). Of course, you can also use the standard new CPG for 50 cubic meters. The kit includes: cylinder, piston, piston rings, pin, retaining rings, as well as gaskets for the head and cylinder. You can buy a CPG for 72 cubic meters at a low price in our online store.
Installation is carried out in the reverse order, after lubricating the cylinder, piston and rings with a small amount of oil. We install on the piston first a thin ring in the lower groove, then an oil scraper and again a thin ring (the wavy ring - the oil scraper will thus be between two thin ones in the lower groove). Next, install 2 compression rings) which are thicker).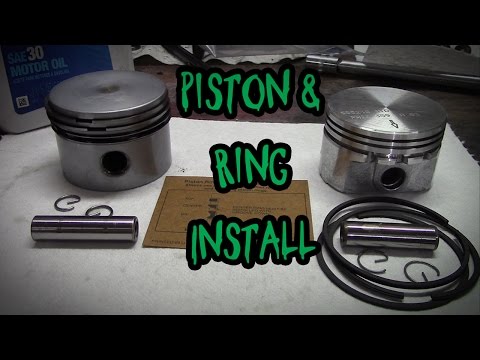 The cuts of all rings should not be on top of each other. After installing the rings, put the piston on the crankshaft connecting rod, fix its position with a finger and retaining rings. We take the connecting sleeves from the old cylinder and insert into the new one.
We put a gasket under the cylinder on the studs
Carefully put the cylinder on the piston with rings so as not to damage the cylinder. Push the chain into the groove for the chain
Then install the chain bar and the cylinder head. Now we can put the chain on the camshaft sprocket (the position of the sprocket should be as follows: a large hole at the top, and two small ones on the sides, parallel to the edge of the cylinder head). We fix the position of the cylinder head with the gasket by screwing it. Then we put the plastic cylinder head cover, chain tensioner, carburetor and muffler. Installation on this is complete!
If you have not changed the oil for a long time, you must change it before starting with a new piston.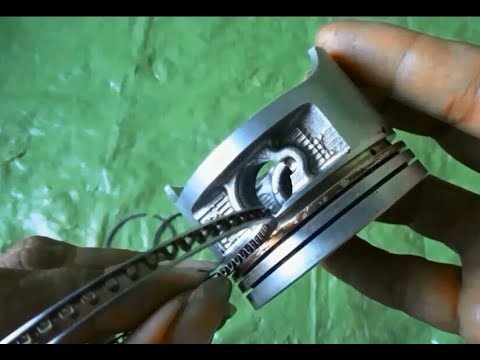 Before giving a full load to the scooter engine, it is necessary to run in, i.e. drive 300-500 kilometers at a speed of no more than 40-45 km per hour.
Along with the increase in the power of the scooter with the installation of a tuning CPG, the load on the variator with the gears of the reducer also increases. Keep this in mind and if possible, replace the variator with gearbox gears with tuned ones (more reinforced.)
Breakdowns can be planned and emergency. The planned failure depends on the manufacturer, the materials of the group, the intensity of operation. Usually calculate the resource of the saw in hours. After working out the prescribed number of hours, the tool should be handed over for repair for engine prevention.
Causes of unexpected breakdowns of the piston:
Every tool run puts some stress on the piston and cylinder. Therefore, the resource of the device also depends on the number of starts. If you notice extraneous sounds from the motor, a decrease in power, an increase in consumption, it's time to take the equipment for preventive maintenance to a service center.
Remove the piston ring kit from the box. Piston ring kit for Chinese four-stroke scooter usually consists of five positions. Three of which are a single prefabricated oil scraper ring, the other two: upper and lower compression.
A typical set of piston rings looks something like this
Or so
Carefully, with perfectly clean hands, unpack the set
In the kit you will find two of the thinnest rings and one thick corrugated ring (expander) - this will be a prefabricated oil scraper ring that must be installed on the piston first of all
We put the expander in the lowest groove of the piston we put thin oil scraper rings - one under the expander, the second over the expander
We look for the lower and upper compression rings in the kit and install them, respectively, in the middle and upper grooves of the piston - with marks on the side surface to the cylinder head (cylinder head).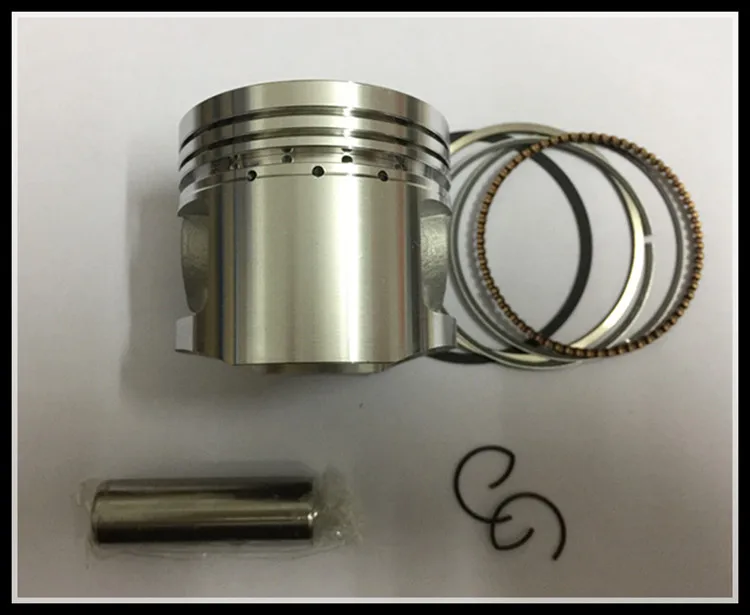 The lower compression ring differs from the upper one in color (not always) and in the shape of the working edge (always). In most sets, the lower compression ring is painted black, and its working edge has a slight bevel.
Markings
The top compression ring in the vast majority of piston ring sets has a uniform light color. But this is in most cases, but in practice it happens that in the kit there are upper compression rings that have black or even red color
By and large - the color is not particularly important to us, something else is important to us: the sides are slightly rounded (chamfers), and the working surface of the edge of the upper compression ring is covered with a shiny protective coating
For example, both compression rings in this kit are black. But at the top compression ring, the working surface is covered with a layer of protective coating, and small chamfers are removed on the edges of the working surface.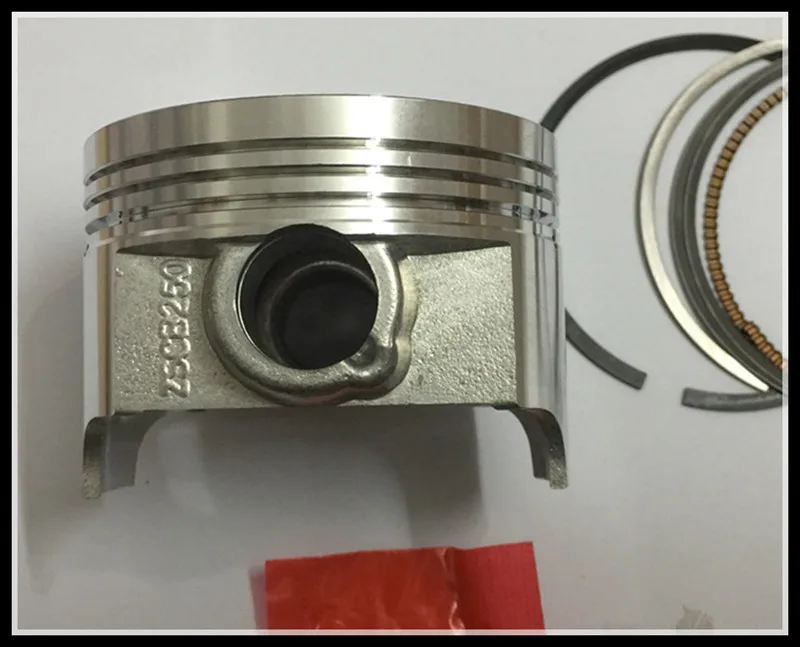
The lower compression ring has a matt working surface and a slightly bevelled working edge. In the photo, all these moments are clearly visible.
The compression rings in this set are red and black. As in the first case, the upper compression ring has chamfers on the working edge and a protective coating, and the lower one has a matte working edge beveled at an angle.
On classic piston ring sets, the upper compression ring is light in color and has a rounded sealing lip. The bottom is dark in color and the working edge is beveled at a slight angle.
When installing the piston rings, do not forget about the marks. The marks on the rings after installation on the piston must be oriented towards the cylinder head (cylinder head).
In order for the engine to run reliably after repair, it is important to choose the right rings. Don't buy the cheapest set of
These rings will not last long and the laborious process of replacement will have to be repeated.
It is also important to inspect the packaging and the parts themselves. The package must contain all the information about the manufacturer, the material of manufacture
The rings must be marked. It represents the top side. Manufacturers usually put instructions inside the package, which details how to properly put rings on the piston. The latter should not have defects, even the smallest ones.
So that later you don’t have green snot about the fact that the tuning piston does not fit into the crankcase and you were allegedly deceived here - remove the old piston from the engine and measure the hole under the sleeve with a vernier caliper. If the hole is smaller than the tuning piston sleeve, the “meat” of the crankcase allows, hands grow from where you need it - a round file will help you (only before boring - disassemble the engine, assemble the empty crankcase into bolts, bore the hole, make sure that the piston enters the crankcase without problems - wash the parts from chips and assemble the engine in a new way. Or, in extreme cases, coat the crankcase and file with grease to somehow protect yourself from sawdust getting inside the engine.)
The hole for the liner of the 162QMK engine (such engines are on Chinese scabs, more commonly known as "Leica") in stock is 65 mm. Without boring, a piston 57mm (150SS), 61mm (1700SS) and 62mm (180SS) easily enters this crankcase. You won’t find a 62mm piston on sale during the day with fire, so it was decided to put a regular 61mm piston on this engine.
By the way, for those who are not in the know, a piston with a diameter of 61mm can be easily installed not only on the Leica engine, but also on any other Chinese 150-ku equipped with a 157QMJ series engine. There, if you put your hands on, you can stick a piston and 62mm, but only if the "meat" of the crankcase allows. Everything is individual, you need to look at the place. In any case, the distance along the studs, which is 61mm for the piston, and 62mm for the piston, is the same.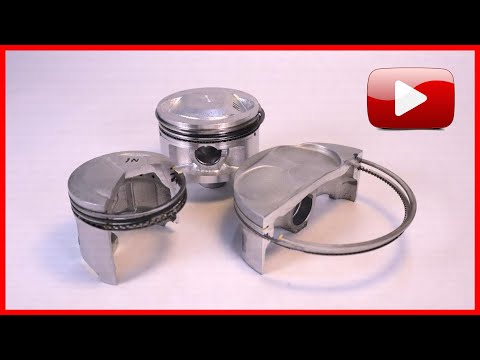
From left to right: 61mm, 57mm
On a 139QMB series engine from a regular Chinese 80-syatki, you can easily install a piston 39mm (45CC), 47mm (72CC), 50mm (84CC)
From left to right: 39mm (45CC), 47mm (72SS), 50mm (84SS)
Need help finding parts?
We will help and advise!
+7-927-653-31-57
Gradually, the time comes and your two-wheeled four-stroke friend needs to change the piston. There can be 2 reasons for this: wear or the installation of a more powerful piston. In this article we will tell you how to replace a piston (cpg) on a 4-stroke scooter with a 139 engineQMB.
If you have a different engine model, for example 152QMI or 157QMJ (150 cc scooter), then this article will also suit you to replace the CPG, since there are no fundamental differences. For 2-stroke scooters, we advise you to read the article “Replacing a piston on a 2-stroke scooter”
For restoration, the master completely disassembles the motor and inspects its working parts. Measurements are made that allow you to accurately assess the condition of the equipment and understand what repair procedures need to be performed. During overhaul, boring of parts is possible if they are made of materials suitable for this.
The recovery process also includes other steps:
In order for the chainsaw cylinder to be successfully restored, the technician carries out a series of checks after the assembly of the equipment
It is important that the power corresponds to the factory parameters, and that the saw shows stable revolutions at idle and under load. Only after such checks can the repair of the equipment be considered completed
It should be noted that the long-term and trouble-free operation of the piston largely depends on the correct installation of the rings. In this case, haste and dirt is absolutely useless. Do everything carefully (for yourself, after all), slowly, and most importantly: keep it clean!
First, let's take a look at what a standard four-stroke scooter piston ring set is. The standard kit consists of: two compression rings (upper and lower) and one oil scraper, which in our case has a collapsible design.
A set of piston rings for a two-stroke scooter engine, differs from the previous one in the absence of an oil scraper ring, also a set of rings for a two-stroke engine may include an expander (marked with an arrow).
So, we have more or less figured out the kits - it's time to get down to business. We prepare in advance small strips of tin or thin plastic, with their help we will put the rings on the piston.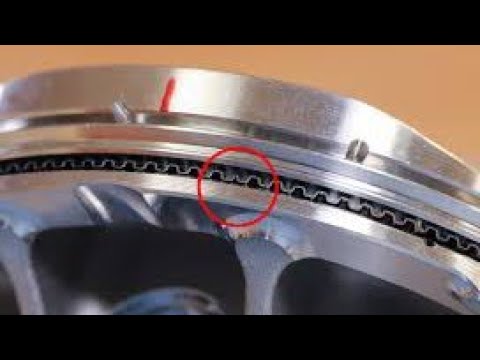
Thoroughly wash the rings and the piston; when installing new rings on a used piston, do not forget to clean its grooves from carbon deposits, otherwise the new rings will not enter the cylinder. We prepare a clean workplace and carry out the installation.
We take the oil scraper ring expander from the kit and put it in the lowest groove of the piston.
In the same way, we install the expander from the kit for a two-stroke engine (if any), with the only difference that the expander lock must be located in the zone of the locking pin (marked with an arrow) of the piston groove.
We are looking for marks on the rings, apply pre-prepared strips to the piston, very carefully and slowly, as it were, pull the rings along our strips onto the piston, in this order: first we put on the oil scraper ring, then we put on the second oil scraper ring, then we put on the lower compression ring ( dark) and only then put on the upper compression ring (light). The marks on the rings after installation should be located up to the cylinder head.
We straighten the rings so that they stand strictly opposite their grooves and slowly pull our strips out from under them. Now the main thing: after you have pulled out the strips and the rings have fallen into their grooves without fail - check each ring for mobility. The rings in the piston grooves must rotate freely in different directions.
After installation, the oil scraper ring should look something like this:
Just before installing the piston in the cylinder, the piston ring locks must be separated in the correct order. It is done like this:
We turn the upper compression ring so that its lock is displaced relative to the axis of the piston pin by about 45 degrees, we turn the lower compression ring so that its lock is displaced by about 180 degrees relative to the lock of the upper compression ring.
The lock of the upper oil scraper ring is deployed by 90 degrees relative to the lock of the lower compression ring, and the lock of the lower oil scraper ring is turned 180 degrees relative to the upper oil scraper ring.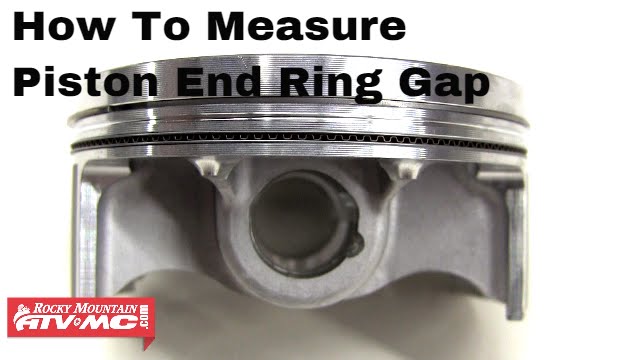
The photo shows how the piston ring locks of a four-stroke engine should approximately stand:
The red marks indicate the locks of the compression rings The blue marks indicate the locks of the oil scraper rings .
If you charge the engine of the same 139QMB to the maximum, then such tuning before the “upgrade” cost the client about 35,000 rubles, and this is not counting the work.
It is clear that not everyone can afford such amounts. Yes, even affordable, but what's the point? It’s easier to buy some kind of old, but branded scooter and drive, than to charge the “Chinese” and then throw it in the trash after a season. But that's how it is for me.
During the operation of the scooter, various breakdowns occur
It does not matter at all who the manufacturer is (Japan or China). The difference is that one vehicle breaks down earlier, and the other over time
Malfunctions can occur with wiring, engine, running gear.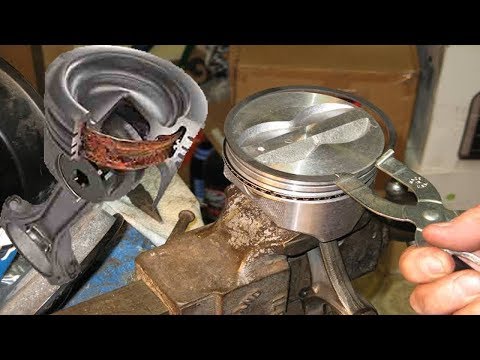 But, as a rule, almost everyone is faced with the replacement of the CPG. This abbreviation implies the term "cylinder-piston-group" or, as people say, "piston". Looking ahead, it must be said that replacing the piston, piston and rings individually is not such a difficult task as it might seem at first glance. It is also worth knowing that the process of removing and replacing the CPG is almost the same on all scooters. Therefore, the article will discuss the main points. Looking ahead, we recall that the power of the CPG can vary. It is recommended to install a piston of the same power, similar to the standard CPG.
 Before removing the piston and connecting rod assembly from the cylinder, check the condition of the top edge of the cylinder bore. If there is a shoulder here (a premature section of the cylinder mirror), it must be removed with a special cutting tool.
 Remove the piston ring kit from the box. Piston ring kit for Chinese four-stroke scooter usually consists of five positions. Three of which are a single prefabricated oil scraper ring, the other two: upper and lower compression.
A regular set of piston rings looks something like this
Carefully, with perfectly clean hands, unpack the set
it is necessary to install on the piston first of all
We put the expander in the lowest groove of the piston
In the same groove we put thin oil scraper rings - one under the expander, the second over the expander
We find the lower and upper compression rings in the kit and install them, respectively, in the middle and upper grooves of the piston - with marks on the side surface to the cylinder head (cylinder head).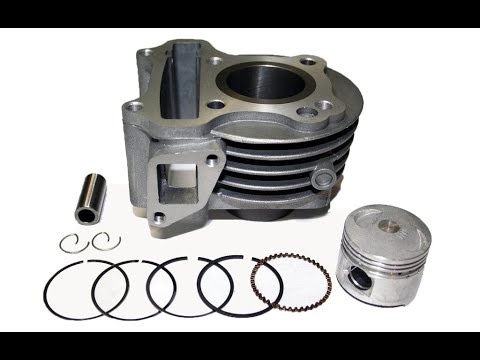 The lower compression ring differs from the upper one in color (not always) and in the shape of the working edge (always). In most sets, the lower compression ring is painted black, and its working edge has a slight bevel.
The top compression ring in the vast majority of piston ring sets is a uniform light color. But this is in most cases, but in practice it happens that in the kit there are upper compression rings that have a black or even red color
By and large, the color is not very important to us, something else is important to us: at the upper compression ring, the working edge has small roundings (chamfers) on the sides, and the working surface of the edge of the upper compression ring is covered with a shiny protective coating
For example, in this set, both compression rings are black. But at the top compression ring, the working surface is covered with a layer of protective coating, and small chamfers are removed on the edges of the working surface.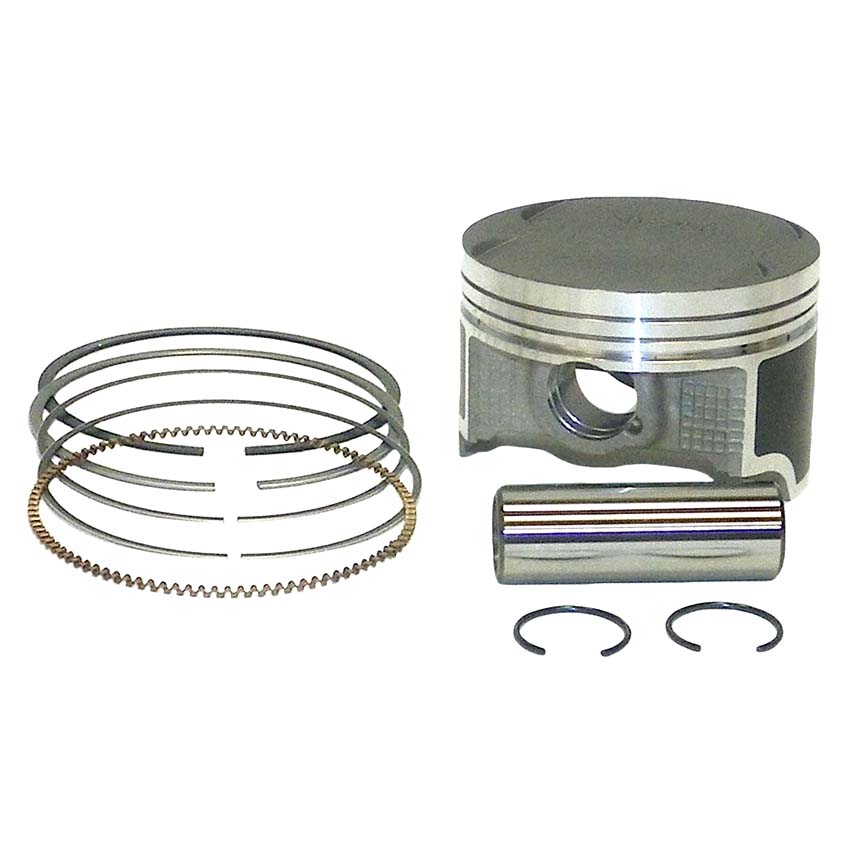
The lower compression ring has a matte working surface and a slightly bevelled working edge. In the photo, all these moments are clearly visible.
The compression rings in this set are red and black. As in the first case, the upper compression ring has chamfers on the working edge and a protective coating, and the lower one has a matte working edge beveled at an angle.
On classic piston ring sets, the upper compression ring is light in color and has a rounded sealing lip. The bottom is dark in color and the working edge is beveled at a slight angle.
When installing the piston rings, do not forget about the marks. The marks on the rings after installation on the piston must be oriented towards the cylinder head (cylinder head).
Ideally, the marks on the sprocket should be strictly parallel to the plane of the valve cover connector.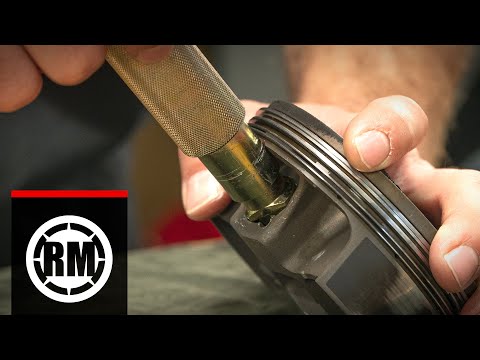 In practice, unfortunately, such accuracy is difficult to achieve. And this is mainly due to the stretching of the timing chain. And there's nothing you can do about it - either change the timing chain to a new one or catch the phase by changing the teeth, but this method of setting the valve timing is not acceptable to me personally.
It's time to tighten the cap screws. In the beginning, we can do it with our fingers, but when the nuts reach the head, the final difficulty begins. If we don't have a "stop" feeling in our hands, it would be good to use a torque wrench. On the key, set the torque specified in the engine service manual - usually it is small and does not exceed 20 Nm, and often even less than 10 Nm - sometimes it is worth checking the instructions for the cylinder cylinder, since some manufacturers recommend different head tension values. When tightening the head, the principle of gradually tightening the nuts using the "cross" method is applied - it is worth keeping it to avoid tension, breakage of the head, cutting the gasket and other troubles.