
This post may contain affiliate links, which help to support this site if you make a purchase through one of our links. As an Amazon Associate I earn from qualifying purchases.
Learn how to make a DIY tire coffee table with this simple step-by-step photo tutorial. It is so easy to make your own beautiful upcycled tire table for your patio or outdoor space! This post contains affiliate links, which help to support this site at no extra cost to you.
When we were working on putting together our Outdoor Living Room Update, we really needed some kind of coffee table or ottoman to make the space work. It’s kind of magical how a pretty coffee table can transform a collection of chairs into a living space.
I wasn’t sure if we wanted to buy or DIY, but then I remembered the recycled tire coffee tables and ottomans I had seen floating around Pinterest. I thought that could be a great outdoor solution, so we gave it a go!
Luckily, my dad is a borderline hoarder collector who specializes in old broken down Nissans, so coming up with a tire to recycle was pretty easy. The finished table looks great in our space and was fairly easy to put together, so I’m calling it a WIN.
It did not turn out exactly perfectly (you can see how the rope goes a bit wonky around the indents in the tire tread), but I think it’s still pretty good. I thought about painting the feet and maybe the bottom few inches white or another color. What do you think? Should I go for a dipped look or leave as is?
There are lots of similar tutorials out there, but here is how we put together our DIY tire coffee table. (I found this article helpful when creating our tire table.)
Tire Coffee Table Supplies:Okay – who’s ready to turn a dirty old tire into a beautiful table?? Let’s do this!
 Clean Tires.
The first step is to clean that tire off. Guys. Old tires are GROSS. This may be super obvious, but you do not want to be putting your hands all over a dirty tire. Plus all the dirt will make the adhesive less effective. So really hose that sucker off and let it dry before getting started.
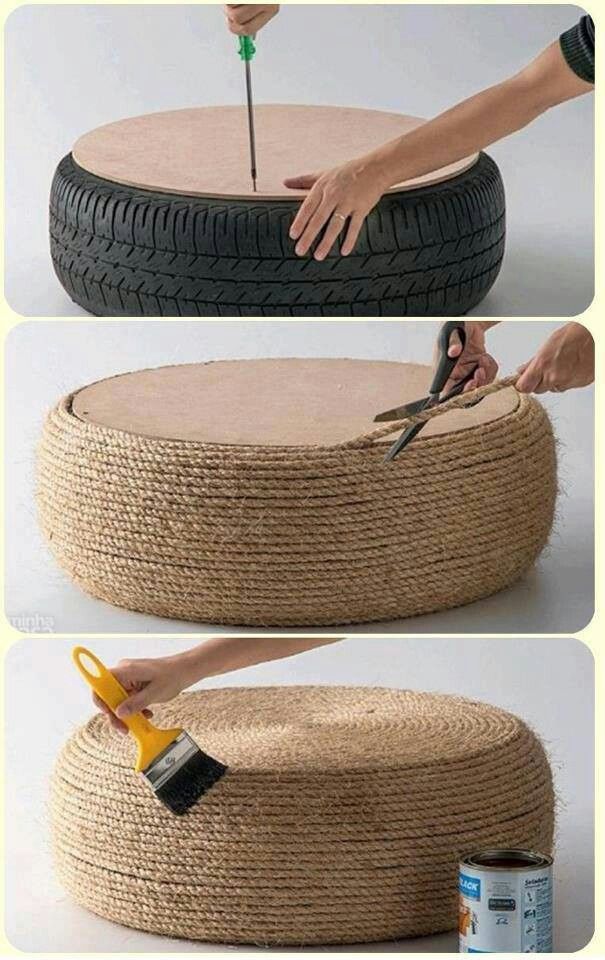
Next use your jig saw to cut two round pieces of plywood the diameter of the tire. As you can see my circle is not perfect, so don’t stress too much if yours goes a little wonky too.
Screw one piece of plywood onto the top and bottom of the tire.
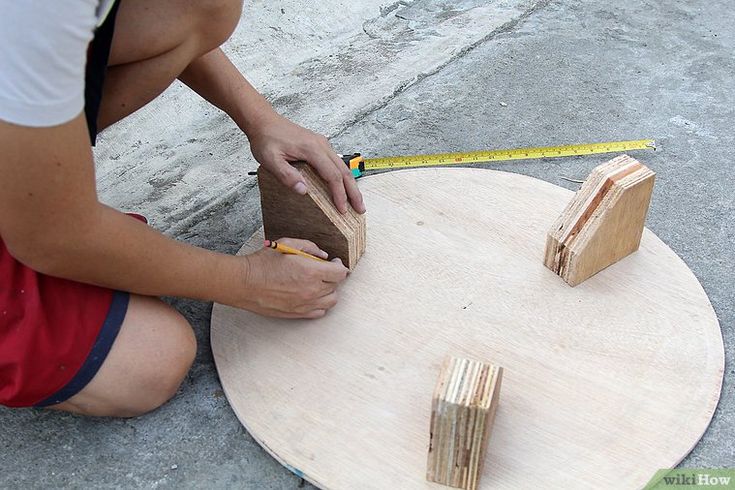
Next, it’s time to screw the furniture feet into the bottom of your table.
I only purchased three furniture feet, because I liked the look and they were sold individually at my local home improvement store and I was being cheap. 😬
To get a stable table with only three feet, you need to carefully measure out the positioning of the feet to make sure they are so evenly spaced.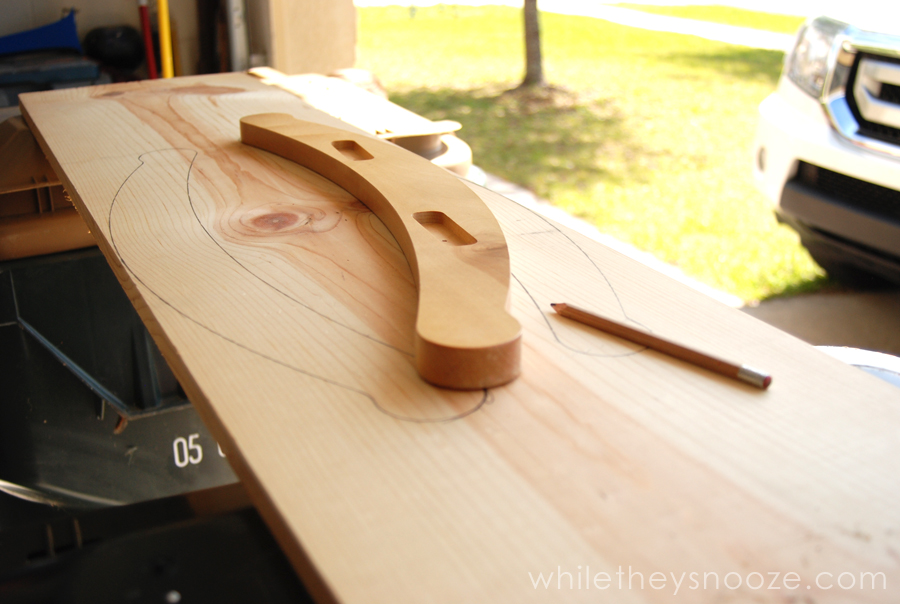 Next time I make a tire table, I think I would splurge on four feet to make things a little easier and more stable.
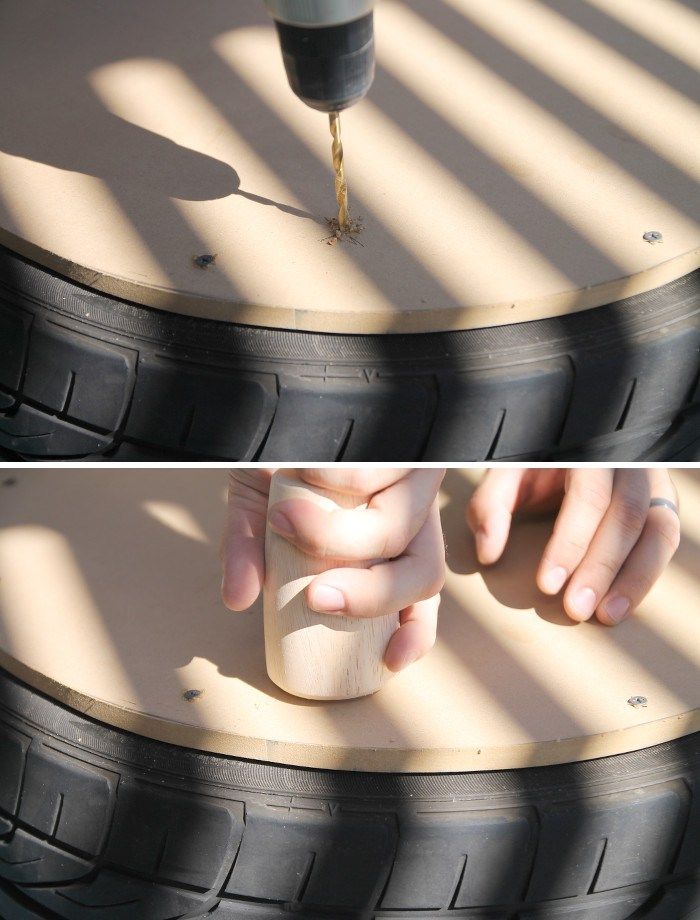
When the placement of the feet was all measured out, we drilled holes slightly smaller than the screws on the feet and thenscrewed the feet into the bottom of the table.
Ta DAAA! The base of the table is all done!
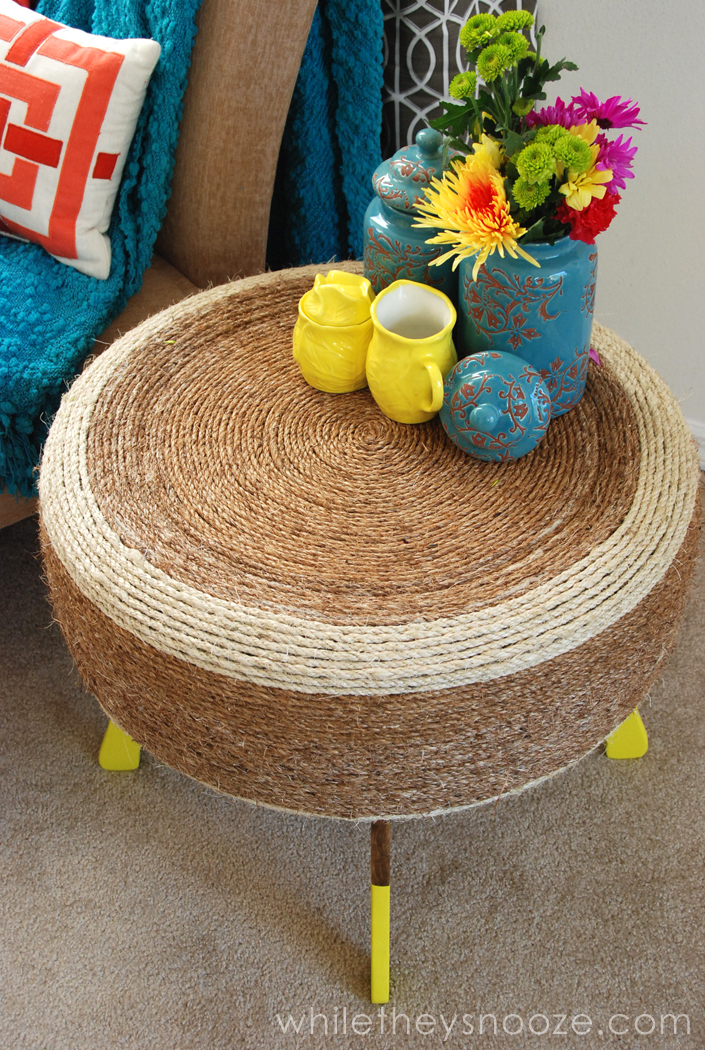
Next up, time to wrap your tire table in pretty sisal rope! We spent a couple hours with some rope and glue covering that all up.
Here are a few tips to help you with your DIY table:
 I really appreciated having two people working on this table because we could just pass the rope around to the other side.
 Just keep wrapping and gluing, wrapping and gluing, and pretty soon – you’re done!
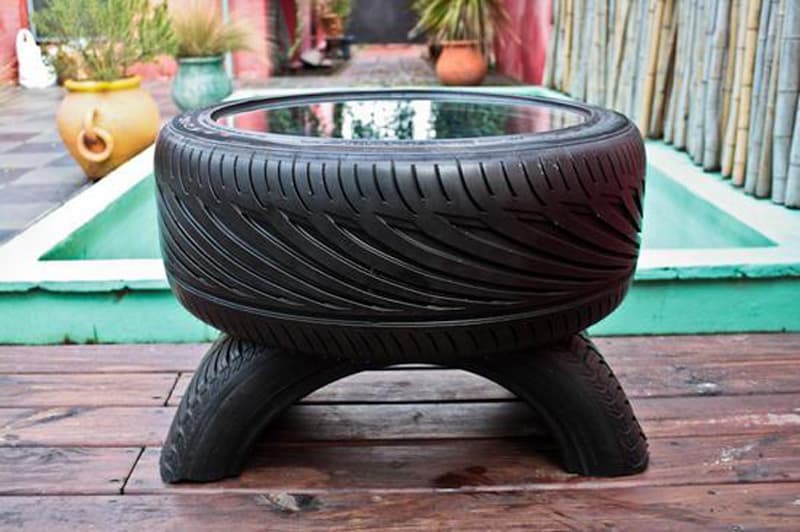
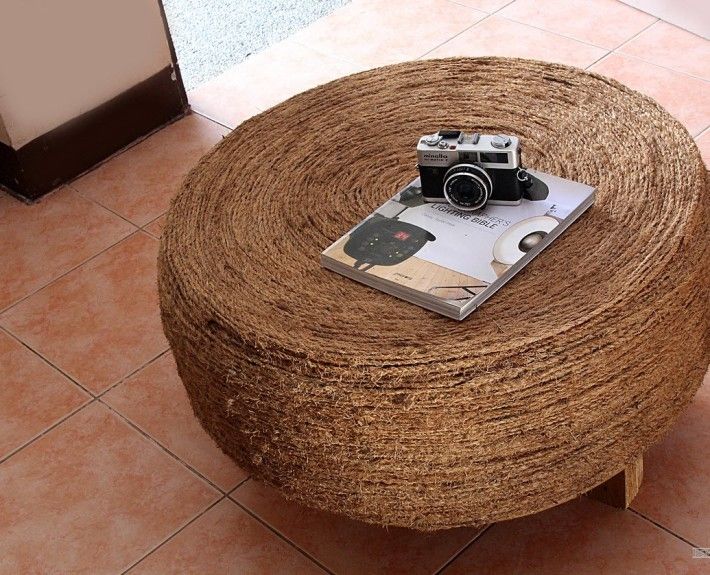
Our new table is the perfect place to put your feet up and relax at the end of a hot Summer day.
What do you think? Have you ever made any kind of recycled tire project? Is this something you would try?
Until next time, Happy Making!
Check out more of my home decor projects here:
Crafts + DIY, DIY Art Projects, Home Decor, decor, diy art, wall art, wood
2
Crafts + DIY, Home Decor, Macrame, dye, macrame, wall decor, yarn
2
If you missed the announcement about which nine contestants made it through to Round 2 of Creating with the Stars, click here! We’re dying to see what those ladies come up with for this week’s Knockoff theme!
————————————————————————————————————————–
There are some nice end tables out there, but this one ranks way up there on the coolness scale (is there such a thing? If not, we just made one.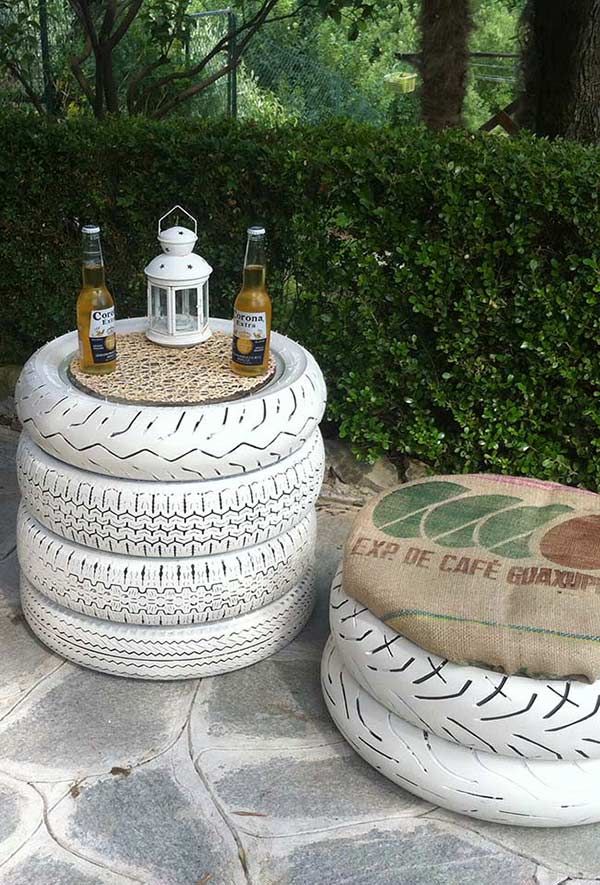 ) We love how Sarah, from While They Snooze, used something free to create something totally fabulous for her home. Booyah to pricey furniture everywhere. Let’s take a look at how she made this bad boy…
On a run a week or so back, I passed a house in my neighborhood with 6, count ’em 6, old tires on the curb (Where you at HOA??). My slightly hoarderish brain immediately tried to think of projects I could use them for. Alas, as Beyonce blasted in my ears, I thought of nothing and ran past. Fast forward a few days to when the Creating with the Stars announcement was made and I learned theme one was Upcycle. In the midst of picking my jaw back up off the floor, I remember those grimy tires. Early Saturday morning, still bra-less and in my PJs, I drove to that house and hurled the one tire that was left into the back of my car. Let’s hope the morning fog prevented most from seeing that. Don’t be fooled, though the kids look excited, they are confused as to why mommy threw garbage in the car.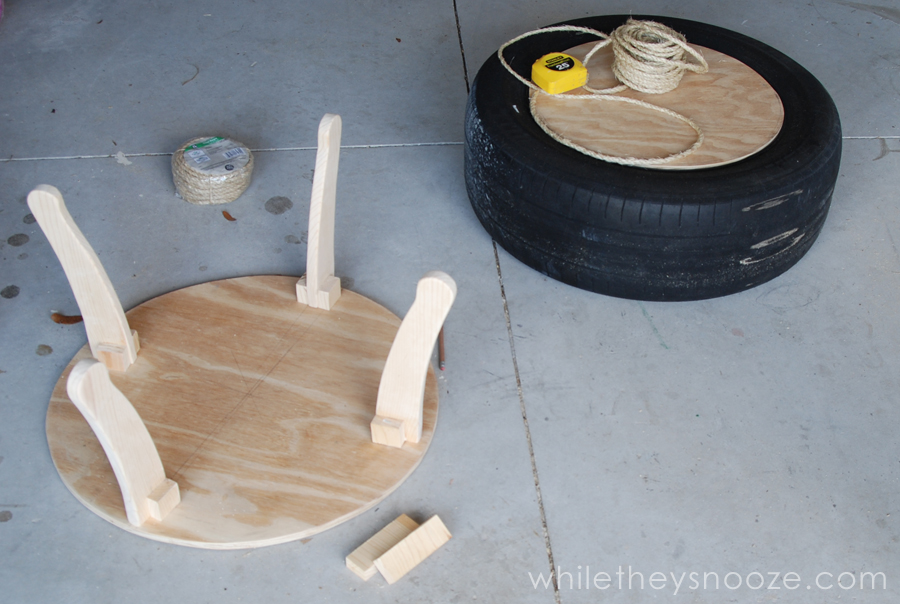
As the tire lay in my garage, it dawned on me that it was the perfect size/shape for a side table. 24″ round. Just needed some legs and some (a boat load of) prettying up. Here’s what I did.
Supplies:
 I used a jig saw to cut the circles. A chop saw, table saw, and jig saw the cut the legs. Drill to attach the legs.
Step 1: Scrub your tire.
Chances are it’s going to be really grimy. Give it a scrub with some dish soap to cut the grease. This will also help your adhesive stick better. Let it dry.
Step 2: Cut out two plywood circles.
First circle should fit in the center of your tire to make a flat surface to form the table top. I measured, then nailed a piece of string into the center of my plywood, attached a pencil, and drew the circle. I had to sand the edges of the circle here and there to make it fit in the tire.
The second circle is the base that the tire will sit on. Trace your tire and cut the circle one or two inches smaller than that.
I bribed the hubs with lunch so he would cut them out for me. 🙂
Step 3: Cut out some legs.
Since this table will be replacing another (ugly) table in my living room, I measured the height of that existing table. It was 20″. The tire is 9″ high, so I needed 11″ legs. Side tables vary in height though. They should work well with the seating they will be next to. So measure your tire and then figure out how high you need your legs.
I must confess, my husband came up with the idea of using the rocker slats from our rocking octopus, cut in half, for the legs.
Since I didn’t want to destroy the octopus (poor Ollie!), we took them off, traced them onto some scrap pine from the garage, and cut them out. If you don’t have rocking octopus legs to trace 🙂 rectangles would be fine!
Trace.
Cut out.
Cut in half and sand smooth.
Step 4: Assemble the legs.
Take your larger base circle and arrange the legs equally spaced around the perimeter. To make the table a little more sturdy, I cut some small blocks from the scrap pine to use as supports for the legs. I glued the blocks to the legs with wood glue and clamped overnight. Once they were dry, I glued them to the wood circle, attached L brackets, and put a screw in through the top of the wood.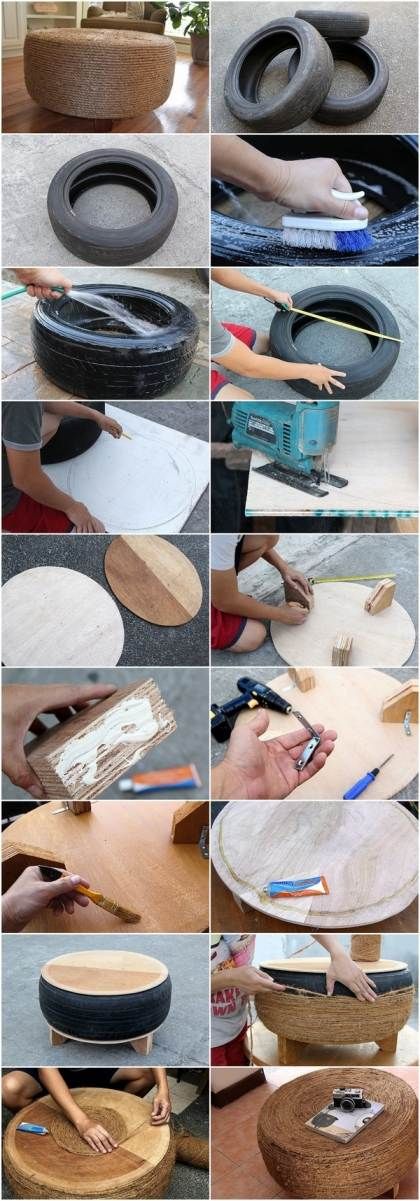
At this point I stained the legs and the rim of the base circle. However, they didn’t turn out that great. I’ll fix that in a minute.
Step 5: Glue tire to base.
Once the legs are secure and dry, flip the base over, apply generous blobs of construction adhesive, and set your tire in the center.
Step 6.: Glue smaller circle to top of tire.
The smaller circle should fit slightly inside the inner curve of the tire so when it’s in place, the whole surface is flat… or close to flat. Since my tire has the rim, I just glued to that.
Step 7: Glue rope to tire.
Attention: hot glue does not stick to tires just incase you were considering it. 🙂 I tried… no go. Stick with the liquid nails. Bonus: Liquid nails is the same color as rope. Some of it bled through. You can’t even tell. Turn the table over, start around the base, and work your way to the top of the table.
Keep going! Once you get around the lip it’s easier if you flip it back over.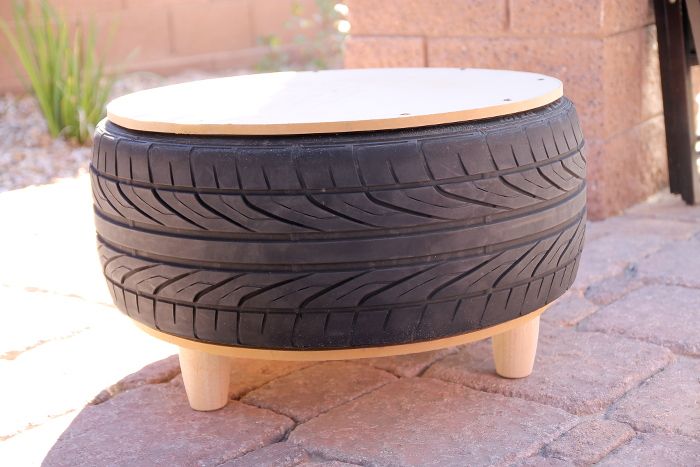 I used a combination of sisal rope (the lighter color) and natural manila rope (the dark color). Both are sold in 50′ sections at Home Depot.
Once you get to the top rim it gets tricky. The rope kept wanting to pop off so I had to keep it taped down with painter’s tape as I went until the adhesive dried.
Then, when I hit the plywood, I switched to hot glue. Much easier! (Does anyone else have toys mixed in with their projects?)
Step 8: Paint the legs.
Remember how the stain on the legs came out kind of meh? Sarah from Thrifty Decor Chick had the great idea to “dip” them. Basically, I painted the bottom half of the legs bright citrus yellow. Not meh anymore!
And that’s it. You can put the rope down. You’re done. I can’t wait to have people over and see if anyone knows it’s an upcycled tire!
My staging assistant. ; )
And so you know last week was one CRAZY week… here’s a lovely shot I took of myself, gluing rope to a tire at midnight while the rest of the family snoozed. Enjoy.
Ahhh, so fun! You guys have to see the behind the scenes look at Sarah’s round 1 project. You know we love it when people keep it real! Sarah is super talented with a sewing machine, but we totally dig these fun DIY Chevron Curtains she made from Ikea curtains.
Be sure to check back tomorrow to see how Sarah created that who-would-have-ever-thought-you-could-do-that-with-egg-crate-insulation light fixture. Omw. Soooo creative.
Also, do you want to be a part of Creating with the Stars yourself? You can link up your favorite upcycle project right here until tonight at 10 PM EST for a chance to win a great prize package and be featured on EC2!
Happy Friday, friends!
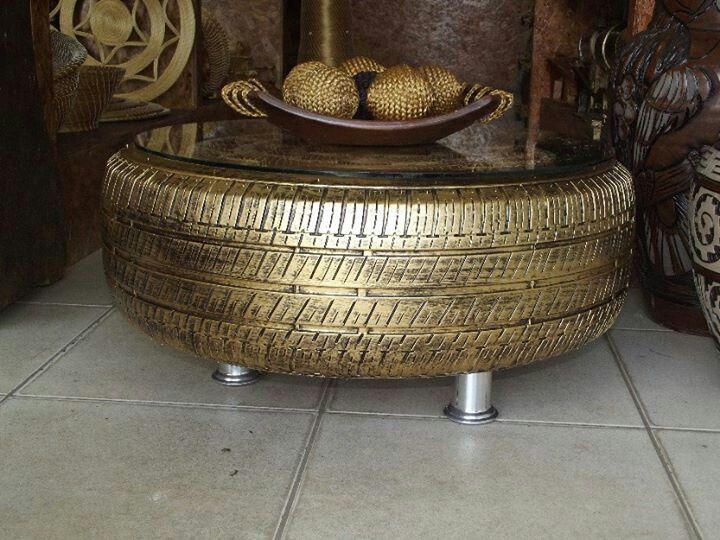
One or a hundred tires can always be made into new things that create great interiors and exteriors. Imagination and creativity help to find numerous ways to reuse or recycle old car tires, this presents an opportunity to give a personal touch to home decor or garden design. Worn out and useless tires creative people turn into furniture, flower pots or swings for children.
Contents
Rubber is very strong and soft due to elasticity, it is easy to work with: 9003 9006 tires will become a cozy courtyard place near the hearth and in a country house. The rubber is decorated with a fabric that matches the current decor. It's easy to make and great for a lounge area.

It is recommended to use the oldest tires. They had much more time to oxidize and get rid of harmful chemicals. New tires have a characteristic smell, old ones do not smell because they have been exposed to oxygen and the atmosphere.
Do you have a tire and don't know what to do with it? You can build a stylish DIY tire table that matches your personality. It can be used indoors or outdoors. The main thing is to use your imagination.
Materials:
Step 1
Start the cleaning process using the hose. Since the tire is likely to be old, dirty and greasy, it needs a bath with soap and water. A stiff bristled brush and dishwashing liquid will help remove grease and dirt. After you have cleaned the tire, you need to rinse it, let it dry completely.
Step 2
Use plywood to make the top and bottom of the tire table. Start from the top. Decide how large the table surface should be, and then measure this distance with a tape. With a pencil, mark the center on a piece of plywood, then tie the thread to the pencil to draw a circle. For the bottom of the table, measure the diameter of the tire, then subtract 5 cm. Both circles are cut out of plywood with a circular saw, remembering to wear goggles.
Step 3
Three or four legs for a new table can be unscrewed from old furniture. To make new legs, you need to create a template, cut the pieces on plywood according to it, and then cut them out with a saw.
Spread the legs around the round table bottom, then attach them with wood glue. Next, an additional support is created, the legs are fixed with screws or corners.
Step 4
After the wood glue has dried, the plywood circles are attached to the top and bottom of the tire with construction adhesive. Start from the bottom, smearing it around the perimeter with a large amount of glue. The tire is centered, then, after the glue has dried, the plywood is attached to the top.
Step 5
An alternate, simpler side table would require two to eight rails and any shape of wood or glass top. The tires are stacked one on top of the other to create one or two support columns. Structural adhesive is used for fastening. The tabletop is leveled, then secured in place.
Read more:
05/03/2017
It is not good to throw away something that can be reused .
This applies in particular to environmentally harmful materials such as tire rubber.
Used tires are valuable material for craftsmen.
At home, in the country and in the yard, you can build many interesting crafts from old tires.
Skillful hands of craftsmen turn them into proud swans, a fence around the site, decorative wells, comfortable benches.
How to make furniture from tires with your own hands - later in our article.
Content
There are several options for making tire tables. Let's dwell on each of them in detail.
Washed, dried, degreased rubber wheels without discs are first painted with acrylic, bituminous, enamel paints.
The most suitable paint mix for tire treatment is rubber paint . It withstands hundreds of cycles of sudden temperature changes, as well as atmospheric precipitation, without cracking or deforming.
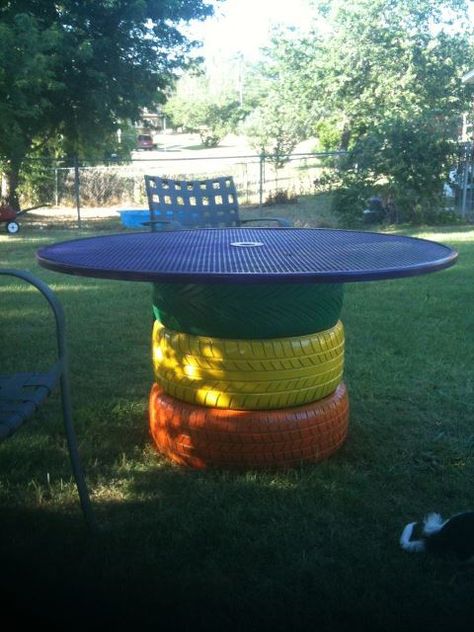
Tires are stacked one on top of the other in the place where the table needs to stand. Need to install two stacks of tires , 4 pieces of each, preferably in different colors, at a distance of about half a meter between the outer walls.
On top of two stacks of multi-colored tires, a rectangular sheet of strong material that is at hand is laid flat on top:
To the top rail of each stack worktop is fixed with four diagonal screws at the contact points.
The edges of the sheet must protrude at least 10 centimeters beyond the outside diameter of the tires.
The table top can also be painted in any color that pleases the eye.
To prevent the wheels from moving, there are two ways to fix them:
Depending on the design, such a table will fit perfectly in the country, on the playground, in the garage.
This type of product is made from one tire, but in larger sizes . By the same principle, you can make stools and chairs.
Of course, it will not work as a full-fledged dining table, but it can serve perfectly as a coffee table.
Let's get started:
This decorative table with legs will serve as an effective stand for a beautiful vase, magazines, pocket items.
The next method will require a little more effort and creativity.
Procedure:
 This will be the reference plane of the table.
 At such a table it is great to play board games in the evening at the cottage, read newspapers.
To make chairs out of tires, follow these steps:
 This will be the back of the chair.
 The garden chair is ready, you can rest on it between work on the site.
There are several options for creating a product. Let's dwell on the most popular, spectacular and uncomplicated.

It turned out to be a very comfortable chair made of tires for giving, a private courtyard, a recreation center.
It is best to build several of these chairs for all family members.
Another version of the chair:
This is a cozy armchair with a minimalistic and laconic design.
It can be as shown in the photo or slightly modified depending on the materials that are on hand.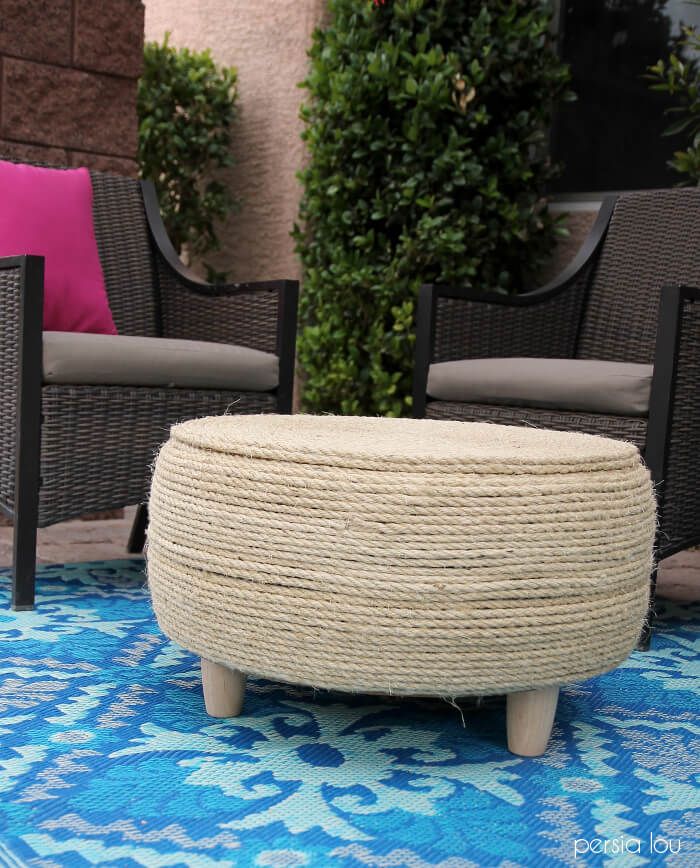
Why not an imposing leather armchair from a designer furniture salon!
It is not a shame to furnish not only a country yard, but also creative interiors of apartments or houses.
In Europe, such furniture in living quarters is no longer a rarity, because the ecological trend is gaining popularity every year.
At the dacha, every item, every useful thing is welcome. There is a spirit of fantasy and creativity here. Every seemingly unnecessary item will always find its use. Worn-out automobile rubber is a valuable material here, a strategic raw material.
It makes an excellent swing for children, front gardens for flowering plants and green spaces. Tires make brightly colored houses.
Benches for sitting, rocking chairs, funny insects and striped caterpillars, flowerpots - this list of uses for old tires is endless.
In this video, the process of creating furniture is shown more clearly:
