Changing the tire on your ATV or side by side is a pretty straight forward process. There are some specialty tools that can make the job easier, but you can also accomplish a tire change on your own with some cool little tricks.
The hardest part about mounting a tire is getting the old tire off the rim and the new tires on. There’s a couple ways to go about this and some tips to make your life easier. Balancing the ATV tire is really only necessary if you’ll be getting up to speeds over 45 – 50 mph.
Here’s the steps you’ll use to remove the old tire and mount the new tire, don’t worry I’ll go into more detail on how to do each of these step by step.
Always start with safety when performing maintenance on your machine. It’s best practice to wear gloves and eye protection when working on your quad.
First off, get the wheel off the quad and deflate the tire. It’s easier is loosen the lugs a little bit before you jack the quad up. Loosen and remove the lugs in a criss-cross pattern, the same way you would install them. Once you have the wheel off the ATV it’s time to deflate the tire for removal.
To deflate the tire, remove the cap and release all the air in the tire. Most tire pressure gauges will have a little notch on one side, that you can use to push in on the valve stem to release the air in the tire.
Or you could always use a screw driver or punch tool, basically you just need to push down on the valve stem to release the air somehow. Once all the air is released from the tire, you can use a valve remover tool to get the valve cores out.
Here is a link to a Tire Valve Stem Tool Remover & Installation Kit on Amazon. This kit has everything you need to deal with the valve cores of the tires. I highly recommend getting a tool like this if you ever plan on doing any type of maintenance to your tires.
You can try to remove the cores yourself with a wrench or something similar, but that option usually leads to damaging the valve cores beyond reuse. In fact, I’ve never seen this done successfully without a valve stem removal tool.
Once the tire has been deflated, it’s time to break the bead seal. This is sometimes the most difficult part of the entire process because the bead is set into the rim a lot more firmly on off-road tires than it is on car tires.
And to top it off, a lot of times there is some sort of bead sealer on the bead to keep the tire from popping off.
If you plan on changing a lot of tires, I suggest looking into getting a tire changer tool. This PowerLift Manual Tire Changer Base on Amazon is only about 55 bucks and makes this step so much easier. If you don’t want to spend the money, that’s ok, this can be done with basic garage tools as well.
A popular option to break the bead is to put the tire on a piece of plywood, or something so the tire doesn’t dig into the dirt.
Then place a jack on the tire near the bead, then simply jack up into something heavy like a truck bumper or hitch.
Repeat this process around the tire on both sides in places where the bead is till set.
Or you could build your own homemade bead breaker with a couple 2x4s like in this picture here.
I would use a chain or something connecting to a piece of wood underneath the tire instead of a car as leverage, but that’s the fun of doing it yourself, use your imagination.
The whole goal of this step is to get the bead off the rim so you can remove the tire.
However inventive you’d like to get is up to you. I’ve seen people use a giant clamp to pop the bead off the rim before. You could use two pieces of 2×4 on each side of the tire and a ratchet strap to pull them together to press the tire off the rim.
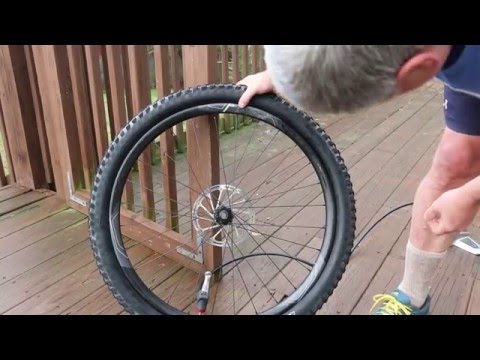
Now that you’ve got the bead of the tire unseated from the rim, it’s time to get the whole tire off the rim. This is sometimes called peeling the tire off the rim.
You’re going to want to take extra special care to peel the tire off the short side of the rim.
You can find the short side of the rim by looking at the depth on both sides of the wheel. The short side has a shallower depth and will be the easiest side to pull the tire off on.
The best tool for this step is a set of tire spoons or a tire changing tool set, like this Fasmov Tire Iron Tire Changing Tool Set. If you don’t have one of these, not to worry, they’re pretty cheap to buy a set, or you could just use a couple pry bars or something similar instead.
I would advise against a screw driver though, the larger ones may work pretty good, but be extra careful not to damage the tire or rim. Well, I guess you can damage your old throw away tires, but you need to do this later on to put the new tires on too.
Start by pushing the tire down into the open area near the rim. Use your tire tool or pry bar to pull the tire up over the rim. It’s best to use the the tool like a lever, sticking the tool down so that just a piece is under the tire and pressing down to pop it over the rim.
Hold that piece of tire over the rim and use the tire tool piece with a lip to work your way around popping the rest of the tire over the rim. Like you see in the picture above. It’s easiest when you use all three tools in the kit because the middle tool will get freed up with each new section of tire you pop over the rim.
Eventually you’ll get to a point where you can just pull the tire off by hand. Then you’ll use one of the tire tools to simply pop the tire off the other side of the rim.
Now that you’ve got the old tire off, you’re going to want to clean the lip of the rim where new tire bead will sit. It’s important to clean this area really well to be sure you get a good fit with the new tire.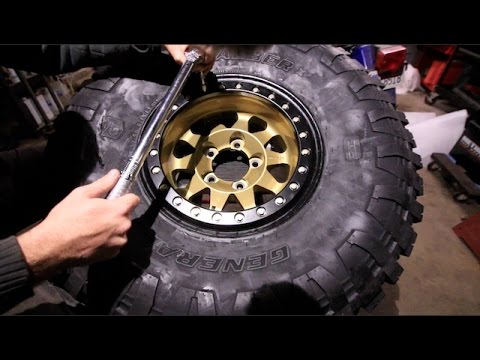
You won’t always need to use a bead sealer, but will always want to clean the lip of the rim. You will only need to use a bead sealer if you think the tire bead won’t seal well enough on the rim on it’s own.
This is usually only a concern if the tire is real beat up around the bead or if the rim is bent up and gashed to the point where the tire won’t seal on the rim.
If you can get away with not using a bead sealer, than I wouldn’t use it. It makes it harder to remove the tires next time you do a tire change anyways.
You will have to clean and lube the tire bead to help with mounting the tire on the rim. To clean it, just make sure the bead is free of debris and gunk. Usually a new tire won’t have dried up sealer or other stuff in the bead yet.
After you’ve made sure the tire bead is clean, it’s time to lube it up and put the tire on the rim. They do sell nice and fancy expensive tire lubes, but I’ve found that some soapy water works just as good.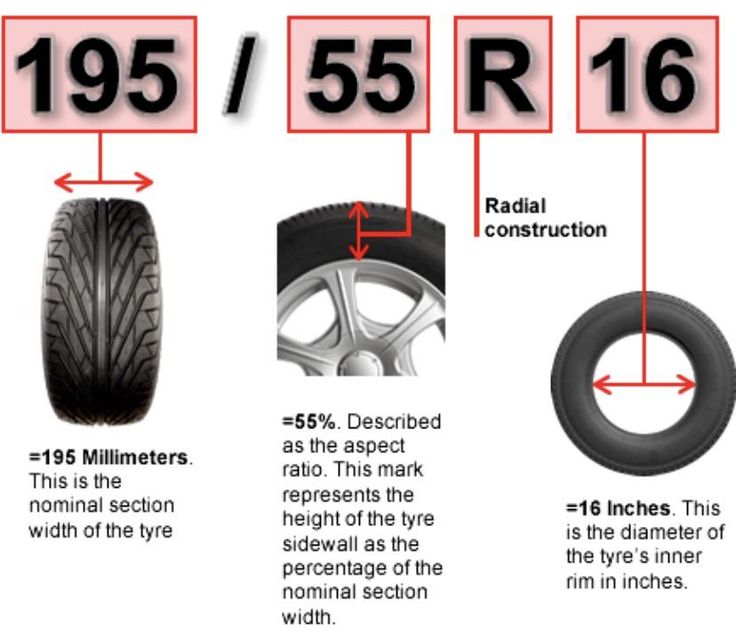 Lube both sides of the bead, inner and outer, if you don’t, it’s going to be really hard to get the tire on the rim.
Now’s a good time to check tire direction. Most ATV and UTV tires will not be directional, but they do make tires that should only be put on a certain way. This is because the tires is designed with groves facing a certain direction to help with traction.
You could look at the side wall of the tire for an arrow, or just decide for yourself by looking at the tread which direction you want the tire to be mounted on the rim.
Now to get the tire on the rim, remember to start with the shallow side of the rim. Place the rim on the ground, on something that will keep it from sliding away from you, with the shallow side facing up. Now poke the bead part of the tire into the shallow side of the rim and press down on the tire until it pops onto the rim.
Ok, you’ve popped the tire onto the rim, now you need to get it seated and the bead lined up correctly. You can kneel down on one section of the tire and use the tire tool or pry bar to seat the rest of the tire into place, as you can see in the picture.
Try using your knee to keep the tire from popping back up on the other end, your free hand will help with this as well. After you get to a little more than half of the tire pryed onto the rim, it will be easy to just push it the rest of the way on.
Now that the new tire is on the rim, it’s time to set the beads on both sides of the tire. If you have a small portable air compressor for airing up tires, that might not be enough to seat the beads.
You can try inflating the tire with the core out, to help you get more air in the tire more quickly to seat the beads. Then once the beads are seated, put the cores, or valve stems in and inflate the tire.
You will usually need a higher powered air compressor to seat the beads. The even make special designed Tire Seating Blaster Inflator Air Compressors made specifically with enough power to seat the bead of the tire.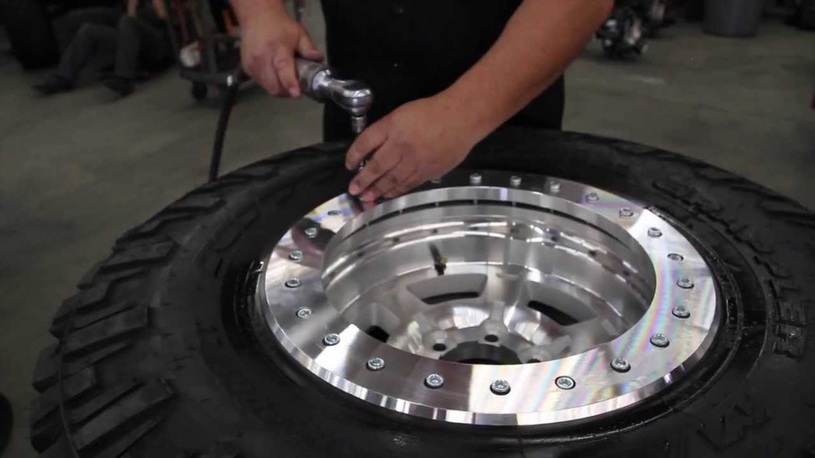 That’s because a compact portable air compressor doesn’t have enough power to do it.
Another popular option you could try is to spray starter fluid into the tire and light it with a lighter. The starter fluid burns all the air out of the tire and pulls the bead into place. To legally cover myself I am going to say to never do that. But, I’ve used this method plenty of times and it works like a charm.
Then once the bead is set, put the core back in and inflate the tire like you normally would using any air compressor you have. If you plan on riding at speeds over 35 mph, it’s a good idea to balance the tires at this point.
Check out my How To Balance ATV Tires article for the step by step instructions on how to balance your tires.
Sharing is caring!
How to Mount ATV Tires
Mounting ATV Tires at Home
If you’ve been thinking about changing ATV tires or UTV tires at home, know that while it can be tricky the first few times because these tires tend to have stronger beads than on-road tires, it’s a pretty straight-forward process as long as you have the proper tools, and follow this step-by-step tutorial from the tire experts at Treadworld. Also keep in mind that air under pressure is potentially dangerous so take any necessary precautions. Balancing your ATV tires can be difficult and is likely not necessary unless you’re racing or engaging in high-speed ATV and UTV activities.
The Tools You Will Need to Change ATV Tires
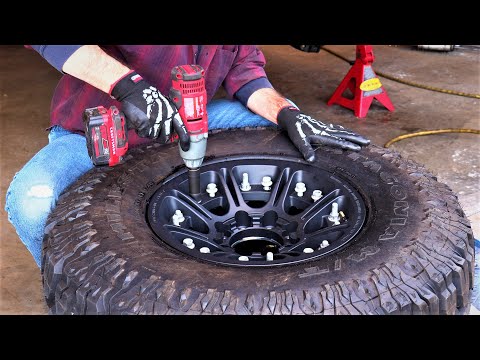
Remove the wheel from the ATV
When mounting ATV tires at home, it’s best to start with your ATV on a hard floor like a garage. Loosen the lug nuts a little to make them easier to get off, then jack up your four-wheeler so you can remove the wheel. Consider getting the bolts off using a hand tool rather than an impact wrench, which can on occasion be powerful enough to snap a bolt.
Deflate the ATV tire
Remove the cap from the valve stem and release all the air in the tire using either a valve stem core removal tool which will remove the stem and is the quickest method, or a tire pressure gauge that has a notch on the side used to push in on the valve stem or a screwdriver, which will take longer.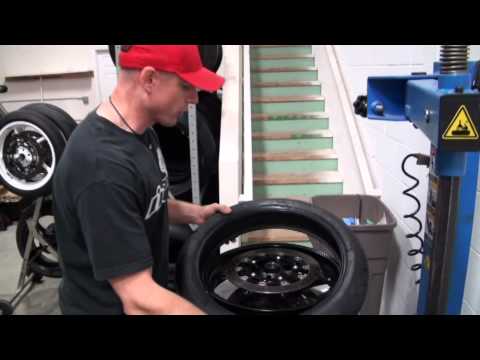
Break the bead on both sides of the ATV tire
This is likely the toughest part of changing an ATV or UTV tire because the bead is set to the rim a lot more firmly with off-road tires, than with on-road tires. That’s because off-road tires are asked to do things on-road tires don’t, like ride steep slopes, travel rocky terrain and land jumps. First, here are a few details. The bead retainer is a small ridge that goes all the way around on both edges of the wheel rim. It is intended to keep the tire in place so that aggressive riding won’t result in it sliding and losing the air seal. The tire bead is on the edge of each tire. Essentially, it’s a strong steel reinforced loop around both edges of the tire. Many times, a bead sealer is used on the bead to further keep it from popping off. In a nutshell, with this step, you’re getting the bead off the rim so you can remove the tire.
3 options for breaking the bead on ATV tires at home
There are essentially three ways to break the bead on an ATV tire.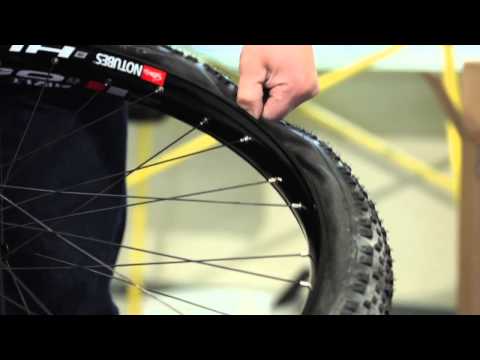 Likely the easiest method is with a BeadBuster, a tool designed for the job that clamps onto the rim and forces a wedge between the rim and the tire. BeadBusters are quick, simple and offer less chance for damaging the tire than other methods. A quick look shows they currently sell for around $100 at online shops. A cheaper alternative is using another of the several available portable tire-changing tools, generally available at any hardware store or auto supply shop. Most models need to be bolted to the floor, or some other heavy object. If you go with this alternative, you’ll want to leave 3-5 PSI air in the tire to facilitate success. Finally, there is the DIY method, which involves your inventiveness. Start by putting soapy water on the bead to help it slide. Devise the best way to get the tire in position so you’ll be able to force the tire to break free of the bead. You may want to use a 2×4 set as close to the rim as possible to push the tire edge away from the bead. Then flip the tire and do the other side.
 Again, it may help to have 3-5 PSI of air left in the tire with this method.
Peeling the ATV tire off the rim
You’ll want to use tire spoons or large screwdrivers for this step. Place one of the irons between the tire and the rim, and lift a section of the tire over the rim. Using one tool, hold that section away from the rim, and use the other tool to edge the rest of the tire over the side of the rim. Continue with this process until the full tire is from the rim, then remove the tire from the wheel rim completely.
Clean the lip rim on both sides and consider a sealer
The better you clean the lip rim on both sides, the better your new tire will fit. Wash off any dirt and debris. Use a stiff brush if necessary. Remove any rust. To get a good airtight seal, you need the surface to be smooth. If your rim shows any signs of pitting, nicks or other damage, you’ll likely want to apply a bead sealer, which is a rubber product designed to aid in bead seating.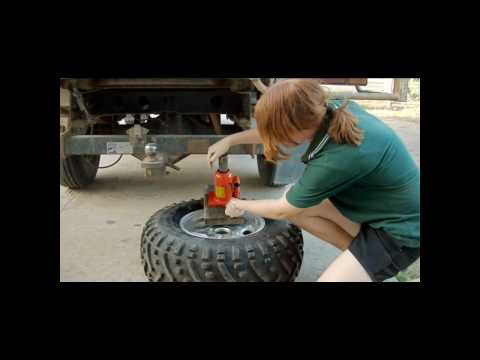 You may want to skip the bead sealer if you don’t need it in order to make changing the tire in the future easier.
Clean and lube the tire bead on the new ATV or UTV tire
So that the rubber will slide easier, put commercial tire lube or some soapy water on the bead retainer on both sides of the wheel rim. You can also use a light coating of baby powder, but stay away from WD40 as it can deteriorate rubber.
Check to see if your ATV tire is directional
Tires can be directional or multi-directional. Directional ATV tires should be mounted in a certain way for best traction and optimal performance and safety, while multi-directional tires work in either direction. Some types of four wheeler tires are directional depending on usage, like ATV mud tires for example. Look on the tire sidewall for an arrow, which indicates the tire is directional and should be mounted with the arrow facing the direction of the forward rotation. Another way to tell is by looking at the tread. A tire with an aggressive V-tread is likely a directional tire and should be mounted so the tip of the V hits the ground first. Directional tires can be mounted on either side.
Pop the new tire on the rim and get it seated correctly
The next step is to get the tire seated and the bead lined up correctly. Start by putting soapy water or lube onto the wheel rim. With stiffer walled tires, place the tire on the garage floor then push the wheel into position. With tires that have a less-stiff wall, placing the wheel on the floor and positioning the tire may be easier. Push straight down with both hands to slip the bead of the tire over the lip of the wheel. To get the second bead pried over the lip of the wheel, you’ll need to use your tire spoons, working your way around the tire until you have the entire bead pried over the wheel. To hold air, the tire needs to be firmly seated on the bead. At this point, be sure the tire is lubed up and begin using your higher-powered air compressor to put air in the tire.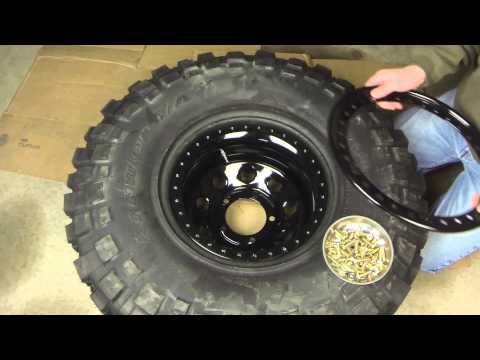 Don’t over inflate. The maximum inflation pressure should be stamped on the sidewall of the tire. The expectation is that as the tire inflates, both beads will seat themselves, as indicated by a loud “pop”, which should happen at a fairly low air pressure, 7-8 PSI. Once that occurs, let the air out of the tire. The beads will remain seated.
You may have difficulty getting the air into the tire fast enough to get the beads seated. That’s due to the gap that still exists between tire and rim. A good way to solve that issue is to tighten a ratchet strap around the middle of the tire, pushing the tire walls out towards the lip of the wheel on each side. Stop tightening as soon as the tire touches the tip of the rim. Then the tire should hold air because the gap has been closed.
Reinstall the valve stem and inflate the tire
Use your valve stem tool to reinstall the valve stem, then inflate the tire before capping the valve stem to keep it free of debris. Now you’re ready to reinstall the tire on your ATV, having solved the problem of how to mount ATV tires at home.
Find Master ATV Tires here. Big selection, fast shipping and guaranteed quality.
Here at Treadworld, we have the ATV tires you need for wherever your adventures take you. Our wide selection of Master ATV Tires and Master UTV Tires are the high performance tires you want, made from top quality rubber compounds, triple-tested for quality before being X-rayed to be sure they’re perfect, and covered by our Ultimate Advantage Warranty. Don’t hesitate to contact our tire experts via live chat or email with any questions you may have, and to get the ideal Master ATV tires for you.
A four-wheeler is an SUV by definition, which means that tires for a ATV are the most important part that ensures its flotation. Going to conquer the next track, you must be confident in your four-wheeler.
Whether racing or riding a quad over rough terrain, you can count on a safe and comfortable ride. Experienced riders know that only high-quality ATV tires can provide maximum comfort and safe handling of this exciting vehicle.
Given the fact that the ATV was originally destined to conquer the off-road, manufacturers shoe SUVs in tires that provide confident driving on hard dirt roads. Naturally, a car on such wheels can also zip along the highway, although driving on public roads for most models is prohibited by traffic rules.
Even if you are not a professional athlete, you are unlikely to resist the temptation to conquer the viscous wetlands, or test the quad in liquid mud to evaluate its ability to overcome impassable areas. After all, that's what you bought the SUV for. Is not it? And if so, then it is clear that ordinary quad tires are of little use for sorties into the area, replete with deep puddles filled with viscous mud. It's time to think about equipping your ATV with real mud tires.
Real mud tires, unlike standard tires, have larger lugs that can bite into loose soil or sand. The tread, in the form of a discharged Christmas tree, resembles a pattern on tractor wheels. The diameter of such tires is increased and, depending on the model, ranges from 25 to 34 inches.
The most sought after ATV tires are between 26 and 28 inches as they fit most ATVs without any suspension modifications. The width of the cross-country tires is slightly larger than the standard tires, and the width of the front and rear tires is different. This allows the front tires to follow their own path, while the rear tires follow a slightly different path, gripping the curb and allowing you to go a lot further.
Under normal operating conditions, the main parameter that affects the stability and handling of the ATV is the crown - the tread area in contact with the road surface. The larger the contact patch, the better the handling on firm ground. Therefore, if you are a fan of high speeds, like to maneuver and ride on rough terrain full of hard dirt roads, forest rolled roads, as well as any other hard ground, choose tires with a radial cord construction (example 1, example 2, example 3). Also, the radial design of the cord very well fulfills the bumps that can get in your way, a protruding tree root, stone or something else, the radial design will allow you to overcome this bump in the most comfortable way!
ATV wheels require softer, lighter rubber for maximum road contact and traction to confidently tackle swampy terrain. Cross-country ability is enhanced by a special tire design. An important role belongs to the lamellas, which have a peculiar shape and optimal height. The ability of the lugs to self-clean is very important, since the adhering dirt greatly complicates the patency on loose soils. Sidewall strength is also important for mud tires. Passing elastic wheels on deep ruts is associated with the risk of damage. The presence of strong sidewalls minimizes such risks.
The diameter of the tires affects the ground clearance of the all-terrain vehicle, the increase of which increases its cross-country ability. The width of the tire changes the area of its contact with the road. Wider profiles sink less into soft and loose surfaces, helping you to move confidently through the mud.
When choosing tires for an ATV, you should proceed from the expected conditions of its operation. Ideally, tires should provide comfortable driving, both on hard dirt roads and in mud. However, in practice it is impossible to achieve such results. Different manufacturers solve this difficult problem in their own way. In principle, all solutions come down to the creation of rubber optimized for use on a certain type of road: solid dirt tracks, or loose soils, mud, sand, grass.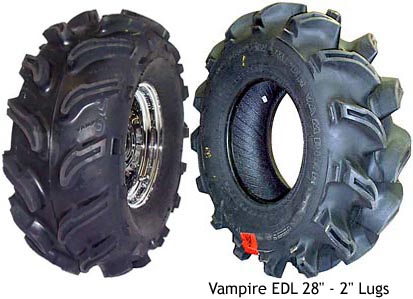 There are also all-purpose tires that provide average performance on different surfaces.
|
|
| DAKAR 2016. SERGEY KARYAKIN IN THE QUAD CATEGORY. |
The well-known American manufacturer ITP has succeeded in creating the perfect tire. It is by far the #1 tire and rim brand in its class. ITP products are known and bought by professional riders and extreme sports enthusiasts all over the world. Our well-known compatriot driver Sergey Karyakin participated in the Paris-Dakar race on tires with ITP rims. The ITP range includes the following tire types:
ITP tires are produced exclusively in the USA, which is an additional guarantee of their high quality.
The softness of ITP tires is superior to all known brands. But this indicator is very important for off-road driving. In an effort to find the best properties for different roads, ITP tire developers create tires for all conditions of use, creating new and unique treads that can cope with their tasks on any type of surface.
The main advantages of ITP tires include:
Just to add, ITP also makes excellent rims for the ATV in various sizes, including beadlock and reversible beadlocks. The discs are made of durable aluminum alloy and are lightweight and stylish. They are compatible with sport and utility models of modern ATVs.
ITP wheels are produced using an original casting technology that provides them with an enviable resistance to deformation and cracking. In the US, ITP provides a lifetime warranty on its discs. The polished surfaces of these wheels go well with the matte color of the tires and give the SUV a touch of special drive.
Equipping your ATV with ITP wheels and tires, you can safely conquer the most difficult tracks on it. It is by far the #1 brand for ATV tires and rims.
05/17/2018
The numbers written on the side of the rubber tire can tell the owner of the ATV everything that interests him. And if you are for some If you don't know what these mysterious numbers mean, then you can be mistaken when choosing the next set of tires. But tires directly determine whether it will go technique further or not. So, in this article you will close all the questions on about the decoding of size ATV tire .
All tires have their own basic parameters - this is the width, height and diameter. The value of these parameters is mainly measured in inches. Exists two units:
1) If you have ATV, then this is for you. English version is the most common number system that is used when determination of tire dimensions on ATVs. All measurements here are in inches. (1 inch equals 2.54 cm). For example, the size indicated in English classification looks like this - 25x8x12 . Let's take a closer look at the meaning of each digit:
- The first digit 25 shows the height of the tire in inches;
- The second digit 8 indicates the width of the tire in inches;
- The last, third digit 12 indicates the diameter of the wheel disk, it is also measured in inches. Disc diameter on each ATV can be different. Therefore, be careful before you buy tires for ATV, see what regular disks are installed on your vehicle.
And a very important point worth noting. Often our customers ask themselves: “If I have a tire size of 20x10x10, can I put instead of them 20x11x10? The answer is yes. First, you can put rubber on regular wheels with a size exceeding 1 inch in height and width. Secondly, if you want tires even wider, then for this you will need to buy other disks. But again, there are limitations. On discs of other diameters, you can install rubber, the largest is only 2 inches in height and width.
These two rules must be strictly observed, otherwise, if you try to put tires of an unacceptably large size, this may adversely affect on a quad bike. After all, the rubber will be larger and, accordingly, heavier, which does not fit the technical parameters of the ATV. In production ATVs take into account all the characteristics, so manufacturers of ATV equipment I don't recommend using bigger tires at all. But if you do decided to increase the size of tires, call our toll-free number, we we will help.
2) Also there is another version - metric . Here the dimensions are indicated in percentage and millimeters. For example, size specified according to the metric classification - 205/80 Rx12 .