Updated: Jun. 09, 2022
Next Project›
Family Handyman
Follow these simple steps for replacing a punctured bicycle tube. You can even fix the flat on the go if you have a spare tube, tire levers and a pump.
By the DIY experts of The Family Handyman Magazine
Step 1: Remove the tire and old tubePry under the bead of the tire with one of the tire levers and hook it to a spoke. Move over about 4 to 6 in. and insert the other tire lever. Pry it down and then slide it along the rim to release the tire.
The first step of how to change a bike tire is to release the brake and loosen the axle nut so you can remove the wheel from the bike. Most bikes have a quick-release mechanism on the brake and a quick-release lever on the axle. If you’re not sure how to remove the wheels on your bike, check the manual or visit your local bike store and ask someone on staff to show you how. Do this before you have a flat so you’ll be prepared. For a guaranteed trouble-free fix, buy a new tube rather than patching the old one (see “Valve Types” below).
After removing the wheel from the bike, the next step is to take one edge, or bead, of the tire off the rim so you can remove the damaged tube (Photo 1). Pull out the tube. Then remove the tire completely from the rim, put it around your neck like a necklace and turn it inside out while running your fingers along the inside to feel for sharp objects. Be careful, though—there could be bits of glass lodged in the tire.
If you don’t want to walk home after having a flat, here’s a tip: Assemble a tire repair kit like this. A repair kit is one of the most valued bicycle accessories you’ll want. You can put it in a resealable plastic bag and tuck it in a knapsack or buy a small pack that straps under your bicycle seat.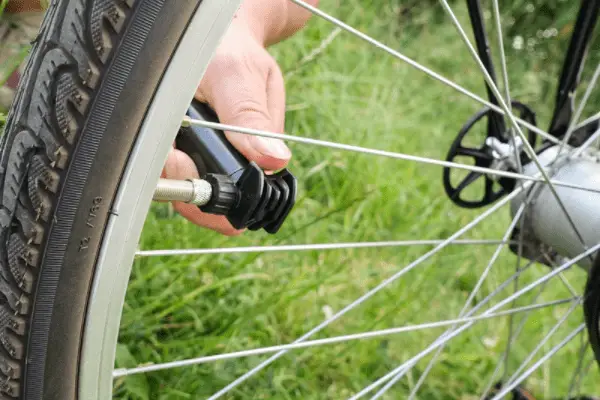 Not including the seat pack, the kit cost us about $38.
Partially inflate the new or patched tube and insert the valve stem into the hole in the rim. Then work the tube into the tire.
Press the bike tire back over the rim, being careful not to pinch the tube. If it’s too tight to push the last section by hand, use the tire levers to pry the bike tire onto the bike rim.
After checking the tire, put one bead back on the rim, leaving the other side loose so you can install the new (or patched) tube (Photo 2).
Photo 3 shows how to push the second tire bead back onto the rim after the tube is in place. When the tire is completely installed, check all around on both sides to make sure the tube isn’t pinched between the tire and rim. To do this, push against the bead and look into the space between the tire and rim to be sure it’s clear.
Now you’re ready to fully inflate the tire. But there’s one last thing to watch for. Occasionally the bead may not seat properly on the rim, so stop before the tire is inflated to full pressure and rotate the wheel while you inspect the area where the tire and rim meet. If you see a spot where the bead isn’t seated in the rim, let a little air out and work the bead into the rim with your fingers. Then inflate the tire to the pressure listed on the side. Reinstall the wheel and spin it to make sure it’s centered between the brakes and rotates freely. If you’ve done an emergency repair using the CO2 cartridge, you may not have enough pressure. When you get home or to a bike store or gas station, fill the tire.
When you go to buy a new tube, take the old tube with you and match the valve. Presta valves have a nut on a threaded shaft that seals the air in and must be loosened to inflate the tube. You need a pump that’s compatible with a Presta valve to inflate these tubes.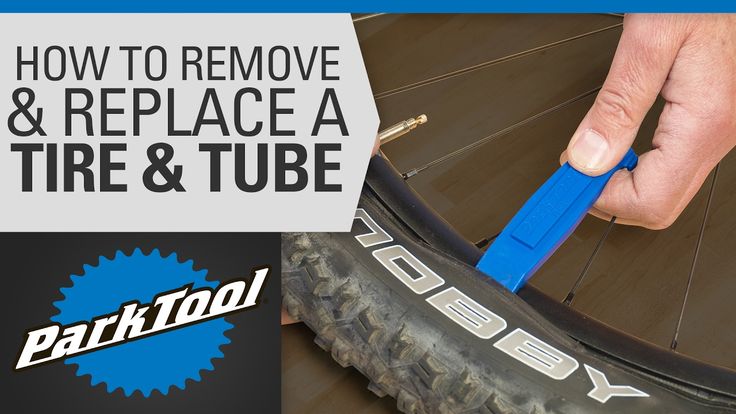 If you have Presta valves on your bike, keep a Presta-to-Schrader adapter with you so you can use a gas-station air pump to inflate your tire.
Next, check out how to change a car tire.
Originally Published: August 28, 2019
ⓘ
istockphoto.com
Experienced cyclists know punctures occur frequently, so it’s important to learn how to change a bike tire even if you are a more casual cyclist. When your bike tire is punctured, you may be able to repair it yourself. But if the damage is too extensive, or the tire is already severely worn, then replacing the tire may be necessary.
Typically, bike owners cannot repair large breaks, splits, or punctures with a tire patch kit. Similarly, any significant signs of tire wear, strain, or cracks should indicate it’s time to replace a bike tire. Most cyclists learn how to fix a bike tire to deal with minor punctures and replace one after more severe damage has occurred. If you need a refresher, are new to cycling, or are getting into bike maintenance, then follow the steps below to learn how to change a bicycle tire.
To access the bike tire, either put the bike on its side or stand it upside down, resting on the handlebars. However, some cyclists avoid placing the bicycle upside down because this position could damage the handlebars or seat. Choose the position with which you feel the most comfortable. Another option is to invest in an upright bike stand that can position the bicycle off the ground while you work. If you are laying the bike on its side, make sure the chain side faces up.
Advertisement
If you are replacing the back tire, then it’s important to adjust the gears to the smallest ring beforehand to make it easier to remove the tire. The smallest ring is the outer gear of the bike.
If the bike includes a quick-release lever, it will be located in the center of the bicycle wheel. Loosen and remove the lever by pulling up and turning the lever 180 degrees. Then set it aside for reinstallation. This should free the wheel to allow the damaged tire to be replaced. However, many bikes don’t come with a quick-release lever. If this is the case, then a wrench is needed to loosen the nut in the center of the wheel.
Typically, a 15 millimeter wrench will be the correct size to loosen and remove the wheel nut. Keep in mind that you can also check the bicycle manual or the manufacturer’s website for details on how to remove your specific bicycle tire. Additionally, if the nut is seized, WD-40 or a similar lubricant can be used to help loosen the threads and remove the nut.
RELATED: How to Change a Car Tire Like a Pro
istockphoto.com
If you attempt to remove the wheel without detaching the brake cables, the force can damage the cables. On some bikes, the brake cables will disconnect automatically when the quick-release lever is removed, but the brake calipers must be squeezed in order to release the cables in most cases.
Don’t forget to lift the chain off of the gears when replacing the rear wheel on a bike. Once the chain and brake cables are disconnected and the wheel nut or quick-release lever has been removed, you can lift or pull the tire out of the forked slot where it usually sits on a bicycle.
Advertisement
To remove the rubber tire from the metal wheel, the tire needs to be deflated completely. Take off the air valve cap and set it aside for reinstallation. Release the air from the tire with a wrench by pressing down on the plunger inside the air valve.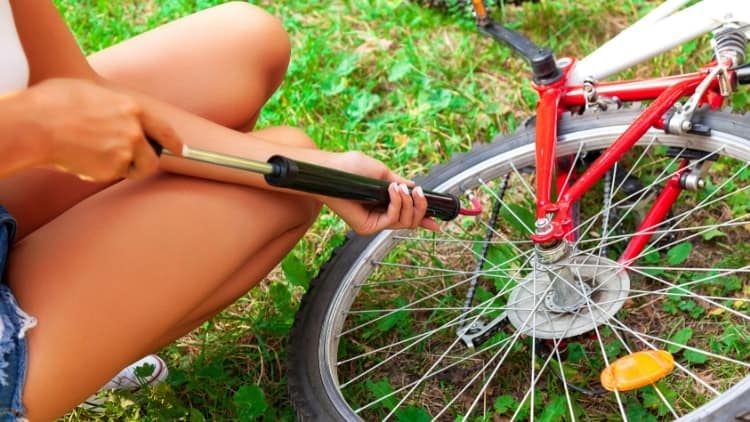 Alternatively, your bike may have a Presta valve or a Dunlop valve; these need to be pulled up to release the air.
If the air valve has a retaining nut or lock ring securing it to the wheel’s rim, then loosen and remove the part, placing it with the air valve cap for reinstallation at a later stage in the process.
The deflated tire will still be difficult to remove from the rim of the wheel. First slide a tire lever between the rim and the tire, then use leverage to pop the edge of the tire up out of the rim. Secure the tire lever to the spokes of the wheel and use a second tire lever on another section of the tire. Work the second tire lever around the rim of the wheel until the entire side is free. This should give you enough space to reach inside the tire and pull out the inner tube.
Once you have removed the inner tube, you should be able to take the tire off the metal wheel by rolling or twisting the tire over the edge of the rim with your hands.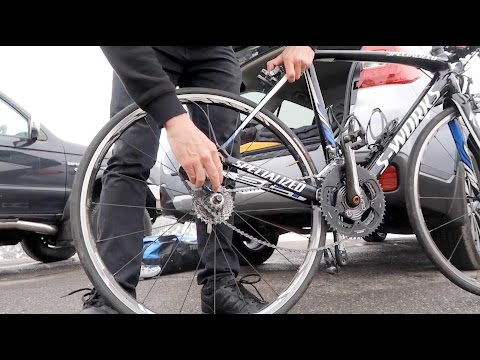 Work your way around the outside of the wheel until the tire is free, and inspect it for any serious damage. In many cases, only the inner tube needs replacing, but if there is severe damage to the outer tire, then it will also need to be changed.
Advertisement
RELATED: 15 Clever Bicycle Storage Ideas for Any Space
Take the new tube out of the packaging, making sure to remove the dust cap, lock ring, and valve cover. Unfold the tube and check to make sure it has no pre-existing damage, then connect it to a bike pump or tire inflator to add air to the new tire tube. Do not fill the tube all the way just yet.
The purpose of adding air at this stage is to help the tube hold its shape and avoid damage caused by pinching, bending, or twisting the tube while reinstalling it. Put any small parts in a safe spot to make sure that they are not misplaced.
istockphoto.com
Whether installing a new tire or refitting an old tire with a new inner tube, it’s recommended to inspect the inside and outside walls of the tire for any existing damage, severe wear and tear, or sharp objects that could cause additional damage before installing the inner tube. Refit one side of the tire on the rim of the wheel, ensuring the tread is pointed in the correct direction.
Slide the air valve through the valve hole and feed the inner tube into the hollow space inside the tire and wheel rim. With the tube in place, twist the outer edge of the tire so that it slips into the wheel rim. Try to start near the valve and finish across from it—the tire will be looser in this position. If the tire resists too much, you may need to let some air out of the inner tube or use a tire lever to help position the last section, where the tire is the tightest. Also, remember to reinstall the lock ring or valve retaining nut if your bike has one.
Advertisement
RELATED: 5 Bike Racks to DIY on the Cheap

Use a bike pump or home air compressor to fully inflate the inner tube. If the PSI is not written on the tire, you can refer to the bicycle manual or manufacturer’s website for the appropriate air pressure. Don’t forget to put the cap back on the air valve to prevent accidental tire deflation during use.
Slide the wheel back onto the bike and secure it with the quick-release lever or wheel nut, as applicable. Reattach the brake cables and lift the chain back onto the gears if you replaced the rear tire. Rotate the wheel to ensure it spins freely, then place the bicycle upright and test the repair with a short ride. Make sure to clean up any old parts and dispose of old tires through local recycling facilities. Some bike and car shops also have programs for accepting old tubes and bike tires.
istockphoto.com
Regular bicycle maintenance and proper storage can help keep a bike in top condition over years of ownership. Always replace or repair any tire damage as soon as possible to avoid bending a bike’s wheel. Also, during the repair or replacement process, make sure to keep track of all small parts, like nuts, lock rings, or valve caps. While small in size, their purpose is essential to the bicycle’s function, and losing one during a repair can create another problem needing to be resolved before the bike can be used again.
Advertisement
Nikolaev bicycle shop "Sportek"
Published: 02.02.2021
Beading tires on a bicycle wheel is a fairly common and not complicated procedure.
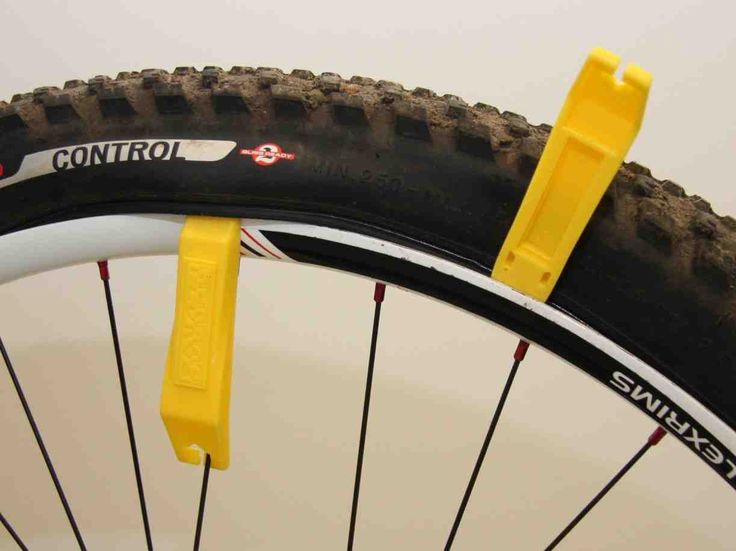
We will not tell you in full how to remove and put on a tire on a wheel rim - there are many different videos and articles about this on the Internet. Let us dwell on only one important moment, but not often discussed by the authors of videos and articles, when, when putting the tire on the rim, the last 10-20 cm remain, and the tire does not want to “sit down” in any place.
In order to tighten the last part, you need to make sure that as you put on the previous parts of the tire, the bead cable does not start to get into its “rightful place” in those parts of the wheel where the tire has already sat down.
That is, during the beading process, you should try to keep the edges of both beads of the tire with the bead ring in the center of the rim - where its “deepest” place is. Thus, slack is formed and the last centimeters of the edge of the tire are much easier to throw over the high side of the rim.
This is illustrated more clearly in the picture:
In case it doesn't work out at all, of course you can use the usual bead blades that many cyclists use.
But for these purposes, in addition to the commonly used blades, there are also special combined blades designed also for putting a tire on a wheel, and not just for removing it.
For example:
Featured Products
11 UAH
BauTech bead blade for bicycle tires (plastic)
15 UAH
BauTech bead blade for bicycle tires (metal)
Comments (0)
x
Lay the wheel on a flat surface with the ratchet up. It could also land around bike . We inspect tire itself . If this is a tire that was already on your bike, then you need to make sure that there are no remnants of glass, wire, nails in it and the tire cord is not rubbed or exposed anywhere.
Cord is a wire inclusion in the tire on the innermost diameter of the rubber - the seat of the tire. Broken, exposed cord does not hold the shape of the tire and can damage the tube.
Direction arrow on tire
Tires are marked with an arrow ROTATION or DRIVE, this is the recommended direction for wheel rotation. The tire is oriented on the wheel by rotation in the direction of the arrow in the direction of the bicycle, clockwise.
For front and rear wheel arrows in different directions
Arrows FRONT - direction of rotation for the front wheel and REAR - direction of rotation for the rear wheel .
A new tire and a used one must be installed according to the arrows printed on its side, on some the arrows are replaced by inscriptions in English, and the arrows can additionally show the direction. Arrows and inscriptions indicate the direction of clockwise rotation of the wheel.
Having decided on the direction, we tighten without any keys, only with our hands one side of the tire onto the rim, so that the arrows on the side surface point clockwise.
In order not to look for the nipple of the camera to inflate it in the future, it is necessary that the brightest pattern on the tire coincides with the nipple hole on the rim, so we turn the tire on the rim until this pattern matches the nipple hole on the rim.
Visible tire design
Inserting the inner tube into the tire begins with inflating the inner tube just a little, so that it just expands. It is easy to find a hole in the wheel rim from the picture on the tire and insert the camera nipple into the nipple hole.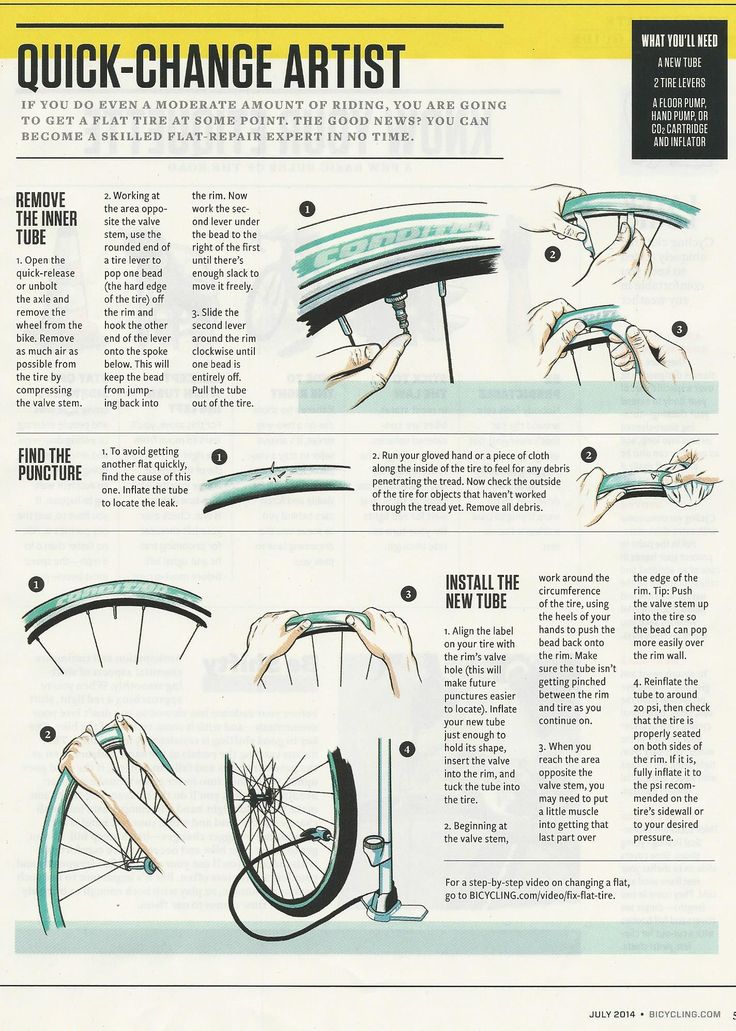 carefully straighten the camera inside the tire.
We finally fill the tire over the side of the wheel rim together with the chamber. We start again from the place where the nipple of the camera is located on both sides of it. You don't need keys for this! As soon as you have a sector left that is already difficult to tuck over the side of the wheel rim, we perform the following manipulations:
For those with caliper brakes on the , it will be difficult to put an inflated wheel on the bike. It is necessary to release the brake pads so that the inflated wheel crawls between them. Then return the brake system to its original position, so it is better to pump up the wheel already installed on the bike. Squeeze tire with your hands at the blocks and squeeze the wheel.
Recommended pressure
Inflate wheel to the value indicated on the tire. Usually it is 4-4.5 bar. If there is no pressure gauge in the system for supplying air to the chamber, then you need to pump to the point where pressing the strongest hand with your thumb and bent index finger on both sides of the tire will not significantly crush the rubber of the wheel.
If the hand is female, then you need to press on the steering wheel, saddle or trunk with your whole body. The rubber should slightly deform at the bottom of the wheel against the support surface.
Pumping a bicycle with a conventional pump is difficult - you need to try. Transferring is not recommended. A well-inflated bike has a light, good ride. Under-inflated tires on a bike impair the ride of the bike, leading to premature tire wear.