Home - Dirtbike - Dirtbike Features - ATV Electronics series: Part 1 - ignition systems
Few things can be as frustrating as diagnosing electrical systems. After all, there are seldom obvious signs of failure - I mean, you just can't see if electrons are flowing or not. Sure, every now and then you find a corroded connection, frayed wire, or burn looking electrical thingamajig. But how can you tell if your CDI or stator is bad? It's a real drag to have spent $100 or more on a new coil only to find that your safety tether had a bad connection.
The key to effectively troubleshooting electrical systems is to have a solid understand of their operation. Only then can one efficiently narrow down what the faulty component is. To aid in that process, the technical folks at ORC have decided to put together a three-part "electrical systems" series to cover the three most basic systems of the typical ATV: ignition, charging, and starting. To kick off the series, the first installment handles the most important: ignition.
Of course, the primary purpose of the ignition system is to create a spark. Years ago, a fellow named Kettering came up with a pretty good way to make a spark. Very basically, his invention consisted of two sets of finely wound copper wire - commonly referred to as the ignition "coil" -. that when powered with electricity on one winding would create a sudden jolt, or spark, of electricity on the other when the electrical power is interrupted. To keep up with a spinning engine, the electrical power is switched on and off via a contact switch that's controlled by a cam lobe driven by the engine. Pretty darn simple, and pretty darn easy to diagnose with basic tools. However, this conventional "breaker" or points-type ignition had reliability issues and was limited to low rpm applications. Enter the age of high tech electronics: integrated circuits, transistorized ignitions, and CDI...
The good news is that CDI, or capacitor discharge ignition, was all that points-type ignitions weren't - they had no moving or wearing parts, could produce a heck of a spark, and could run very high speed. Bad news is that the ignition system now became a "black box", both literally and metaphorically. No spark? Might as well start swapping parts until you the spark magically reappears. Not a bad proposition for a dealer that has parts sitting on the shelf he can try with no obligation. But to spend a hundred non-refundable dollars on simply a hunch is a tough pill to swallow.
| Schematic of a typical CDI ignition system |
Fortunately, we can break down the operation of the CDI to some basic circuits - the guzzinta's and the guzzouta's (inputs and outputs). Whereas the points-type ignition has only two circuits (power and ground), the CDI has 5 primary circuits. On the guzzinta side we have the obligatory duo of power and ground, but with the added complexity of a circuit to tell the CDI when to fire (trigger circuit), and another to tell if to fire (kill circuit). What's left is the only circuit on the guzzouta side: the power to the ignition coil (fire circuit).
So let's discuss those circuits and their possible failure modes. The CDI's ground (DC negative) is always connected and provides the connection back to the engine's own voltage ground point or reference, which is the same reference the spark plug uses when creating a spark. The key piece of info here is that wherever the CDI makes its ground connection has to be essentially the same ground reference as the spark plug - make sure there's clean metal all the way between the two connection points, and virtually no resistance (ohms). If the CDI makes its ground connection at the frame up near the gas tank, be assured that the circuit from there is good all the way back the cylinder head. Don't rely on a ground connection through engine mounts. They can be intermittent, dirty, corroded, rubber-bushed, or painted. Proper grounding would dictate a ground strap from the engine directly to the wire harness.
Next thing we need is a way to power the CDI. Some CDI's are powered by 12vdc from the machine's electrical system, but most others generate the requisite electrical power from an exciter coil underneath the flywheel. As the magnet on the flywheel passes the exciter coil, electrical current is generated and in the case of a Capacitor Discharge Ignition or CDI, that charge is stored temporarily in a capacitor for a split second until the CDI is told to fire.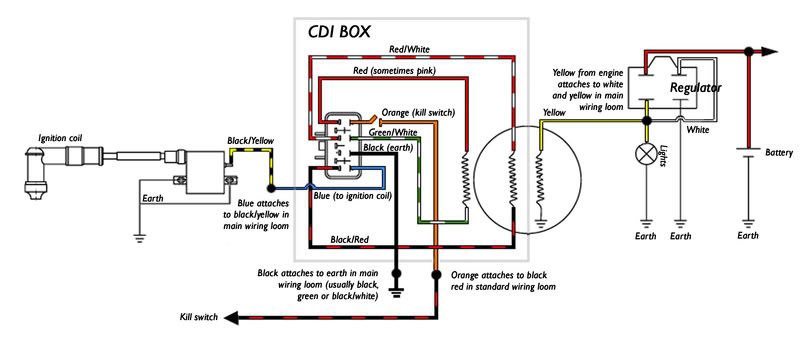 Since the CDI is already tied to ground, there's only a single wire connecting the exciter coil to the CDI. To check this voltage produced by the exciter is tricky because it requires the engine to be turning. An electric starter can produce the necessary crank rotation, but diagnosis by means of kick starting is difficult since the output voltage varies with engine speed. To check, use a digital voltmeter (DVM) and set to AC scale. Connect one DVM lead to the exciter output wire, and the other to case ground. Most shop manuals will list a minimum AC voltage for both running and starting. Be CAREFUL when testing, the output from the exciter coil can reach 200 volts!
The power stored in the CDI's internal capacitor needs to be put to work, but the key to proper engine performance is doing it at the right time. That's where the pulse generator comes into play. Again, underneath the flywheel lies yet another magnet and coil combo, but the sole purpose of these two is to precisely identify to the CDI the position of the crankshaft. That is, it tells the brain box where the piston is and therefore when to fire. Basically, the CDI waits around for the pulse generator to tell it that the piston has just hit some point before TDC, and then waits the appropriate amount of time (dependent on rpm and spark advance) before energizing the guzzouta circuit that sends power to the well-recognized ignition coil. This circuit is diagnosed similarly to the exciter coil above, but instead connect your DVM to the pulse generator output. The voltage is much less and should be listed in your manual.
The last CDI circuit is the "kill circuit" which is how the CDI knows to quench the spark and kill the engine. Typically this circuit is switched to ground, and some CDI's require this circuit to be closed, while others require it to be open for engine shutdown. Most safety tethers, kill switches, and ignition switches utilize this circuit to control engine operation. The easiest way to troubleshoot a no-spark malfunction is to pull the spark plug and check for spark by unplugging this circuit. If no spark, then connect a ground wire directly between engine ground and this circuit (on the CDI box side). If still no spark, the problem is likely with another circuit.
To complete the whole ignition system, we still need to produce enough voltage to jump a spark across a 1mm gap, inside a running engine. This part of the system hasn't changed much over the years - it's still a good ole ignition coil with a small wire going in, and fat one going out. It's a little different since we no longer have 12vdc going in, but rather nearly 10x that!. It also requires a good ground connection so insure that there's no corrosion, mud, or paint separating the mating connections. Although it's easy to blame coils for electrical problems since it's difficult to test (resistance checks are not always reliable), they are not commonly known to be failure prone. More likely is a bad spark plug cap or connection to the fat plug wire. With some coils passing as much as 60,000 volts make sure your plug wire and cap has no exposed breaks or possible leak paths that water can penetrate.
 When the coil fires it will seek the path of least resistance, and if there's a way for 60,000 volts to get to ground easier than through a compressed air-fuel mixture (spark plug gap), it'll take it. And water does that job quite nicely.
Stay tuned, next month we'll get into the charging system of an ATV's electrical system.
ATV Riders Forum > ATV Riders Mechanical Section > ATV Powertrain > How your electrical CDI system works.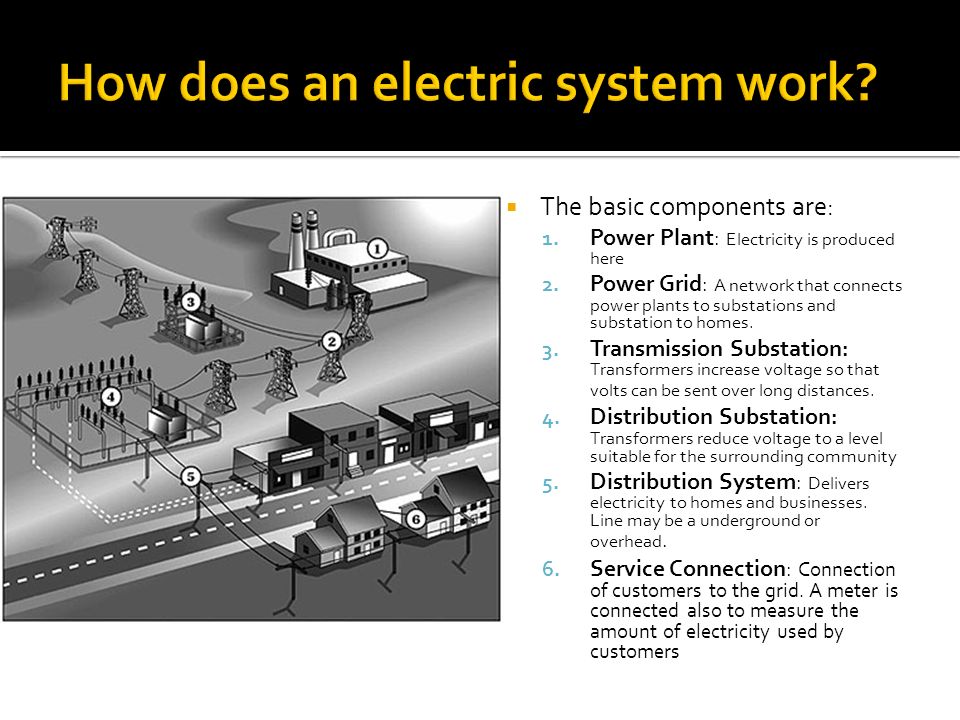
PDA
View Full Version : How your electrical CDI system works.
hondafox440
11-24-2003, 08:02 PM
Basic CDI Ignition overview.
Electronic ignition systems, using a CDI are a much welcomed change to the points based ignition systems of the yesteryear. These new systems are more reliable than points, wear slower, and are less complicated in design. However, the parts that go into an electronic ignition system are more complex and expensive that those of a points ignition system
There are three main parts to an electronic ignition system:
The stator, which contains AC (alternating current) generating coils, and a pick up.
The CDI, which creates a high voltage electrical charge and sends it to the spark plug.
The flywheel, which contains several magnets that rotate around the stator.
A basic understanding of electricity is needed to understand your bike's ignition system. Electricity is the flow of electrons in a closed circuit. A closed circuit means the electrons have a complete path to travel in. For example, a wire placed from the positive (+) end of a battery, to the negative end of the battery (-), is a closed or complete circuit. A wire that is simply attached to the postive end of the battery at one end, and nothing at the other end of the wire is NOT a complete circuit.
*Rememeber*
1)Electrons must flow in a complete circuit
Conductors are materials that allow electrons to flow through them easily. Copper and gold are good conductors. Insulators are materials that do NOT allow electrons to flow through them easily. Examples of insulators are glass, rubber, or plastic. Voltage is the electrical pressure that is created when electrons (negatively charged) are separated from protons (positively charged). Remember that like charges (postive and positive) repel each other, and unlike charges (negative and positive) atract each other. Voltage is measured in the unit volts. Current is the flow of charged particles in a circuit, and is measured in amperes, or amps. Another way to think of current is the amount of electricity that can flow by a point in a given time. When voltage is applied to a circuit, and there is a path (current) for the electrons to move on, they move from the negative terminal to the postive terminal.
Alternating Current (AC) is the type of electricity that is delivered you your home. In AC, the voltage varies over time - it does not stay the same. This means that the voltage may spike and drop hundreds of times a second. Think of AC as a mountain range, with peaks and valleys. The voltage is constantly changing, going up and down. /\/\/\/\/\
Direct Current (DC) is the type of electricity that is created by batteries. In DC, the voltage does not vary over time - it is always the same. That means that a 9V battery ALWAYS produces 9 volts. ---------
*Remember*
1)Voltage is the "power" of the electricity.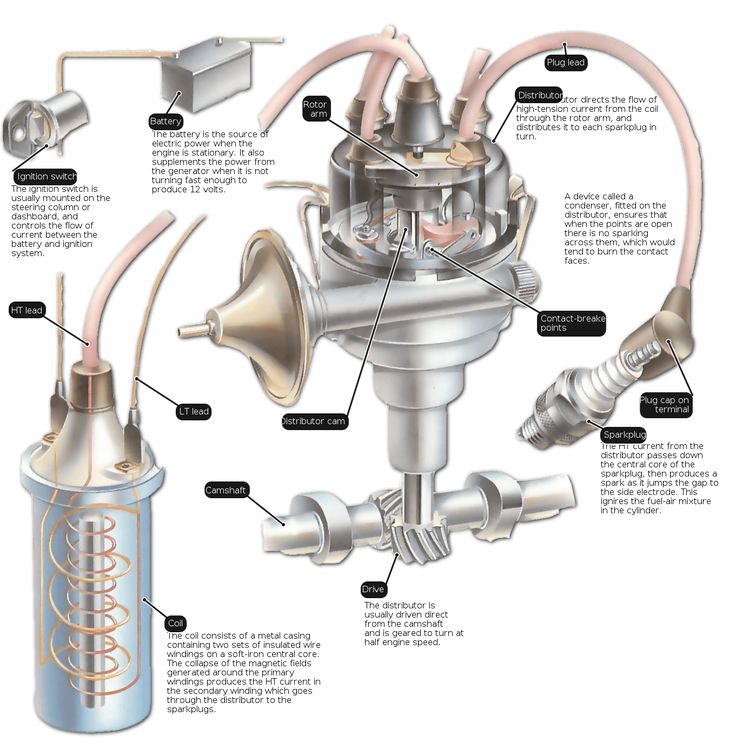
2)AC voltage always varies.
3)DC voltage always stays the same.
Now, how does your engine create electricity? The most common way to create electricity is by spinning spools of wire through a magnet. This is what happens in power plants. Your engine does a scaled down version of this, with the stator and flywheel. Remember now that the stator contains AC generating coils. These coils are basically just coils of wire. The flywheel has magnets on it. The flywheel is connected tot he crankshaft of the engine, so as the engine runs, the flywheel rotates around the stator, which is stationary. This rotating action creates an electro magnetic field, and thus electricity is created in the same way it is at the power plant. Now that we have electricity, we need to turn that into a spark for the spark plug. This is where the CDI and coil come in. The electricity that is generated at the flywheel is routed up to the CDI by wires. Inside the CDI, the AC voltage is transformed into DC current. This DC current is then sent to a capacitor that is also located in the CDI. You can think of the capacitor as a storage tank for electricity. It stores energy until the "correct" voltage is reached. This varies between CDIs, but let's use 250V for this example. So when the capacitor gets 250V of electricity in it, it releases it all at once into the coil, which is correctly called the ignition coil. Inside the coil are 2 windings of wire, called the primary winding and the secondary winding. These windings are proportional to each other, with the secondary winding being much longer, even though it resides inside of the primary winding. For this example we will use 100:1, meaning the secondary winding is 100 times longer than the primary winding. There is also a magnetic field inside the ignition coil, created by the primary and secondary windings. This magnetic field is called the flux field. When voltage is passed through the primary winding, this magnetic field collapses and a voltage spike happens.
 This is when the ratio of primary to secondary winding comes into play, and the coil acts like transformer and steps the voltage up immensly. In this case, it would increase it by 100 times. Multiply that by the voltage that entered (250), and you have 25,000 volts leaving the coil. Where does this voltage go? It is fed into the spark plug. The benefits of the CDI system over the points system is apparent here because of how easy and precise it is to control the duration of the spark. The stronger (hotter) and faster the spark, the better.
So, as an overview.
Electricity is created by the flywheel spinning around the stator. The electricity is fed into the CDi, where it is released in a controlled pulse to the coil. The coil acts like a transformer and steps the voltage up, and feeds it into the spark plug.
There you have it. It's actually a relatively simple design, since there are no batteries involved. If your machine has a battery or lights, some of the electricity is routed to the alternator (changes AC current to DC) and to the battery from the stator, and some is routed to the lights from the stator.
TheRedRebel17
11-24-2003, 08:49 PM
Great post..should be in the FAQ forum
hondafox440
11-25-2003, 03:01 PM
What, no one else even cares to read this?
cals400ex
11-25-2003, 03:33 PM
oh, i read this. it was a good article. however, i think this will confuse more members on this board more than it will help. it would be a hard article to follow if you haven't had physics or are not an engineering major. good work.
hondafox440
11-25-2003, 03:59 PM
:cool:
I'm only 15 and I wrote/understand it.. lol.
I didn't mean to be an *** by my previous post. It was meant as a lighthearted comment. I actually wrote the article up for a different forum and figured I'd post it here as well.
AndrewRRR
11-25-2003, 08:00 PM
Nice job
hawiianpwr
11-25-2003, 08:58 PM
Hey thats a nice post! I'm an Electrician (local #22) :) and I'm around that everyday. You explained that very well you got the main lump sum of it, ofcourse you can go allot further on it. But only being 15 thats sweet!
pnut420
11-25-2003, 10:24 PM
Sounds good for the most part, I couldnt read the whole thing though :p
hondarider2006
11-25-2003, 11:58 PM
Originally posted by pnut420
Sounds good for the most part, I couldnt read the whole thing though :p
I agree, I read it until the things on there I couldn't understand anymore....but good post!
2004TRX450R
11-26-2003, 01:04 AM
Nice job. It is pretty accurate for the most part. AC voltage doesn't vary the voltage though. It is also called Alternating Current. This is because it actually goes back and forth. So each time it "varies" as you say it actually changes direction. That is why there is no plarity in AC. Reminds me of the reaserch paper I did in 7th or 8th grade on two and four stroke engines. Good job!
Powered by vBulletin® Version 4.2.1 Copyright © 2022 vBulletin Solutions, Inc. All rights reserved.
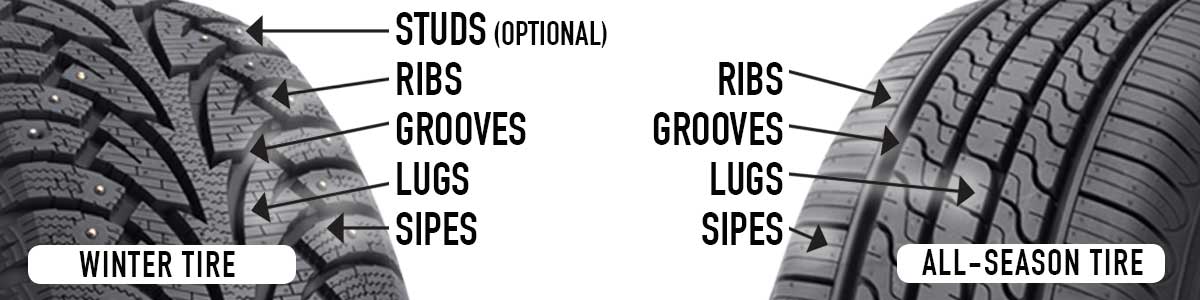
Many people wonder if it is possible to ride ATVs in winter. In fact, it turns out that lovers of a sports lifestyle choose a motorcycle for the summer, and a snowmobile for the winter. But there are also those who manage to use ATVs all year round, regardless of weather conditions. A dose of adrenaline and saving space in the garage, as well as budget funds for two types of equipment, are the main reasons for this approach. Each type of transport also requires a separate technical inspection and a permit to drive.
But if you are wondering whether it is worth riding an ATV in winter, take care of its proper operation and preparatory work for it. There is nothing complicated about this, and such preparation is not much different from preparing a motorcycle. Let's consider in more detail.
The ATV is a kind of hybrid of a tractor and a motorcycle, that is, a motorcycle engine is bolted to the tractor chassis. Engine preparation comes down to adjusting the carburetors (if the engine is carbureted) to a low temperature and changing the oil to "winter", that is, with improved starting characteristics in cold weather.
For the vast majority of ATVs, the instructions require the use of motorcycle oil with a viscosity of SAE 10W-40 and a JASO MA quality level. Usually it is called semi-synthetics, and it is considered efficient up to a temperature of -20 ° C, which is clearly not enough for winter operation in the middle lane, to say nothing of Siberia and the North. Therefore, before winter, even if the oil has not worked out the required resource, we ruthlessly change it to a fully synthetic one with an extended temperature range, for example: Liqui Moly ATV 4T Motoroil 5W-50. This lubricating fluid meets improved cold start temperatures and is able to resist overheating. This phenomenon may surprise many when riding an ATV in winter, but in fact it turns out that it is not so rare. Occurs when skidding in the snow, so this must be taken into account in advance.
There are two more specific winter problems with the ATV engine when driving:
 To solve a problem that has already arisen, you can use the Anti-ice Liqui Moly defroster. The same alcohol liquid will help unlock the throttle and other controls if they are not equipped with heating. By the way, the brake mechanisms can also freeze, especially in the parking lot after a tempo ride.
 In addition, in order to ride an ATV in the winter, you should pay attention to the liquid cooling system. It may be necessary to replace the antifreeze with a more frost-resistant one. We recommend using Liqui Moly Kuhlerfrostschutz KFS 12++, a concentrate that should be diluted 2:1 with water (product and water). Such a mixture can only freeze at temperatures below -60 °C. Hence the conclusion that such a reserve will not interfere even in the Moscow region.
She does not need special arrangements. It is advisable to change the oil in the bridges to fully synthetic, if you have not already done so. Motorcycle synthetics are excellent for increased loads - Motorbike Gear Oil VS 75W-140, if such oil is allowed in the instruction manual. Anthers on CV joints must be regularly treated with silicone so that they do not lose elasticity in frost. The chain in winter conditions needs to be processed less often and you can use the same chain lubricants as in summer, for example: Motorbike Kettenspray Enduro.
Change old brake fluid ruthlessly in winter for ATV riding. The accumulated water insidiously freezes in the brake machines and working cylinders. It happens, as always, suddenly, and you already know what happens when the brakes fail. Brake Fluid DOT 5.1 has good low-temperature qualities. It remains fluid at temperatures even below -50 °C, and it is not for nothing that travelers in the Arctic latitudes use it.
Rarely does anyone on an ATV change tires to winter tires, considering the usual mud option suitable for winter conditions. However, on clear ice, rough off-road tires are completely helpless. The situation can be improved by studding large tread blocks with cargo studs. Such services are provided by both some tire shops and cargo services. You can also “cut” the rubber into small lamellas using a grinder or a special device, but this is a very laborious and literally dirty event.
In order for ATV riding in winter to be normal, attention should also be paid to the winch, as the only means capable of pulling out of the snow captivity. To do this, it is necessary to properly service the structural element even before the onset of winter time in accordance with the instructions attached to it. To do this, it is necessary to change the lubricant to a low-temperature one and remove water if it has entered the gearbox. For the latter, Liqui Moly Marine Winschfett marine waterproof synthetic lubricant with Teflon is optimal. Its temperature range allows you to use the winch down to -35 ° C, and one tube is just enough. Electronic-Spray contact lubricant is well suited for servicing electrical contacts and solenoids, it will also save you from freezing.
Pay attention to the fuel system as well. Both carburetor and injection systems need maintenance, for which Motorbike 4T-Bike-Additiv is well suited. It cleans the system of carbon deposits, makes it easier to start the engine, improves traction and protects against corrosion.
ATV with proper care, will give you pleasure both in summer and in winter. There is nothing terrible or frightening in winter trips, it is enough to prepare the equipment and acquire the appropriate equipment.
Fans of ATV rides were waiting for the onset of heat like manna from heaven. Well, the season can be considered open. At the same time, so that after the very first forays into the forest, the quadric does not end up in a service with expensive repairs, it must be thoroughly prepared for the summer.
Dmitry Zlenko
If you forgot to change the oil in the fall, now is the time to refresh the contents of the engine crankcase. Used oil contains products of combustion, wear and oxidation, and such a cocktail will do more harm to the motor than good. Ideally, before draining the waste and changing the oil filter, you should use a special flush.
Add the special Motorbike Engine Flush to a warm ATV engine and let the engine idle for 10 minutes. During this time, flushing will remove contaminants from the channels of the oil system, wash away gear and friction wear products from the internal surfaces of the motor (after all, many ATVs have the so-called oil bath clutch), soot and sludge. At the same time, what is important, Motorbike Engine Flush does not damage the friction linings of the clutch, their glue and the varnish windings of the generator. Applying a ten minute flush will clean the piston rings and combustion chamber, which will improve compression. Due to the fact that the engine will be absolutely clean from the inside, freshly filled oil will last much longer.
It must be remembered that the ATV is operated in extremely harsh conditions, and therefore neither car oil, nor lubricant for road motorcycles, and even more so motor lubricant for lawn mowers, will not work for him. ATVs usually ride through mud at low speeds, at which both the radiator of the cooling system and the engine itself are poorly blown by oncoming air flows. In addition, on many quads diving into the swamp slurry up to the very handlebars, the heat exchanger is clogged with dirt, as a result of which the motor “works” beyond the upper limits of operating temperatures, especially in hot weather. Oil not intended for such conditions inevitably liquefies to the state of water, starts to burn, pressure in the system disappears, and stopping the “fiery heart” is only a matter of time. ATV oils, unlike automotive and others, are "charged" with a package of special additives that retains the characteristics of the lubricant in the widest temperature range. In addition, such oils are able to work for a long time and not burn out at high speeds.
Liqui Moly ATV 4T Motoroil Offroad 10W-40 is one of the most popular products on the ATV oil market today. This synthetic engine oil was created specifically for heavily loaded off-road motorcycles.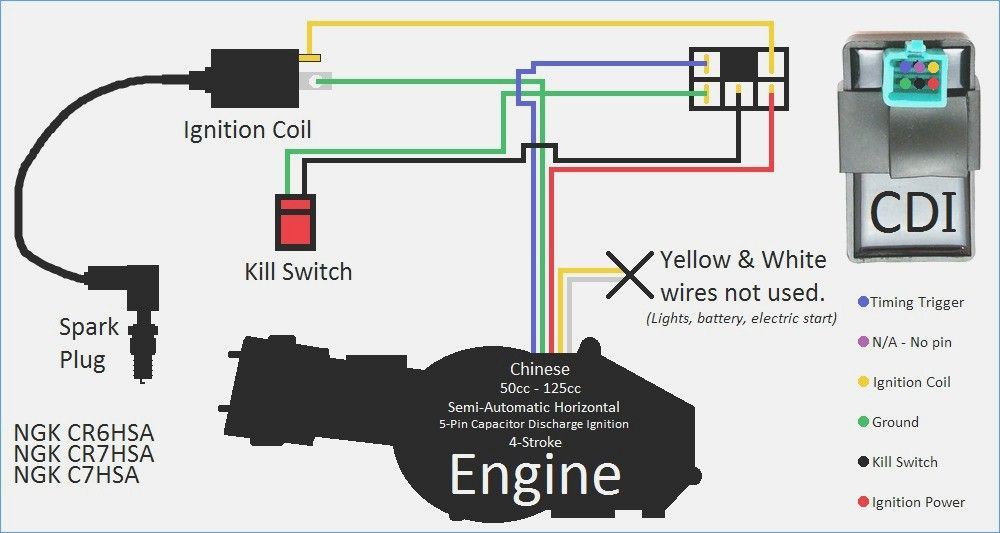 It can be poured into both ATVs, side-by-side (all-terrain vehicles with an automotive layout of controls), and motocross, pit bikes and enduro engines. This oil is universal and, thanks to a complex of additives, it is suitable for engines with a “wet” and “dry” clutch, air and water cooling, and even for engines that have a “wet” type variator.
However, grease with such viscosity characteristics is not suitable for all types of quads. For example, highly accelerated and turbocharged engines require oil with a wide variation in viscosity. For such devices, the German brand Liqui Moly offers its top synthetic product "ATV 4T Motoroil 5W-50". The complex of anti-wear additives and the basic base ensure the correct and trouble-free operation of the engine of your ATV or UTV in the widest possible range of temperatures and loads, ensuring the performance and protection of the engine under any, even extreme operating conditions.
The use of Liqui Moly ATV Motoroil 4T 5W-50 engine oil ensures high reliability of ATV units and ease of starting the engine at very low temperatures (this is in case you do not get off the ATV even in winter). This grease mixes easily with all standard oils, and therefore, before changing the oil, it is not necessary to specifically flush the motor.
Well, since we touched on the issue of overheating, then when preparing your ATV for the summer, look at the condition of the radiator cells. And in general - make sure that there is a sufficient amount of antifreeze in the cooling system. If the radiator has a filler neck, then be sure to unscrew the plug and make sure that there is no scale inside the heat exchanger. Found "fossils" or noticed that the antifreeze is cloudy - flush the cooling system. Inexpensive and extremely effective Motorbike Kuhler Reiniger from the manufacturer Liqui Moly, dissolves scale and dirt in radiators, pipes and engine water jackets. The cleaner removes these deposits and ensures the normal operation of the cooling system. Motorbike Kuhler Reiniger is free of harsh acids and bases and should generally be used with every coolant change.
Well, to prevent limescale from appearing inside the radiator and leaving no deposits, use only high-quality antifreeze, and do not forget to change it in a timely manner - at least once every two years, and ideally every year. A rather interesting “cooler” has appeared in the Liqui Moly product grid - long-term antifreeze Motorbike Langzeit Kuhlerfrostschutz GTL 12 Plus. This antifreeze is based on ethylene glycol, a combination of additives and a package of inhibitors. The technical fluid is designed to work in the cooling systems of heavily loaded engines (including aluminum ones) of modern ATVs, motorcycles, snowmobiles and other motor vehicles. Motorbike Langzeit Kuhlerfrostschutz GTL 12 Plus instantly blocks emerging pockets of corrosion and reliably protects the engine from overheating.
It goes without saying that even the most modern antifreeze will not save the engine from overheating if the radiator cells are clogged with dirt or grass seeds. So first of all, clean the heat exchanger from what prevents it from coping with its duties.
Ideally, the radiator should be blown out with compressed air. But an electric tire inflation pump is unlikely to be a good ally for you, here you need more powerful artillery, such as in tire shops. You can also flush the radiator with a high pressure washer, but you need to be more careful with it, since a jet of water directed at an angle will easily bend the honeycombs.
It will not be superfluous at the beginning of the season to change the oil in the transmission. In some ATVs, the gearbox is combined with the engine and is lubricated with the same oil as the crank mechanism. But there are all-terrain vehicles with a separate "box". Transmission oil is poured into such a gearbox. Liqui Moly has Motorbike Gear Oil 75W-90 Synthetic Motorcycle Gear Oil which is just perfect for this ATV assembly. The transmission has the so-called thermal-oxidative stability and resistance to aging, which means that the interval between replacements is significantly higher than that of other manufacturers of oils with a similar viscosity.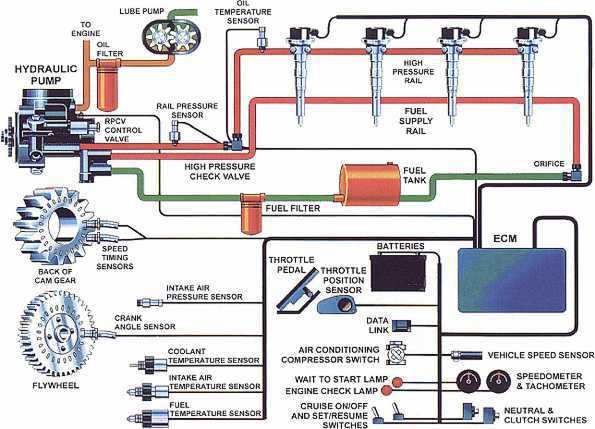 The main feature of this oil is its high tolerance to shock loads, which guarantees maximum protection for gears and gearbox shafts.
However, not only can this product be filled into the box of an ATV. For most ATV gearboxes, Motorbike Gear Oil 75W-90 is also suitable. But in any case, first you need to familiarize yourself with the specification for your all-terrain vehicle, because, for example, this product will not work in the rear gearbox of the Suzuki King Quad 750. You should fill in a special Motorbike Axle Oil ATV transmission oil with a viscosity of 10W-30, designed for work with frictions. Pour something else in there and the quadric will be left without rear brakes in an instant. As well as a special fluid, the front gearbox of Polaris ATVs also requires a conductive oil, without which the front axle simply will not connect. And in the front gearbox of the Kawasaki BruteForce ATV, engine oil with a viscosity of 10W-40 is completely poured. In general, before buying lubricant for the gearboxes of your quadric, we strongly recommend that you familiarize yourself with the specification. Don't know where to get it? Contact the Liqui Moly branded store, where specialists will help you choose the right liquids in the right amount.
No matter what oil you use in your ATV, check the condition of the gearboxes after every ride. When an ATV rides on a dry surface for a long time, the gearboxes inevitably heat up, and as soon as you drive into cold water, a vacuum forms inside the gearbox and water is sucked in through the seals. No, the gearbox is by no means filled to the brim with swamp slurry, only a few grams get into it. But even this amount of water is enough to change the properties of the oil. You can easily determine this by the color of the lubricant: ideally, it should be golden-transparent.
If the oil is cloudy, blackened or resembles coffee with milk, then this liquid, unsuitable for further use, must be drained, the gearbox flushed with a quick cleaner Liqui Moly Schnell-Reiniger, and filled with a fresh transmission.