by Emily Patterson
When a lawnmower tire has plenty of tread left yet has a puncture or leak, it may be less expensive to put an inner tube in the tire to extend the life of the tire. To purchase an inner tube for a lawnmower tire, get the numbers on the side of the tire and call local tire shops for price and availability. Check for any glass, nails or other debris and remove before inserting the inner tube in the tire.
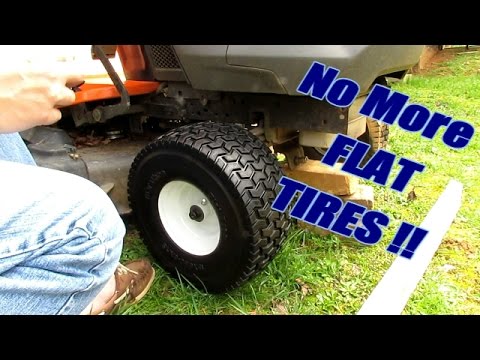
Put a jack, jack stand, concrete block or other stable wedge under the lawnmower to support the lawnmower.
Remove the tire and rim from the lawnmower. Lay the wheel on a solid surface.
Wedge a crowbar and hammer between the rim and tire. Hit the crowbar with the hammer to push the tire away from the rim to break the bead. Go all the way around the rim with the crowbar and hammer to push the tire totally away from the rim. Be careful not to damage the edge of the tire or the rim.
Push the tire down where the valve stem is protruding through the rim. Use a pair of sharp snips to cut the valve stem and remove.
Use the crowbar as a wedge to carefully slide the tire, one small section at a time, over the rim so the rim is under the lip of the tire.
Sprinkle cornstarch into the tire. This will help the inner tube move freely in the tire and make it easier to maneuver into position.
Lay the inner tube on the top and position it so that the valve stem on the inner tube is in the same position as the hole for the valve stem on the rim. Push the inner tube into the the tire and push the valve stem through the hole in the rim. Use a pair of vise grips to clamp the valve stem on the outside of the rim.
Push the inner tube onto the rim with your hands and move it into position in the tire. Make sure that the inner tube is not twisted in the tire.
Wash the edge of the tire and inner edge of the rim with hot, soapy water. Do not saturate. It is easier to reseat the bead when both the tire and rim are clean.
Lay the crowbar across the rim horizontally so that the hooked end can be inserted between the tire and the rim. Hook the end of the crowbar onto the rim under the edge of the tire that was removed from the rim. Be careful that you do not pinch the inner tube. Lift the end of the crowbar so the tire moves back into position on the inner side of the rim. Follow this procedure all the way around the rim, in small increments, until the entire tire has been moved back into position on the rim.
Remove vise grips from the valve stem and inflate the inner tube until the tire pushes against the rim. When the tire pushes against the rim, pour liquid dish soap between the edge of the tire and the rim. Wrap a heavy rope around the center of the perimeter of the tire and pull it tight. You can also use a clothing belt for this. The purpose of this is to push the edge of the tire as tight against the edge of the rim as possible with equal distribution all the way around. Pour more dish liquid all the way around the rim between the tire and the inner tube.
Continue inflating the inner tube until the tire is completely tight against the rim and there is no space between the edge of the tire and the rim. Deflate the inner tube and push on the tire where it meets the rim. If it pushes away from the rim, reinflate the inner tube. Repeat this process until the tire cannot move away from the rim when pressed.
Deflate the inner tube until it is inflated to the manufacturer's recommended pressure. Replace the rim on the lawnmower.
References
Tips
Things You'll Need
Warnings
 Inflate the tire only to the manufacturer's recommendation before replacing on the tire. Overinflating can cause the tire to burst.
 Writer Bio
Emily Patterson has been creating content for websites since 1996. She specializes in home improvement, natural body care and natural cleaning articles. Patterson holds a computing certificate from Penn State University.
If you’ve had a lawn mower for more than a couple of seasons, chances are you’ve had a flat tire. In this article, we’re going to tell you how to get a flat tire back on the rim and how to change a tire if you need to.
With our step-by-step guide—lawn mower tire flat & off the rim? Here’s how to fix it, you’ll be back to cutting your lawn in no time.
A tire that’s slipped off the rim is never a wanted sight!
Using simple tools and a few helpful tricks, you can get your tire back on the rim or replaced. With a little effort and minimal cost, your mower will be ready to go again.
Want to know how to get your lawn mower tire back in working order? Let’s get stuck in.
For this repair, you’ll need a few tools. And if you need to replace the tire, a few more. For both repairs, don’t forget your safety gear. Here, we’ve listed what each job requires:
Not all flat tires are created equal. Sometimes a flat caused by a very slow leak or just time can simply be reflated. And it will last a good while until next time. But sometimes a flat causes the tire to come off the rim of the wheel, and this requires a more complicated fix. And in the worst case, with a damaged or worn-out tire, you’ll need to replace it.
No matter if your tire is just off the rim, or needs replacing, we’ve got you covered. Here is our step-by-step guide to fixing a flat on your lawn mower. Steps 1, 2 and 3 are required for both fixes. After that we’ve split the instructions depending on whether you’re putting it back on the rim (steps 4a to 7a) or changing the tire (steps 4b to 10b).
I know it’s obvious, but we’re nothing if not complete. Make sure your mower is on a flat surface. Then turn off the mower and remove the ignition key. It’s a good idea to chock the wheels as well.
What might not be so obvious, is that we highly recommend you remove the spark plug cable as well. Removing the cable means there is no chance of the blades moving while you’re fixing your flat. It’s never wasted time to do things safely.
In order to get to your tire, you’re going to need to jack up the mower. Any jack will do as long as it’s rated for more than the weight of the mower. We would recommend fixing your flat on a hard surface, driveway, garage or shed. But, if your mower is still on grass, and you’re using a bottle jack, you’re going to need to put wood under the jack to stop it from sinking into the grass.
Jak up the mower so your tire spins freely. You want enough height to make it easy to get your hand underneath the tire. Once you’ve reached the required height, support the mower with a jack stand.
You need to check the tire for obvious damage, holes or sharp objects. If it helps, put a little chalk mark on the tire. Carefully roll the wheel round, inspecting both side walls and the surface for damage. When your chalk mark comes back around, you know you’ve covered the whole tire.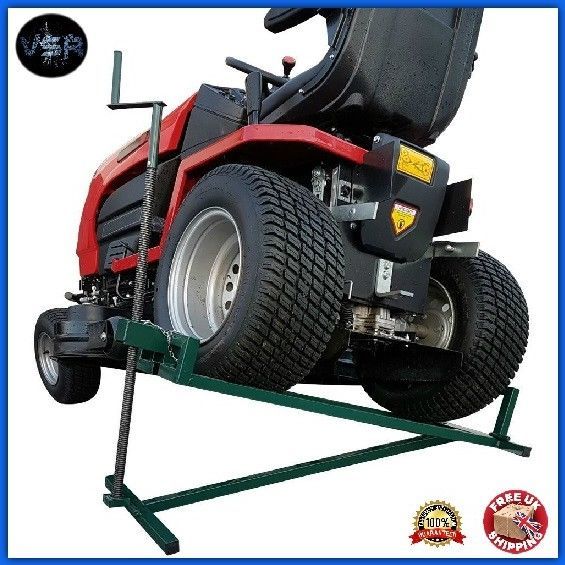
If you can’t find any obvious holes or damage, and the tire is not completely worn out, you can try putting it back on the rim, inflating it and seeing if it holds. If the tire is punctured, ripped, or completely worn out, you’re going to need a replacement.
These days most mower tires are tubeless. That means there is no inner tube inside the tire that holds the air. Instead, the air is held inside the tire by a seal formed between the tire bead and the rim.
In order to refill a tire where the bead has come off the rim, you first have to create a seal between the bead and the rim.
The easiest way to do this is to apply pressure to the surface of the tire. This pushes the bead outwards and helps create the seal you need. On used tires, it’s usually not possible to do this by hand. So instead, we can wrap a ratchet strap or a rope around the tire and use that to help.
Get your ratchet strap around the tire and ratchet it a few times to apply pressure.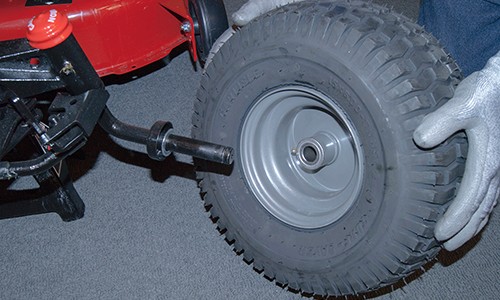 This pushes the middle of the tire down and the sides outwards.
Once you’ve applied a bit of pressure, try pushing the sidewalls near the rim. If the bead seems solid against the rim, you can start adding some air and seeing if you have a seal.
If air still escapes from the sides and the tire won’t inflate, ratchet a couple of times on your strap and see if that helps. Once you have a seal, inflate the tire enough to keep the pressure on the bead so that you can remove the strap.
After removing the strap, you can continue to inflate the tire. The optimum tire pressure will be on the tire wall. And that is the number to aim for. Usually it’s between 15-40psi and often around 20psi.
Make your to check the tire and inflate to the right pressure.Make sure you check your tire and inflate to that pressure. Under or over inflating can increase tire wear, decrease grip, and increase the chance of a puncture or blowout.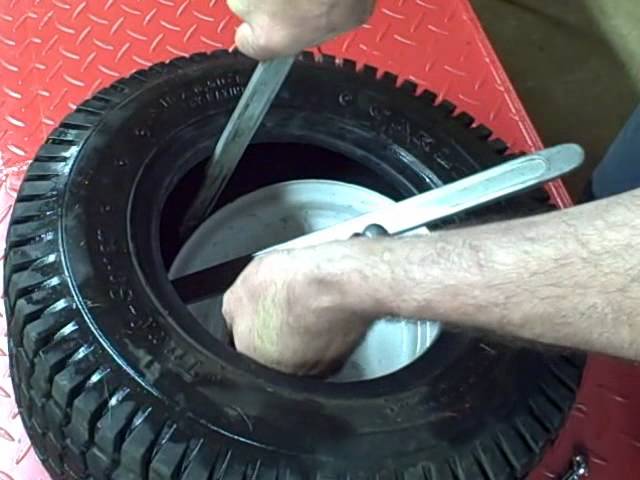
That’s it, your tire is back on the rim and fully inflated. Re-insert your jack and raise the mower enough to remove the jack stand.
Lower the mower back onto all its wheels. We recommend letting it stand for a few minutes before moving it. This way you can wait and see if your tire will keep pressure.
Once your happy everything is working, don’t forget to reconnect the spark plug wire and remove any chocks on the other wheels.
So, you’ve inspected the tire and decided to replace it. Now you need to remove the wheel. Take off the axle cover if there is one. Underneath will be a retaining ring. Use a slot screwdriver or pliers to pull it off.
Now you can remove the washer and pull off the tire. Beyond the tire is an inner washer. It’s best to pull that off as well. Make sure you put your two washers and the retaining ring somewhere safe. It’s really annoying to find you lost one when it’s time to put the tire back on.
Take the tire and lie it flat with the valve facing upwards. Remove the stem cap and use the stem core removal tool to unscrew and pull out the core.
Push down on the tire to dislodge the bead. Using a couple of slot screwdrivers, pry the tire up and off the rim on one side. Take your time. Pry a little of the bead up, slide another screwdriver next to the first and pry a bit more. Continue around the rim until the whole side is free. Flip the tire over and do the same again so that you can pry the tire completely off the rim.
While you’ve got the rim separate, give it a clean. Removing any dirt and grime will give a better seal between the new tire bead and rim.
Now it’s the reverse procedure from removing the tire. Using your slot screwdrivers (and make sure there are no sharp edges that could damage the tire) pry one side of the tire onto the rim. Flip it over and pry the other side on.
Flip your tire vertical again and find your compressed air. With a new tire, and not attached to the mower, it shouldn’t be necessary to use a ratchet strap or rope to get the bead to seal.
Push down a little on the tire and start to inflate. The bead should seal. Once you’re happy you have a seal, re-insert the valve stem core.
With the valve stem in, you can continue inflating the tire to the optimum tire pressure. Remember to check the optimum pressure on the tire wall and only fill to this value. As we said above (step 6a), over or under inflating a tire is not a good idea.
Using the reverse procedure from taking off the wheel, you can now re-install it. Find your washers and the retaining ring.
Put the back washer on first and then slide on the wheel. Add the front washer. Using pliers, put the retaining ring back on the axle and then replace the axle cover.
That’s it, you have a new tire. Re-insert your jack and raise the mower enough to remove the jack stand. Lower the mower back onto all its wheels.
Once your happy everything is working, don’t forget to reconnect the spark plug wire and remove any chocks on the other wheels.
Well done! You have fixed your mower tire and are ready to get back to your lawn.
I hope this guide has been useful to you. Whether you’ve put your tire back on the rim or replaced it completely, following our step-by-step guide should get your mower back on the grass in no time. Happy mowing!
The chainsaw chain is one of the main elements of the entire device. Many parameters and the result of all equipment depend on how it is stretched and installed. If improperly installed, the "cutting" element of the chainsaw can quickly become unusable (tear), show poor cutting performance and lead to premature wear of the saw motor and main gear. To prevent this from happening, we will describe the main reasons why the chain flies off the chainsaw tire, as well as how to properly dress and tension the chainsaw chain.
In practice, the chain can fly off for one of 2 reasons: either the chainsaw tire has loosened, or the chain itself was not tightened enough. In rare cases, the chain flies off due to drive gear play, however, this factor is very predictable, and it is eliminated long before the chain flies off.
Due to constant vibrations and heavy loads, the fixing bolts on the bar may become loose. As a result, a backlash (space) is formed between the tire itself and the chain. This problem is first expressed in a slight “walking” of the tire during cutting the material. To eliminate it, it is enough to tighten the fixing bolts again.
Chainsaw chain links stretch over time. The chain begins to fly out when it is stretched by more than 1 cm. In this case, you must either replace the entire chain, or remove 1-2 links until there is no sagging.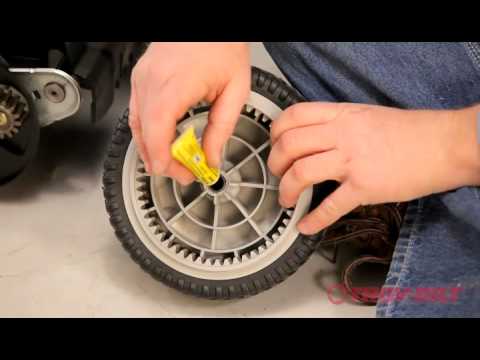 It is not recommended to use a grinder for this purpose, because there is a high probability of damage to neighboring links. For repair, it is recommended to drink rivets from the holes, after which they also connect the holes of the desired links.
The shaky position of the drive sprocket can also affect the behavior of the chain during operation. This phenomenon occurs due to poor fixation of the sprocket after repair, or “bolt pattern” during prolonged operation. To eliminate chain play, you need to remove the engine cover and spark plugs (you will need a special spark plug wrench), and then turn the clutch plate with a special wrench until the piston position gives access to the drive sprocket. Only after obtaining such access can the sprocket be fixed in the correct position.
A slow installation of the chain takes no more than 30 minutes, provided that the parts are correctly and fixed installed. The chainsaw chain installation algorithm consists of 8 steps:
 During installation, it is important to ensure that the asterisk itself is level and without play.
 After the completion of this algorithm, it remains to tension the chain itself. But before proceeding to this procedure, you should make sure that the chain is in the correct position. Otherwise, either you will have to repeat the algorithm again (up to the disconnection of the bus and circuit).
After installing the chain and bar, you need to tighten the chain. It is not enough to remove the chain slack under the bar by simply tightening the bolt to the right of the bar (depending on the model). After the initial tightening, the chain must be turned along the tire forward at least 2 skeins. During operation, the chain will "straighten out" in the direction of the bar. During which the sag ("belly") will be formed again and it will need to be removed again.
The chain tension does not end there. As the practice of many experts shows, the position of the tire itself plays an important role in chain tension. While working with a chainsaw, when the tire is pressed against the surface of the object being sawn, the tire, together with the saw, begin to “play” up and down. As a result, the "belly" appears again.
To remove the sag for the 3rd time, you need to lift the tire itself, together with the maximum tenacity, by gently pulling the tire itself, and re-tightening the chain tension bolt to eliminate the sag. At the same time, it is worth remembering that the chain itself should not resemble string tension - it is enough to remove the sagging of the chain under the tire. It is often written in the operating instructions that in order to determine the correct tension of the chainsaw chain, it is necessary to pull the upper part of the chain as much as possible with your finger, and in the resulting gap (in the upper “belly”) 3 driven teeth will be visible. But, in practice, this advice does not justify itself, because there is a chance to get on stretched links.
To definitely check the chain tension, you need:
After a similar "backlash" in the chain tension is reached, the chainsaw can be used. With a strong constriction, during operation, the teeth of the chain, and then the tire itself, will become very hot. Subsequently, such heating can damage or destroy the main elements of the chainsaw (drive sprocket, chain, tire).
← How to shorten the chain on a chainsaw | How to sharpen a chainsaw chain with your own hands with a file or machine →
AlbaniaAustriaBelarusBelgium (fr)Belgium (nl)Bosnia and HerzegovinaBulgariaCyprusCroatiaCzech RepublicDenmarkEstoniaFinland (fi)Finland (sv)FranceGeorgiaGermanyGreeceHungaryIcelandIrelandItalyLatviaLithuaniaLuxembourg (de)Luxembourg (fr)MoldovaMontenegroNetherlandsNorth MacedoniaNorwayPolandPortugalRomaniaRussiaSerbiaSlovakiaSloveniaSpainSwedenSwitzerland (de)Switzerland (fr)Switzerland (it)TurkeyUkraineUnited Kingdom
ArgentinaBoliviaBrazilChileColombiaCosta RicaDominican RepublicEcuadorGuatemalaMexicoNicaraguaRepublic of PanamaParaguayPeruUruguay
Canada (en)Canada (fr)MexicoUSA
Shopping advice
Looking to buy a lawn mower with a seat and looking for the best option? Use our tips to make the right choice.
As a general rule, if there is a lot of open space in the garden, you should choose a lawnmower with a seat with a wide cutting width. However, if there are many obstacles in the garden, such as trees and bushes blocking the passage, you should opt for a small model that can be used even in narrow passages. Husqvarna's range of lawn mowers with seat includes models with cutting widths from 77 cm to 137 cm.
Husqvarna lawnmowers with a seat will help you achieve excellent results, because you can choose the mowing method that suits your lawn. If you want to collect grass clippings as you work to keep your lawn looking neat, choose a model with a built-in grass catcher. Do you prefer to work quickly and efficiently? Opt for the side-discharge model. Is it time to fertilize your lawn? Use the BioClip® mulching system.
We offer a wide range of accessories for lawn mowers with a seat, which will help you perform a variety of jobs at any time of the year.