One of the most consequential small ATV accessory purchases you’ll ever make, and choosing the best ATV grips can elevate your riding experience more than you might realize.
Think about it: the handlebars are how you interface with your ATV’s steering, brakes, and in some cases, the clutch and throttle. Maintaining a solid grip that won’t be shook by a hard landing or a brush with a fallen tree branch is essential, as is hand comfort. The last thing you want on a long ride is for your hands to cramp up, or to freeze in colder riding temperatures.
Thankfully, if your ATV grips just aren’t cutting it anymore, or they’ve gotten chewed up and ruined from years of hard riding, a new set can be had for cheap – in some cases,
dirt cheap. And if you have issues with circulation and your hands just can’t keep warm in colder temperatures, there’s even a plethora of heated ATV grips on the market, with hidden powered heating elements that keep your mitts toasty in spite of the cold.
If you’ve decided it’s high time that you got a new pair of ATV hand grips for your ride, there’s good news: we’ve put together this list of the best ATV grips available today, with a range of different good-looking, well-priced options that your hands are sure to love.
 Editors Choice: Pro Taper Pillow Top Grips
Our editorial staff has had the opportunity to ride all kinds of machines and test more grips than you can imagine, and one brand/style of grips that is a hands down favorite are the Pillow Top grips from Pro Taper. The Vibrasonix pillow top design helps to eliminate vibration felt through the bars and provides comfortable grip that isn’t too hard or soft. The compound that is used in these grips also provides ample control of the handlebars whether you’re riding in dry or wet weather conditions, and is extremely durable against ripping. They install easily with your favorite grip glue, but if you’d rather use safety wire to keep them in place, the grips have special channels to accommodate. Available for both twist throttle and thumb throttle controls (with and without flange), you can’t go wrong with these best ATV grips.
Check Price
One of the world’s foremost brands in road and mountain bikes, skis, and powersports accessories, Scott Sports doesn’t mess around. But not everything in the Scott catalogue costs an arm and a leg, and these Scott Sports “Full Waffle” ATV grips show that you don’t need to be rich to have Scott quality at your fingertips – literally. These ATV handlebar grips have been designed with thumb throttle controls in mind, with no flange to block throttle access, and they’re made from a cushy, comfortable single-density material that absorbs shocks and provides plenty of grip with a “full-waffle” molded design. Designed for 7/8” handlebars, they even have integrated safety wire channels, for a bit of extra ATV grip security.
Check Price
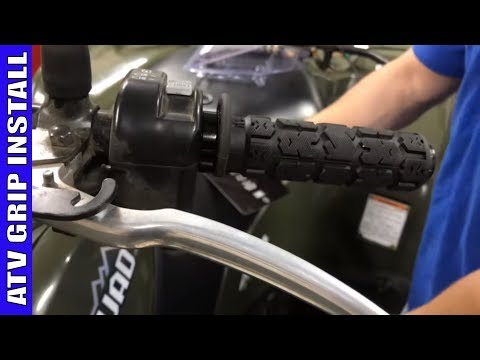
When it comes to changing ATV grips, many consider it to be a tedious task. You’ve got to cut the grips off of the handlebars, clean off the remaining glue residue, and then start the messy process all over again. To add insult to injury, you’ve got to give your grip glue time to dry, or risk having them slide off while you ride. That is why we list the ODI Lock-On ATV Grips as the easiest to install. Sure you need to do the same prep work in removing the old grip and the glue, but the installation of these tacky grips is simple and instant.
Once your handlebars are prepped, all you need to do is slide the new ODI Lock-On Grips, tighten the clamps with the supplied allen wrench and. you’re done! It really is that simple. No need to worry about waiting for grip glue to dry, or if you use safety wire to secure your grips into place, no worry about impaling your fingers with sharp wire. What’s even better about these grips, other than the easy installation, is the fact that they offer great rider comfort and control. The large raised tread pattern provides excellent shock absorption at the same time providing superb grip qualities.
Check Price
Your Polaris ATV has been good to you. Why jeopardize a good thing by introducing a whole bunch of aftermarket parts? These Polaris OEM ATV handlebar grips will technically fit most any ATV with 7/8” handlebars and thumb throttle control, but they’re made especially for Polaris ATVs, and they’re as thoughtfully designed and well-engineered as any OEM Polaris part. Featuring tall, longitudinal ridges for grip and comfort, these ATV hand grips deliver a safe, secure level of control, and they look factory correct on any modern Polaris ATV because, well, they are. Sure, they’re not the most flashy or technical of ATV handlebar grips, but it’s a proven design handpicked by the geniuses at Polaris. Who are we to argue?
Check Price
Great ATV handlebar grips aren’t the only trick up Polaris’s sleeve. The trusted powersports manufacturer also produces these hand grip warmers for ATV, with a pair of wafer-thin resistive heating elements that install inside the grips, on the outer surface of the handlebars, and work to keep your mitts warm all winter long. A three-position switch gives you selectable on-demand access to low-heat, high-heat, and no-heat levels, and just a couple of wires and some basic splicing is all that’s required for installation, after you manage to mount the switch somewhere. Technically, according to Polaris, these hand warmers are only for use on certain Polaris ATV models, but we won’t tell anyone if you try to install them on something else.
Check Price
Say, speaking of heated ATV grips, there are plenty of great, universal ATV handlebar grips with built-in heating elements – like these ones from Heat Demon. Designed for standard 7/8” handlebars, these very attractive heated ATV grips feature an uncommon clamp-on design that makes installation easier than your average ATV grips, and they feature a proven, effective grip texture for a secure hold. More importantly, each grip channels up to 20 amps of heating current at 14 volts, for a total of 40 hot, toasty amps, with a round rocker switch providing easy access to low, high, and off functions. For the money, these ATV hand grips are an absolute steal, and one that just might save your digits come winter.
Check Price
 Oxford Heaterz Premium Heated Handlebar Grips
Folks with twist throttle ATVs shouldn’t feel shut out from the heated ATV grips market; for them, we recommend these premium Oxford Heaterz handlebar grips. They offer even more precise control over the heat level, with a five-level “intelligent” controller letting riders dial-in the heat from 30% all the way up to 100% – or down to 0%, if the weather’s nice. A fine, intricate diamond grip pattern inspired by genuine race grips provides the utmost grip security, and the entire package has been engineered for optimal performance and reliability, with a welded, weatherproof controller, winter-grade wiring, and silicon cables that keep their flexibility even in the coldest of colds. In all, this is one of the best things you winter twist-throttle riders can do for your hands.
Check Price
Removing a pair of ATV handlebar grips is about as simple as installation, although the process can sometimes be a chore if excess grip adhesive was used. There are a couple of different methods you choose between, depending on which you feel most comfortable with.
Method 1 involves using a screwdriver or similar long, slender prying tool to methodically lift every square inch of grip off the end of the handlebars. As you go, you can spray some contact cleaner underneath the grip to help gradually loosen every bit of old adhesive until the entire grip has released from the bar. Method 2 involves simply taking a box cutter or X-acto blade and cutting a straight line down the full length of the grip, before spraying some contact cleaner underneath a lifted edge to loosen the old adhesive and either pulling the grip off by hand, or inserting a screwdriver to lift it off as in Method 1.
Both methods run the risk of damaging the surface finish of your handlebars, but thankfully, that damage should be limited to an area that will be covered by your new grips anyway. Not only should that render the damage invisible during normal use, but it means that the damaged surface area should be pretty well protected from corrosion.
Whichever method you choose, after you have successfully removed the old ATV grips, use contact cleaner or something similar to remove any old, stuck-on adhesive so that you can start with the cleanest surface possible when you install your new grips.
Become an ATV insider. Get the latest news first by subscribing to our newsletter here.
We are committed to finding, researching, and recommending the best products. We earn commissions from purchases you make using the retail links in our product reviews. Learn more about how this works.
When handlebar grips wear out or become loose, you might as well cut them off as they are not worth keeping. But from time to time, it can be necessary to remove the grips without destroying them.
This post will cover three methods that may help you take off the grips on one piece.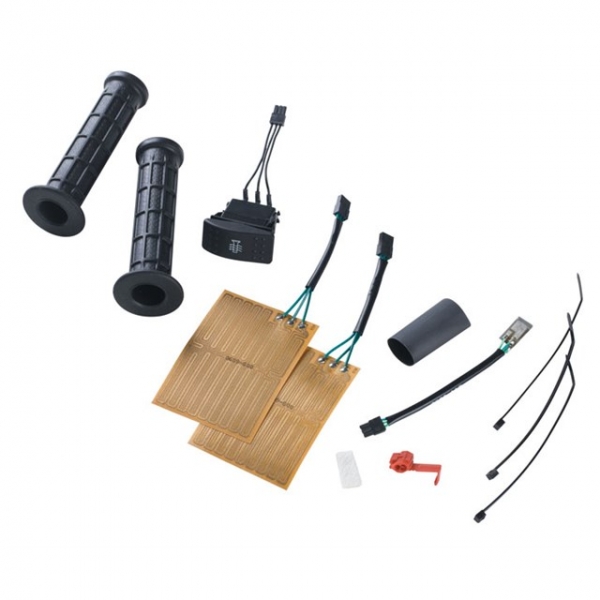 Most of them require tools and supplies you would typically find in most homes.
By knowing how the grips stick to the handlebar, you’ll better understand how to remove them.
Removing handlebar grips without removing them is not always easy, and you may need to try several methods before you hopefully succeed.
The first method works great with dry-fitted grips, while you may need to use one of the latter methods if the old grips were installed using an adhesive of any kind.
To use this method, you will need an air compressor with a hose and air blower nozzle. This is how you do it:
You need a small gap to get the nozzle of the air blower in between the handlebar and the grip.
You can also try poking a small hole at the end of each grip. Some grips come stock with holes for easy installation and removal.
This method works with most grips, at least the ones that are not glued in place.
However, if you don’t have access to compressed air or are struggling with a stubborn adhesive keeping the grip in place, the next method may be just what you need.
When the grips are held in place with an adhesive like any glue, spray paint, or even hairspray, you need to break the bond before the grip moves.
Your best bet is using a solvent as this will not only dissolve the adhesive it also acts as a lubricant, making it easier to slide the grip off the handle.
Another benefit of using a solvent is that it will evaporate without leaving any residue, and when you are done, there is no need for cleaning.
If you don’t have access to a solvent, there are some less effective options you can try:
You will also need a flat object to pry between the handlebar and the grip. Here are a few options:
Lean the motorcycle against a wall, or park the ATV sideways on a slope. This will make it easier to pour solvent to flow along with the handlebar and inside the grip.
Wedge the screwdriver or whatever flat object you have at hand between the grip and handlebar to create a small gap.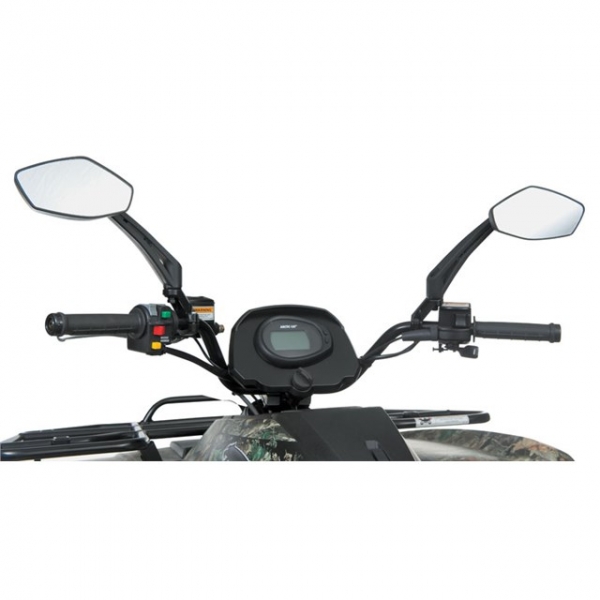 There is no need to push the screwdriver too far at this point. You need only a small gap to allow the solvent to start entering behind the grip.
Tip: Depending on what glue was used to glue the grips in place, try heating it using a hairdryer as this may make the glue less adhesive. Do this before you add a flammable solvent.
If you use an alcohol-based solvent or water, feel free to use as much fluid as you need as the leftovers will evaporate when you are done.
However, if you use WD-40 or vegetable oil, keep in mind that everything needs to be cleaned thoroughly before installing new grips.
Sometimes when the grips are glued solid to the handlebar, you may not be able to pour solvent in between the grip and the handlebar.
As a last resort, you can try using a basting syringe/marinade injector to inject the solvent.
These types of syringes are sold at any kitchen supply store. Similar syringes are used in golfing to remove rubber grips from golf clubs.
If neither blowing compressed air or using a solvent like a contact-cleaner won’t make the grip come loose, you may need to cut it. Use a razor blade or a box opener and gently along the grip’s entire length from top to bottom.
Make sure to not cut through the rubber as it may damage the plastic inner layer or heating elements if your bike has them.
Most ATV grips are ⅞ inches in diameter on both sides. Unlike motorcycles, ATV grips are the same diameter on each since they use a thumb throttle instead of a wrist throttle.
Rating: 5 / 5
Please rate Grade 1 Grade 2 Grade 3 Grade 4 Grade 5It may be necessary to remove the grips from the handlebars to replace them or to install heated grips. In the first case, if the handlebars are not needed, they can simply be cut off with a knife. If the handles are still needed for further use, then we recommend reading this article.
There is usually no adhesive under the rubber of the handles. They are held together by a tight fit and the friction that occurs when the palms squeeze the handles. To remove the handles from the steering wheel, you can use one of the proposed methods.
 At the same time, they try to pull the handle off the steering wheel. B) Apply compressed air to the central hole of one of the handles. The hole in the second handle is then blocked. Due to the pressure created inside the rudder, the opposite handle usually flies off. Or by supplying air to the handle hole, they are trying to pull it off the steering wheel tube. If nothing works, use method 3 or 4.
 Rudder handle, inside, moistened with water. This can be done in two ways, for example, carefully pry off the rubber handle with a flat screwdriver and pour water under the handle. Or, using a medical syringe, pierce the rubber with a needle, pump water under the rubber. Then it will be quite easy to remove the handle from the steering wheel.
 With sharp blows to the key, the handle gets off the steering wheel. Usually 4-5 strokes are enough.
In order to put the rubber grips on the steering wheel, lubricate the seating surfaces of the steering wheel and grips with water or alcohol or soapy water, which will ensure glide. Alcohol is preferred as it evaporates faster than water. The soap solution dries much longer, but gives more glide and, after drying, slightly attaches the rubber of the handle to the steering wheel. However, in order for the soapy solution to dry, it is necessary to heat the handle with a heated steering wheel or in another way. Also, the handle can be put on by screwing it onto the seat and supplying a powerful stream of air from the compressor into the central hole. In this case, the handle is escorted by hand and it becomes very easy to put it in place.
Do not forget to thank the author by clicking the rating button at the top of the page, or by posting a link to the article on the Internet. Thank you
ATV Grips/Grips (130MM)
ATV Grips/Grips (130MM)
Ruffian ATV Lock-On Grip different narrow narrow diamond pattern for optimal grip and control. As part of our patented Lock-On Grip System™, they also have a hassle-free installation and guarantee 100% slip protection.
PRODUCT FEATURES:
Full diamond pattern for optimal grip
130mm length / 3/4 flange pattern
Easy installation allows you to change handles in seconds
100% guaranteed no slip
Snap cap caps ™
Fits:
ATV
Yamaha Grizzly 700
Yamaha Grizzly 550
Yamaha Grizzly 660
Yamaha Grizzly 600
Yamaha Grizzly 450
Yamaha Grizzly 400
Yamaha Grizzly 300
Yamaha Grizzly 125
Yamaha Grizzly 50
Yamaha Grizzly 90
Yamaha Raptor 700
Yamaha Raptor 660
Yamaha Raptor 350
Yamaha Raptor 250
Yamaha Raptor 90
Yamaha Raptor 50
Yamaha Kodiak 700
Yamaha Kodiak 450
Yamaha Kodiak 4000012 Yamaha YFZ450
Yamaha YFZ450R
Yamaha YFZ450X
Yamaha YFZ 450R
Yamaha YFZ 450X
Yamaha YXZ 1000
Yamaha Breeze
Yamaha Blaster
Yamaha Beartracker
Yamaha Big Bear
Yamaha Warrior 350
Yamaha Banshee
Yamaha YFM70
Yamaha YFM45
Yamaha YFM70
Yamaha YFZ45
Yamaha YFM5
Yamaha YFM40
Yamaha YFM35
Yamaha YFM125
Yamaha YFM66
Yamaha YFM25
Yamaha YFZ350
Yamaha YFS200
Can-Am Outlander 1000
Can-Am Outlander 850
Can-Am Outlander 800
Can-Am Outlander 650
Can-Am Outlander 570
Can-Am Outlander 500
Can-Am Outlander 400
Can-Am Outlander 6X6
Can-Am Outlander L
Can-Am Outlander T3
Can-Am Outlander MAX
can-am Renegade 1000
can-am Renegade 850
can-am Renegade 650
can-am Renegade 800
can-am Renegade 570
Canegade L
and Renegade lcan-am Outlander L570
can-am Outlander L500
can-am Outlander L450
can-am DS 650
Can -M DS 450
Can-Am DS 250
CAN-am DS 90 90 90.