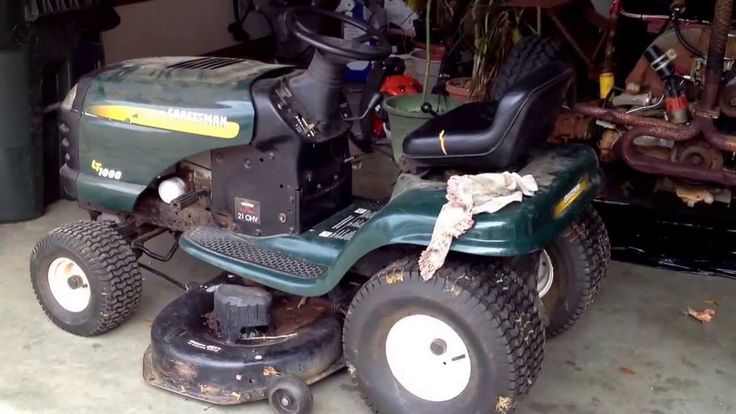
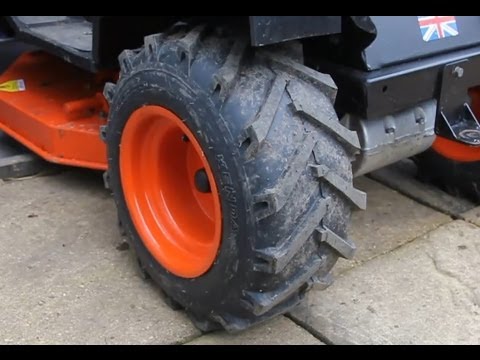
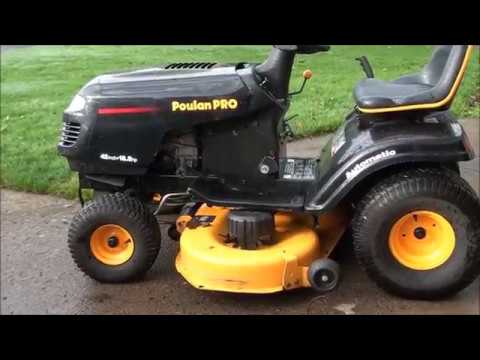
rasenmähertraktor image by Ideenkoch from Fotolia.com
Sooner or later you will end up with a flat tire on your Murray riding mower. You have a decision to make when changing the lawn mower tire. You can either purchase a replacement tire that is already mounted to a rim or you can simply remove the flat tire from your existing rim and place a new tire on the rim. It is less expensive to use your existing rim.
Park your Murray riding mower on a level part of your driveway or garage floor. Avoid changing tires on the lawn. The jack or jack stands can sink into the ground, making removal or reinstallation of the tire difficult.
Place a block of wood on each side of the tire on the opposite end of the mower that you will be working. Place one block in front of the tire and one block in back of the tire.
Position the floor jack under the middle of the front frame, if you are changing the front tire. If you are changing the rear tire, position the jack under the rear frame.
Raise the mower with the floor jack until the bottom of the tire is off the ground. Put a jack stand on each side of the jack under the frame. Adjust the jack stands so that they make contact with the mower frame. Lower the mower with the floor jack until all the weight of the mower is on the jack stands.
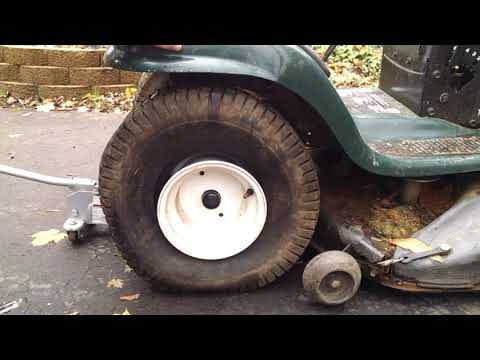
Remove the plastic cap in the center of the rim. Use a pair of pliers to twist the cap away from the rim. When removing front tires, bend the retaining cotter pin straight with a pair of pliers and pull the cotter pin out of the axle. Rear tires use a retaining ring; pry it off with a flathead screwdriver.
Remove the square key that is in between the axle and the rim with a pair of vise grips, if you are changing the rear tire. Do not lose the key, because it is necessary for reinstallation.
Lay the tire and rim on a flat surface. Remove the cap from the valve stem and press a flathead screwdriver in the middle of the valve stem to release the remaining air.
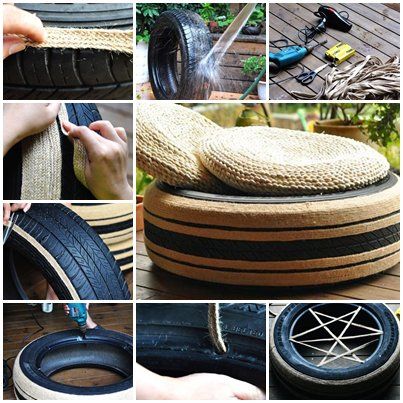
Remove the tire from the rim using two crowbars to pull the tire beads from the rim. Insert one crowbar between the upper tire bead and the rim and pry up until you can insert the second crowbar. Insert the second crowbar and pry up and then slide the crowbar around the circumference of the rim to completely remove the upper bead. Remove the opposite side of the tire the same way.
Place the new tire onto the rim using the crowbars to pry the tire over the rim. Use care when doing this so that you do not damage the tire. Brush tire bead seal around the outside beads of the tire using a small brush.
Wrap a ratchet strap around the circumference of the tire and tighten the strap until the tire bead walls make contact with the rim on both side. Begin filling the tire with air as you slowly release the ratchet strap. Once the tire is halfway full of air, remove the ratchet strap. Finish filling the tire with air to the recommended PSI on the sidewall of the tire.
Place the tire over the axle. If you are working on a rear tire, position the notch on the inner rim with the notch on the axle. Tap the square key into the notch with a hammer.
Place the retaining ring over the axle to secure the rear tire. On front tires, place the cotter pin back into the axle and bend the ends to secure the tire. Snap the plastic cap over the end of the axle.
Raise the mower with the jack just enough to remove the jack stands. Lower the mower to the ground and remove the wood blocks.
Please enable javascript to view the website ..
Repair help > Riding Mowers & Tractors repair > Riding Mowers & Tractors repair guides
January 1, 2015
By Lyle Weischwill
This step-by-step riding mower repair guide shows how to replace the rear tire on your lawn tractor or riding lawn mower if the tire is too damaged to repair.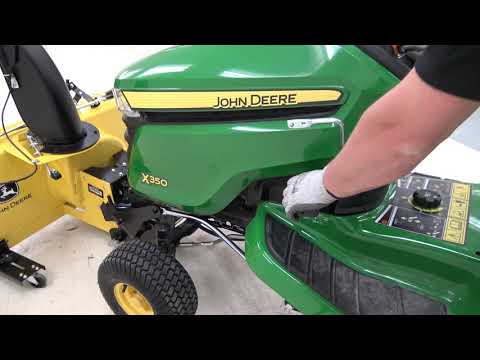 Installing a new rear tire is relatively easy and requires just a few tools and a manufacturer-approved lawn mower part.
Use this repair guide and video to replace the rear tire on Craftsman, MTD, Husqvarna, Murray, Troybilt, Toro, Snapper, Yard-Man, Weed Eater, Ariens, John Deer and Southern States lawn tractors and riding lawn mowers.
If the tire just has a puncture in the tread, you can fix it with tire sealant. The video How to Repair a Riding Lawn Mower Tire shows how.
Quick links
Tools required
Floor jack or bottle jack
Jack stand
Slot screwdrivers
Pry bars
Pliers
Valve stem core removal tool
Liquid detergent
Water
Wood blocks
Work gloves
Safety goggles
Compressed air supply
Anti-seize compound
Repair difficulty
Time required
60 minutes or less
Repair difficulty
Time required
60 minutes or less
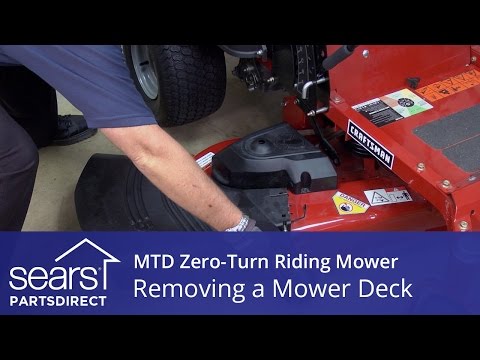
Replacing a rear tire on a riding lawn mower
This video explains how to replace the rear tire on a riding lawn mower.
01.
Park the riding mower on a level surface and set the parking brake.
Turn the ignition switch off and remove the key.
Wear work gloves to protect your hands and safety goggles to protect your eyes.
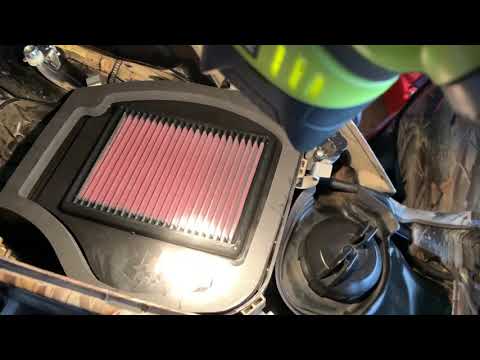
Lift the riding lawn mower hood and disconnect the spark plug wire.
Lower the tractor hood.
Tip: Disconnect both spark plug wires if your engine has 2 cylinders.
PHOTO: Disconnect the spark plug.
02.
Block the front tires to keep the riding mower from rolling.
Position the jack under the frame and jack up the riding mower to raise the rear wheel.
Place a jack stand under the frame to support the riding mower.
Remove the jack.
PHOTO: Jack up the riding mower.
03.
Pull off the axle cover.
Remove the retaining ring and then pull off the washer.
Pull the tire off the axle.
Remove the square key.
PHOTO: Remove the rear wheel.
04.
Remove the valve stem cap.
Remove the valve stem core, which lets any remaining air out the tire.
Break the tire bead and pry the tire off the wheel rim on one side.
Pry the tire off the rim on the other side.
PHOTO: Break the tire bead and pry the tire off the rim.
05.
Clean the wheel rim.
Lay the new tire flat on a work surface.
Lubricate the top tire bead with liquid detergent.
Pry the rim into the top side of the tire.
Flip the rim and tire over.
Lubricate the tire bead with liquid detergent.
Pry the remaining side of the tire onto the rim.
Warning: Use blunt tools to pry the tire to avoid damaging the tire bead.
PHOTO: Pry the new tire onto the rim.
06.
Fill the tire with air to seat the tire bead.
Reinstall the valve stem core.
Fill the tire fully with air.
If the tire doesn't fill with air, install ratcheting tension straps around the outer edge of the tread on each side of the tire.
Tighten the straps to force the beads outward.
Fill the tire with air to seat the tire bead.
Reinstall the valve stem core and fill the tire with just enough air to keep the beads seated.
Carefully release the tension straps and then remove the straps.
Tip: If the tire didn't fill with air, install a ratcheting tension strap around the center of the tire tread, tighten the strap to force the beads outward, and fill the tire with air to seat the tire bead. Carefully release and then remove the strap.
PHOTO: Seal the bead to the rim.
07.
Slide the wheel on the axle and line up the key slots in the rim and axle.
Apply anti-seize compound to the square key.
Push the key into the rim.
Reinstall the washer and snap the retaining ring onto the axle.
Push the axle cover onto the wheel.
PHOTO: Lubricate the square key.
08.
Push the jack under the frame and raise the riding mower.
Pull out the jack stand.
Lower the riding mower to the ground.
Remove the wood blocks from the front tires.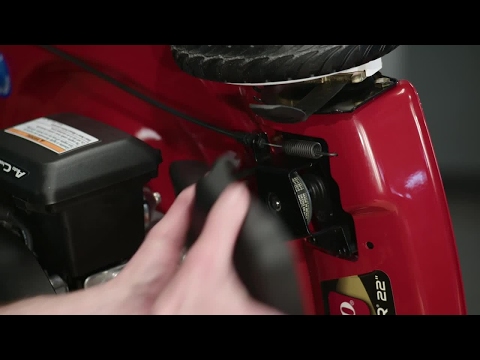
PHOTO: Lower the riding mower.
09.
Raise the tractor hood.
Reconnect the spark plug wire and lower the hood.
Tip: Reconnect both spark plug wires if your engine has 2 cylinders.
Warning: Undertaking repairs to appliances can be hazardous. Use the proper tools and safety equipment noted in the guide and follow all instructions. Do not proceed until you are confident that you understand all of the steps and are capable of completing the repair. Some repairs should only be performed by a qualified technician.
Choose a symptom to see related riding mower and lawn tractor repairs.
Main causes: punctured tire or inner tube, leaky valve stem, damaged wheel rim
Read moreMain causes: worn or broken ground drive belt, bad seat switch, transaxle freewheel control engaged, transaxle failure, dirty carburetor
Read moreMain causes: shift lever needs adjustment, neutral control needs adjustment
Read moreMain causes: worn or broken blade belt, broken belt idler pulley, blade clutch cable failure, bad PTO switch, damaged mandrel pulleys
Read moreMain causes: damaged cutting blade, worn deck pulley, damaged mandrel pulley, loose fasteners on mower deck components
Read moreMain causes: engine overfilled with oil, leaky head gasket or sump gasket, damaged carburetor seals, cracked fuel pump, broken fuel line
Read moreMain causes: clogged carburetor, damaged flywheel key, dirty spark plug, stale fuel, improper valve lash, engine needs a tune up
Read moreMain causes: faulty battery, bad alternator
Read moreMain causes: unlevel mower deck, dull or damaged cutting blades, worn mandrel pulleys, bent mower deck, engine needs tune up
Read moreThese step-by-step repair guides will help you safely fix what’s broken on your riding mower or lawn tractor.
January 1, 2015
By Lyle Weischwill
Your mower can’t run on a damaged rear tire. Here’s how to install a new one.
Repair difficulty
Time required
60 minutes or less
Read moreJanuary 1, 2015
By Lyle Weischwill
If a blade on your mower is dull or bent, replace it following the steps in this repair guide.
Repair difficulty
Time required
30 minutes or less
Read moreJanuary 1, 2015
By Lyle Weischwill
Help your mower run better by replacing the fuel filter during your riding mower's annual tune-up.
Repair difficulty
Time required
15 minutes or less
Read moreUse the advice and tips in these articles and videos to get the most out of your riding mower or lawn tractor.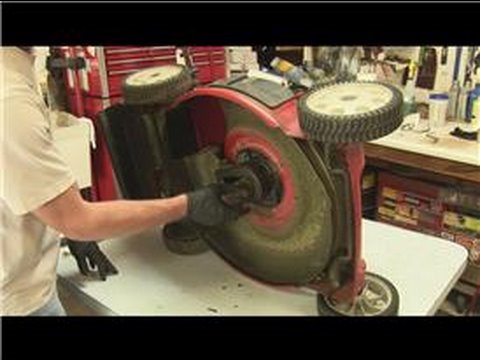
August 5, 2022
By Lyle Weischwill
Learn about Sears Technical Institute and the advanced technical content being developed for aspiring appliance techs.
Read moreAugust 6, 2020
By Lyle Weischwill
Learn how a blade removal tool makes replacing the blade easier and safer
Read moreApril 9, 2019
By Lyle Weischwill
Keep these 6 things on hand to keep the mower season running smoothly.
Read moreShop Frigidaire FFBD2406NB9B dishwasher parts
Shop LG DLGX2502V dryer parts
Shop Bosch HBL8650UC/10 electric wall oven parts
Repair Kit 35791R 2302860783BLACK LOWER OUTER DOOR ASM WB56X33052Dishwasher Water Inlet Guide Assembly 4975DD1001A partsWasher Motor Stator WPW10419333 partsRefrigerator Can Rack WP13005401SP partsGrill Drip D WR17X23167 partsRefrigerator Door Assembly ADD74296601 partsSlinger Vane 905006MAWasher Outer Rear Tub Assembly DC97-19681A partsHome Electronics Shield 126-02036Elliptical Resistance Motor 241949 partsDishwasher Spray Arm, Lower WD12X10244 partsSpark Plug 715811
Shop Snapper 301016BE rear-engine riding mower parts
Gas Grill Not Hot Enough
Shop GE GSL25JFPEBS side-by-side refrigerator parts
POWERED LAWN MOWER ASSEMBLING AND OPERATOR'S MANUAL
WARNING! Read this manual before operating the product.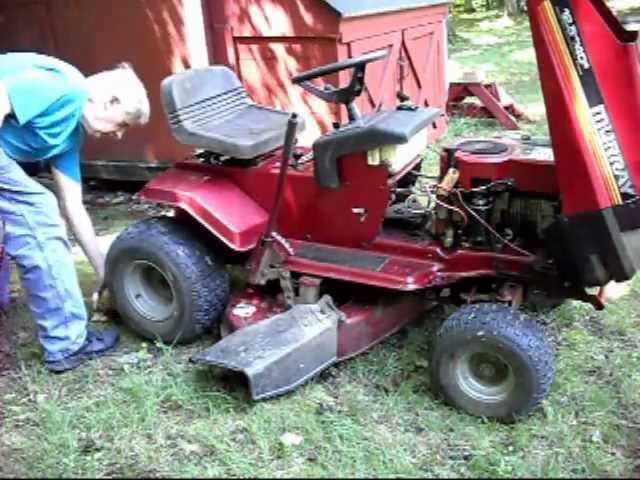
Register your Murray product... Enjoy all the benefits!
www.MURRAY.com/Registration
Details
Thank you for purchasing a Murray electric mower. Murray prides itself on the quality and performance of all of its products.
This instruction manual will assist you in the assembly, safe operation and maintenance of your product.
Please read the following warnings to ensure the safety and long life of your product.
The images in this manual are for illustrative purposes only. The appearance of the actual product may vary.
WARNING
Do not attempt to operate this product until you have fully read and understood all instructions, safety precautions, etc. contained in this manual. Failure to do so may result in accidents with electric shock, fire and/or serious injury.
INTENDED USE
This product is intended for residential lawn mowing only. The cutting disc should rotate approximately parallel to the ground on which it rolls. When mowing, all four wheels must be in contact with the ground. This is a pedestrian-controlled mower walk.
NOTE: The mower must not be operated with its wheels off the ground, pulled or ridden. It should not be used to mow anything other than home lawns.
Do not use the product for any application other than that for which it was designed.
General safety
| Attention! | Read the instructions and remove the mains plug before performing any maintenance work. | ||
| Read the instructions for use before operating the machine. | Wait until all machine components have come to a complete stop and remove the mains plug. | ||
| Wear safety goggles and ear protection that meets safety standards. | Keep hands and feet away from cutting area. Contact with blades can amputate hands and feet. Playback Contact with blades can amputate hands and feet. Playback | ||
| Wear sturdy, non-slip shoes. | Make sure that the main cable does not touch the blade. Always keep an eye on the position of the cable. | ||
| Wear protective gloves. | DO NOT dispose of with household items. | ||
| Do not use the machine in wet conditions, protect the machine from rain and moisture. | Switch off and unplug the power cord before making any adjustments, cleaning, or if the cable is damaged or entangled. | ||
| Beware of thrown objects! Make sure bystanders are at least 50 feet (15 m) away and stop the machine if approached. | Never operate the mower without the grass catcher or guard installed. | ||
| Beware of the risk of electrical shock during operation. |
NOTE: WARRANTY DETAILS ARE NOT SPECIFIED IN THIS MANUAL. FOR DETAILED WARRANTY INFORMATION, SEE IN OTHER DOCUMENTS SUPPLIED WITH THIS MACHINE.
General Safety
 Thrown objects can cause serious injury.
 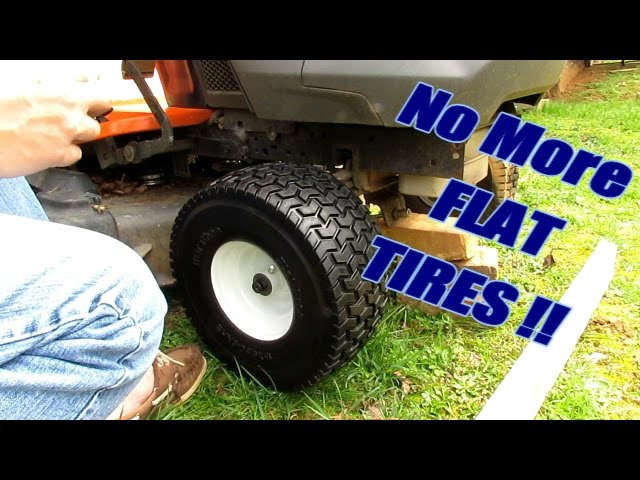 Pay attention to what you're doing and make sure others are aware of your intentions for a task before you commit to it.
  Keep the car out of the reach of children.
 Electrical safety
DOUBLE INSULATED
This appliance is double insulated according to EN:60335; therefore no ground wire is required. Always check that the power supply matches the voltage.tage on the nameplate.
USING THE EXTENSION
Always use an approved extension cable suitable for the power input of this mower (see technical data). The extension cable must be suitable for outdoor use and marked accordingly. Up to 30m of 1.5mm extension cable H05VV-F can be used without loss of product performance. Before use, inspect the extension cable for signs of damage, wear and age. Replace the extension cable if it is damaged or defective. When using a cable reel, always unwind the cable completely.
Product Disposal
PROPER DISPOSAL OF THE PRODUCT
Used electrical products must not be disposed of with household waste. Please dispose of where equipment is available. Contact your local authorities or dealer for disposal advice.
Unpacking
This product requires assembly.
WARNING
Do not attempt to modify this product or create accessories not recommended for use with this product. Any such change or modification is not used for its intended purpose and could result in a hazardous situation that could result in serious injury.
Make sure the mower is turned off and disconnected from the power source before any assembly and until assembly is complete and you are ready to operate the mower.
car.
Unfolding and adjusting handles
For 37 cm model see fig. 1, 2 and 3.
For 32 cm model see fig. 4 and 5.
WARNING
Do not operate if handles are not properly installed.
Cable fixation
See figures 6 and 7.
WARNING
Ensure that the cable is secured with cable clamps before connecting the plug to the wall outlet.
Be sure to fully unwind the extension before use.
Grass catcher installation
See fig. 8.

WARNING
Always replace damaged or worn grass bags.
Do not operate if the trap is set incorrectly.
Do not keep the lid open while the machine is running.
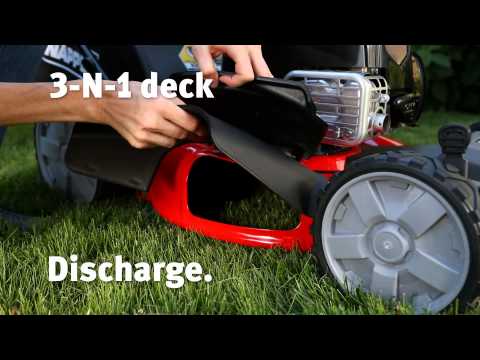
Installing and removing the mulch plug
See fig. 9.
WARNING
Do not let the back cover slam shut, always close carefully to avoid damaging it.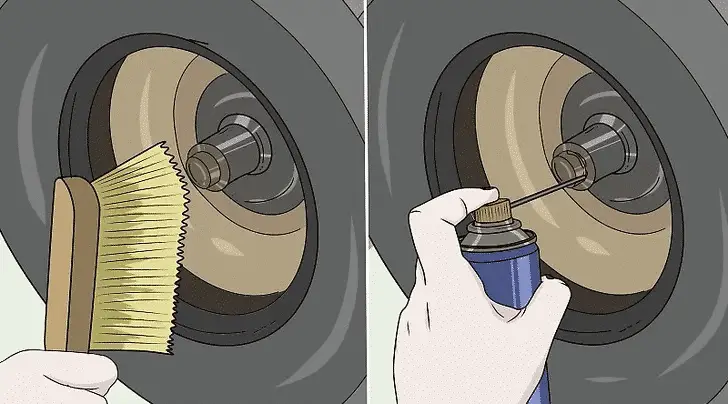
Always replace the rear guard and mulch plug if damaged.
Starting and stopping
For your safety
WARNING
Worn or damaged blades are a serious hazard.
See fig. 10.
To START the mower:
To STOP the mower:
WARNING
Do not attempt to override the safety lock button or shackle lever. Do not tie or lock the bail.
Do not leave mower running unattended.
Cutting height adjustment
NOTE: See Figure 11.
NOTE: Height adjustment lever location and appearance may vary between models.
Before using the mower for the first time, raise the cutting position to the height that best suits your lawn.
To adjust the blade height:

WARNING
Do not adjust the height while the mower is running.
Quick Installation Guide
1 - DONE0147 Do not set up the mower without turning off or unplugging the machine. 2 - KIT Do not cut long, thick or damp grass low. 3 - FORWARD Do not continue mowing if the mower is frequently switched off. This windrower is equipped with a THERMAL MOTOR PROTECTION* to protect the motor if it is shut down during operation due to overload or blockage. Cutting tips See fig. 12. A sharp blade will greatly increase the performance of the mower, especially when mowing tall grass. Be sure to check the blade and replace it at least once a year as described in the Maintenance section. WARNING Mulching tips Emptying the grass bag See fig. WARNING Shaft replacement See fig. 14, fig. 15 and fig. 16. WARNING NOTE: Use only genuine Murray manufactured and warranted parts. Insist on them with your spare parts and service supplier. WARNING WARNING Cutterbar Replacement (continued) NOTE: Check all fasteners frequently, always making sure the mower is in safe working condition. Use only genuine Murray replacement blades. Replace worn or damaged blades and bolts with balance kits. Cleaning WARNING The bottom of the mower deck should be cleaned after each use as grass clippings, leaves, dirt and other debris will accumulate causing rust and corrosion. Do not use solvents, strong detergents, and certain aromatic oils such as pine and lemon oils when cleaning plastic parts. Chemicals can damage, weaken, or destroy plastic components, resulting in serious injury. Storage The following steps must be taken to prepare the machine for storage. Handle can be fully folded for storage. (See fig. 17). Service Servicing requires special care and knowledge and should only be performed by a qualified service person. For service, we suggest that you return the product to the nearest authorized service center for repair. Maintenance Continued • Never with safety devices. Check their functionality regularly. NOTE: Refer to the warranty card included with this product for support contact information. WARNING WARNING Maintenance schedule Features Technical characteristics of the product Report this, © 2021 Briggs & Stratton LLC. All rights reserved. You need additional files: drivers, additional user manual (manufacturers often for each product make several different technical assistance documents and manuals), the latest firmware version, then you can ask the administrators or all users of the site a question, everyone will try to respond promptly to your request and help as soon as possible. Your device has the characteristics: Type: self-propelled lawn mower, rear-wheel drive, Cutting width: 48 cm, Grass bag: yes, soft, volume 65 l, Mulching: no, Cutting height: 25-85 mm, Cutting height adjustment: yes, central, number levels - 9, see the full specifications in the next tab. Download For many products, various additional files may be required to work with the Murray MX550: drivers, patches, updates, installers. You can download these files online for a specific Murray MX550 model or add your own for free download by other visitors. If you did not find files and documents for this model, you can look at the instructions for similar products and models, as they often differ in small changes and complement each other. Be sure to write a few words about the product you purchased so that everyone can read your review or question. Be active so that as many people as possible can get the opinion of real people who have already used the Murray MX550. The main and most important characteristics of the model are collected from reliable sources and similar models can be found by characteristics. Here is a list of the most frequent and common breakdowns and malfunctions of lawn mowers and trimmers. If you have such a breakdown, then you are lucky, this is a typical malfunction for the Murray MX550 and you can ask a question about how to fix it and you will be answered quickly, or read the questions and answers below. 18 353 services are registered in our database in 513 cities of Russia, Belarus, Kazakhstan and Ukraine.
Switch off and unplug the lawn mower before making any adjustments.
Do not cut when the trap is full or the chute is blocked.
Empty the catcher before mowing.
Adjust to cut higher on overgrown lawn.
Do not push the mower through a dense lawn.
Slow down if the grass gets thicker.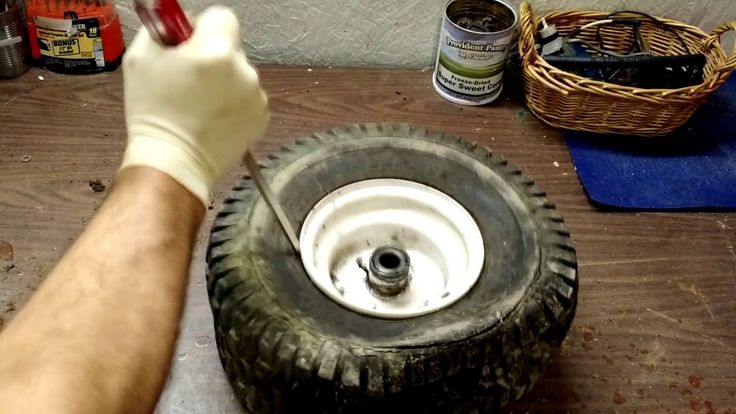
Avoid frequent trips of the THERMAL PROTECTION.
Do not continue if the engine overheats.
Allow motor to cool down if MOTOR THERMAL PROTECTION is activated.
Avoid frequently overloading the mower as this may cause the motor thermal protection to trip. Motor thermal protection requires the machine to rest sufficiently to cool down.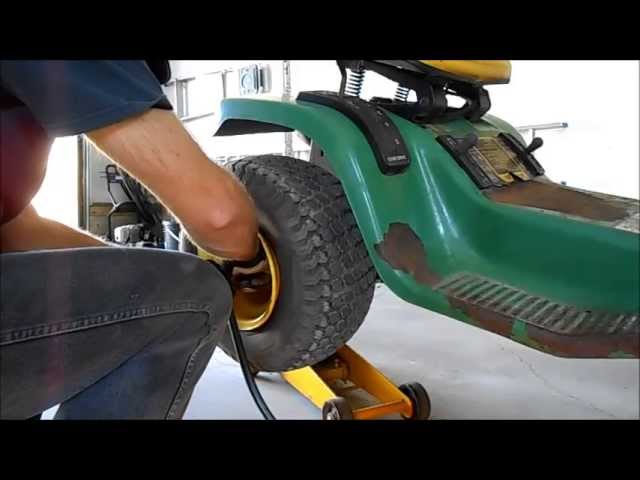 Clear blockage and restart by increasing cutting height.
Mow across the slope, not up and down.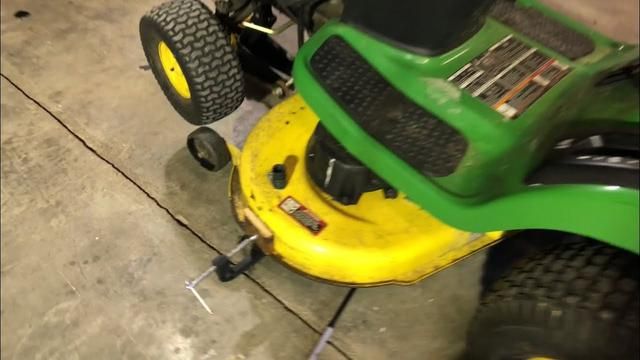
Use extreme caution when changing direction on slopes. Do not mow too steep slopes, always be sure that you are standing on the slopes.
MAINTENANCE AND CARE
 13.
13.
Always protect your hands by wearing heavy gloves and/or wrapping the cutting edges of the blade in rags or other material when performing blade maintenance. Blade contact can result in serious injury.
Detailed installation instructions are printed on original Murray blade sets.
Use of non-original blades may void your warranty and cause damage or injury.
Never start the mower without blades or with damaged blades.
Never modify the blades or cutting system.
 14).
14).
To prevent serious injury, turn off mower and unplug from outlet before servicing, cleaning, or removing debris.
Remove any accumulation of grass and leaves on or around the engine cover.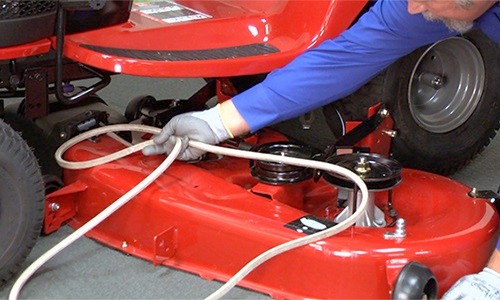 If debris accumulates on the underside of the lawnmower during use, stop the engine, disconnect the mains plug, and then tilt the lawnmower forward or on its side and clean it with an appropriate tool.
Option only available for model 37 see
 When servicing, use only original spare parts.
Never allow brake fluid, gasoline, petroleum products, penetrating oils, etc.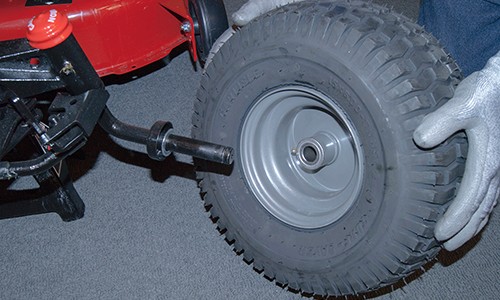 to come into contact with plastic parts. Chemicals can damage, weaken, or destroy plastic, which can lead to serious injury.
Do not lubricate wheel parts. Lubrication can cause wheel components to fail during use, which can result in serious injury to the operator and/or lawnmower or property damage.
See the following table for routine maintenance.
Requirements 9 Don't start. The lawnmower is not connected to the power supply.
The grass is too long. wrapped around the blade.
The body of the mower is clogged with grass and debris. Connect to power supply.
Start with short grass or increase the cutting height.
Check under the deck for weedy grass and a clean exhaust port. Loss of power. Cutting too much grass. 
The body of the mower is clogged with grass and debris.
The cutting blade is worn or rusty. The herb box is full. Increase cutting height.
Check under the deck for weedy grass and a clean exhaust port.
Replace cutting blades. Make sure the grass bag is empty. The mower cuts the grass unevenly. The lawn is rough or uneven.
The cutting height is set incorrectly. Check the mowing area. Increase cutting height. Mower does not mulch properly. Wet cut grass sticks to the bottom of the deck.
Mulch plug missing. Wait until the grass is dry before mowing.
Install the mulch plug. The mower is hard to push. The grass is too tall or the cutting height is too low.
The rear of the mower body and the blade are dragging thick grass. Increase cutting height.
Dump the cut grass from the grass catcher. The mower is too noisy and vibrates. 
Motor shaft is bent. The blade is not balanced. Stop the engine. and inspect for damage.
Fix before restart. If the vibration persists. contact an authorized service center. Mower stalls (“stalls”) when mowing grass. Mower blade overloaded due to mowing conditions. e.g. long, fat. wet grass or type of grass.
Blades are clogged with grass and dirt accumulated under the base plate. Stop engine, increase mowing height and try mowing again.
Wait until the grass is dry and try to mow again.
Check under the deck for weedy grass and a clean exhaust port. The grass bag is not full enough. The lawn is too wet.
The body of the mower is clogged with grass and debris.
Cutting blade worn or rusty. The herb box is full. Wait for the grass to dry before mowing.|
Check under the deck for weedy grass and a clean exhaust port.
Replace cutting blades. Make sure that the grass collector is empty
 Technical characteristics
Description Murray Model . 26 /26 26 /26 Deck type Material material Hybrid (fabric + plastic) Hybrid (fabric + plastic) Poster/self -propelled Push Push NOT ACTION NOT access Blade type Bar blade Bar blade Height adjustment Handle type Ergonomic Ergonomic 0052 Law: 91.14 dB(A), kVA: 1.55 dB Law: 95 dB(A) Sound power level (guaranteed) 96 dBA 96 dBA total vibration 905 .) 2.26 m / s 2 , k = 1. 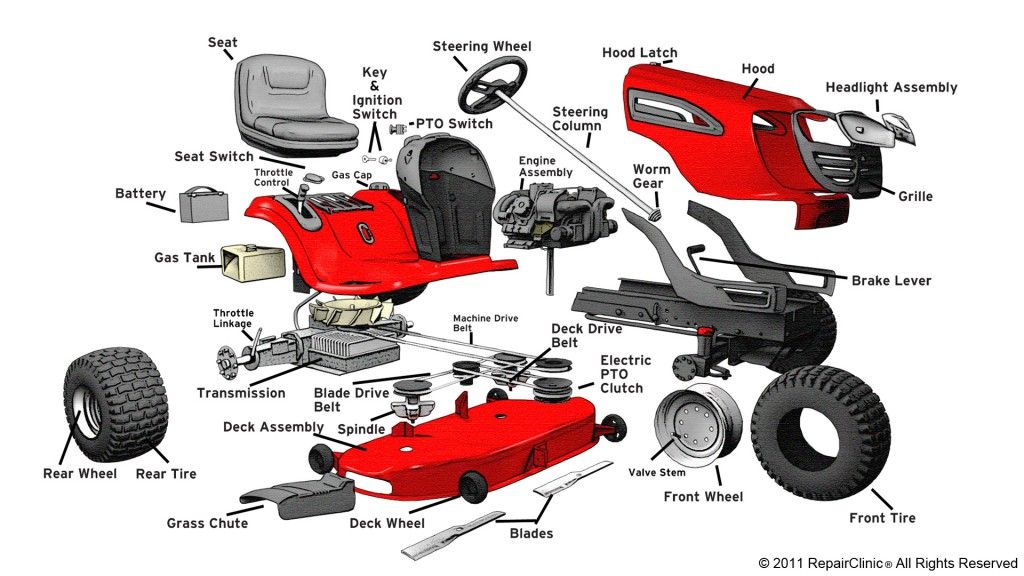 5 m / s 2
 1.35 m / s 2 , K = 1.5 m / s2
No part of this booklet may be reproduced in any way without prior written permission.
All information here is subject to change without notice.
Murray is a registered trademark of Briggs & Stratton LLC.
WWW.MURRAY.COM
2495 B JC JM ISSUED Posted inMurrayTags: Electric Lawn Mower 32cm, EC320, EC320 32cm Electric Lawn Mower, Murray Murray MX550 Ilt Trimmer Lawn Mower Manual in Russian

murray-mx550-guide.pdf User Manual murray-mx550-certificate.doc Download certificate of conformity
No files found 
General characteristics Type self propelled lawn mower, rear wheel drive Cutting width 48 cm Grass catcher yes, soft, volume 65 l Functionality Mulching no Cutting height 25-85 mm Cutting height adjustment yes, central, number of levels - 9 Grass discharge to grass bag Engine Engine type petrol, four-stroke Power 4.50 HP Displacement 158 cc Engine brake yes Catalytic Converter yes Manufacturer Briggs and Stratton Design Handle foldable height-adjustable Body material steel Anti-vibration system no Number of wheels four wheel Front wheel diameter 17. 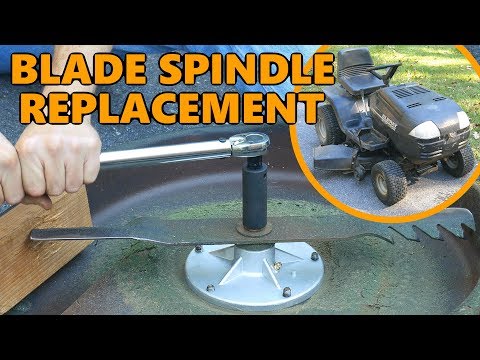 5 cm
5 cm Rear wheel diameter 20 cm Additional information Equipment grass catcher disc/knife Dimensions Weight 30 kg
Breakdown name Description of failure Action Engine Stalls Noisy Engine Increased Vibration During Operation Whistling sound during operation Leaves Rough Cut Grass Engine Won't Start Engine Stalls Titan Peck 10 380 Everything Works But Doesn't Spin Head With Line Lesnik 254 How to Remove the Starter Extended Rotor Grass got into the gap between the impeller and the housing and squeezed the head (with rotor) from the housing by 12mm (together with the bearing). Back Inserts But Doesn't Hold, Comes Out Again And Loses Contact With The Brushes.
Drive Belt Drive Belt Broken. Write the characteristics of the belt, dimensions and data, so that you can order at least somewhere. There is no marking on the belt. Replacement Line Line Diameter, Line Length, Winding Order No torque transfer from motor to drive Does not develop speed, stalls. Only works at idle. When you add the mixture, it starts to smoke and stalls. Metal Bobbin In Spool Cracked Over Time - Replacing Her Engine Stalls At Castelgarden R 484 the engine stalls when heated, the candle is in soot, I change it to a new one, it works again then it stalls Starter Cord Replacement Starter Cord Replacement Motor Doesn't RPM Not gaining momentum, Black soot on the candle How the engine warms up does not start Cools down at night Then you can start Lesnik 305 The coil constantly rotates at any engine speed. 
Constantly Rotating Coil, At Any Engine RPM. Doesn't RPM Shoots Exhaust Cord return spring burst. How to get to her? The cord does not return to its original position. Cord return spring burst. How to get to her? The cord does not return to its original position. High RPM Engine Starts Well, Develops High RPM, Cable Doesn't Stick, I Think Oil Seals No. Shaft. They pass. She is with us Out Coil Ka Carcass Flew Out Together With Stip Replacement Coil Tell me which coils are suitable for this trimmer, to buy Flexible Shaft Coupling Hot Drive Drive Repair The "Motor-Body" Drive Pulley On The Body Has Suddenly Fallen Off. Crankshaft Oil Seal Replacement Oil leaking from crankcase Constant Rotation Coil Nonsense Don't Write Which Rod? This is an electric trimmer.  Go To School..
 Shoot the Moderator! Definitely.. When Starting the Brushcutter, the Starter Cord Does Not Return Back Bison Zgke-32-1000 Free Spin Knife For what in the fuel tank Third Gasoline ~Knee rotates when mowing, does not hold the part that connects the knee to the motor Hitachi Cg25Sc Engine warms up after 15 minutes of operation Bobbin Hole Destruction How to Remove - Disconnect From the Motor - Block with the Bobbin Slot? Gtg400 Winded Line Electric Motor Not Rated, Collector Sparking Sides Decreased rpm during mowing, no smoke. Engine Patriot Pt 1132E Engine Buzzes But Doesn't Spin How to Remove Coil How To Remove Coil For Replacement, Top Cap Won't Unscrew, Stuck, How Different Button Does Not Include Motor Broken Start Key