Mitsubishi Outlander 2007-2013 Owner's Manual / For emergencies / How to change a tyre
Before changing a tyre, first stop your vehicle in a safe, flat location.
1. Park the vehicle on level and stable ground, free of loose pebbles, etc..
2. Set the parking brake firmly.
3. Turn the ignition key to the “LOCK” position, move the gearshift lever to the “R” (Reverse) position.
4. Turn on the hazard flashers and set up a warning triangle, flashing signal lamp, etc., at an adequate distance from the vehicle, and have all your passengers leave the vehicle.
NOTE:
● The warning triangle and flashing signal lamp does not come with your vehicle. It is recommended that you keep one in the vehicle for use if needed.
5. To prevent the vehicle from rolling when it is raised on the jack, place chocks
or blocks (A) in front of and behind the tyre that is diagonally opposite from the
tyre (B) you are changing.
WARNING:
● Be sure to apply chocks to the correct tyre when jacking up the vehicle. If the vehicle moves while jacked up, the jack could slip out of position, leading to an accident.
NOTE:
● The chocks shown in the illustration do not come with your vehicle. It is recommended that you keep ones in the vehicle for use if needed.
● If chocks are not available, use a stone or any other object that is large enough to hold the wheel in position.
6. Get the spare wheel, jack, and wheel nut wrench ready.
Refer to “Tools and jack”.
Spare wheel information
Check the air pressure of the spare tyre frequently and make sure it is ready for emergency use at any time.
Maintaining the spare wheel at the highest specified air pressure will ensure that it can always be used under any conditions (city/high-speed driving, varying load weight, etc.).
The spare wheel is stored under the floor of the luggage area.
CAUTION:
● The pressure should be periodically checked and maintained at the specified pressure while the tyre is stowed.
Driving with an insufficient tyre pressure can lead to an accident. If you have no choice but to drive with an insufficient tyre pressure, keep your speed down and inflate the tyre to the correct pressure as soon as possible (refer to “Tyre inflation pressure”).
● When the tread wear indicators appear, the tyre must be replaced.
Refer to “Wheel condition”.
Compact spare wheel
The compact spare wheel is stored under the floor of the luggage area. It is designed to save space in the luggage area and its light weight makes it easy to handle in the event of a flat tyre.
CAUTION:
● The compact spare wheel is for temporary use only and should be removed as soon as the original wheel can be repaired or replaced.
● The vehicle must not be driven at speeds in excess of 80 km/h (50 mph) while
using the compact spare wheel.
● The compact spare wheel is not as good as a standard wheel in controllability and stability. When the compact spare wheel is used, avoid quick starts, sudden braking and sharp steering.
● The compact spare wheel is specifically designed for your vehicle and it should not be used on any other vehicle.
● Do not use tyre chain with your compact spare wheel. Because of the smaller tyre size, a tyre chain will not fit properly. This could cause damage to the wheel and result in loss of the chain.
If a front tyre becomes flat when using tyre chains, first replace a rear wheel with the compact spare wheel and then use the removed rear wheel to replace the flat front wheel so that you can continue to use the chains.
CAUTION:
● Upon installation of the compact spare wheel, the ground clearance is reduced as the tyre is smaller in diameter than the standard tyre.
When passing over the projections on the road, use care not to damage the vehicle’s
undercarriage.
● Do not install more than one compact spare wheel at the same time.
To remove the spare wheel
On vehicles with a compact spare wheel
1. Open the tailgate and remove the tyre hanger installation bolt covers (A) with the jack bar.
Refer to “Tailgate: To open”.
2. Loosen the tyre hanger installation bolt by turning it anticlockwise with the wheel nut wrench.
CAUTION:
● Be careful as you loosen the tyre hanger installation bolt. If you loosen it too far, the hook may come out and let the compact spare wheel fall.
3. Raise the lower gate until it locks properly in position with a click.
Refer to “Tailgate: To open”.
4. Lift up the tyre hanger (B) at the section indicated by the arrow in the diagram, remove it from the hook (C), lower it, and then take the tyre off the tyre hanger.
CAUTION:
● When removing the tyre hanger from the hook or hanging it back on the hook,
hold the tyre hanger carefully so that it does not drop on your feet.
NOTE:
● Put the spare wheel under the vehicle body near the jack.
This makes it safer if the jack slips out of position.
On vehicles with a standard spare wheel
1. Open the tailgate and remove the cover (A) with the jack bar.
Refer to “Tailgate: To open”.
2. Insert the wheel nut wrench in the hole and lower the standard spare wheel by turning it anticlockwise.
3. Raise the lower gate until it locks properly in position with a click.
Refer to “Tailgate: To open”.
4. Remove the chain from the spare wheel cover.
5. Take out the standard spare wheel from the spare wheel cover.
To store the spare wheel
On vehicles with a compact spare wheel
1. Put the tyre on the centre of the tyre hanger, with the wheel surface facing upwards.
CAUTION:
● Storing the tyre with the wheel surface facing down may damage the wheel or
tyre hanger. If you find any damage on a spare tyre, do not use the tyre and contact
a MITSUBISHI MOTORS Authorised Service Point.
If you find any damage on a spare tyre, do not use the tyre and contact
a MITSUBISHI MOTORS Authorised Service Point.
2. Lift up the tyre hanger (A) and hang it on the hook (B).
CAUTION:
● Do not attach the hook to any part of the tyre hanger other than the correct position. Otherwise the hook could damage the vehicle body, or the tyre could fall while driving and cause an accident.
3. Open the lower gate.
Refer to “Tailgate: To open”.
4. Tighten the tyre hanger installation bolt securely by turning it clockwise with the wheel nut wrench.
CAUTION:
● After storing the spare wheel, check that the tyre hanger is securely locked in place. If the tyre hanger is not securely locked in place, it could come loose and fall while you are driving and cause an accident.
● When removing the tyre hanger from the hook or hanging it back on the hook,
hold the tyre hanger carefully so that it does not drop on your feet.
5. Install the tyre hanger installation bolt cover.
On vehicles with a standard spare wheel
1. Put the tyre on the spare wheel cover with the wheel surface facing downwards.
2. Install the chain on the spare wheel cover.
3. Open the lower gate.
Refer to “Tailgate: To open”.
4. Turn the wheel nut wrench until the tyre is secure and the chain is tight. Do not over tighten.
CAUTION:
● After storing the spare wheel, check that the spare wheel cover is securely locked in place.
If the spare wheel cover is not securely locked in place, it could come loose and fall while you are driving and cause an accident.
NOTE:
● Overtightened nut can lead to gear damage, and to become unable to wind up the chain.
5. Install the cover (A).
To store the tools and jack
Reverse the removing procedure when storing the jack, bar and wheel nut wrench.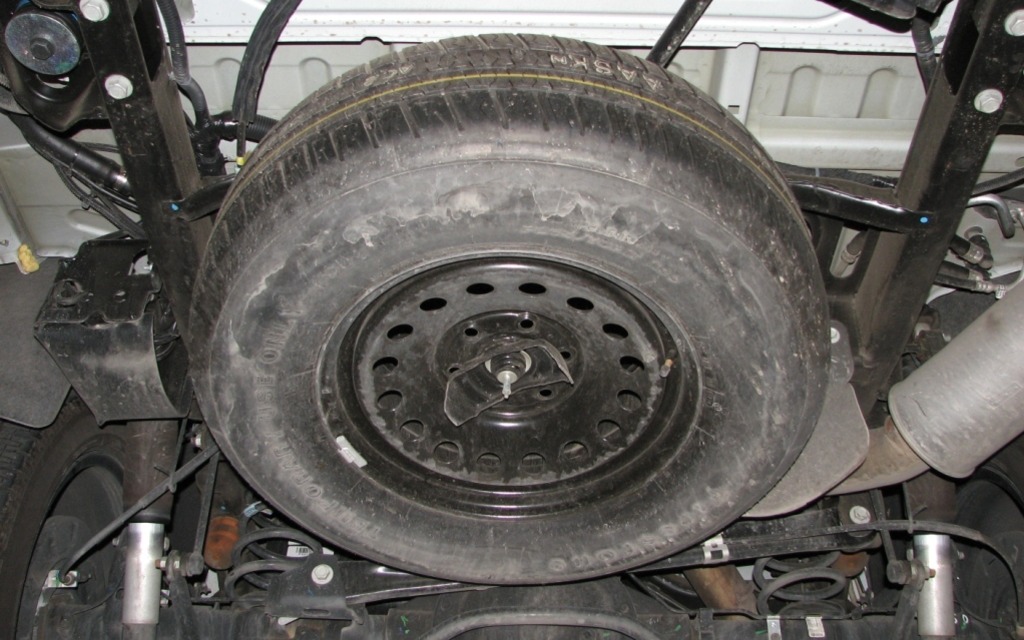
Refer to “Tools and jack”.
Wheel covers
To remove
Wrap the tip of the jack bar with a cloth, insert it deeply into the notch provided in the wheel cover, and pry the cover away from the wheel. Using the same procedure at the other wheel cover notches, work the wheel cover away from the wheel to remove it completely.
CAUTION:
● Removing the cover with your hands may cause injury to the fingers.
NOTE:
● The wheel cover is made of plastic. Pry it loose carefully.
To install
1. Make sure the tabs (A) of the back of the wheel cover are not broken and correctly fitted on the rings (B). If in doubt, do not install the wheel cover and consult your MITSUBISHI MOTORS Authorised Servise Point.
2. Align the tyre valve stem (C) with the cut out area (D) in the wheel cover.
NOTE:
● There is a symbol (E) on the back of the wheel cover indicating the cut out
area.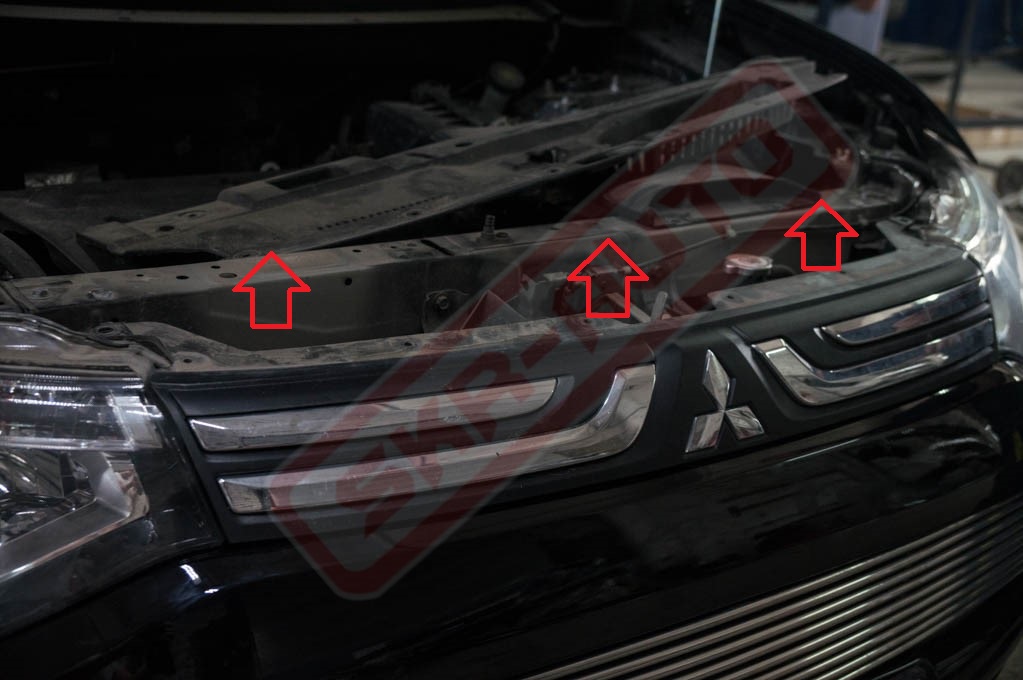
3. Push the underside (F) of the wheel cover into the wheel.
4. Gently push both sides (G) of the wheel cover and hold it in place with both knees.
5. Gently push around the top (H) of the wheel cover.
To change a tyre
1. If a wheel cover is installed, first remove the cover (refer to “Wheel covers”).
Then loosen the wheel nuts a quarter turn with the wheel nut wrench. Do not remove the wheel nuts yet.
2. Place the jack under one of the jacking points (A) shown in the illustration. Use the jacking point closest to the tyre you wish to change.
WARNING:
● Set the jack only at the positions shown here. If the jack is set at a wrong position, it could dent your vehicle or the jack might fall over and cause personal injury.
● Do not use the jack on a tilted or soft surface.
Otherwise, the jack might slip and cause personal injury. Always use the jack
on a flat, hard surface.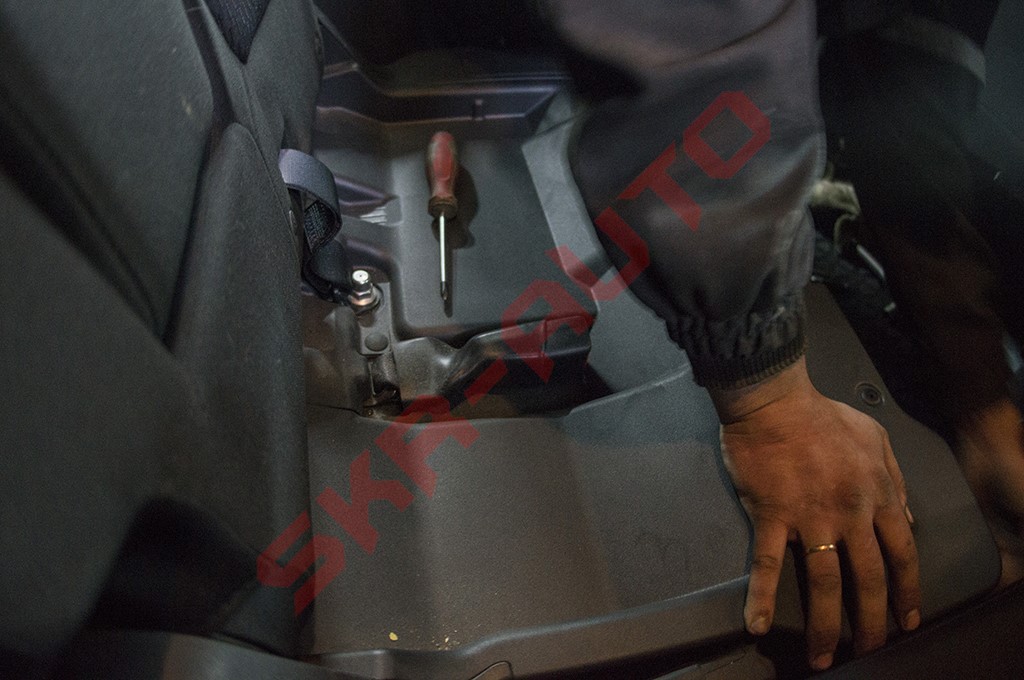
Before setting the jack, make sure there are no sand or pebbles under the jack base.
3. Rotate the jack by hand until the flange portion (B) fits in the groove (C) at the top of the jack.
4. Insert the jack bar (D) into the wheel nut wrench (E).
Then put the end of the jack bar into the shaft’s jack end, as shown in the illustration.
Slowly rotate the wheel nut wrench until the tyre is raised slightly off the ground surface.
WARNING:
● Stop jacking up the vehicle as soon as the tyre is raised off the ground. It is dangerous to raise the vehicle any higher.
● Do not get under your vehicle while using the jack.
● Do not bump the raised vehicle or leave it sitting on the jack for a long time. Both are very dangerous.
● Do not use a jack except the one that came with your vehicle.
● The jack should not be used for any purpose other than to change a tyre.
● No one should be in your vehicle when using the jack.
● Do not start or run the engine while your vehicle is on the jack.
● Do not turn the raised wheel. The tyres still on the ground could turn and make your vehicle fall off the jack.
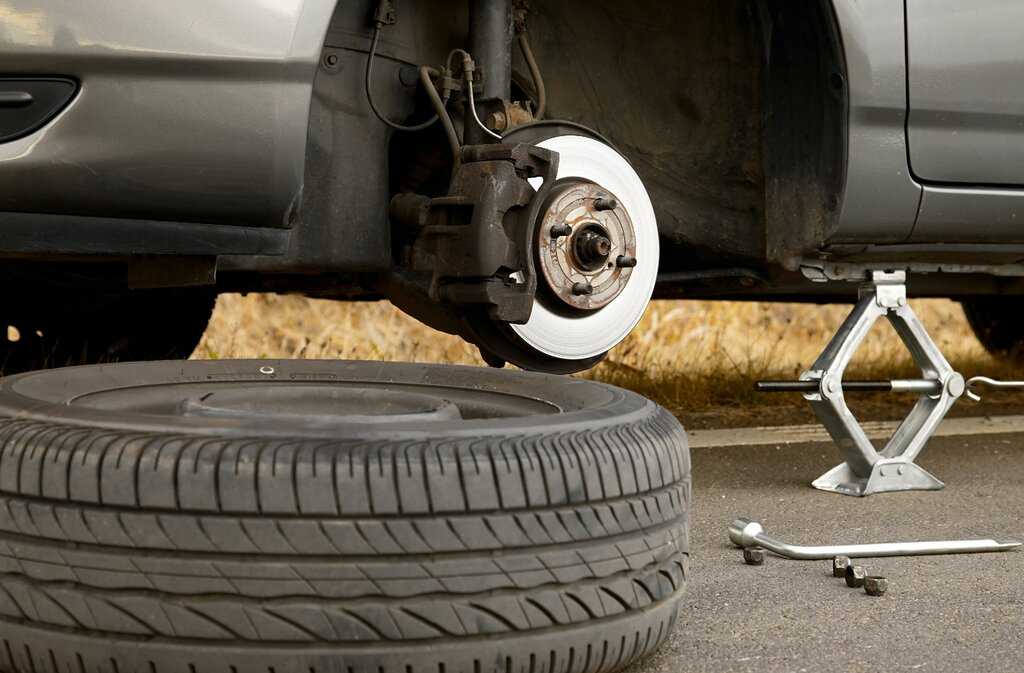
5. Remove the wheel nuts with the wheel nut wrench, then take the wheel off.
CAUTION:
● Handle the wheel carefully when changing the tyre, to avoid scratching the wheel surface.
6. Clean out any mud, etc. on the hub surface (F), hub bolts (G) or in the installation holes (H) in the wheel, and then mount the spare tyre.
WARNING:
● Be sure to position the tyres the correct way when putting them on the vehicle. The valves should be on the outer side of the vehicle. If the valve (I) cannot be seen, the tyre has been mounted the wrong way around.
If tyres are mounted the wrong way around it could have a negative effect on the vehicle and cause an accident.
7. Turn the wheel nuts clockwise by hand to initially tighten them.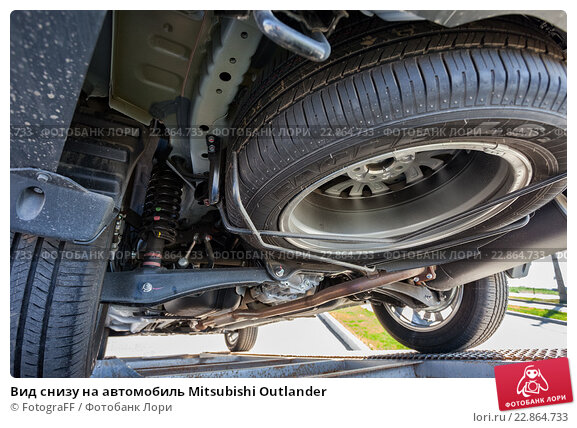
[On vehicles with steel wheels]
• Normal wheel and compact spare wheels Initially tighten the wheel nuts until the tapered part (A) of the nuts lightly touches the wheel hole seats (B) enough to keep the tyre from wobbling.
Initially tighten the nuts in the same way when mounting the compact spare wheel.
[On vehicles with aluminium wheels]
• Normal wheel.
For the normal tyres, initially tighten the wheel nuts until the wheel nut flange area (C) touches the wheel enough to keep the tyre from wobbling.
• Compact spare wheel.
For compact spare wheels, initially tighten the wheel nuts until the tapered area (A) of the nuts lightly touches the wheel hole seat area (B) enough to keep the tyre from wobbling.
CAUTION:
● Never apply oil to either the wheel bolts or the nuts or they will tighten too much.
NOTE:
● Flange nuts can be temporarily used on the steel wheel, but return to the original
wheel and tyre as soon as possible.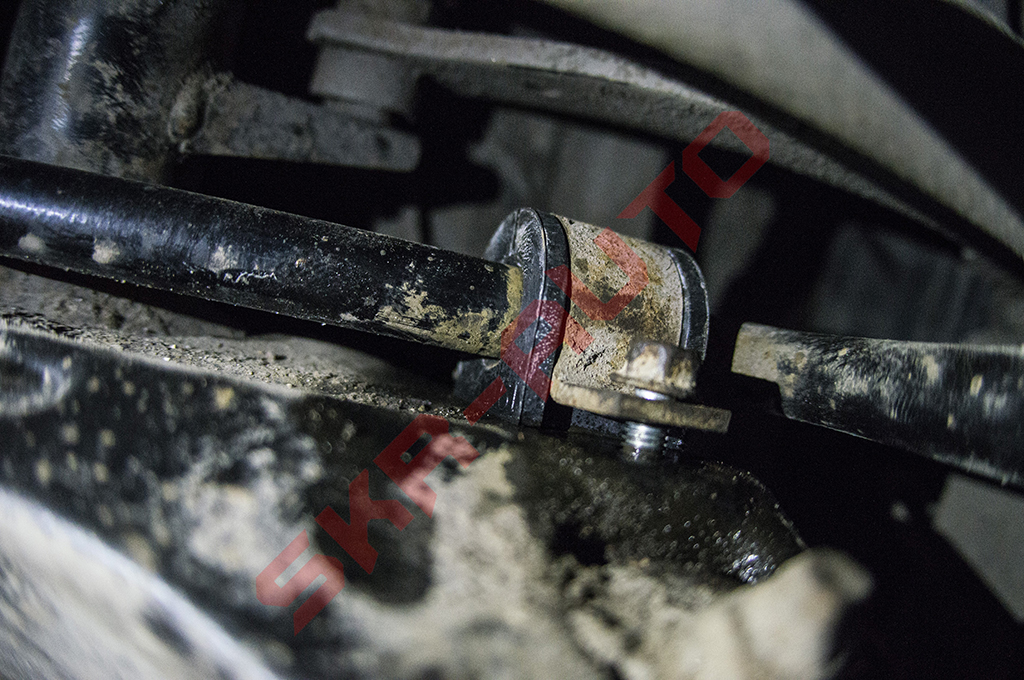
● If all 4 aluminium wheels are changed to steel wheels. e. g. when fitting winter tyres, use taperd nuts.
8. Lower the vehicle slowly by rotating the wheel nut wrench anticlockwise until the tyre touches the ground.
9. Tighten the nuts in the order shown in the illustration until each nut has been tightened to the torque listed here.
Tightening torque 88 ~ 108 N•m (Achieved by applying force of 350 to 420N at end of wheel nut wrench supplied with vehicle)
CAUTION:
● Never use your foot or a pipe extension for extra force in the wheel nut wrench. If you do so, you will tighten the nut too much.
10. If the vehicle has a wheel cover, install it.
Refer to “Wheel covers”.
11. Lower and remove the jack, then store the jack, flat tyre, and chocks. Have your damaged tyre repaired as soon as possible.
12. Check your tyre inflation pressure at the next gasstation.
The correct tyre pressures are shown on the door label.
See the illustration.
CAUTION:
● The compact spare wheel is to be used only temporarily when the standard wheel is damaged. Repair the damaged tyre as soon as possible and use it to replace the compact spare tyre.
● After changing the tyre and driving the vehicle about 1000 km (600 miles), retighten the wheel nuts to make sure that they have not come loose.
● If the steering wheel vibrates when driving after changing the tyre, we recommend you to have the tyres checked for balance.
● Do not mix one type of tyre with another or use a different size from the one listed. This would cause early wear and poor handling.
If your vehicle needs to be towed If you need to tow your vehicle, we recommend that you contact a MITSUBISHI MOTORS Authorised Service Point or tow truck company. In the following cases, transp
On a flooded road
● Avoid flooded roads. Water could enter the brake discs, resulting in temporarily
ineffective brakes. In such cases, lightly depress the brake pedal to see if the
brakes
Water could enter the brake discs, resulting in temporarily
ineffective brakes. In such cases, lightly depress the brake pedal to see if the
brakes
ON-BOARD DIAGNOSTICS The CAN is a communication method which the ECUs use in order to communicate each other. The CAN-related diagnostic trouble codes will be stored in the following ECUs, which use the CAN communication. ETACS-ECU ECM TCM <CVT, A/T> ABS-ECU <vehicles without ASC>
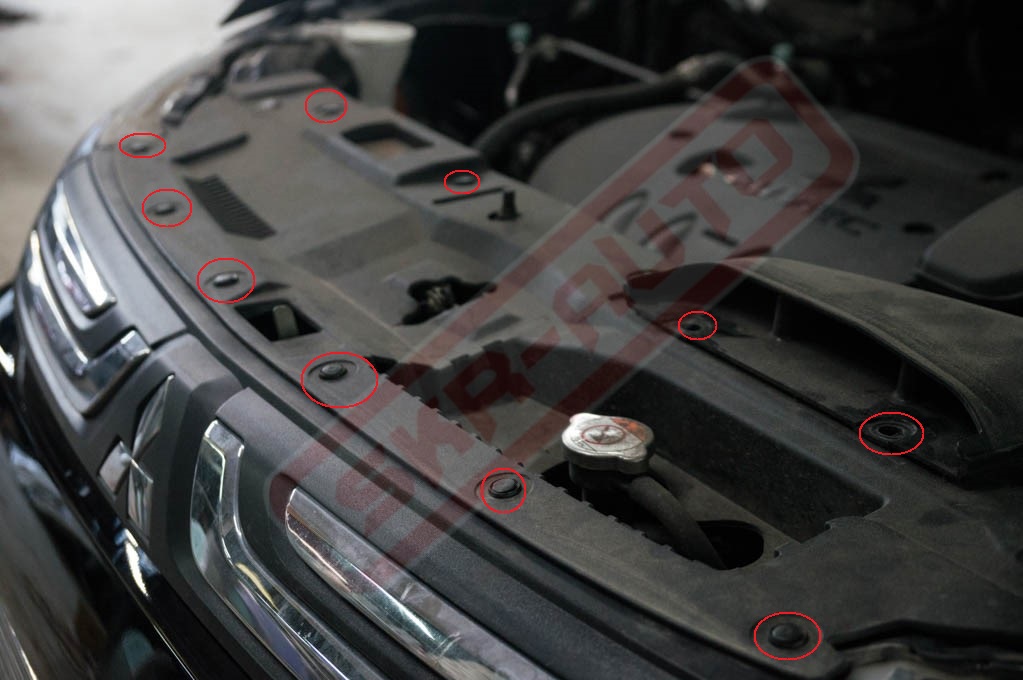
REMOVAL AND INSTALLATION CAUTION The parts indicated by the * are the bolts with friction coefficient stabilizer. In removal, ensure there is no damage, clean dust and soiling from bearing and thread surfaces, and tighten them to the specified torque. Pre-removal operation Engine compartment un
First, the spare tire is stored in automotive tire in case the tires having issues along main roads, usually placed in the rear luggage compartment or outside sealed.
According to experts automotive engineering, there are many reasons leading to the car makers reduce tire size of the current generation of new vehicles may be mentioned.
With the smaller size tires, spare tires will significantly reduce weight. Thereby, the vehicle will reduce the load and uses less fuel when operating the engine. Above all, the spare tire small space-saving luggage compartment, allowing space luggage compartment expanded for storage by size “slimming” of the spare tire instead of “hugging” luggage compartment as former.
In case of driving on the road alone desolate, small spare tire will not be the concern of the driver when tire porters themselves to up / down and proceed instead.
The damage appears to cause incidents on the road is completely can happen to anyone, especially puncture xe.Do that every driver should know to equip yourself with a spare tire and a clear understanding replacing tires What if the unfortunate should be done in person.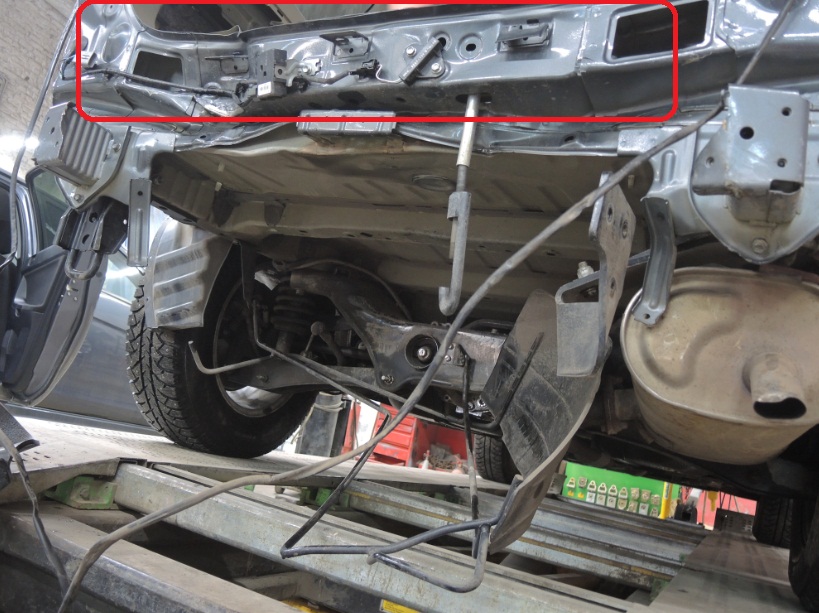
Here are step instructions when replacing the spare tire:
Finding safe parking
Upon detecting signs tires out of breath or punctured, the driver need to find a secure location, to conduct extensive replacement spare tire. Ideal place usually flat terrain and easy parking as roadsides, vacant land …
Next, the driver turned on the lights hazard warning or signal to other means to recognize and then turn off the machine, pull the hand brake and tuck 0 (or P mode if the vehicle uses an automatic), better is drawn down both keys and cars to find a hard material such as brick or stone to insert tire safety.
Prepare the spare tire
External spare tire is available in the vehicle, the vehicle owner should bring the car repair kits include size, wrench, Wrenches mine … Place the spare tire in the trunk often for Mitsubishi.
After retrieving the spare tire, vehicle owners need to turn a small building to the right of the stimulus to get the jack. Spare tire also has a snail in the middle of the wheels, you can be removed by hand for easy replacement spare tire.
Remove the old wheel
Before fitting new tires, the driver must remove the cap axle (if any), set fire to the correct point vehicle designed to enable up. Next, click on the section against the edge-axle chassis with holes, noting that part of the chassis edges to slip into the groove of the stimulus. Then lift the wheel detached from the ground a bit, then lowered a few inches (centimeters) until wheel leaning slightly down on the road just enough to not have to bear high loads but also not to lose control, and then remove the light bread broken out
When removing the bolts from the wheels, you twist back the clock, if too tight, then lowered further dimension to the removable wheels curb and continue twisting until the drain bolt.
Note that should remove one bolt under the stars. First, remove the bolts any, followed by removing the opposite side, so proceed until all bolts. Continue lifting up the tread size need to replace a few centimeters higher than the road surface and the tire lifted out. The purpose is raising high to medium size space for the spare wheel also flatulence.
Drain the nuts have been loosened and put them on the side, where you can find easy and ensure that they are not rolling away.
New spare tire mount
Need to put the spare tire in the correct position, if not sure when mounting the new tires, you should find the valve position to be put in place.
After replacing the tire into place, tighten all the nuts snugly into the lace correct sequence as when removed: for each nut into one and twisted fabric loop to a fixed (no need to tighten). You should also mounting nut under a star turn as you remove it.
Lower size for wheel leaning down pavement strong enough to brake tire rotation and tighten. How to identify a sufficient tightening force is when you hear the sound “ripped ripped” body bolts.
Increased the size and rotate the wheel a few rounds to try to check the operation and installation with no problem. If the wheels turn smoothly, slowly lower and remove the jack of all size, finally tighten all the remaining nuts. Not forget fitting lids and tire wheel broken at the location of the spare wheel has just taken place.
Testing and commissioning
Complete the tire change, the driver must start the engine for the car run off and see if there are unusual phenomenon.
On most vehicles, the spare tire usually only designed for temporary use on a certain distance. Therefore, car owners should take the car to the nearest dealer to carry out repairs and substitute more accurate.
6. Wheel replacement
Before changing a wheel, the vehicle must be stopped in a safe place on a level and level ground.
1. Stop the vehicle on a level, firm, level surface.
2. Apply the parking brake.
3. On a manual transmission vehicle, turn the ignition key to the "LOCK" position and engage reverse gear.
On an automatic transmission vehicle, place the selector lever in the "P" position and turn the ignition switch to the "LOCK" position.
4. Turn on the hazard warning lights, set the warning triangle, flashing signal light, etc. at a distance prescribed by traffic regulations, and ask passengers to get out of the car.
Note
The warning triangle and flashing light are not supplied with the vehicle. It is recommended that these items be stored in the vehicle and used when needed.
5. To prevent the vehicle from moving unintentionally when the vehicle is jacked up, place a brake shoe or block (A) under the wheel diagonally from the wheel to be changed (B).
WARNING
When jacking up the vehicle, be sure to place a brake shoe under the wheel on the ground. If the jacked up vehicle moves, the jack may slip out, resulting in injury.
Note
The brake shoe shown in the illustration is not included with the vehicle. It is recommended that the brake shoe be stored in the vehicle and used when needed.
If no brake shoe is available, use a stone or other object large enough to hold the wheel in place.
6. Remove the jack, handle and wheel wrench.
Periodically check the air pressure in the spare tire and keep it in a state of constant readiness. By maintaining the maximum prescribed air pressure in the spare wheel, the wheel will always be ready for use in all conditions (city driving, high speed driving, loads of various sizes, etc.).
The spare wheel is located under the boot floor.
CAUTION
Periodically check and maintain the prescribed air pressure in the spare wheel tire.
Driving with insufficient tire pressure can cause an accident. If you have to drive with insufficient tire pressure, slow down and restore the prescribed tire pressure as soon as possible. If a wear indicator appears on the tread surface, the tire should be replaced with a new one. Note
If the vehicle is supplied with light alloy (aluminum) rims, it may be equipped with a spare wheel mounted on a steel rim or another alloy rim.
1. Open the tailgate and remove the cover using the jack handle.
2. Using a wheel wrench, remove the spare wheel bolt by turning it counterclockwise.
3. Remove the spare wheel mounting bracket from the hook to lift the wheel down.
CAUTION
When removing the spare wheel mounting bracket from the hook, be careful not to let the wheel slip over your foot.
1. Lay the wheel on the middle of the mounting bracket with the flat side of the disc facing down.
2. Raise the spare wheel and place the mounting bracket on the hook.
3. Turn the wheel wrench to tighten the spare wheel nut. Don't overtighten it.
CAUTION
After putting the spare wheel in place, make sure that the spare wheel bracket is secure. Otherwise, the wheel may fall off while driving, resulting in an accident. Note
If the nut is overtightened, the gear may be damaged, making it impossible to wind the chain.
4. Replace the cover.
1. Use a wheel wrench to loosen the wheel nuts a quarter of a turn. The nuts must not be completely loosened.
2. Position the jack under one of the points shown in the illustration. Install the jack at the point closest to the wheel being changed.
CAUTION
The jack must only be installed at the points shown in the figure. If the jack is installed in the wrong place, it may dent the vehicle body or fall, resulting in injury.
Do not place the jack on an uneven or soft surface. On an unreliable surface, the jack may slip and cause injury. Install the jack only on a flat, solid surface. Before installing the jack, make sure that there is no sand or small gravel under its base.
3. Turn the jack screw by hand until the rib fits into the groove on the top of the jack.
4. Insert the jack handle into the wheel wrench. Then insert the end of the handle into the hole at the end of the jack screw as shown. Slowly turn the wheel wrench until the wheel is off the ground.
CAUTION
Stop lifting the vehicle as soon as the wheel is off the ground. Raising the vehicle higher is dangerous. It is forbidden to stay under the car raised on a jack. It is forbidden to strike a raised car and leave it on a jack for a long time: this is extremely dangerous. Only the jack supplied with the vehicle should be used. The jack may only be used to change a wheel.
The vehicle being jacked up must not carry passengers. Do not start the engine and leave it running while the vehicle is jacked up. Do not spin a raised wheel: wheels on the ground may spin, causing the vehicle to fall off the jack.
5. Remove the wheel nuts with a wrench, then remove the wheel.
WARNING
When replacing the wheel, be careful not to scratch the surface of the rim.
6. Clean the surface of the wheel hub, hub studs and holes in the rim from dirt and install the spare wheel.
CAUTION
Make sure that the wheel is installed on the correct side. The valve must be on the outside of the wheel. If the valve is not visible, then the wheel is installed incorrectly. Incorrect wheel alignment adversely affects the vehicle's handling, which can cause an accident.
7. Finger tighten the wheel nuts.
- Alloy wheels: when installing a standard spare wheel, tighten the nuts until the flanges of the nuts press the wheel against the hub so that it locks into place.
- Steel rims and compact spare wheels: when installing a compact spare wheel, tighten the nuts until the conical portions of the nuts touch the holes in the rim and press it against the hub to lock the wheel.
WARNING
Do not apply grease to the wheel studs or nuts, as the lubricated parts will be overtightened. Note
It is possible to temporarily use a steel rim secured with flange nuts, however an alloy wheel with a suitable tire should be fitted as soon as possible.
When replacing all four wheel rims with steel rims (e.g. winter tires), use flare nuts.
8. Slowly lower the vehicle by turning the wheel wrench counterclockwise until the wheel touches the ground.
9. Tighten the nuts in the sequence shown in the figure. Tighten each nut to the specified torque.
Tightening torque: 88-108 N.m (Achieved with a force of 350 to 420 N applied to the end of the wheel wrench supplied with the vehicle).
WARNING
Do not press the wheel wrench with your foot or use the tube as an extension to increase the torque of the wrench, otherwise the nuts will be overtightened.
10. If there is a wheel cover for the wheel, install it on the wheel.
11. Lower and remove the jack, then stow the jack, flat tire and chock in the luggage compartment. A defective tire should be repaired as soon as possible.
12. Have your tire pressure checked by your nearest workshop. The nominal pressure is indicated on the plate on the door.
6. SPARE WHEEL
Periodically check the air pressure in the spare tire and keep it in constant readiness. By maintaining the maximum prescribed air pressure in the spare wheel, the wheel will always be ready for use in all conditions (city driving, high speed driving, loads of various sizes, etc.).
The spare wheel is located under the boot floor.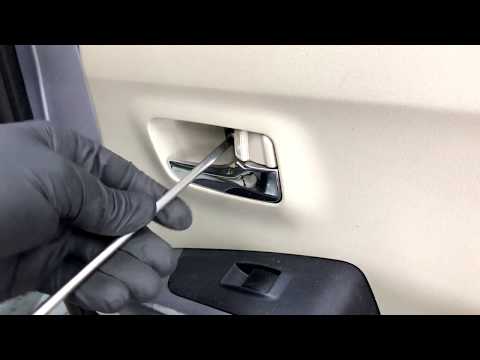
CAUTION
Periodically check and maintain the prescribed air pressure in the spare tire.
Driving with insufficient tire pressure can cause an accident. If you have to drive with insufficient tire pressure, slow down and restore the prescribed tire pressure as soon as possible. If a wear indicator appears on the tread surface, the tire should be replaced with a new one.
The compact spare wheel is located under the boot floor. The compact spare tire takes up less space in the trunk and is lighter, making it easier to install in the event of a main tire puncture.
CAUTION
The compact spare wheel is for temporary use only. As soon as possible, a new or refurbished wheel of normal size should be replaced.
With the compact spare wheel fitted, the vehicle can travel at a maximum speed of 80 km/h. A compact spare tire does not provide the stability and control that a normal size tire provides. If a compact spare tire is fitted, avoid sudden acceleration and braking, as well as sudden maneuvering at high speed. The compact spare tire is specially designed for this vehicle. It is forbidden to install it on other vehicles. WARNING
Do not install snow chains on the compact spare wheel. Due to the smaller bar, the chain will not fit properly.
This can damage the wheel and cause the chain to be lost. If the front tire deflates with the snow chains installed, first replace the rear wheel with a compact spare and then replace the removed rear wheel in place of the failed front wheel. In this case, you can continue driving with snow chains installed.
CAUTION
When the compact spare wheel is fitted, the overall height and ground clearance of the vehicle will be slightly reduced because the compact wheel has a smaller tire diameter than the standard tire.
When driving over bumps, be careful not to damage the underside of the vehicle.
Do not fit two or more compact spare wheels at the same time.
1. Open the tailgate and remove the spare wheel bracket bolt cover (A) using the jack handle.
2. Using a wheel wrench, loosen the bolts securing the spare wheel bracket by turning them counterclockwise.
CAUTION
Be careful when loosening the spare wheel bracket bolts. If you loosen them too much, the hook may disengage and the wheel will fall off.
3. Raise the bottom of the tailgate until it clicks into place.
4. Lift the spare wheel bracket (B) at the location shown by the arrow in the illustration, remove it from the hook (C), lower it, then remove the wheel from the bracket.
WARNING
When removing the wheel bracket from the hook and putting it back on, carefully support it so as not to drop it on your feet. NOTE:
Place the spare wheel under the vehicle body next to the jack. This will be an additional safety measure in case the jack slips.
1. Open the tailgate and remove the cover (A) using the jack handle.
2. Using a wheel wrench, remove the spare wheel bolt by turning it counterclockwise.
4. Remove the chain from the spare wheel bracket.
5. Remove the spare wheel from the bracket.
1. Lay the wheel on the middle of the bracket, with the flat side of the rim facing up.
CAUTION
Laying the wheel flat side down could damage the rim or bracket. If the spare wheel is damaged, do not use it; contact an authorized service center.
2. Lift the bracket (A) and hang it on the hook (B).
CAUTION
The bracket must be hung correctly on the hook. Otherwise, the hook may damage the vehicle body or the wheel may fall off while driving, resulting in an accident.
3. Open the bottom of the tailgate.
4.