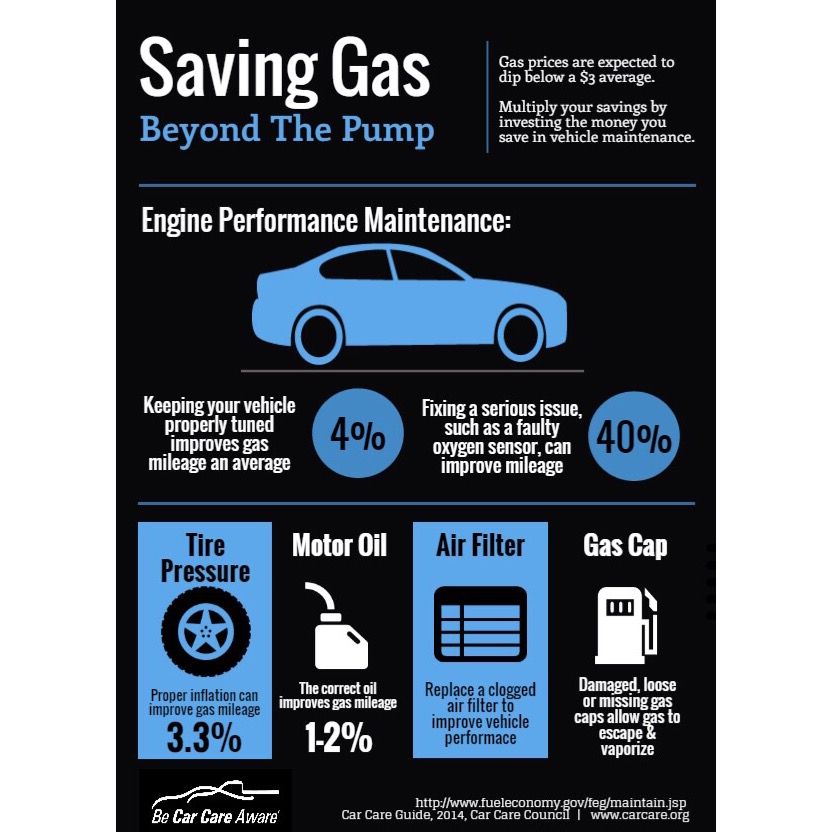
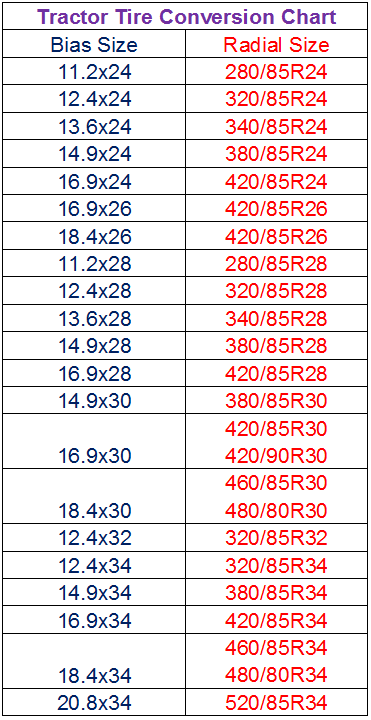
Last Updated November 25, 2022
TireHungry.com is reader-supported. When you buy through links on our site, we may earn an affiliate commission at no added cost to you
First, if a boot has been placed on your car and you remove it yourself, you can be charged with a crime, or you could face additional fines for any damage done to the boot, read more about the ramifications of removing the tire boot yourself in this article. However, if you do make the choice to remove the boot, you can find all you’ll need to know right here!
You first have to identify what kind of boot is on your car, then you can make a plan. One of the easiest methods, which will work on all types of boots, is to pick the lock.
What Kind of Tire Boot Do I Have and How Do I Remove It?There are about four different basic types of tire boots. The first step in removing your tire boot is to determine which kind is on your vehicle. There are a few techniques that will apply to most if not all the different kinds of tire boots, such as drilling the lock’s core out, deflating your tire, or cutting one of the boot’s arms off.
The claw type is one of the easier ones to deal with because it doesn’t cover the hub. As long as there is only one on your car, you can simply remove the wheel and throw the spare on, allowing you to remove the boot in the safety and comfort of your own home.
There are a few strategies that you can use to remove the claw-type tire boot. Firstly, you have to decide if you want to damage the boot or keep it intact. Damaging the boot can land you in trouble for vandalism or destruction of property.
If you want to avoid this, you could try and pick the lock. You could even order some lock picking tools online to make it easy and find some instructional video on how to pick the said lock. Alternatively, if you are not worried about damage to the boot, you could drill the lock’s core out.
If you do not have a drill and a good drill bit, you could use a grinder with a cutting disc or even a hand saw with a metal saw blade. When using power tools to remove the boot, be careful about damaging the tire itself. Sparks from a grinder can burn and damage your tire, not to mention accidentally cutting your tire.
Chain TypeThe chain type is probably the simplest design you will come across. It covers the wheel hub which makes removing the wheel impossible, however; this does not make it impervious to freedom.
Once again you could pick the lock in order to prevent damage. Alternatively, if the valve stem is accessible, you could deflate the tire and remove the boot without causing damage.
For those that are not considered with damage, the easiest way to remove this boot is to cut the chain or padlock with a bolt cutter. This method is quick and quiet and should not cost too much as a really good pair of bolt cutters will set you back by about $30.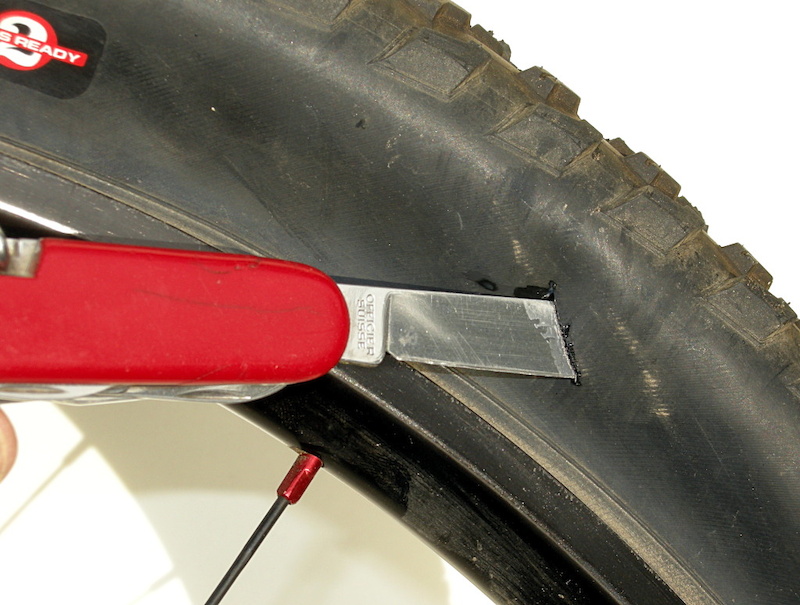 Some hardware stores also rent them out for a cheaper price.
Provided you have a drill with a good drill bit you can forgo the bolt cutters and drill the lockout. Other than being quieter and quicker, bolt cutters are better for this because the lock is often not secure to the boot.
This makes it dangerous to drill because the lock could slip out of your hands, resulting in a drill bit-sized hole in your hand. A drill jig can help you steady the lock and guide the drill right where you want to be drilling.
Tire Clamp-TypeThe tire clamp-type typically consists of three arms, two static and one adjustable, a plate to cover the wheel hub, and the lock. Once again you could drill out the lock and get it off that way, however; the way this one works allows you to take it off in a simpler manner.
This boot works by holding on to your vehicle’s tire, so it’s time to deflate. Before you go ahead and let all the air out, you should first jack that side of the vehicle up.
If you do not jack the vehicle up, you could damage your tire and you probably will not be able to get the boot off, due to clearance. The wheel well will be in the way, preventing you from removing the device.
Once you have jacked the wheel up and deflated it, you can get to slipping the boot off. What you want to do is rotate the boot so that the lone arm (the one which is adjustable) is pointing down. You should then be able to pull it towards you and the boot will be freed.
If the boot is still stuck, pull down on the lone arm or push down on the other two arms to further deflate the tire. The boot should then become free.
Alternatively, you could cut one of the arms off with a grinder, but this is not necessary. Deflating the tire might be annoying, but it prevents you from being charged with the destruction of property or vandalism.
Clamp-TypeNot to be confused with the tire clamp type, the clamp type is similar to the claw type by having an additional arm coming off the outer claw. The additional arm has a round plate that covers the hub preventing you from removing the wheel.
The main purpose of this type of boot is to intimidate the owner of the vehicle, but just like Achilles, the boot has its weakness. First of all the plate which prevents access to the hub, and therefor ability to remove the wheel, is one of the weaker part of the design.
The plate and arm are connected by a pin, which is only attached by a few, weak, spot welds. These spot welds can be broken in a couple of ways. A drill with a 15-cent cutting tool can do the job but the cheapest route is as simple as a hammer and chisel.
Once the pin’s weld is broken, you can force the pin out with a good smack with the hammer. You can remove the pin to then remove the wheel in order to remove the rest of the clamp at a different location.
You could also use the same hammer and chisel method on the main hinge pin if you can get to it. Additionally, if the boot was not installed correctly, (which does happen often, especially on a cold winter’s night), you could deflate the tire in order to remove the boot.
Just like shoddy pins, the locking mechanism is sometimes weak which means if you yank hard enough on the arm, or kick it, you could break the whole clamp off or at least the arm covering the wheel hub. Finally, like with all locks, you can attempt to pick the lock open and then simply loosen the device with a screwdriver.
Most clamp locks have circle pin tumbler locks which can be picked with a normal plastic pen and a multi-tool. First, you want to disassemble the pen until you are left with the plastic outer shell, kind of like a straw. Next, using the multi tool’s file, file one of the sides down so that it becomes thinner.
Then with the plyers, shape the filed end so that it fits into the round keyhole but can also grip the teeth inside the lock. After that, you should be able to turn the pen and unlock the clamp’s lockbox. Finally, you can use the screwdriver attachment to unwind the clamp.
Lastly, as with all other boots, you can always use a grinder with a cutting disc or saw. Personally, I would recommend a battery-operated band saw for this kind of work. With a band saw it shouldn’t take too long and you minimize the risk of damaging your tire of the wheel rim.
Before you go ahead and damage the boot that’s on your vehicle you might want to take a step back and think about it. Firstly, who is booting your car and why are they doing it? Is it law enforcement, a private company/landowner, or is it a scammer?
Law EnforcementYou probably don’t want to mess with law enforcement boots. First, they know who they boot. They would have taken down your vehicle’s information so that they can find you if you take the boot off. If you are able to take the boot off without damaging it, you could still get slapped with additional fines.
Furthermore, they will opt to tow your vehicle in the future which means even more costs and you will have to pay everything before getting your vehicle back. The best thing you can do is just to pay the fine.
Removing a private company or landowner’s boot is technically not illegal, however; damaging it is still considered destruction of property which can get you in hot water. The best thing is to just bite the bullet and pay the fine.
ScammerIf you do however feel that there is something fishy going one, it could very well be a scam. In the case of a scam, you have every right to cut the boot off, however the best thing to do is to call the police. Not only can they help you get it off, but they can catch the scammer and stop it from happening to other people.
ConclusionThere are many different ways to remove the different types of tire boots. From cutting to picking the locks, there is a way. The sure-fire way to remove them though is to pay the fine and be done with it. This will save your money in the long run and will prevent you from ending up with charges that you don’t want.
Top Tire Retailers
If you haven't seen what this is an update to, check this out.
So Sunday afternoon (Yeah, sorry for the slow update. I've been working on taxes ever since, and while we're at it, sorry for the grammar. I've been celebrating with some homebrew since finishing my taxes a few hours ago.), I go to the car with the intention of paying by credit card and doing a chargeback. My dad gives me a lift, we get over there, and while we're staring at it, I have a bit more clarity since the shock has worn off.
It's this type of boot, so I start tugging at the leading edge of the round part. I manage to pivot it towards the back side of the tire enough to get a folding lug wrench underneath it. Take the wheel, with boot still attached, off the jeep, and put the spare tire on.
Call up the guy (I know his name and where he lives at this point thanks to his LLC filing. Nothing like that to give you confidence.).
"IMPOUND (this honestly made me chuckle/WTF? on the inside)"
"Hi, my name is Daniel. You left something on my green jeep that I don't really have any use for, and I thought you'd like it back."
At the point, he starts going off and acting all tough about how he's already called the cops for theft, how there's going to be an arrest warrant out for me, and how I'm going to jail for this. (I think one of the neighbors had called him after he came out to bitch at me for a few minutes for being in their parking lot.)
"Look man, I'm offering to deliver your equipment back in one piece that you left on my car. That's not theft by anybody's standards. (This whole time I was shocked how calm I was because I knew his name and home address. I used to get flustered over simple confrontations. I recommend The 50th Law if you haven't read it. It's a great book on fearlessness, but that's a different post. )"
)"
"Ok, look, I just want my equipment back. If you'll meet me, we'll call it even."
We decide where/when to meet.
Him by the end of the phone call - "I've got to admit, I've got tons of respect for you having the ability and balls to pull this off. Nobody ever gets these things off around here without cutting them. How'd you do it? Did you deflate the tire?"
"No. I'll show you when I get there."
So I meet him, and he's EXACTLY like I pictured. Stereotypes FTW! Twenty-something unkempt redneck in a old dodge durango complete with magnetic sign on the door and a 9mm on his hip. Thankfully because of years of directing, I can pretty much make instant friends with anyone. We struck up a conversation and talked for 10 minutes or so after he removed the boot for FREE, and this is what I learned...
He "doesn't like getting the cops involved." and "Cost of doing business. (when they get cut/disappear)" Basically he virtually never calls the cops. I'm guessing he got tired of being laughed at by the Atlanta PD. (I can't promise others don't have a friend in the PD, so caveat emptor.)
His mind was this really twisted blend of the Yuppie Nuremberg Defense, mixed with a "cleaning up the place" mentality. I can't quite describe it, but let's just say it didn't make me feel any better about the guy.
If the boot is like the one pictured above and doesn't have a cable going through the wheel and around the axle, you can probably get the hub/wheel off, especially if you deflate the tire.
Don't listen to your friends, even at their own home. If it says they'll tow/boot, chances are good they will.
I'm happy to feel better educated regarding boots and have a cool story to tell. I will say, please do what you can to get these things outlawed or at least regulated on a state level. It's already happened lots of other places (like the entire countries of France and Scotland) where they're willing to call a spade a spade and prosecute the booter for extortion. I highly recommend this website (thanks to r0swell in the other thread).
TL;DR Everything went better than expected. Bypassed the boot and gained some insight into this shitty practice.
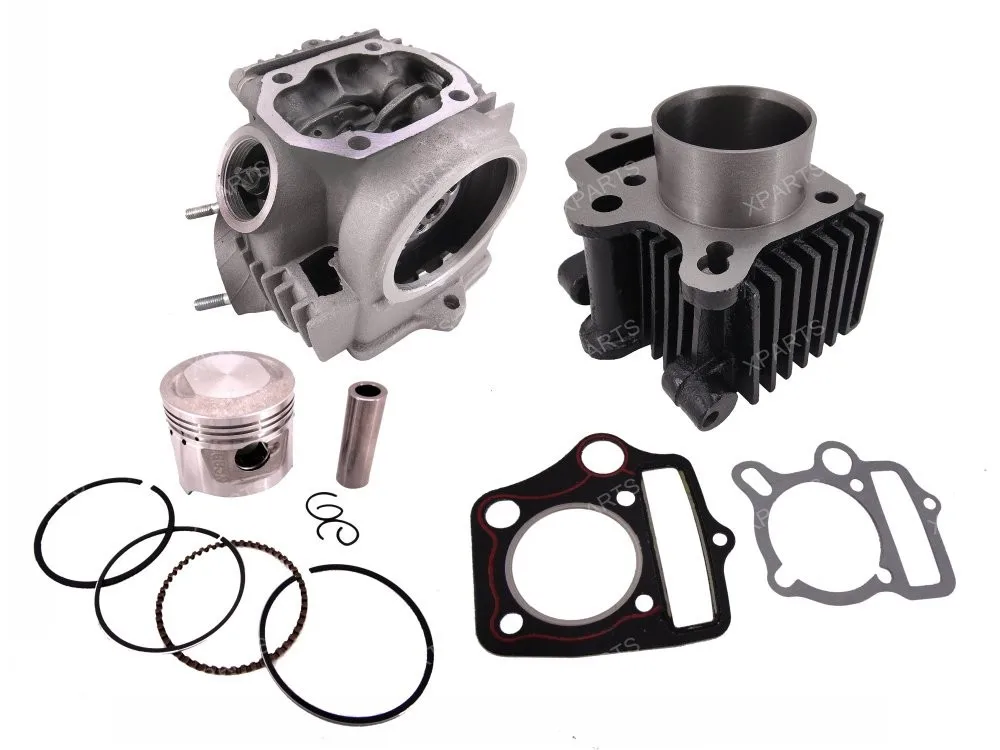
Why do I need a ball joint boot?
Ball joint - a special swivel joint that secures the wheel hub to the suspension arm. Due to the ball bearing, the wheels move freely in a horizontal plane. High-quality operation of the swivel is guaranteed by the necessary amount of lubricant and the absence of road dirt and moisture inside the mechanism.
To ensure reliable protection against external influences and friction inside the joint, due to the absence of lubricant, the use of high-quality ball joint boots is recommended. It is the boot that prevents dirt from getting inside the swivel joint and securely holds the grease inside.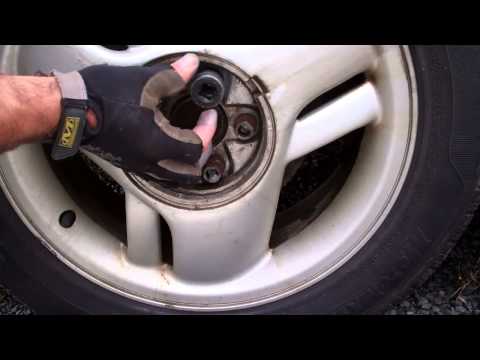
Why do ball joints break?
There are three main reasons why a ball joint fails during operation:
- critical shock load;
- lack of lubrication in the hinge;
- ingress of dirt into the swivel joint.
There are three main reasons why a ball joint fails during operation:
- critical shock load;
- lack of lubrication in the hinge;
- ingress of dirt into the swivel joint.
If the first point is predictable enough (for example, when hitting an obstacle or driving a car in extreme conditions), then both of the remaining ones are due to damage to the rubber boot. It should be borne in mind that rubber anthers are exposed to road chemicals, in addition, they are corroded by grease and lose their elasticity at low temperatures. As a result of the rupture of the anther, dirt with lubricant residues will create an abrasive that can disable the ball joint.
What to do if the ball joint fails?
It is quite easy to determine that the ball joint is faulty: if there is a creak when driving on a flat surface, knocks when turning the steering wheel, as well as a clang and vibration in the front suspension, then it's time to go to the lift. When the first signs of a malfunction of the ball joints appear, it is necessary to check the anthers for damage, and if the anther is torn, the ball joint will have to be changed. By the way, experienced auto mechanics advise immediately replacing the support on the opposite side.
In order to change ball joints as little as possible, we recommend that you immediately replace all rubber anthers with silicone ones. Silicone anthers of CS20 ball joints remain elastic even at -60°C and are resistant to road chemicals. Unlike rubber counterparts, silicone anthers are tear-resistant and do not burst from small pebbles. Silicone dust boots protect ball joints from damage and keep grease inside the joint.
90,000 replacement of the anthers of the steering rack Renault Logan
Installed the corrugation of the Renault Logan steering rack from the car VAZ 1111 Oka…
Greetings, Renault Logan car enthusiast! The steering rack corrugation on the left side was torn. To replace the boot of the steering rack Logan, let's try to use a protective cover from the Oka car.
Your opinion - is the tie rod boot from the VAZ-1111 Oka suitable for a Renault Logan car?
Today, when examining my Logan, I discovered just such a malfunction - a burst boot of the Renault Logan steering rack on the left side of the rack. Although the dirt has not yet got into the gap, it needs to be changed urgently in order to save the steering mechanism.
Since there is no corrugation from Logan at hand, I will try the duster from the small car Oka. If it does not work out, then we will look for the native Loganovsky anther.
The boot on the steering rack is torn.Vote in the community if I can install a rubber corrugation from the small Oka on Logan.
The hole for traction on the anther from Oka is visually smaller than for Logan, but I think that the rubber will stretch and it will still be possible to install this corrugation. Let's experiment.
To change the steering rack boot, you will need to remove the wheel and release the steering knuckle. And also beforehand, it will be necessary to loosen the tie rod lock nut, the steering tip nut, having treated the connections with a rust remover. While the rust is impregnated, we dismantle the wheel.
Remove the disc cap to get to the wheel bolts and loosen. Before lifting the body, we install wheel chocks under the rear wheels. After lifting with a jack, you need to install an additional stop for safety net.
Remove the wheel cap. Remove the cap and unscrew the wheel bolts. Unscrew the wheel bolts. Install wheel chocks under the rear wheels. Raise the car with a jack. Install an additional safety stop and lower the jack slightly. Next. We raise the car on the jack, after the wheel has come off the ground, install an additional safety stop and slightly lower the jack so that the weight of the car “lies” and on the stop. Then completely unscrew the wheel bolts and remove the wheel. In order not to look for bolts later in the garage, we put them in one place.
The removed wheel can be placed under the lever, thereby making an additional support, in case there is no support next to the jack.
Using a box wrench on X17, loosen the steering tip pin nut. You can use the head and knob, or add, as an additional lever, a tube to the second part of the key to increase the effort when unscrewing.
Once the nut has been torn off, it can already be turned with an open end wrench. In the case when the finger scrolls along with the nut, you can insert a hexagon into its end to keep it from turning.
We do not unscrew the nut completely, since we still have to “knock out” the finger with a hammer in order to disassemble the connection. Working with a heavy hammer from the side, we apply light blows to the tip.
It is recommended to hit the special recess on the steering knuckle with a hammer so as not to damage the steering pin .
..
Then you can completely unscrew the nut and remove the steering tip.
Completely unscrew the nut and remove the steering tip.I hurried to remove the pin, because the lock nut on the steering rod was not given, which must be unscrewed until the tip connection is disassembled.
With a key of 22, loosen the locknut.To loosen the locknut, use the key on X22. However, it turned out that the native turnkey nut on the X21. They took such a key and added a lever, in the form of a tube, to the second part of the key. Nut immediately, as they say, "went"!
Then remove the tie rod pin and unscrew it from the tie rod. Completely unscrew the locknut from the tie rod to remove the old one and install the new tie rod boot. Before unscrewing the nut, we wrap the thread behind the nut with electrical tape in order to know how much to tighten the nut.
We wrap the thread behind the nut with electrical tape. We completely give the lock nut from the steering rod.
After such manipulations with the steering, after replacing the tie rod boot, you still have to go to the alignment stand to check the angle of the steered wheels.
Then you need to give the clamps fixing the anther on the steering rod. There is no clamp on the narrow part of the corrugation, apparently, it rests on the boot rubber itself, as it is worn very tight.
Cut the rubber boot with a knife. Cut the old boot and take it out.To remove a worn boot, you can use a knife simply by cutting it into two parts, anyway, it is already unusable and will be thrown away. Since the anther was torn into two halves, we first removed one part, and now we need to remove the fixed collar from the wide part of the corrugation. Using the tip of a screwdriver, remove the clamp and you can remove the rest of the anther.
Tear off the plastic clamp with the sting of a screwdriver. The steering rack has opened. The removed old boot is now comparable to the new boot from the Oka car. It is immediately clear that the diameter on the side of the thrust body of the native anther is larger than the diameter of the hole for thrust on the Oka anther. Let's hope that the rubber stretches and, we will try to pull a new boot on the traction body. From the side of the rail itself, the diameters also differ slightly, but only slightly.
New boot Balakovo BRT and rubber is very flexible, so there is hope that we will succeed.
Anyway, at this moment there is no anther from Renault Logan, you will have to use what is at hand ...
After you have removed the old anther, you need to clean the connections under it with a clean rag and apply fresh grease.
For the convenience of further work, turn the steering wheel to the right so that the rod comes out of the rack body in our direction. Carefully remove with a clean rag all the accumulated dirt with old grease from the rack teeth and from the tie rod body. It is necessary to clean everything from what came across due to the rupture of the rubber anther.
Use an aerosolized Brake Cleaner to clean the rack. You can use another cleaner, you need to wash off the abrasive from the road dust. We especially carefully wash between the teeth of the rack, where dirt, sand and old grease accumulate.
Wipe the rail dry with a clean rag and you can apply a new lubricant, using, for example. Litol 24. I used the BLUE high-temperature grease, which I use to lubricate the guide pins on the brake caliper during revision and repair.
Apply a new lubricant Litol 24.Apply the prepared lubricant and you can start trying to install the corrugation from the Oka.
In order for the dust boot to pass through the threads of the tie rod, you can cut a piece of plastic from a plastic bottle and wrap it in the form of a cone on the thread. Then lather it liberally on top or apply any lubricant.
Let's put the boot on the rail with a screwdriver. Having thrown the corrugation, we will push it with the tip of the screwdriver. Carefully push the corrugation further with a screwdriver. After the threaded part, the boot sits in its place.
 In my case, I helped with a screwdriver, gradually stretching the hole in the anther and moving the corrugation along the body of the thrust. Only the threaded part is tight, then it will go easier. We work carefully so as not to tear the edge of the anther.
As a result, having stretched the boot to the body of the rail housing, we put on its housing and put a new clamp. We do not put a clamp on the narrow part, since it is held very tight there and without a clamp. In order to put the boot on the rail itself, turn the steering wheel to the left.
In the course of work, the boot had to be removed in order to expand the corrugation, since it is not put on the steering rack housing in any way. To expand the rubber, I used a container with temperature grease, a corrugation climbed onto it from the wide side. I left the corrugation until the morning so that the rubber would stretch.
I pulled the rubber corrugation onto the grease container.