Delivery options and delivery speeds may vary for different locations
Sign In
or enter a zip code
Email * Password *
REPAIR & HOW TO
MAINTENANCE
TROUBLESHOOTING
GUIDES
TIPS & TRICKS
ALL ARTICLES WATCH VIDEOS ABOUT US SHOP PARTS CONTACT US
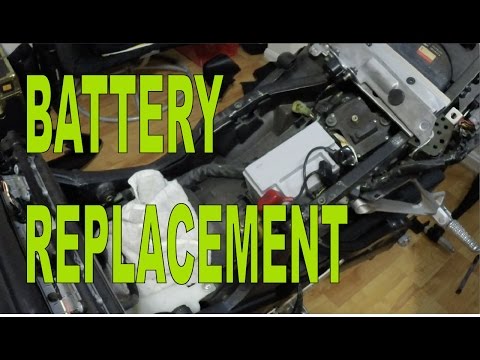
When your Honda ATV won’t start, the first thing you want to test is the battery. Our Honda Rancher 420 was experiencing starting problems, so we tested, charged, and ultimately replaced the battery.
Watch the video above and follow the steps below to learn how to diagnose a battery problem and replace the battery on a Honda Rancher TRX420.
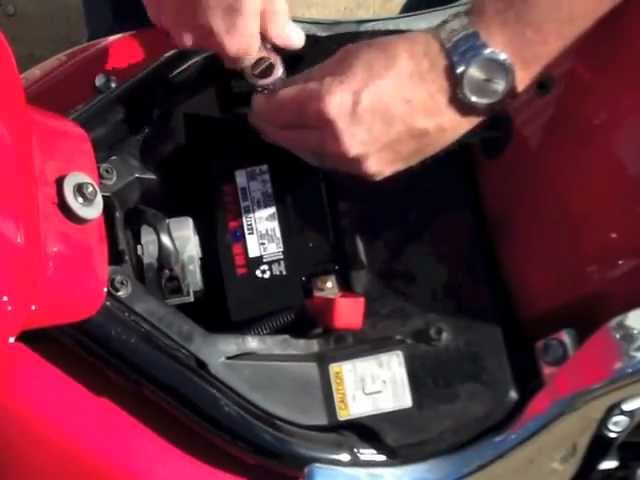
Step 1. Remove the seat by pulling up on the lever located underneath the rear of the seat.
Step 2. Pull on the tab that holds the rear section in place to allow the rear section to fall back.
Step 3. Lift up on the rear section to expose the battery.
Step 4. Set the digital multimeter to DC, then make contact on the battery terminals with the tester probes.
NOTE: Our battery should’ve been reading about 12 volts, but it only read 10.86 volts.
Step 5. Connect a battery charger and charge the battery if the voltage reading is low. Turn the ATV’s power on as the battery is charging.
NOTE: We didn’t need to start the unit; we just turned the power on to check to see if power was flowing and that we didn’t have a blown fuse. If the lights on the instrument panel are on, it indicates that power is flowing and the fuse is not blown.
Step 6. Continue charging the battery and test it again with your multimeter for voltage. If the voltage reading turns up low again after charging the battery, you need to replace it.
NOTE: With the battery charged, we tested it again and our multimeter read 12.62, suggesting the battery is healthy. However, if your battery needs replacing, follow the next steps.
How to Replace a Honda Rancher 420 BatteryStep 1. Unbox the replacement battery and remove the cap from the electrolyte pack.
NOTE: Don’t throw away the cap, since you’ll need it later.
Step 2. Remove the red film on top of the battery to expose the openings where you’ll insert the electrolyte.
Step 3. Insert the electrolytre container by lining up one side and then pushing the whole thing into place to start filling the battery.
Step 4. Let the electrolyte empty out completely into the battery.
NOTE: Don’t squeeze the electrolyte to speed up the process. The electrolyte needs time to fill the battery and absorb into the mat inside the battery. Once the electrolyte is completely emptied into the battery, let it rest for 30-45 minutes to ensure absorbtion into the mat.
Step 5. Remove the empty electrolyte container and prepare to charge the battery.
NOTE: Keep the cap off for the charging process, since the battery may expel some gases.
Step 6. Once the battery is charged, place the cap from the electrolyte over the openings in the battery, and use a soft-blow hammer to seal it down.
Step 7. Remove the old battery by unhooking the rubber strap that holds it in place, and then removing the two screws that secure the connections to the battery terminals.
Step 8.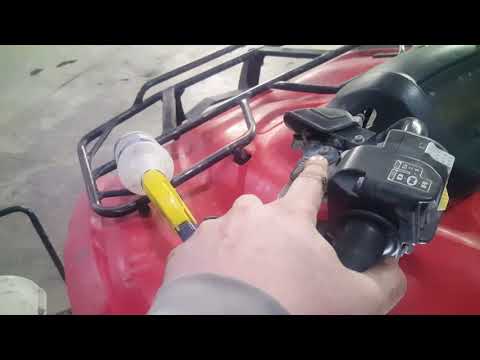 Lift the old battery out, and clean off any dirt or debris in the battery compartment.
Step 9. Lower the new battery into place and reattach the strap. Next, reattach the battery connections to the terminals and tighten the screws, positive side first.
Step 10. Replace the back panel, pull up the rear door and reattach the rubber tab holding it in place.
Step 11. Put the seat back on and you’re done.
body
Honda is one of the largest and most well known vehicle manufactures in the market. Since 1970 with its debut premier three-wheeled ATV, Honda has been leading the industry with innovation and performance. Some of Honda’s more popular ATV models include the Foreman, Rincon, Recon, Rancher, Big Red, and the TRX.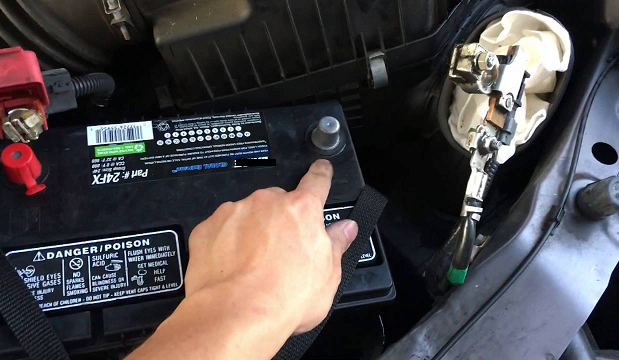 Their sports line, specifically the TRX, come with electric start, independent suspension, and shaft drive. Honda’s utility ATVs are also very sophisticated and balanced, providing great performance and well known Honda reliability. Use the links below to browse our selection of Honda ATV batteries and other replacement battery options. Need help finding the best Honda battery for your ATV? The contact the experts at BatteryStuff now!
ApplicationMotorcycleATVRiding MowerPersonal WatercraftUtility VehicleSnowmobileMotor ScooterMakeYearModel
31 Items Found
Sort By
YB14A-A2 Scorpion 12v 180 CCA Power Sport Wet Battery with Acid Pack
$69. 95
95
Part No. sYB14A-A2
C.C.A.
180
Amp/Hr
14
Size (L×W×H)
5 5⁄16 × 3 ½ × 6 15⁄16 in
VIEW PRODUCT
YT5L-BS Scorpion 12v 80 CCA AGM ATV & Motorcycle Battery
$34.95
Part No. sYT5L-BS
C.C.A.
80
Amp/Hr
4
Size (L×W×H)
4 ⅜ × 2 11⁄16 × 4 ⅛ in
VIEW PRODUCT
YT9A Scorpion 12v 120 CCA AGM Power Sport & Motorcycle Battery
$54.95
Part No. sYT9A
C.C.A.
120
Amp/Hr
9
Size (L×W×H)
5 5⁄16 × 3 × 5 ⅜ in
VIEW PRODUCT
YTX12-BS Scorpion 12v 180 CCA Sealed AGM Motorcycle Battery
$59.95
Part No. sYTX12-BS
C.C.A.
180
Amp/Hr
10
Size (L×W×H)
6 × 3 ½ × 5 ⅛ in
VIEW PRODUCT
YTX14-BS Scorpion 12v 200 CCA Sealed AGM Motorcycle Battery
$58. 95
95
Part No. sYTX14-BS
C.C.A.
200
Amp/Hr
12
Size (L×W×H)
6 × 3 7⁄16 × 5 ¾ in
VIEW PRODUCT
YTX14AH-BS Scorpion 12v 210 CCA AGM ATV & Motorcycle Battery
$58.95
Part No. sYTX14AH-BS
C.C.A.
210
Amp/Hr
12
Size (L×W×H)
5 5⁄16 × 3 9⁄16 × 6 9⁄16 in
VIEW PRODUCT
YTX20HL-BS Scorpion 12v 310 CCA Sealed AGM Motorcycle Battery
$81.95
Part No. sYTX20HL-BS
C.C.A.
310
Amp/Hr
18
Size (L×W×H)
6 ⅞ × 3 7⁄16 × 6 ⅛ in
VIEW PRODUCT
YTX9-BS Scorpion 12v 135 CCA Sealed AGM Motorcycle Battery
$49.95
Part No. sYTX9-BS
C.C.A.
135
Amp/Hr
8
Size (L×W×H)
5 ⅞ × 3 ⅜ × 4 ⅛ in
VIEW PRODUCT
YTZ7S Scorpion 12v 130 CCA AGM ATV & Motorcycle Battery
$49. 95
95
Part No. sYTZ7S
C.C.A.
130
Amp/Hr
6
Size (L×W×H)
4 7⁄16 × 2 ¾ × 4 ⅛ in
VIEW PRODUCT
YTX14-BS Motocross 12v 200 CCA Sealed AGM Motorcycle Battery
$88.95
Part No. YTX14-BS
C.C.A.
200
Amp/Hr
12
Size (L×W×H)
6 × 3 7⁄16 × 5 ¾ in
VIEW PRODUCT
YTX14H-BS Motocross 12v 240 CCA Sealed AGM Motorcycle Battery
$98.95
Part No. YTX14H-BS
C.C.A.
240
Amp/Hr
12
Size (L×W×H)
6 × 3 7⁄16 × 5 ¾ in
VIEW PRODUCT
YTZ7S Motocross 12v 130 CCA AGM ATV & Motorcycle Battery
$106.95
Part No. YTZ7S
C.C.A.
130
Amp/Hr
6
Size (L×W×H)
4 7⁄16 × 2 ¾ × 4 ⅛ in
VIEW PRODUCT
SSTX12Q-FP Scorpion Stinger 12v 350 CCA LiFePo4 Quad Terminal Extreme High Output Battery
$178. 00
00
Part No. SSTX12Q-FP
C.C.A.
350 - As tested Midtronics model #417755
Amp/Hr
*See Notes
Size (L×W×H)
5 ¼ × 2 15⁄16 × 5 ¼ in
VIEW PRODUCT
SSTX14AHQ-FP Scorpion Stinger 12v 360 CCA LiFePo4 Quad Terminal Extreme High Output Battery
$149.00
Part No. SSTX14AHQ-FP
C.C.A.
360 - As tested Midtronics model #417755
Amp/Hr
*See Notes
Size (L×W×H)
5 ¼ × 2 15⁄16 × 5 ¼ in
VIEW PRODUCT
SSTX14H-FP Scorpion Stinger 12v 354 CCA LiFePo4 Extreme High Output Battery
$179.00
Part No. SSTX14H-FP
C.C.A.
354 - As tested Midtronics model #417755
Amp/Hr
*See Notes
Size (L×W×H)
5 ⅞ × 3 7⁄16 × 3 9⁄16 in
VIEW PRODUCT
SSTX20HQ-FP Scorpion Stinger 12v 525 CCA LiFePo4 Quad Terminal Extreme High Output Battery
$259.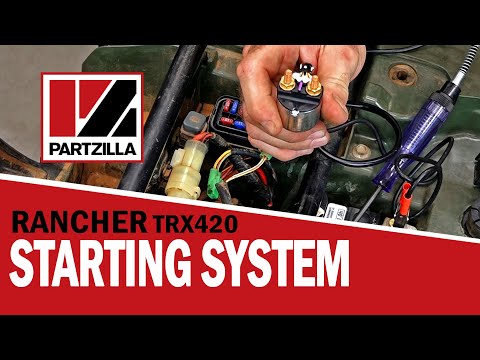 00
00
Part No. SSTX20HQ-FP
C.C.A.
525 - As tested Midtronics model #417755
Amp/Hr
*See Notes
Size (L×W×H)
6 ⅞ × 3 7⁄16 × 5 ⅛ in
VIEW PRODUCT
SSTZ5S-FP Scorpion Stinger 12v 219 CCA LiFePo4 Extreme High Output Battery
$130.00$109.00
Part No. SSTZ5S-FP
C.C.A.
219 - As tested Midtronics model #417755
Amp/Hr
*See Notes
Size (L×W×H)
4 7⁄16 × 2 ¾ × 3 5⁄16 in
VIEW PRODUCT
SSTZ7S-FP Scorpion Stinger 12v 275 CCA LiFePo4 Extreme High Output Battery
$148.00
Part No. SSTZ7S-FP
C.C.A.
275 - As tested Midtronics model #417755
Size (L×W×H)
4 7⁄16 × 2 ¾ × 4 ⅛ in
VIEW PRODUCT
ATX-12-HD Antigravity 12v 480 CA RE-START Lithium-Ion Battery
$233.99
Part No. AG-ATX12-HD-RS
Amp/Hr
16 AH (PbEq)
Size (L×W×H)
5. 9 × 3.46 × 5.12 in
VIEW PRODUCT
ATX-12 Antigravity 12v 360 CA RE-START Lithium-Ion Battery
$202.49
Part No. AG-ATX12-RS
Amp/Hr
12 AH (PbEq)
Size (L×W×H)
5.9 × 3.46 × 5.12 in
VIEW PRODUCT
ATX-20 Antigravity 12v 680 CA RE-START Lithium-Ion Battery
$287.99
Part No. AG-ATX20-RS
Amp/Hr
20 AH (PbEq)
Size (L×W×H)
6.89 × 3.5 × 5.12 in
VIEW PRODUCT
ATZ-10 Antigravity 12v 360 CA RE-START Lithium-Ion Battery
$179.99
Part No. AG-ATZ10-RS
Amp/Hr
10 AH (PbEq)
Size (L×W×H)
5.9 × 3.5 × 3.74 in
VIEW PRODUCT
ATZ-7 Antigravity 12v 150 CA RE-START Lithium-Ion Battery
$116.99
Part No. AG-ATZ7-RS
Amp/Hr
7 AH (PbEq)
Size (L×W×H)
4.53 × 2.75 × 3.35 in
VIEW PRODUCT
LFX14A1-BS12 Shorai 12v 14 AH PBEq LiFePO4 Power Sports Battery [+ -]
$153.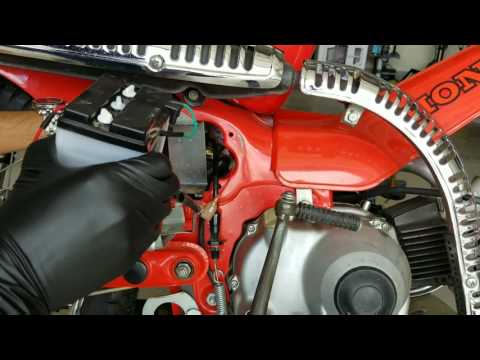 95
95
Part No. LFX14A1-BS12
C.C.A.
210
Amp/Hr
14 PbEq
Size (L×W×H)
5.83 × 2.60 × 4.13 in
VIEW PRODUCT
LFX14A2-BS12 Shorai 12v 14 AH PBEq LiFePO4 Power Sports Battery [+ -]
$153.95
Part No. LFX14A2-BS12
C.C.A.
210
Amp/Hr
14 PbEq
Size (L×W×H)
4.45 × 2.28 × 3.50 in
VIEW PRODUCT
LFX14L2-BS12 Shorai 12v 14 AH PBEq LiFePO4 Power Sports Battery [- +]
$153.95
Part No. LFX14L2-BS12
C.C.A.
210
Amp/Hr
14 PbEq
Size (L×W×H)
4.45 × 2.28 × 3.50 in
VIEW PRODUCT
LFX18A1-BS12 Shorai 12v 18 AH PBEq LiFePO4 Power Sports Battery [+ -]
$185.96
Part No. LFX18A1-BS12
C.C.A.
270
Amp/Hr
18 PbEq
Size (L×W×H)
5.83 × 2.60 × 4.13 in
VIEW PRODUCT
YTX12-BS Motocross 12v 180 CCA Sealed AGM Motorcycle Battery
$78.95
Part No. YTX12-BS
C.C.A.
180
Amp/Hr
10
Size (L×W×H)
6 × 3 ½ × 5 ⅛ in
VIEW PRODUCT
YTX14AH-BS Motocross 12v 210 CCA AGM ATV & Motorcycle Battery
$89.95
Part No. YTX14AH-BS
C.C.A.
210
Amp/Hr
12
Size (L×W×H)
5 5⁄16 × 3 ½ × 6 9⁄16 in
VIEW PRODUCT
YTX20HL-BS Motocross 12v 310 CCA Sealed AGM Motorcycle Battery
$117.95
Part No. YTX20HL-BS
C.C.A.
310
Amp/Hr
18
Size (L×W×H)
6 ⅞ × 3 7⁄16 × 6 ⅛ in
VIEW PRODUCT
YTX9-BS Motocross 12v 135 CCA Sealed AGM Motorcycle Battery
$71.95
Part No. YTX9-BS
C.C.A.
135
Amp/Hr
8
Size (L×W×H)
6 × 3 ½ × 4 3⁄16 in
VIEW PRODUCT
Batterystuff.com is the leading provider of replacement Honda ATV batteries. No one in the industry can match our wide selection and superior customer service. Whatever your need, we have the replacement batteries that will meet your expectations
The ATV battery is one of the most important elements in its electrical system. Given the amount of additional equipment installed on the ATV (winches, additional lights, alarms, heating, etc.), the battery often does not charge to the end. And the owners do not pay due attention to this, which is why they change the battery every season. Believe me, with proper care, the battery can last 3 or more seasons. Let's pay attention to the rules for charging your ATV battery, consider errors and answer questions that arise when servicing the battery.
Warning. The conversation for the most part will be about serviced batteries. Maintenance free ones have no plugs (at the top of the battery) and only need a timely and full charge, and their owners may skip some of the points described below.
Can I use a car charger to charge my ATV battery?
It is possible, in the case when the charger has a charge current adjustment and it is possible to set the minimum current from 0.5 to 0.7.A. There is a simple rule: one tenth of the battery capacity will be considered the normal current for charging (calculation should be made in Amperes). Of course, it is much easier and more correct to use special devices designed for low charging current. Complete with the charger always comes instructions for use, which contains the basic requirements and rules, do not neglect to read it.
Is charging noise and boiling normal?
Moderate boiling is normal. This is explained by the reaction in which the electrolyte enters with lead plates, in which the acid releases a certain amount of gas.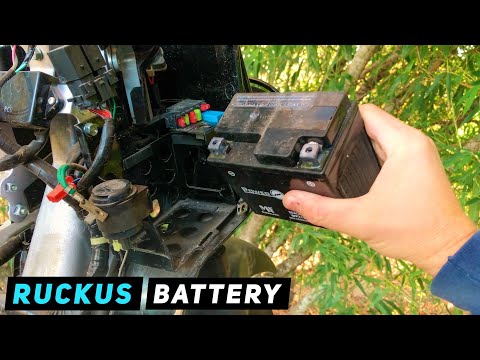 It is worth worrying if the boiling is excessively strong - this indicates that the charge current has been exceeded.
Why does a new battery drain quickly?
What is sulfation?
Sulfation is the formation of lead sulfate (white matter) on the battery plates.
All old and failed batteries are subject to this phenomenon.
What affects the sulfation process?
 5 V.), especially at low temperatures;
 How to avoid sulfation?
Monitor the condition of the ATV's electrical system at all times. The battery loses its charge significantly during the engine start, and the charge must be replenished when driving, so monitor the health of the regulator and generator relays. When the ATV is not used for a long time, remove the battery and charge it with the charger at least once every 2 months. When the first signs of sulfation appear, charge the battery with low current for a long time (up to 2 or more days).
Amps / hours - what is the characteristic?
This is the unit in which the battery capacity is measured. For example, a fully charged battery with a capacity of 1 Ah should theoretically provide a current of 1 ampere for an hour.
How and why to monitor the electrolyte level?
The electrolyte is sulfuric acid diluted with water in the right proportion. During operation, water evaporates, and the proportion of sulfuric acid increases, which, in turn, adversely affects the health of the battery.
If the electrolyte level drops (each battery has a normal level mark), add distilled water (available from auto parts stores) to the mark.
How can I tell if the battery is charged?
A charged battery produces 12.8 V. If your multimeter measures 12.5 V or less, the battery needs to be charged.
Which terminal should be connected first when installing the battery on the ATV?
Always connect the positive terminal first. When connecting the wire to the terminal, a spark may occur, so all flammable liquids must be removed in advance. Always tighten the bolts on the terminals firmly to avoid short circuits. The terminals can be treated with a lubricant to prevent oxidation.
What happens if the polarity is reversed?
Always respect the polarity - wrong polarity can lead to a blown fuse at best and an exploding battery at worst.
How to store the battery in winter?
If you do not use the ATV in winter, the battery must be removed and stored in a cool place, and charged several times during the winter with a small current.
As you can see, there are no difficulties in maintaining the battery, following simple rules will significantly extend battery life and save your finances.
And how to properly charge the battery, we will learn by watching the video.
Many beginner riders think that starting the engine from an external source is an easy task. Yes, the procedure itself is quite easy, but there are a number of contraindications in which lighting up will harm motor vehicles.
Riders who bought ATVs in Kyiv or other regions of Ukraine make the following mistakes:
To decide whether it is possible to light an ATV from a car or not, pay attention to the operation of the vehicle's systems. For example, if the starter of an ATV is spinning, then the problem is not in the battery. And trying to light the device will only lead to the fact that you completely discharge your battery and the donor battery.
The choice of cigarette light cables must be approached with all responsibility. The fact is that low-quality wires often melt or cannot pass the current of the required magnitude. To choose a good cable that can light an ATV from a car, you need to pay attention to:
But it's not worth saving on starting wires. For an ATV, components with a diameter of 9 mm and a current value of 200A, which are not so expensive, will fit quite well.