Keeping your brakes in good condition is critical for ATV maintenance. Once your brakes start to wear out, you could be putting yourself into dangerous situations. You need to be able to stop quickly and successfully at all times on an ATV.
Mud and moisture is the main killer of ATV brake pads, as well as excessive use. Brake pads do their job best under dry conditions. I’m not saying avoid mud, that’s the best part of off-roading, but it’s just something to be aware of.
To complete a successful brake pad swap out, the first thing you need to be aware of is if you have disk brakes or drum brakes.
Most newer quads you will see with disk brakes for every tire. Hydraulic disk brakes are the norm now a days, but you still see drum brakes here and there, and more on older four wheelers. The hydraulic disk brakes are so popular because they stop so much more effectively, limiting the amount of ATV accidents and injuries.
You will be able to easily tell if your brakes are disk or drum brakes by looking for the brake system behind the tire or on the axle. Here are some examples:
ATV Disk BrakesYou will notice where the ATV disk brakes got their name, there’s an actual disk that the brake pads press against to slow the machine down.
These are very common for sport or racing quads. The front disk brakes will very similar except they will most likely be behind the front tire, usually on both sides of the front wheels.
This is because the front brakes are used more often and are so much more critical to slowing the machine down quickly.
ATV Drum BrakesThe drum brakes will look like this picture, they are enclosed with the brake shoes being pressed onto the the wall of the drum inside the drum itself.
These are more often found on older quads or on utility ATVs on the rear wheels. Since the front brakes are most important, it’s usually fine for the the back brakes to be the less effective drum style brake system.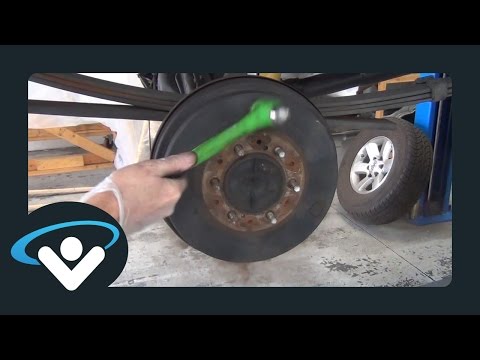
After you figure out which brake system you have, drum or disk, you can get the parts and do a brake pad change.
If you do have drum brakes but want disk brakes, they sell pretty good Disk Brake Conversion Kits on Amazon, just make sure to get the right kit for your make and model.
But what type of pads will you want to get? Let’s talk about the different brake pad materials.
There are three common types of brake pad material to choose from. Ceramic, Metallic, and Organic. Ceramic are usually the most expensive but run a lot cleaner. They create less brake dust which in turn causes less wear and tear to your other brake system components.
Metallic brake pads are popular for sport quads because of the high temperatures they can withstand. But they tend to be noisy and rough on the rotors. Semi-Metallic brake pads are optimal for an everyday rider.
Organic brake pads are the cheapest option of the three.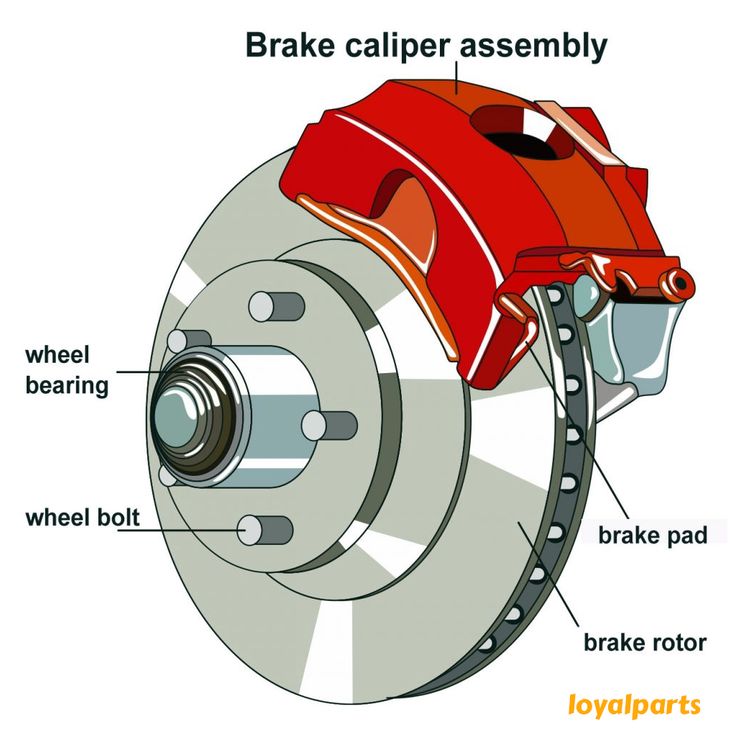 They are easy on the rotors, and contain no metallic material. The down side is they offer the least performance and slowest braking time.
Semi-Metallic brake pads are the most common and best for everyday use. Here is a link to Semi-Metallic ATV Brake Pads on Amazon to help get your search started. Make sure you get the right set for your make and model.
First step is to make sure you have all the tools you need to complete the job. Unless you like running out to the parts store in the middle of a job. Most of these tools are very common and already in most garages.

Once you have all your tools and parts ready, it’s time to replace the brake pads. This is a pretty easy straight forward process.
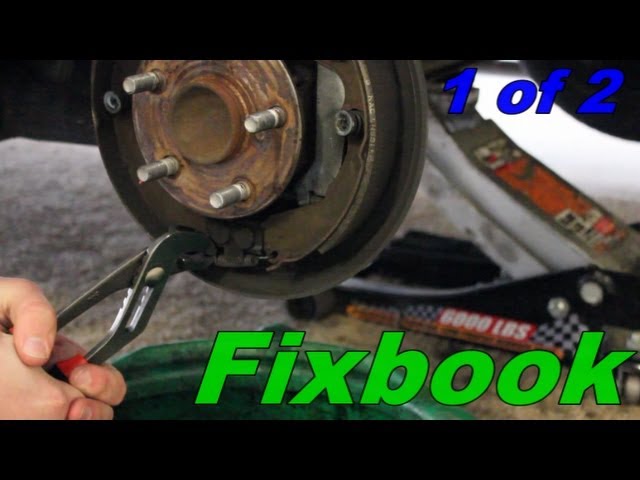
First remove the ATV tire and wheel assembly from the machine. It’s best practice to loosen the lugs while the ATV is on the ground. Then lift the quad and remove the lugs and wheel.
This is usually done with a socket set, sometimes with an allen wrench. Look on the back of the caliper and you will notice two bolts that hold the brake assembly on.
Remove these bolts and the whole assembly comes off the rotor. The pads may still be on the caliper held there by two pins.
You will need to suppress the pins on the caliper to remove the brake pads. This is where you’ll use the vice grips or clamp. Once suppressed the brake pads will easily fall right out of the caliper housing.
This part can be a bit of a pain, but if you get the vice grips on just right you won’t have any problems.
You will need to compress the caliper piston with a c clamp or something to get the new brake pads in the caliper.
Once you compress the caliper piston you can remove the clamp and insert the new brake pads.
Remember to set the pads back on the caliper pins just the way the old ones were installed. You will need the vice grips again to compress the pins to put the new pads on.
Simply put the brake assembly back onto the machine by bolting the caliper back into place. There you have it, you just changed your brake pads. Not that difficult of a job, and can be easily done in less than an hour once you know what you’re doing.
Put the wheel and tire back onto the machine and lower the jack. It’s best to loosely put the lugs on while the machine is jacked up, and then firmly tighten the lugs after you’ve lower the quad back to the ground.
Press the brake down to be sure that your brake is working properly. The first or first two pumps on the pedal are soft as the piston started at a new point on the backside the brake pad.
This might be a good time to check your brake fluid and replace or add any if needed. If you want to bleed the brakes and get all new fluid in there check out this article on How To Bleed Your Brake Fluid On An ATV.
The average rider can go a few years before needing new brake pads. It’s not a good idea to judge if you need pads by how long it’s been since last replacement though. Since everyone rides their machine differently and with differing frequency, there are better ways to check of you need to do a replacement.
The best way to tell if you need to replace your ATV brake pads is by looking at the thickness of the pads. You could always measure them by hand, but a quick look is enough to tell if they’re worn out.
In this picture the pads on the right are worn and the pads on the left are new.
Another way to tell is if you hear a scraping noise while using your brakes when you’re riding. If you press down hard on the brakes and notice a jittery feeling in your handle bars, that’s another sign you should check out your brake pads.
Sharing is caring!
Delivery options and delivery speeds may vary for different locations
Sign In
or enter a zip code
Email * Password *
REPAIR & HOW TO
MAINTENANCE
TROUBLESHOOTING
GUIDES
TIPS & TRICKS
ALL ARTICLES WATCH VIDEOS ABOUT US SHOP PARTS CONTACT US
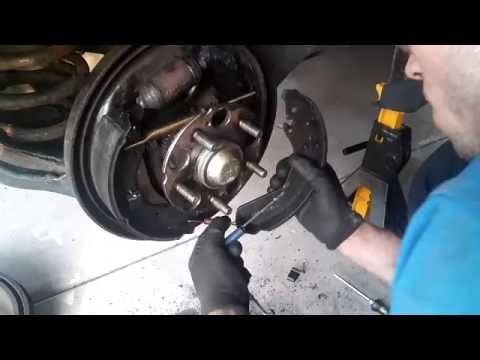
If you’re thinking of replacing the rear brake shoes on a TRX 420 Rancher model Honda ATV, be prepared to tackle a job that’s not as easy as you might think.
Replacing the brake shoes on a Rancher 420 isn’t anything like just swapping out the pads on disc brakes. There’s a lot more digging down to get to the drum brake shoes, and that means a lot more steps where complications may crop up.
You need to pull the wheel, hub, and a locking nut to even get to the rear brake housing, and then the fun really begins.
There’s an outer cover and an inner cover to get through before you find the brake shoes.
Watch the video below to see how to change the rear brake shoes on a Honda Rancher. What you’ll find is that the devil is in the details. A unit that is a little older or has spent a lot of time in the water might be more difficult to service.
You may find the locking nuts fused together, in which case some penetrating lube might get them loose.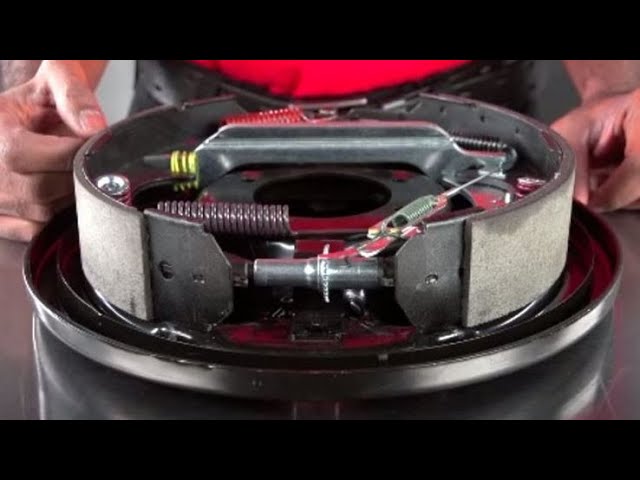
Past that, to remove the outer cover, the bottom bolts are behind a protective lower cover. The bolts that hold the cover in place may be rusted, and since the cover is shaped like a bowl, it can easily fill with water and mud that can damage the cover bolts themselves.
If water intrudes past the covers and into the brake drum itself, it can cause the brake shoes to swell and they won’t release. In that case, it may be necessary to replace the entire packing plate and brake drum assembly because the pieces simply won’t come apart.
One way to prevent this is to preemptively replace all of the seals and O-rings in the brake housing. This will prevent water intrusion and the countless problems that can occur downstream from water getting into the brake assembly. That involves replacing:
A couple of special tools from Honda help you get the torque specs right on the axle bolts during reassembly.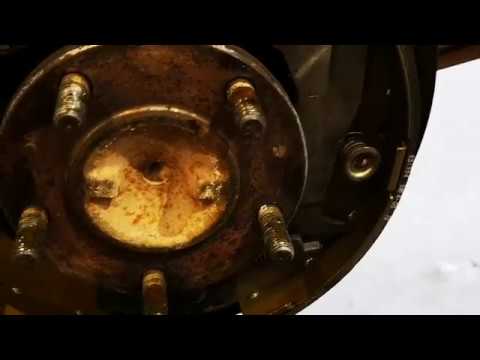 Honda makes an axle nut holder wrench and axle nut torque adapter, and you can see a diagram of how that works below.
Finally, as with any other job, stay organized. Bag and label parts, keep everything as clean as possible, and torque bolts properly to get the best results.
body
Currently, many motorists are fond of various tuning. This word is usually associated with them with external changes to the car. Without a doubt, the exterior and interior of a car are very important, but without a good "stuffing" - it's just a beautiful pile of metal. Realizing this fact, you first of all want to tune the "insides" of the car. First, pay attention to safety and upgrade the brake system. To increase its efficiency, it is necessary to replace drum brakes with disc brakes.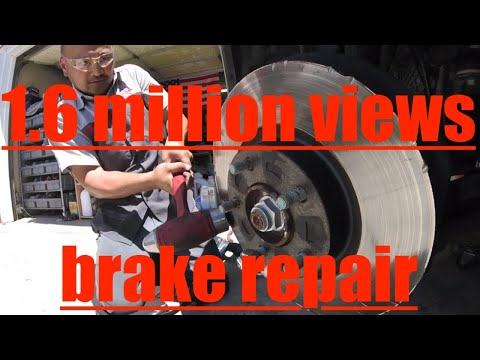
This manipulation is carried out both with the front and rear wheels. Often, drum braking parts are installed on the rear wheels of domestic automobiles or foreign budget models. It is not clear what manufacturers are guided by in this case, because it has long been known that disc braking mechanisms are much safer and more reliable.
Contents
Replacing brake systems is an important decision that must be backed up not only by the desire to stand out, but also by common sense. Changing the security design is a very important undertaking. Therefore, you should be aware of the advantages that disc brakes have over drum brakes:
These advantages should be enough to justify the need to change drum devices to disk ones.
On the video - the differences between drum brakes and disc brakes:
Like any manipulation with automotive systems, working with brakes has its own peculiarities. You must clearly realize that by changing the type of mechanism, you are changing the factory design of the car. These changes can lead to various consequences for which you should be prepared. So, features:

If you are ready for such difficulties and they do not scare you, then you can safely replace the braking mechanisms on your car.
You can replace one type of mechanism with another at any service station. This is not a cheap procedure. Pros - professionals will not need a lot of time for this and they will issue you with the appropriate certificate of quality for the new brake system.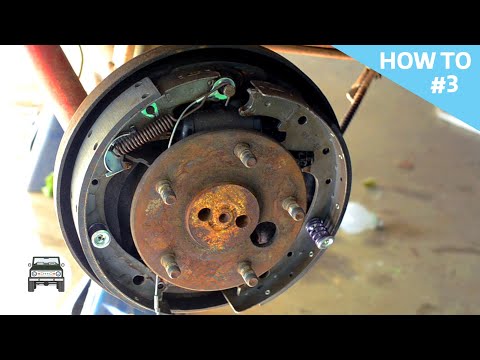
If you want to save on work, then you need to stock up on time and patience. Such structural manipulation with the brakes of a car is not simple and certainly not easy. To carry it out, you first need to stock up on the necessary tools. In general, pads are replaced with a standard set. In addition to this kit, you will need a disc brake installation kit. It includes:
In the video - replacing drum brakes with disc brakes:
When buying a car, the kit should have included an instruction manual for its operation. It is written in black and white, point by point, what needs to be done in order to replace the brake pads (from time to time they are erased and new ones need to be installed). With the help of this instruction, you can remove the old drum mechanisms.
To install the disk system, read the instructions that are also sold in the kit. In it you will find detailed descriptions, diagrams, etc.
Remember, for each model and brand of car, the replacement of brake systems is carried out in different ways, and to be more precise, it has its own characteristics. Next, we will introduce you to the main actions that are as unified as possible.
So, first of all, you need to remove the drum brakes. To do this, tear off all the mounting bolts that are on the rear wheels, fix the front ones with improvised materials and jack up the required side. Attention, for safe operation securely fix the car. Now unscrew the bolts and remove the rear wheel.
Next, unscrew the nut that secures the parking brake cable. Now you can remove the drum. Very often it sticks and it needs to be plucked. For this you will need a hammer. For greater effectiveness, strike medium strength with high frequency. After removing the drum, disconnect the brake hose from the brake cylinder. Remove it, the hub and the rear suspension arm flange.
Now proceed to the installation of disc brakes. To do this, first fasten the suspension arm flange, and then the hub with the disk to it. Use only new bolts. Next, install the brake disc, pad guides and pads themselves. Before installing the caliper, press its pistons inward using a large flathead screwdriver. Now you can put the caliper and secure the entire structure.
Rear disc brake installation video:
Next, you need to connect the brake hose, handbrake cable and caliper to the system itself.
After replacing the brake system, experts recommend pumping it and removing air from it.
From all of the above it is necessary to take out the most important thing. First, disc brakes are indeed more effective and will make the car safer, but any manipulation of factory parts is a design change that must be recorded in certain documents. Secondly, it takes time, space, special tools, knowledge and skills to replace these parts on your own.
Author: Vladimir Ivanov
After some mileage of the scooter, the efficiency of the drum brake operation begins to decrease, as a result of which the braking distance increases adjust the drum brakes . This is especially true for Chinese scooters.
This happens because the brake cable is pulled out, and also because brake pads wear out over time, and this leads to an increase in brake lever free play .
Adjust and service the scooter drum brake when:
Adjustment of the drum brake consists in setting the free play of the rear brake lever.
The free play of the drum brake lever is determined by the distance from the start of the movement of the handle to the setting. The normal free travel of the drum brake lever should be within 10 ... 20 mm.
Procedure for adjusting the drum brakes on the scooter:
If the threaded part is not enough to adjust the free play of the control lever, then you can adjust the brake by moving the brake lever by 1-2 splines.