
I love this creative gardening technique. It hits on so many of my happy Bonzai buttons that it makes me giddy!
First of all, you’re growing your own food, which of course I think is divine. Secondly, this is some super small-scale gardening, because you utilize the vertical ‘dead’ space by growing *up* instead of *out*. As well, this is essentially container gardening, and can be accomplished on a concrete patio without access to actual ground. Both of these benefits make this a perfect project for a small area, like an apartment courtyard or a crowded townhouse farmyard. But the icing on the vegan cupcake, is that you’re re-using old unwanted tires, and recycling them into functional farming equipment. PLUS you get taters! Woo-hoo!
It’s a simple concept, really. By turning the plant’s stem into a root, you can maximize the potato-making parts. And it’s easy to convert tater stems into tater roots – just cover the stalk with soil. In other words, add a tire to the top and fill in the dirt surrounding the foliage. The plant will then convert the stalk into root, sending out lateral buds (little spuds!), and continuing growth at the apex in search of more sun. As a mechanism, the tires also insulate the soil, which stimulates root growth (more spuds!). Come fall, you’ll have a towering tire pile, just teeming with taters. Below, I’ve outlined the process:
procure some used tires
There are lots of ways to go about finding old tires (scout service stations and recycling centers), but I think the Internet is the easiest answer. I just posted a ‘wanted’ add on Craigslist, and within hours I was flooded with dozens of emails from people asking me to please, please take their tires away. Easy-peasy.
procure some seed potatoes
Not just any old grocery tuber. You want organic, seed-quality taters, specially selected for their disease resistance and quality yield.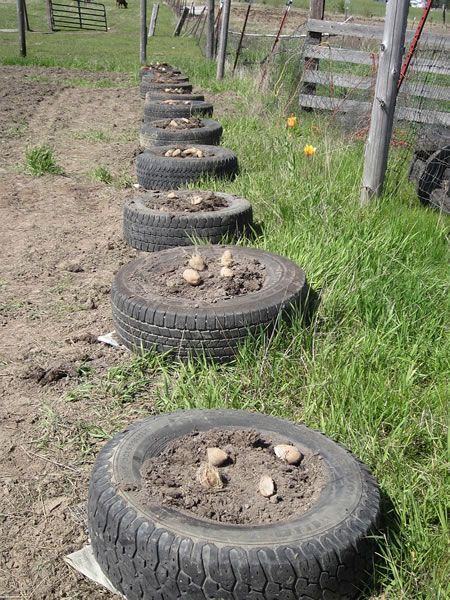 Your local nursery will carry certified seed potatoes. There are tons of varieties to choose from, but this year I started small with Russets, Reds, and Yukon Golds. Yum!
select a spot and set up shop
Potatoes like full sun and warm soil, so the more exposed the spot, the better. If you consider old tires an eyesore, try to hide your stacks out of sight. Personally, I love the look of scrappy, haphazard gardens and found-object art. There’s no purpose behind painting them, but I had some red left over and thought they’d make a nice match for the raised beds.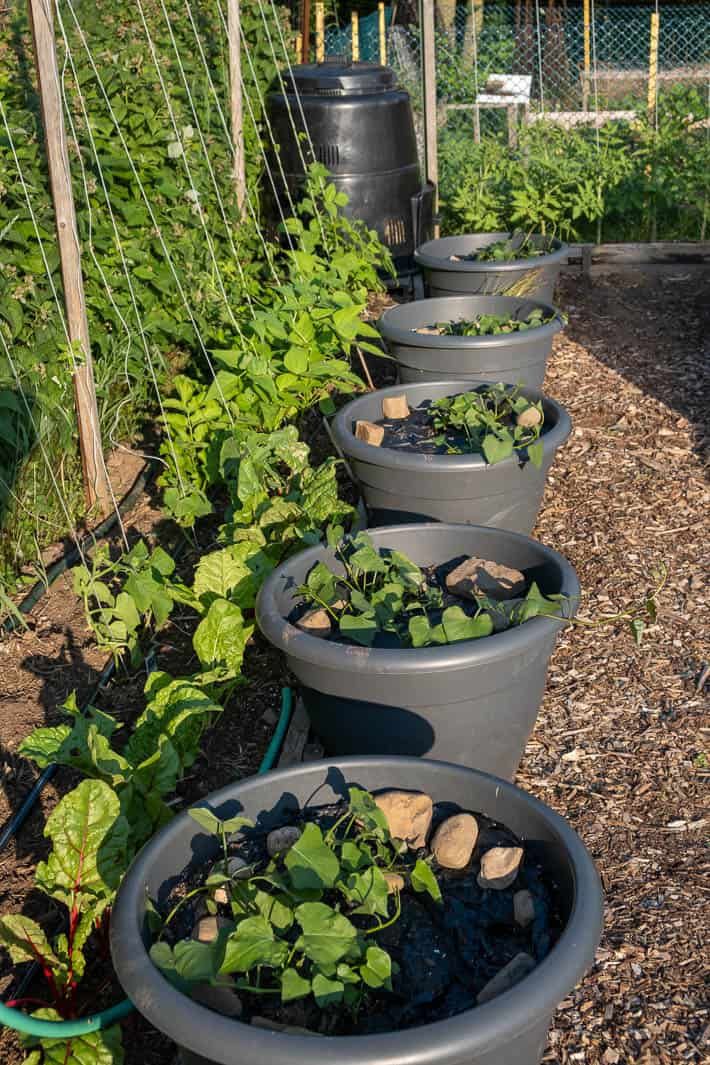 I do so love a colorful (and coordinated!) backyard.
You could of course leave them black – an aesthetic that would work in a more minimalist, industrial sort of spread. Or on the flipside, I think these spires would look splendid painted petal pink, completely covered in glitter! HA!
plant them potatoes
Not all tires have the same diameter, so determine the largest and lay it down first. This will be your base. Load it up with soil, making sure to fill up the inside of the tire casing completely.
Set your second largest tire on top of the first and fill it with soil, about half way full. Place the potato seeds in the tire center, and cover them with more dirt. Use enough to fill the tire nearly full, but not all the way. Give it a thorough watering, and you’re good to go!
potato parenting
Water your taters well, and make sure the water soaks all the way down through the bottom tire. Water extra liberally when the plant is in flowering mode, and immediately after. Try to do this in the morning, because leaves that remain damp over night are more prone to disease. When the plant is 8 or so inches tall, add another tire and fill in the soil around the stalk. Leave a few inches uncovered to prevent suffocation. Wait until the shoot reaches 8 inches again, and then repeat.
At summers end, the foliage will begin to brown and die back. You should stop watering at this point, but you don’t get to harvest quite yet. The potatoes need a few more weeks to mature.
Harvest the taters before the first rain, or they’ll begin to will rot in the ground. After you gig them up, allow them to rest in a dry place for a few days. This gives them a nice solid skin for long-term storage. Potatoes will keep in a cool dry place for up to 6 months. A four-tire stack is supposed to yield about 25 pounds of tubers!
CHICKEN KISS!!!
By Shelley Hoose Updated August 27, 2020
If you have just a little space in your yard, but you have some sun and old tires, by Thanksgiving, you can be eating potatoes you grew yourself.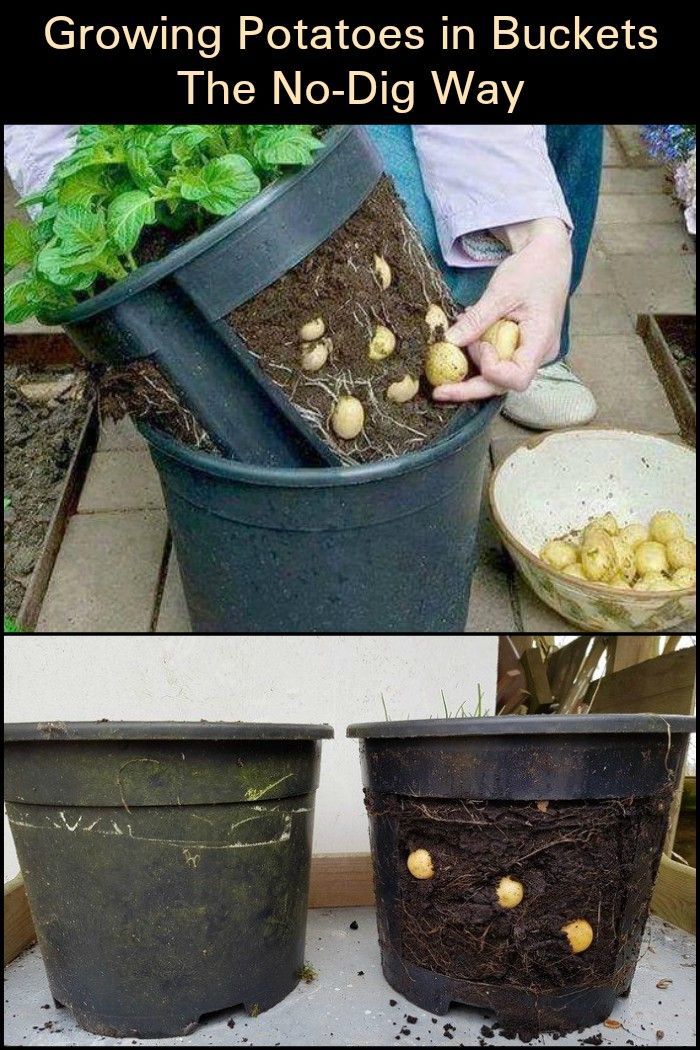 Potatoes are easily grown in a wide range of containers, but tires lend themselves to stacking, which can create an easy and effective growing environment for potatoes to help them develop deeper roots. Tires also provide warmth and insulation for your growing tubers.
First off, let's consider the question: Is it safe to use tires as planters? We know that tires are veritable chemical factories that contain rubber, vulcanizing agents, antioxidants, oils, solvents and lots of other unsavory things you would never want in your food, according to McGill University. While no studies have analyzed whether the use of tires as garden containers has resulted in toxins appearing in vegetables, McGill posits that, given the short growing season for veggies, and that the leaching process of chemicals from tires is slow – and the tires are not being incinerated in your garden – the risk is low.
So if you've decided to create a tire potato planter, here's how. Get ahold of four tires, if possible, so you can stack them on top of one another as the tubers grow. Garden Helper recommends 2 pounds of seed potatoes and four tires to produce 20 to 30 pounds of potatoes. Choose a full-sun location. Loosen the soil under the spot where you plan to put your tire; then set the largest tire in place. Fill it with rich garden soil mixed with well-aged compost or manure. Potatoes prefer well-drained, loam or sandy soils, according to Oregon State University.
Once the chance of frost is past, it's time to plant potatoes. Prepare your seed potatoes by cutting large ones into several pieces, ensuring that each piece has at least two eyes or buds. Use newly cut seed potatoes as soon as possible or wait until the cuts completely heal, which usually takes about four or five days.
When planting potatoes in a row, the traditional spacing is about 10 to 12 inches between plants and 2 to 3 feet between rows, according to Fine Gardening. When growing potatoes in containers such as tires, the spacing is the same, but without any rows – about 10 to 12 inches between tubers. For most tires, this translates to three potato plants per tire or four at most. Remember: Crowding your potato plants into a too-small space will result in smaller potatoes.
When your potato plants are about 8 inches high, Garden Helper recommends adding another tire on top and covering the stems to their tips by filling the second tire with a rich soil mix. Burying the stems of potatoes is called “hilling,” a traditional method that supports the growth of more tubers and avoids the greening of the potatoes. Stacking tires makes hilling easy. Continue to bury the stems in 8-inch increments by adding tires, for a total of four in all if you have them.
Water the potatoes well throughout the growing season, but especially when they are flowering and immediately afterward, because that's the time they are actively creating new tubers underground.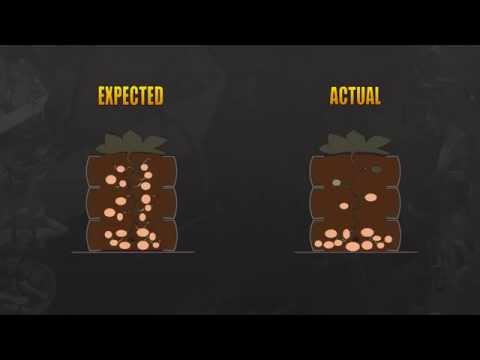 Harvest the potatoes two to three weeks after flowering.
References
Writer Bio
Shelley has been writing and editing garden stories for 10 years, and has a Master Gardeners certificate in Oregon.
Surprisingly, in cold Canada they manage to get good yields of sweet potatoes - a tropical vegetable. Residents of our Middle Strip should learn from experience, as their climate is milder than Canadian. But first, a few facts about sweet potatoes, without knowing which, you can’t grow a normal crop.
Sweet potato is one of the most nutritious crops and yet can be easily stored at room temperature. It has FIVE features.
1. Sweet potato tubers are alive, they breathe and can die without air. Therefore, they cannot be kept in plastic bags. Cardboard boxes are best. It is desirable to keep it at a temperature of about + 15 ° C. The main thing is that rodents do not get access to the tubers.
2. Do not throw tubers into buckets. Yes, they seem indestructible. But this is not a potato, it is enough to throw a tuber, as microcracks are obtained from the impact and the sweet potato will no longer be stored. After a month or two of storage, they will rot and ruin the crop.
3. Sweet potato is a tropical plant and its tubers freeze even at +10°C. The refrigerator is usually set a few degrees above zero. This is normal for apples, carrots, potatoes, but not sweet potatoes. After a day of this temperature, the tuber dies and it will no longer be possible to revive it. Its core hardens, and after a few days spots appear on the peel. Such material is not suitable for cooking, and even more so for planting.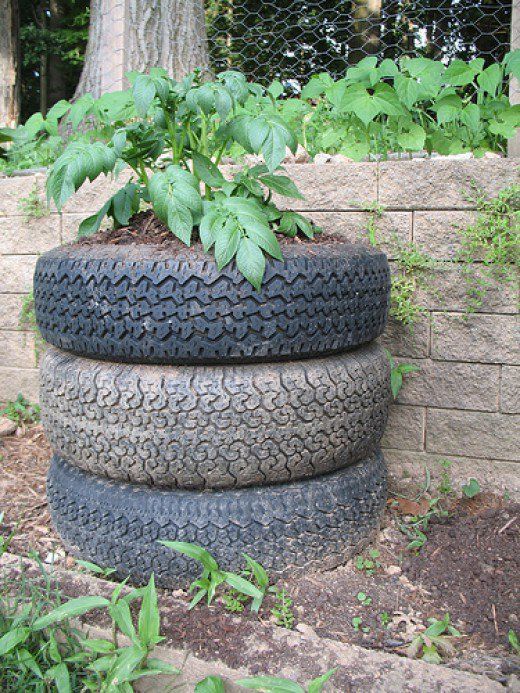
4. Tubers must be treated after harvest. Usually kept for five days at +30...+32° C. During this time, they heal wounds and form a second peel. Without it, the sweet potato will only last a month in storage. Humidity in the clinic should be around 80-90%.
5. Freshly dug sweet potatoes are tasteless. It becomes tastier after treatment and several months of storage. It can also be eaten fresh. But if you appreciate the taste of this product - wait.
Sweet potatoes are tolerant of soils, but do best in sandy ones. He is not afraid of drought, but will not grow and develop until moisture returns to the soil. The only factor that cannot be ignored is temperature. Sweet potato tubers love the heat. + 10 ° C - a dangerous temperature, at + 15 ° C sweet potato does not grow at all, above + 21 ° C there is already something for growth, but it will grow normally only at + 27 ° C, it will grow very well at + 32 ° C and great at +38°C.
In the South, you can wait until the soil warms up.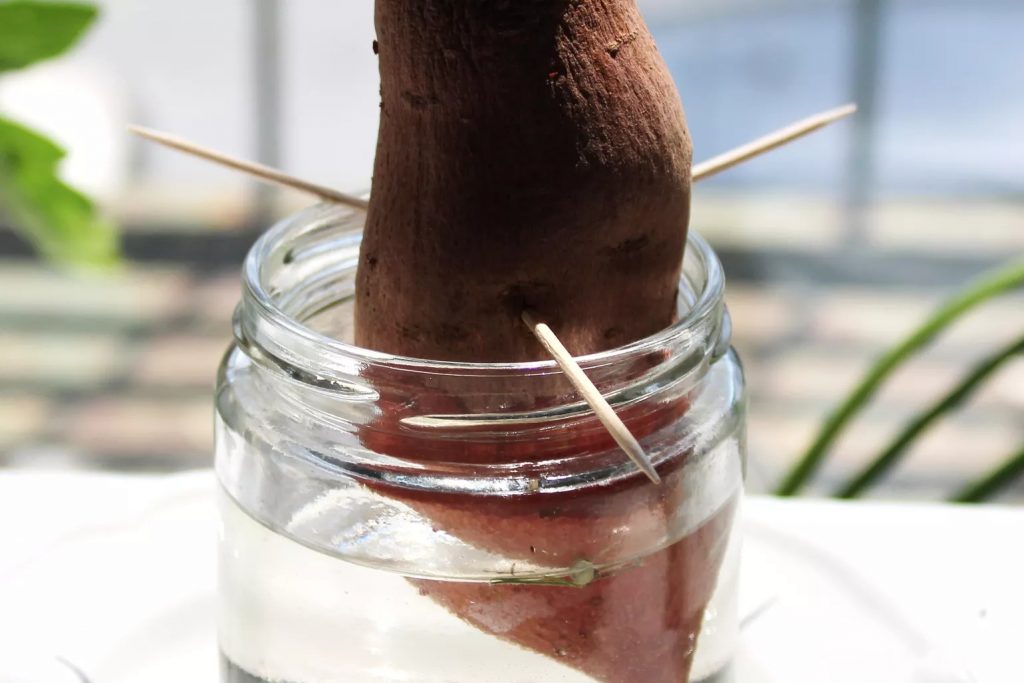 Not in Canada. Therefore, there the soil is heated with a transparent film. The film is laid and the edges are covered with earth. It is important that the film is well stretched. During planting, holes of 20 cm are made in the film and the soil is compacted around them, so that the planted sweet potato tubers are then watered into this bowl.
Weeds must not grow under the foil. It's too hot for them. If they grow, then you did something wrong.
And one more thing - sweet potato is an evergreen crop. It doesn't dry out like potatoes. We just wait until it becomes too cold for its growth, but the temperature has not yet dropped below +10 ° C, and we go to the sweet potato with a pitchfork. This is the perfect way to dig up a crop without cutting it into pieces.
Immediately after digging it is washed with a soft brush and dried a little. Then they are sent for treatment. And then for winter storage.
Subscribe to our Zen channel
Subscribe to our video channel on youtube
 All secrets.
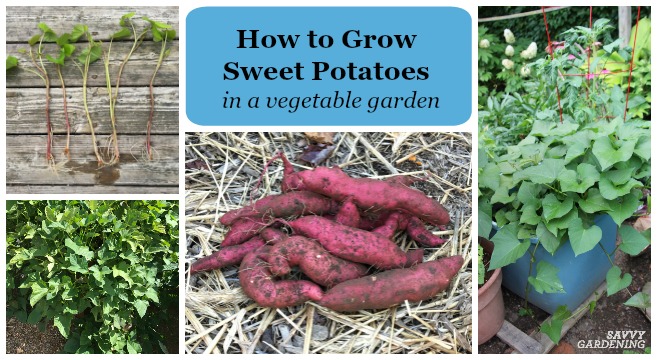
 In this article I will tell you in detail about how to grow sweet potatoes with your own hands and, after reading it to the end, you can easily do it yourself!
First of all, what is sweet potato? This is a plant of the bindweed family, a herbaceous liana with stems-whips up to 5 meters long. Sweet potato is grown for its tubers, somewhat similar to potato tubers, but much sweeter in taste and healthier in many other ways.
Sweet potato leaves are similar to bindweed leaves, and flowers are like bluebell flowers.Sweet potatoes come in a wide variety of sizes and shapes, from the smallest to over 30 centimeters in length. The largest tuber that we managed to grow on our site was about 30 cm long and weighing more than 1 kilogram! This is not a bad result for the first cultivation - believe me!
Record-breaking tuber that we have grown! Friends, I will talk about how to grow a good sweet potato crop from my own experience, so all the tips will be tested in practice.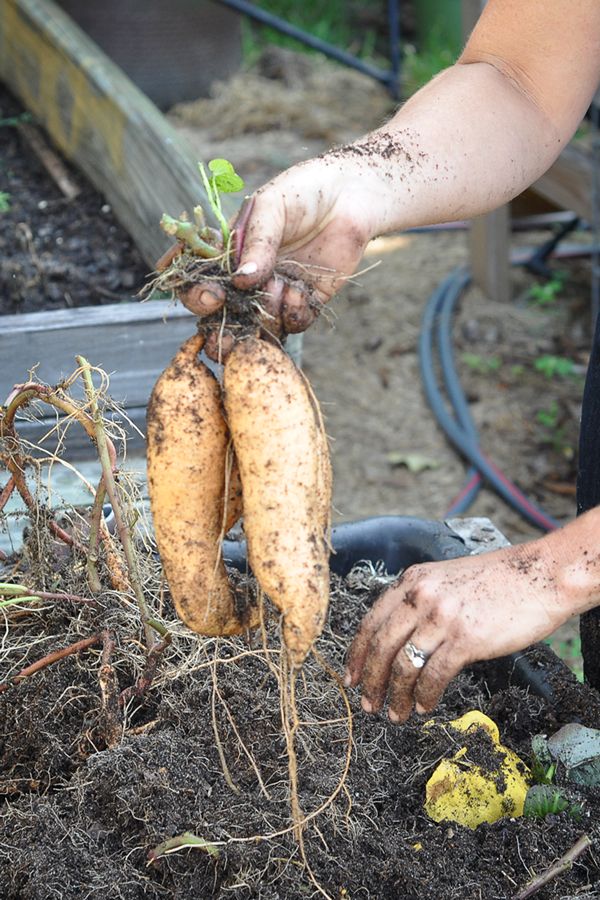
We had sweet potato tubers for planting quite by accident - they were sent to me by my subscribers from the city of Dnipro, before that we were not familiar with sweet potato, but, as it turned out, it is not at all difficult to grow it, if you follow some nuances when growing.
With varieties, I think, each of you will be able to decide on your own, and with time and experience you will understand which of them are suitable for you, because, as they say, there are no comrades for taste and color! The only thing I can say on this issue is that basically all varieties of sweet potato have a sweetish taste, but some of them are sweeter, and some are less.
Sweet potato does not belong to the nightshade family, like potatoes and, accordingly, is not damaged by diseases and pests that prevent us from growing potatoes - on sweet potato you will not meet the Colorado potato beetle and late blight and, accordingly, during its cultivation you will not have to treat plants pesticides!
Obtaining planting material for planting sweet potatoes is fundamentally different from dealing with potato tubers.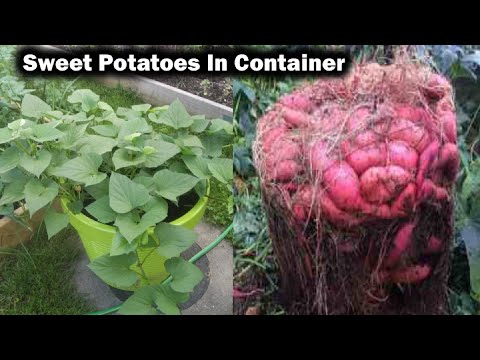 The main difference is that sweet potatoes do not have eyes, like potatoes, and sprouts develop from hidden buds. From one tuber you can get 25 or more pieces of finished seedlings - not bad at all!
In order to get sprouts suitable for planting, do the following:
the case if waterlogging is allowed during irrigation) in order to avoid spilling the soil and fill it with soil, loose in composition - in our case, we used self-prepared soil from the components of river sand, cow humus, peat and chernozem - all this was mixed in equal amounts and obtained a light, moisture- and air-permeable, fertile soil with an average acidity of about 5.5-6.5, suitable for growing most plants. How to prepare suitable soil for growing sweet potatoes, you can read here.
The soil layer in the box, sufficient for good germination of tubers, should be about 8 centimeters. Then we lay the sweet potato horizontally on the surface of the soil, deepening them by no more than half.
Spread the sweet potato horizontally on the surface of the soil, deepening the tubers halfway into the soil.
We leave the distance between the tubers 1-2-3 cm and carry out thorough watering so that the lower part of the tubers in the soil is well moistened. But you should not water to such an extent that puddles appear in the box - waterlogging can lead to rotting of the tubers.
Thoroughly water the tubers for good germination.It is desirable to add some kind of root formation stimulator to irrigation water, we added a very effective and inexpensive stimulant that helps accelerate root development - succinic acid at the rate of 2 grams per 5 liters of water.
On average, the entire process of sweet potato germination and the appearance of shoots suitable for planting in the ground takes from two to four weeks - a lot depends on the temperature regime, it is best to maintain a temperature of at least 20 degrees during this period.
Some gardeners use sweet potato tubers bought in the vegetable section of the supermarket as seed material - these tubers can also be used, but you need to be prepared for the fact that the germination process of such tubers may be a little more extended in time due to the fact that they treated with a special solution that delays their premature germination.
After 2-4 weeks, subject to the temperature and humidity conditions, sprouts should appear on the tubers - at least 20-25 pieces on each, and in some cases their number reaches 50 pieces!
Shoots that have reached a length of 15-20 can already be separated from the tuber, i.e. - break out with a root, which was formed at the bottom of the shoot. At the same time, there is no need to remove the tuber from the soil - everything can be done perfectly on the spot. Is it possible to start separating the shoots from the tuber earlier, when they have not yet reached the specified length? Can! But, if there is little planting material, and a large area needs to be planted, then it is better to separate the cuttings from the tuber longer, which can then be divided into several parts and rooted in a glass of water, thereby increasing the amount of planting material several times.
When this size is reached, the seedlings can be separated from the tuber.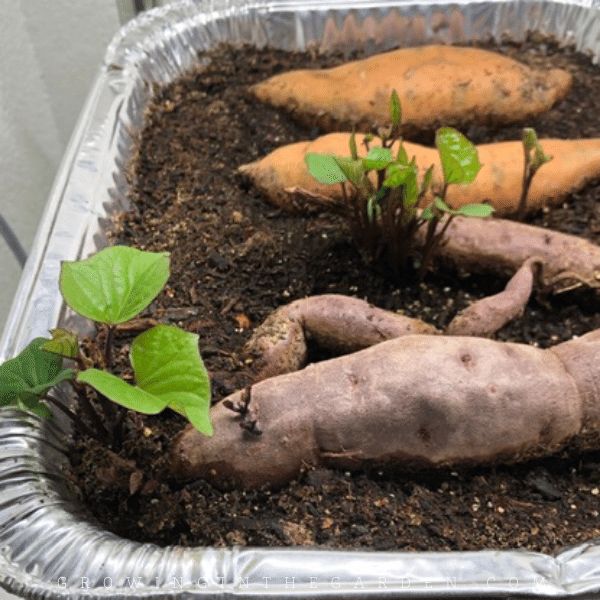
It is very easy to divide and root the cuttings:
Separate shoots at least 20 cm long from the tuber and cut them into cuttings 5-7 cm long, leaving two leaves on top of them. The lower part of the cuttings prepared in this way is placed in a glass of water, the depth of immersion of the lower part of the cutting in water is 1-2 cm. Sweet potato takes root very easily, so after 5-7 days you can see the roots that have appeared on the cuttings.
When the cuttings are rooted, they can be planted immediately into the ground - if the weather conditions allow, but remember that sweet potato does not withstand the effects of negative temperatures, in other words, it dies when it freezes.
Therefore, if there is a threat of frost, it is best to first pick the rooted cuttings of sweet potato into cups with a volume of 180-250 ml filled with fertile soil. In these cups, at a temperature of 18-20 degrees, sweet potato can develop until it becomes possible to plant it in open ground.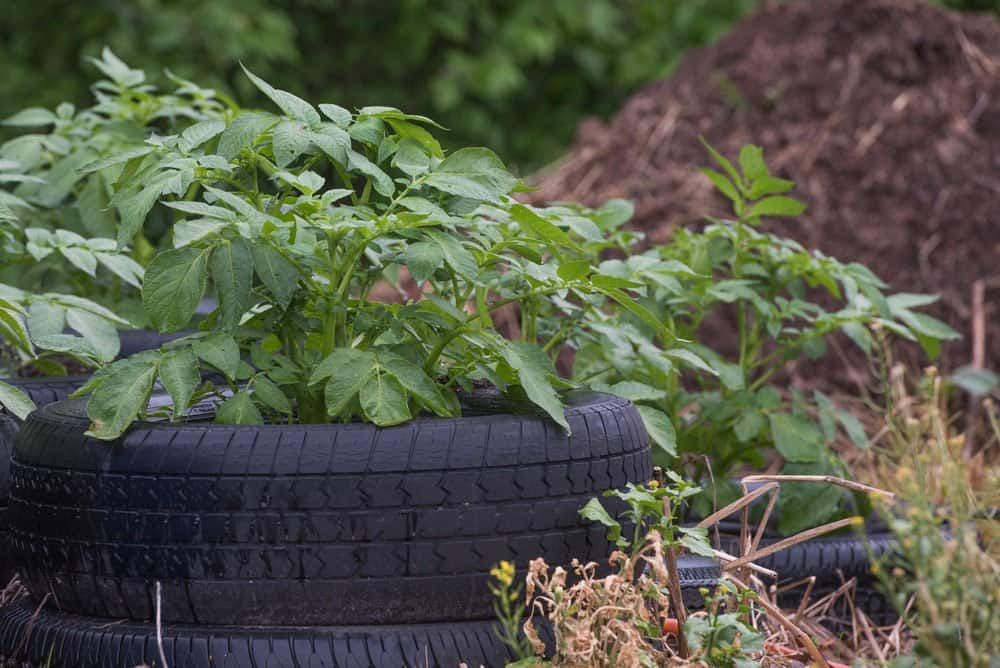 During this time, the above-ground and root parts of the plants will develop enough to quickly "start" after landing on the garden.
As mentioned above, sweet potato seedlings can be planted in open ground immediately after separation from the tuber, but I think (and practice confirms this) that it is still better to transplant it first into cups and hold it in a suitable room for some time - this will allow us to achieve powerful development of the root system and, after planting "in the field", the plants will not receive strong post-transplant stress, but will immediately begin to develop normally.
We plant the grown seedlings in the garden when the threat of return frosts is over, because, as mentioned above, sweet potato dies under the influence of frost.
The soil must be prepared in advance - it must be light, loose - this will contribute to the good development of the tubers and they will not be crooked and crooked. In dense soil, it is more difficult for tubers to develop, pushing the soil apart, so they are curved and have an unsightly appearance.
To make the soil less dense, you need to add 10 kg to it every year. humus per 1 square meter. When introducing humus into the soil for digging, it is also desirable to add up to 70 grams of double superphosphate per 1 sq. meter - this will help provide plants with phosphorus during the period of active development of the root system and, accordingly, increase the yield.
We plant sweet potatoes in a belt way, i.e. in rows, the distance between holes in a row should be about 40 centimeters, the distance between rows should be up to 1 meter, because sweet potato vines grow strongly. In addition, tubers underground are also not located in one place, like potato tubers, but tend to “spread” at some distance from the hole, which makes it difficult to dig them out of the soil.
It is best to plant sweet potato seedlings on ridges 25-30 cm high and up to 40 cm wide.
Seedlings by the time of planting should be well developed and have 5-7 leaves in the aerial part, and the root system should almost completely fill the volume of the seedling cup.
When planting sweet potato seedlings in the ground, it is allowed to deepen it by 3-5 cm. so that the roots on the vines do not have the opportunity to grow into the ground. If it is not possible to carry out such mulching, then it is very desirable to pull the vines several times a season so that additional roots do not develop - such actions on our part will allow us to increase the yield.
After planting, we carry out abundant watering of each hole and, in the future, it is very undesirable to allow the growing sweet potato to dry out, as this will negatively affect the yield. If the soil is properly prepared (humus and superphosphate are added), then additional top dressing under the root during the cultivation of sweet potato can not be carried out - the harvest will be quite good without them, but two foliar top dressing with microelements such as Brexil Combi or Biomaster Humat + 9 microelements can be carried out .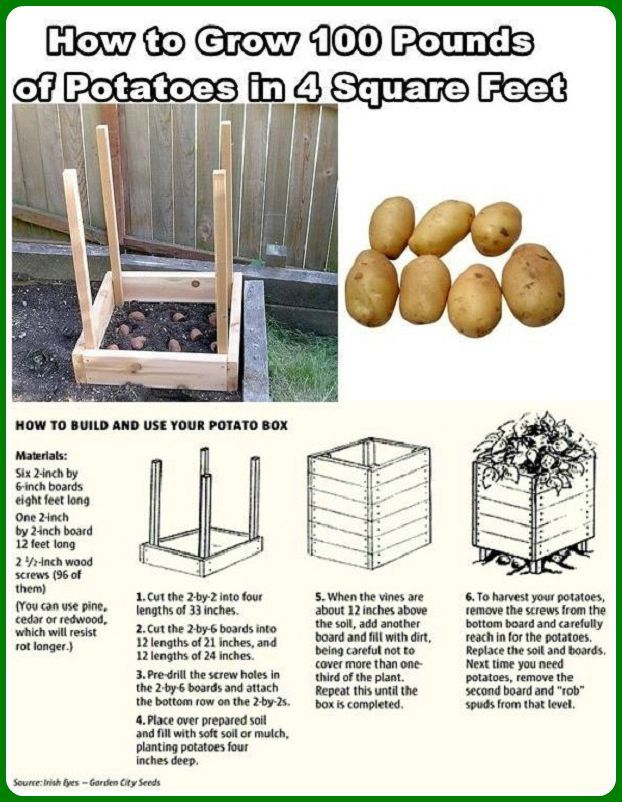
We figured out how to grow sweet potato with our own hands, now let's talk about its cleaning and storage.
Sweet potato crop is ready for harvest in anticipation of the first autumn frosts, or immediately after them. By this time, the tubers should already be fully formed and there is no point in keeping them further in the soil.
Before harvesting, we cut off the vines from the garden and put them on the compost, leaving small stumps from the cut stems in the holes in order to navigate when digging where the center of the hole is located. If this is not done and the vines are not removed, then the harvesting process will be very difficult and take a lot of time and effort.
The best way to dig up sweet potatoes is with garden pitchforks, as a large number of tubers can be cut with a shovel because you can't guess where they are located. In general, in my opinion, sweet potato harvesting is how interesting and exciting it is - digging each hole is a pleasant excitement and expectation, especially when you dig up a record-breaking tuber, it is so time-consuming - the tubers can be located anywhere, therefore, in order not to miss anything, you have to literally "shovel" a large amount of soil!
Harvesting is always fun! But once again, it's interesting to harvest sweet potatoes! Especially if the harvest is good.
After digging, the tubers must be dried by spreading them in a dry place in a small layer, it is not advisable to expose them to direct sunlight during drying. It is necessary to handle the tubers carefully after harvesting, since the skin on them is very delicate and easily damaged, and, as you know, pathogens of various diseases can easily penetrate into the wounds.
After drying, store the harvested crop. Unlike potatoes, whose tubers need to be stored in the basement at low temperatures of 3-5 degrees, sweet potato tubers are perfectly stored for a long time at a temperature of 15 to 18 degrees - this is the usual pantry temperature in a house or apartment, so storing sweet potatoes does not create any problems!
Friends, this is, in fact, the whole process, which describes the main steps for growing sweet potato, I also advise you to watch these videos from my YouTube channel “Garden, vegetable garden, with your own hands!”, In which I showed clearly, on my example how to grow sweet potatoes:
