Delivery options and delivery speeds may vary for different locations
Sign In
or enter a zip code
Email * Password *
REPAIR & HOW TO
MAINTENANCE
TROUBLESHOOTING
GUIDES
TIPS & TRICKS
ALL ARTICLES WATCH VIDEOS ABOUT US SHOP PARTS CONTACT US
When you’re ready to ride your Honda ATV but nothing happens when you turn the key, not even a light coming on, it’s time to troubleshoot that no-start condition.
Obviously the sooner you find and fix the problem, the sooner you can hit the trails. Here are some troubleshooting steps that should get your ATV to fire up again.
NOTE: We worked on a Honda TRX400EX to diagnose the problem, but the same or similar troubleshooting steps can be applied to most ATV makes and models.
Step 1: Test the Battery VoltageSet a multimeter to DC volts, and put the positive and negative leads from the multimeter onto the positive and negative terminals on the battery.
The reading on a healthy, fully charged battery should be somewhere between 12.5 to 13 volts. If you know the battery is charged but the volt reading is below 12 volts, the battery needs replacing. However, if the voltage checks out, you can rule out the battery being the problem and move on to the next most likely culprit.
Step 2: Test the Main FuseMany ATVs have a main fuse that controls the electrical supply to the entire machine.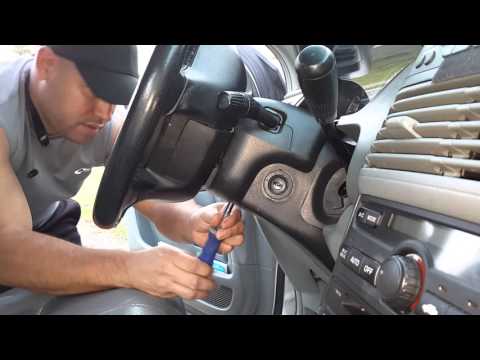 On the Honda TRX 400 EX, the fuse is located in a protective housing near the battery.
Remove the housing’s cover and the main fuse. The fuse should be a 15 amp and must be replaced if it’s the wrong ampage or if the filament is blown. There should be a spare 15A fuse within the housing, which you can use to replace the blown fuse if necessary. If the fuse is sound but the machine still won’t start, the next step is to test the solenoid and starter motor.
Step 3: Test the Solenoid & Starter MotorATVs rely on a solenoid or starter solenoid and a starter motor to fire up the engine. The solenoid or starter solenoid is a relay switch that closes or completes the electrical circuit to the starter motor. The starter motor is an electrical motor that turns over the engine, enabling it to start.
The solenoid on the Honda TRX 400 is located just below the main fuse housing.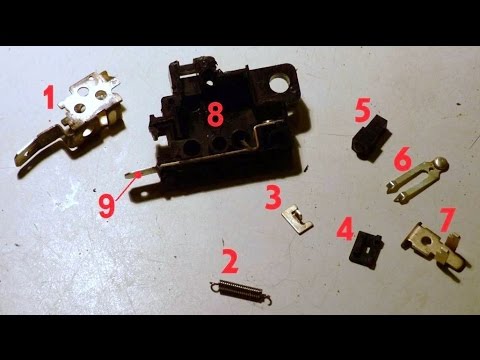 To test the solenoid, disconnect it from the battery, attach a jumper wire to the yellow wire with a green stripe coming from the solenoid, and attach the other end of the jumper cable to the negative battery terminal. Next, take the yellow wire with the red stripe coming from the solenoid and hold it against the positive battery terminal.
If the engine fails to turn over when the solenoid and battery are connected and there’s no audible “click” from the solenoid, the solenoid or starter solenoid has failed and must be replaced. If the engine fails to turn over when the solenoid and battery are connected but there’s an audible “click” from the solenoid indicating it’s working, the starter motor has failed and must be replaced.
If the problem with your Honda TRX 400 ATV is a weak battery or it’s simply not charging, watch the video above to see how to test the charging system (stator, rectifier and battery).
body
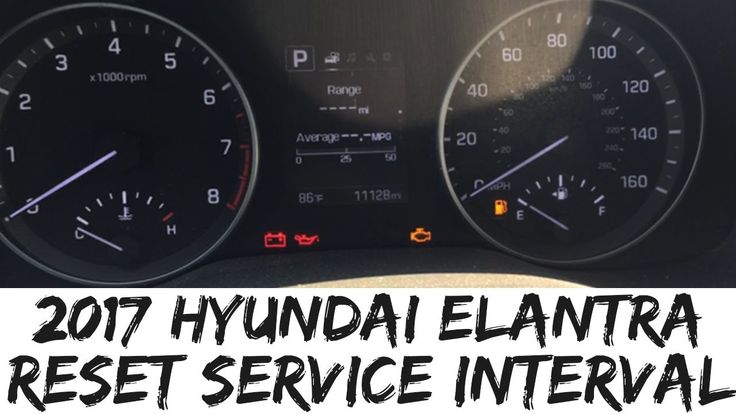
My DCT light has been flicking on and off every other hour for the past two weeks. I don’t know if there’s a real problem or if my system’s just a little wonky. What’s the best way to reset my Honda Rancher’s computer?
Joshua Levy · Answered on Dec 08, 2021
Reviewed by Shannon Martin, Licensed Insurance Agent.
ATVs can be lots of fun, but they’re also complicated toys. That said, you can reset a Honda Rancher’s computer when the ignition is off and the transmission is in neutral.
Follow these steps to reset your Honda Rancher’s computer:
If you’re still having problems after resetting the computer, bring your ATV to a repair shop. While you can take care of some repairs at home, ATVs are expensive pieces of equipment that are best handled by professionals.
To offset pricey repairs, save money where you can. Jerry’s here to help!
A licensed broker, the Jerry app helps users save an average of $879 on car insurance. Just download the app, answer a few questions, and Jerry will help you compare personalized car insurance quotes from over 50 top providers like Progressive and Nationwide for free.
MORE: How to find the best cheap car insurance
HondaCar Technology
View full answer
WHY YOU CAN TRUST JERRY
Jerry partners with more than 50 insurance companies, but our content is independently researched, written, and fact-checked by our team of editors and agents. We aren’t paid for reviews or other content.
Browse More Content
Replacing Your Hood Lift Support Shocks
Throttle Body Replacement
Drive Belt Tensioner Replacement
What To Do If Check Fuel Cap Light Is On
Supercharger Belt Replacement
Lexus Rc 350 Insurance Cost
Kia K5 Gt Line Insurance Cost
Ford Econoline E350 Super Duty Van Insurance Cost
Volkswagen New Gti Insurance Cost
Chevrolet Traverse High Country Insurance Cost
Oxon Hill Car Insurance
Freeport Car Insurance
King Of Prussia Car Insurance
Wilson Car Insurance
Bethlehem Car Insurance
I just got my Honda and I’m really struggling with certain things.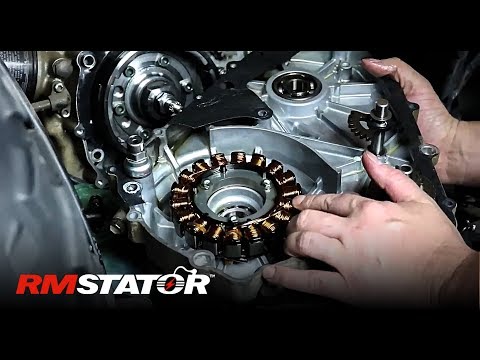 Specifically, I can’t seem to open the trunk! How do you pop the trunk on an Accord?
Joshua Levy
Dec 08, 2021
My brake lights aren’t turning on as they should be, and a police officer pulled me over for it a few days ago. But I’d rather not spend the money on professional repairs if I can avoid it. What’s the easiest way to replace a brake light switch in a Honda Accord?
Joshua Levy
Dec 08, 2021
I used Apple CarPlay in my friend’s car, and it was so convenient! I’m getting ready for a road trip, so I figured it would be a good idea to get it working in my own car before I go. What’s the best way to set up CarPlay in a Honda CR-V?
Joshua Levy
Dec 08, 2021
Browse All Questions
Every car insurance policy in New Mexico is required to offer uninsured motorist coverage, but drivers have the right to refuse it.
Mary Alice Morris
Oct 06, 2022
If you’re issued a Vermont speeding ticket, you can either pay the fine or fight the ticket in court.
Mary Alice Morris
Jan 27, 2022
California
Car Body Repair
Parking
Insurance Exclusions
Cheap Car Insurance
New York
Depreciation
Drunk Driving
Trailers
Customer Service
speeding tickets
The General
Scooters
Aston Martin
Travelers
Extended Car Warranty
Liability Coverage
Bodily Injury
Finance
Minivans
Car Insurance Claims
Roadside Assistance
Penalty Fees
GEICO Insurance
Proof of Insurance
New Cars
Personal Liability
No long forms
No spam or unwanted phone calls
Quotes from top insurance companies
Find insurance savings — it's 100% free
Toyota
Hyundai
Mercedes-Benz
Subaru
Chevrolet
Mitsubishi
Moscow:
1st Varshavsky proezd, 2s8
+7 499 500-97-34 Call me back
Page not found at given address.
Please go to the main page or use the site map.
 ru - technology and answers to questions
 Content
The motorcycles of this brand are equipped with a four-cylinder four-stroke engine
with a volume of 399 cm3 in the NC23E modification. Engine power - 53 hp at 11,000 rpm, torque 37 Nm. The engine is designed for gasoline with an octane rating of at least 95. It has an in-line arrangement of cylinders, with forced water cooling. The engine is interlocked in the crankcase with the gearbox. The crankshaft has a composite and non-separable design. The piston stroke is 42 mm, the cylinder diameter is 55 mm, the compression ratio is 11. 3. The cylinders are made of aluminum alloy and cast-iron sleeves are poured into them.
Cylinder compression test.
Attention: before starting the test, it is necessary to check the engine and fully charge the battery.
Before starting, you need to remove the fuel tank, disconnect the low-voltage wires from the ignition coils.
Removal begins with turning out the spark plugs of all cylinders. Next, you need to insert the tip of the complessometer into the spark plug hole of the cylinder being checked and press it tightly to exclude the possibility of gas breakthrough.
The next step is to fully open the throttles by turning the control stick towards you and to the stop. We turn the crankshaft with a starter for a couple of seconds and measure the compression.
This operation is carried out for each of the cylinders. The compression value for each of the cylinders should not differ by more than 1 bar. Recommended value 11-15 bar.
Cylinder head. Checking and adjusting valve clearances.
This check and adjustment is carried out every 24,000 km. run. Before starting it, you need to remove the cylinder head cover.
Using a 10 hexagon, remove the plug on the right crankcase cover.
Rotate the crankshaft by 14 by the alternator rotor bolt until the actuator cam of the valve being measured is in the “closed” position. Clearance A changes between the pushrod and the cam.
Record the clearance for each valve.
If the clearances are within tolerances, the job is complete. Otherwise, adjustments must be made using washers of different thicknesses.
Remove switchgear. shafts and take out the pushers from the sockets of the cylinder head. Then we take out the adjusting washers.
Use a micrometer to measure the actual washer thickness.
After that, we replace with a new washer.
Reinstall the tappet, repeat the procedure for each of the valves.
Install camshafts, bearing caps.
Using a socket wrench of 14 turn the engine crankshaft 3-4 turns.
Further assembly of the engine is carried out in reverse order.
Removal and installation of the cylinder head.
This procedure is necessary when repairing the valve train or timing parts.
Before removing the cylinder head, remove the fuel tank, ignition coils, thermostat and pipes, exhaust system, carburetor bar. In addition, it is necessary to drain the coolant, and disconnect the cooling hoses and the tube of the crankcase ventilation system from the fittings.
Using a 10 socket wrench, unscrew the bolts securing the cylinder head cover, and then remove the cover with the gasket. After that, with the same 10 key, it is necessary to unscrew all 16 bolts securing the camshaft bearing caps.
Next, remove the chain guide and remove the shaft bearing cover.
With the same 10 socket wrench, unscrew and remove the plug of the timing tensioner. After that, remove the chain from the sprocket and take out the shaft.
The operation must be carried out for the second shaft.
The next step is to inspect the shafts. On the cams and bearing journals there should be no mechanical damage, as well as noticeable traces of wear.
The nominal height of the jaws is 32.180-32.420 mm, and the maximum height is 32.130.
The nominal diameter of the bearing journals is 22.959-32.420 mm, and the maximum diameter is 22.950 mm.
Replace if damaged.
Remove the valve lifters from their sockets using pliers.
Most often, valve clearance shims stick to the bottom of the tappet on a layer of oil and are removed with it.
It is important to ensure that the washers do not remain in the seat of the valve thrust plate.
Using an 8 hexagon, remove the nuts securing the cylinder block.
Using a 10 socket wrench, remove the cylinder head bolts, and then remove the head itself from the cylinder block.
Remove the head gasket.
We clean the rest of the gasket from the landing planes of the head and block.
After that, inspect the internal parts of the head.
Before starting the reinstallation, it is necessary to blow out all the channels, install a new gasket, put the head in place, tighten all the nuts. Tighten bolts to 12 Nm.
After that, in several steps, tighten the head mounting bolts in the sequence shown in the photo. Tightened with a torque of 29 Nm.
We remove the adjusting washer from the pusher and then install it in the seat of the valve spring thrust plate.
Install the pusher in place.
We lubricate the planes of the pushers with engine oil, after which we unscrew the plugs of the right crankcase cover. By rotating the crankshaft by the generator bolt with a 14 socket wrench clockwise, we combine the “T” mark with the corresponding icon on the engine cover.
Lubricate the camshaft beds with engine oil.
Install the camshafts. The marks on the sprockets shafts must be located in the same plane.
Lubricate the camshaft bearing journals. shafts.
Install the bearing caps. It is important not to confuse them.
Wrap the bearing cap bolts. Using the marks, we control the correct installation of the camshafts.
Unscrew the 4 central screws securing the slider covers and install the timing chain guide in place.
Torque 12 Nm tighten the bolts of the bearing caps distribution. shafts.
Reinstall the cylinder head cover assembly with gasket. We wrap the bolts of the cylinder head cover, after which we tighten it with a torque of 10 Nm. in the order shown in the photo.
Reassemble in reverse order.
After 500-600 km, the cylinder head cover must be removed again and tightened with a torque of 29 Nm.
Removal, installation, lapping of valves.
Removal of the valves must only be carried out on the removed cylinder head.
If the valves are leaking, they must be lapped. In order to check the tightness of the valves, it is necessary to install the cylinder head on a horizontal, flat surface and fill the combustion chambers with kerosene to the brim.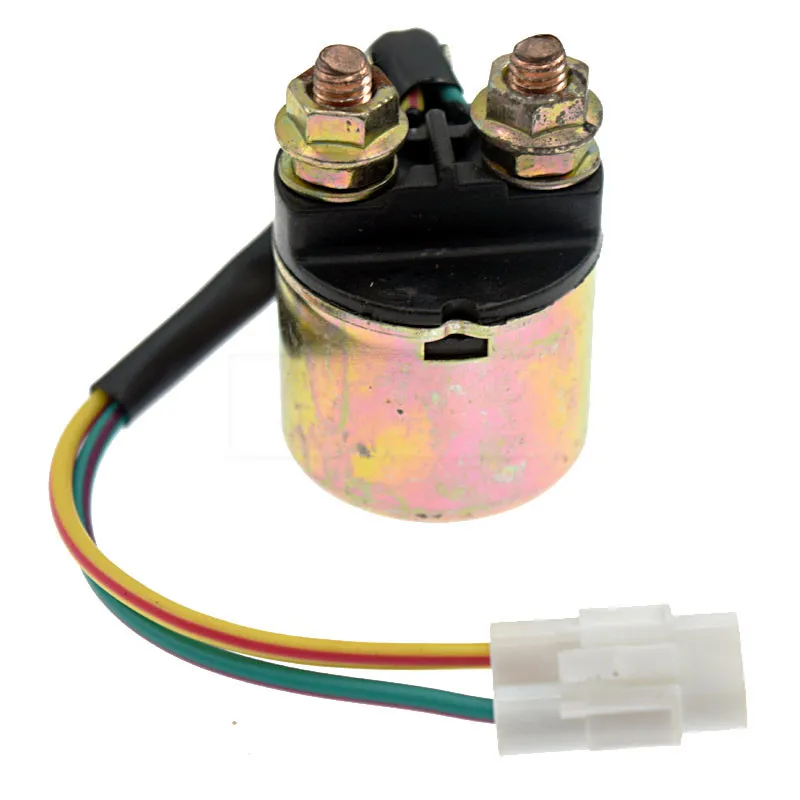 If the level of kerosene drops within three minutes, it is necessary to grind the valves.
The valve must be replaced if it is severely damaged or deformed.
Use a wire brush to remove carbon from the valves, after soaking it with a carburetor cleaner or a common solvent.
Using any suitable valve puller, compress the spring.
Using tweezers, remove the crackers, then remove the upper valve spring plate and remove the valve spring.
Next, remove the lower valve disc.
Use a thin blade screwdriver to pry and remove the valve stem seal and remove the valve.
After that, having previously soaked the carbon deposits on the inner surface of the valve head plate and its seat with a carburetor cleaner or solvent, it is necessary to clean the carbon deposits with a brush.
Next, we select a plastic or rubber hose or tube that is suitable in diameter for the valve stem, as well as a drill or tool tip of approximately the same diameter.
Apply lapping paste to the valve seat, then lubricate the valve seat with engine oil.
It is accepted that for high-quality lapping of one valve, only 5-7 minutes of processing is required at each stage.
There is also an alternative way to hold the valve while lapping. To do this, gently buy a suction cup of the required diameter. The suction cup is fixed in the drill chuck, and the other side is attached to the valve plate. Before assembling the assembly, rinse and blow out the cylinder head and valves as thoroughly as possible to prevent lapping paste from entering the valve guides.
Timing chain tension. Its removal, check, installation.
Removal starts by removing the carburetor bar.
Using a 10 socket wrench, it is necessary to loosen the plug of the first timing tensioner screw, after which, using a 8 wrench, remove the 2 remaining bolts securing to the cylinder block.
Remove the tensioner from the cylinder block.
Using a slotted screwdriver with a thin blade, turn the screw counterclockwise, after which the tensioner rod should sink into the body.
In the extended position, the stem must not retract when pressed, and must be extended by spring action from the retracted position.
Before assembling, it is necessary to clean the remnants of the old gasket from the tensioner housing and the mounting hole on the engine. Next, using a slotted screwdriver, it is necessary to turn the screw inside the tensioner counterclockwise, after which we install the tensioner rod.
We put a new gasket on the tensioner housing, and then install it on the engine. Tighten the fixing screws.
Starter drive mechanism, its assembly and disassembly.
Using an 8 wrench, remove the seven engine cover bolts.
Remove the cover, then clean the surface of the cover and the crankcase from the remnants of the gasket.
While holding the overrunning clutch from turning and fixing it with the tip of a screwdriver, which is inserted between the gears and the 14 key, it is necessary to unscrew the fastenings of the freewheel to the input shaft of the gearbox.
Remove the ratchet from the gearbox shaft, then remove the overrunning clutch assembly with the starter driven gear. 9- rear wheel, 10 - rear tire, 11 - chain, 12 - side stand, 13 - oil drain bolt, 14 - radiator hose, 15 - steering column bearing, 16 - brake hose, 17 - front fork.
Air filter
1 - side cover, 2 - fixing screw.
Replacement interval 20000
1 - filter element, 2 - air filter housing cover.
Checking valve clearances
Attention: check and adjust valve clearances when the engine is cold (below 35°C).
.
1 -
1 - probe.
Attention: checking and adjusting valve clearances is carried out on a cold engine (below 35°C).
.
4. Check the intake (IN) valve clearance qi
No. 1 and 3 cylinders.
Nominal clearance:
IN 0.15 ±0.03 mm
6. Check the clearance in the exhaust (EX) valves qi
cylinders No. 2 and 4. hour hand
by aligning the marks as shown.
8. Check the clearance in the inlet (IN) valves qi
cylinders #2 and 4.
Rated clearance:
IN. 0.15 ±0.03 mm
9. Rotate the crankshaft 180° clockwise, aligning the marks as shown.
10. Check the clearance in the exhaust (EX) valves of cylinders #1 and #3.
1 - tensioner holder, 2 - plug (bolt), 3 - washer.
1 - special tool.
2. Screw in the special tool.
3. Remove the camshaft.
4. Remove the valve lifter and shim
.
5. Measure the thickness of the removed shim.
6. Select a new shim according to formula
.
A - new washer thickness,
B - measured clearance,
C - nominal clearance (IN - 0.15 mm, EX - 0.20 mm),
D - thickness of the removed washer.
1.80 mm 1.825 mm 1.85 mm 1.875 mm
Shims are available in 65 sizes, thicknesses from 1.200 to 2.800 mm in 0.025 mm increments.
9. Recheck the valve clearance.
Adjustment and timing of carburetors
1) the engine is warmed up to normal operating temperature
,
2) the gear is in neutral.
1 vacuum tube, 2 screw.
3. Connect the tester to
inlet ports of carburetors #2,3,4 using an adapter.
4. Connect the carburettor vacuum tube
No. 1 with a tee to the tester and fuel cock
, as shown in the figure.
1 - tee, 2 - test tubes.
1 - throttle stop screw.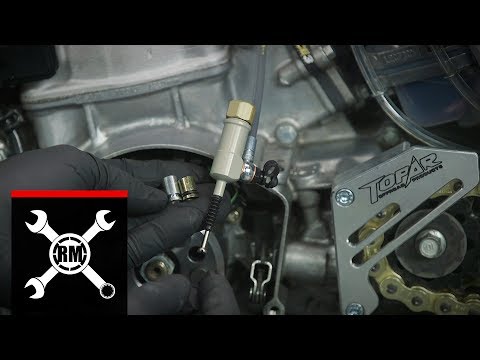
5. Warm up the engine and use the throttle stop screw
to adjust the idle speed
.
Rated speed
1200 ± 100 rpm
6. Adjust the carburetors.
Synchronization is done by carburettor #2
b) If necessary, adjust it by turning the screws
.
1 - Adjustment screws.
c) Adjust the idle speed. 7. Remove the tester, reconnect the tubes and tighten the screws.
Idle system adjustment
Note: Idle system adjustment is made by the manufacturer and should not be readjusted unless the carburettor body or adjusting screws are replaced. Before disassembly, put marks on the screw and set it to its original position during assembly.
1 - idle screw, 2 - special tool.
idle 1200 ± 100 rpm
1 - quantity screw.
Turn the quality screws of each carburettor 1/2 turn clockwise and counterclockwise to achieve maximum idle speed. After a few oscillations, the idle speed should stabilize.
Stand switch test
If these conditions are not met, check the stand switch.
Honda CB400F(CB1) Air filter
1 - filter element, 2 - up mark, 3 - wiring harness.
Change interval 20,000 km
Checking valve clearances
1. Remove the cover and remove the plugs.
1 - PTO test hole plug, 2 - cover, 3 - center plug.
1 - upper mounting bolt, 2 - lower mounting bolts, 3 - radiator.
1 - mark "T", 2 - probe, 3 - mark.
Element arrangement (1) (CB400F). 1 - timing, 2 - steering column bearings, 3 - headlight, 4 - clutch lever, 5 - starter lever, 6 - air filter, 7 - carburetor, 8 - fuel filter, 9 - rear shock absorber, 10 - drive chain, 11 - stand, 12 - coolant expansion tank, 13 - carburetor, 14 - engine oil drain bolt, 15 - radiator hose, 16 - spark plugs, 17 - front fork.