Trying to see how to test a cdi box with a multimeter?
Super, you are in the right place!
In this ToolsGaloreHQ.com blog, we will show you:
Check out the table below before continuing with the rest of the guide on how to test cdi box with a multimeter.
What you need to know about how to test CDI box with a multimeterThe capacitor discharge ignition (CDI) as you know is that black box on your motorcycle that basically functions as the brain of the ignition and motor unit.
This unit is typically found underneath the seat.
It is so common in motorcycles now a days, and has all but replaced the old mechanical trigger mechanisms of the past (before 1980’s).
Before we get into the various steps on how to test your cdi box using a multimeter.
Let's understand a few critical components of the CDI to ensure that your testing is not just theoretical but is backed up by a firm and solid understanding of the underlying electronics involved.
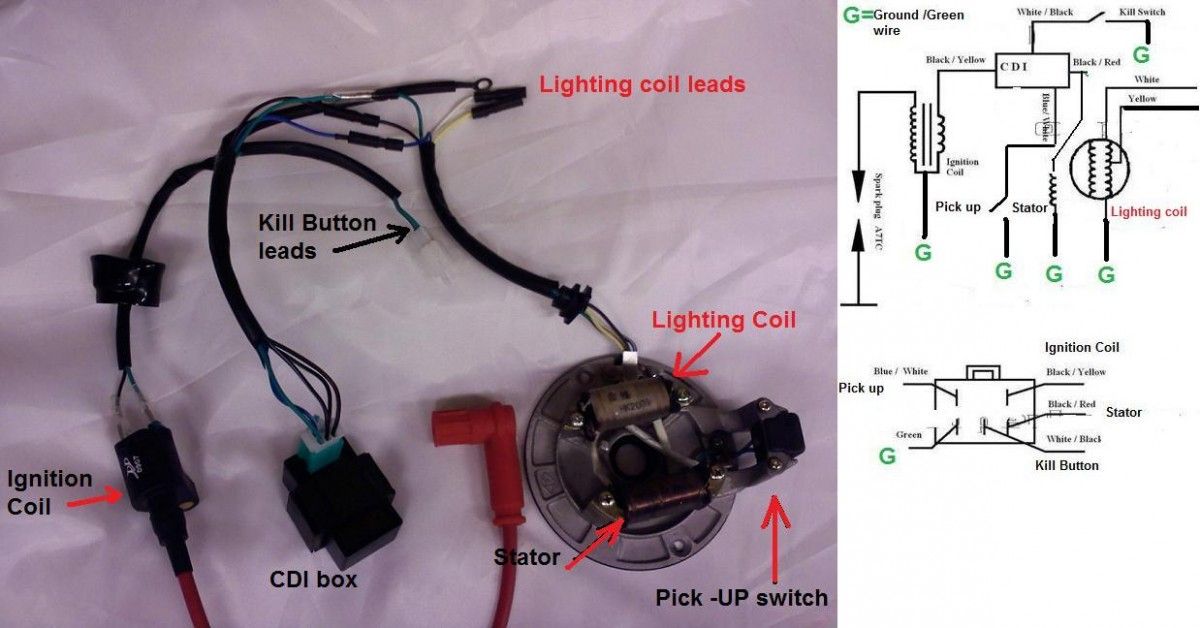
Internal Workings of your CDI
The CDI has the components as shown in the image below
Source: usman032.com
The alternator (exciter) coil is typically powered with an AC voltage ranging anywhere up to 400 Vac.
This passes through a forward biased diode and produces a DC voltage which is inturn fed to the micro-capacitor and the silicon controlled rectifier (SCR).
The SCR is further controlled by a pulse coil which dictates it’s open and close position.
Read More:>> Find the Best Multimeter under $50
When the SCR is closed. This creates a short circuit causing current to flow from the charged capacitor in the direction as shown below.
This charges the ignition coil before releasing the energy to the spark plug, and hence providing energy to the engine.
There are various symptoms that can be derived from a defective cdi. Of which you will be able to use a multimeter to test. They are listed here below.
Misfiring engine
There are many reasons as to why an engine could misfire.
Getting the help of a professional mechanic would usually be your best bet. However a worn out ignition coil found within the cdi is a very common issue with misfiring engines.
Dead Cylinder
This occurs when one or more of the cylinders fails to fire properly.
Often what will happen is that the CDI could have a defective blocking/forward diode, creating fuzzy voltage signals which inturn confuse the spark plug’s firing mechanism.
Backfiring
This tends to happen at higher RPMS above 3000. It can be an issue on the stator, but it has been shown that a bad cdi can contribute to backfiring.
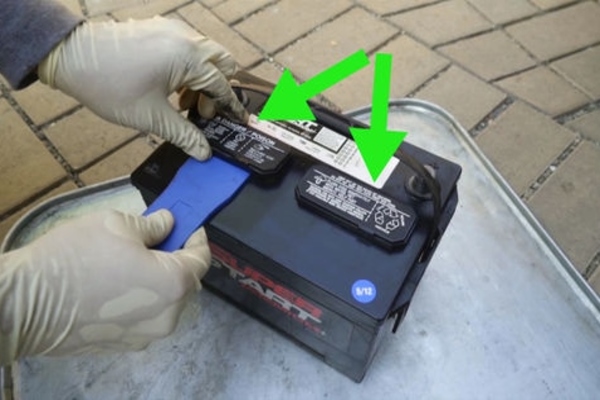
SafetyPlease ensure that whenever you are working with cdi parts or motorcycle mechanics you ensure that you use the typical Personal protective equipment.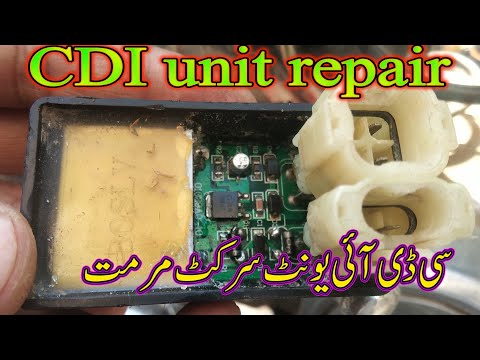
The minimum that should be use cut resistant and water proof mechanical gloves, protective and protective eyewear.
I can tell you from experience working with electrical equipment that safety and the dangers that come from not protecting yourself adequately can be very dangerous.
CDI’s are active components that have capacitance inside although this is usually minimal (i.e. micro farads). You should not take your safety lightly.
Step 1 -Remove CDI box from motorbike
The CDI is usually connected with insulated leads and pin connectors. Disconnecting this from the motorcycle should not be too difficult.
Make sure that you do not work on the cdi immediately. Let it sit for at least 30 minutes to 1 hour to allow the internal capacitance to discharge.
Also during this step, it is important to run a visual inspection of your CDI. Typically damaged CDI’s have some form of mechanical deformation in the form of heat or damaged insulation from the casing.
Read More:>> Testing Purge Valve using a Multimeter
Step 2 – Testing CDI (Cold Test)
Here is the image we used above again as a reminder of the internal circuitry
This method requires us to test the cdi for continuity.
So what you would do is set your multimeter to continuity mode. First take the leads of the multimeter and connect them together.
If you are using a digital multimeter then you should hear a beeping sound.
Measure for continuity between all the ground and the various other points.
If your cdi is working well, you should not hear any sounds. If you do however hear any beeping sound as you are testing, then you cdi is faulty.
All is not lost at this stage, the cdi can still be rectified if you are able to fix the defective component.
Usually on a cdi when you have continuity between ground and any of the other terminal points , it either means that the diode, scr or the capacitor has failed.
Step 3 – Testing CDI (Hot Test)
There is an alternative method to testing the cdi box whilst it is still connected to the stator of the motorbike. Generally cdi boxes have a blue and white wire than comes from the stator to the cdi box itself.
When testing for continuity on the multimeter, it is important to test via the stator end rather than the cdi end.
This is because it is notoriously difficult to get any test lead connection through to a connected cdi box.
The voltage, continuity and resistance is generally the same as on the stator end.
There are a couple of things that you would want to test. Namely:
 Whilst in general the white wire to ground should provide you with a resistance of between 360 to 490 ohms.
This will provide you a genera hot health status check of your cdi box. If the resistance values on your multimeter reading go outside of this range. It is worth checking it with a mechanic.
Read More:>>> Learn more about clamp meters vs multimeters
Final thoughts on how to test CDI box with a multimeterHaving a motorbike that does not fire correctly or produces cracky idling can be a pain to diagnose.
One thing that is often overlooked in checking the cdi for it’s health and functionality with a multimeter.
I hope this guide has provided you with additional insights as to how to test your cdi box with a multimeter.
In your automotive vehicle, the CDI is one of the most important components. What is a CDI box and what does a CDI box do?
In a motorcycle, a CDI is a black box underneath the seat that functions as the heart of your ignition system. It is an electronic component that replaces the pre-1980 mechanical ignition processes and one that your bike can’t work without.
Nonetheless, just like every other component in your bike, issues arise with it and making a diagnosis may be tough.
This article presents you with all you need to know about a CDI box. Let’s get right in.
Here is the system of components in a CDI:
Source: Usman032As the key is turned, the rotating magnet induces a voltage of up to 400Vac into the Excitor coil. When this coil becomes positive, the charge is directed to the forward biased diode till the capacitor gets fully charged ( usually after 3 to 4 magnet rotations).
Once the capacitor is charged, the pulse rotor sends a trigger to the SCR which, in turn, initiates a conduction process that discharges the capacitor immediately. This sudden discharge produces a high spike of voltage in the ignition coil.
High current on both contacts of the spark plug is created and this provides power to the engine.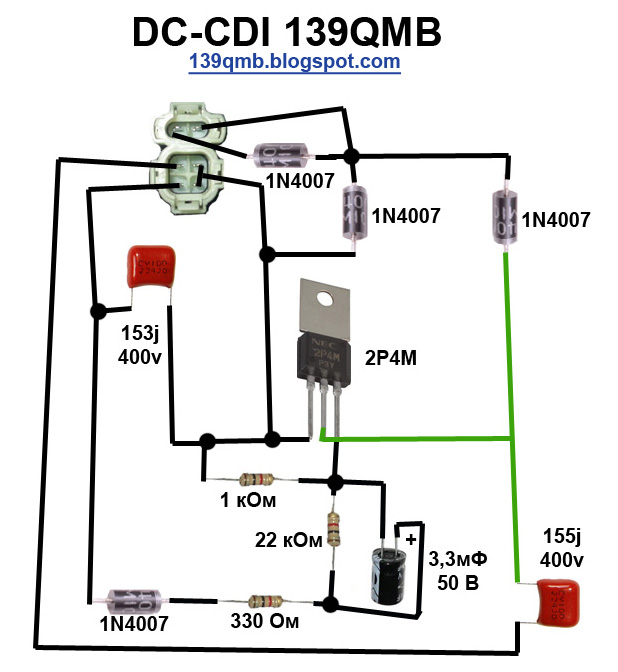
The ignition stop switch grounds all excess voltage.
Of course, before getting into your CDI, you want to be sure that there are problems with it. Here are some of the symptoms your bike may be exhibiting that point you to issues with a CDI.
These symptoms represent problems with particular components of the CDI box. For instance, a misfiring engine may be caused by either worn out spark plugs or a worn out ignition coil. A dead cylinder may also be caused by a bad ignition coil or a bad diode.
Identifying exactly where the problem lies helps you to easily make fixes or replacements and get your ignition systems up and running again.
How do you identify these problems? A multimeter proves useful throughout the whole process and here is how you test your CDI box with it.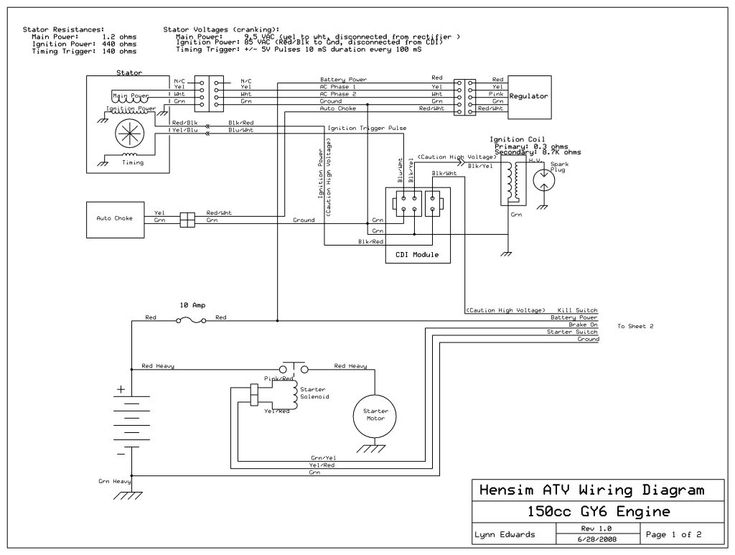
All you need is your;
Before moving forward, you also need to take safety measures and protect yourself. These measures include wearing cut and water resistant gloves as well as eye safety equipment.
To test your CDI box, you disconnect it from your bike, use the positive and negative leads of your multimeter to check for continuity, and listen for a beeping sound which signals that it is faulty.
There is a whole lot more to this seemingly straightforward process and here is further details on it.
To test your CDI, you engage in both cold testing and hot testing procedures. Cold testing is when you run diagnosis on the CDI box with it disconnected from the stator, while hot testing has it still connected to the stator.
Do the following.
This is for cold testing procedures. The CDI Box is typically located underneath the seat of your bike. As you check, you should see a blue and white wire connecting the stator and black CDI box together through lead and pin connectors.
Once disconnected, you avoid working on your CDI with any equipment for about 30 minutes to an hour. As the internal capacitor discharges during this waiting process, you carry out a visual inspection on your CDI.
Visual inspections may allow you to quickly identify physical deformations on the CDI.
Cold testing involves inspecting the continuity of your CDI box components. What you do is set your multimeter to continuity mode and test the continuity between the ground point and other terminal points within the CDI.
If a problem exists, your multimeter gives off a beeping sound. You know the exact component that has issues and a fix to this component may be the solution.
Continuity issues within a CDI are usually caused by problems with the SCR, Diode, or internal capacitor. If these cold steps prove a little difficult to follow, this video from youtube may help you out.
If you don’t want to disconnect the CDI from the bike, you could run a hot test. Tests are made from the stator end of the blue and white wire that connects it to the CDI.
To do this, you set your multimeter to a 2k ohms resistance and measure resistance between these two points; the blue wire to the white wire and the white wire to ground.
For the blue wire to the white wire, you check for a resistance reading between 77 and 85. With the white wire to ground, you use your multimeter to check for a resistance between 360 to 490 ohms. If any of these don’t match, your stator could be faulty and a professional mechanic could prove useful.
If they match, however, then your CDI is a likely culprit.
You know a CDI box is bad when your bike misfires, has dead cylinders, unusual tach behavior, runs roughly, experiences ignition problems, or its engine stalls.
To bypass your CDI box, you clear your bench, remove the box, check resistance specifications, measure the primary and secondary oil resistance, and compare readings.
A bad CDI box may not cause a spark at all. However, your bike shows symptoms like ignition problems, dead cylinders, and engine stalling.
A bike will not start without a CDI box as it is the component that controls the ignition system.
No. CDI boxes are not universal because ignition systems vary across different vehicle models. They come as either AC or DC.
To test the CDI box for an ATV, you use a multimeter to inspect the fuses, ignition switch, ignition trigger coil, electronic module, and check for loose wires.
The CDI box is an important component of your vehicle’s ignition system and you should take good care of it.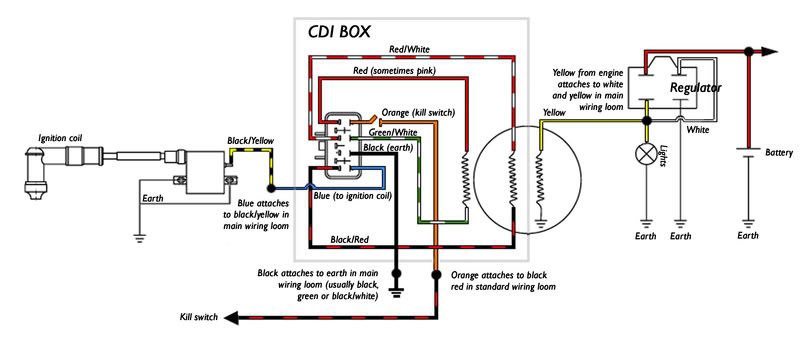 No matter how clear these steps may be, hiring the expertise of a professional mechanic seems a better option.
Suspension. Shock absorbers must be free of oil, and CV boots must be free of holes through which moisture can enter. To check the condition of the wheel bearings and hub bushings, you need to raise the ATV with a jack and shake the wheels vertically and horizontally - if there is play, one of these parts is worn out. Most often these are bearings. You also need to check all the suspension arms for play - perhaps ball bearings or silent blocks need to be replaced.
ATV with working shock absorbers lowers and rises evenly - when pressing on the rear or front, one of the sides should not sag.
Transmission. Gearboxes must be free of oil leaks and cracks. The oil in them can be checked by lowering a plastic clamp into the filler neck or unscrewing the drain bolts: it’s bad if the liquid is opaque, it contains chips or other foreign particles. To check the modes of operation of the transmission, you need to jack up the front of the ATV. When all-wheel drive is on, when turning the left wheel, the right wheel should rotate in the opposite direction, and vice versa. When the differential lock is engaged, both wheels rotate in the same direction. Transfers should be included without effort and crunch.
Engine. It must be free of oil. A serviceable motor starts in 2-3 seconds and works without a metallic rattle, an arbitrary increase and decrease in idle speed.
Bad sign - black oil or with foreign particles. Normally it is transparent.
A malfunction is also indicated by black, white or blue smoke from the exhaust pipe, as well as a burning smell. At idle, the exhaust gases of a serviceable ATV are almost transparent.
It is advisable to measure the compression in the cylinders - this will require a compression meter with adapters for different threads of the candles and knowledge of the normal compression value in the cylinders of a particular ATV model, taking into account the decompression meter.
Coolant . You need to check with a cold engine. The antifreeze level must be between the minimum mark "LOW" and the maximum "FULL". The liquid should not be cloudy. If there is sediment or dirty “flakes” under the radiator cap, the motor was poorly maintained and may have overheated.
Air filter . If there are oil stains on it, most likely the ATV turned over.
Electrical . It is necessary to check the operation of the parking lights, high and low beams, turn signals, alarms, horns, heating, winches. Error indicators - for example, an electric booster - should go out when the engine is started.
Electric power steering . With the ATV running and jacked up, turn the steering wheel left, right, then center. With a working electric power steering, the steering wheel does not turn on its own.
Frame. Cracks, extensive corrosion, welding spots, stripped or fresh paint in the places where the suspension arms are attached, on the arms themselves and on the bottom of the frame - a reason to refuse to buy. Cracks or welding in the cargo platform area are not critical.
The difference in one or more bolts of the engine, variator or bridge, as well as traces of sealant on the crankcase connectors, indicates that the assembly was disassembled to fix the breakdown.
ATV in good working order does not pull to one side. When moving back and forth with the wheels fully inverted, there is no cod. The start of movement and acceleration without jerks and bumps. When you turn on the four-wheel drive and differential lock, it becomes more difficult to turn the steering wheel.
Winter is coming. But who said you can't ride an ATV in cold weather? In fact, frost will only be a hindrance if proper precautions are not taken before setting out on a day's journey.
ATV owners don't usually store them in their living quarters where they can stay warm. Even a domestic cat moves from the garage to the house on cold nights, but what about an ATV? Cars usually stay outside, but that doesn't mean they can easily endure the cold. But the temperature in a garage or under a shed very often drops below zero, especially when the mercury column in the thermometer shows -12 degrees outside.
Sometimes severe frosts come before the first snow. Therefore, it is possible that during the first winter trips on an ATV, the roads will be clean. However, do not think that starting the engine in such weather will be as easy as on a 26-degree summer day. ATVs don't like cold weather more than their riders. They require proper warm-up before opening the throttle. So if you're itching to get outside and your ATV is in the garage, we recommend that you complete the following checks and take action before heading out into the searing cold of the outdoors.
Like a car, ATVs are also difficult to start in the cold. Fluids get thicker, spark plugs don't spark, and manufacturers don't make motor oils with -5w-30 specifications. Don't be surprised if you get a "hard start" where the engine starts with some effort and its running sound is unusually harsh until the oil has lubricated all the components.
Engine overheating is usually a major concern for drivers, especially those who race and forget to add antifreeze to their coolant. But for those who ride all-terrain vehicles in nature, to remove snow or hunt in cold weather, antifreeze is necessary. Chances are they already use the recommended antifreeze for their cars.
After starting, there will be no problems with engine operation in cold weather. However, if the coolant is of poor quality, contains too much water, or is not certified for low temperatures, it may freeze if the ATV is stored in freezing temperatures. Even more problematic is the expansion of the freezing liquid, which can cause serious damage to individual engine components made of non-ductile cast aluminum and steel. Cylinder walls and water jackets containing engine cooling fluid may be damaged.
Before starting the ATV, check the coolant to make sure it is not frozen. If this happens, you should not start the engine.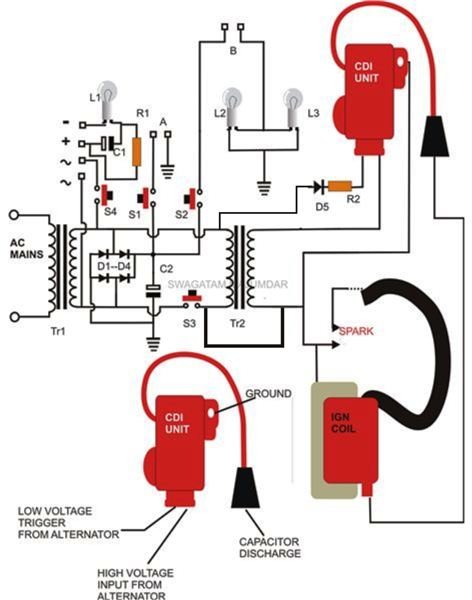 You need to melt it and replace it. Frozen fluid will be spoiled, and if you continue to use it, the engine will overheat. To avoid freezing of the coolant, it is recommended to replace it immediately after the summer season by adding antifreeze, which protects against freezing and overheating.
Note: Most known refrigerants will not freeze, at least at temperatures slightly above freezing. But for harsher, more extreme weather conditions, a refrigerant with antifreeze is required.
Even if the ATV is not used in winter, it is best to replace the old coolant with new antifreeze fluid to avoid any problems during winter storage of the vehicle.
Don't be surprised if the suspension feels a bit stiff at the beginning of the ride. You don't have to worry - this is normal. Keep moving on. The suspension will not work properly until the thick fluid is heated. It will return to normal after approximately 10 minutes of driving.
Although this is rare, it is still possible.