In this post, we’ll have a look at some common causes if your ATV won’t move forward or backward when you put it in gear. Typical components that may need to be addressed to fix this are:
Page Contents
I recommend that you start your troubleshooting by making sure all four wheels on the ATV spin freely and that there’s nothing in the driveline preventing it from moving as normal.
To test this, all you need to do is to put the ATV in neutral (N), leave the parking brake off, and try to push it forward or backward by hand. Some of the larger ATVs can be a bit heavy to push, even for an adult, but on a flat smooth surface like asphalt or concrete, you should be able to make it move.
If the wheels spin freely, you know that the driveline and brakes are fine and that the problem is with your gearbox, transmission, or gear-shifting mechanism. You may jump straight down to troubleshooting transmission issues.
If you cannot get the wheels to turn, no matter how hard you push, the problem may still be with your transmission or gear shifter. But because it is far easier, you should start by looking into the bike’s driveline, brakes, and bearings to ensure there are no issues there.
Wheel bearings may seize up completely if you let them wear too far before having them replaced.
 Worn bearings need to be replaced.
 On solid rear axle racing quads, you should also inspect the carrier bearing as they may break and lock up.
While you have the wheels off the ground, you should also inspect the brakes.
 Service kits that include replacement brake caliper pistons and glide pins are available for most ATVs. In more severe corrosion cases, you may need to replace the complete brake caliper and brake disk for the brakes to disengage properly.
If you still haven’t found a definite indicator that something is wrong with either the wheel hub assembly or brakes, you should isolate them from the rest of the driveline. This way, you don’t waste time troubleshooting parts of the ATV that may be working as normal.
You usually don’t break an axle without noticing. The most common scenario for broken axles is your front axle popping when struggling in a mud hole at full throttle, and the tire suddenly finds traction. “POP,” and the ATV no longer moves.
An axle may strip if it pops out of place. The C-clip that holds it in place may come loose so that the axle starts moving out until just a small portion is still gripping and the splines stip. You will likely hear scraping noises if the axle has been stripped.
When a driveshaft or axle breaks, your bike will no longer pull on the wheel that the stripped or broken axle goes to. The remaining wheels will likely still pull as normal.
When installing bigger tires, you will add more strain to your bike’s driveline. Consider upgrading your axles to heavy-duty aftermarket parts that don’t break as easily.
The drive belt on CVT transmissions may break due to old age, wear, or misuse. An old belt that is pushed hard may explode in an instant, leaving the bike stranded.
This is what a shredded ATV drive belt looks like.If your bike stopped moving instantly, you should remove the belt cover to inspect the belt.![]() You may find your belt in a thousand pieces or just worn so badly that it is slipping.
You may find your belt in a thousand pieces or just worn so badly that it is slipping.
Related: ATV belt slipping – symptoms and causes
If you get water on the drive belt and CVT clutches, it will break the friction that makes your ATV move. The drive belt housing is sealed and should normally protect the drive belt from splashing water.
But if the cover fasteners are not properly tightened or the seal is not in place, it may not be sealed properly. And if you have been riding in deep water, it may enter the belt housing through the belt housing vents.
Related: 16 Steps to Repair an ATV Submerged in Mud or Water
If you suspect that water in the belt housing is your cause, a drain plug at the bottom will drain any water that has entered.
Look to the bottom of the belt case to locate the drain plug.After you have gotten all of the water out, the bike should start moving again. Go gentle for the first few miles so that the belt and clutches can dry completely before applying too much throttle, or the belt will slip, causing premature wear.
When you get back home, it’s a good idea to remove the belt cover to see if you can find the cause of water entering.
In addition to loose bolts and a seal that has popped out of its place, you should look for damage to the casing itself. It is not unusual that the cover gets damaged by hitting rocks or branches.
See if you can hear or feel if the gears inside the transmission are shifting when you put the AVT in gear. The gear shift indicator may indicate that the bike is in gear even if the internals have not shifted completely.
A shifter that feels loose or is not shifting all the way may need adjusting. Try setting the bike in gear with a bit more firm motion than normal. You can even gently hit the lever to make it “pop” into gear.
Do not use excessive force; you are only trying to find out if it needs a bit of convincing to pop into gear. If this helps, you will likely be able to fix your issue by adjusting the gear linkage.
Also, ensure none of the visible components in the gear shifting mechanism have come loose or are broken. Some ATVs use a plastic clip that sometimes pops off. And where the shifter rods connect to the transmission, you will find a bell crank that is well known to strip or crack.
You need to make sure the clutch cable is adjusted correctly on manual clutch setups.
If all of the externals seem fine, but you can still not make the ATV shift completely, you may have a bent or broken shift fork, broken drive chain, or stipped pinion inside the transmission.
Before splitting the case, you can try this:
This post goes more in-depth on possible causes when an ATV won’t go into gear or won’t shift gears.
If one of the clutches is not working properly, they may not engage to move your ATV forward.
Listen if you hear any abnormal or weird noises from the belt housing area while in gear and applying throttle.
To further investigate, you need to open the belt cover and inspect how the clutches behave. Keep your hands and any loose objects clear of the clutches whenever the motor runs.

None of the dry clutches on belted ATVs with centrifugal wet clutches should spin at idle, even when in gear. When you apply throttle, the wet clutch engages – which engages the primary clutch – which turns the belt – which spins the secondary.
On belted ATVs without a wet clutch, the primary clutch is spinning all the time, while the secondary clutch only spins when throttle is applied. When idling, the belt rests on a bearing on the spinning primary, but as soon as it speeds up, it grabs onto the belt so that it starts turning.
If your ATV does not behave as described above, you may have issues with the clutches that need to be addressed.
Differentials are another possible culprit if your ATV won’t move. A range of things can go wrong, but here are some of the more common:
Some ATVs have internal wet clutches that sit in an oil sump. The same issues listed here also apply to the Hondas with hydrostatic transmissions.
Wet clutch systems require a specific type of oil for the clutches to work properly. If the oil you are using is not wet clutch safe, it will prevent your wet clutch from engaging and prevent your four-wheeler from moving.
Please refer to your service manual to learn what type of oil your ATV needs.
Another common issue that will prevent your wet clutch from working properly is running with too little oil.
Adding oil to the specified level may, in some cases, be enough to bring your ATV back to full working order.
But if you’ve been running too little oil for too long, you may be looking at expensive repairs such as a transmission rebuild, oil pump replacement, or in the worst case, a complete engine rebuild.
Your service manual will tell you the correct oil level.
Here are a few issues it may be worth looking into if you suspect that your wet clutch is not working properly:
Some, if not all, wet clutches have an adjustment screw for proper alignment. If not adjusted correctly, the clutch pack will always stay disengaged. A service manual will tell you where to find it on your ATV.
Many owners report that they find this adjustment screw very hard to move.
If the adjuster screw is turned too far, it may push the pressure plate back too far, where it may get hung up. Other components like the clutch plates, may hang up or get jammed.
To find out, you need to remove the clutch plate cover on your wet clutch. Replace the clutch plates if you see any sign of damage.
On Honda ES models, you may find that the shift motor is not fully shifting the transmission into gear. It may lurch or make a noise as if it is going into gear but then bumps back out of gear as soon as you apply throttle.
The grease used inside these motors may be too heavy, or it tends to gum up over time. Cleaning out the old grease and adding white lithium grease may be all that is needed to bring the motor back in working order.
Gear position sensors may go bad from shorting out or due to internal corrosion.
Check for continuity in the different gear settings if you know your way around a multimeter. If there is no continuity in any of the positions, you know that the sensor is toast or needs replacing.
“ How to thaw gelled diesel fuel in an emergency. Preventing diesel fuel from gelling by using risky fuel line heaters, using portable propane heaters (very unsafe) and doing all sorts of other not-so-safe maneuvers or even paying a shop to make an emergency repair/thaw out at your stranded location? Pff… read on and make your life easier by avoiding an unnecessary emergency situation from happening to you in the first place. “
As you already know, gelling of diesel fuels occurs in winter conditions and affects all drivers that live in very cold areas. The secret on how to thaw gelled diesel fuel in an emergency is having the right stuff on board. Continue reading.
At times, winter seasons are sometimes longer and more extreme. This makes winter fuel blends found at most truck stops and other fueling stations incapable of handling the colder temperatures for a diesel engine to operate trouble free.
New and useful formulas have to be invented and formulated in order to keep up with changing climates and colder temperatures.
Adding a quality diesel fuel supplement or anti-gel to your tank greatly decreases the chances of gelled fuel in the first place.
But what do you do if you forget to add this miraculous fuel additive or if this crazy weather caught you off guard?
If caught off guard by the cold weather your diesel powered rig or light truck might be very hard to start or not start at all.
This happens because diesel fuel thickens inside the filters and fuel lines and by becoming a gel, it clogs your truck’s fuel system. This can be a very expensive cost to a truck owner/operator or anyone trying to travel and becoming stranded on a dark and lonely highway in the middle of nowhere. Emergency call outs to thaw a gelled system can range from a few hundred dollars to a few thousand depending on severity and location.
CleanBoost® Diesel Rescue Emergency De-Gel™ is designed for one purpose and one purpose only… to get you out of an emergency situation and back on the road as soon as possible. Read on.
All the products on the market either try to help you prevent fuel gelling or help you transform the gelled fuel back into a liquid fuel again… however, it’s important to understand that there are preventatives (Anti-Gel’s) and then there are emergency rescue products (De-Gel’s). If you’re pouring in an anti-gel after you’re already gelled up, well, let’s just say you’re in for a long, long day. If on the other hand you’re using a de-gel product to prevent a gelling situation, then you’re also doing harm to your expensive diesel fuel system components by introducing emulsifiers and high concentration alcohols that exasperate water dispersal that tend to score or wear down the close metal to metal tolerances of the injection system.![]() Alcohol has one other very negative effect on diesel injection systems. Alcohol by its very nature is a drying agent. As such, it dries out and hardens seals and o-rings in your fuel system. This leads to all kinds of nasty side effects down the road as you will learn more about herein.
Alcohol has one other very negative effect on diesel injection systems. Alcohol by its very nature is a drying agent. As such, it dries out and hardens seals and o-rings in your fuel system. This leads to all kinds of nasty side effects down the road as you will learn more about herein.
CleanBoost® Diesel Rescue Emergency De-Gel™ is the only formula out there that helps you INSTANTLY. All you have to do is follow the instructions. It instantly goes to work on re-liquefying gelled diesel fuel. It thaws out frozen fuel filters (that are mostly filled with ice, water and gelled fuel). It prevents fuel filter icing while removing water from the fuel system. Finally, it extends the life of frozen or gelled fuel filters, injectors and pumps. CleanBoost® Diesel Rescue Emergency De-Gel™ is effective in all diesel fuels, including ULSD (ultra low sulfer diesel).
No more waiting around and hoping that the fuel lines will get unclogged eventually. This formula helps you in those situations where losing time is not an option for you or your schedule. The important thing here is that you better have it on your truck(s) stored and ready to deploy when this tragedy strikes. These on the road emergencies happen quickly and without notice. It will do you no good if you don’t have it with you. Order today, get fast and free shipping and keep it in the truck always!
CleanBoost® Diesel Rescue Emergency De-Gel™ is a great product that looks after your truck fuel system in more ways than one.
With it you can liquefy fuel, thaw frozen fuel filters and even remove water from the fuel system.
All you have to do is follow the instructions below:
In order to Liquefy Diesel Fuel:
This is all you have to do !
In order to Thaw Frozen Fuel Filters:
In order to Remove Water from Fuel Systems:
Treat your fuel according to the following:
All the steps above can be done in a matter of minutes and the results will be instant.
After performing any of the processes from above, it is recommended that you use CleanBoost® Sno-Cat™ regularly, in order to prevent future gelling. You can read all about what Sno-Cat is here. However, one of the most important things to understand about gelling diesel fuel, is first how to prevent it in the first place. In order to further your understanding, it helps a great deal to understand how many products… that are available at truck stops, auto parts stores and diesel service centers do their job.
In essence, many are using alcohol and light aromatic solvents. This is a dangerous formula since they work by allowing water to emulsify and/or disperse water into the fuel using these alcohols and solvents. This represents more than 90% of the ant-gel products that will find on the shelf. This dangerous formulation allows for further damage to key system components by allowing the water to pass through the fuel/water separator.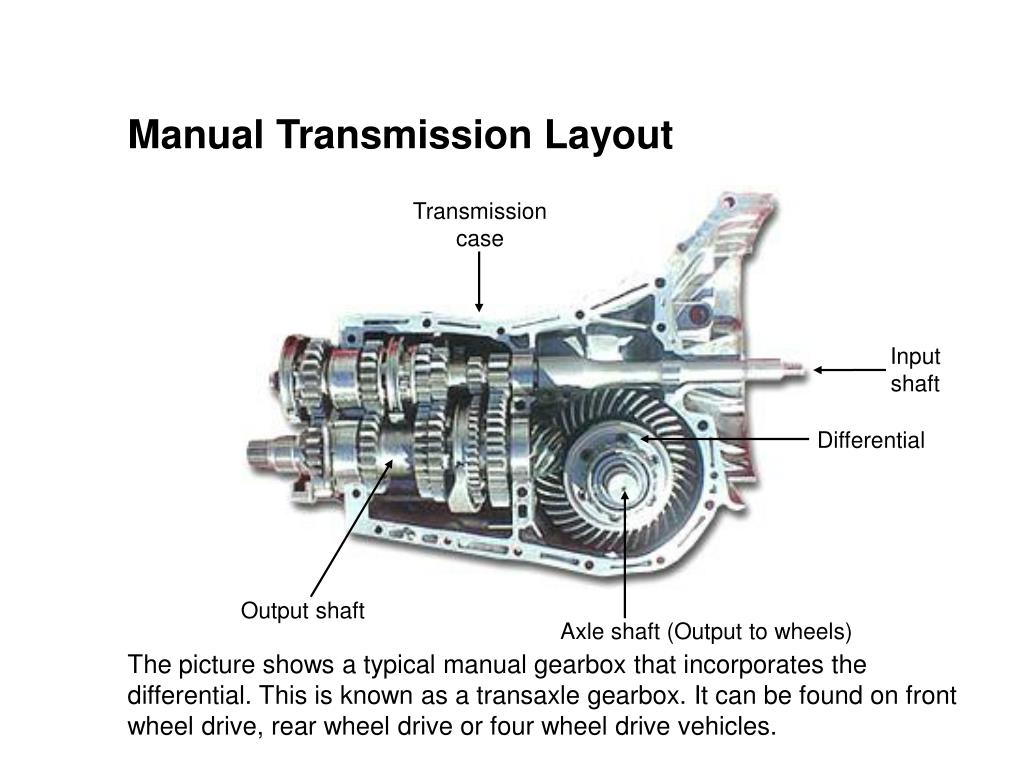 Since water is abrasive by nature, it tends to ‘score’ or wear down the close metal to metal tolerances of the injection system causing smoke and loss of performance/MPG.
CleanBoost® Sno-Cat™ is first and foremost a combustion catalyst. It acts to demulsify and displace water out of the fuel, as it contains NO alcohol. This leaves pure fuel to burn. As a truck moves and agitates, water is easily removed by the fuel/water separator filter. This is all done without emulsification and/or disbursement. Once again, the key differences being demulsify vs. emulsify AND displacement vs. disbursement.
CleanBoost® Sno-Cat™ is made up of organic compounds and only 2% light aromatic solvents, while once again, containing NO alcohol and this is how it works to demulsify and displace water rather than emulsifying and dispursing water, which is harmful to fuel system components. Check it out today and for a limited time, you can purchase a 1 – 2 punch of CleanBoost® Diesel Rescue and a 32 ounce bottle of CleanBoost® Sno-Cat™ for a nice package savings! Check it out here.![]()
To learn even more about diesel fuel gelling, including another method on how to fix gelled diesel fuel, click here to read this article here on Fuel & Friction!
Share It!
Automotive enthusiast, passionate about Jeeps, hot-rods, turbos, performance, efficiency, diesels, fuels, high performance oils, additives and anything with an engine.
Read Next
Why Use Fuel Stabilizer First, is there still a need to use fuel stabilizer when storing off season gas powered tools/equipment and vehicles such as: Lawn mowers & Chain saws Weed eaters & Trimmers ATV’s, UTV’s & RV's Snowmobiles & Snowblowers Motorcycles, Race cars, & Other toys? The answer may surprise you. Finally, ...
Every owner whose car is operated in regions with a cold climate faces the situation when the gearbox is frozen.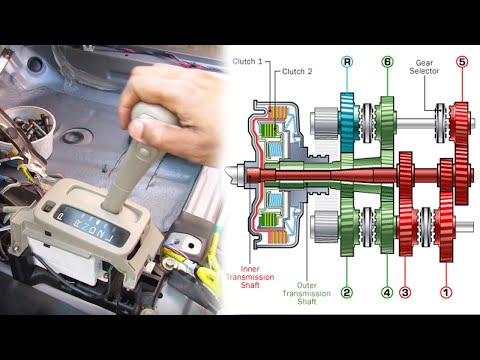 It is enough for the thermometer to drop to -25 degrees and the iron friend may surprise you in the form of the inability to change gear. The same trouble can occur at temperatures slightly below zero, but already due to a malfunction in the gear shift system.
The culprits of freezing of a mechanical gearbox can be:
• cable transmission (link), which is used in front-wheel drive;
• Hinge used in rear wheel drive configuration;
•Old or not suitable for the given climate zone.
The yoke cables are located in special guides that are filled with grease. nine0003
As a result of its thickening, it is difficult to move the cable. A symptom of this malfunction is the absence of complete freezing and immobility of the lever, since only an effort appears when it is moved.
To eliminate this malfunction, it is enough to change the lubricant, while it must meet the following requirements:
• availability of recommendations for a particular vehicle;
• presence of hydrophobic properties;
• correspondence to the climatic zone; nine0003
• All-season or winter season.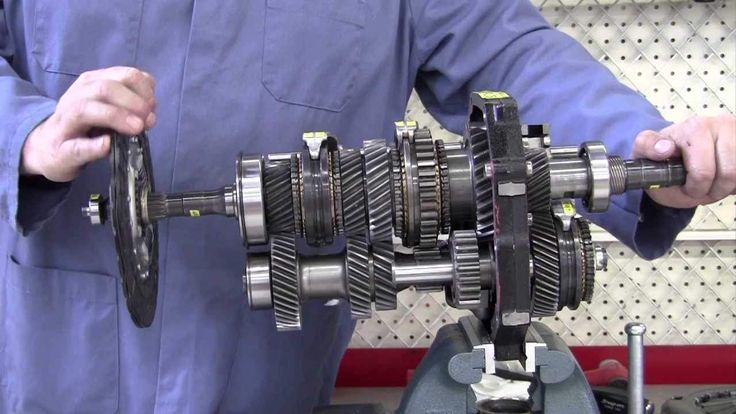
It is recommended to use a syringe to apply lubricant. First you need to flush the casing with a small portion of gasoline.
The hinge rarely freezes, and the reason for this is the ingress of moisture through a damaged rubber cuff. If a rupture is found, the cuff should be replaced.
To take a concrete example, Fiat often has a freezing problem. The solution turned out to be gearshift lubrication. Must be lubricated with lithium grease
If the gearbox freezes inside what to do:
• Place the car in a warm garage for several hours;
• warm up the gearbox by yourself using a heat gun at the minimum temperature;
• Warm up carefully with a blowtorch.
Driving with frozen oil is strictly prohibited, as gears
will run without lubrication and this will lead to excessive wear. nine0003
You can move the car by towing no more than 100-200 meters. If the distance to a warm garage is greater, then you should call a tow truck.
To prevent the oil from freezing in the following days, it should be replaced with a new transmission oil that is appropriate for the climate zone and season.
Synthetics like 75w90 do not thicken as much as mineral waters. Therefore, try to fill in synthetic or semi-synthetic oils if the climate in the region is cold and the temperature can reach up to -35C. nine0003
Also, for reliable operation of the transmission in winter, add a special additive to eliminate freezing.
The transmission of power in an automatic transmission occurs with the help of gear oil. Its solidification makes the operation of the torque converter completely impossible, since it is impossible to create a hydroflow.
Any attempt to drive under your own power will result in damage and costly repairs. nine0003
Therefore, there are two ways out:
• Call a tow truck;
• Warm up the box on site.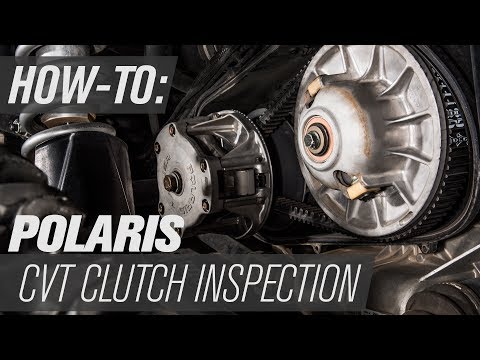
If the oil hardens repeatedly, it should be checked and replaced with a more frost-resistant one.
Gears are transmission modes that allow you to adapt your ATV to different tasks and road conditions. Shifting increases traction or top speed.
In this article, we will tell you how to shift gears on ATVs with different types of transmission in order not to break anything and confidently overcome any routes. nine0003
The CVT transmission is the most popular 4WD utility ATV.
The variator consists of two pulleys. A belt is stretched between them, which rotates along a larger or smaller radius as the engine speed changes. This ensures a smooth change in gear ratio. In fact, the same thing happens as when moving the gears in a manual transmission.
How the variator worksThe variator is combined with the gearbox. The shift lever can be in five different positions:
L - downshift;
H - overdrive;
N - neutral;
P - parking lock;
R - reverse.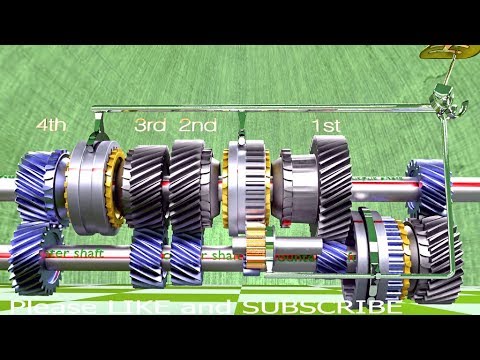
Downshifting allows the ATV to climb steep slopes, off-road, or haul loads more easily and without damage to the CVT. In overdrive, the technique can develop maximum speed. It is recommended to use it for driving faster than 10 km/h. nine0003
There is no conventional clutch on an ATV with a CVT. Instead, a centrifugal automatic. Therefore, before each shift, be sure to come to a complete stop, apply the brakes and reduce the engine speed to idle.
To stop, just remove your finger from the throttle trigger - the ATV will quickly slow down and stay even in the H or L position until the driver again increases the engine speed.
For a long stop, it is better to switch to neutral. To prevent the vehicle from rolling away, you can apply a handbrake or P gear.
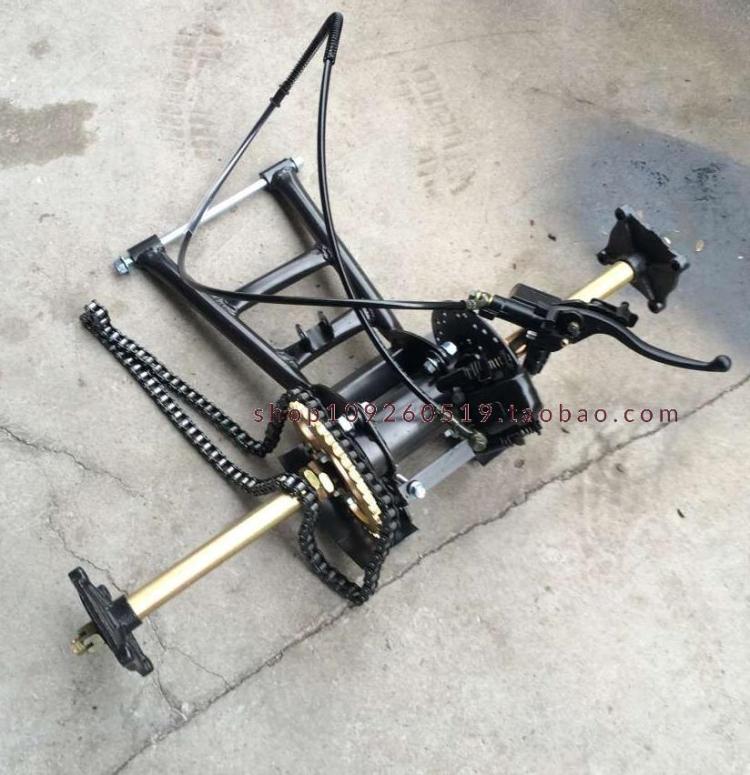
Manual transmission is commonly used on small displacement RWD ATVs. Structurally, it is similar to the transmission of a high-speed bicycle, only instead of sprockets there are gears. They are connected in different combinations depending on the selected gear.
In order not to break anything when changing gears, there is a clutch. This mechanism decouples the transmission from the engine and allows the gears to engage without load. To control the clutch there is a separate lever on the steering wheel. nine0003
On an ATV with a manual transmission, the gears are shifted by a lever located at the left footrest. How exactly depends on the specific model. Popular options:
N is a neutral gear in which the vehicle will not go anywhere. R is reverse.
ATV manual transmission design0046 What is the difficulty. It can be difficult for a beginner to move off. If you release the clutch too quickly or add insufficient rpm, the engine will stall. If you give too much gas and drop the clutch, the vehicle will move with a jerk and may even jump out from under the rider.
What to do. At first, you can try to start without gas at all - just release the clutch smoothly and slowly. This will help you feel the moment when the ATV is ready to go and you need to increase the engine speed. nine0003
What is the difficulty. At first it is not obvious when to switch.
What to do. You can focus on feelings. If vibration is felt, the ATV twitches and accelerates sluggishly, you need to switch down, and if the engine “roars”, up. Another option is to look at the speedometer. Each gear has its own optimal speed range. Here are the average values:
On the manual transmission, the gears are shifted with a foot lever. Depress the clutch before every shift.